| Author |
Message |
 |
|
|
|
|
Advert
|
Forum adverts like this one are shown to any user who is not logged in. Join us by filling out a tiny 3 field form and you will get your own, free, dakka user account which gives a good range of benefits to you:
- No adverts like this in the forums anymore.
- Times and dates in your local timezone.
- Full tracking of what you have read so you can skip to your first unread post, easily see what has changed since you last logged in, and easily see what is new at a glance.
- Email notifications for threads you want to watch closely.
- Being a part of the oldest wargaming community on the net.
If you are already a member then feel free to login now. |
|
 |
2009/07/28 09:46:33
Subject: How to Paint Bitz WITHOUT Getting Paint on Your Figure! Great for Orks!
|
|

Ultramarine Master with Gauntlets of Macragge
|
Now, we've all had this sort of problem. You need to paint a big Ork head, a bolter held close to a Marine's chest, or any number of other pieces that would cause spillover or leave parts of your model unpainted. What is a painter to do? Mess up their new Nobz by getting green paint all over their shoulderpads? Ugly up their Ultramarines by slathering red all over their formerly pristine chest aquila?
Well have we got the solution for you!
Brother SRM's Pike-o-Matic 2000!
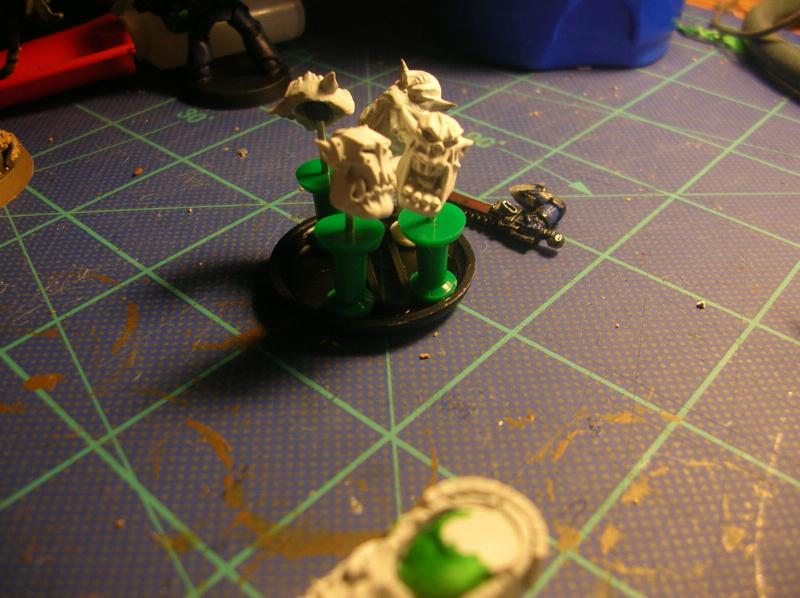
Now I unfortunately didn't take pictures till after I built it, but here's how you can make your own using supplies from around your home!
Step 1.) Take a base of decent size; slotted is ideal, but I'm sure it would work with any other base that has some protrusions on the bottom. I used a slotted base from Reaper Miniatures, which I'm pretty sure is the same size as the ones supplied with basic troops in Warmachine. Make sure the base is big enough that you can get a firm grip on it between two of your fingers.
Step 2.) Get as many pushpins as you can comfortably fit, and test fit them on the base. For the Reaper base I used 4, but I'm sure if you went big to a 40mm or 60mm base you could fit plenty more. Personally, I don't think more than 4 could fit on the base I used.
Step 3.) Use the protrusions on the bottom (i.e. - the slot on this base, the nubs sticking out at the bottom of a GW 40mm base, etc) to support the pushpins, and glue them in; point up. This works better with a really flat back on a pin, but mine were somewhat rounded and worked out okay.
Congratulations! You've built your own Pike-o-Matic! Now to use it!
Step 4.) Put a lump of blue- tac (the blue stuff in a container of green stuff) on top of each pin's head you plan to use.
Step 5.) Put heads, guns, or whatever else you can comfortably stick up there. Make sure they're angled well enough to paint. Blue- tac can be pretty easily manipulated though, so sometimes you can get some swivel action.
Step 6.) Paint!
Once this is all done, you can just pluck whatever bits you painted and glue them to the rest of your miniature. Now, you might ask yourself; "But Brother SRM, why don't I just paint on the sprue?" To this I say bullhonkey. This way you don't have to clip anything off, leaving ugly chunks of flash and damaging your paint job.
NOTES: This was created with Orks in mind. I was working on my Nobz and found that their heads sat really close to their bodies, and getting a clean paintjob on either the heads or the shoulderpads would be nearly impossible. I had the same trouble painting Boyz, and tried to find a solution. At first I figured I could put blue tac on paperclips and stand them up, but that took a lot of time and space. I decided to try putting them on pushpins, but had a dilemma in that I didn't know how to make them stand up. I think I came up with a pretty good solution myself.
Anyway, hope you liked the tutorial!
|
Check out my Youtube channel!
 |
|
|
 |
|
2009/07/28 12:18:22
Subject: How to Paint Bitz WITHOUT Getting Paint on Your Figure! Great for Orks!
|
|
[DCM]
Dankhold Troggoth
|
Brother SRM wrote:Now, you might ask yourself; "But Brother SRM, why don't I just paint on the sprue?" To this I say bullhonkey.
Best... Quote... Ever... 
Very nice tutorial! I actually have some bits sitting around that I was wondering how I should get some paint on... you've answered my question
|
|
|
|
|
2009/07/28 14:31:36
Subject: How to Paint Bitz WITHOUT Getting Paint on Your Figure! Great for Orks!
|
|
Longtime Dakkanaut
|
I've used poster tack on a soft-drink bottle cap for years to do the same thing, but I like the pike thing you've got going on here.
|
What harm can it do to find out? It's a question that left bruises down the centuries, even more than "It can't hurt if I only take one" and "It's all right if you only do it standing up." Terry Pratchett, Making Money
"Can a magician kill a man by magic?" Lord Wellington asked Strange. Strange frowned. He seemed to dislike the question. "I suppose a magician might," he admitted, "but a gentleman never could." Susanna Clarke Jonathan Strange & Mr. Norrell
DA:70+S+G+M++B++I++Pw40k94-D+++A+++/mWD160R++T(m)DM+
 |
|
|
|
|
2009/07/28 21:27:49
Subject: Re:How to Paint Bitz WITHOUT Getting Paint on Your Figure! Great for Orks!
|
|

Squishy Squighound
|
Cool i use some blu-tack on an empty citadel paint pot, i like that idea
|
 Bring it on!!! Bring it on!!!
I have Orc Boyz, fully painted and ready to OWN!
 I like the dice! I like the dice! |
|
|
|
|
2009/07/31 17:48:44
Subject: How to Paint Bitz WITHOUT Getting Paint on Your Figure! Great for Orks!
|
|
Longtime Dakkanaut
|
I've been thinking about how I'd do this with plastic minis for a long time. I try to paint absolutely everything, even the areas that are hard to see once assembled. So yes, I go by "paint first, assemble afterwards" too. My current solution was to use match sticks (or metal florist's wire) and Blue Tack, and attach this to something that I could hold it with. However, although I managed to paint a whole model like this - and it worked fine - the bond between the match stick and plastic component was weak. This however, seems like a good idea indeed. What I would say, Brother RSM, is that the areas that are going to be finally glued together should be masked with yet more Blue Tack. This ensures that the best plastic-on-plastic bond can be acheived when they're ready. Just take the masking Blue Tack off and glue.
NOTE: You refer to a "blue-tac", the blue component of Green Stuff? I'm talking about adhesive putty, a brand known as "Blue Tack" in the U.K. (Confusing!) Would you think that adhesive putty would work just as well as blue-tac? I'll try it out myself anyhow. Cheers!
|
|
|
|
|
|
2009/07/31 20:37:49
Subject: How to Paint Bitz WITHOUT Getting Paint on Your Figure! Great for Orks!
|
|
Decrepit Dakkanaut
|
Cosmic wrote: I've been thinking about how I'd do this with plastic minis for a long time. I try to paint absolutely everything, even the areas that are hard to see once assembled. So yes, I go by "paint first, assemble afterwards" too. My current solution was to use match sticks (or metal florist's wire) and Blue Tack, and attach this to something that I could hold it with. However, although I managed to paint a whole model like this - and it worked fine - the bond between the match stick and plastic component was weak. This however, seems like a good idea indeed. What I would say, Brother SRM, is that the areas that are going to be finally glued together should be masked with yet more Blue Tack. This ensures that the best plastic-on-plastic bond can be acheived when they're ready. Just take the masking Blue Tack off and glue.
NOTE: You refer to a "blue-tac", the blue component of Green Stuff? I'm talking about adhesive putty, a brand known as "Blue Tack" in the U.K. (Confusing!) Would you think that adhesive putty would work just as well as blue-tac? I'll try it out myself anyhow. Cheers!
http://en.wikipedia.org/wiki/Blu-Tack
Using the blue component in greenstuff would not work, it has to be blue tac or a substitute like white tac.
|
|
|
|
|
2009/07/31 20:40:28
Subject: How to Paint Bitz WITHOUT Getting Paint on Your Figure! Great for Orks!
|
|
Longtime Dakkanaut
|
Just what I thought... Thanks!
|
|
|
|
|
|
2009/08/01 04:44:55
Subject: How to Paint Bitz WITHOUT Getting Paint on Your Figure! Great for Orks!
|
|
Ultramarine Master with Gauntlets of Macragge
|
Well, I actually used the blue component from green stuff and it worked just fine! It took a tiny bit of work to get some out of the area it was stuck on with, since it is pretty strong. I read some tutorial from the GW site a long time ago about using the blue half of the green stuff to test fit, and that inspired me. As long as you use a small amount you should be okay.
|
Check out my Youtube channel!
|
|
|
|
|
2009/08/01 13:07:33
Subject: How to Paint Bitz WITHOUT Getting Paint on Your Figure! Great for Orks!
|
|
Decrepit Dakkanaut
|
Brother SRM wrote:Well, I actually used the blue component from green stuff and it worked just fine! It took a tiny bit of work to get some out of the area it was stuck on with, since it is pretty strong. I read some tutorial from the GW site a long time ago about using the blue half of the green stuff to test fit, and that inspired me. As long as you use a small amount you should be okay.
Isnt using GS a tad espensive for temporary putty 
|
|
|
|
|
2009/08/02 04:17:27
Subject: How to Paint Bitz WITHOUT Getting Paint on Your Figure! Great for Orks!
|
|
Ultramarine Master with Gauntlets of Macragge
|
I'm only using the blue half, and not mixing it. If you don't mix the two parts and instead just use the blue stuff, it just functions as a tac material.
Besides, I bought a big tube of GS, not the ultra-expensive strips GW sells.
|
Check out my Youtube channel!
|
|
|
|
|
2009/08/15 11:39:09
Subject: How to Paint Bitz WITHOUT Getting Paint on Your Figure! Great for Orks!
|
|
Furious Fire Dragon
ROK
|
Brother SRM wrote:I'm only using the blue half, and not mixing it. If you don't mix the two parts and instead just use the blue stuff, it just functions as a tac material.
Besides, I bought a big tube of GS, not the ultra-expensive strips GW sells.
where'd you get a big tube of greenstuff for cheap?
|
Nothing currently, got out of the hobby, maybe getting back in? |
|
|
|
|
2009/08/17 06:51:39
Subject: How to Paint Bitz WITHOUT Getting Paint on Your Figure! Great for Orks!
|
|

Fresh-Faced New User
|
Yea i'm interested in that too.
Cool invention you got there btw.
|
|
|
|
|
2009/08/20 13:32:22
Subject: Re:How to Paint Bitz WITHOUT Getting Paint on Your Figure! Great for Orks!
|
|

Thunderhawk Pilot Dropping From Orbit
|
or whatever else you can comfortably stick up there
as you can comfortably fit
Not to be a pitnick but ... GROSS
On a serius note :
Well done , now to get painting !!
|
|
|
|
|
|
2009/08/20 19:15:41
Subject: How to Paint Bitz WITHOUT Getting Paint on Your Figure! Great for Orks!
|
|
Stealthy Dark Angels Scout with Shotgun
Caliban
|
Great idea, thanks for the tip.
|
 Dark Angels 10k+ pts Dark Angels 10k+ pts |
|
|
|
|
2009/08/21 02:15:26
Subject: Re:How to Paint Bitz WITHOUT Getting Paint on Your Figure! Great for Orks!
|
|
Posts with Authority
Boston-area [Watertown] Massachusetts
|
Green stuff is two-part epoxy, which can be bought in Hardware/DiY stores in the Plumbing Section, usually called plumber's putty, or such. Comes in big stonkin' tubes. May not be blue/yellow in coloration.
--Brian
|
Falling down is the same as being hit by a planet — "I paint to the 20 foot rule, it saves a lot of time." -- Me
ddogwood wrote:People who feel the need to cheat at Warhammer deserve pity, not anger. I mean, how pathetic does your life have to be to make you feel like you need to cheat at your toy army soldiers game?
 |
|
|
|
|
2009/08/24 05:00:44
Subject: Re:How to Paint Bitz WITHOUT Getting Paint on Your Figure! Great for Orks!
|
|
Nurgle Veteran Marine with the Flu
Pennsylvania, USA
|
Briancj wrote:Green stuff is two-part epoxy, which can be bought in Hardware/DiY stores in the Plumbing Section, usually called plumber's putty, or such. Comes in big stonkin' tubes. May not be blue/yellow in coloration.
--Brian
I think the problem with that is the difference in formulation. I've used the stuff billy mays sold(might putty, which is actually a type of plumber's putty rebranded) , and it just isnt even close to green stuff despite being a two-part epoxy. My dad actually just redid the sinks in the bathroom in their house and I took all the plumber's putty he didn't use to try it out and again it just isnt the same thing as GS. Each formulation of the 2-part epoxy gives you different properties some of which might be better or worse for your project depending on what you're trying to do. Some of them are made to harden quickly so you can use them to plug leaks in a wet environment, some are made to dry only after a long time to give modellers more time to fool around with it before it hardens up. There are just so many kinds of 2-part epoxy that saying plumber's putty = GS is just not correct.
|
|
This message was edited 2 times. Last update was at 2009/08/24 05:01:43
In the embrace of the great Nurgle, I am no longer afraid, for with His pestilential favour I have become that which I once most feared: Death.
 -Kulvain Hestarius, Death Guard -Kulvain Hestarius, Death Guard |
|
|
|
|
2009/08/24 17:24:04
Subject: How to Paint Bitz WITHOUT Getting Paint on Your Figure! Great for Orks!
|
|
[SWAP SHOP MOD]
Killer Klaivex
|
Are we talking about Brown Stuff here? From what I've heard, it's harder to use, but can in some cases, actually be BETTER than green stuff.
|
|
This message was edited 2 times. Last update was at 2009/08/24 17:25:11
|
|
|
|
|
2009/08/26 10:37:14
Subject: How to Paint Bitz WITHOUT Getting Paint on Your Figure! Great for Orks!
|
|

Junior Officer with Laspistol
|
Nice idea and simple to make,I will be sure to try it out.
|
"I refuse to join any club that would have me as a member."-Groucho Marx
|
|
|
|
|
2009/08/26 21:11:47
Subject: How to Paint Bitz WITHOUT Getting Paint on Your Figure! Great for Orks!
|
|
Ultramarine Master with Gauntlets of Macragge
|
Ketara wrote:Are we talking about Brown Stuff here? From what I've heard, it's harder to use, but can in some cases, actually be BETTER than green stuff.
Nope, it was green stuff.
First result when googling "green stuff" - http://www.thewarstore.com/product18832.html
That's the stuff I use.
|
Check out my Youtube channel!
|
|
|
|
|
2009/10/06 20:14:27
Subject: How to Paint Bitz WITHOUT Getting Paint on Your Figure! Great for Orks!
|
|
Ultramarine Master with Gauntlets of Macragge
|
Update: This actually works really, really well with poster tack. It's usually called something like "fun tack" or "poster putty". It's great for heavier bits.
|
Check out my Youtube channel!
|
|
|
|
|
2009/10/08 08:35:52
Subject: How to Paint Bitz WITHOUT Getting Paint on Your Figure! Great for Orks!
|
|

Ferocious Blood Claw
|
Try google or ebay for "kneadatite".
|
|
|
|
|
|
|
 My blog