
+++++++++++++++++++++++++++++++
Friday Quick Tip: Beginners Oil Paint Weathering
By: grey_death
For some time now, I've known about using oil paints for use on scale models. It's one of the many tools in the military modelers repetoire that are used quite frequently and quite commonly. So what's so great about it? What can this do that I can't do with a wash? I decided to sit down and find out a couple of weeks back and was extremely surprised, and happy, with the results.
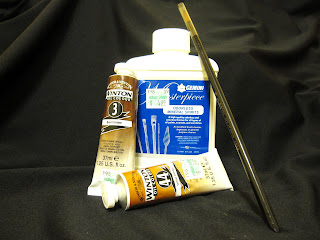
As you can see above, you need a few things that you likely don't have already. Of course, you'll need to pick out some oil paint colors that will work for what you're working on. I decided to pick up a few standard military modeling colors, a dark brown, a yellow and a white. The only one you'll see me using in today's tip will be Burnt Umber. You'll also want to have a brush that will be dedicated to painting in oils. Finally you'll need some sort of thinner medium. In this case, I've gone with Odorless Mineral Spirits.
Other materials you'll find useful will be
a dropper, a plastic palette such as the one featured
here in our cleaning tip, and a can of spray varnish. In this tip, I've used
GW's Purity Seal to seal everything.

I've gone with a great resin base from IronHalo.net I picked up from BoLSCon last month as my test piece. It's got a lot of nooks and crannies to really test out the effects of the oils, as well as a few nice flat areas. As always, your basecoat color is really up to you and your style. I've gone with Chaos Black
GW spray because it will be an overall darker piece. If you're having issues picking an appropriate base color to work from, check out
this Ask the Corps article for some tips.

Ok, so I know I am skipping an entire step that
we've talked about before, but for the purposes of this tip, I think we'll be alright! Here I've painted the entire surface
Boltgun Metal. I used two thinner coats as to not obscure the details we are trying to pick out with the oils.

Now the fun starts. Here I've taken the top off the Burnt Umber and am pulling paint directly from the tube. I then dabbed the brush on randomly along spots and areas I wanted weathered. Don't be too worried about getting things exact, unlike acrylics or even washes, you have all the time in the world to get the paint just where you want it. Once you've gotten things roughly where you want them, it's time to break out the thinner medium.

This is where the eye dropper came in handy. Take a few drops of your thinner medium and drop it into one of the wells on your plastic palette. Then take your brush and swirl it about in the medium, this will dilute what is on the brush, and give you a nice wash of color to work with as you spread your color around.
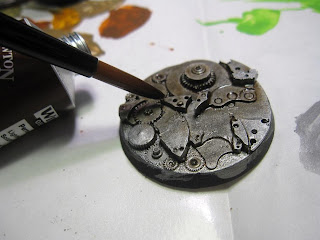
With your brush charged with thinner, it's time to thin out the oils on the model. Wipe the oil streaks and spots you were put on the piece earlier with your brush. The color will start to pool and go translucent. Use this to work it into the crevices and details. You'll notice you have complete control over how much and where the color goes. If the gradient on a flat surface isn't to your liking, wipe it away and try again.
Oils are going to take practice, but it's practice well worth your time, as you have 100% control over your finished product. Compare this with normal washes where many times you are victim to the whims of gravity and viscosity of the wash. Continue to work your oils until you are satisfied with the effect. Once you are finished, let the piece dry.

Oils take some time to dry, so be a bit more patient with them. I believe I waited a day before messing with this piece. No reason to ruin the work I put into it by getting overzealous! When I came back to it, and it was dry, I hit the entire piece with a spray of Purity Seal to lock in all the hard work! Oil paints require this step and they never truly dry as an acrylic does.
So why bother? Control. Just in this small test of the technique, I've found I had far more control with the color than I would have ever imagined. The long dry time gives you a near infinite ability to get things just how you want them. It just takes a bit of thinner medium and you're working again! The long dry time is also one of the drawbacks though. Don't expect to do any work on a piece back to back with oils. It's just not happening. But a bit of additional time to contemplate what's going on next is usually a good thing, especially on display pieces!
This is my first experiment with oil paints on models and I can see myself using them on many different projects in the future. As I learn more about them, I'll be sure to pass that knowledge on to everyone here as well!
If you have experience with oils, we'd love to hear some beginners tips.


