| Author |
Message |
 |
|
|
|
|
Advert
|
Forum adverts like this one are shown to any user who is not logged in. Join us by filling out a tiny 3 field form and you will get your own, free, dakka user account which gives a good range of benefits to you:
- No adverts like this in the forums anymore.
- Times and dates in your local timezone.
- Full tracking of what you have read so you can skip to your first unread post, easily see what has changed since you last logged in, and easily see what is new at a glance.
- Email notifications for threads you want to watch closely.
- Being a part of the oldest wargaming community on the net.
If you are already a member then feel free to login now. |
|
 |
2014/03/12 21:23:22
Subject: White Scars - New horizons...
|
|

Steady Space Marine Vet Sergeant
|
@para: Yeah, I dont want the FW one. I've looked around and RabbitFerret did a great tutorial in his blog. He took a Basilisk and used a maxmini turret for the hydra part. Albeit, the total cost of that is more than the FW Hyrda, his tutorial shows that I can easily have different turrets on the back. So while it does cost more for one, I can take it as a Basilisk OR Hydra... I'm going to do it that way, imo.
@Maniak: Thanks for the direction with the digital camo  I've already checked it out, and it is definately a good way!
|
|
|
|
 |
|
2014/03/12 23:51:46
Subject: White Scars - New horizons...
|
|
Lit By the Flames of Prospero
|
Love the Land Raider, love the Sternguard (so far), looking forward to seeing much, much more!
|
Muh Black Templars
Blacksails wrote:Maybe you should read your own posts before calling someone else's juvenile.
|
|
|
|
|
2014/03/15 09:00:03
Subject: White Scars - Sternguard complete!
|
|
Steady Space Marine Vet Sergeant
|
Mornin' everyone  I hope everyone's day is going to be as productive as mine. @BoB. Thanks matey! I got the sternguard all done on thursday/friday. 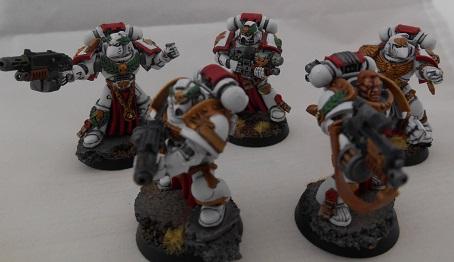  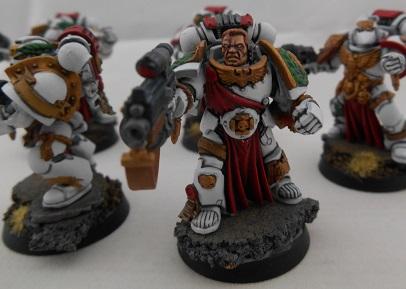 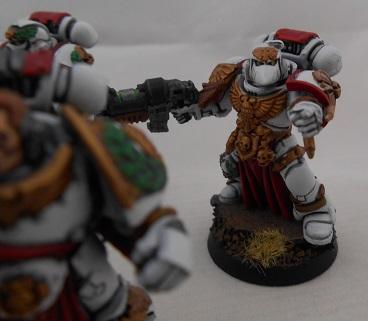 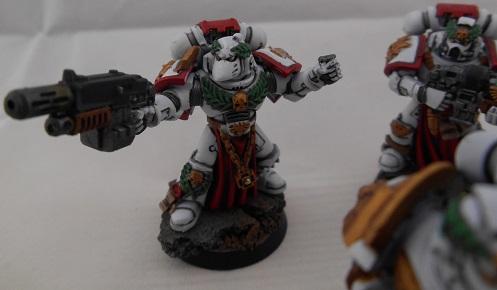 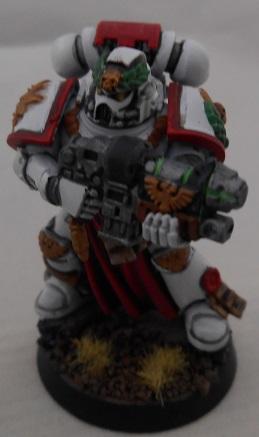 These kits are awesome, I hope I did them justice Now for the good / bad news... Bad news: This will be my last Scars update for a little while... Good news: I should have some IG pictures up for you next... As far as my Scars go; I have remaining: NoS: Stormraven, 3 Attack Bikes, Command Squad, Vanguard Veterans and 2 Masters of the Chapter Built(unpainted): Land Speeder storm, 5 Tactical Marines, 10 Terminators, a Land Raider and 1 Attack Bike. As soon as I get to a place where I can play IG models in the campaign, I'll come back and chip away at the last few things. In terms of Imperial Guard, I changed my list again (*sigh*)  . I replaced the 150 points of the hydras with an Imperial Navy Avenger. The FW Avenger looks aweful in my opinion. So, I'm going to get the FW Thunderbolt (which looks sweet) and magnetise the weapons for both the TB and Avenger. I've not brought any of it from FW (yet). But what I have brought is 4 Chimeras and 2 Leman Russes. They're in the system, slowly working their way towards me (hoping the Chimeras show up later today). But for now, back to the guardsmen i'm building Have a good one Z
|
|
This message was edited 3 times. Last update was at 2017/07/16 00:06:30
|
|
|
|
|
2014/03/15 11:17:17
Subject: White Scars - New horizons...
|
|
Is 'Eavy Metal Calling?
|
Sternguards are looking awesome, I love the combi-melta+grenade pose.
Looking forward to IG pics.
|
|
|
|
|
|
2014/03/16 18:32:54
Subject: Zambro's Imperial Guard - The beginning of an Armoured Regiment.
|
|
Steady Space Marine Vet Sergeant
|
It's officially happening... My main focus is now IG - hence the blog's name change.
This weekend has been... interesting, to say the least.
I built the 10 guardsmen I had lying around, and they are primed and ready for some infantry colour scheme tests (They probably wont get colour for a while, but atleast I can play them!)
And I attempted digital camo on the Russ that I have lying around. I experimented with the Russ for a while; here is the pic:

First things first... I was dissapointed by the digital camo. I gave it a solid effort, but I didn't like it. The lines were crisp, and you could tell that it was digital, but it just didn't look right. It seemed very flat and 'bland'. I went ahead and continued anyway. I tried some weathering on it, and i'm not sure if I like that either...  (If digital camo doesn't please me, what will? More white?). I started with a whole model wash (to line the panels etc), the sponged some black on, followed by silver. I used some brown wash to make rust marks where water would run off, it looks a lot better that the other side, which was done using rust coloured weathing liquid (it came out WAY to red xD). Finally, I fired up the ol' airbrush and put some soot on the exhaust bits and mud along the bottom. Unfortunately, it didn't occur to me that airbrushing the brown will cover the paint scratches (invalidating a fair amount of the previous 30 minutes). As a first piece, it was good. I learnt a lot of good / bad techniques to use, and got a feel for painting a LR (Not a total waste... )
But a few things I want to ask:
-If not digital camo, what scheme? This IG army will be Urban themed. So that put a few colour restrictions in place. I was thinking maybe a 2 tone camo. But i'm going to look around for something I like, before I try again.
-How much weathering? I dont like what I did (looks too busy). I think light dusting of mud, soot and with paint chips will be my limit. How do I do the dusting of mud without covering the silver paint chips?
Thats all the IG for now. Chimeras and more LRs will arrive some time next week.
Z
|
|
This message was edited 2 times. Last update was at 2014/12/22 03:00:14
|
|
|
|
|
2014/03/16 18:47:41
Subject: White Scars - Sternguard complete!
|
|
Is 'Eavy Metal Calling?
|
Camo looks nice, but if you don't like it, then there are other options. The most obvious would be to stick with the same colours but do a more free-form camo, more akin to traditional aircraft/tank patterns. Bear in mind that the purpose of camoflage on a tank is not to hide it but to break up the outline to prevent critical parts (sponsons, engines, drivers) from being easily distinguished. To that end, you'd want organic shapes crossing over multiple components. Something like this:  As for weathering, pigments/chalks could the what you're looking for. Applied lightly, it will leave the chipping showing through.
|
|
This message was edited 2 times. Last update was at 2014/03/16 18:48:37
|
|
|
|
|
2014/03/16 18:57:05
Subject: White Scars - Sternguard complete!
|
|

The Marine Standing Behind Marneus Calgar
|
Have you thought about using stronger contrasting colors for the camo? Maybe not all the way to white/grey/black, but something you can tell you are using different paints. If you asked me how many different shades you used for that tank, I couldn’t answer you. They are subtle enough that it looks more like uneven fading (albeit along straight lines) rather then camo. I’m not talking about going all the way to the crazy quilt black/white zebra-esque camo patterns that work more for breaking up the silhouette rather then hiding the tank, but just something that shows a bit better.
Good camouflage is a lot of work to make something look bland and boring. Very realistic is not very fun. I suspect once you add the guns and details, the tank will liven up a bit.
I like the weathering. It’s been used and run around a bit, but not overpoweringly so. The understated weathering, coupled with the subtle camo makes this look like a real tank. An army painted like this is not going to draw the eye from across the room. It lack the brightly colored cartoony punch that most 40k armies do. But it looks like an army of actual troops holding the line, and from across the table or at arms length, should look quite sharp.
|
|
|
|
|
|
2014/03/17 18:24:11
Subject: Zambro's Imperial Guard - The beginning of an Armoured Regiment.
|
|
Steady Space Marine Vet Sergeant
|
Thanks guys 
I slept on your comments and realised it isn't the end of the world
I'm going to give it another few attempts before I make any final decisions about changing the scheme.
When i'm at the LGS tomorrow, i'm going to pick up some better colours. I was using thinned VGC paints, and they dont have much of a selection of greys. I'm going to use the same colours as buypainted in this video - Which are vallejo model air medium sea grey and dark sea grey
All tanks I need for the opening of the capaign are in the post making their way to me. 4 Chimeras from my LGS are awaiting a delivery from GW - IIRC, when I got my scars, I had to wait until a wednesday for GW to deliver some stuff to them. 2 LRBTs from an online store. It says the order is being processed, so I guess it's the same deal with the Chimeras. And I just picked up A Vulture, a Thunderbolt, Punisher Cannons (for the Vulture) and a bunch of ammo creates (It's about time I have my own objectives ) from Forgeworld. My guess is these will arrive first.
Next on my to-do list whilst waiting for things to show up:
-source my IG infantry needs for the opening of the capaign. I'm hoping a few IG players at the club can help me out by loaning me some models (only need about 15 guys and 4 weapons teams)
-Work out exactly what I need for home made decals, and get that stuff together (already done the research).
-Research how to properly use oil washes (input appreciated ). The last (and only time) I used it, I made a complete botch of the job...
-And finally, find out how I'm going to do flying bases for my Navy fliers. If i'm understanding right, they dont come with the marked 'X' underneath for the GW stands. So I'm going to be looking at how to make something that can hold it, and at the same time be removable for transport.
Hopefully, my next update will show some FW goodies...
Z
|
|
|
|
|
|
2014/03/17 18:50:27
Subject: Re:Zambro's Imperial Guard - The beginning of an Armoured Regiment.
|
|

Death-Dealing Dark Angels Devastator
|
That Land Raider looks amazing. I'm assuming you airbrushed it? I've wanted to stencil stuff for a while, but am too cheap to pony up for an airbrush. Can you get the same effects with brushes?
I'm an IG player, so I'm very excited to see how you tackle my army.
|
 2,500 points 2,500 points
 2,500 points 2,500 points
 1,500 points 1,500 points
41-31 since returning to the game.
|
|
|
|
|
2014/03/17 19:07:26
Subject: Re:Zambro's Imperial Guard - The beginning of an Armoured Regiment.
|
|
Jovial Plaguebearer of Nurgle
|
Mate, for the stands you can but threaded bars (I use 5mm) and then glue/epoxy resin them to the base and flyer. That way you can unscrew the bar for transport. I airbrush and varnish mine black but they work great. You can buy the threaded bars on eBay etc or even tap and due your own.
As for oil washes, I use mig oils and odourless turpentine. Getting the mix right us just practice. Always use it over satin/gloss varnish though so you can take off any excess.
I'm interested to see how you get on with the transfers as I'm looking at doing some god my Scars.
|
|
|
|
|
|
2014/03/17 20:01:46
Subject: Re:Zambro's Imperial Guard - The beginning of an Armoured Regiment.
|
|
Steady Space Marine Vet Sergeant
|
@TheNightWillEnd. Thanks mate. The LR was the first time I masked an area off, and it was a little rough along some edges. The airbrush definately helps, but I dont see why you couldn't get a similar effect with a brush. It would take time and a lot of patients, but you can do it. I have done a boat load of lightning bolts and dags on a much smaller scale with relatively good success (see spoiler tag below), I dont see why doing it on a larger canvas would be much harder.
[spoiler]
A few examples of hand painted jags and lightning bolts:


@Maniak. Thanks mate, I was trying to remember exactly what you said you had used. Can you link me to the stuff you have used? In terms of oil washes, odourless turp. would be awesome (I opened the stuff in an enclosed room last time xD ). I'm going to be using winsor and newton oil washes. I know about putting down gloss varnish first, but what do you use to remove excess?
And in terms of home made decals, I made this thread the other day. I got some pretty good info for making my own decals from it.
|
|
This message was edited 2 times. Last update was at 2014/12/22 02:58:30
|
|
|
|
|
2014/03/22 11:53:03
Subject: Zambro's Imperial Guard - Reporting for duty!
|
|
Steady Space Marine Vet Sergeant
|
'afternoon everyone It's happened... My tanks have arrived! 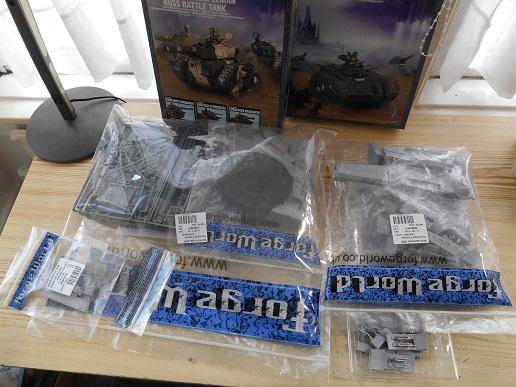 I have 1 Vulture, 1 Thunderbolt, 2 Leman Russes, 4 Chimeras (some stuff not pictured). I had a great sense of smug satisfaction when I opened the door to the postman who was balancing 2 massive boxes Anyway, the FW stuff is great. I've never had any FW stuff before, so it was a blast looking through the pieces. Definately got to wash them, I could feel the release agent on my fingers. As far as I could tell, there are no hideously miscast pieces. I did notice some minor twisting of some pieces (9/10 people wouldn't notice). I'm going to try and fix them before I put it together. I was really supprised by the Vulture. I get a valkyrie sprue, with the vulture bits seperate in resin. The supprising bit was, the entire back part of the vulture (the circular engine part all the way to the back) is a solid piece of resin. And a pretty heavy piece at that. It turns out they actually come with flying stands and additional bits you can attach to make the 'X' needed. I'll see how much hassle it is to install the bars, if it's too much, I may not bother and just use the regular flying stands. As for the regular stuff; the chimeras arrived yesturday. And as a result, I've already built 2 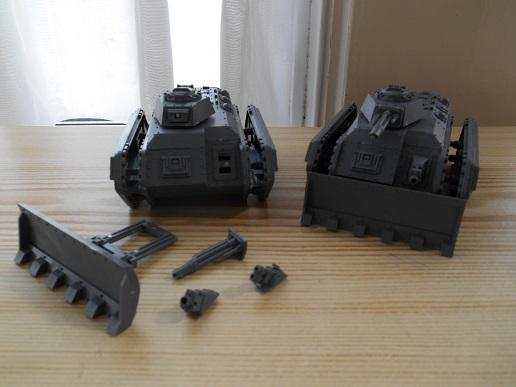 They're a nice kit (first time ever assembling one). I made a mistake or two magnetising some of the pieces, but I know how to do it properly now. I left the tracks off, in order to paint seperately. It'll be relatively slow going this week (imminent coursework deadlines), but I look to get at least another chimera done this weekend, possibly two - although i'm running low on magnets. Z
|
|
This message was edited 3 times. Last update was at 2017/07/16 00:09:29
|
|
|
|
|
2014/03/22 12:09:06
Subject: Zambro's Imperial Guard - The beginning of an Armoured Regiment.
|
|
The Marine Standing Behind Marneus Calgar
|
Nice to see some plastic going together.
|
|
|
|
|
|
2014/03/22 12:37:56
Subject: Zambro's Imperial Guard - The beginning of an Armoured Regiment.
|
|
Jovial Plaguebearer of Nurgle
|
Looks good mate. I would definitely recommend the bars ax transport is so much easier.
The rest of the Valkyrie will make for some good scenic bases. If you get stuck for inspiration then just ask nev, he's full of great ideas
|
|
|
|
|
|
2014/03/22 15:00:54
Subject: Zambro's Imperial Guard - The beginning of an Armoured Regiment.
|
|
Steady Space Marine Vet Sergeant
|
 McManiak wrote: McManiak wrote: If you get stuck for inspiration then just ask nev, he's full of great ideas
QFT
I didn't think about using the valkyrie bits as a scenic base. Would it look weird to be flying over my own guys, considering that most people put 'enemies' on their bases?
|
|
|
|
|
|
2014/03/22 15:22:14
Subject: Zambro's Imperial Guard - Reporting for duty!
|
|
Jovial Plaguebearer of Nurgle
|
Make it a traitor Valkyrie...
|
|
|
|
|
|
2014/03/22 18:14:05
Subject: Zambro's Imperial Guard - Reporting for duty!
|
|
Is 'Eavy Metal Calling?
|
Sounds like a lot to build, best of luck.
|
|
|
|
|
|
2014/03/22 23:02:04
Subject: Re:Zambro's Imperial Guard - Reporting for duty!
|
|

Fixture of Dakka
|
Hmm. Good luck with the guard.
Got any infantry to go along with those tanks?
|
|
|
|
|
|
2014/03/23 18:37:46
Subject: Re:Zambro's Imperial Guard - Reporting for duty!
|
|
Steady Space Marine Vet Sergeant
|
Yeah. 20 guys I have lying around. And an un-known number of catachans in a box (pretty bad condition, maybe I can salvage something).
10 of the guys are Kasrkins I painted almost a year ago. They're in the scheme of Cadian 8th (The guardsmen in the IA11 Doom of Mymeara book).
The other 10 are assembled and primed. I started working on a colour scheme today for the infantry. I've got a scheme i'm happy with, but i'll finish the model before I throw it up for you guys to comment on
The only reason I started the infantry today, was because I hit a small problem with the tanks... I ran out of magnets. lol. 4 Chimeras are built, 2 of which are primed. I need to put a few magnets here and there, then I can start on the Russes. Does anyone know any good videos on how to magnetise russes? I've looked on here and youtube but nothing exemplary jumped out. I've looked at the sprue and I have a decnt idea on what I will do, but it's always nice to see someone else do it before I mess up
Z
|
|
|
|
|
|
2014/03/23 18:43:31
Subject: Zambro's Imperial Guard - Reporting for duty!
|
|
Is 'Eavy Metal Calling?
|
In all honesty, you won't need to magnetise the Russes. The turrets are detachable, and the sponson and hull weapons are easily held without glue, allowing swapping.
For the main gun, rather than magnetising, it's easier to glue a piece of sprue on the end of the gun, kind a 'lever' to hold it in place. Might save you some time/money, and holds up well to use.
|
|
|
|
|
|
2014/03/28 17:59:45
Subject: Zambro's Imperial Guard - First (proper) IG update
|
|
Steady Space Marine Vet Sergeant
|
Afternoon folks. I think I picked the worst time possible to do a new army. This past week has been rammed with uni work. But now that that is (more or less) over, some warhammer time First on the agenda; Infantry. I've decided on a scheme I like. My regiment will be engaged in an urban conflict. As a result, I've decided hard armour is going to be a dark, gritty green and fatigues will be grey. Here is an (unfinished) mock up: 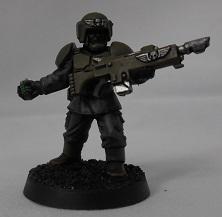 Below are some extra shots of the above model next to a previous test model:  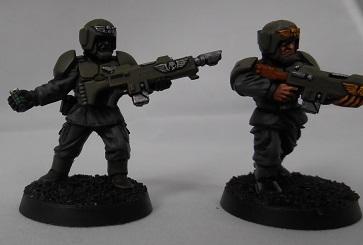 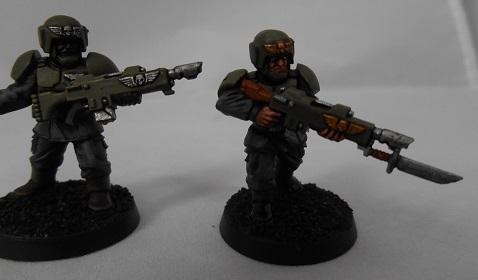 As you can see, a few things changed. I disliked the gold. It almost gave it 'too much' colour. Also, the brown gun stock looked aweful, so that went too. Other than that, not too much changed. I switched up the mixed colour for the highlights on the new guy. They're incredibly suttle, but they are there. I may try and go a bit brighter, and do them from above, but we'll see. Also, the boots. On the first test mini they are just glossed black, and on the second they're a dark brown. I know they're both quite dark and hard to see, but what do you think? Next up; Tanks. I've not really had much time working on these recently. I've built another 2 chimeras. Some magnets arrived today, so the 2 chimera's will get some magnets. Also, now that the 5x1mm magnets have arrived, I feel more comfortable making progress on the Russes. Para, you said I wont need to magnetise the russ's sponsons. Are you sure the sponsons are held on without glue? It doesn't look like they will... Additionally, today I painted my first 2 chimeras. I got home from uni and started work on them around 11:30, and by 17:00 I was done 2 Chimeras with the digital camo pattern put down. I appreciate your comments, guys. If it wasn't for you I would have bottled it and not done a digital camo scheme (based on the last attempt). Nev, your advice about upping the contrast was ace. Take a look: 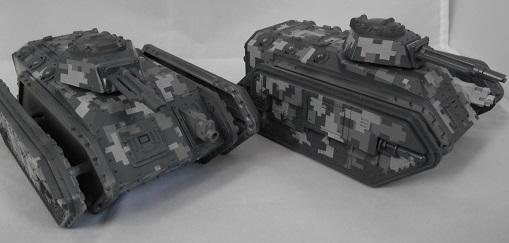 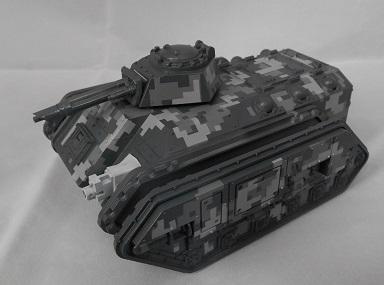  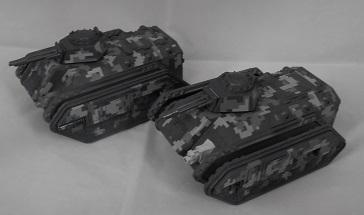 IMO IMO, the camo scheme looks great. I'm a fair way from finished, but I can only imagine that lining the pannels and hitting the details will make it look better. The colours are much better than last time, and this time around, I only pulled the paint off down to the plastic 3 times when removing the masking. And 3 small patches, in unnoticable places, at that . I painted the tracks silver, too. I got a silver airbrush paint and laid down the silver onto the tracks in less than 5 mins. I cant imagine how long it would have taken with a brush. Next thing to do on these chimeras is an oil wash. All in all, I'm pleased with my somewhat limited progress. This weekend is going to hold the progress of my russes. The opening night of the campaign is this tuesday, and I want all of my tanks built for the night (I'm running an ABG list, after all). The FW fliers are probably going to wait until next week (I'll probably proxy the fliers I need using my STs). Well, there we have it, my IG... Z
|
|
This message was edited 4 times. Last update was at 2017/07/16 00:12:32
|
|
|
|
|
2014/03/28 18:37:34
Subject: Zambro's Imperial Guard - First (proper) IG update
|
|
The Marine Standing Behind Marneus Calgar
|
VERY nice tanks. Looking forward to the details and some of the light weathering you did on the russ earlier.
I’m going to give you the same advice on the trooper as on the tank. Real camo is boring. He needs more contrast. What I might do is to change his pants. If you brightened them up a shade it would help break him up. Right now you have to look close for where the jacket, pants, and boots separate. A brighter highlight pass might also fix this. Another option would be to do the pants in a camo. Either a freeform one, or a tiger stripe would be easy. Digital would be awesome, but probably cost you your sanity.
The fact that he’s no based yet doesn’t help. Dark mini on a dark base, done in subdued tones. There is no “pop”. If you are not careful, these guys are going to get lost and forgotten on the table. Be sure to count them coming out and going into the case
|
|
|
|
|
|
2014/03/28 20:07:20
Subject: Zambro's Imperial Guard - First (proper) IG update
|
|
Is 'Eavy Metal Calling?
|
Both trooper and tanks look good, nice and grimdark. I agree about maybe adding some more spot colour (maybe squad markings in white?). Brown boots as well.
To clarify, the sponson weapons can be switched without magnets (what I thought you were referring to), but to switch the sponson itself you will need magnets. I may have umisnderstood if you originally meant the second one.
|
|
|
|
|
|
2014/03/28 20:37:14
Subject: Zambro's Imperial Guard - First (proper) IG update
|
|
Mysterious Techpriest
|
Nice camo on the tanks, it looks like you hand painted them. There is somewhere that sells little square bits of masking tape or something, the last person that I saw painting digital camo on their tanks used them on their tanks so take a look around, might save you some time.
I can't really see the infantry but from the description it sounds ok.
|
|
|
|
|
|
2014/03/28 22:21:30
Subject: Re:Zambro's Imperial Guard - First (proper) IG update
|
|

Ork Boy Hangin' off a Trukk
Moncton, New Brunswick, Canada
|
Wow. Those tanks are sharp!
|
|
|
|
|
|
2014/03/29 01:16:51
Subject: Re:Zambro's Imperial Guard - First (proper) IG update
|
|
Fixture of Dakka
|
I don't like the tank camo. It makes the tank look like it was constructed out of Lego bricks.

I just plain don't like digital camo though. I think it's stupid. So it's not your rendition of the camo that's the problem per-se.
As far as the camo itself goes it's hard to fault. The edges are sharp and there's a lot of variation in the shape. We'll see how it goes once the whole thing is finished.
I do however like your guardsmen. The green and grey I like. Add a little bit of (non-digital ) camo to the fatigues and I think they'll look grouse.
|
|
|
|
|
|
2014/03/29 15:08:57
Subject: Re:Zambro's Imperial Guard - First (proper) IG update
|
|
Steady Space Marine Vet Sergeant
|
Thanks for the comments guys @Para. Yeah, slight mis-communication between us I was refering to the actual sponsons, opposed to the weapons in the sponsons. @OneManNoodles. Yeah, I have camo masking tape. I cant imagine doing it without masking it off. I found a few camo schemes I like on the interweb (for the fatigues). I'm going to repaint 3 previous test guardsmen in a few different schemes too see what I like. Paradigm suggested white squad markings, but i'm going to stay away from that for one reason: I can't make white home made decals. I like the idea of a dark, gritty red as the spot colour. I'll do some tests and see what happens... As for the tank progress, I tried an oil wash again. Similar experiance as before (except I didn't use water to clean up this time ). It didn't turn out well, good job I only used 1 Chimera. Looking at it now, it's not completely bad... I was just trying to line the pannels with the oil wash, but it didn't work as expected. It looks dirty, and well used now, which isn't entirely bad. I'm going to make some more progress today and tomorrow on it, and I'll show you some pictures soon. I also built 1 Leman Russ. Para, you were right about the sponsons/hull weapons not needing magnets. They have a nice snug fit, as is (so i'll save myself 11 magnets per russ). I did manage to magnify the sponsons, it was remarkably easier than expected. I magnetised the turret weapons too. They droop slightly towards the left, but it'll be unnoticable once on the TT. ...back to the paint station... Z
|
|
This message was edited 1 time. Last update was at 2014/03/29 15:10:09
|
|
|
|
|
2014/03/31 19:36:19
Subject: Zambro's Imperial Guard - 'We need air support!' -> Vulture inbound!
|
|
Steady Space Marine Vet Sergeant
|
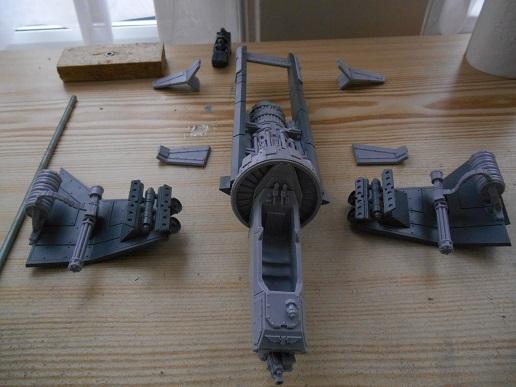 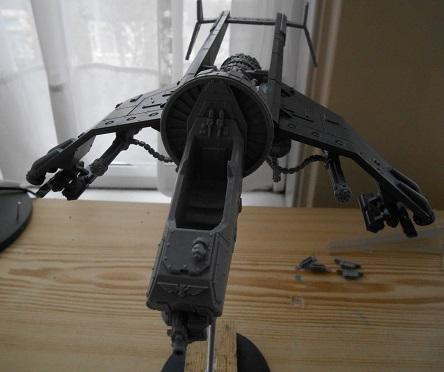 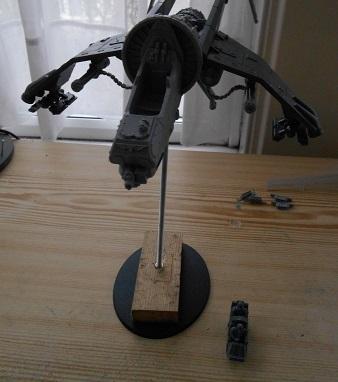 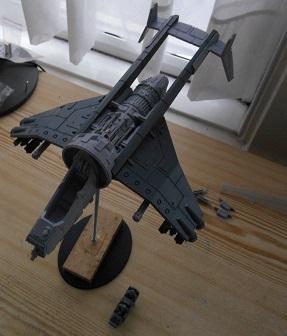 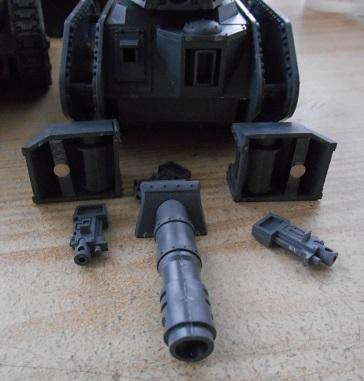 This was easily the most challenging/frustrating/ enjoyable kit i've built in recent time. The kit itself was superbly cast. The additional armour pannels on the tail booms were the only thing that was warped. Super easy fix; hold under running hot water for a minute, place piece on tail boom and hold under the hot water for another minute (Pressing it up again the tail boom gets the shape right), then hold under cold water for a minute. Easy. The pieces have some massive blocks of resin sprue attached to them. They were a real PITA to take off. I spent a fair few hours on Sunday cutting and cleaning the kit. In the end I just took it down to my parents and used the old man's power tools to take the pieces off (It was also mothers day on Sunday... two birds ). Whilst I was there, I got the holes for the threaded bars and nuts done. Mcmaniak, thank you for suggesting it. The bar is great. It's a solid fit, and easy to take apart for transport. In the pictures above, the bar isn't quite straight. This has nothing to do with the fact that I cant use power tools for gak, and everything to do with the fact that it looks more dynamic... I also got a block of wood and block of resin drilled out for the base. I'm going to glue these onto the regular flying base for a little bit extra stability. Nev, how can I make the block of wood / resin look scenic, whilst not getting too tall (for transportation reasons)? Some ideas would be appreciated, i'm drawing a blank on how to make it look better. If one of the ammo belts on the punisher cannon looks like it's held together with copious amounts of super glue and GS, it is! I broke the belt in 2 places... And they weapons themselves are poorly attached to the wings. There were no instructions at all with them, so I was just guessing based on the pics on the FW website They're incredibly delicate and I expect them to break tomorrow at the LGS, i'm going to have to be really gentle. There were some pieces of this kit I looked at and thought; 'Thats going to break off in less than 20 minutes'. So I went ahead and magnetised it, to save me fixing it later. I also included a scale pic. I think the bar is 150mm tall. It really towers over everything! 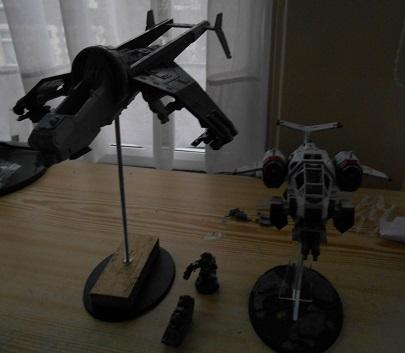 I also finished the other Russ. The sponsons and weapons are magnetised Here is a group shot of my Armoured Company so far: 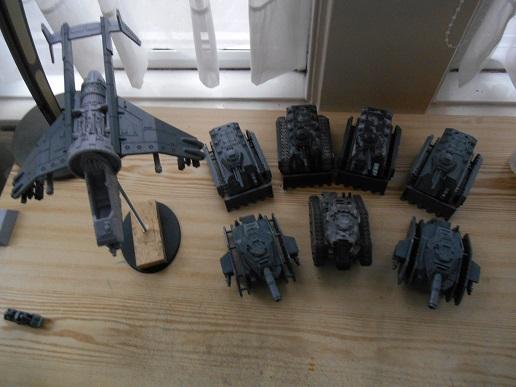 All's going well for the start of the campaign tomorrow, Z
|
|
This message was edited 5 times. Last update was at 2017/07/16 00:15:51
|
|
|
|
|
2014/03/31 19:43:43
Subject: Zambro's Imperial Guard - 'We need air support!' -> Vulture inbound!
|
|
Jovial Plaguebearer of Nurgle
|
Looks great mate. Maybe trim the bar down a touch though. If your flyer is too high people will complain about distance fir range and cover etc.
As for the resin blocks they can be cut to make 'barricade like' terrain very easily and slur waddy have the Vadim shape. The bonus is the weight they add to the base. A few cracks and bullet holes looks great....
|
|
|
|
|
|
2014/03/31 19:50:55
Subject: Zambro's Imperial Guard - 'We need air support!' -> Vulture inbound!
|
|
Is 'Eavy Metal Calling?
|
Looking like a formidable force already, that many tanks should ruin anyone's day. The Vulture is an awesome-looking kit.
|
|
|
|
|
|
|
|

 Ultramarines, 3rd Co. and friends, 16k+
  4k
4k  4k Points
 8500 White Scars. See my blog,
  13000 Nurgle CSM
  2000 Eldar


