| Author |
Message |
 |
|
|
|
|
Advert
|
Forum adverts like this one are shown to any user who is not logged in. Join us by filling out a tiny 3 field form and you will get your own, free, dakka user account which gives a good range of benefits to you:
- No adverts like this in the forums anymore.
- Times and dates in your local timezone.
- Full tracking of what you have read so you can skip to your first unread post, easily see what has changed since you last logged in, and easily see what is new at a glance.
- Email notifications for threads you want to watch closely.
- Being a part of the oldest wargaming community on the net.
If you are already a member then feel free to login now. |
|
 |
2018/03/21 14:26:39
Subject: Re:sCratchbuilding and Citbashing by Meer_Cat: 3/14- A Study in Rust
|
|

[DCM]
Boom! Leman Russ Commander
|
No longer groovin' on the Raging Heroes figures. Not that there is anything wrong with them per se, they are actually very detailed and well animated (and I got them for cheap from Cool Mini or Not). But this is my first time working with resin, nd I can't get the darn things glued together!
I applied the advice I've read here over the past year (washing the parts in soapy water, drying thoroughly, slightly roughing he surface [although ost of the parts are really too small for that]) and nothing I have will stick. I've tried a couple of different types of Cyanoacrylate superglues, one gel superglue, Testor's Cement for Metal and Wood and my go-to Jewelry making glue- nothing sticks.
For the superglues, I don't have any Zip, or other type of accelerant, and the parts are really too small and fine to try to add some baking soda (which Camkierhi suggested during one of my vehicle builds and to quote him 'it works a treat'- just not for this application).
I've done some searching through the articles here on DakkaDakka, and I've been searching on YouTube as well, with no joy so far.
So, help please! What technique do I need to perform, or what better sort of glue should I use? Should I try joining the parts with greenstuff?
Thanks very much!
|
"He fears his fate too much, or his desserts are small, who will not put it to a single touch; to win- or lose- it all."
Montrose Toast

|
|
|
 |
|
2018/03/21 14:29:37
Subject: Re:sCratchbuilding and Citbashing by Meer_Cat: 3/21- How to glue together resin figures?!
|
|
Longtime Dakkanaut
|
With resin I have had to sometimes let them sit in a bath of dawn dishwashing soap and water for a week. You will see little globules of whatever they use to make sure the resin does not stick to the mold after a few days in the soak.
|
|
|
|
|
2018/03/21 14:39:29
Subject: Re:sCratchbuilding and Citbashing by Meer_Cat: 3/21- How to glue together resin figures?!
|
|

Longtime Dakkanaut
|
How cold is your house Meer cat ?
Superglue is heat sensitive, glue stored in a fridge will not cure, put a hairdryer on it and it will go super quick.
Maybe it needs a gentle warming, I normally don't have any trouble and I do way less prep than you seem to have done !
|
|
|
|
|
|
2018/03/21 14:41:37
Subject: Re:sCratchbuilding and Citbashing by Meer_Cat: 3/21- How to glue together resin figures?!
|
|
[DCM]
Boom! Leman Russ Commander
|
Thanks for the advice Big H! I wouldn't think the glue was particularly cool or cold, but I have a desk lamp with an incandescent bulb for close work, I can try holding the pieces under that while the bond is setting to see of the heat helps.
Thanks again and good to hear from you!
Automatically Appended Next Post:
Also- to clarify- I'm not this fastidious in prepping a figure. I'd read often enough that resin can have mold release or other contaminants on it fresh out of the box, so I started with a rinse and called it good.
At each successive stage, as the glue continued to not stick, I tried something new to try to improve the bond.
Normally, I toss the pieces in the air, squirt some adhesive (whatever is closest to hand) and hope the right bit latches onto the right body. Plastic is so forgiving!
|
|
This message was edited 1 time. Last update was at 2018/03/21 14:58:30
"He fears his fate too much, or his desserts are small, who will not put it to a single touch; to win- or lose- it all."
Montrose Toast
|
|
|
|
|
2018/03/21 16:50:43
Subject: Re:sCratchbuilding and Citbashing by Meer_Cat: 3/21- How to glue together resin figures?!
|
|
Longtime Dakkanaut
|
I virtually only buy plastics for that very reason my friend, except for the odd character figure or some homecast bits !
Try a slow deep breath on the parts to warm the glue as it sets, but watch you don't get the fumes in your eyes as that stings like a real stingy thing.
|
|
|
|
|
|
0008/07/18 12:42:12
Subject: Re:sCratchbuilding and Citbashing by Meer_Cat: 3/21- How to glue together resin figures?!
|
|
[DCM]
Boom! Leman Russ Commander
|
Where I work is in the area affected by the US East Coast winter storm today, and work was closed down (14 inches of snow). I thought that I could make some nice progress on a command group composed of Raging Heroes figures that could be used with my female Panzerjaegers, and also with the Empire of Man female storm troopers coming next month from the Kickstarter.
It's the first time I've ever worked with resin. Which fething sucks on ice. None of the glues I had seemed to want to set a bond, no matter what I did to prep the figures: washed them with detergent, scrubbed them with a toothbrush, dried them, roughed up the matching surfaces to form a key, applied heat from a lamp to help the stuff set- nothing worked. At one point I hiked to a gas station down the road that was open and got one of every kind of superglue they had.
Finally, after using straight pins to pin the arms in place (like we used to have to do with heavy _metal_ castings) the figures seem to be holding together, for now, but I don't want to even use harsh language around them for fear the joins are too brittle and will fall apart. I'm hoping they hold together until I can get some primer on them, and then maybe the fething _paint_ will hold the stinking things together. I'm not sure if I'm kidding or not in that last statement.
Here are the glues I had on hand:

The Testor's plastic glue I didn't use- it's only for normal plastic and works by acting as a solvent and dissolving the join edges which then reform and fuse together.
The Testor's Cement for Metal and Wood was easy to work with, being very sticky and helping to hold the pieces together fairly quickly, but when dry simply crumbled apart- couldn't get a grip.
The generic 'Superglue' in the yellow tube has always been a good choice for me, I built practically the whole of the Athena out of it and some styrene. But no good here- I couldn't hold the pieces together long enough for it to set even into a soft set (in some cases I tried to hold the pieces together for more than two minutes).
The Loctite Super Control Gel, isn't (a gel that is). It's very liquid, but after pinning the arms and such it seems to be able to form a soft set, and we'll see if it holds up. The dispenser is actually pretty good for putting just a little dab where you want it. I needed to hold the parts together for about one minute to get the soft set to occur. I had a bottle of this stuff before and it hardened in the spout and dried and was useless, but we'll see.
The Gorilla Superglue was very liquid and didn't work well when there was any irregularity to the surfaces- but it seems to have made a soft set when the two faces to be joined are very flat and can butt up perfectly. This also needed about a minute to form a soft set.
The Krazy Glue actually has a brush applicator and a very large opening so it doesn't harden up and clog. This seemed to form a soft set in about 20 seconds, and so far nothing has fallen off. Of them all, I'd have to say that this one was the most successful for gluing up these figures.
I also got very, very good using my finger drills to make tiny, tiny holes in very small, very small, pieces of resin.
So here's what all day working off and on looks like:

I like the figures- the detail is amazing, the animation superb and the personality conveyed outstanding, but man, today was a high tuition for learning! Still, it's a good company command group, I think, with leader, medic, standard-bearer, bodyguard and the figure on the far left I believe I will paint up in blues and have her represent an Officer of the Fleet (love me some orbital bombardments).
And I need to get better at working with resin, because I have a metric crap-ton of resin figures coming from the Empire of Man Kickstarter- I've been looking forward to these 'way too much to let a little thing like no-stick glues to get in the way! I'll use direct heat to melt 'em together if I have to. Excelsior!
More follows soonest.
|
"He fears his fate too much, or his desserts are small, who will not put it to a single touch; to win- or lose- it all."
Montrose Toast
|
|
|
|
|
2018/03/23 00:22:10
Subject: sCratchbuilding and Citbashing by Meer_Cat: 3/21- New IG Command Group Started
|
|

Gargantuan Great Squiggoth
|
Ah Paduan, resin is hell. However pinning and superglue are about it. The joints are too small for epoxy. I would add though, very careful and considered use of The Superglue trick will help.micro- dusting with bi-carb. Fiddley as hell, but work. Just watch where you get your glue. And yes it works with gel also..
Good luck. Looking brilliant and envious of a beautiful command group.
|
|
|
|
|
|
2018/03/23 01:30:10
Subject: Re:sCratchbuilding and Citbashing by Meer_Cat: 3/21- New IG Command Group Started
|
|
[DCM]
Boom! Leman Russ Commander
|
Thanks Cam- it is reassuring to know that resin isn't a challenge just for me (misery loves company, right?) I'll have to look more at the bicarb trick- especially where there is a bit of a gap anyway at a join. A trick I used myself when you first told me about bicarb as an accelerant was to add the dust first, then flow the glue onto it, for those times when I didn't wasn't the look of a rough weld seam.
Ah well, live and learn. For future Kickstarters- no matter how attractive- no more resin! Plastic, white metal, pewter, lead or nothing!
Glad you like the command group- I really want to take my time and do the best prep I can and maximize the outcome by doing all the tedious 'little steps' that yield such great looking figures from other folks. Want to try getting the eyes right on these.
More follows soonest.
|
"He fears his fate too much, or his desserts are small, who will not put it to a single touch; to win- or lose- it all."
Montrose Toast
|
|
|
|
|
2018/03/23 05:34:34
Subject: Re:sCratchbuilding and Citbashing by Meer_Cat: 3/21- New IG Command Group Started
|
|
Longtime Dakkanaut
|
Models look great Meer as you said very dynamic. Looking forward to seeing some paint flowing soon.
|
|
|
|
|
2018/03/23 15:59:27
Subject: Re:sCratchbuilding and Citbashing by Meer_Cat: 3/21- New IG Command Group Started
|
|
Posts with Authority
Boston-area [Watertown] Massachusetts
|
Resin is, regretfully, tricky (he said, having just bought another ton of it). My go-to is "Zap-A-Gap" Medium CA, pinning where needed, and zip-kicker. I try to avoid the ZK, because it makes a brittle bond, but sometimes you just need it.
Sorry your experience is so negative!
--Brian
|
Falling down is the same as being hit by a planet — "I paint to the 20 foot rule, it saves a lot of time." -- Me
ddogwood wrote:People who feel the need to cheat at Warhammer deserve pity, not anger. I mean, how pathetic does your life have to be to make you feel like you need to cheat at your toy army soldiers game?
 |
|
|
|
|
2018/03/23 18:46:55
Subject: Re:sCratchbuilding and Citbashing by Meer_Cat: 3/21- New IG Command Group Started
|
|
[DCM]
Boom! Leman Russ Commander
|
Hi Yorkright! Painting has begun and the focus is on the faces, once that's done the rest is more in my line of experience and skill level.
Hi briancj- Thanks for the advice- especially about the zip kicker; I've read about it, had never used it, but was going to pick some up to try. I may hold off and work with better ways of introducing a little bicarbonate of soda/baking soda into the glue (or vice versa) and see how that goes. The experience wasn't so much negative as (childishly) disappoitning- with the snow day, I was hoping to get a lot more done. Things are as they are, not what we'd like them to be. It did honestly startle me at how slickery the resin was though- after all the reading about it here on dakkadakka, that was the last thing I was expecting!
More follows soonest!
|
"He fears his fate too much, or his desserts are small, who will not put it to a single touch; to win- or lose- it all."
Montrose Toast
|
|
|
|
|
2018/03/23 21:39:05
Subject: sCratchbuilding and Citbashing by Meer_Cat: 3/21- New IG Command Group Started
|
|

Dakka Veteran
|
Ah, they look great - I simply love these girls - but as you experienced they are hell to handle.
I think one time I used Greenstuff to get an arm attached - that did work surprisingly well.
And I also took part in the Empire of Men Kickstarter 
I look forward to see these at my doorstep.
Really a nice Command Group!
|
|
|
|
|
|
2018/03/24 16:10:44
Subject: sCratchbuilding and Citbashing by Meer_Cat: 3/21- New IG Command Group Started
|
|

Longtime Dakkanaut
|
They look good Meer cat ! Get some paint on them !
|
|
|
|
|
|
2018/03/24 22:56:46
Subject: Re:sCratchbuilding and Citbashing by Meer_Cat: 3/21- New IG Command Group Started
|
|
[DCM]
Boom! Leman Russ Commander
|
Thanks to all for tips, advice, and encouragement- paint follows soonest. The object of the exercise with this lot is to focus on skin and face, and try to up my game in what are historically areas I invest minimal effort into and then move on (you can't get better if you don't try new things, right?)
I think resin and I will come to understand one another, now that I have first hand knowledge of how to work better with it. Wash it, dry it, rough it up and use an accelerant. And if necessary (and the join will permit) greenstuff it.
My problem this go-round was that- being ignorant of reality- I thought the assembly would go quickly and let me do other things. Now I know better, and as the old GI Joe cartoon tells us "Knowing is half the battle"!   
More follows soonest.
|
"He fears his fate too much, or his desserts are small, who will not put it to a single touch; to win- or lose- it all."
Montrose Toast
|
|
|
|
|
2018/03/27 15:18:42
Subject: sCratchbuilding and Citbashing by Meer_Cat: 3/21- New IG Command Group Started
|
|
Mastering Non-Metallic Metal
|
My only experience with resin models is the stuff I've cast and a few bits I got from OMN.
I've not had any problems with using whatever superglue I have on hand to stick it together or to other things.
I still prefer plastic though. I like using poly-cement on my models.
Good luck moving forwards.
|
     Mastodon: @DrH@warhammer.social Mastodon: @DrH@warhammer.social
The army-                  ~2295 points (built). ~2295 points (built).
 
* -=]_,=-eague Spruemeister General. * A (sprue) Hut tutorial *
Dsteingass - Dr. H..You are a role model for Internet Morality!  // inmygravenimage - Dr H is a model to us all // inmygravenimage - Dr H is a model to us all
Theophony - Sprue for the spruemeister, plastic for his plastic throne! // Shasolenzabi - Toilets, more complex than folks take time to think about! |
|
|
|
|
2018/03/27 16:21:16
Subject: sCratchbuilding and Citbashing by Meer_Cat: 3/21- New IG Command Group Started
|
|

Liberated Grot Land Raida
|
Ah resin... Have you washed it with dishwasher soap? Seems the best for me. Wash, let it dry thoroughly, and for an insta bond: wood glue (elmer's glue in the states?) on one side, superglue on the other
|
A Squeaky Waaagh!!
Camkhieri: "And another very cool thing, my phones predictive text actually gave me chicken as an option after typing robot, how cool is that."'
Meercat: "All eyes turned to the horizon and beheld, in lonely and menacing grandeur, the silhouette of a single Grot robot chicken; a portent of evil days to come."
From 'The Plucking of Gindoo Phlem' |
|
|
|
|
2028/03/28 02:20:45
Subject: Re:sCratchbuilding and Citbashing by Meer_Cat: 3/21- New IG Command Group Started
|
|
[DCM]
Boom! Leman Russ Commander
|
Hi Doc- plastic is going to remain a favorite with me also, but as someone noted earlier, there are some really cool figs that only come in resin. I'm going to have to Curb My Enthusiasm for entire units made of resin though- right now it strikes me as 'way more aggravation to get them together than I'm willing to invest (I say that now, but expect that with practice and experience the threshold for more and more resins will gradually become less and less).
Hi CK- yep, I'm washing, drying, tucking into bed and singing a lullaby. Hadn't heard of the wood glue/superglue trick before- I'm looking forward to trying it. Between that and the baking soda accelerant trick, these little guys might be worth putting together. I'm getting very good at pinning tiny parts also.
Thank you both for your comments and suggestions!
More follows soonest.

|
"He fears his fate too much, or his desserts are small, who will not put it to a single touch; to win- or lose- it all."
Montrose Toast
|
|
|
|
|
2018/04/02 23:56:25
Subject: Re:sCratchbuilding and Citbashing by Meer_Cat: 3/21- New IG Command Group Started
|
|
[DCM]
Boom! Leman Russ Commander
|
Hi all,
I'm actively getting the basecoating done on the Raging Heroes command group, but came across a new product at my local big box DIY store (Lowe's) that I found very interesting and which will certainly feature in a build in the near future.
This stuff is some kind of edge trim, I think I found it in the department where they sell siding and such like. It's made of vinyl, is 1.25 inches wide on each edge and comes in 10 foot lengths and sells for US$2.89 per length:

It cuts easily with scissors into any number of shapes (as the old Hasbro toys used to proclaim: The Only Limitation Is Your Imagination!) and is very flexible:
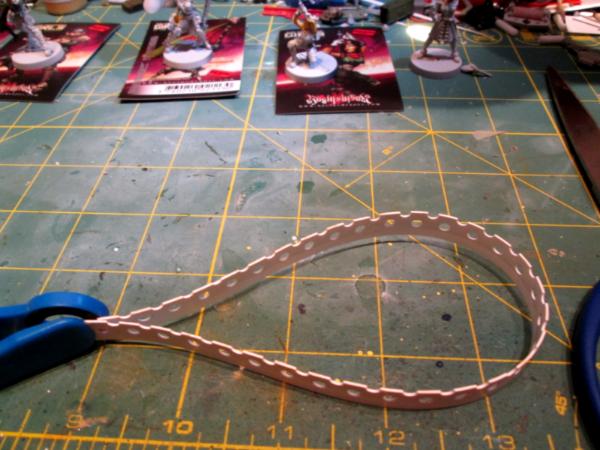
If you lightly score the underside, you can flex it into very realistic track tread angles, that will look very good wrapped around drive sprockets or laying atop return rollers for a tracked vehicle:
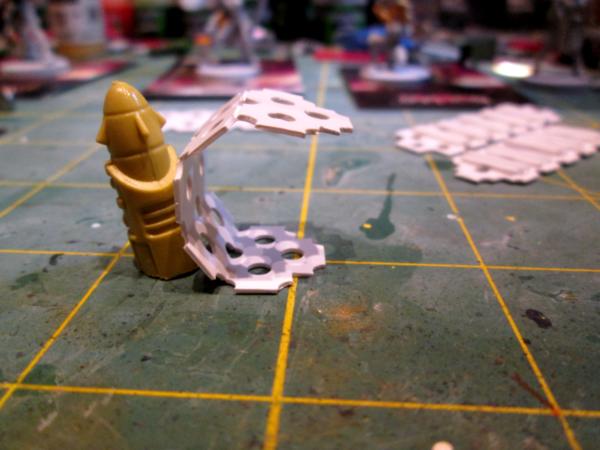
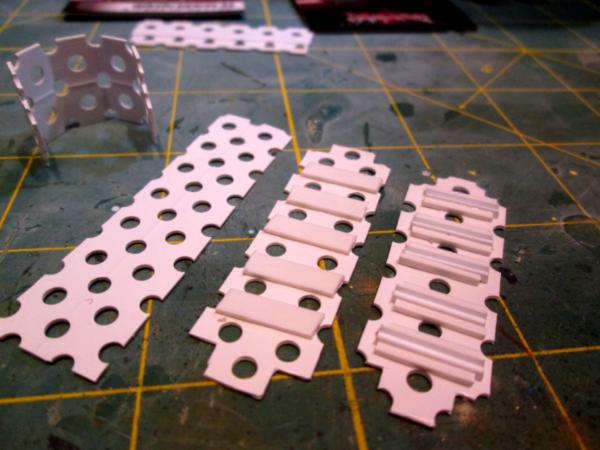
Here are a couple of quick configurations I came up with in just a few minutes using only the loose bits on my workbench showing just a couple of the endless possibilities for making up track sections:
I came across this stuff when my wife and I headed down to the store to find something to install on the corners of our outdoor shelters for our rescue Shetland ponies to stop them chewing on the corners. I tacked it onto the corners with deep staples (and then we sprayed No-Chew all over everything) and had to trim some bits to get it to match the building edges and found how easy it was to work with.
When I looked at my offcuts, I had one of those "I can make something out of this" moments and took time out from the command squad to mess around a bit.
Hope this proved at least interesting to someone, and hopefully helpful/useful to at least one person.
Thanks for dropping by and I look forward to your ideas, suggestions, observations and constructive criticism.
More follows soonest!
|
"He fears his fate too much, or his desserts are small, who will not put it to a single touch; to win- or lose- it all."
Montrose Toast
|
|
|
|
|
2018/04/03 05:08:51
Subject: sCratchbuilding and Citbashing by Meer_Cat: 4/2 Scratchbuilt track-tread sections
|
|
Gargantuan Great Squiggoth
|
I have had a similar product in the cupboard for ages. Been wondering what to do with it. This is an excellent example, brilliant idea bud. There are different ones available, this looks like the one used for corner beading up before plastering. I have one used to trim the corners when tiling. Good shout bud. Thank you.
|
|
|
|
|
|
2018/04/03 05:19:12
Subject: sCratchbuilding and Citbashing by Meer_Cat: 4/2 Scratchbuilt track-tread sections
|
|
Grim Dark Angels Interrogator-Chaplain
|
That is a VERY cool tracks trick! Nice find!
|
 Stormonu wrote: Stormonu wrote:For me, the joy is in putting some good-looking models on the board and playing out a fantasy battle - not arguing over the poorly-made rules of some 3rd party who neither has any power over my play nor will be visiting me (and my opponent) to ensure we are "playing by the rules"
|
|
|
|
|
2018/04/03 13:22:40
Subject: Re:sCratchbuilding and Citbashing by Meer_Cat: 4/2 Scratchbuilt track-tread sections
|
|
Longtime Dakkanaut
|
That track doesn't look bad at all matey !
Does it take glue ok ? I find industrial plastics frustrating to stick.
|
|
|
|
|
|
2018/04/03 13:43:06
Subject: sCratchbuilding and Citbashing by Meer_Cat: 4/2 Scratchbuilt track-tread sections
|
|
Gargantuan Great Squiggoth
|
If you use the plumbers solvent works OK, and sticks any plastic. But looks like you got it nailed already Meer_cat, what did you use?
|
|
|
|
|
|
2018/04/03 15:29:06
Subject: sCratchbuilding and Citbashing by Meer_Cat: 4/2 Scratchbuilt track-tread sections
|
|
Battleship Captain
|
You need to do a soapy wash/scrub on resin with active drying. Future tips.
|
|
|
|
|
2023/05/14 11:43:35
Subject: sCratchbuilding and Citbashing by Meer_Cat: 4/2 Scratchbuilt track-tread sections
|
|
Liberated Grot Land Raida
|
That's a brilliant find in the hardware store Meer_Cat! Will have to go raid one nearby soonish
|
A Squeaky Waaagh!!
Camkhieri: "And another very cool thing, my phones predictive text actually gave me chicken as an option after typing robot, how cool is that."'
Meercat: "All eyes turned to the horizon and beheld, in lonely and menacing grandeur, the silhouette of a single Grot robot chicken; a portent of evil days to come."
From 'The Plucking of Gindoo Phlem' |
|
|
|
|
2018/04/03 21:10:29
Subject: sCratchbuilding and Citbashing by Meer_Cat: 4/2 Scratchbuilt track-tread sections
|
|
Mastering Non-Metallic Metal
|
Good find. Good ideas.
|
Mastodon: @DrH@warhammer.social
The army- ~2295 points (built).
* -=]_,=-eague Spruemeister General. * A (sprue) Hut tutorial *
Dsteingass - Dr. H..You are a role model for Internet Morality! // inmygravenimage - Dr H is a model to us all
Theophony - Sprue for the spruemeister, plastic for his plastic throne! // Shasolenzabi - Toilets, more complex than folks take time to think about! |
|
|
|
|
2018/04/04 00:07:31
Subject: Re:sCratchbuilding and Citbashing by Meer_Cat: 4/2 Scratchbuilt track-tread sections
|
|
[DCM]
Boom! Leman Russ Commander
|
Thank you all for the comments!
Cam: I noticed there were other pieces at the shop- this style suited what we needed, but I'll have to get a kitchen pass and sneak back and see what else I might can use!
JohnnyHell: Thanks much! I was only messing around quickly the other night- for starters when I sit down to build track units two things come to mind: one is that I'll notch the ends of the sections male and female so that they can mate up easier- without a big clunky overlap and two, I'll run the cleats the width of the track piece, instead of short like they are here. Loads more playing around to do, though!
Big H: I used superglue (cyano-acrylite) for these and was pleasantly surprised tonight when I picked them up and flexed them that nothing popped off. I think for a permanent build though I would use plumber's PVC solvent like Cam suggested- it should form a stronger, flexible bond and is pretty cheap. Just don't sniff the fumes too long!
Cormadepanda: Thanks for the advice and boy will I follow it! I did ultimately scrub these in dish detergent and the other night a leg still popped off the Commander figure. I had half facetieously suggested in my earlier rant using greenstuff to stick resin together- but Klaus, Not Santa said he had actually used it to render a fix one time, so that's how I fixed this figure- with greenstuff!
ComissarKhaine: Thanks pal! I'm gld though that I had offcuts from a piece- not sure what I would do with a full ten foot length (although as you layer pieces to make full, thick tracks it goes more quickly than I would have thought); when I have leftovers I have to keep an eye on the wife-unit who has trouble telling the difference between my 'treasures' and junk.
Dr. H: Thanks Doc!
Tonight, more work on the Ragin Heroes figs- trying a different process workflow and am starting with the faces, slow going (for me) for now. It'll break out soon though. Toujours en avant!
|
"He fears his fate too much, or his desserts are small, who will not put it to a single touch; to win- or lose- it all."
Montrose Toast
|
|
|
|
|
2018/04/07 20:00:40
Subject: Re:sCratchbuilding and Citbashing by Meer_Cat: 4/2 Scratchbuilt track-tread sections
|
|
Krazed Killa Kan
|
Meer_Cat, I've only finished the first page of your blog so far, but I'm really enjoying it. What you created from that multi-picture frame is amazing. I'm glad you like converting vehicles, that makes it fun for all of us. Most of all, I'm glad you mentioned your background in the Marines and Army, because I immediately thought you must have some military background, or are a military history buff, when you were explaining the artillery emplacement you made. It has a realism to it, that I feel most people wouldn't think to include when building.
P.S. I'm glad to see someone else thinks milk pulls look like hatches, I use them for that too
|
|
|
|
|
|
2018/04/08 03:07:31
Subject: Re:sCratchbuilding and Citbashing by Meer_Cat: 4/2 Scratchbuilt track-tread sections
|
|
Is 'Eavy Metal Calling?
|
 I never thought about using that drywall cornerbead for anything game wise . Brilliant work on the tracks. I think that corner bead will find all sorts of uses in Necromunda.
|
LOL, Theo your mind is an amazing place, never change.-camkierhi 9/19/13
I cant believe theo is right.. damn. -comradepanda 9/26/13
None of the strange ideas we had about you involved your sexual orientation..........-Monkeytroll 12/10/13
I'd put you on ignore for that comment, if I could...Alpharius 2/11/14 |
|
|
|
|
2023/07/27 04:37:22
Subject: sCratchbuilding and Citbashing by Meer_Cat: 4/2 Scratchbuilt track-tread sections
|
|
Rogue Inquisitor with Xenos Bodyguards
|
Interesting looking tracks!
|
"Your mumblings are awakening the sleeping Dragon, be wary when meddling the affairs of Dragons, for thou art tasty and go good with either ketchup or chocolate. "
Dragons fear nothing, if it acts up, we breath magic fire that turns them into marshmallow peeps. We leaguers only cry rivets!


|
|
|
|
|
2018/04/09 23:20:35
Subject: Re:sCratchbuilding and Citbashing by Meer_Cat: 4/2 Scratchbuilt track-tread sections
|
|
[DCM]
Boom! Leman Russ Commander
|
 Syro_ wrote: Syro_ wrote:Meer_Cat, I've only finished the first page of your blog so far, but I'm really enjoying it. What you created from that multi-picture frame is amazing. I'm glad you like converting vehicles, that makes it fun for all of us. Most of all, I'm glad you mentioned your background in the Marines and Army, because I immediately thought you must have some military background, or are a military history buff, when you were explaining the artillery emplacement you made. It has a realism to it, that I feel most people wouldn't think to include when building.
P.S. I'm glad to see someone else thinks milk pulls look like hatches, I use them for that too
Thank you for the kind words, Syro- and thank you for looking in. The picture frame/firebase was a lot of fun, and the biggest project I'd ever tried up to that time. The milk pulls had been bugging me for a long time- they were just too perfect to _not_ use for something!
 Theophony wrote: Theophony wrote: I never thought about using that drywall cornerbead for anything game wise . Brilliant work on the tracks. I think that corner bead will find all sorts of uses in Necromunda.
Thanks Theo! Now that you mention it, the corner bead could be trimmed to any size and make girder-work for Necromunda- I didn't think of that when I saw it. I do like that it glues up and cuts easily- a treat to work with.
Thanks shas! These were literally thrown together in just a few minutes as a 'proof of concept' project- I'm quite sure that there's a lot better can be done with them. I've still got a howitzer to scratchbuild (after the command team, after the grot tankette- no scope creep here, no sir!) so I'll be messing with them some more!
Thanks all for looking in- more follows soonest
|
"He fears his fate too much, or his desserts are small, who will not put it to a single touch; to win- or lose- it all."
Montrose Toast
|
|
|
|
|
|
|


