| Author |
Message |
 |
|
|
|
|
Advert
|
Forum adverts like this one are shown to any user who is not logged in. Join us by filling out a tiny 3 field form and you will get your own, free, dakka user account which gives a good range of benefits to you:
- No adverts like this in the forums anymore.
- Times and dates in your local timezone.
- Full tracking of what you have read so you can skip to your first unread post, easily see what has changed since you last logged in, and easily see what is new at a glance.
- Email notifications for threads you want to watch closely.
- Being a part of the oldest wargaming community on the net.
If you are already a member then feel free to login now. |
|
 |
2011/10/05 12:41:04
Subject: The Lamenter Project
|
|

Never Forget Isstvan!
|
Thanks everyone.
Egg.. yeah it's on my learn to do list. I just need to practice it. My concern is that it doesn't come across sloppy and overdone. Any suggestions from a pro like you would be appreciated.
You, GD, MajorTom and Gits have provided me with a lot of insperation and I credit you guys for getting me to jump into the AB arena.
SL
|
|
|
|
 |
|
2011/10/05 12:49:14
Subject: The Lamenter Project
|
|
Decrepit Dakkanaut
|
Considering you were the one inspiring me with your 40k armies 20 years ago... turn-about is fair play.
|
|
|
|
|
|
2011/10/05 13:34:57
Subject: The Lamenter Project
|
|
Never Forget Isstvan!
|
Sounds like you need to jump back into the Lamenter painting. We need to dispel this whole cursed founding nonsense and leave that to the dice rolling!
SL
|
|
This message was edited 1 time. Last update was at 2011/10/05 13:36:56
|
|
|
|
|
2011/10/05 16:07:48
Subject: The Lamenter Project
|
|

Homicidal Veteran Blood Angel Assault Marine
|
Nice & crisp, they look striking. A bit clean for my personal taste but I'm liking them nontheless. 
|
|
|
|
|
|
2011/10/05 16:20:36
Subject: The Lamenter Project
|
|

Homicidal Veteran Blood Angel Assault Marine
|
Solar_lion wrote:
Egg.. yeah it's on my learn to do list. I just need to practice it. My concern is that it doesn't come across sloppy and overdone. Any suggestions from a pro like you would be appreciated.
Ah, there should be a few techniques I've seen out there that could be useful depending on how much time you want to invest in weathering and damage. The first thing that comes to mind is either a sepia or devlin mud wash. Do some tests first to see if sepia would be dark enough for you, would help bring out some more details and create more shading.
After that, if you don't mind spending the time, you could always use the sponge chipping technique to add battle damage around edges of armor. Skys the limit with this as you can always create a bevel effect on the chips by highlighting the edge of the chips as well as using watered down brown/orange paint to create rust stains.
|
|
|
|
|
|
2011/10/05 16:24:17
Subject: The Lamenter Project
|
|
Decrepit Dakkanaut
|
grey_death has a really great tutorial on the sponge weathering technique SL... you might hunt it down if you're interested. Check out his Son's of Medusa to see some fine examples.
|
|
|
|
|
|
2011/10/05 16:45:33
Subject: The Lamenter Project
|
|
Homicidal Veteran Blood Angel Assault Marine
|
Well, a quick & easy way is how I do my marines. I don't really weather them but I highlight them by drybrushing them very, very dryly. The layers of consecutive lighter shades and then I give them a pretty dark but heavily thinned wash.
If they turn out to light or too dark you can always give them another wash, or gives them another drybrush and a glaze of light & thinned ink/glaze.
Then I do the detailing, like guns, secondary colours etc.
Another very easy and good technique is the following one. It's something you could perfectly do at your current stage of your models. I guarantee you it's quick, easy, and looks amazing. Give your models a wash with heavily thinned black oil paint.
First seal your models with a spray of varnish, I personally prefer satin.
Thin a little blob oil paint with turpentine. (Take the odourless modeling kind) The ratio can be easily 1:10 or higher as the oil paint paste has a very high concentration of pigments. Easiest is to do it in a little jar are paint pot so you can shake it like crazy, it does take a few minutes to mix it well.
Then; apply liberally over your model with a brush. The nature of the oil paint mix over the smoothness of the slick varnish coat will make the wash literally suck itself into every nook & cranny of your model, detailing all the texture in the paint & model. The cool thing is that this highly thinned oil paint will not coat your model in black like an acrylic ink would so you can easily use it over light colours such as white and yellow.
And there's a cherry on top; it's correctable! Oil paint does not set permanently so even after it's fully dry (takes long though, easily overnight) you can just take a brush damp with turpentine and nudge, feather, or even remove any bit you don't like and you'd like to adjust or correct.
When you're satisfied with the result, simple seal your model again with a coat of varnish and voila!
You can use the exact same technique on smaller parts of your model using brown or Burnt Umber oil paint to add rust or grease stains.
Oil paint and modeler's turpentine can easily be found in most hobby stores or online stores such as Ebay.
Both techniques go reasonably fast in batches.
Don't be shy to ask for specifics or other techniques. 
If you want a quick 'level-up', that's it right there.
|
|
This message was edited 2 times. Last update was at 2011/10/05 16:47:06
|
|
|
|
|
2011/10/05 16:59:57
Subject: The Lamenter Project
|
|

Chaplain with Hate to Spare
|
Do you have any examples of the oil weathering Meph? is it your main technique for marine weathering?
sounds pretty good, i've never tried oils before but need something to practice and expand my painting world.
both of the ideas would look great on these lamenters, especially the second one! actually since reading this blog a few days ago i'm in the process of experimenting myself and painting up 3 spare marines i have as lamenters! I really liked the look of the op's ones and couldn't stop thinking about yellow.....
keep it up, it's looking great!
Nerdfest09
|
 Flesh Eaters 4,500 points Flesh Eaters 4,500 points

" I will constantly have those in my head telling me how lazy and ugly and whorish I am. You sir, are a true friend " - KingCracker
"Nah, I'm just way too lazy to stand up so I keep sitting and paint" - Sigur
"I think the NMM technique with metals is just MNMM. Same sound I make while eating a good pizza" - Whalemusic360 |
|
|
|
|
2011/10/05 17:01:27
Subject: The Lamenter Project
|
|
Never Forget Isstvan!
|
Thanks. I appreciate the help.
My camera makes the pic brighter than they are. I use the Sepia wash on all the joints and cracks, then several more coats of golden yellow followed by a sunny yellow highlight.
I need a way to correct the photo's whiteness.
I 'll check out the sponging technique and the oil techniques. ( I already have the material - wife is art professor).
I'm working on a razorback using egg's AB technique ( thou nowwhere as good) Using Black then to a brownish yellow on the seams, around the hatches ect. Much to learn yet!. So far it is a noticeable improvement from the yellow brightness.
Thanks for all the advice.
|
|
This message was edited 1 time. Last update was at 2011/10/05 17:03:48
|
|
|
|
|
2011/10/05 17:05:44
Subject: The Lamenter Project
|
|
Chaplain with Hate to Spare
|
Try GW's Ogryn flesh on the armour, i'm using at the moment and it gives a really nice wash without being too dark, you can then easily touch it up again with a bright yellow.
|
Flesh Eaters 4,500 points
" I will constantly have those in my head telling me how lazy and ugly and whorish I am. You sir, are a true friend " - KingCracker
"Nah, I'm just way too lazy to stand up so I keep sitting and paint" - Sigur
"I think the NMM technique with metals is just MNMM. Same sound I make while eating a good pizza" - Whalemusic360 |
|
|
|
|
2011/10/06 13:56:44
Subject: The Lamenter Project
|
|
Homicidal Veteran Blood Angel Assault Marine
|
Well, the oil stage is still on the to-do list for my marines. i still need to apply the decals first.. however... I could do a before & after on the Thunderhawk pilot...
|
|
|
|
|
|
2011/10/06 18:27:24
Subject: The Lamenter Project
|
|
Never Forget Isstvan!
|
Meph wrote:Well, the oil stage is still on the to-do list for my marines. i still need to apply the decals first.. however... I could do a before & after on the Thunderhawk pilot...
Before and after would be good.. or a nice step by step tutorial would be nice.
either way I take all the help I can get.
thanks
SL
|
|
|
|
|
|
2011/10/09 13:47:26
Subject: Re:The Lamenter Project
|
|
Homicidal Veteran Blood Angel Assault Marine
|
Well, I just posted some before and after shots on my Blood Angels thread to avoid hijacking yours. ^^
Go ahead and take a looksee, and I'd be happy to answer any questions you might have.
http://www.dakkadakka.com/dakkaforum/posts/list/120/311030.page#3423951
|
|
|
|
|
|
2011/10/10 03:13:12
Subject: The Lamenter Project
|
|
Agile Revenant Titan
|
Looks great!
|
 Eldar Eldar  -5000 points -5000 points |
|
|
|
|
2011/11/10 15:22:35
Subject: Re:The Lamenter Project
|
|
Never Forget Isstvan!
|
long time no update. Ive been working on several new concepts and these things take time to learn.
I've taken Majors Toms concepts to Magnitize one of my Predators. Thou not exactly the same way with just switching out the guns, but the Sponsons. I did the turret the same way and it works great. First time I magnitized anything. I have to admit those little magnets and superglued fingers make it more challenging than it looked.
Secondly you all have been telling me to get more " dirty " with my yellows. Git, Egg and Meph all have been giving me some good help as well as examples. The follow pics are WIP but I have learned alot. Still need to get the process down in the right order so I can speed up the process and I still consider this a novice attempt.
Also the pic's are on the bright side a bit. The yellow is much browner and the recesses are more brown red. I will still need to blend the main color with the exsisting paint ( I keep going back to fix the modeling flaws - namely the seams and model fit - drives me nuts) and finish with a brighter highlight yellow on the upper areas. after that the detail scratches and track weathering.
Slow but learning...
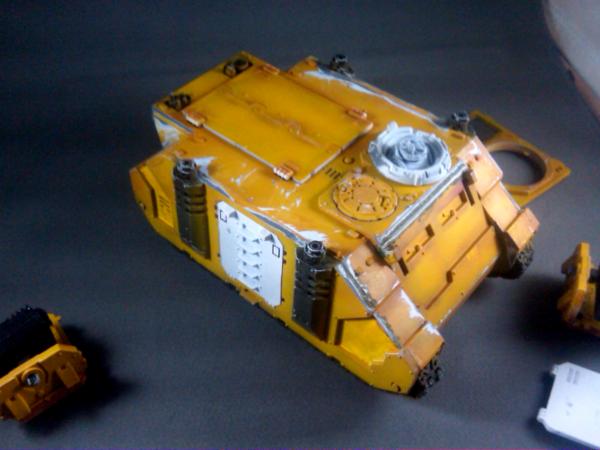
Pred as a rhino.
Pred w/ parts
Sl
|
|
This message was edited 3 times. Last update was at 2011/11/10 20:38:29
|
|
|
|
|
2011/11/10 16:17:22
Subject: The Lamenter Project
|
|
Decrepit Dakkanaut
|
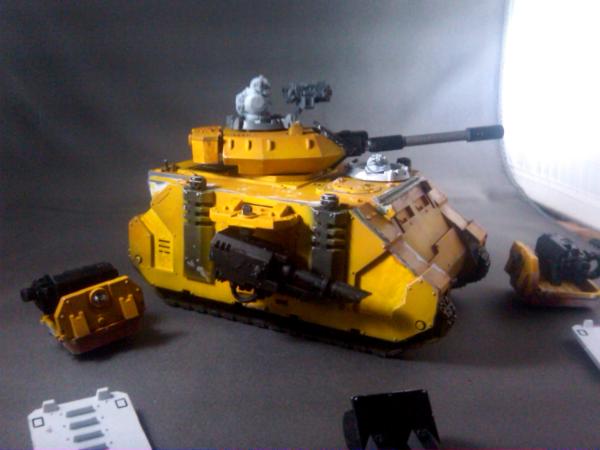
Coming along nicely SL. I can see Egg & Meph's influence on your work (that's a good thing). You might take a look at the way I used the airbrush to shade my LS Storms... It looks like what you've started to do here with your rhino hull, just a bit more consistent.
Make sure you paint the edges of the main hatch on the rhino.
|
|
|
|
|
|
2011/11/11 14:26:00
Subject: The Lamenter Project
|
|
Never Forget Isstvan!
|
Yeah. I consider this a first step. I'm still experimenting how much gradiant works for yelow. I'm quessing lighter colors are tougher to do.
Yeah I'll be going over the edges while they are on the model in order to blend them in.
Also learning how important it is to do all the vechicles at the same time ( really the same tech). I'm doing a second predator and 2 Razorback ( all converting to rhinos ) and some of my AB work clearly shows my learning curve.
SL
|
|
|
|
|
|
2011/11/11 14:30:26
Subject: The Lamenter Project
|
|
Humorless Arbite
Outside the DarkTower, amongst the roses.
|
I like them, but the black and white checker on the flyer makes it look like they called a cab for a ride.
|
Every Dakkanaught gets a 4+ Pinch of Salt save.
When you suffer a Falling Sky hit, roll a D6 - on a 4+ the hit is ignored as per the Pinch of Salt save. On a 1-3 panic insues - you automatically fail common sense tests for the next 2 weeks and get +7 to your negativity stat. -Praxiss
|
|
|
|
|
2011/11/11 15:24:32
Subject: The Lamenter Project
|
|
Homicidal Veteran Blood Angel Assault Marine
|
Cool, that's definitely a good start on weathering.
It's just a matter of building up the layers in a somewhat logical manner. First damaged paint, then rust and oil smears, then soot, then dirt. Of course this by no means a fixed order, I like to play a bit with it. (And also because generally I tend to forget bits and have to over them at a later stage. For ex, I tend to overlook bullet impacts completely until the model is almost finished and then face-palm myself...)
|
|
|
|
|
|
2011/11/11 16:44:04
Subject: The Lamenter Project
|
|
Never Forget Isstvan!
|
Deathshead420 wrote:I like them, but the black and white checker on the flyer makes it look like they called a cab for a ride.
I get that a lot. Still was looking for ways to incorporate the heraldic elements. I like the tail the most, and the landing gear the least. Also wish I had some 3 D doors to put on them. Maybe I try my hand at GS some day.
The eventual plan is to clean them up and then distress them and make them less new looking.
|
|
|
|
|
|
2011/11/11 18:29:53
Subject: The Lamenter Project
|
|
[SWAP SHOP MOD]
Robot Cat
OH-I Wanna get out of here
|
Bout time you got a PM Blog. Now I just have to read it
|
|
|
|
|
2011/11/11 20:36:51
Subject: The Lamenter Project
|
|
Decrepit Dakkanaut
|
I had to brow-beat him into it as part of our Adepticon preparation. Glad I did, great to see SL's step by step & have a chance to comment en-route.
|
|
|
|
|
|
2011/11/21 14:53:17
Subject: Re:The Lamenter Project
|
|
Never Forget Isstvan!
|
Making some progress. Still needs to do some more details and weathering.
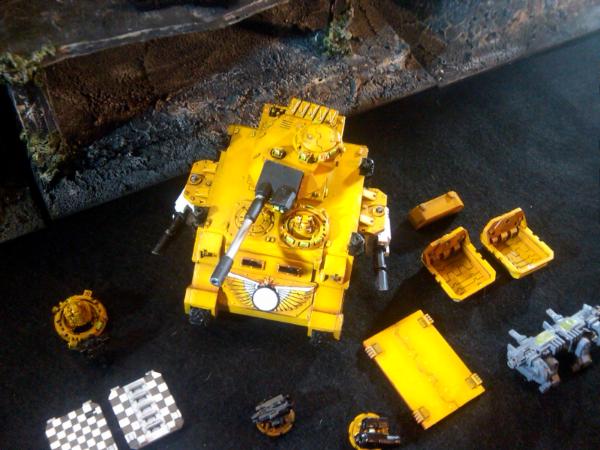
This was a quick camera phone pic. Need to set up the light box. The lighting make it look so much brighter than it really is.
SL
Automatically Appended Next Post:
Another too bright photo
I think I need to dull coat to bring down the shine.
|
|
This message was edited 3 times. Last update was at 2011/11/21 15:02:21
|
|
|
|
|
2011/11/21 17:03:13
Subject: The Lamenter Project
|
|
Decrepit Dakkanaut
|
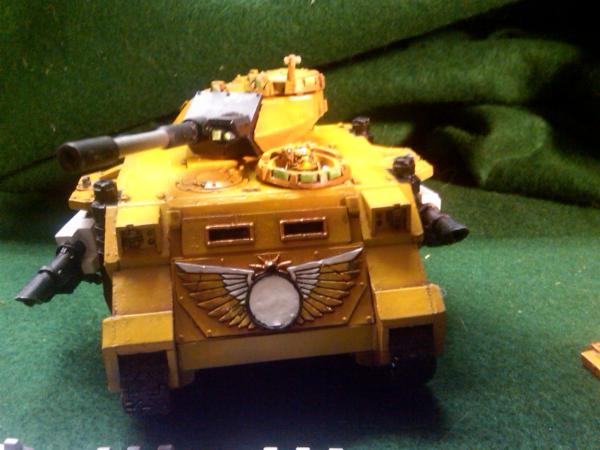
Coming along very nicely Solar. Those doors are completely mental. Love the wings on the front plate.
|
|
|
|
|
|
2011/11/21 18:36:08
Subject: The Lamenter Project
|
|
Never Forget Isstvan!
|
There is much more red to the yellow than the current pictures are showing.
The front panel is the red Scorpion Forge world doors. they will be cleaned up and have the bleeding heart in the center, The same motif is on the doors will be I'll used for it's rhino/RB variants.
SL
|
|
|
|
|
|
2011/11/21 18:39:46
Subject: The Lamenter Project
|
|
Chaplain with Hate to Spare
|
Looking great! I do love a good yellow paint job! mainly because I can't paint it well! like Gits said those doors look great and the wing icon on the front from forgeworld will be a great focal point on the tank, I look forward to you going on with this project.
nerdfest09
|
Flesh Eaters 4,500 points
" I will constantly have those in my head telling me how lazy and ugly and whorish I am. You sir, are a true friend " - KingCracker
"Nah, I'm just way too lazy to stand up so I keep sitting and paint" - Sigur
"I think the NMM technique with metals is just MNMM. Same sound I make while eating a good pizza" - Whalemusic360 |
|
|
|
|
2011/11/21 18:47:42
Subject: The Lamenter Project
|
|
Homicidal Veteran Blood Angel Assault Marine
|
Looking great indeed. That front plate is looking awesome already, works great with the colours. And the doors like nice & crisp, me likey!
|
|
|
|
|
|
2011/11/21 21:48:23
Subject: The Lamenter Project
|
|
Never Forget Isstvan!
|
Thanks everyone. It gets easier everytime. The actual color is more like the hatch with the marine in it ( left in Picture)
Things I still need to do on this model:
lenses, light battle damage ( sm arms fire) weathering, Add a few more detail peices ( scrolls and seals ect) dirty the tracks, antenna..finish the guns and gun housing.
Do the same for it's sister Predator.
Meph. Like the oil dirty effect. Tried it on a couple of super clean Dev. models. really easy to " wipe away " the excess areas or mistakes. A little more practice forthcoming. Gonna use to weather my SR a bit.
Thanks again
|
|
This message was edited 1 time. Last update was at 2011/11/21 21:49:54
|
|
|
|
|
2011/11/23 15:36:34
Subject: The Lamenter Project
|
|
Homicidal Veteran Blood Angel Assault Marine
|
Cool, glad to hear you've crossed the threshold. ^^ Oh, and because of a varnish-can-atmospheric-frosting-frak-up (nearly ruined all of my marines and land raider) I had to switch to gloss varnish before the oi inking. I was always a bit skeptical of gloss varnish but that works even better and is easily matted down again afterward with some satin.
Don't be shy to post some pics, as I'm curious.
|
|
|
|
|
|
2011/12/09 18:15:57
Subject: The Lamenter Project
|
|
Never Forget Isstvan!
|
So big weekend planned. Both days off. Been working on getting everything built so I have a day with the Air brush. Most of the time I get about 30 minutes or so a day to do stuff so progress is slow.
What on the agenda.. work on the Predators and all the interchange parts and variations, 4 scout bikes, 2 five man Assault squads with interchangeable Backpacks and Jump packs. If time I'll continue to detail my Dev squad. All above items built and ready to paint. Whew!
I've started building 3 Drop Pods. Here's hoping for no interuptions or a winning lottery ticket. I'll take either
SL
|
|
This message was edited 3 times. Last update was at 2011/12/09 18:17:48
|
|
|
|
|
|
|
 [Eggroll's Blood Angels WIP Log]