| Author |
Message |
 |
|
|
|
|
Advert
|
Forum adverts like this one are shown to any user who is not logged in. Join us by filling out a tiny 3 field form and you will get your own, free, dakka user account which gives a good range of benefits to you:
- No adverts like this in the forums anymore.
- Times and dates in your local timezone.
- Full tracking of what you have read so you can skip to your first unread post, easily see what has changed since you last logged in, and easily see what is new at a glance.
- Email notifications for threads you want to watch closely.
- Being a part of the oldest wargaming community on the net.
If you are already a member then feel free to login now. |
|
 |
2017/04/03 21:57:41
Subject: Re:Customizing, sCratchbuilding and Citbashing by Meer_Cat: Imperial Firebase- finished!
|
|

[DCM]
Boom! Leman Russ Commander
|
A friend wondered what the area I kitbashed/painted/etc looked like. Here's a couple of shots:

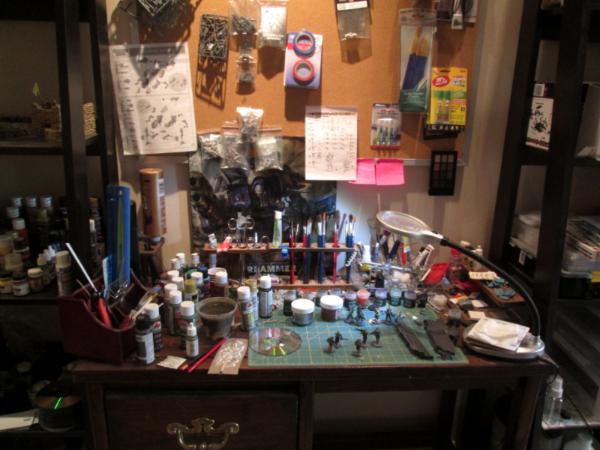
Some of the handiest things came from Goodwill:
- The pipe stands make great racks for paint brushes, tubing, coffee stirrers, styrene and tubes of glue,
- The acrylic makeup stand is very good for separating out small bits and having them easily seen when looking for just the right bit.
- The remote control caddy at the front left holds clippers, tweezers, small pliers and rulers.
The grow-lamp you see in the first picture swings around and can flood the desk when I need bright light, otherwise I work mostly through the desk LED lamp with the magnifier.
|
"He fears his fate too much, or his desserts are small, who will not put it to a single touch; to win- or lose- it all."
Montrose Toast

|
|
|
 |
|
2017/04/10 21:57:42
Subject: Re:Customizing, sCratchbuilding and Citbashing by Meer_Cat: APC Conversion
|
|
[DCM]
Boom! Leman Russ Commander
|
Getting back to the counts-as Chimera conversion:
I wanted a transport for the DreamForge Panzerjaegers squad I just finished and- while I don't get any chance to play just now- wanted it to be reasonably compliant with the rules for Warhammer 40k. I also wanted it to look a lot like the Keilerkopf transport that DreamForge puts out.
I got a terrific price on a 1/35 scale Tamiya Hanomag kit (Sdkz 251) for US$8 and free shipping, so that will be the base kit for the conversion. It will need a lot of work to mimic the footprint of a Chimera, while still looking like the Keilerkopf. So, I did what any good converter does and took a perfectly good kit:

And cut it in half:
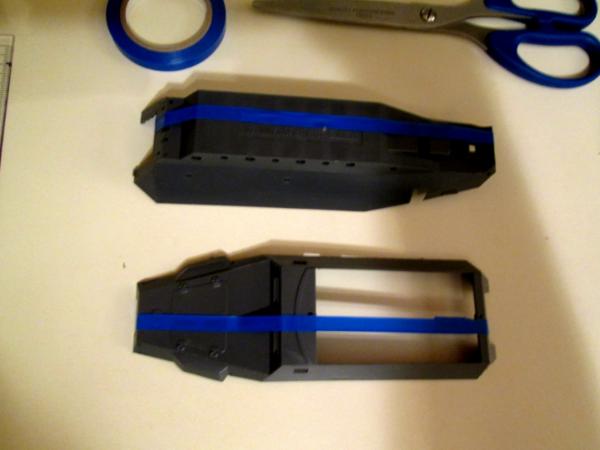
A little work with an emery board and the cut lines were fairly clean. I've seen other conversions based on the Hanomag, and some of them are very good. But all of them struck me as being too long and narrow to fit in well with other GW/ WH40K vehicles, which tend to be bulky and give an impression of brute force.
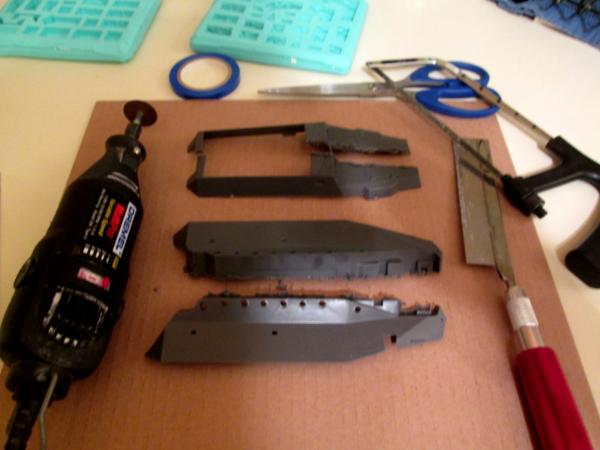
So, I glued the upper side pieces to the lower and inserted 55mm of plasticard to widen the body:

This gave me a chassis with the width of a Chimera, but in retrospect turned out to be a little long. The next one of these I do I'll shorten the engine compartment. I use a verity of materials as 'plasticard', including actual, store-bought plasticard. But I find that yard sale signs are cheaper and old motel key cards (I travel a lot for my work, so I get a fair few of these) are the perfect thickness and a good size to work with for a lot of the work.
Next up was how to close in the top, cover the engine compartment, get the tracks on and think about how to arrange the interior. Originally, this was going to be a closed vehicle, with no need for a lot of fancy embellishment. Doing a closed job means you can stick guns and hatches wherever you like, they don't have to sensibly inter-relate between inside and outside.
But you guys out in Dakkadakkaland have inspired me, and I'm having a lot of fun with this project so far, so I'm going to make it so the rear ramp drops and the top deck lifts off. That will let me change the configuration from Chimera to Hellhound to Basilisk as needed, by building different top plates. But it means the interior needs finishing off and must be a sensible layout.
Thank you for the chance to show some more of my work, more follows soonest. Please leave feedback to give me an idea of how I'm doing!
|
"He fears his fate too much, or his desserts are small, who will not put it to a single touch; to win- or lose- it all."
Montrose Toast
|
|
|
|
|
2017/04/10 22:44:49
Subject: Customizing, sCratchbuilding and Citbashing by Meer_Cat: APC Conversion
|
|

Longtime Dakkanaut
|
Nice use of a hanomag ! I was planing something similar for my zombie Nazi traitor guard , so interested how you go about this !
Tho you have already done a ton more than I was going to ...  
|
|
This message was edited 1 time. Last update was at 2017/04/10 22:45:23
|
|
|
|
|
2017/04/10 23:20:40
Subject: Re:Customizing, sCratchbuilding and Citbashing by Meer_Cat: APC Conversion
|
|
[DCM]
Boom! Leman Russ Commander
|
Hi Big H- Yup, I'm already 'way over scope for what I was envisioning at first. As I work I keep thinking of things that might make the finished product better (for instance, I _really_ want to wire something up for micro-lights, like some of the projects I see here).
My wife accuses me of finding a brick by the road as I walk back from work (figuratively) and having built the Taj Mahal in my mind by the time I get home!
|
"He fears his fate too much, or his desserts are small, who will not put it to a single touch; to win- or lose- it all."
Montrose Toast
|
|
|
|
|
2017/04/11 23:01:44
Subject: Re:Customizing, sCratchbuilding and Citbashing by Meer_Cat: APC Conversion
|
|
[DCM]
Boom! Leman Russ Commander
|
This next bit I started fiddling with the interior. As it turns out, I should have been more aggressive in scratch-building the consoles, benches and firewalls, etc- would have saved a lot of trial and error fitting. But then, that's the fun part, isn't it?
I took the original kit's firewall/driver's panel and thought I could cut one wing off, fit the two pieces into the odd-shaped edges of the forward end of the compartment and then piece in a bit of plasticard in the middle. That didn't work- it placed the driver 'way too far forward into the engine compartment- so I cut both wing pieces off and fitted a panel in between them at the right depth. I later cut the dashboard gauges bit off and attached it directly to the panel:
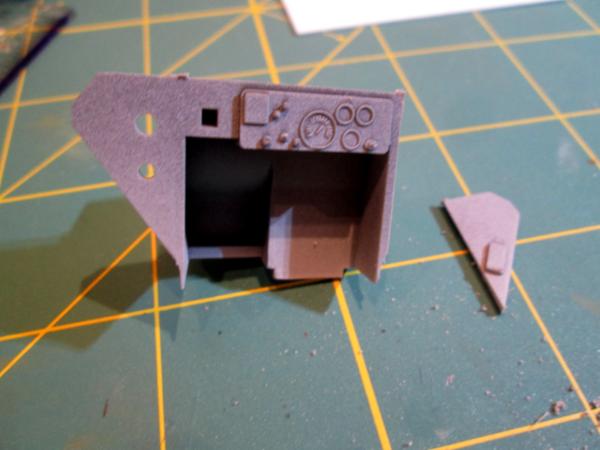

The engine compartment itself was easy to cover over. Not sure what I'm going to do with the odd hinge- grind or slice it off, or just leave it and add more. I scored the line down the middle to simulate to opening sections or a fold over with a dull pocket knife:
This is a piece of non-slip diamond plate that will cover the fighting compartment floor, suitably dirtied:

The effect was created with a base coat of Gunmetal Gray acrylic, drybrush of silver and a liberal splash of Nuln Oil wash (gotta love me some washes!)
I've got more pics on my camera to get transferred over to the laptop and I can post some more.
Hope you're enjoying some of my work- and thank you for the opportunity to show it off a bit. Please leave any constructive criticism and/or suggestions- I'm learning new thigns every day!
|
"He fears his fate too much, or his desserts are small, who will not put it to a single touch; to win- or lose- it all."
Montrose Toast
|
|
|
|
|
2017/04/12 17:13:53
Subject: Customizing, sCratchbuilding and Citbashing by Meer_Cat: APC Conversion
|
|
Gargantuan Great Squiggoth
|
Looking brilliant, really nice work, nice and tidy.The checker plate could maybe stand a little dusting around the edges.
|
|
|
|
|
|
2017/04/13 01:21:14
Subject: Re:Customizing, sCratchbuilding and Citbashing by Meer_Cat: APC Conversion
|
|
[DCM]
Boom! Leman Russ Commander
|
Hi Cam- and thank you for the kind words. By 'dusting around the edges' do you mean it could stand some dry brush highlighting? Or use weathering powders to dull them down a bit? I'm happy to give it a try when I understand what you're suggesting!
|
"He fears his fate too much, or his desserts are small, who will not put it to a single touch; to win- or lose- it all."
Montrose Toast
|
|
|
|
|
2017/04/16 13:17:31
Subject: Customizing, sCratchbuilding and Citbashing by Meer_Cat: APC Conversion
|
|
Longtime Dakkanaut
|
I would probably do both !
A lighter shade dry brush, and if it suits the model, some rust spots and grime or dust on top.
When I do stuff like this I always either trawl google for pics of old construction / farm machinerery or my own memories of stuff like it I have been in.
|
|
|
|
|
|
2017/04/16 21:58:25
Subject: Re:Customizing, sCratchbuilding and Citbashing by Meer_Cat: APC Conversion
|
|
[DCM]
Boom! Leman Russ Commander
|
Thanks Big H- I'll give it a whirl. The nice thing about having the basic army built, is I'm spending 'way more time on individual pieces now- having fun with the little details, trying techniques I never have before because it was more important to slap some paint on and get 'em on the table! I never had time for major custom jobs like this before. Now it only makes sense to take the time to do the job properly, if I'm going to invest more than basic time required anyway.
I'm looking at my own farm equipment with an artist's eye now, looking for the change in color and texture and thinking 'how do I replicate that with paint?'
More follows soonest!
|
"He fears his fate too much, or his desserts are small, who will not put it to a single touch; to win- or lose- it all."
Montrose Toast
|
|
|
|
|
2017/04/17 22:38:41
Subject: Re:Customizing, sCratchbuilding and Citbashing by Meer_Cat: APC Conversion
|
|
[DCM]
Boom! Leman Russ Commander
|
Welp, here's some next steps in converting the Hanomag into a Keilerkopf-esque transport for my grenadier Panzerjaegers.
Here's an interesting kitbash to make up two crewmembers for the vehicle- I need a driver and an NCO. The legs are extra bits from the Panzerjaeger set, combined with a Cadian torso. The legs were intended to form a kneeling figure, but if you swap the pieces, you get two seated postures:

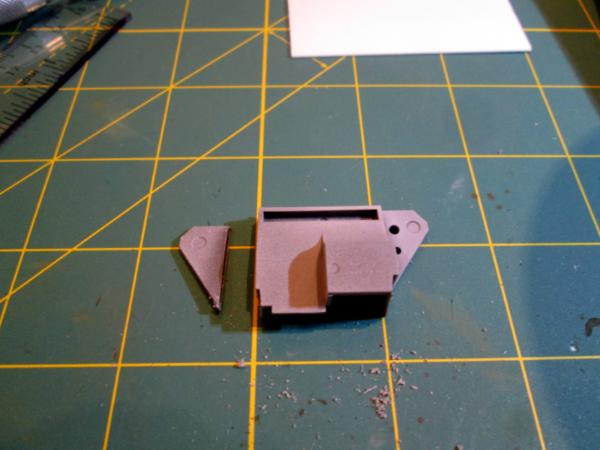
Here's a couple of shots of the dashboard installed. I was hoping to use the whole thing, with the knee-well and all, but it just didn't work. So I sawed off the dashboard with its dials and gauges, and will save the rest for another project:

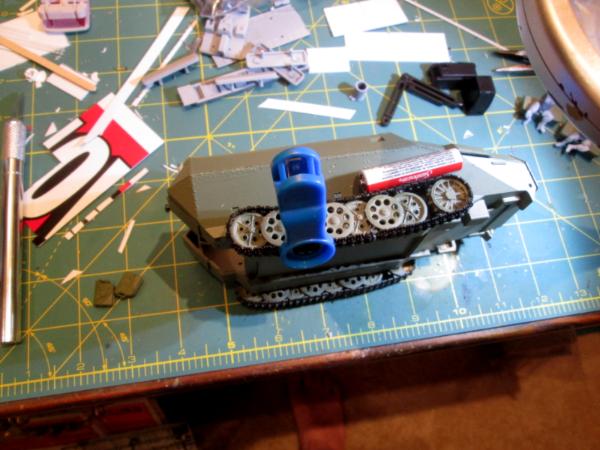
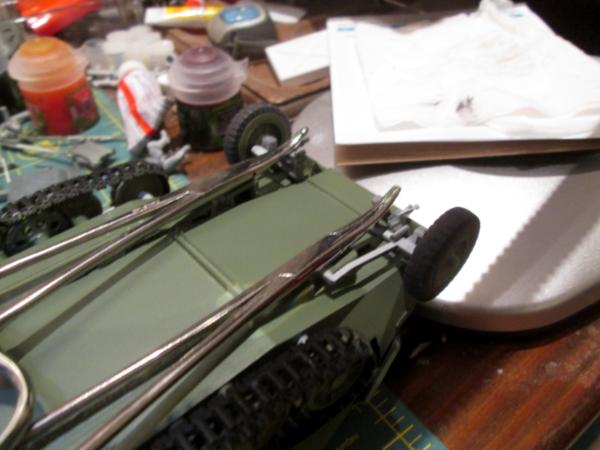
I attached all the bogie wheels as standard- per the kit- and added the treads. They are that slippery, engineer-plastic/rubbery stuff, so I base coated them with Rust-o-leum, then hit them with flat black. I'll weather/muddy them with everything else when the time comes. I had to clamp them down and glue them in place so that the tracks didn't stretch straight across the top road wheels unrealistically; all the photos of the real vehicle in action showed them slumped along the tops of all the bogies. I didn't want to stretch out the tread lengths themselves and risk warping or breaking them, so just glued them and clamped them in place:
This is the undercarriage assembly for the wheels, their steering arms and shocks/leaf springs. I cut them in half and will fit a piece of sprue between to match the new width of the vehicle:

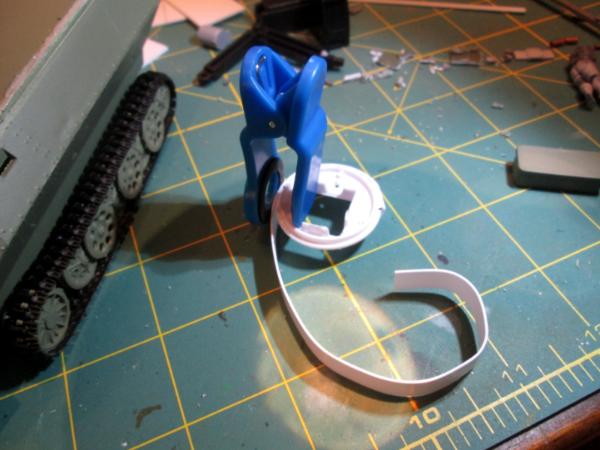
And finally (for now), my current nemesis. I want a small turret for the commander's hatch and found a great piece of junk in my parking lot the other day- I believe it is the front face from a dual USB charging connecter, Wherever it comes from, it is exactly the right size and round along the outer edge. Also, there is a bit that sticks out that us exactly right for the base of a pintle mount for a heavy bolter, that will take the place of the one that would normally be mounted in the bow, on a Chimera. I cut a piece of styrene out to bend around and glue in place- as you can see in the photo- and it will sit just perfectly over the front edge of the cab.
The problem is, nothing I've tried so far will actually stick to both the USB face it thing and the styrene. I've tried superglue (no dice), Testor's plastic model cement (nope), Testor's Cement for Wood and Metal, Jet Styrene Glue and JB Weld 2 Part Epoxy. Everything just pops right off after it dries. I'm trying Eileen's Tacky Glue now, which is my go-to product whenever everything else fails. If _that_ doesn't work, I'll have to build the turret out of something else:
The good part is I'm almost done with the major exterior bits, and can look to start finishing off the interior in the near future.
That's it for now, more follows soonest. Please leave any tips, suggestions or constructive criticism. I'm still a'learnin'!
|
"He fears his fate too much, or his desserts are small, who will not put it to a single touch; to win- or lose- it all."
Montrose Toast
|
|
|
|
|
2017/04/17 23:36:19
Subject: Re:Customizing, sCratchbuilding and Citbashing by Meer_Cat: APC Conversion
|
|
Combat Jumping Rasyat
|
Genius! Simple, effective, inexpensive, and great looking to boot.
If you don't mind I'll be borrowing the Sdkfz 251 turned pulp Sci-fi transport idea.
|
|
|
|
|
2017/04/18 00:09:30
Subject: Re:Customizing, sCratchbuilding and Citbashing by Meer_Cat: APC Conversion
|
|
Gargantuan Great Squiggoth
|
On the glue side, try roughing up the surface a little, just to give the glue a key, and have you tried Bicarbonate of soda on the super glue. Sprinkle a little on the wet glue and it instantly sets, it actually has a chemical reaction producing heat. It seems to form a weld almost on anything. Glue and clamp the bits together and then sprinkle on the bicarb, works a treat on most stuff I have tried.
As to your model, it is looking stunning bud, nice work on the converted driver etc. and the whole thing is really coming together.
|
|
|
|
|
|
2017/04/18 00:29:45
Subject: Re:Customizing, sCratchbuilding and Citbashing by Meer_Cat: APC Conversion
|
|
[DCM]
Boom! Leman Russ Commander
|
Hey ChaoticMind- thank you for the kind words! I can honestly say that I've been eyeballing the Hanomag kit for some time with the idea of converting it for 'the far future', but I've also gotten some good ideas since I've started work from what shasolenzabi and Inso have done- they've both got some great pics on their blogs. For mine, it'll crry a squad of ten, like a Chimera, have the pintle mounted heavy bolter at the commander's hatch to account for the hull/bow gun and I'm going to fashion an articulated arm-mounted splinter cannon at the rear, on top of the deck, to account for the normal Chimera turret-mounted gun.
Hi Cam- and thanks for the tip! And the kind words! I'll try the bicarb trick as soon as I can- I'm in New Orleans for work the next few days, so it will probably be Friday or Saturday before I can go all 'evil mad scientist in the lab'. I'm excited to give it a try. I reckon to include a folded-up tripod for the heavy bolter inside the crew compartment- like the Army APC's I served with I figure the squad would take the heavy weapon with them sometimes when they dismount to dig in.
Of course, mech infantry don't like to get out and walk that much, which is why Airborne Infantry like me refer to them as 'drive by shooters'.
More follows soonest!
|
"He fears his fate too much, or his desserts are small, who will not put it to a single touch; to win- or lose- it all."
Montrose Toast
|
|
|
|
|
2017/04/18 05:58:15
Subject: Customizing, sCratchbuilding and Citbashing by Meer_Cat: APC Conversion
|
|
Pious Palatine
|
Awesome conversions dude.
EDC
|
|
|
|
|
2017/04/24 22:30:45
Subject: Re:Customizing, sCratchbuilding and Citbashing by Meer_Cat: APC Conversion
|
|
[DCM]
Boom! Leman Russ Commander
|
Hi Doc- and thank you!
Sorry I've been out of the loop for a few days- I've been itching to try Cam's suggestion of adding bicarbonate of soda (baking soda) to the superglue to find something that would stick styrene plastic to the more slippery 'engineering' plastic. To date, I had tried everything in my arsenal- superglue, Testor's Plastic Model Cement, Testor's All-purpose Cement, Eileen's Tacky Glue and even two part epoxy- nothing stuck.
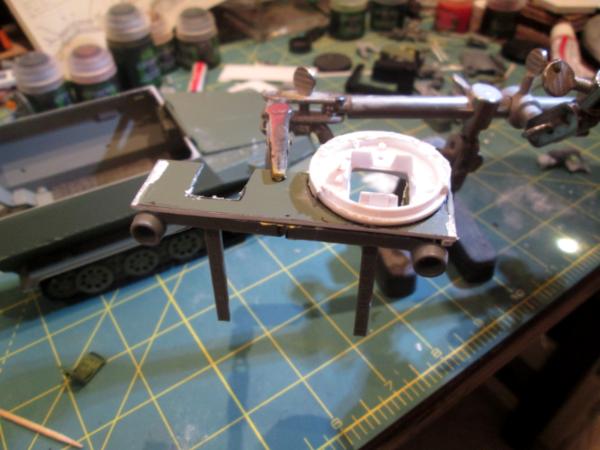
I formed the styrene strip around the turret plate (it's the face off a two-outlet USB charger I found in my parking lot) and clamped it in place with a pair of over-size hemostats (the fancy medical name for what we use to remove fish hooks and that you can get many places for cheap). This formed a raised ridge around the edge, which I filled liberally with superglue. When I added the bicarb, it 'froze' instantly into slush and hardened within seconds after that.
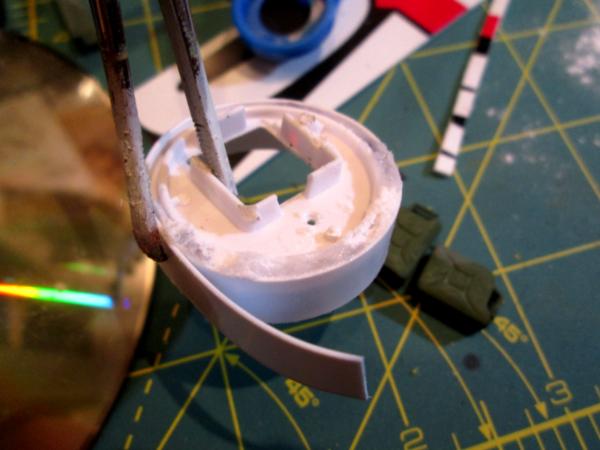
Cam, I can't thank you enough for this tip. In addition to fastening these pieces together, I think I can use this mixture to fill rough areas on a model and then sand smooth- the trial pieces I glued together this way were easy to sand. I'd use this in places where it was hard to get regular body putty, modeler's putty or green stuff into- it flows like water until you add the bicarb. Things are still drying in this picture, but the trial piece is dang-near indestructible- those pieces aren't _ever_ coming apart.
And because I haven't been able to work on this project since last Monday (was in New Orleans for business) I glued the wheels into the front of this beast, just to say I'd made some progress:
Once I get the commander's turret in place, I can roll on with outfitting the front portion of the fighting compartment with elevation-adjustable seats, the driver's flat hatch and the commander's workstation inside (a la' the APC in "Aliens", which I've seen done here on DakkaDakka several times and done very well).
Hopefully more progress tonight and tomorrow to show soon- please leave any tips, suggestions or constructive criticism- I'm having fun trying all these new techniques!
|
"He fears his fate too much, or his desserts are small, who will not put it to a single touch; to win- or lose- it all."
Montrose Toast
|
|
|
|
|
2017/04/27 00:50:13
Subject: Re:Customizing, sCratchbuilding and Citbashing by Meer_Cat: APC Conversion
|
|
[DCM]
Boom! Leman Russ Commander
|
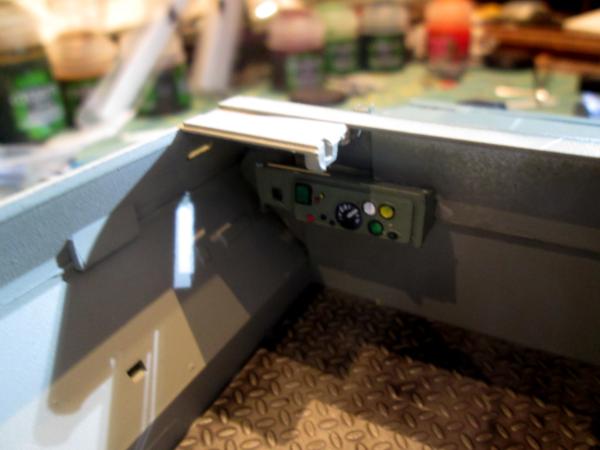
Okay- a lot of work this week- fiddly, nerve-wracking work- that yields a couple of pics to show some progress!
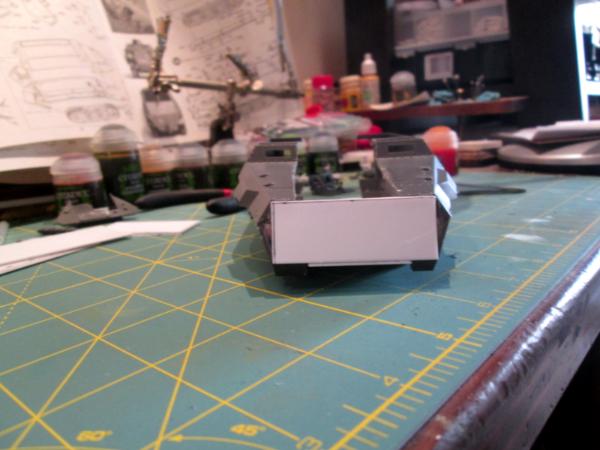
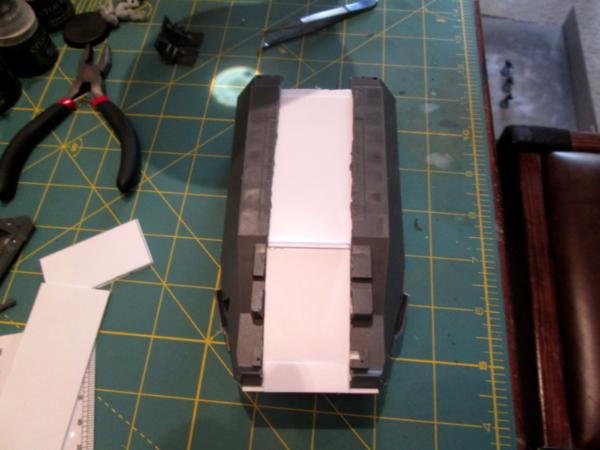
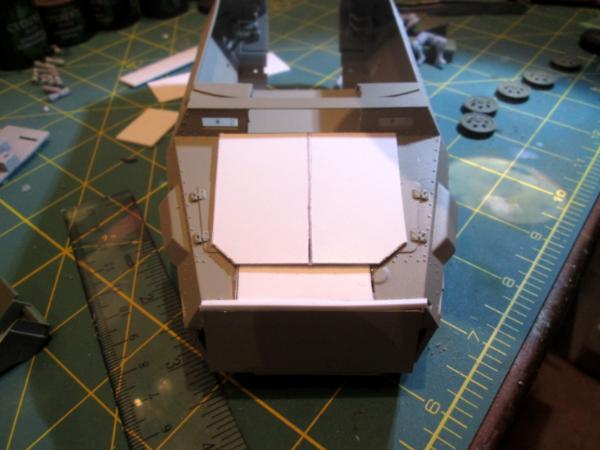
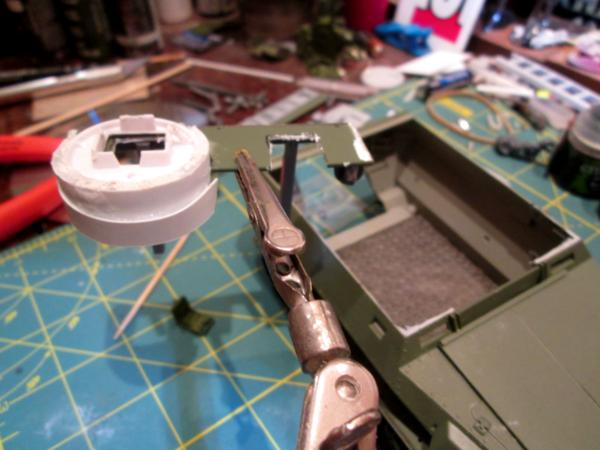
Here's the new forward bulkhead frame and hatches for the fighting compartment. The hatch plate is made from the dual-USB charger piece, the rest is a couple of pieces of plasticard and some sprue. Thanks to Camkieri's tip about using baking soda (bicarbonate of soda) as an accelerant for the super glue, everything is fastened tight. The two upright bits of sprue you see hanging from the bottom are the chair rails- the driver and TC can elevate their seats to ride with heads outside (fresh air, better visibility) or drop them down and button up (less visibility, but much, MUCH safer in a hostile environment). This piece will glue permanently into the forward end of the fighting compartment and will be open to the rear portion of the compartment. One of the first projects I described in this thread was making hatches out of milk carton pull rings- I'll do one of those for the driver's hatch. The TC's hatch will have a heavy bolter on a limited traverse pintle mount, the equivalent of the bow weapon on a Chimera. I may magnetize that, so it can be exchanged for a heavy flamer or meltagun.
This is the side that will face to the rear, into the fighting compartment:
Here's the front face- the rounded hatch portion will actually overhang the edge of the vehicle windscreen itself- pics as soon as the glue dries!
And in other news, the front wheels are now attached and the fenders over the track runs- it's starting to look more like a hanomag (or even a Keilerkopf) now. Most of the crew stowage will go on top of the fenders. I need to keep the top deck relatively clear, because I want to install an articulated arm with a splinter laser similar to what the Keilerkopf carries. I have to figure out a way to put a whip antenna on that will be out of the way of the main gun (possibly mounting it onto the main gun articulated arm). I know in the 41st century they probably don't need HF, VHF or even UHF antenna-based comms- but what's an armored vehicle without a whip antenna, I ask you?

More follows soonest!
|
"He fears his fate too much, or his desserts are small, who will not put it to a single touch; to win- or lose- it all."
Montrose Toast
|
|
|
|
|
2017/04/27 03:21:36
Subject: Customizing, sCratchbuilding and Citbashing by Meer_Cat: APC Conversion
|
|
Ragin' Ork Dreadnought
|
Without a whip antenna? Why nothing at all. Clearly.
|
|
|
|
|
|
2017/05/02 01:52:13
Subject: Re:Customizing, sCratchbuilding and Citbashing by Meer_Cat: APC Conversion
|
|
[DCM]
Boom! Leman Russ Commander
|
A couple of updates- but not as much as I had hoped: I finally am home and had a block of time to use to work on the conversion, when the light strip over the workbench blew out. Bulbs test good, breaker box is good, I can only assume that it's an internal fuse in the light strip itself. I'll have to call the property manager to get it looked at and in the meantime buy a stand lamp to be able to continue to work. But as I've heard said "if miniature painting was easy- everyone would do it". 
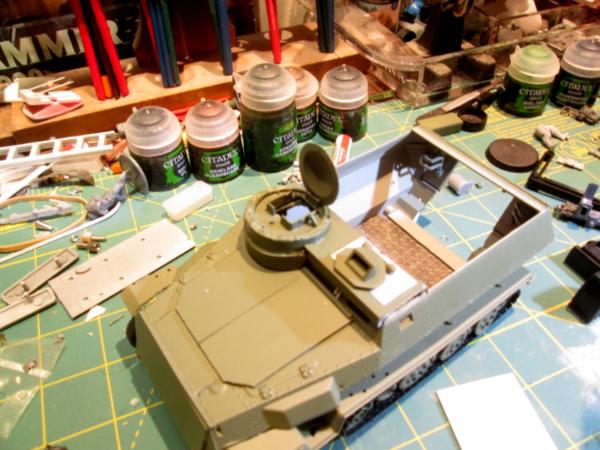
Here's what I got done anyway. In these first pics, the forward deck section is installed with the commander's turret ring in place. Hopefully easier to see now where the seats will attach to the vertical pieces of sprue. A little putty work and the outer hull is nearly done:
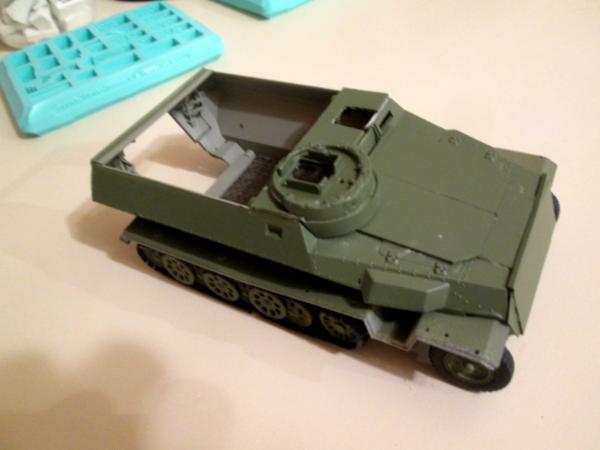

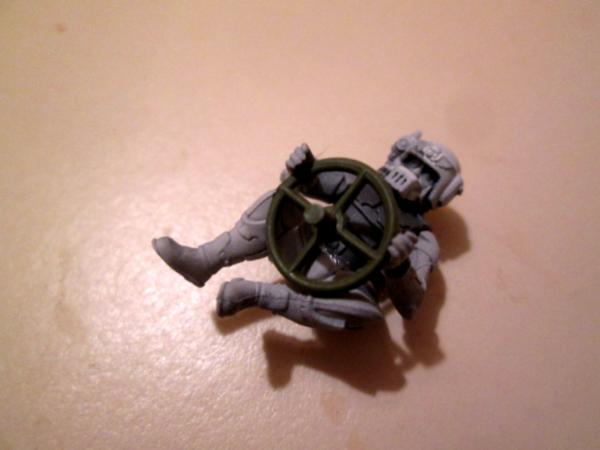
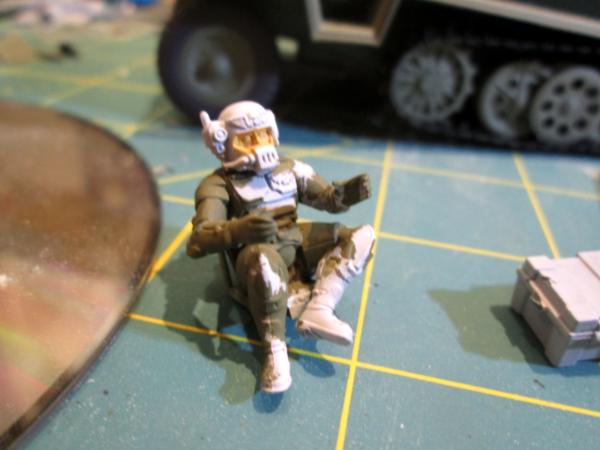
And here's the driver, all assembled. I may not go with the Hanomag kit's steering wheel, as pictured, it seems a bit out of scale. On the other hand, only the driver's head will be visible, stuck out of the hatch, and the wheel and everything else relatively hard to see. In which case the exaggeration for effect might be a good thing, to have the wheel visible at all from the sight angles it will have. Or I can clip away half or three quarters of the wheel and leave just a steering bar- like on the M-1 Abrams tank. I'd be interested to hear all y'alls opinion whilst I cogitate:
More follows soonest- especially if I can get some light to work by again!
|
"He fears his fate too much, or his desserts are small, who will not put it to a single touch; to win- or lose- it all."
Montrose Toast
|
|
|
|
|
2017/05/02 04:18:08
Subject: Customizing, sCratchbuilding and Citbashing by Meer_Cat: APC Conversion
|
|
Ragin' Ork Dreadnought
|
Can we get a shot if the driver in place so as to better inform our opinions?
|
|
|
|
|
|
2017/05/02 05:49:23
Subject: Customizing, sCratchbuilding and Citbashing by Meer_Cat: APC Conversion
|
|
Pious Palatine
|
I think it'll be alright as it is to be honest.
EDC
|
|
|
|
|
2017/05/02 08:37:22
Subject: Re:Customizing, sCratchbuilding and Citbashing by Meer_Cat: APC Conversion
|
|
Longtime Dakkanaut
|
|
|
|
|
|
|
2017/05/03 00:13:41
Subject: Re:Customizing, sCratchbuilding and Citbashing by Meer_Cat: APC Conversion
|
|
[DCM]
Boom! Leman Russ Commander
|
Hi Warboss, EDC, BigH,
And thank you for the feedback! I went to take a photo of the driver more-or-less in place, per Warboss Waaazag's suggestion (still working on my kitchen counter, as I haven't gotten a temporary lamp for the work table and the overhead light strip has now developed the amusing habit of clicking on and off at random intervals), and discovered that no matter how I try, the driver won't fit up into the hatch with the helmet/head outside the driver's compartment. The darn instrument panel gets in the way, and it's stuck on entirely too well to the firewall bulkhead to remove without taking everything with it.
So, as the musicians say, it's not a mistake, it's a variation on a theme. Now the driver will be in the 'buttoned up' position, with the seat lowered all the way and using a view screen to see by. The TC will still be topside, manning the heavy bolter. The original question still obtains- to keep the full steering wheel or cut it down. It's not as important now though, I think, because the driver will not be very visible at all except looking in through the rear ramp (when it's down). I'm inclined to leave the wheel full-size though- that notoriously poor Imperial power steering, doncha know.
Here's pics:


Looking at it this way, I'm re-thinking and believe that I can raise the seat (the gas can is temporary) halfway up, so the figure is looking out the armored viewport. I cut the vertical rail out trying to fit the driver up into the hatch opening- I'll glue that onto the back of the seat and use some putty to hide the join line. A bit of paint and bob's your uncle.
Not sure if I want to do the driver's hatch up/open or closed, with the driver inside the hull.
I still want to try to build in a whole 'commander's suite' on the right hand side- computer screens, switches, dials and meters and the machine that goes 'bing'. We'll see how that goes when I get past this road block- I need to make some good progress so as to feel like I'm moving forward a bit, not hung up on one thing.
I look forward to your suggestions and comments! More follows soonest. Automatically Appended Next Post: As a postscript to the post above- don't get me wrong- I love the challenges that a conversion like this poses. Otherwise, I'd stick to building kits as they are and having fun with the painting, or some other aspect. I'm so wrapped up in how the whole thing is going to fit together that some times it seems like nothing is happening. Didn't mean to sound like I was whining. 
|
|
This message was edited 1 time. Last update was at 2017/05/03 00:22:31
"He fears his fate too much, or his desserts are small, who will not put it to a single touch; to win- or lose- it all."
Montrose Toast
|
|
|
|
|
2017/05/03 04:13:53
Subject: Customizing, sCratchbuilding and Citbashing by Meer_Cat: APC Conversion
|
|

[MOD]
Otiose in a Niche
|
Great blog, that base is an epic project and a real education in how to use found objects.
Thanks for sharing!
|
|
|
|
|
|
2017/05/03 12:38:59
Subject: Re:Customizing, sCratchbuilding and Citbashing by Meer_Cat: APC Conversion
|
|
[DCM]
Boom! Leman Russ Commander
|
Thank you for the kind words Kid! It's a great boon to having a base army painted up and being able to focus on the interesting possibilities that a particular object might present. My wife just shakes her head sometimes when she sees me rooting around through the trash can, or running across the parking lot to grab some piece of junk (treasure) that looks promising. But hey, it keeps me off the streets (at least when I'm not 'gleaning')!
More follows soonest.
|
"He fears his fate too much, or his desserts are small, who will not put it to a single touch; to win- or lose- it all."
Montrose Toast
|
|
|
|
|
2017/05/03 15:50:52
Subject: Customizing, sCratchbuilding and Citbashing by Meer_Cat: APC Conversion
|
|

Liberated Grot Land Raida
|
Ah well, the vagaries of conversions. Still works out nicely!
Will you be doing something with that front? It seems a tad bland in my (not so humble) opinion. A radiator grill or something would help out tremendously.
|
A Squeaky Waaagh!!
Camkhieri: "And another very cool thing, my phones predictive text actually gave me chicken as an option after typing robot, how cool is that."'
Meercat: "All eyes turned to the horizon and beheld, in lonely and menacing grandeur, the silhouette of a single Grot robot chicken; a portent of evil days to come."
From 'The Plucking of Gindoo Phlem' |
|
|
|
|
2017/05/03 18:16:53
Subject: Re:Customizing, sCratchbuilding and Citbashing by Meer_Cat: APC Conversion
|
|
[DCM]
Boom! Leman Russ Commander
|
Hi CommissarKhaine!
Yes, I plan to louver the front grill, add air injection filter intakes and add armored covers to the existing ports. I'm thinking about breaking up the bland expanse of the hood/engine cover with grab handles and possibly raised access panels. From my own experience in the military, I know that there isn't any existing vehicle that is actually used by real soldiers or marines that isn't over-run with personal gear, so I'll add a ton of ammo boxes, packs, tarps, etc in all the logical places (is it out of the way of the gun? Of air intakes? Oil/fuel? Then I'm puttin' my junk there). The rest of the fighting compartment will be covered over also, but the main gun will be mounted up there and will (should) fill out nicely.
Please keep the ideas/suggestions/constructive criticisms coming- they're all helping shape what this ends up looking like!
|
"He fears his fate too much, or his desserts are small, who will not put it to a single touch; to win- or lose- it all."
Montrose Toast
|
|
|
|
|
2017/05/03 18:26:23
Subject: Re:Customizing, sCratchbuilding and Citbashing by Meer_Cat: APC Conversion
|
|
Liberated Grot Land Raida
|
Sounds like you hav it all planned out then .
Don't worry, I'll happily post up C&C, it's why I love dakka in the first place: it's a very open and constructive community.
|
A Squeaky Waaagh!!
Camkhieri: "And another very cool thing, my phones predictive text actually gave me chicken as an option after typing robot, how cool is that."'
Meercat: "All eyes turned to the horizon and beheld, in lonely and menacing grandeur, the silhouette of a single Grot robot chicken; a portent of evil days to come."
From 'The Plucking of Gindoo Phlem' |
|
|
|
|
2017/05/04 01:41:56
Subject: Re:Customizing, sCratchbuilding and Citbashing by Meer_Cat: APC Conversion
|
|
[DCM]
Boom! Leman Russ Commander
|
So, little steps and big ones. I'm finally at a point where I can start finishing things off for the interior, so I can get started on the exterior.
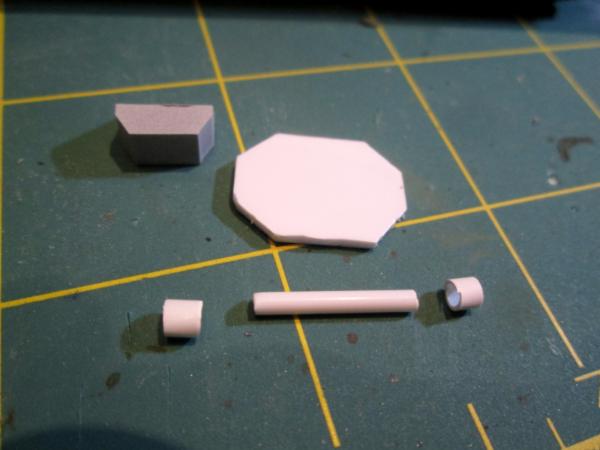
Here's a shot of the pieces to make the driver's hatch:
And the hatch test fitted to the driver's compartment, along with the TC's hatch in the open position:
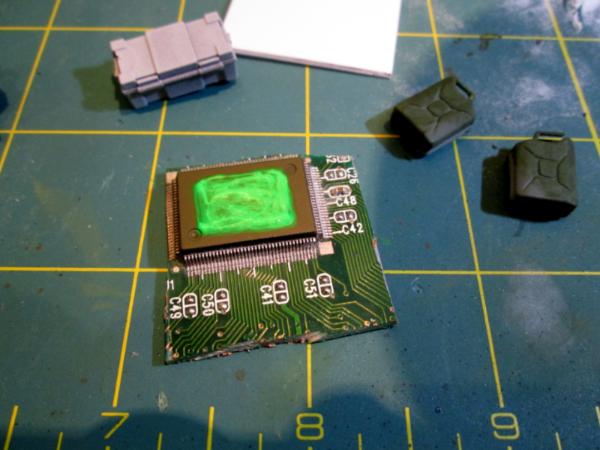
I also started working on the TC's 'command screen'- this will be located on the forward bulkhead in front of the TC's seat adjustment rail (the darn glowy green paint needs several coats to cover smoothly- I used Testor's spray enamel as a base coat, apparently it's pretty slippery). The bit of circuit board is an old sound card I got from Goodwill for 50 cents- it's harder to cut than it looks and will need a bit of edging added around the rim:
And started to basecoat the driver. I can't assemble anything in the front part of the hull until the driver, along with the seat and the seat adjustment rail all as one piece, gets glued in place. Most of the effort will go into the eyes (should be visible through the vision slot) and the helmet. The rest gets a good basecoat, a little bit of wash and that's it. Although it goes against my grain, it isn't worth the time to put more effort in when it really can't be seen.
More follows soonest!
|
"He fears his fate too much, or his desserts are small, who will not put it to a single touch; to win- or lose- it all."
Montrose Toast
|
|
|
|
|
2017/05/04 04:54:42
Subject: Customizing, sCratchbuilding and Citbashing by Meer_Cat: APC Conversion
|
|
Gargantuan Great Squiggoth
|
Excellent work.
|
|
|
|
|
|
2017/05/08 22:39:21
Subject: Re:Customizing, sCratchbuilding and Citbashing by Meer_Cat: APC Conversion
|
|
[DCM]
Boom! Leman Russ Commander
|
Hi all,
I try to maintain good project discipline and only work on one thing at a time (ok, ok, maybe three things at one time), but I wanted to take a quick minute to share some picks of a new 'bit' for converting, kitbashing and scratchbuilding I found. I will be working on the Hanomag conversion some more tonight, and hope to have some real progress photos soon.
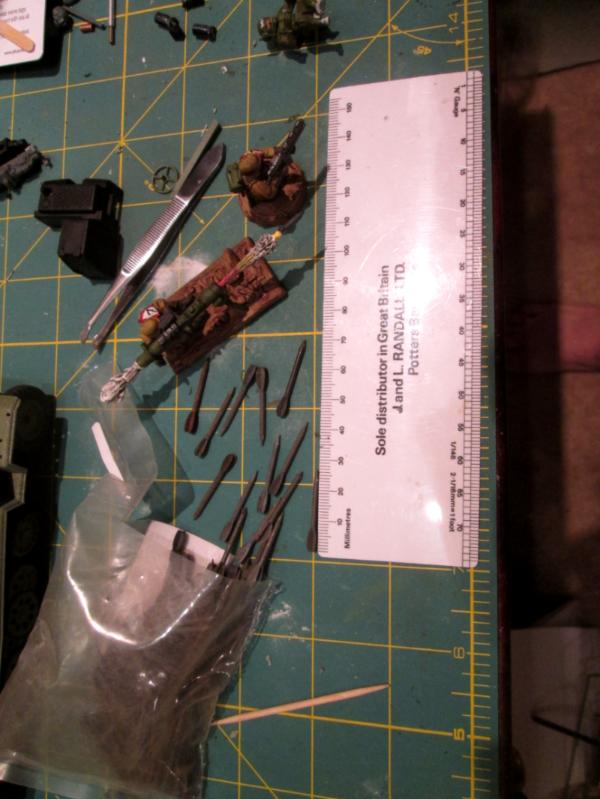
These are flechettes from a de-militarized 'beehive' round. These were outlawed back in the 1970's, I believe, and were intended as an anti-personnel round particularly for use in areas of heavy foliage. I got these from the Sportsman's Guide catalog, who offer them as a military curiosity.

These are about an inch long/25mm and in profile look very much like a missile or rocket, to me. The catalog sells them in packets of 2 ounces (as you see in the phot, which is more than 100 of them) for about US$8.00 or by the pound (16 ounces) for a higher price (I forget what). They are metal, but fairly light and as you see from the color, almost don't need weathering.
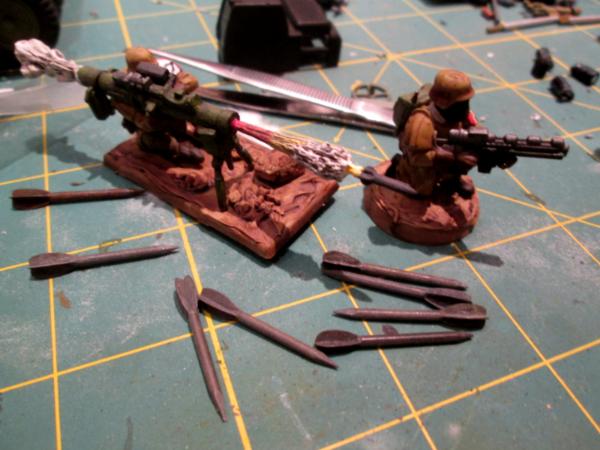
I put this Imperial Guard Dragon anti-tank crew in the photo for perspective. The missile in the 'firing' addition I added is much smaller (see Klaus- Not Santa's blog on how to make these for yourself) but the missile that comes with the IG Heavy Weapons set is much larger. These actually look well-scaled next to the infantry. I also see these as good in batteries on flying vehicles, as ammunition for quad launchers or thud guns and as great detail on scenic'd bases and/or objective markers.
You could even hang these on top of armored vehicle cannon barrels and they'd look a lot like the 1960's/70's NATO Shillelagh ATGM.
More follows soonest.
|
"He fears his fate too much, or his desserts are small, who will not put it to a single touch; to win- or lose- it all."
Montrose Toast
|
|
|
|
|
|
|


