| Author |
Message |
 |
|
|
|
|
Advert
|
Forum adverts like this one are shown to any user who is not logged in. Join us by filling out a tiny 3 field form and you will get your own, free, dakka user account which gives a good range of benefits to you:
- No adverts like this in the forums anymore.
- Times and dates in your local timezone.
- Full tracking of what you have read so you can skip to your first unread post, easily see what has changed since you last logged in, and easily see what is new at a glance.
- Email notifications for threads you want to watch closely.
- Being a part of the oldest wargaming community on the net.
If you are already a member then feel free to login now. |
|
 |
2019/02/05 02:52:07
Subject: Re:Inquisition Guard - STRELETS - project
|
|

Grumpy Longbeard
|
Veteran Specialist in progress
Leaf and gun details are painted before gluing for ease of brush access into the undercuts on the main torso.
|
|
|
|
 |
|
2019/02/05 04:45:50
Subject: Re:Inquisition Guard - STRELETS - project
|
|
Grumpy Longbeard
|
Veteran Specialist Finished!
Turned out not bad, even if I do say so me self. 
|
|
|
|
|
|
2019/03/07 08:04:57
Subject: Re:Inquisition Guard - STRELETS - project
|
|
Grumpy Longbeard
|
IG Sergeant is upgraded to The Holy Battle Priest! Conversion obviously.
1 - Some sort of a mechanical bit with a Vox-Speaker on top will serve as BackPack with a holy relic and a power unit for the hammers
2 - Tomb Kings Standard Bearer Banner Bits will serve as epic seals
3 - I believe this is a Space Wolf head, will be trimmed to size and fit into place.
4 - I wanted the model to have a robe, was not to hard to work green-stuff into the cuffs and the legs.
The weapons from back belt had to be removed, right arm had to be repositioned and left hand angled forward.
5 - Both hammer bits are for the right hand only. was a bit of drilling, pinning, and sculpting, especially the right hand into left hand.
A - The BackPack got a scull from the Tomb Kings bits, a small candle in the top, and epic seal
B - A piece from LasPistol and some Green-Stuff rolled cables will go into that BackPack hole and into the hilts of the Hammers.
C - Most of the pieces will be painted separately, and thus held by a drill-bit
So far so good.
Thinking of adding a Holy Book and few more candles for the backpack. Or a chained up bolder gun as a Holy Relic.
![[Thumb - Character_Imperial_Guard_STRELETS_24.jpg]](/s/i/at/2019/3/7/8188bb944f0f4293fc73c173162bd274_79426.jpg__thumb)
|
![[Thumb - Character_Imperial_Guard_STRELETS_25.jpg]](/s/i/at/2019/3/7/185fdf6d82abbe8e5f328382a2e2a113_79426.jpg__thumb)
|
![[Thumb - Character_Imperial_Guard_STRELETS_26.jpg]](/s/i/at/2019/3/7/96059e7e7deac9d527abcd7fba9ebf70_79426.jpg__thumb)
|
|
|
This message was edited 3 times. Last update was at 2019/03/07 08:11:40
|
|
|
|
|
2019/03/08 05:28:45
Subject: Re:Inquisition Guard - STRELETS - project
|
|
Grumpy Longbeard
|
|
|
|
|
|
|
2019/03/09 20:42:05
Subject: Re:Inquisition Guard - STRELETS - project
|
|
Grumpy Longbeard
|
Battle Priest finished.
Not the best conversion or paint job, but I like this guy!
|
|
This message was edited 3 times. Last update was at 2019/03/09 20:44:53
|
|
|
|
|
2019/03/11 15:53:47
Subject: Inquisition Guard - STRELETS - project
|
|

Regular Dakkanaut
|
I think it's a great conversion and design. One can easily imagine him smashing through hordes of chaos cultists while reciting some ancient litany.
|
|
|
|
|
2019/03/11 16:56:11
Subject: Inquisition Guard - STRELETS - project
|
|
Grumpy Longbeard
|
 Max Moray wrote: Max Moray wrote:I think it's a great conversion and design. One can easily imagine him smashing through hordes of chaos cultists while reciting some ancient litany.
Thanks man. Reciting litanies indeed! That is why I was fortunate to have found a Vox-cast speaker in the bit pile.
There is a tech-priest character in a recent game I have played, Warhammer 40,000: Mechanicus, and his name is Videx who always ALWAYS speaks in recitations of scriptures. So good. That was a bit of inspiration as well.
|
|
|
|
|
|
2019/03/12 17:16:55
Subject: Inquisition Guard - STRELETS - project
|
|

Regular Dakkanaut
|
All of your models look fuzzy. You seem to be having an issue with your undercoat choice.
Secondly as stated before. You should use these steps to paint.
Step 1 glue prep clean (wash your models with soapy water)
Step 2 spray under coating light grey.
Step 3 Scour or sand your model with a toothbrush or sandpaper or buffer / etc
Step 4 go back to step 2 under coating again
Repeat scouring.
Step 5 wash models with nuln oil or black ink wash
6. Applying base coat, than scour again with the brush
7 application of second base coat.
8 Layer paint.
9 wash/ shades / glazes
10 highlights.
Done.
This process should help you mitigate the fuzzy quality of your miniatures. I would recommend getting an airbrush for undercoats.
You can really see the build up here and here. 
|
|
This message was edited 2 times. Last update was at 2019/03/12 17:24:24
|
|
|
|
|
2019/03/13 02:26:49
Subject: Inquisition Guard - STRELETS - project
|
|
Grumpy Longbeard
|
The Allfather wrote:All of your models look fuzzy. You seem to be having an issue with your undercoat choice.
Secondly as stated before. You should use these steps to paint.
Step 1 glue prep clean (wash your models with soapy water)
Step 2 spray under coating light grey.
Step 3 Scour or sand your model with a toothbrush or sandpaper or buffer / etc
Step 4 go back to step 2 under coating again
Repeat scouring.
Step 5 wash models with nuln oil or black ink wash
6. Applying base coat, than scour again with the brush
7 application of second base coat.
8 Layer paint.
9 wash/ shades / glazes
10 highlights.
Done.
This process should help you mitigate the fuzzy quality of your miniatures. I would recommend getting an airbrush for undercoats.
You can really see the build up here and here.
I appreciate the input fine sir, perhaps some day I will try that labor intensive method, however the current paint process suites my purposes quite well. As the models end up reading well at arm length distance, I see no reason to change the current method.
About the fuzziness, in previous posts I have mentioned that the models came from graveyard piles and not the best of quality or surfaces. Perhaps that is the issue.
|
|
This message was edited 4 times. Last update was at 2019/03/13 02:33:17
|
|
|
|
|
2019/03/13 08:17:01
Subject: Inquisition Guard - STRELETS - project
|
|
Regular Dakkanaut
|
 Mothsniper wrote: Mothsniper wrote:The Allfather wrote:All of your models look fuzzy. You seem to be having an issue with your undercoat choice.
Secondly as stated before. You should use these steps to paint.
Step 1 glue prep clean (wash your models with soapy water)
Step 2 spray under coating light grey.
Step 3 Scour or sand your model with a toothbrush or sandpaper or buffer / etc
Step 4 go back to step 2 under coating again
Repeat scouring.
Step 5 wash models with nuln oil or black ink wash
6. Applying base coat, than scour again with the brush
7 application of second base coat.
8 Layer paint.
9 wash/ shades / glazes
10 highlights.
Done.
This process should help you mitigate the fuzzy quality of your miniatures. I would recommend getting an airbrush for undercoats.
You can really see the build up here and here.
I appreciate the input fine sir, perhaps some day I will try that labor intensive method, however the current paint process suites my purposes quite well. As the models end up reading well at arm length distance, I see no reason to change the current method.
About the fuzziness, in previous posts I have mentioned that the models came from graveyard piles and not the best of quality or surfaces. Perhaps that is the issue.
Your painting is great. And very few people know about the scouring method. I recently myself picked up a few of the below suggestions, and they're very helpful I don't yet have an airbrush myself. It's however all solid advice on painting to get desired effects on as thinly as possible, thus more detail. So as you say stands out from a distance. Another helpful tip is using your hobby knife to shave off unwanted paint, it comes in very handy with space marine trims.
Anyways i do honestly wish you well in your painting endeavors.
Oh if you're using models that are already base coated theirs a nifty tool you buy around 30$ that helps easily strip models before use. Forgive me if you're familiar with it. An ultrasonic cleaner.
Don't fret at feedback. Honestly all the crappy feedback I've gotten over the years pushed me to be a better painter. We live in a society where everyone is afraid to stand tall and speak truthfully, out of fear or social standards. And it's okay to get beaten over the head with basics once in a while.
Anyways keep up the solid work. Don't worry about it and use or not use the advice. It may take longer but you may be surprised at the results. You may even try experimenting with differing kinds of undercoats. What's popular right now is a Zenithal undercoat and high lighting. I'm still working on that one.
Anyways happy modeling may the emperor protect.
|
|
|
|
|
2019/03/14 00:06:34
Subject: Inquisition Guard - STRELETS - project
|
|
Grumpy Longbeard
|
The Allfather wrote: Mothsniper wrote:The Allfather wrote:All of your models look fuzzy. You seem to be having an issue with your undercoat choice.
Secondly as stated before. You should use these steps to paint.
Step 1 glue prep clean (wash your models with soapy water)
Step 2 spray under coating light grey.
Step 3 Scour or sand your model with a toothbrush or sandpaper or buffer / etc
Step 4 go back to step 2 under coating again
Repeat scouring.
Step 5 wash models with nuln oil or black ink wash
6. Applying base coat, than scour again with the brush
7 application of second base coat.
8 Layer paint.
9 wash/ shades / glazes
10 highlights.
Done.
This process should help you mitigate the fuzzy quality of your miniatures. I would recommend getting an airbrush for undercoats.
You can really see the build up here and here.
I appreciate the input fine sir, perhaps some day I will try that labor intensive method, however the current paint process suites my purposes quite well. As the models end up reading well at arm length distance, I see no reason to change the current method.
About the fuzziness, in previous posts I have mentioned that the models came from graveyard piles and not the best of quality or surfaces. Perhaps that is the issue.
Your painting is great. And very few people know about the scouring method. I recently myself picked up a few of the below suggestions, and they're very helpful I don't yet have an airbrush myself. It's however all solid advice on painting to get desired effects on as thinly as possible, thus more detail. So as you say stands out from a distance. Another helpful tip is using your hobby knife to shave off unwanted paint, it comes in very handy with space marine trims.
Anyways i do honestly wish you well in your painting endeavors.
Oh if you're using models that are already base coated theirs a nifty tool you buy around 30$ that helps easily strip models before use. Forgive me if you're familiar with it. An ultrasonic cleaner.
Don't fret at feedback. Honestly all the crappy feedback I've gotten over the years pushed me to be a better painter. We live in a society where everyone is afraid to stand tall and speak truthfully, out of fear or social standards. And it's okay to get beaten over the head with basics once in a while.
Anyways keep up the solid work. Don't worry about it and use or not use the advice. It may take longer but you may be surprised at the results. You may even try experimenting with differing kinds of undercoats. What's popular right now is a Zenithal undercoat and high lighting. I'm still working on that one.
Anyways happy modeling may the emperor protect.
Roger that! I hear ya man.
One thing I will try to communicate is:
You have mentioned an important point - "it may take longer but you may be surprised at the results"
I model and paint because I enjoy the process of converting and panting.
The final result is not as important to me as the process it self. Sooo, that is why following advanced techniques and laborious preparations cuts into the fun section of the hobby. Like I said, some day I shall try it, but not now, now I am having too much fun
|
|
|
|
|
|
2019/03/16 06:43:34
Subject: Re:Inquisition Guard - STRELETS - project
|
|
Grumpy Longbeard
|
Pulled and lined all all vehicles I have.
1 LemanRuss Demolisher
1 Chimera
1 Wyvern
1 Sentinel (GW)
1 Sentinel (robogear conversion)
And I hope to have 3 Sentinels conversions form German Weasel APC kit
Tried out oil paint for first time on vehicles, and wow I can get a very dusty look!
|
|
|
|
|
|
2019/03/18 03:55:10
Subject: Re:Inquisition Guard - STRELETS - project
|
|
Grumpy Longbeard
|
I need to add enough of 40K elements to the APCs to marry the concept.
Some pintle-mounted weapons and various crates, decorations, and arms on the armor would do it. I hope.
Possible adjustment in the color and use of hairsray is in order.
|
|
|
|
|
|
2019/03/26 05:44:00
Subject: Re:Inquisition Guard - STRELETS - project
|
|
Grumpy Longbeard
|
Unfortunately ether weather was cool, ether humidity was high, ether 5 minutes of shaking was not enough, ether can was old, ether whatever reason; the Army Primer covered parts of vehicles in that flaky dust.
Fortunately vehicles where partly ruined, and I can work that into weathering.
Speaking of, Oil paint and Thinner was surprisingly easy and quick in application and looks pretty sweet and dusty!
Next step dry brushing same color but acrylic, then inking model in raw-siena or burnt-umber, then graphite on tracks, and then little bit of rust.
|
|
|
|
|
|
2019/04/21 08:17:57
Subject: Re:Inquisition Guard - STRELETS - project
|
|
Grumpy Longbeard
|
Dressing bags and rolled up gear made from Paper-Towel pieces and watered down Wood-Glue.
And $2 dollar Rust pigment paint made from oxidizing Steel-Wool using Vinegar and Oxygen combo.
1-Wash Steel-Wool with soap first to remove oils from machining process.
2-Dip Steel-Wool in Vinegar and hang to dry. Repeat till nothing is left but rust mixture.
(Do not forger to wear a mask from the smell during dipping process and later from the dry rust dust particles!!!)
All in all not to bad
|
|
|
|
|
|
2021/11/25 08:05:32
Subject: Re:Inquisition Guard - STRELETS - project
|
|
Grumpy Longbeard
|
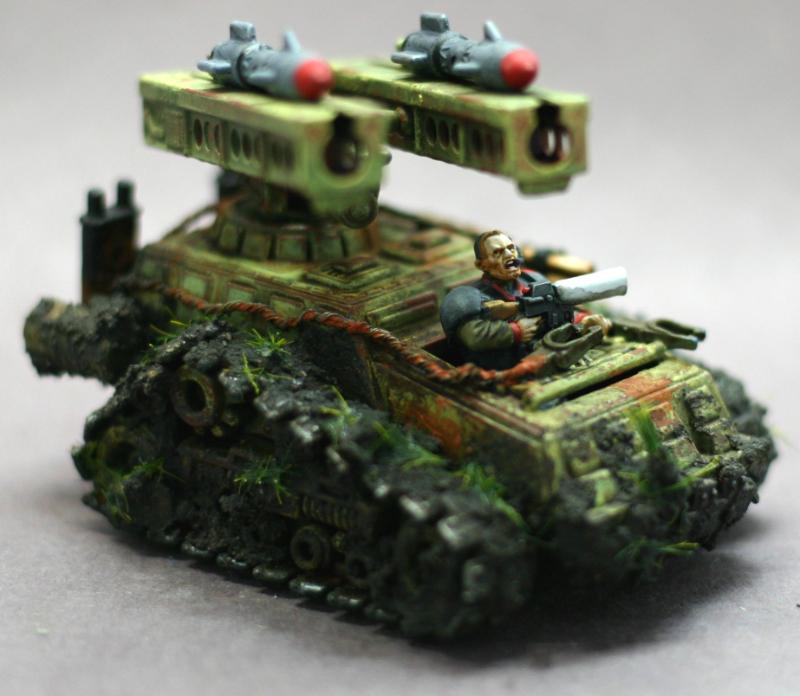
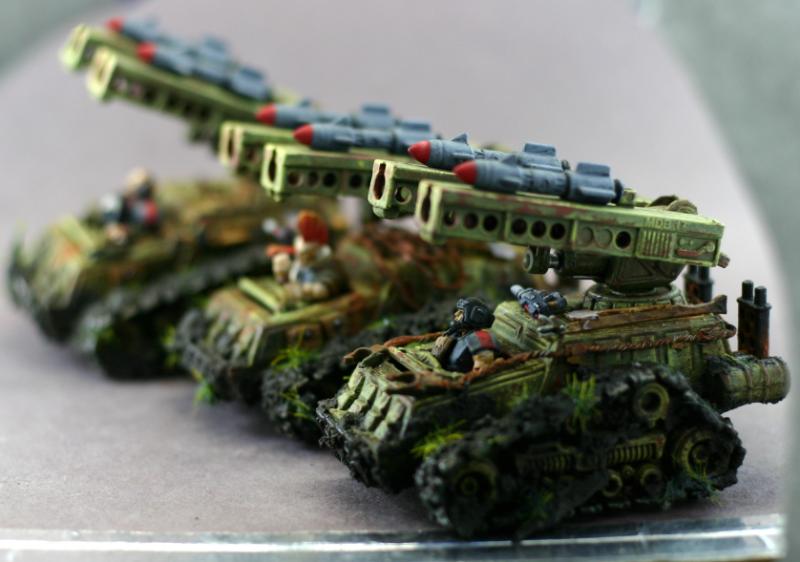
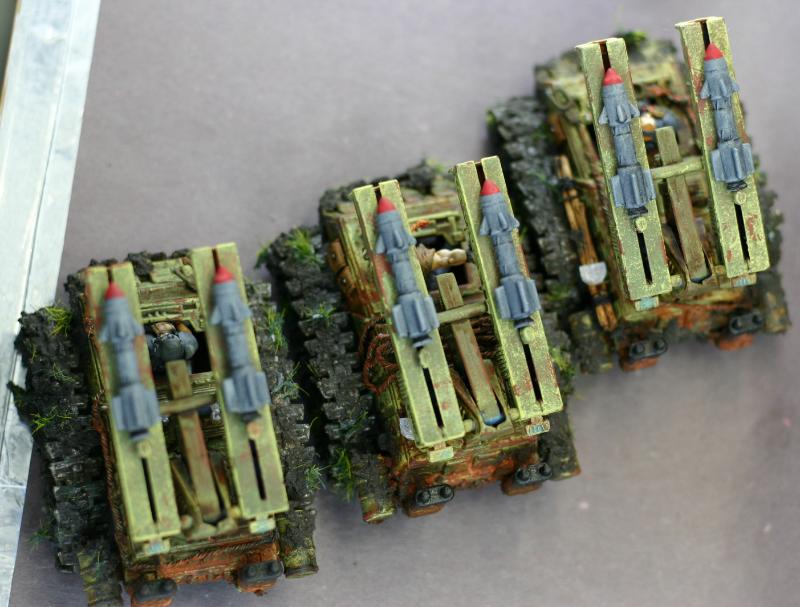
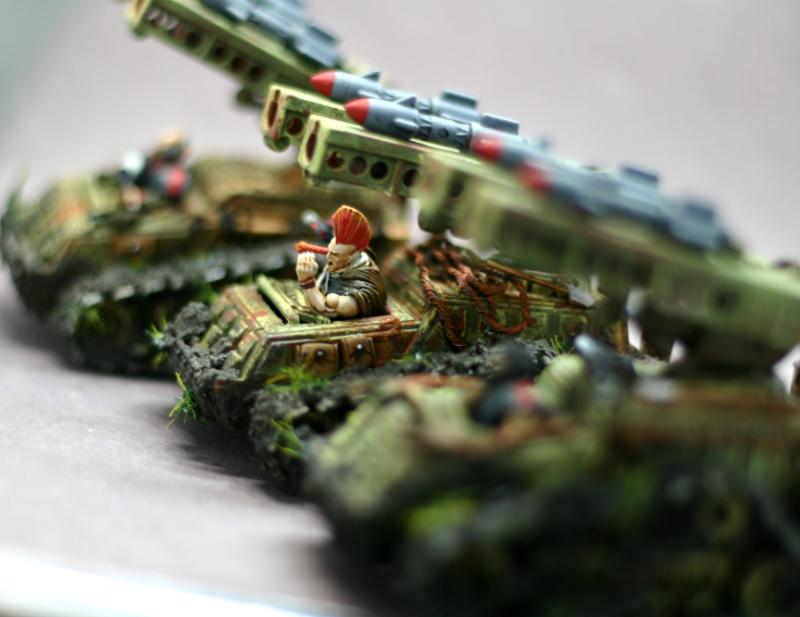
Tehnolog - Robogear - Varan - Conversion
Firing mechanism that launches the missiles with the press of the trigger. Kept functional
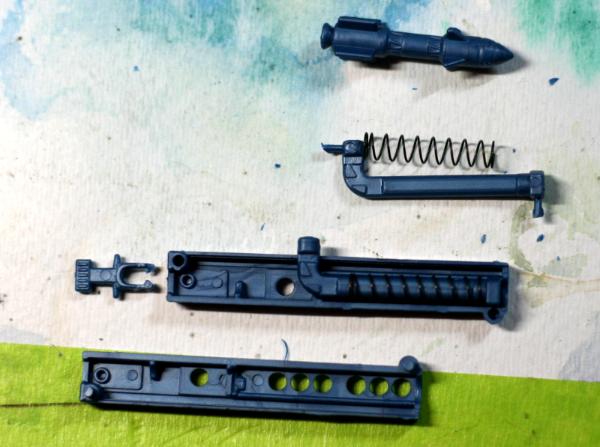
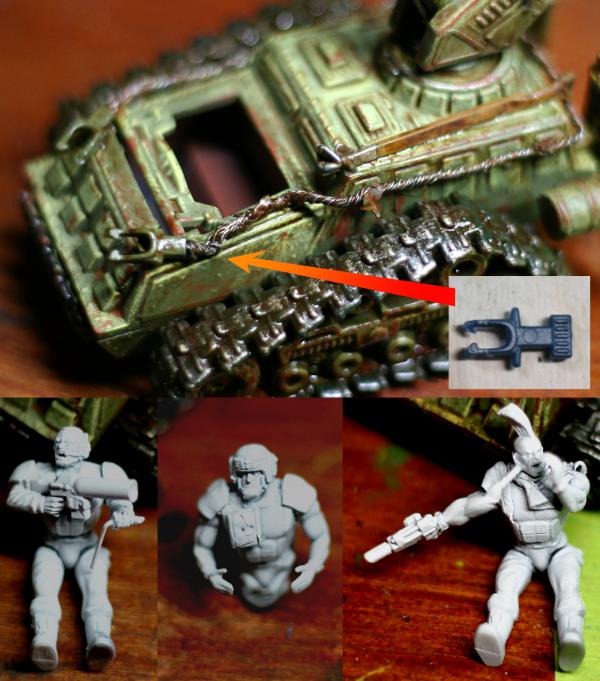
The pilots are good for a toy but not the best.

Kit came in with extra missile launching triggers that got repurposed as tow hook fittings
missile rack rotates 360 and goes up almost 90*
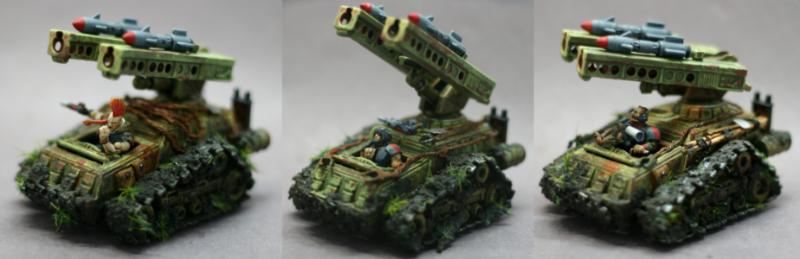
side
other side
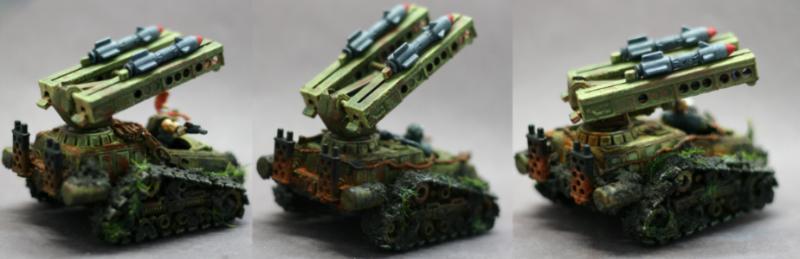
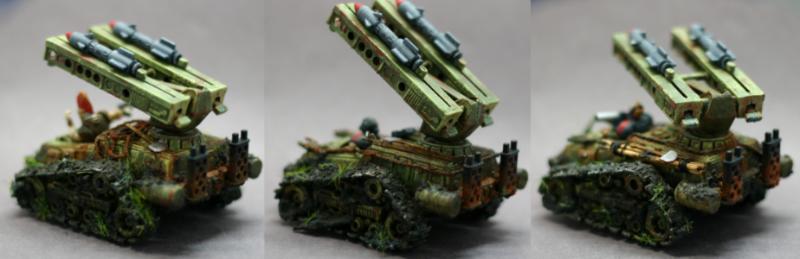
Mud is mixture of glossy Modpoge, dirt, dark gray paint, grass added later with glossy Modpoge.
Side
Top
Thank you for checking these out.
|
|
|
|
|
|
2021/11/25 08:24:22
Subject: Re:Inquisition Guard - STRELETS - project
|
|
Boom! Leman Russ Commander
|
You have some really cool models there. The paintjobs and the amount of detail you put in are awesome. I really enjoyed scrolling through the pages. Keep it up!
|
 ~6550 build and painted ~6550 build and painted
 819 build and painted 819 build and painted
 830 830 |
|
|
|
|
2021/11/25 08:28:51
Subject: Inquisition Guard - STRELETS - project
|
|

Boom! Leman Russ Commander
|
Fun conversions, I've been eyeing some teknolog pieces to add to my renegades, and your conversions are making it hard to resist. The wiesels also turned out very good, they fit into 40k with your modifications and painting.
I really like your plasma bunker, inspired idea.
|
|
|
|
|
|
2021/11/25 11:27:59
Subject: Re:Inquisition Guard - STRELETS - project
|
|
Grumpy Longbeard
|
Pyroalchi wrote:You have some really cool models there. The paintjobs and the amount of detail you put in are awesome. I really enjoyed scrolling through the pages. Keep it up!
Thank you sir, I still remember your tribal-guard! Glad you like these.
Illumini wrote:Fun conversions, I've been eyeing some teknolog pieces to add to my renegades, and your conversions are making it hard to resist. The wiesels also turned out very good, they fit into 40k with your modifications and painting.
I really like your plasma bunker, inspired idea.
Plasma bunker was born from a need to use every extra piece from the kit lolz.
I am trying to use these smaller vehicles as (sentinels) for scale/size.
Not yet finished with weasels, something I did not like about them 2 years ago, will have to get them out and take a look.
About Tehnolog, I always wanted those toys but never could get them. Shipping from Russia was crazy back then, plus I couldn't find reasonable solution because not all sites offered international shipping. The ones on amazon or ebay are way overpriced! These should be $3 or $4 dollars per model kit. So, these 3 Varans cost me $12 bucks. The plastic is a type of Polietilen, good for a toy, not very good for a model, these suppose to be cheap cool little toys, thus the low cost. I finally found a janky site, that does not even offer order confirmation or receipts. But that site sold kits for a correct price, so I ordered about $300 bucks worth of Tehnolog kits lolz. Got a box packed with ziplock bags with these kits, no instruction no kit boxes. At least now I have a life supply of Robogear models.
![[Thumb - STR_Vehicles_robogear_varan_11.jpg]](/s/i/at/2021/11/25/788ae5d1de376d7b0906771639f50317_79426.jpg__thumb)
|
|
|
This message was edited 2 times. Last update was at 2021/11/25 11:33:11
|
|
|
|
|
2021/11/26 10:52:31
Subject: Inquisition Guard - STRELETS - project
|
|
Boom! Leman Russ Commander
|
That is a lot of Tehnolog!
If you are in to making terrain / narrative pieces, I could see the possibility to make some cool civilian & logistic type vehicles and walkers with all those legs and tracks
|
|
|
|
|
|
2021/11/26 11:55:53
Subject: Inquisition Guard - STRELETS - project
|
|
Grumpy Longbeard
|
 Illumini wrote: Illumini wrote:That is a lot of Tehnolog!
If you are in to making terrain / narrative pieces, I could see the possibility to make some cool civilian & logistic type vehicles and walkers with all those legs and tracks
That would work very well and be cost effective! I am into terrain and dioramas but I have no room 
Plus its fun to convert a toy or junk into something interesting and detailed.
|
|
This message was edited 1 time. Last update was at 2021/11/26 11:56:44
|
|
|
|
|
2021/11/26 16:25:43
Subject: Inquisition Guard - STRELETS - project
|
|

[DCM]
Lone Wolf Sentinel Pilot
|
Great stuff, thanks for posting. Tehnolog is great, I use it myself for Guard. It's funny that you kept the rocket firing mechanism
Your opponent may get a shock when they fire overwatch
|
|
|
|
|
|
|
|

