Forum adverts like this one are shown to any user who is not logged in. Join us by filling out a tiny 3 field form and you will get your own, free, dakka user account which gives a good range of benefits to you:
No adverts like this in the forums anymore.
Times and dates in your local timezone.
Full tracking of what you have read so you can skip to your first unread post, easily see what has changed since you last logged in, and easily see what is new at a glance.
Email notifications for threads you want to watch closely.
Being a part of the oldest wargaming community on the net.
If you are already a member then feel free to login now.
2020/04/11 11:46:34
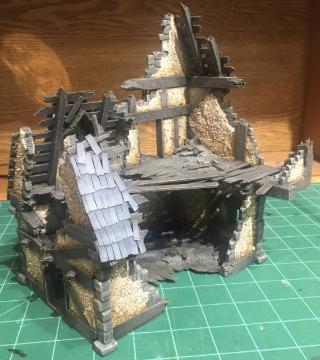
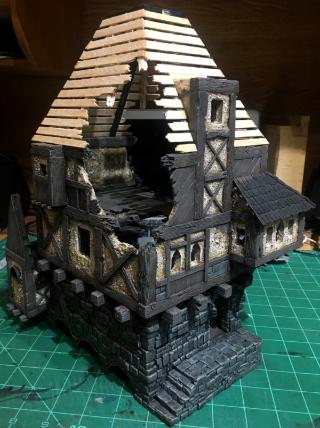
Subject: Thumpingbear Builds a Mordheim Table - Terrain (and the Occasional Model)
Beautiful work! Look forward to seeing this one painted up. Ah yes, Warhammer Online. Sad to see it go, I remember seeing the early concept art for it in White Dwarf
2020/04/27 03:31:37
Subject: Re:Thumpingbear Builds a Mordheim Table - Terrain (and the Occasional Model)
@Captain Brown: Thanks man, cheers!
@Flapjack: Me too man, hopefully within the next few months I'll talk the guys into getting a game going.
@Fifty: Lots of patience, tempered by a greater amount of cursing @Viterbi: Thank you kindly!
@zahnib: Thanks! Yeah it's a shame, I played it for like a week when the servers were running. A lot of work went into the game.
Some updates:
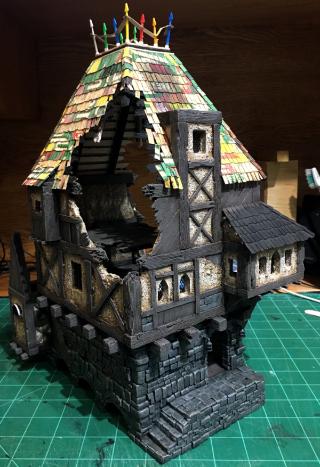
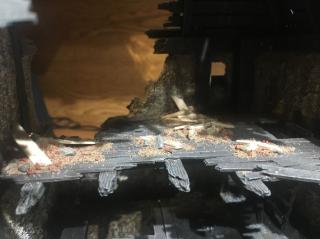
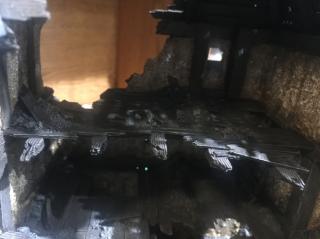
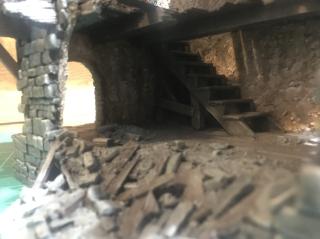
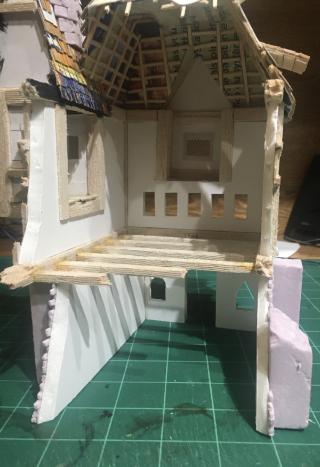
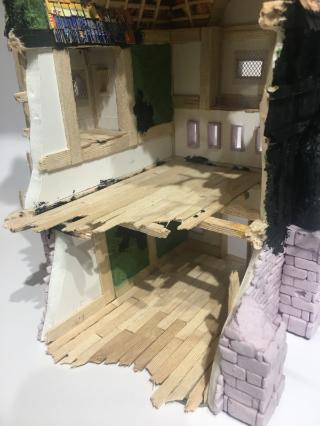
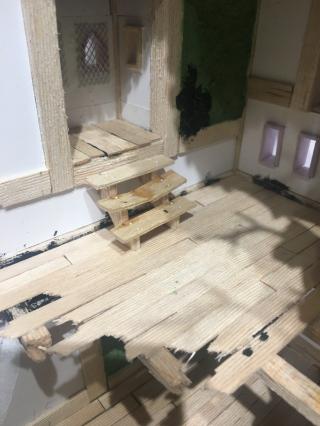
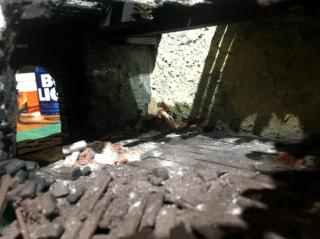
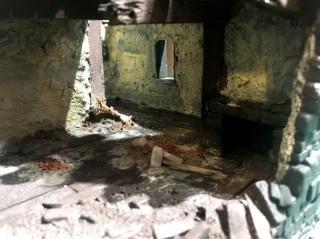
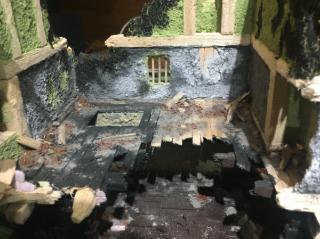
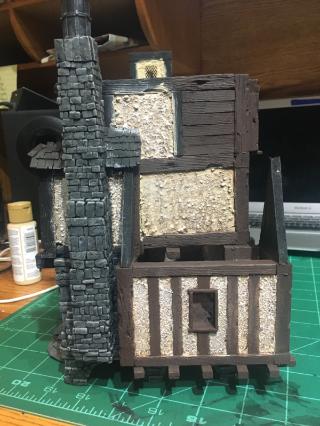
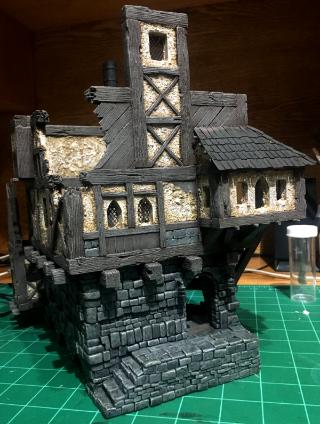
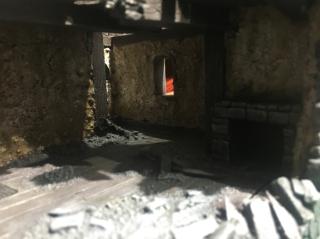
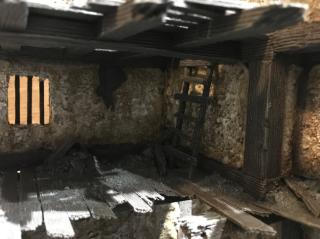
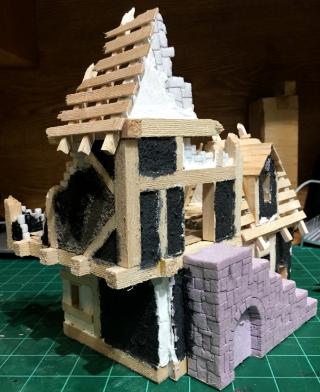
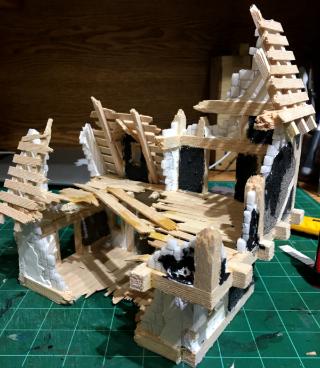
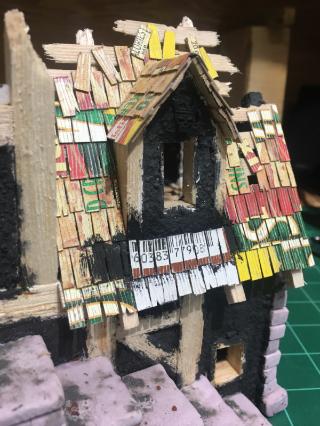
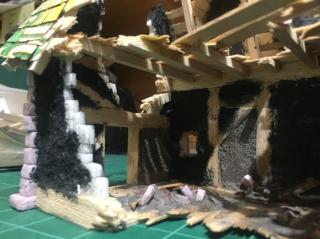
Added rubble piles to the interior.
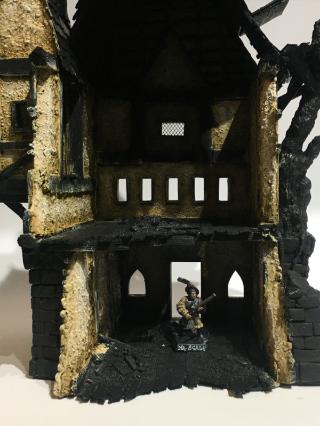
Some quick and dirty work, I hadn't mentioned the hole in the 2nd story floor (as seen in pic. 3), which will house a staircase once the painting is all finished. The last shot is the 2nd story sniper nest, which gives a 180 degree view of the front of the building - perfect for the largely underwhelming shooting in Mordheim.
Once the rubble piles were in place, I moved onto painting.
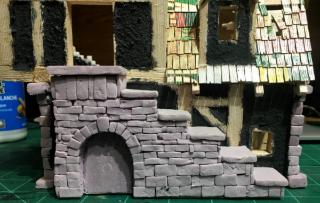
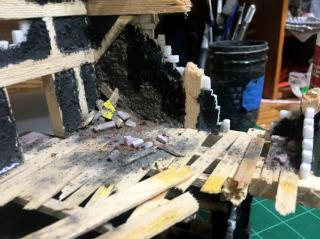
Currently the stonework, 1st floor walls, and some of the exterior 2nd floor walls are nearly finished, just needing some washes and dirty blending to grime em up. The wash I put on the stonework unfortunately pooled in a few places, which is something I'll have to watch for the next project.
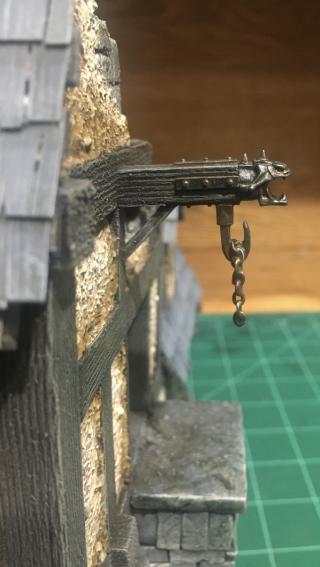
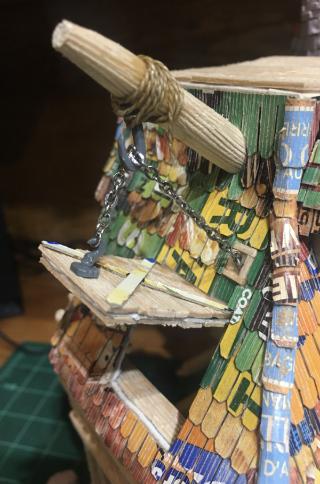
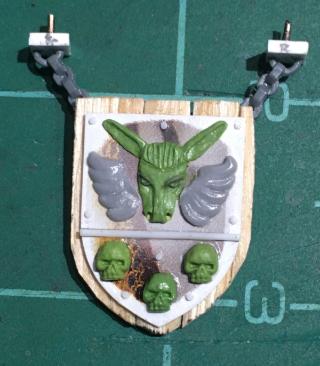
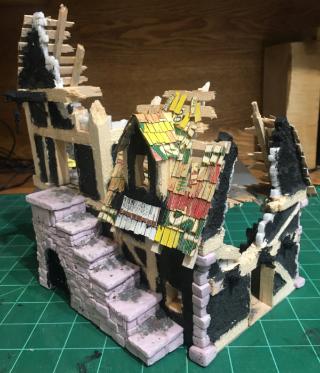
Finally, I designed a hanging crest for the front of the building.
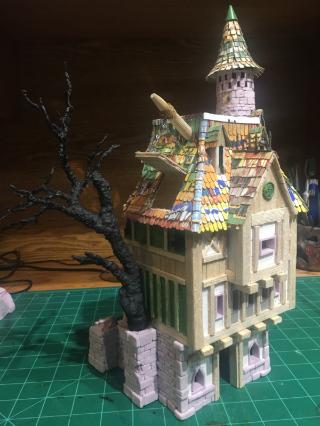
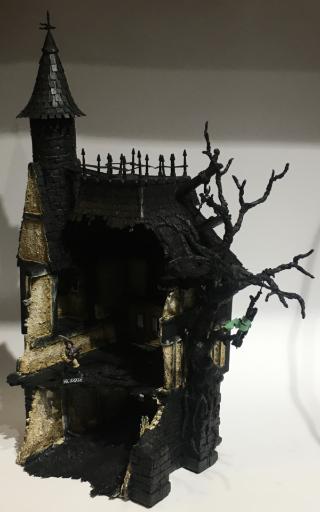
The building's name now is the House of the Flying Ass (or Donkey, not sure if that word violates the language restrictions on the site), aka. Flying Ass Usurial Loans, the shadiest bank in Mordheim. A bit of fluff and design research for those interested:
Spoiler:
This building is quite large, so I imagined it was a somewhat wealthy family that lived there. I decided banking would be a good enough and I wanted to have a hanging guild sign that would communicate that. Through research, I found that banks as we know them today didn't exist in the medieval period, but existed instead as merchant bankers that traded in material commodities. These merchant bankers were usually pretty powerful and had their own coat of arms, such as the Medici family, who were textile merchant bankers (I know these guys were Renaissance, but give me a break). As such, merchant banks didn't have a universal symbol, but instead used the symbol of the material they traded or of the family that ran the bank.
There was no universal guild symbol for banks, however there was a symbol for pawnbrokers : 3 gold coins on a field. This guild symbol for pawnbrokers is still used today, and is thought to originated from Lombardian banking families, or the Medici family who used coin symbols on their crest. While I didn't envision the building as a pawnshop, I still liked the symbolism of money so I added them to the crest as 3 skulls on the bottom, keeping with the Warhammer skull fetish. I thought the 3 coins were a little plain though, and I needed to embellish it more. For that, I had to design a family crest.
The design of the winged donkey came from the fluff of Mordheim. Before the comet fell, the richest area in the city was the Merchant District, known as the District of the Flying Horse. I figured the family that ran this bank was of a lower born class and was riding the coat tails of the wealthy by imitating their symbol. So they adopted the crest of the Flying Donkey in order to trick the foolish and desperate into taking out usurial loans. Come to think of it, a loan collection agency would make a great Mordheim warband...
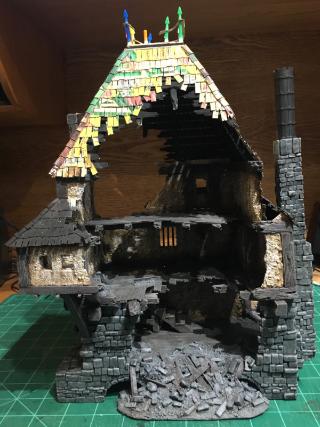
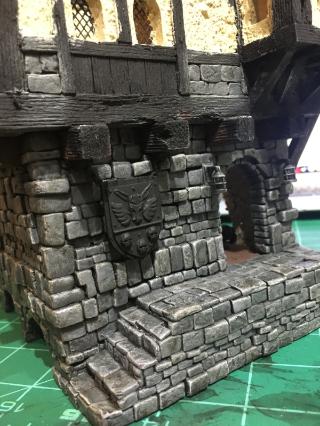
And here it is, primed and set into it's place.
I think it breaks up the front brickwork very nicely, along with the hanging lanterns on the door. I think I'll try some OSL on the lamps this time around.
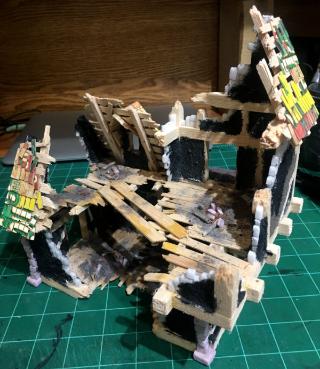
So that's all for now. For now, I have to continue painting until at least the interior is finished, then I can start on the 3rd floor and the roof. More updates soonish
2020/04/27 05:54:35
Subject: Re:Thumpingbear Builds a Mordheim Table - Terrain (and the Occasional Model)
The building looks fantastic! You've done a great job on the stonework, it looks straight out of a dark, medieval alley. Also I love the crest, it's strange and historical-looking. Maybe you could add a motto somewhere above/beside it, like 'homines sunt asini'.
That sign is great! I'll second Pomander Cask, that stonework looks fantastic.
I wonder if GW will revive Mordheim like they have some of the other specialist games once the Old World returns
2020/04/27 15:30:57
Subject: Thumpingbear Builds a Mordheim Table - Terrain (and the Occasional Model)
This building is unreal, the level of detail is insane. With the sunlight beaming in it almost looked like a photo of an old abandoned building! Keep up the awesome
Goberts Gubbins - P&M Blog, started with Oldhammer, often Blackstone Fortress and Void Panther Marines, with side projects along the way
2020/08/31 00:58:51
Subject: Re:Thumpingbear Builds a Mordheim Table - Terrain (and the Occasional Model)
@Pomander Cask: Thank you. And thanks for the motto, I was not expecting to go down a wiki-hole on medieval philosophy today. I think I'll be using it in a themed warband I'm brainstorming.
@zahnib: Thanks. Honestly, I couldn't care less if GW decided to put out another Mordheim-esque game. If they do that'd be great, I'll check it out. If not there's like 15 years of free Mordheim resources online, official and fan-made, to play with.
@gobert: Thank you! I try very hard to keep my awesome levels stable lol.
So... it's been a while. The current pandemic made life tough for a bit, especially on a mental wellness level, so the hobby was abandoned temporarily. Got some Mordheim games in with the group recently - lots of one-offs, experimenting with fan-made warband lists and house rules (I like Necrarch: Soul Stealer vampires and Hochland Bandits a lot!). Those games caused the hobby itchiness to come back, and here I am scratching it.
As a brief aside, if anyone reading this is curious about Mordheim or would like to try it, Broheim is a great database for all the rules, for free. There's A LOT of stuff on there though, so I'd recommend any new players to just stick to the core rulebook, and expand outwards.
Anyways, updates:
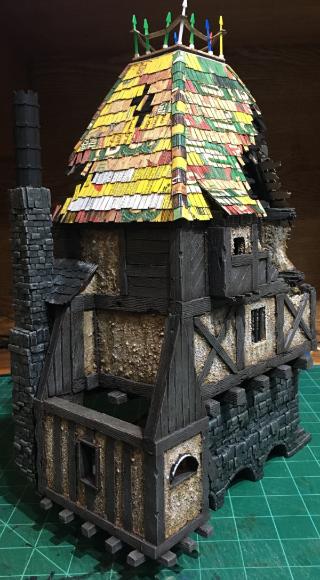
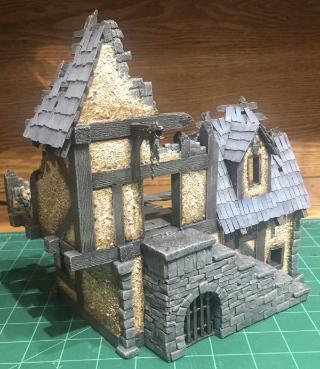
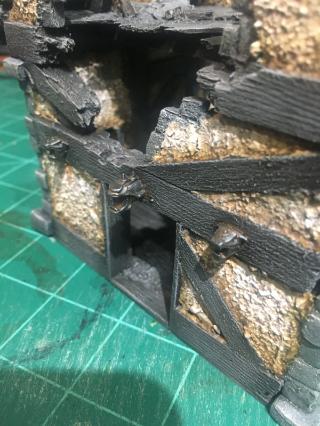
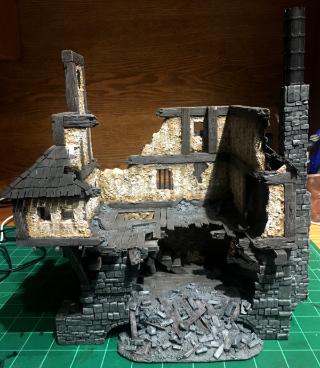
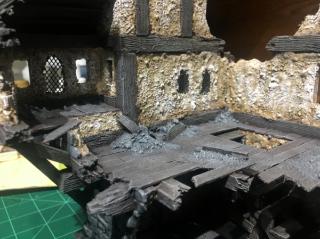
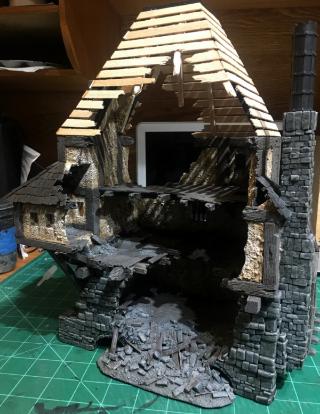
The plaster, wood, and rubble piles of the building are finished on the House of the Flying Ass.
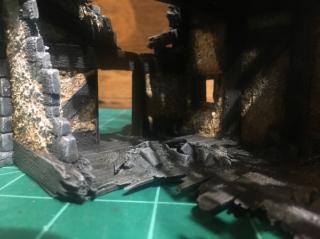
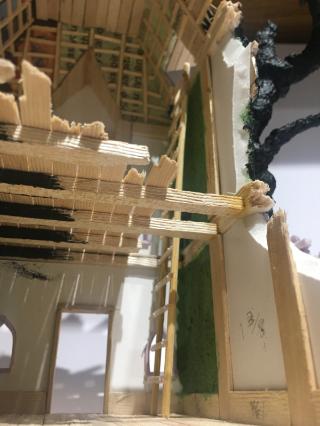
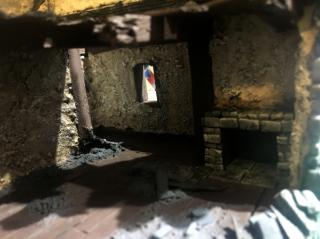
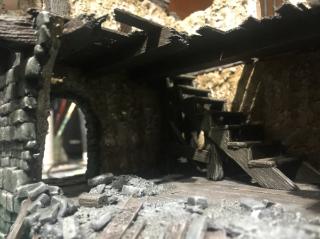
Some shots of the interior. The staircase has yet to be glued in, I like the way it turned out.
With that out of the way, I moved on to putting in the 3rd story. Here it is, snugly dry-fitted in place prior to painting and gluing.
And here it is, finished. I should probably go back in to do some rubble piles though...
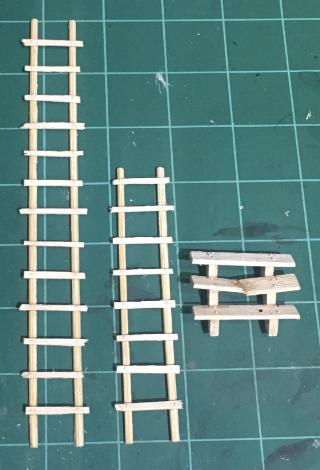
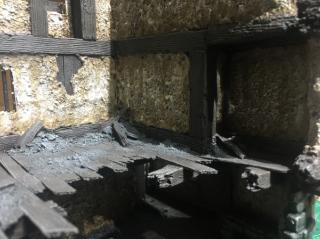
Access to the third story is up this ladder. I debated making another staircase, but couldn't figure out how to fit it in. My official explanation is the staircase was on the side of the building that collapsed.
At this point, the building is (nearly) fully functional as a gameplay piece, save for a flat area on the roof that can connect to other roofs via bridges and catwalks. So, onto the roofing.
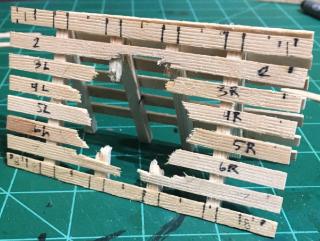
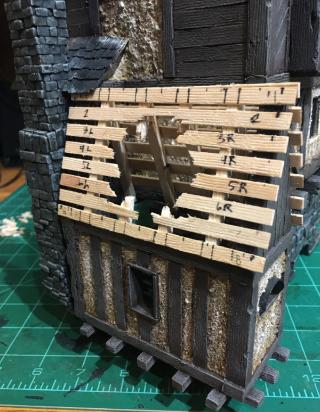
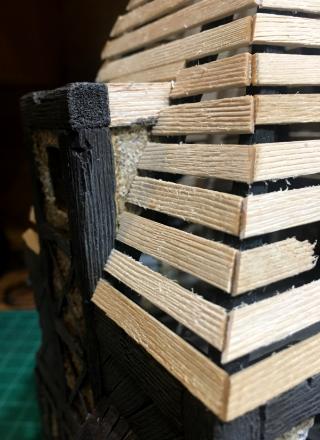
This is the frame for the back roof, on that weird little addition beside the chimney. The roof intersects part of the second story, hence the removal of planks from the one side. I wanted to have a hole in this roof so bridges could be placed into it - a one-way entrance into the building from the back. This part would have been a nightmare to paint if built onto the building, so I decided early on to build and paint it separately before gluing on.
Here it is in place. It is an EXTREMELY tight fit. Good thing wood is such a pliable material.
That's where the House of the Flying Ass stands. Next updates will see the back roof constructed, and the top roof construction beginning - maybe even ending, who knows? I certainly don't. Maybe I'll abandon this blog for another 4 months before another update. It's the 2020 pandemic baby, there are no rules! The only constants are these 4 walls and the slow creeping mania of forced hermitage.
Jokes aside, more updates soonish.
2020/09/04 03:35:41
Subject: Re:Thumpingbear Builds a Mordheim Table - Terrain (and the Occasional Model)
@ Viterbi & zahnib: Thank you guys, much appreciated.
Some updates:
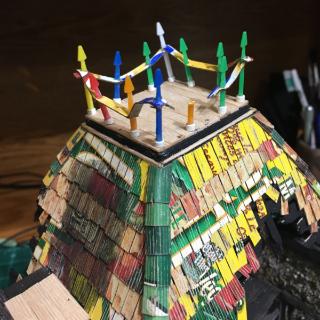
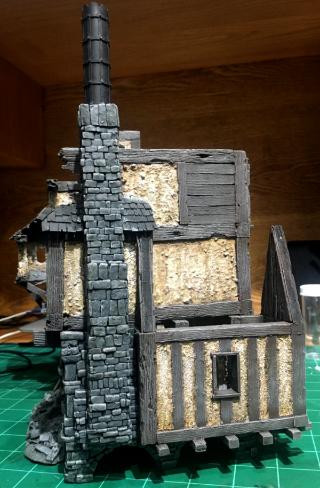
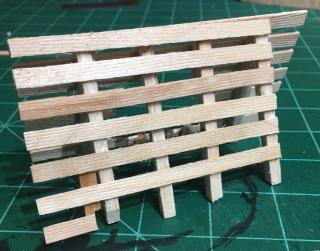
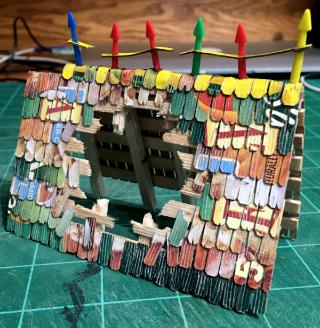
On the House of Flying Ass, the back roof construction has been finished.
The roof spikes are plastic cocktail stick spears, I picked them up at a party supplies store in my city. It was ~$10 for 250 of the things, they're absolutely fantastic (and I'd argue essential) for Warhammer scenery. The strip connecting them is just cardboard hardened with liquid superglue. It will be painted at a later time.
Next up, I got to work on the main roof.
I was debating whether to make this roof removable or not. Then I remembered I'm stressed enough as it is, so why torture myself? So, I glued on this rough frame of roof beams and started laying on coffee stirrers for roof slats.
Here is the slatted roof. I'm going to paint the exterior black before laying on the cardboard shingles. I also fitted in 2 small connecting wall pieces, shown in the third picture.
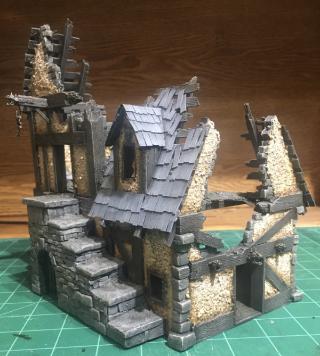
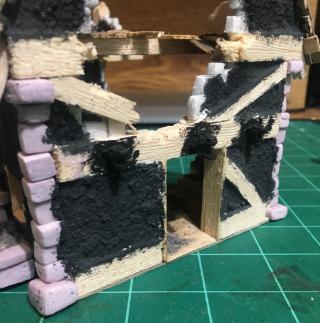
That small connecting wall piece created a bit of a setback, completely of my own making. I made a batch of my plaster mix to texture + strengthen the walls, but only ended up using around 1/20 of all of the plaster. I'm not one to waste good hobby materials (on purpose, anyhow), so I decided to use the remainder of the plaster on one of my older projects that needed updating - a simple house ruin.
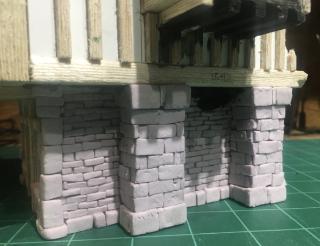
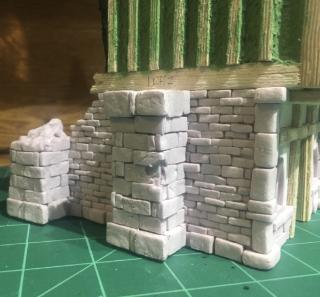
This is one of the terrain pieces that survived the destruction of all my old terrain. It's great to play with too - the open 2nd story allows for movement to other elevated areas via bridges, but the entrance to the second story is a thin stairwell - only an inch wide. It's fantastic for defending, you can line your models up on each step to create a gauntlet for attackers to get through.
Anyways, I didn't snap a picture of the previous roofing, which was just cardboard with shingles laid overtop. I ripped that off and installed beams and slats, as per my usual technique. The corners of the main floor also had some megalithic corner stones on em that looked out of scale with models next to them, so those came off and new ones were put in place. With those installed, I plastered the rest of the building and put on cardboard shingles.
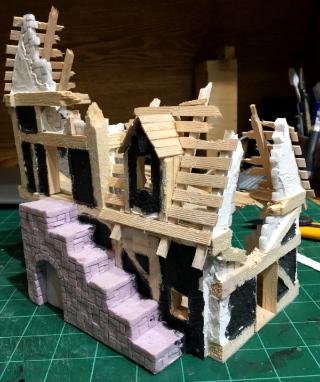
I also decided to replace the stones on the stairwell. I had carved them originally, which looked decent, but not in line with how I do stonework now. I carefully shaved down all of the old stonework and glued everything on.
Before
After
I did a bit of detail work as well.
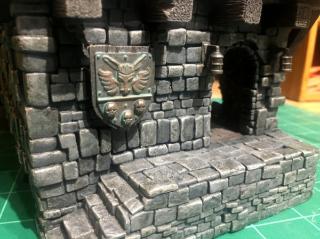
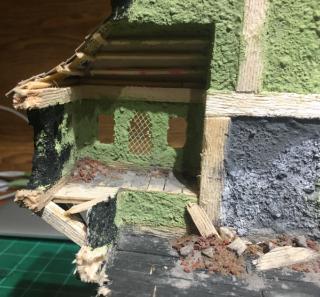
This is a gate fit into the arch under the stairwell. It's hard to see as I prepainted it, but the construction is 2 toothpicks stuck into the wall as horizontal bars and more of the cocktail spears glued onto them vertically in an arch. I imagine this gate would be an entrance to the labyrinthian catacombs that lie beneath Mordheim (even though, physically, it should just be a side entrance to the building). Perhaps if I make more entrances like this, I can come up with some shortcut rules for crossing the board through the tunnels...
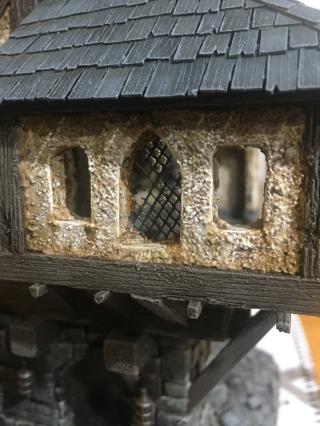
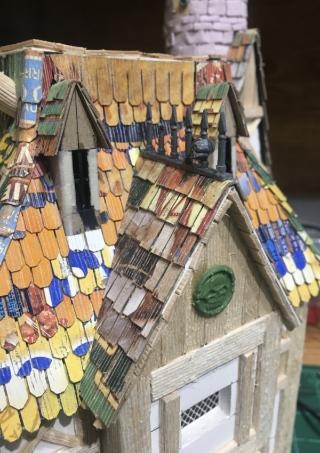
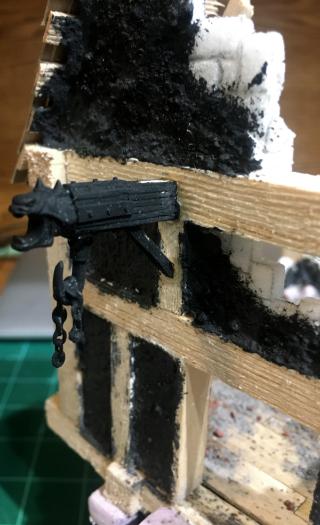
Some simple decorations. The first pic is a skull sculpture above the window. The bit from the second pic, installed above the 2nd story doorframe, was actually from the Ratcatchers Manse in it's first form. The third pic are gargoyle head installed above the first story door to break up the flatness. I measured wrong on it though - the left head is ~1.5 mm out of line, an asymmetry that no one but me will notice, and I will be annoyed by it every time I look at it. Unfortunately it's superglued on and I don't want to break the balsa wood to get it off, so I must live with my mistake.
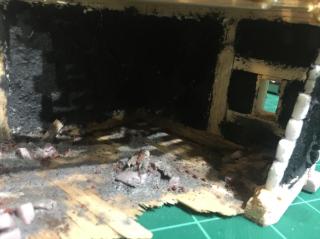
I finished up by doing some rubble piles and general dirtying.
With that done, construction on the ruin is finished!
Painting will have to wait on this guy as I want to finish Flying Ass Usurious Loans first. I should have the main roof finished next, and I can work on basecoating the ruin while I wait for glue to dry.
More updates soonish.
2020/09/11 00:50:18
Subject: Thumpingbear Builds a Mordheim Table - Terrain (and the Occasional Model)
Awesome update Thumpingbear! The new stonework on the smaller buidling looks fantastic, I'd love to know your method. The roofs on both buildings look fantastic as wekk, I especially like the truncated pyramidal roof on the House of Flying Ass.
This message was edited 1 time. Last update was at 2020/09/11 00:50:29
2020/09/11 04:50:52
Subject: Thumpingbear Builds a Mordheim Table - Terrain (and the Occasional Model)
@ zahnib, Viterbi, Gwyn chan 'r Gwyll, gobert, & Captain Brown: Thank you for the kind words, you're keeping me motivated to finish this project.
@ zahnib: It's a method that I picked up from the "Tabletop Workshop" Youtube channel (absolutely fantastic content), this video specifically: https://www.youtube.com/watch?v=I1DrL45dzBU. Basically pre cut your bricks, shake em around in a bin with some rocks to texture em, then glue them on one by one. It's a time consuming method but gives pretty great results IMO, and I've started to see other builders use the technique as well. The only thing I do different is I use much smaller bricks and stones.
Some updates:
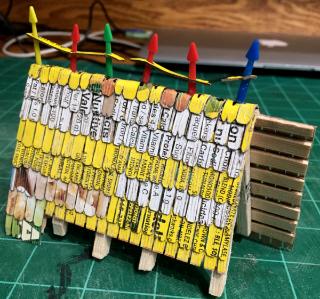
Finished the cardboard shingles on the main roof.
I also installed the roof fencing.
Pinned the spears on top, then used cardboard to make the connecting bar, then stiffened it with liquid superglue. I'm a little disappointed in the bends in the cardboard bars, they're a little too exaggerated and cartoonish. Still, it's fine and, more importantly, finished.
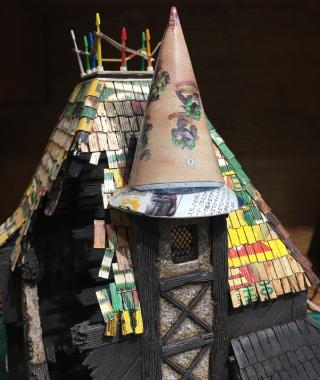
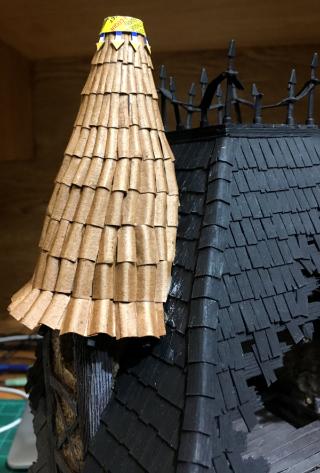
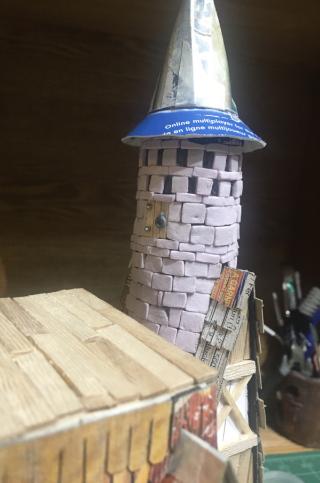
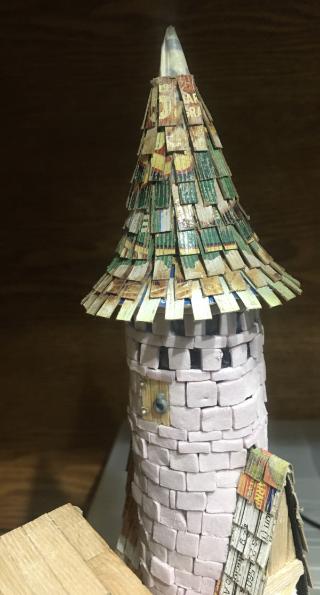
Next up was the tower roof, which I was excited to make because, according to the concept art of the piece, uses rounded Monk and Nun roof tiles, which I had never made before. But before that, it needed a base.
For my conical roofs, I do have a very simple method: cut a circle out of cardboard, cut a "pie piece" out, overlap the edges to make a cone, adjust the size of the circle/pie piece until I like the base size and angle, then tape + glue in place. By stacking 2 on top of each other like I've done here, you can do a "witches hat" style, a technique I used on the Ratcatcher's Manse tower roof.
The biggest drawback of this method is that the bottom is untextured cardboard, however it's usually something people don't notice, and if you really want to you can put pieces of balsa underneath to add some detail. This wasn't the final cone I used as it wasn't tall enough for what I wanted, but I didn't get a picture of the unpainted final one and I wanted to demonstrate how I did it. Also ignore that the cardboard has 40k Boyz on it, that's not the subject of this blog
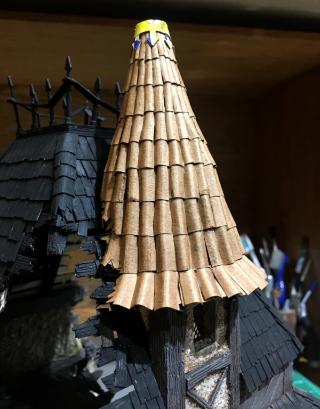
Anyways, here's the final tower roof, pre-primed so any gaps in the tiles wouldn't show too much. I also threw some small balsa pieces on the underside to simulate roof beams.
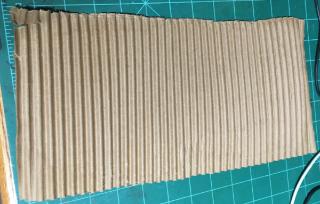
With the tower roof finished, I got to work on tiling it. I really wanted an easy way to do this. I really did. I tried laying strips of corrugated cardboard along the top, but I couldn't get it to look good.
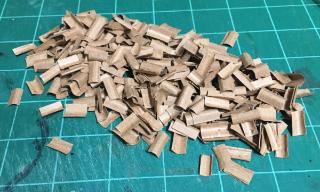
So I made individual tiles.
I didn't take any WIP pictures, but here's the results.
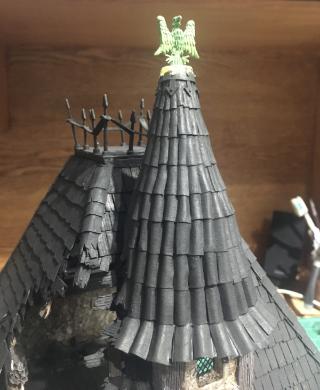
Turned out pretty good, but I screwed up the alignment on the bottom half that makes it look a bit twisted. Still, it's finished, which is the most important part. I also threw on a cardboard strip with arrows on the cap, which will be painted iron. It's actually a sneaky 8 sided Chaos star, a remnant of the blatant Chaotic influence that permeated Mordheim before the comet struck.
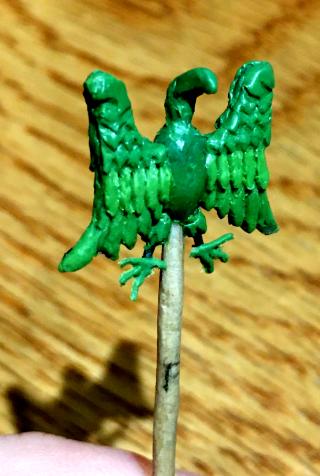
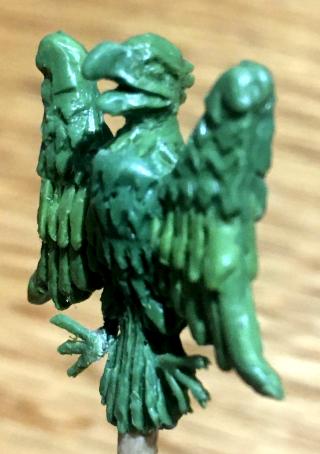
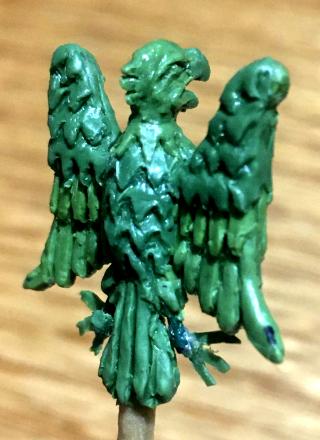
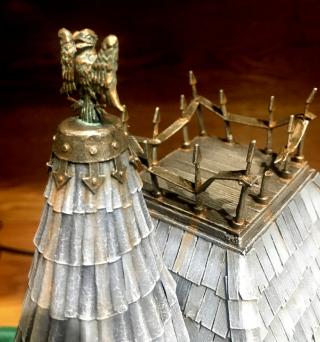
Finally, I'm sculpting an eagle statue to place on top of the tower roof (WIP).
Could've just used one of the extra Aquilas I have lying around, but that's boring. I wanted a weird heraldic-looking eagle, which I think I'm getting close to. My sculpting skills aren't particularly strong, so it's a good opportunity to practice.
Not gonna lie, I've been working on this building for far too long and I'm getting burnt out. I make a solemn vow that my next update will be see the House of Flying Ass finished, cause I just want this thing done.
More updates soonish.
2020/09/23 05:48:39
Subject: Thumpingbear Builds a Mordheim Table - Terrain (and the Occasional Model)
Thanks for linking the video, its an awesome technique, you've really nailed. That conical roof looks great! Doing all the tiles individually really pays off. Also as a side note, I love the multicoloured roof with the rainbow spikes before base coating
2020/09/23 18:54:25
Subject: Thumpingbear Builds a Mordheim Table - Terrain (and the Occasional Model)
That’s some serious dedication, making individual bricks and tiles! Do you mix mortar and lime render too? I think the eagle looks great, and I love that it’ll be mounted atop a chaotic symbol! All in, the house of the flying ass is going to be spectacular, well worth the time and effort.
This message was edited 2 times. Last update was at 2020/09/23 18:55:04
Goberts Gubbins - P&M Blog, started with Oldhammer, often Blackstone Fortress and Void Panther Marines, with side projects along the way
2020/09/23 20:08:43
Subject: Thumpingbear Builds a Mordheim Table - Terrain (and the Occasional Model)
Oh yeah, the house is nearing completion! It's already glorious, can't wait to see it with paint on! I just can't stop admiring all the details and the amount of effort you've put in.
The eagle's great, even if not quite up to the modern GW's computer-created quality. Certainly better than what I can do, I'm basically still at the gap-filling stage! Is that all greenstuff, or do you have a small wire armature in there?
@zahnib: thanks! the multicoloured spears do look festive, don’t they? Although I do like them better rusty and metallic.
@gobert: thank you - I don’t make my own mortar/lime, but I do mix my own plaster for the walls!
@mcmattila: thanks. I have a bit of an aversion to GW’s computer created stuff tbh - maybe I’m a neo-Luddite, but there’s something about the imperfections and limits of hand sculpting that seems very authentic to me. Not that GWs new stuff isn’t nice, just a bit soulless, depending on the sculpt.
My own unasked opinions aside, there is a small armature in there- the body and head are roughly formed, and the wing outline was created with wire. It’s my first full sculpt, and it’s certainly not perfect, but I had a lot of fun making it!
I’ve been putting off updating for a bit since I’m now doing it from my phone - my laptop had an unfortunate encounter with a glass full of paint water and is now a very expensive paperweight. The phone is a pain to update with, so I’ll be doing infrequent large updates until I can save up for a new computer.
Anyways, updates:
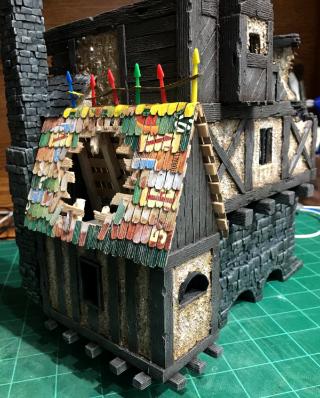
On the House of Flying Ass, I finished the eagle sculpt and glued it in place.
Next I did some rubble piles for the top floor and painted them. I switched brands for my Burnt Umber paint so they are a slightly different colour than the lower 2 floors, but it can’t be helped.
I then decided to try something new - glass panes for the leaded windows. These were created by mixing gloss medium with a bit of water, then brushing it on to the wire mesh. I think it turned out a little too well - you don’t notice it unless you’re up close! Next time I’ll mix in some blue ink to make them stand out.
I also glued the stairwell to the second floor in place.
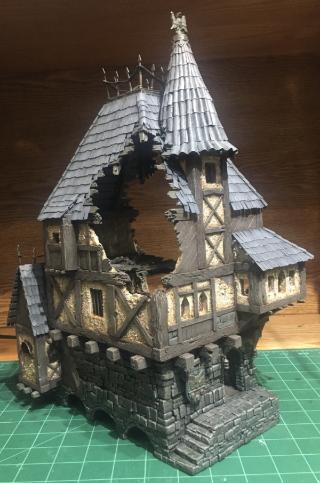
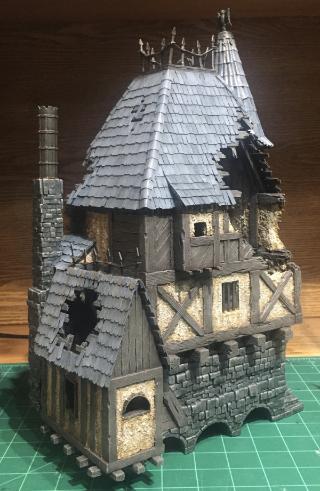
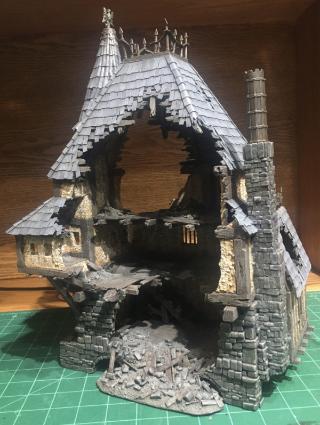
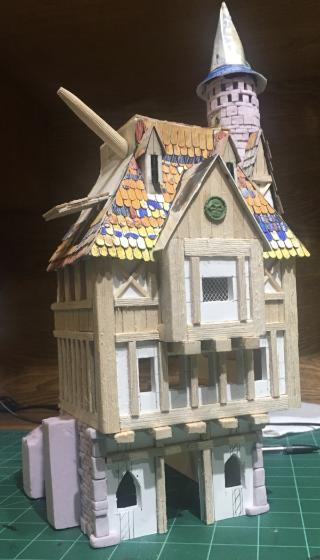
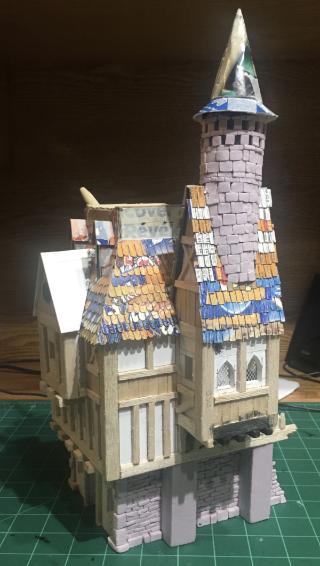
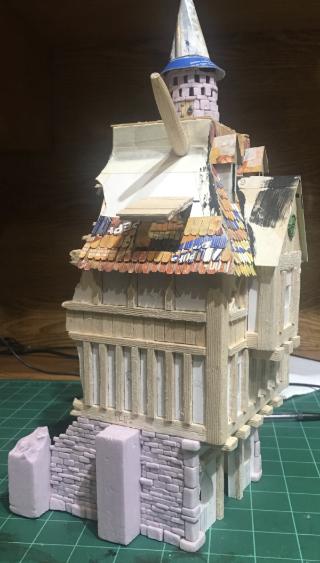
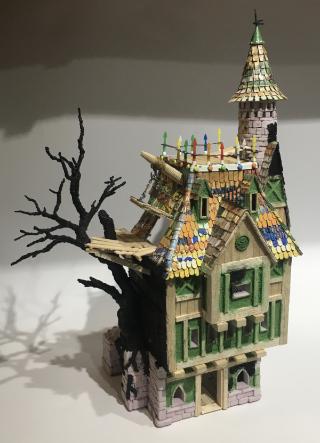
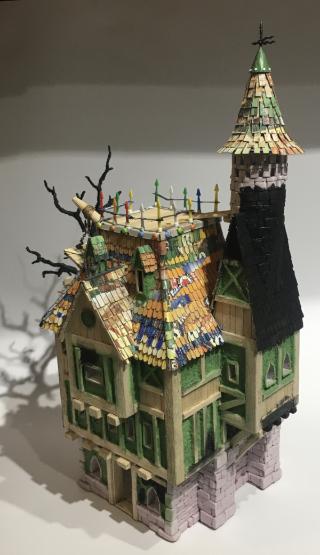
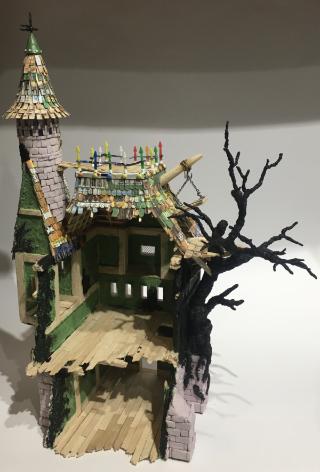
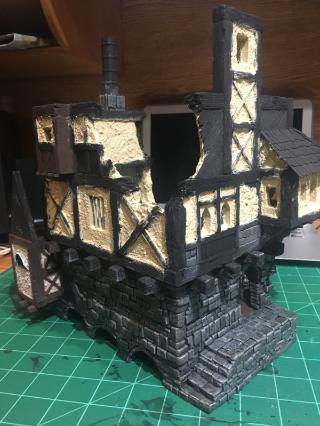
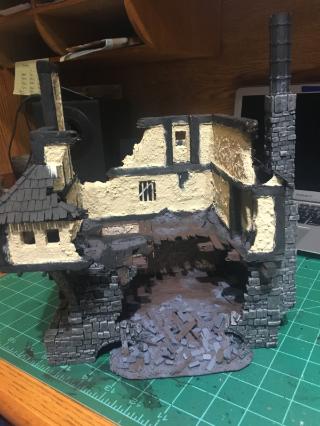
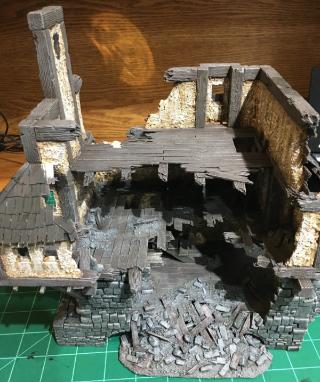
With the completion of the roof and metals, the House of Flying Ass (aka Flying Ass Usurious Loans) is complete!
Simultaneously I finished the small Ruin. Nothing to write home about, and I’m happy it’s painted.
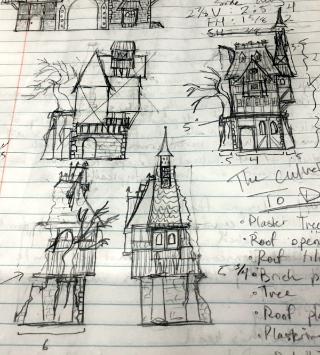
With those projects behind me, onto the next one: The Culverhouse.
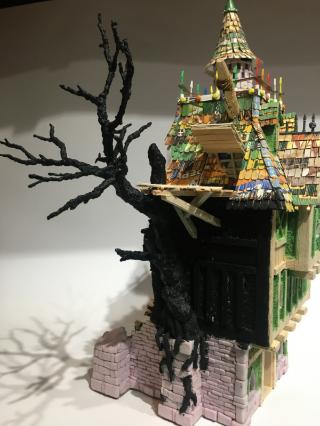
The concept. I had created the general design first, then decided the function later as a messenger pigeon service in Mordheim, adding the tall tower on the right as a pigeon house. The building also has a large tree growing on the side of the house, mainly cause I haven’t done any trees yet and I wanted to take a crack at it.
Here’s the initial build. I had actually started this building a while ago, but stopped when I got stumped on how to get access to the roof platform.
We use it in games, but we all typically avoid the ground floor since there’s no access to the roof and it essentially acts as a platform for connecting high level bridges. This is quite annoying in games as any models with ranged weapons can plunk themselves on the roof, fire freely at all models, and be pretty much untouchable for the entire game (unless you plan to send models to deal with them).
This is only an issue because I couldn’t figure out how to actually get to the platform. I wanted a stairwell of some kind, but couldn’t figure out a way to do it while still being able to move models easily inside it. Eventually I decided to simply have a very long ladder from the bottoms floor, through the second, and to a hatch in the roof. The hatch will open to another platform connecting the house to the tree, which will have another ladder that leads to the roof platform. I apologize if that’s a bit confusing, when I build it it’ll make sense.
Anyways, here’s the roof hatch finished, along with the front roof addition.
Here’s a couple pics of the pigeon house, the second with the roof tiles placed. The material to make the tower was a clear tube, so even though it looks black, each of the openings is clear and you can see into the structure. There will eventually be a small platform for access to the small door, used by the postman to grab messenger pigeons for deliveries. I also put a green stuff cap on the roof, which is visible in other photos.
After that I bricked the buttresses on the sides of the building. The intact one in the second picture is what the tree will be growing out of.
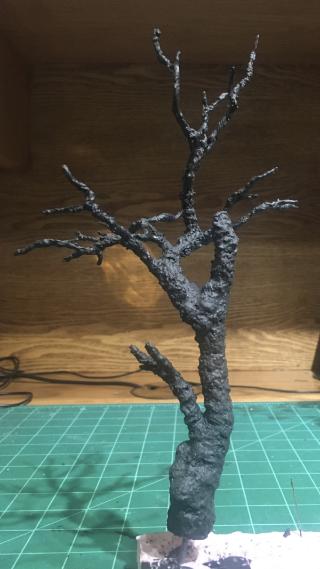
Last up is the tree itself. I apologize for not having any WIP pics as I just forgot to take any. It was created using the wire wrap technique, with the burls sculpted onto the frame with green stuff. It’s been coated with a mix of acrylic caulking and black tea to strengthen it and give it texture, it still needs a few more layers and a final layer of wood filler, into which the bark will be sculpted.
The second pic is it in place on the building. After it’s finished and glued in place, I’ll be sculpting roots wrapped around the buttress and writhing out of the brickwork.
Overall I’m satisfied with how it’s turning out - I was trying to get a gnarled and twisted appearance to it. I think I nailed the gnarly aspect, but it’s not as twisted as I’d like. Still, as a first attempt, I’m happy.
Okay, update finished. I’m gonna keep plugging away at the Culverhouse, and will update probably later than soonish
2020/11/21 20:12:53
Subject: Thumpingbear Builds a Mordheim Table - Terrain (and the Occasional Model)
That sucks about the laptop! We’ve all at least had near misses like that. The small ruin and House of the Flying Ass both look AMAZING! The realism you get in to your models is fantastic. The culver house is coming along great too, so much attention to detail it’s beyond anything I have the patience for. Hopefully the updates can still trickle through via your phone
Goberts Gubbins - P&M Blog, started with Oldhammer, often Blackstone Fortress and Void Panther Marines, with side projects along the way
2020/11/22 23:39:41
Subject: Re:Thumpingbear Builds a Mordheim Table - Terrain (and the Occasional Model)
Stunning work there mate! Your buildings put mine to shame Seconding gobert, but the attention to detail is amazing. I especially like the bricks.
Sorry to hear about the laptop accident. Happens to the best of us.
Best case scenario, the battery or the main power outlet is the only thing that fried. Seen that happen a few times and they started working after changing it.
@ everyone: thank you very much for the comments. Sorry for not responding individually, still going from the phone and it’s annoying. Also it’s Christmas Eve and I’m about 7 Yuletide drinks in.
Some updates:
First I put most of the flooring in.
I left part of the second floor uncovered because I was fitting in the ladder, which is the longest one shown here.
The longest ladder and the stairwell provide access to the roof hatch and small sniper platform as shown in these pics.
Unfortunately I didn’t get pic of the 2nd stairwell in situ, as I was finishing the construction of the building at the time. As I had said previously, the tree on the side of the house was to have a platform that would connect the interior ladder to an exterior one that would go to the roof.
Anyways, here is the (mostly) completed building. Finished the plastering, and the tree platform, and the roots of the tree around the pillar, which were done with green stuff and textured with a mix of caulking and saw dust. Hopefully you can see where that ladder would go: right beside the hatch, ending at the break in the roof spikes seen in pic 4.
I apologize for the tree side of the house being difficult to see, I primed it before gluing the tree in place because I figured it’d be easier. Turns out it’s still annoying to prime this thing.
With the main construction done, I turned to putting some small details in:
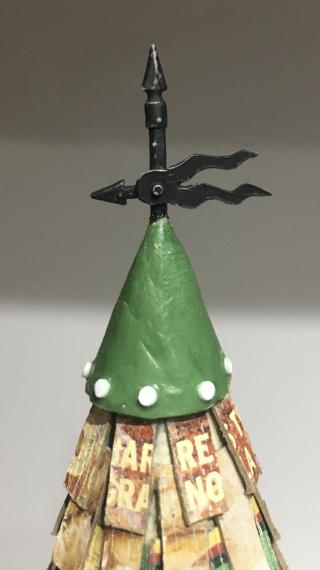
First is this weathervane on the top of the tower, bedecked with the twin tailed comet of Sigmar. This was a scavenge from a previous build that had broken off - now the interior of that plastic spear is mostly paper clip, all from some delicate and nerve wracking drilling. Unfortunately it doesn’t have the 4 spikes for the cardinal directions like true weather vanes have, but whatever. It looks cool and I’m happy.
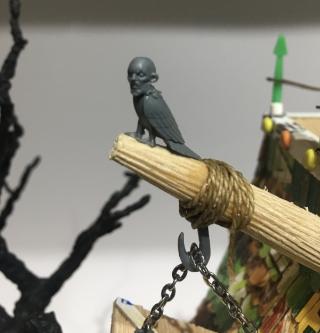
Next up is this ugly little guy - the wyrdstone that crashed into the city caused much mutation. Was this thing a human that mutated into a bird, or a bird that grew a human head? Whatever the case, it flies around crying portents of doom at any soul unfortunate to come across it.
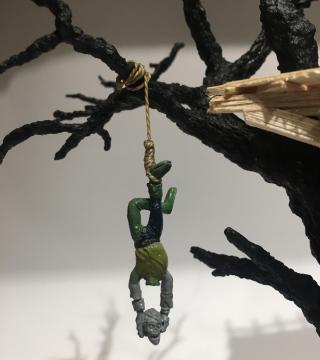
Finally, here’s my take on giving The Hanging Man tarot card a Mordheim twist - the original has his hands tied behind his back, but I feel a corpse holding his own severed head was twisted enough to be forgiven. Fun fact: the noose around his foot is the actual Hangman’s Noose, which was an incredible pain in my donkey to tie. Looks pretty cool though IMO.
I’m currently priming The Culverhouse, painting should be done soonish.
However, in this blogs title I specify that I paint the occasional model. So here’s a model:
This is Mr. Scale. I’ve been bothered that I don’t have a human sized model to give a sense of scale to my builds, so I decided last night to paint up this guy. Please forgive the crime that is the glue job at his feet, I bought these models second hand and had no part in that travesty. Mr. Scale is painted in the traditional purple and yellow of Ostermark, the Imperial province Mordheim is found in - this was also a test of a paint scheme I’ll be using in the future. Mr. Scale will be in most of my photos from here on out.
For a personal nitpick, the eyes look awful - however the eye sculpt was weird, so I’ll forgive myself. For a personal praise, I’m VERY happy with the stubble - it was done with a turquoise glaze, which I had read somewhere was a good way to do it. I think it looks great.
I plan on setting up a lightbox to take some glamour photos of the buildings I’ve recently made, some of the scatter terrain I’ve painted but not shown, and a few shots of all the terrain so far.
Merry Christmas/Happy Holidays to all, thanks for stopping by. More updates soonish.
2020/12/25 23:17:46
Subject: Thumpingbear Builds a Mordheim Table - Terrain (and the Occasional Model)
It’s always a treat to see your thread pop up on the subscriptions list! Another fabulous amount of detail to feast on. Glad to hear you’re having a Merry Christmas too!
Oh and thanks for the tip on turquoise for the stubble, interesting how well it worked on Mr Scale.
This message was edited 1 time. Last update was at 2020/12/25 23:18:48
Goberts Gubbins - P&M Blog, started with Oldhammer, often Blackstone Fortress and Void Panther Marines, with side projects along the way
2020/12/26 16:45:00
Subject: Thumpingbear Builds a Mordheim Table - Terrain (and the Occasional Model)
Great update, platform on/in the tree looks amazing! Love Mr. Scale and nice trick for the stubble. I've only tried mixing grey with the skin color one used, but will try out yours sometime too.
2021/01/08 20:12:07
Subject: Re:Thumpingbear Builds a Mordheim Table - Terrain (and the Occasional Model)
@gobert: what a kind thing to say, thank you. Hope your Christmas was stellar as well.
@Shadow Walker: thanks man, I aim to please!
@Viterbi: thanks, I was trying for a real ramshackle look, like if you sneezed near it it’d collapse. Takes a while to get right, I’m pretty happy.
Some updates:
Painting of the Culverhouse is coming along, albeit a bit slowly. Here is the stucco finished:
With Mr Scale in the shots you can see the size of building - it’s 15.25 inches to the top of the weathervane. Apologies that most of the building is inscrutable - the contrast between the black prime and walls doesn’t allow for great pictures on an iPhone. Next up will be the stonework.
In the last post I stated I’d take glamour shots of the buildings and some other scatter terrain I haven’t shown yet. Well that didn’t happen because I got distracted by another project - painting Mr. Scale reminded me of the fun of converting and painting figures. So I decided to build a Human Mercenary Warband.
The Warband will be run as Reiklander mercenaries, which confers a bonus to Ballistic Skill to Marksmen henchmen, and an increase to the Leader’s Leadership buff range, which serves well facing against warbands that cause Fear. The backstory I came up with is the Warband is made up of various Mordheim citizens that managed to escape the destruction of the city, now returning to plunder the empty streets. The paint scheme I’ll be using is the traditional purple and yellow of Ostermark, which I tested on Mr Scale.
The kits I used were mostly the Empire Militia and State Troopers (not sure what they’re called now in AoS), along with a ton of Empire bits from a giant bag of miscellaneous bits I had bought a few years back. Mordheim is supposed to be a WYSIWYG game, however my group plays with the Rule of Cool when it comes to modelling, so I took the opportunity to make characterful figures.
Anyways, here they are in no particular order:
The Ratbasher
I made this model a while ago before I had any concrete plans to make a Warband, mainly just as an exercise in modelling. In the Warband he’ll likely be run as a Youngblood hero. The legs of the rat nailed on his shield are a little wonky, but I’m sure it’ll look better painted up.
The Dualist
This model only had a simple weapon swap for an extra sword. Overall this guy is kind of plain, but I like him.
The Tortoise
This is the first model I put a lot of effort into greenstuffing by extending the brigandine chest piece and adding some cuisses to the legs for extra bulk. I called this guy the Tortoise because he reminds me of the turtle-like Ironclad Soldiers from Dark Souls 2, and because I plan to add a shield slung over his back. I haven’t put the shield on yet because I put too much work on the chest armour and I’m hesitant to make that effort pointless by covering it. I’ll have to eventually do it...
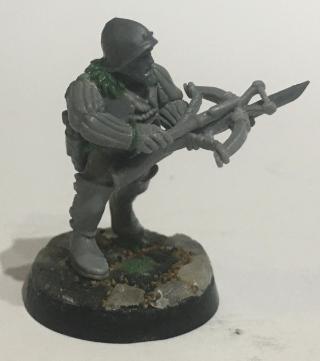
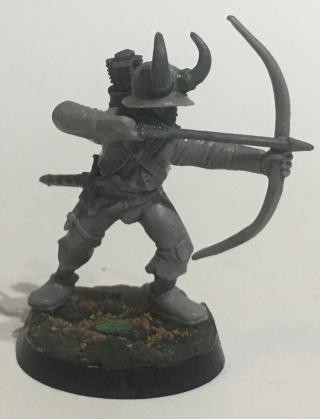
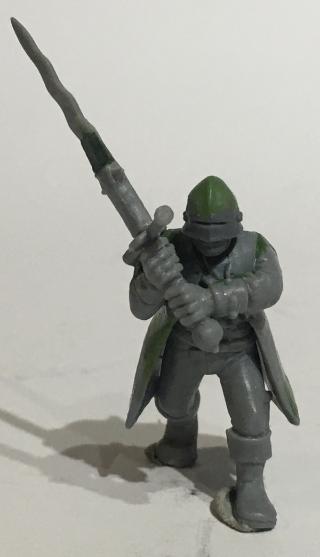
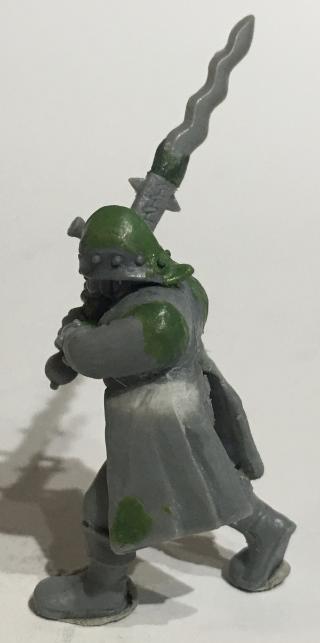
Crossbow Youngblood
As evidenced by the name, I intend to run this guy as another Youngblood hero. This model was an exercise to try sculpting fur for his collar - turned out pretty well IMO. I used Juan Hildago’s method for doing it, which I think can be found in the Tutorial section here. I included a third pic because this model is pretty hard to photograph - I wanted to show off his bayoneted crossbow.
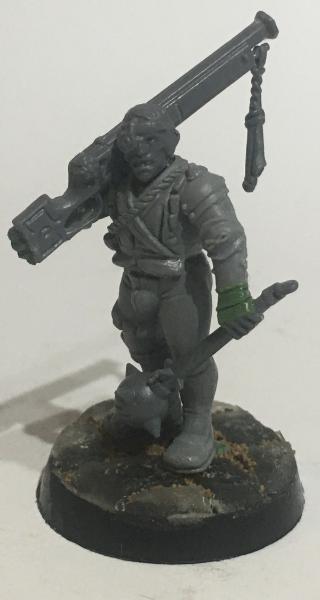
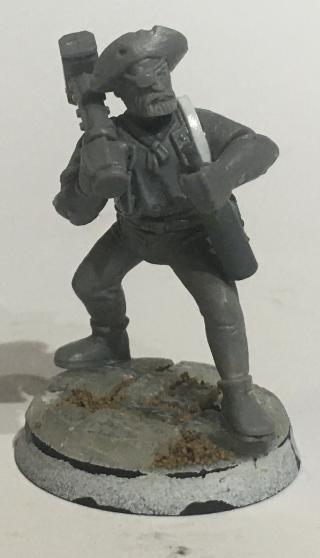
The Mad Gunner
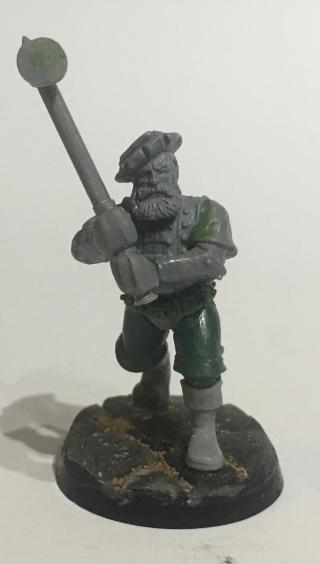
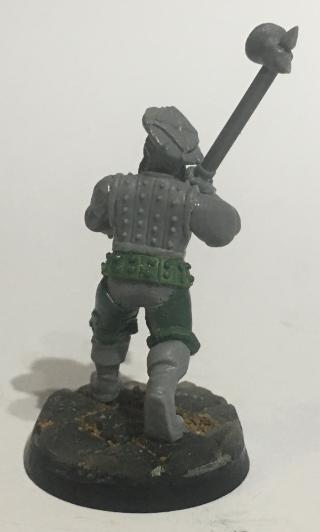
Extended periods of time in Mordheim comes at a risk to your health and sanity. This model exemplifies this with his peg leg and the fish he impaled on his helmet spike. This guy is loosely based on a couple pieces of art from the Mordheim rulebook, which I would show here but I’m lazy. The fish spike took FOREVER to get on there, it was incredibly fiddly. I’m very happy with this one, he’s one of my favourites and I’m excited to paint him!
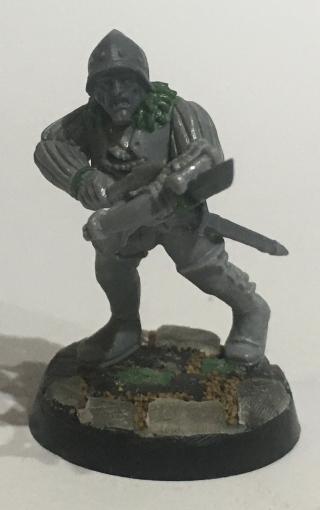
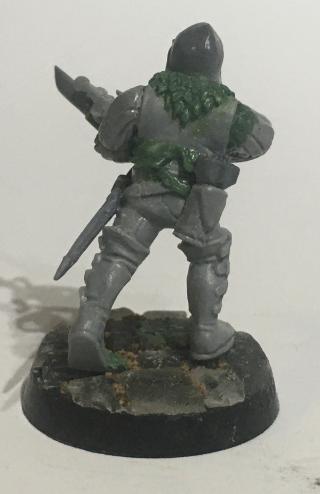
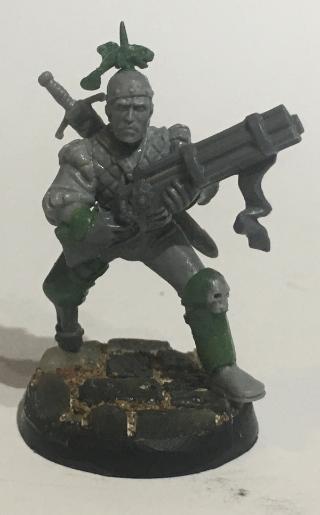
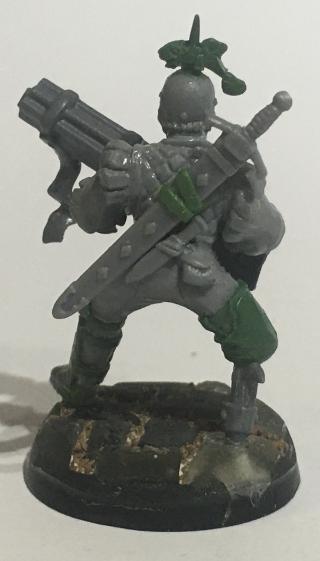
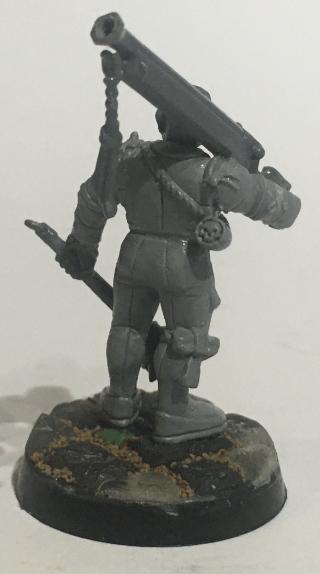
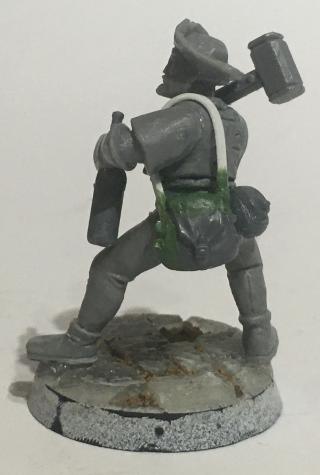
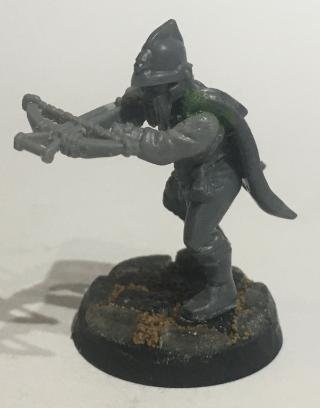
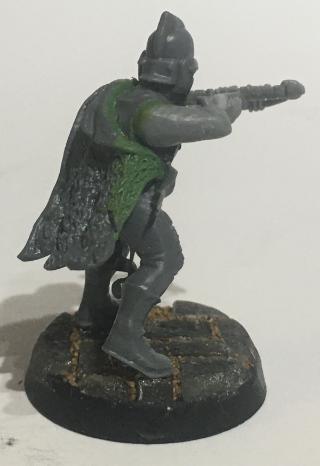
The Nuln Gunner
This model took some effort to have the gun resting on his shoulder, which also required greenstuffing his hand on the rifle butt. This one will represent the model that gets a Hochland Long Rifle in a campaign, which is the most powerful base blackpowder weapon warbands can get. I’ll probably add a scope to the rifle at some point. This models pose is my favourite of the bunch.
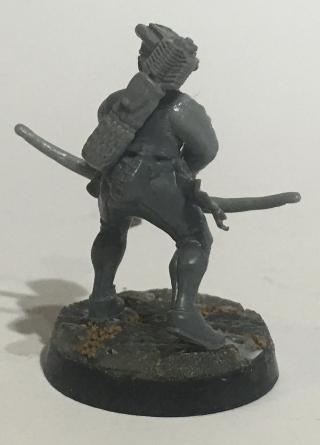
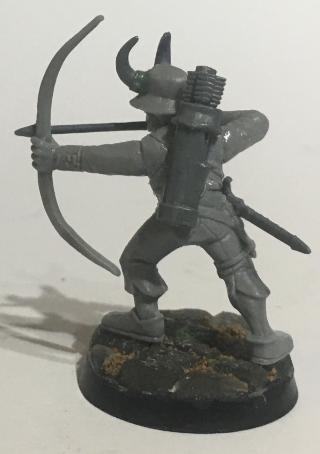
The Archer
This was another very simple conversion, just a Militia arm swap on a State Trooper body, and a strap for the quiver. Nothing special, but I like his look.
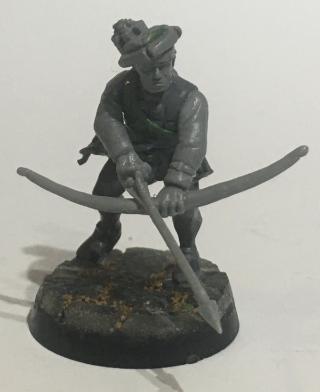
The Goat
I love front facing horns like this, it’s very under-utilized and looks dope. Other than the horns, the ends of the bow were bent inwards to sell the effect of the drawn arrow. I’m a big fan of this one.
The Prospector
It might be a little anachronistic to have a Wild West prospector in Mordheim, but they’re all Warhammer bits so whatever. This model is just fun, and I think I could count his bottle as another mace if I wanted to.
The Bard
I was never a big fan of this head from the Militia kit - I now realize it just needed proper context. The ruff was fun to sculpt, I followed a tutorial on the Gardens of Hecate blog. On his belt is a playbill and the skull of his good friend Yorick. I think I’m most proud of this guy because the ruff came out so well.
The Warden
This guy I imagine was a warden at a prison in Mordheim before the comet fell. This again is a fairly simple conversion - State Trooper body, Militia crossbow arms, and the head is from the Demigryph kit (I think), and a fur cloak from the Marauders of Chaos kit. I’ve become very fond of this one though, not quite sure why. I’m going to be giving him a spiked cudgel on his belt at some point.
So those are the models that I’ve made for the Warband, however I have a couple that I need some input on:
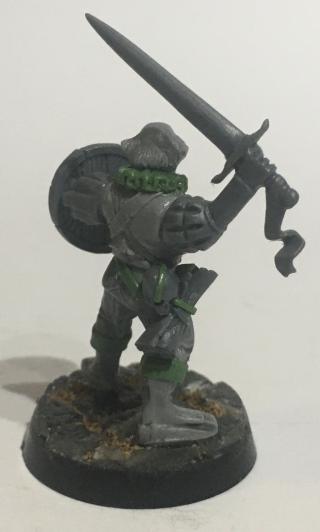
The Templar
This model took some effort to rebuild the sallet, which had a big Jaguar on top before I removed it. The body is from the Militia kit, which I’ve converted to hang more closely to the legs.
I like this model, however I don’t think he quite fits the theme I’ve established with the rest. He’s a lot more menacing. I think he’d probably be better suited to a Witchhunter Warband, in which cruelty and menace are expected. What do you all think?
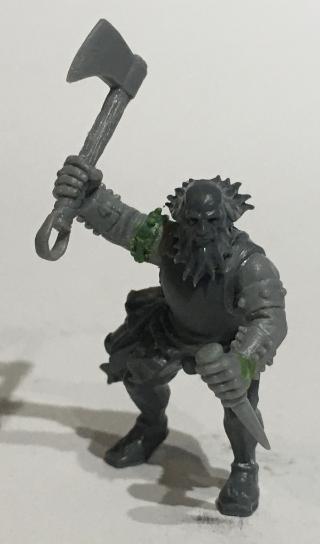
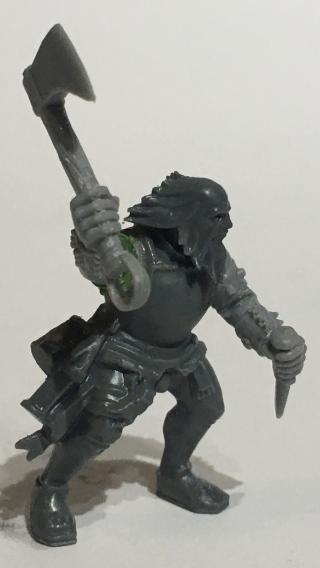
The Meh Model
This guy I’m just not happy with. I don’t think the head fits, and the axe arm just looks awkward. I’m open to suggestions for this model - maybe he needs something on his back? A loincloth? What do you all think?
So thats what I’ve been up to. I’ll continue painting the Culverhouse. I also have a few more models to make for the Mercenaries to get to the maximum of 15 models, including the Leader. I also want to make a Warlock hired sword to run with the Warband, which I have some ideas for. More updates soonish.
So great seeing the mercenary builds. Prospecter face is my favorite one. I have it on a pikesman (who failed to kill a single model in at least 20 games ).
Regarding the Meh mini, I think it might work better, if you switch out the axe for a hammer to go with the stake. Other than that he looks like a proper Mordheim citizen
Great stuff! Love the complexity of your builds in contrast with the pragmatic approach when it comes to materials. The warband is also shaping up nicely.


 that’s looking fantastic, the attention to detail and realism are spot on. Great to see a master at work!
 Finished Tau Sept Cadre
  Finished Ork Waaagh |
  Alaitoc Eldar Warhost
  Finished Order of Our Martyred Lady - Sisters of Battle
  Finished Necromundian Imperial Guard Regiment