| Author |
Message |
 |
|
|
|
|
Advert
|
Forum adverts like this one are shown to any user who is not logged in. Join us by filling out a tiny 3 field form and you will get your own, free, dakka user account which gives a good range of benefits to you:
- No adverts like this in the forums anymore.
- Times and dates in your local timezone.
- Full tracking of what you have read so you can skip to your first unread post, easily see what has changed since you last logged in, and easily see what is new at a glance.
- Email notifications for threads you want to watch closely.
- Being a part of the oldest wargaming community on the net.
If you are already a member then feel free to login now. |
|
 |
2022/05/08 16:21:34
Subject: Re:Jaunty Handmaiden - A Scratch-Built Spaceship for Star Wars Legion
|
|

Huge Bone Giant
|
It took a while but I've left the bottleneck behind:
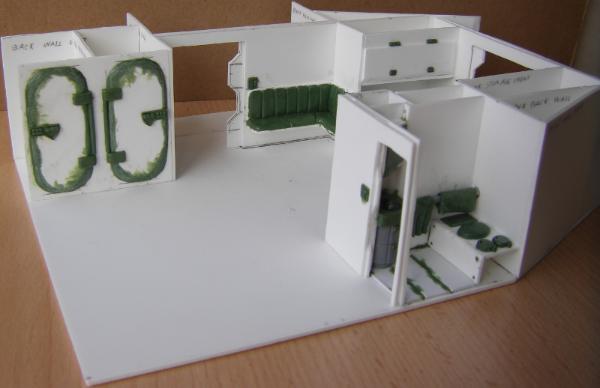
The wall is installed now. I opted for something a little fancier for the door controls since they're supposed to look secure, and there is need for at least one force field control button. That happens to double as a test run for the back ramp and external airlock door controls, which I also intend to give a little more attention than the rather simple interior door controls. Not that there's anything wrong with simple, but I like to think you want to play it safe with the doors that keep bad space weather out.
As for the aforementioned force field, here's a view of the field projectors:
Simple and smooth, I wanted something that fits inside the door frame without getting in the way of walking through. So I kept it simple. I'm likely going to paint the little indentations, aka the projectors, red to draw attention to them. I expect the cells will be painted more pragmatic and colorless, so the projectors along with the toilet box buttons will likely be the only colorful spots.
So, it took a while to get here, but I have not been idle. I'd like more tangible progress of course, but I used the time to start planning out the cockpit. Which made me realize how helpful it would be if I was an elder god, because boy is there going to be some weird geometry and exotic angles between the windows and exterior decor. And indeed, the interior is in such a good place now that I'm starting to work out the first exterior details in earnest now. There are still lots of little bits to be done, but before long I won't be able to push back the exterior any longer.
Now that the cell wall is installed I can look into installing the floor. As I said a few updates ago, that's the gateway to continuing the sitting corner and the next logical step. That will lead straight into the cockpit as I want the simple chairs of the sitting corner before I consider how I want to go about the fancy pilot seats.
|
Nehekhara lives! Sort of!
Why is the rum always gone? |
|
|
 |
|
2022/05/08 17:19:23
Subject: Jaunty Handmaiden - A Scratch-Built Spaceship for Star Wars Legion
|
|

Leader of the Sept
|
Awesome progress is awesome! Looking forward to seeing the cargo doors. Love a bit of well realised industrialised shenanegans.
|
Please excuse any spelling errors. I use a tablet frequently and software keyboards are a pain!
 Terranwing - w3;d1;l1 Terranwing - w3;d1;l1
 51st Dunedinw2;d0;l0 51st Dunedinw2;d0;l0
 Cadre Coronal Afterglow w1;d0;l0 Cadre Coronal Afterglow w1;d0;l0 |
|
|
|
|
2022/05/10 11:00:52
Subject: Re:Jaunty Handmaiden - A Scratch-Built Spaceship for Star Wars Legion
|
|
Huge Bone Giant
|
Oof. Well realized, too? No pressure! 
The ramp in the back is going to take a while to get to, though. I need the enter framework there for it to work and move, and that includes the exterior hull. For that I need to construct the cockpit, as that's going to have the most exotic shape and also determines how the ship is going to look in the end. Also I need the landing gear to construct the ramp. Plenty left to do. Heh. 
|
Nehekhara lives! Sort of!
Why is the rum always gone? |
|
|
|
|
2022/05/11 16:32:36
Subject: Re:Jaunty Handmaiden - A Scratch-Built Spaceship for Star Wars Legion
|
|
Huge Bone Giant
|
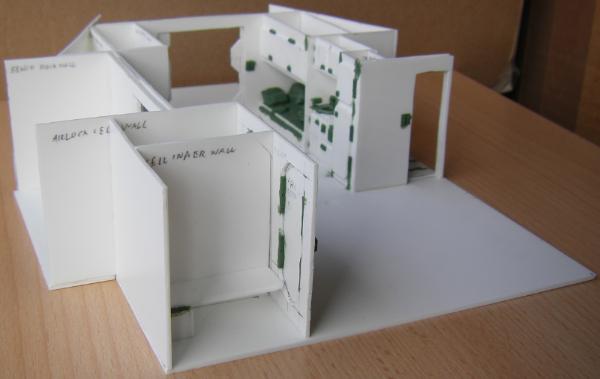
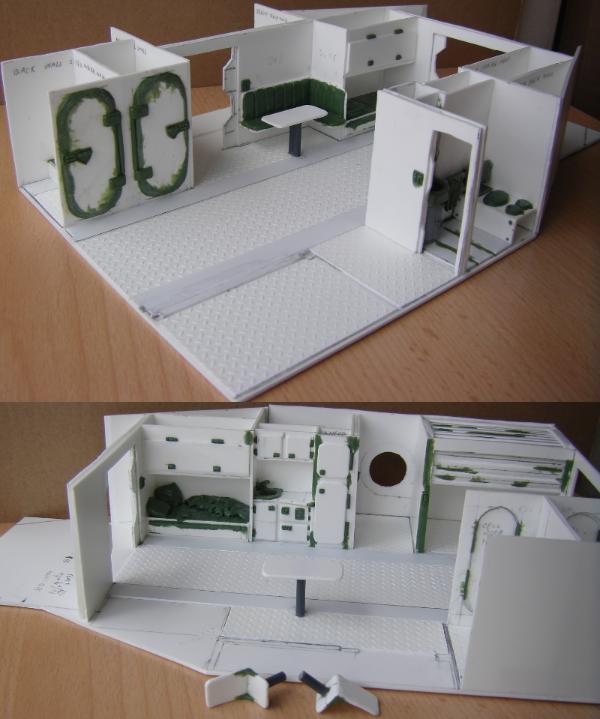
The floor has been installed:
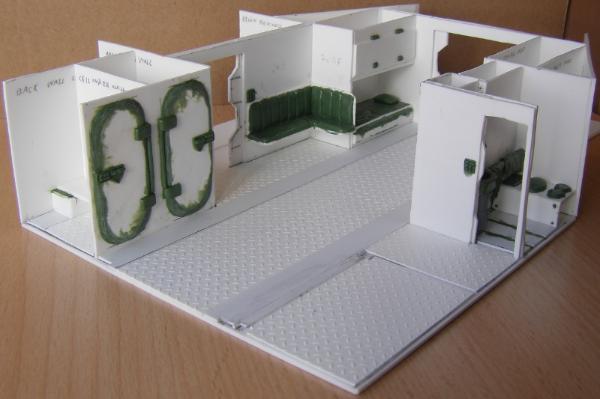
Moving on from the scenic shot to a top down view to see the layout:
Everything now has a floor except for the cockpit, which I have yet to work on, and the airlock whose base construction is still in two parts. I'm going to have to see when best to fit in the floor. At the very least it needs a reasonably finished outer bulkhead construction before I can really start thinking about that.
As mentioned before the next step is the table and accompanying chairs. I should get a few extra bits sculpted alongside that, like clean up the rolling door, get the back ramp some door controls, wrap up the interior of the airlock's inner bulkhead. Little things here and there that have been pushed back to work on bigger, more pressing stuff. Now that the interior of the ship is such an advanced state, it's time to take care of that. After that the big thing that remains is the wing access hatch in the starboard wall.
The top down view shows pretty well some of the warped parts. It's one of the things that with my previously limited exposure to plasticard I just didn't have a clue about. I'm relaxed about it and it certainly doesn't bother me enough to rip half of the ship apart to fix it. I could do better, more precise work now than I could a month and a half ago but as unfortunate as it is, that's just part of the learning process, being able to do a far better job after you're done than before. I don't let that bother me these days.
The thing that does need fixing in this regard is the starboard wall that comes up a millimeter or so short. That problem is probably best solved with an appropriately sized strip of plasticard. I mentioned earlier that the toilet door frame suffers a bit of bad construction as well and needs a fix. Both of these things are easier to do now that the floor is installed as the cargo compartment now has something to slot into and doesn't slip or move around so easily anymore. That should give me a solid base to work on. And thinking about it, I might add a bit of extra detailing to that corner of the toilet to hide the slip up and make it look a little more elegant.
|
Nehekhara lives! Sort of!
Why is the rum always gone? |
|
|
|
|
2022/05/18 20:17:39
Subject: Jaunty Handmaiden - A Scratch-Built Spaceship for Star Wars Legion
|
|

Druid Warder
|
Wonderful and inspiring!
|
Painting progress tracker:
2017: 50 of 50 planned; 2018: 80 of 60 planned; 2019: 75 of 75 planned
Pledge 2020:
6 to sculpt, 75 to paint (2/57 done) |
|
|
|
|
2022/05/19 07:24:43
Subject: Re:Jaunty Handmaiden - A Scratch-Built Spaceship for Star Wars Legion
|
|
Huge Bone Giant
|
Thank you.
A note on updates. For the past week real life interfered with my plans in a big way and I've been unable to get any meaningful work done, so it'll be a little while longer until the next update.
Ah, real life. Nice place to visit, but I wouldn't want to live there.
|
Nehekhara lives! Sort of!
Why is the rum always gone? |
|
|
|
|
2022/05/25 14:59:21
Subject: Re:Jaunty Handmaiden - A Scratch-Built Spaceship for Star Wars Legion
|
|
Huge Bone Giant
|
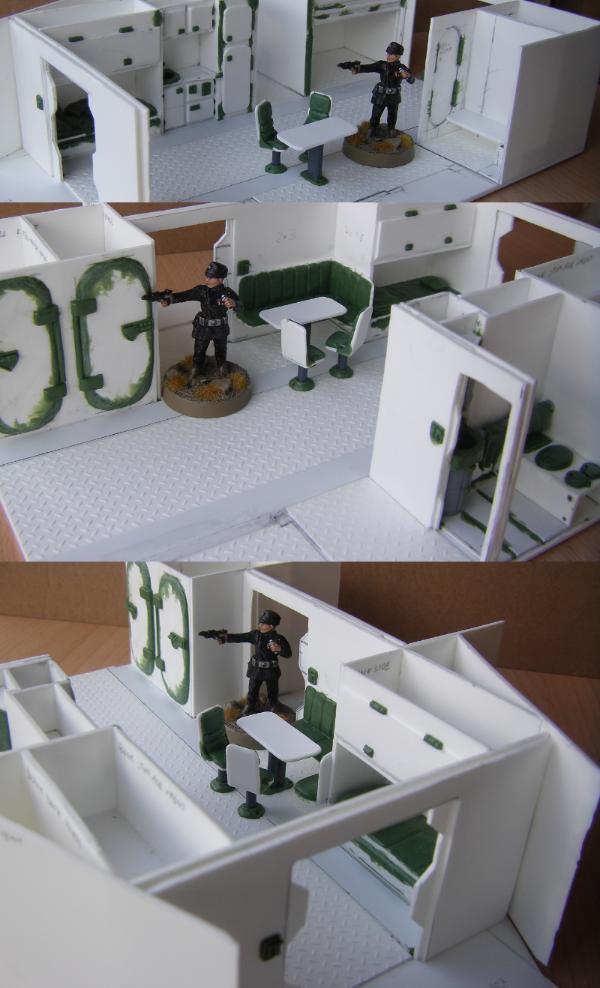
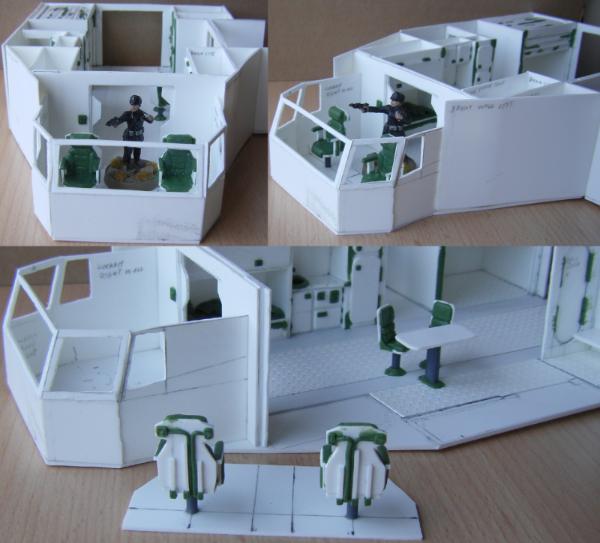
So, back on track. Furniture:
The table and chair are the obvious additions here. The chairs need some padding and a foot sculpted, in case of the latter only once they're glued to the floor. It's easy enough, but will take some time with all the various green stuff bits that need to cure.
The cargo compartment now has door controls and I added plastic strips to close the gaps in the bathroom walls that I mention earlier. That's going to require some more refinement, but it seems that layering on thin plasticard is feasible as a fix.
I've been looking into the wing access a little and I think I can add a door and some detailing around the hole at my leisure. That is not likely relevant to any adjacent bits so I can do that whenever I have some spare time. And, I guess, when I've made up my mind on how deeply recessed I want the door to be. So maybe it's all still a little hazy for now, but technically there's nothing physically in the way of developing that part of the ship.
The next big expansion will be the cockpit, though. Nothing to show yet, but I've drawn some exotic lines on a few pieces of plasticard and once I wrap my head around how the partially slanted walls actually fit together I can start the wall construction.
|
Nehekhara lives! Sort of!
Why is the rum always gone? |
|
|
|
|
2022/05/27 07:57:10
Subject: Jaunty Handmaiden - A Scratch-Built Spaceship for Star Wars Legion
|
|

Fixture of Dakka
|
That's a cool project, will there be 3D "chess"?
|
|
|
|
|
|
2022/05/27 12:15:15
Subject: Re:Jaunty Handmaiden - A Scratch-Built Spaceship for Star Wars Legion
|
|
Huge Bone Giant
|
Thank you. I considered a space chess table akin to the Falcon's early on, but dismissed it because I wasn't excited by the idea of a round bench to go with the table, the space requirements of it and how it would fit into the framework I'd already established. For the sitting corner I actually prefer what I'm building now, inspired by similar designs that were popular back in the 70s and 80s, at least around here.
I could however put a smaller, portable version of the game on the table for flavor. Run a cable from it to the nearest power port in a wall. Actually add power ports to the walls, I guess. Thanks for giving me that idea.
|
Nehekhara lives! Sort of!
Why is the rum always gone? |
|
|
|
|
2022/05/29 11:32:55
Subject: Re:Jaunty Handmaiden - A Scratch-Built Spaceship for Star Wars Legion
|
|
Huge Bone Giant
|
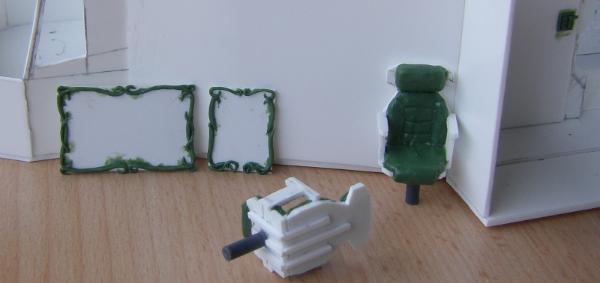
The sitting corner furniture is complete:
That concludes the sitting corner for the time being. As per the previous post there's a decent chance I'll add fun little details and stuff all over the place, similar to the starboard bed, to bring the ship to life a little more. I did the bed early on because I didn't know how long I'd keep the different wall pieces separate, but since there is currently no rush to glue them in I will have plenty of time to fill these things in without slowing down construction.
That said, I started work on the wall decoration for the sitting corner. I noted down the relevant measurements on the walls some time ago but only got around to actually doing anything with them now. Originally I thought I'd put up a poster or two, but changed my mind to paintings with fancy frames and all. Those frames will take up most of my sculpting time for a while.
As mentioned the next big step is the cockpit. I've been fiddling around with plasticard but I still have to draw up a comprehensive plan for the wall construction. It's slow going as I have a lot of trouble visualizing it, but I'm hoping to get there in the next half week.
|
Nehekhara lives! Sort of!
Why is the rum always gone? |
|
|
|
|
2022/05/30 22:15:27
Subject: Jaunty Handmaiden - A Scratch-Built Spaceship for Star Wars Legion
|
|
Stealthy Warhound Titan Princeps
|
The furniture style matches the Star Wars aesthetic very well!
|
|
|
|
|
2022/05/31 10:30:07
Subject: Re:Jaunty Handmaiden - A Scratch-Built Spaceship for Star Wars Legion
|
|
Huge Bone Giant
|
|
Nehekhara lives! Sort of!
Why is the rum always gone? |
|
|
|
|
2022/06/02 17:44:07
Subject: Re:Jaunty Handmaiden - A Scratch-Built Spaceship for Star Wars Legion
|
|
Huge Bone Giant
|
Another entry in the humble beginnings category, I started work on the cockpit:

That's a necessary frame to build on. I've been going through my options and with how thin plasticard is prone to warping I think I just need the whole thing enclosed and joined to the bulkhead to get everything to line up properly.
The plan is to build the pilot and co-pilot chairs first as the size of these are the only thing I have to match to anything established, which is to say the size of people. Anything else isn't set in stone all that much. After I have the chairs I can build the control consoles around them. I may try to fit them to the front window and wall extensions that will follow in order to keep a piece of the cockpit separate for painting. I'll have to see how that works out. The slanted walls I want for the cockpit unfortunately make things a bit complicated.
The back of the cockpit is going to get separate computer banks and stuff that should be entirely separate from anything else, so I can fit that in at my leisure once I have the exact position of the chairs.
On the original plan I have an escape hatch in the floor. I'm not sure how to go about that just yet and it might have been more convenient to cut a hole in the floor before the walls were attached, but without an exact layout of the cockpit that's unfortunately just not possible.
|
Nehekhara lives! Sort of!
Why is the rum always gone? |
|
|
|
|
2022/06/07 17:25:55
Subject: Jaunty Handmaiden - A Scratch-Built Spaceship for Star Wars Legion
|
|
Druid Warder
|
Considering news of "Rogue Trader" and old "Wing Commander: Privateer" fame - very fitting.
Yes, thin plastic does warp. The only bad thing about it when choosing between plastic and MDF or other kinds of wood. Sometimes using lots of narrow strips as reinforcement around all holes and across any space larger than 3 inches helps, but not always. :(
But the progress is good!
|
Painting progress tracker:
2017: 50 of 50 planned; 2018: 80 of 60 planned; 2019: 75 of 75 planned
Pledge 2020:
6 to sculpt, 75 to paint (2/57 done) |
|
|
|
|
2022/06/09 07:44:20
Subject: Re:Jaunty Handmaiden - A Scratch-Built Spaceship for Star Wars Legion
|
|
Huge Bone Giant
|
Heh, I've worked with MDF way back when and I've had my fill. I very much prefer plasticard, no matter the downsides. I'm cool with stickking laser cut MDF together as intended, but anything that involves cutting? No, thanks.
The reinforcement idea is a good one. Not the least when you consider that exposure to plastic cement, too much enthusiams and too little care even warped the floor plate a little. It's not too bad and should be fixed by gluing everything I have firmly in place, but it's something that really requires attention. The idea for the hull is to have an inner wall and an outer wall, both of them connected and spaced out by plastic sprue pieces. It would have probably been a sound idea to start with that and get a solid foundation to build on, but it's a little late for that. But yeah, I think giving reinforcements a bit more thought in the future might help.
|
Nehekhara lives! Sort of!
Why is the rum always gone? |
|
|
|
|
2022/06/11 12:47:40
Subject: Re:Jaunty Handmaiden - A Scratch-Built Spaceship for Star Wars Legion
|
|
Huge Bone Giant
|
A little progress:

The pilot chairs are currently only the frames cut straight from plasticard and glued together. I have yet to make up my mind which edges I want rounded, if any. I'm bound to give the corners of the seats and armrests some treatment, but it might just be 45° cuts to blunt them a little. I'm also not sure about the backrest yet. I might keep the sharp edges since I went with an octagonal headrest and I'm not sure if it still looked the part with rounded edges. I somehow doubt it. And if I have an angular backrest, I may be better off echoing that design on the rest of the chair.
The chairs are larger than the ones in the back not just to make room for the armrests but also to look more comfy. I'm considering letting the padding on the seat spill over the front and subtly pad the armrests as well.
I'll probably add a few reinforcement bars to the back to make it look more interesting. And also to make the chairs look heavier. I put them on rods as a matter of course, but I think piloting a ship is easier if your chair doesn't swivel, so I'll either reinforce it as well to make it look firmly installed or sculpt something that looks like a solid locking mechanism to give the option to turn the chair if needed, even if it's not something you would do in flight.
The fancy frames for the pictures I mentioned in a previous update are coming along nicely. I went with a flowing lines inspired by the designs on bigwig Pantoran characters in the Clone Wars show. Being as fancy as they are, they remove a little bit of space from the canvas. Ideally that won't make it harder to freehand the paintings later on.
|
Nehekhara lives! Sort of!
Why is the rum always gone? |
|
|
|
|
2022/06/15 00:35:17
Subject: Re:Jaunty Handmaiden - A Scratch-Built Spaceship for Star Wars Legion
|
|
Krazed Killa Kan
|
It's so detailed, it will be amazing to play on/in when it's done. 
|
|
|
|
|
|
2022/06/15 11:27:57
Subject: Re:Jaunty Handmaiden - A Scratch-Built Spaceship for Star Wars Legion
|
|
Huge Bone Giant
|
One can only hope.
|
Nehekhara lives! Sort of!
Why is the rum always gone? |
|
|
|
|
2022/06/19 10:01:43
Subject: Re:Jaunty Handmaiden - A Scratch-Built Spaceship for Star Wars Legion
|
|
Huge Bone Giant
|
Some progress on the stuff from last time:
The frames are finished now. Next time I'm priming any models, I think I'll just put some primer on these as well. No idea when I'll get around to actually painting them, but I'm fairly sure I want to paint them before gluing them to the walls.
The padding on the chairs is nearly complete. The headrests are a bit more work, especially on the one pointing away from the camera. After the padding I'll add flashy lights on one side of them and a switch on the other. Then run a cable from the switch down the back to connect for the locking mechanism I talked about earlier.
I'm starting to get an idea of how I want to mount the chairs. That's going to take a bit of extra time, so I don't expect to be able to do more work on the cockpit for a little while longer. To give me something to do in the meantime I put some work into the wing and gun access tube. I'm using Mantic plastic pipes for that. They're pre-cut and modular in length, which is convenient. The biggest issue for now is what to do with the hatches that close the tube. Two part doors like the cockpit door but smaller were my first thought, and on the fuselage side that won't be an issue. But since I don't have a clear idea of the size of the gun turret, I've been wondering if it wouldn't be better to have an iris hatch instead to save space. Either one isn't likely going to be a joy to create, so I'm not even considering what's easier. So while I'd like to get physical work done, I think I'm going to have to channel some more brain power into planning first.
|
Nehekhara lives! Sort of!
Why is the rum always gone? |
|
|
|
|
2022/06/26 16:48:31
Subject: Re:Jaunty Handmaiden - A Scratch-Built Spaceship for Star Wars Legion
|
|
Huge Bone Giant
|
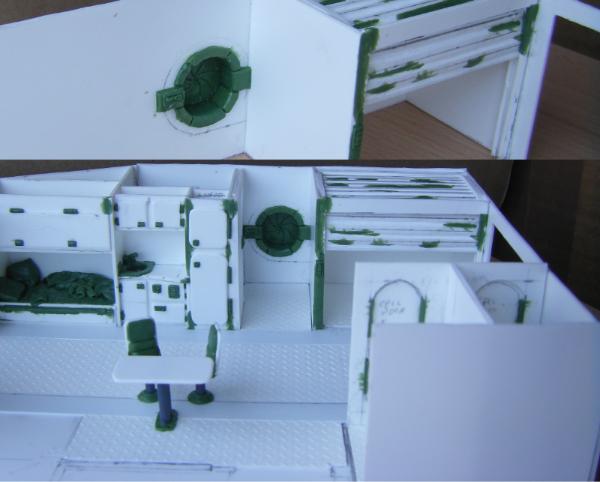
Wait, is that a spot of color?
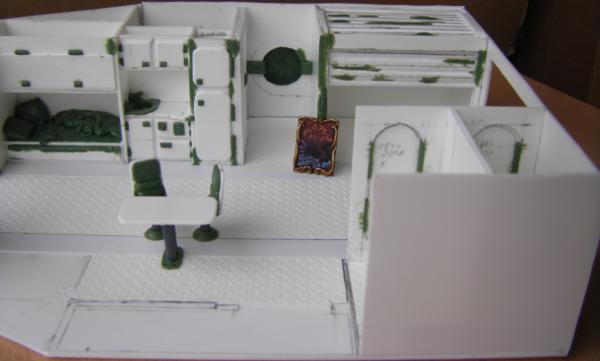
The first wall decoration is finished. I just couldn't resist painting it. It's a framed poster from the Pantoran Blue tour of the glam punk band Dye Dye Dye. I had the idea fairly early on and all the elements I wanted are there, though the composition has been adjusted a little because my mind can paint smaller letters than my brush. One more to go, and I might just work on it next. I'm kind of in the mood.
Behind it you can see progress on the wing access. I ended up going with the iris hatch as it's the most elegant solution. The tube has a metal beam with embedded light strip on each side, and both of these are already finished. Bottom and top of the tube are going to have leather padding that I'll set up as a wide central strip each with two narrower ones to frame it. The hatch controls will be added onto the wall extension of the forward metal beam. I may add a few handles above the tube to pull yourself out or help you crawl in.
I also adjusted the top of the cargo compartment's door frame as it was a little too long and therefore bent. The whole component now fits smoothly in the floor gaps.
Progress on the pilot chairs slowly continues. I had hoped to be further along, but they're hard to hold and not mess up fresh green stuff, so I have to work in more, smaller steps. It won't take that much longer now, though.
|
Nehekhara lives! Sort of!
Why is the rum always gone? |
|
|
|
|
2022/06/26 18:40:19
Subject: Jaunty Handmaiden - A Scratch-Built Spaceship for Star Wars Legion
|
|
Utilizing Careful Highlighting
|
Its looking really cool, and yeah, even just that small is pretty impressive!
|
|
|
|
|
2022/06/27 07:20:04
Subject: Jaunty Handmaiden - A Scratch-Built Spaceship for Star Wars Legion
|
|
Shas'la with Pulse Carbine
|
Spaceship is looking good!
|
My hobby ADHD, mostly Necromunda, with a splash of regular 40k... |
|
|
|
|
2022/06/27 11:16:51
Subject: Re:Jaunty Handmaiden - A Scratch-Built Spaceship for Star Wars Legion
|
|
Huge Bone Giant
|
Thanks, guys!
|
Nehekhara lives! Sort of!
Why is the rum always gone? |
|
|
|
|
2022/07/10 10:35:35
Subject: Re:Jaunty Handmaiden - A Scratch-Built Spaceship for Star Wars Legion
|
|
Huge Bone Giant
|
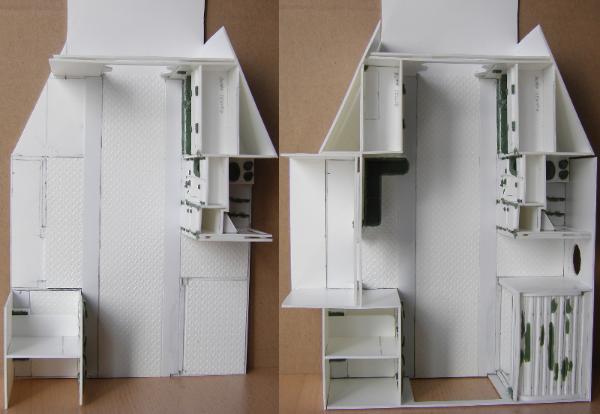
Progress on the cockpit:
Slanted walls are hard for me to wrap my head around, so the window panels took a while to plan and cut out. I think I mentioned before that I have to build the full cockpit wall to make sure the whole thing fits and doesn't warp. Since I can't really work in that space anymore, the cockpit interior will be handled with two or more inserts that I'll finish and likely paint separately. I'll start with the forward insert with the chairs and instruments, as seen above. Behind it I want further computer stuff on the side walls, and I'm not sure yet if that's going to be a single piece or two separate ones with a third one just for the floor between them.
The chairs are finishes except for the floor connection. There will be a console between them with the hyperspace lever thingy we all know and love, pilot and co-pilot controls to the front and some modest techy stuff on the sides. That should take up most of my time for the next bit.
The walls currently cap out a 4/5 of the ship's wall height, and because the cockpit is cramped I'll have to decide if I want to leave it like that and make the rest of the wall part of the ship's roof assembly. I'm going to have to put some models in there to see how I feel about it. It's not a certainty yet.
As for the wing access:
It's finished. Hurray!
|
Nehekhara lives! Sort of!
Why is the rum always gone? |
|
|
|
|
2022/07/19 07:51:55
Subject: Re:Jaunty Handmaiden - A Scratch-Built Spaceship for Star Wars Legion
|
|
Huge Bone Giant
|
More paint!
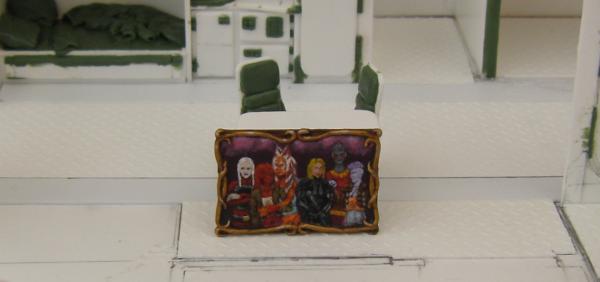
This one is more personal than the other picture, showing the captain's closest friends. From left to right: Gloomy, Bouncy, Bawdy, Skull Girl, Horror Show, and Action Girl (the captain).
I didn't keep exact track, but around twelve hours went into the freehand. I never thought I'd spend that kind of time on a two by three centimeter canvas.
Similar to the other picture, this is the smallest I can paint. I used my finest detail brush that's worn down further by two years of loyal service for even thinner lines. Between keeping my hands steady and paint wet on the brush, this was a real tough one to pull off.
It's also one of the reasons I've slowed down a bit recently, pouring my time into painting instead of further construction. With the picture done now I'm hoping for that to pick up again.
|
Nehekhara lives! Sort of!
Why is the rum always gone? |
|
|
|
|
2022/07/21 13:38:47
Subject: Jaunty Handmaiden - A Scratch-Built Spaceship for Star Wars Legion
|
|

Grisly Ghost Ark Driver
|
Wow, that painting is REALLY impressive!
|
|
|
|
|
|
2022/07/21 17:09:55
Subject: Jaunty Handmaiden - A Scratch-Built Spaceship for Star Wars Legion
|
|
Druid Warder
|
Very cool, very impressive, very spacey. Please continue!
|
Painting progress tracker:
2017: 50 of 50 planned; 2018: 80 of 60 planned; 2019: 75 of 75 planned
Pledge 2020:
6 to sculpt, 75 to paint (2/57 done) |
|
|
|
|
2022/07/23 07:33:29
Subject: Re:Jaunty Handmaiden - A Scratch-Built Spaceship for Star Wars Legion
|
|
Huge Bone Giant
|
Thanks, guys!
Edit: I just noticed that Bouncy's and Bawdy's left arms can't interact like that. I'm going to have to fix that.
Edit 2: Or not? Maybe I'm just be seeing things. I'm going to have to look into it when it's cooler. I don't brain so well when it's hot.
|
|
This message was edited 2 times. Last update was at 2022/07/23 12:44:34
Nehekhara lives! Sort of!
Why is the rum always gone? |
|
|
|
|
2022/08/02 08:50:32
Subject: Jaunty Handmaiden - A Scratch-Built Spaceship for Star Wars Legion
|
|
Fighter Ace
|
It looks great to me, mate, really solid work here.
|
|
|
|
|
|
2022/08/03 10:33:40
Subject: Re:Jaunty Handmaiden - A Scratch-Built Spaceship for Star Wars Legion
|
|
Huge Bone Giant
|
Thank you.
|
Nehekhara lives! Sort of!
Why is the rum always gone? |
|
|
|
|
|
|

