Forum adverts like this one are shown to any user who is not logged in. Join us by filling out a tiny 3 field form and you will get your own, free, dakka user account which gives a good range of benefits to you:
No adverts like this in the forums anymore.
Times and dates in your local timezone.
Full tracking of what you have read so you can skip to your first unread post, easily see what has changed since you last logged in, and easily see what is new at a glance.
Email notifications for threads you want to watch closely.
Being a part of the oldest wargaming community on the net.
If you are already a member then feel free to login now.
2019/04/21 17:07:40
Subject: Re:Dungeons and Dragons Blog - DIY Resin magnetic dungeon tiles - full room with walls
I know it’s crazy, but have you tried using actual stones for the texture? I did when making some base inserts with air drying clay. I have a bag of rocks under my desk and you can just reach in and grab a random one and use it for texture with different edge stuff giving an assortment of reliefs.
LOL, Theo your mind is an amazing place, never change.-camkierhi 9/19/13
I cant believe theo is right.. damn. -comradepanda 9/26/13
None of the strange ideas we had about you involved your sexual orientation..........-Monkeytroll 12/10/13
I'd put you on ignore for that comment, if I could...Alpharius 2/11/14
2019/04/21 17:35:54
Subject: Dungeons and Dragons Blog - DIY Resin magnetic dungeon tiles - full room with walls
As long as the hot glue isn't too hot, it should be fine. I personally don't think super glue would work very well. I think it would melt the foam unless the paper is left on the part you're gluing. The paper doesn't always stay on well either. Super glue is very brittle, with something flexible like foam, I think it might fall apart. Do you think PVA warps it because of the water in it? Maybe it wouldn't warp with all the paper pealed off the foam Also, I expect leaving a not too heavy weight on it while the PVA dries would probably work too. No matter what, good luck
I did it with the hot glue, thanks for the advice!
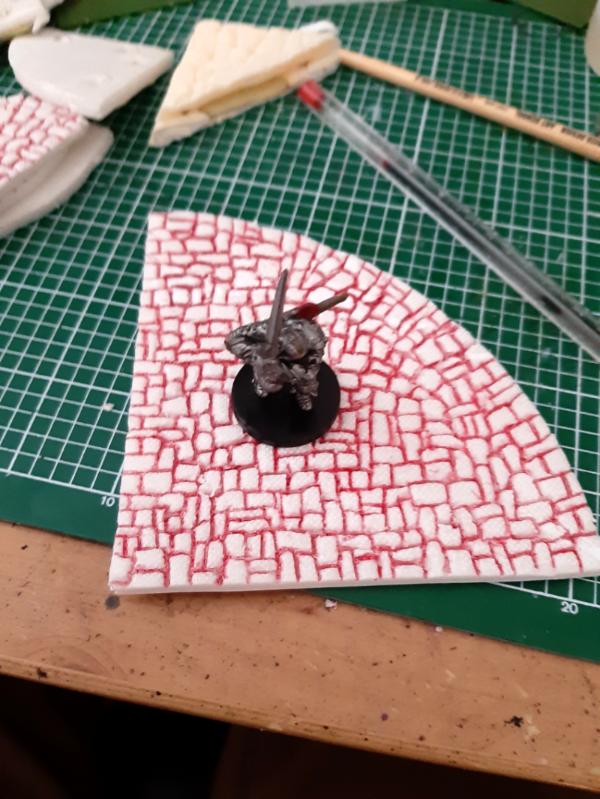
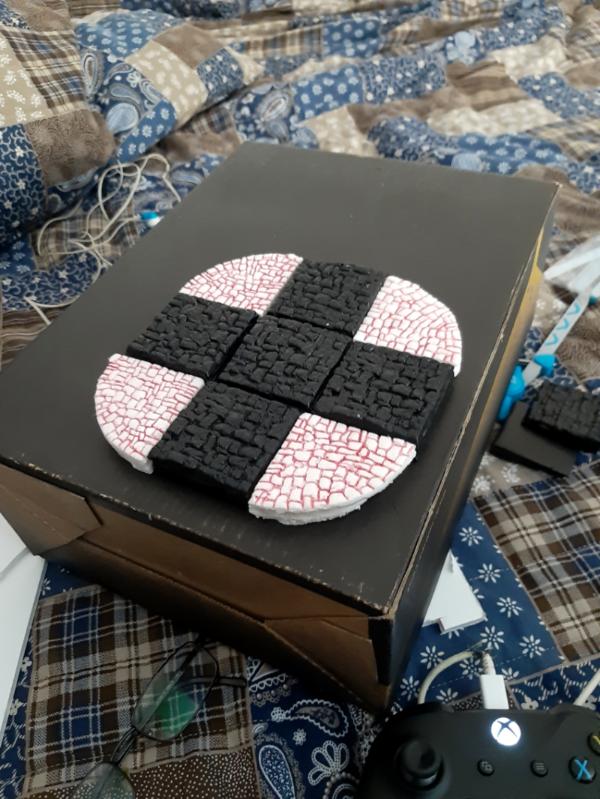
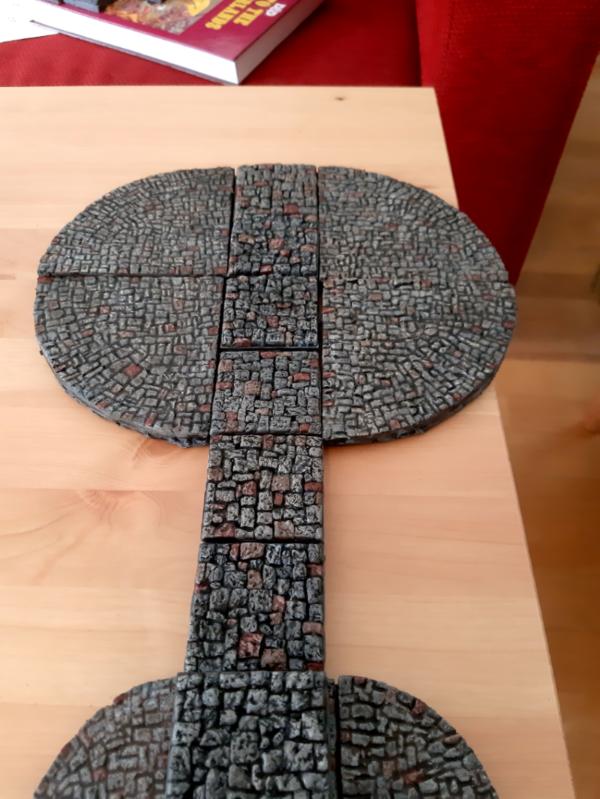
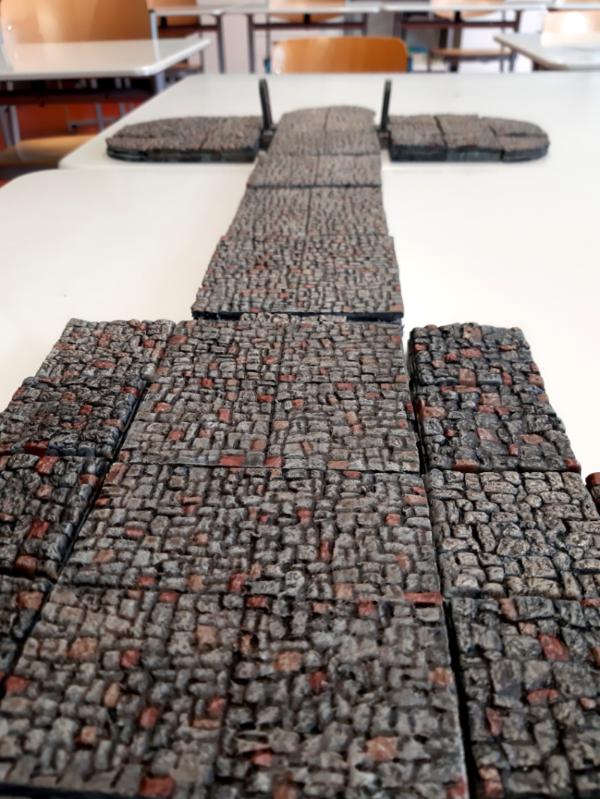
Phew. Been working hard on these circle tiles, and got my first 50mm radius circle done. I want to get at least one more done, and I have started work on a 100mm radius circle.
I decided to make them magnetised, and this turned out to be REALLY ANNOYING, but it works now that they are done and given I am only going to do this for a few tiles I think it is worth it for maintaining consistency.
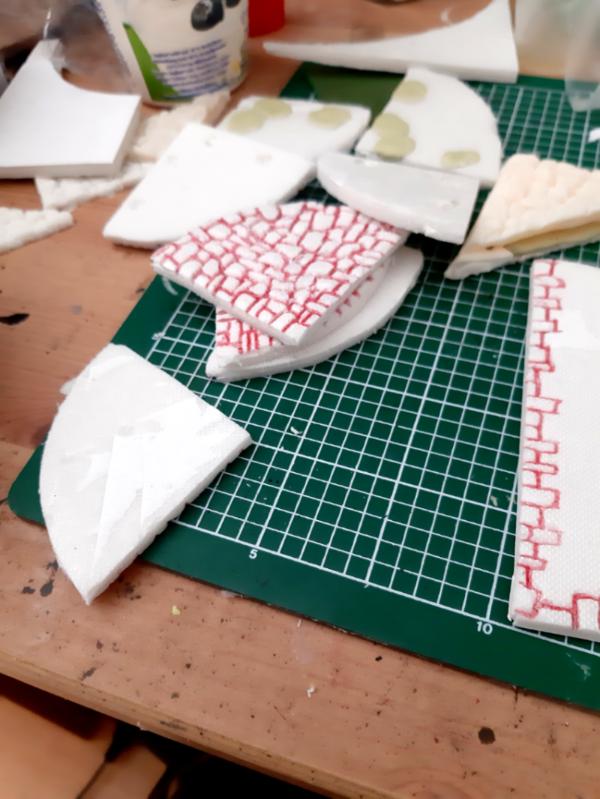
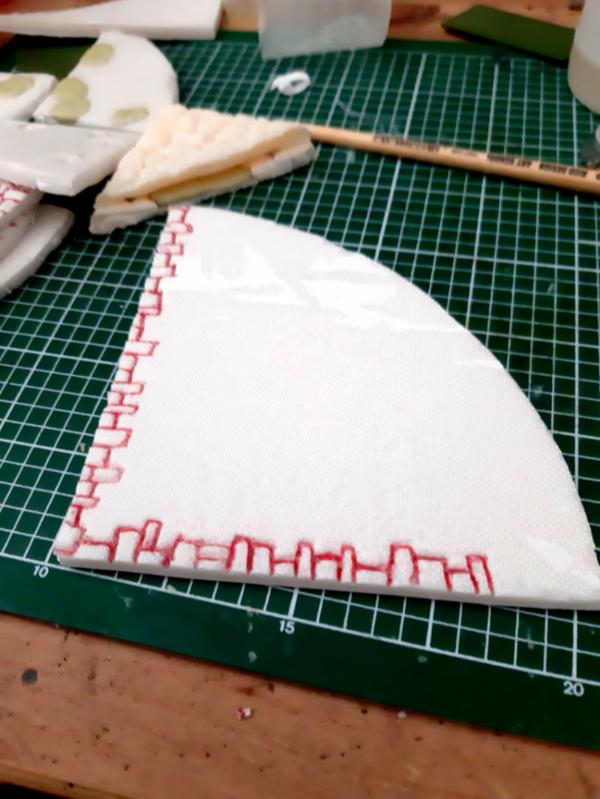
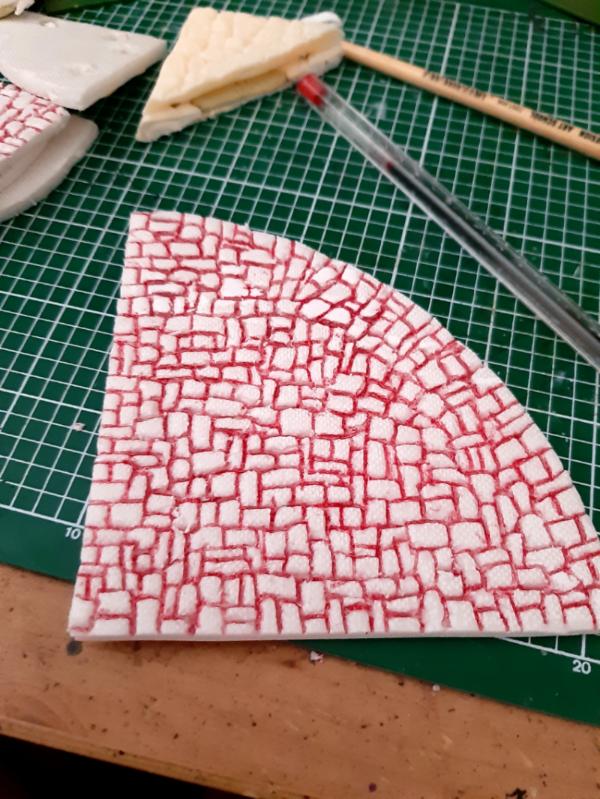
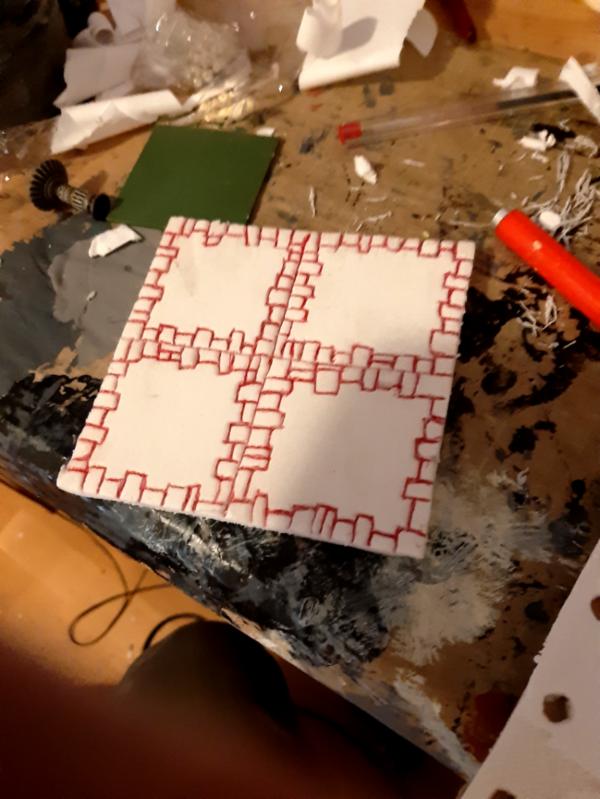
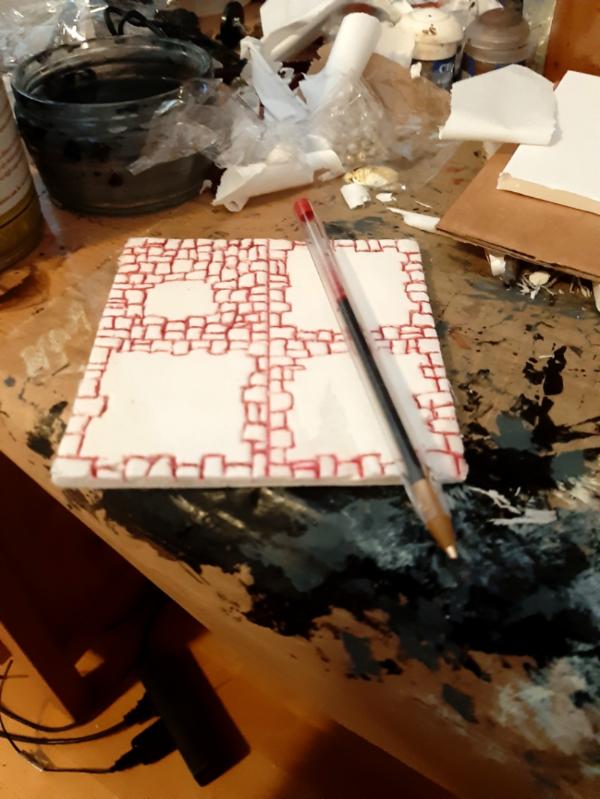
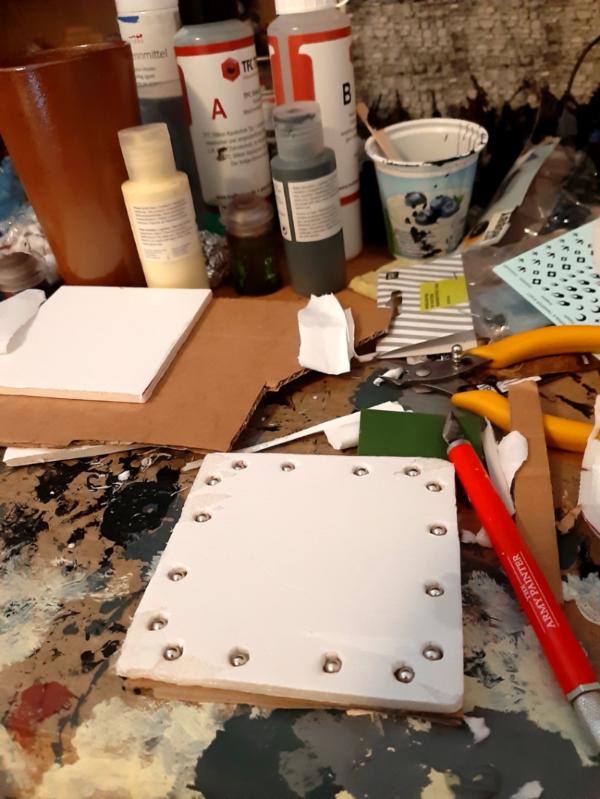
I made 4 of the top tiles with the flagstone pattern etched into it with my red biro, and then I used them as templates to cut out 4 base tiles. All of this was done with 5mm foamboard. Tedious, but it looks good in the end. I textured them with rock and tinfoil (Thanks Theophony!)
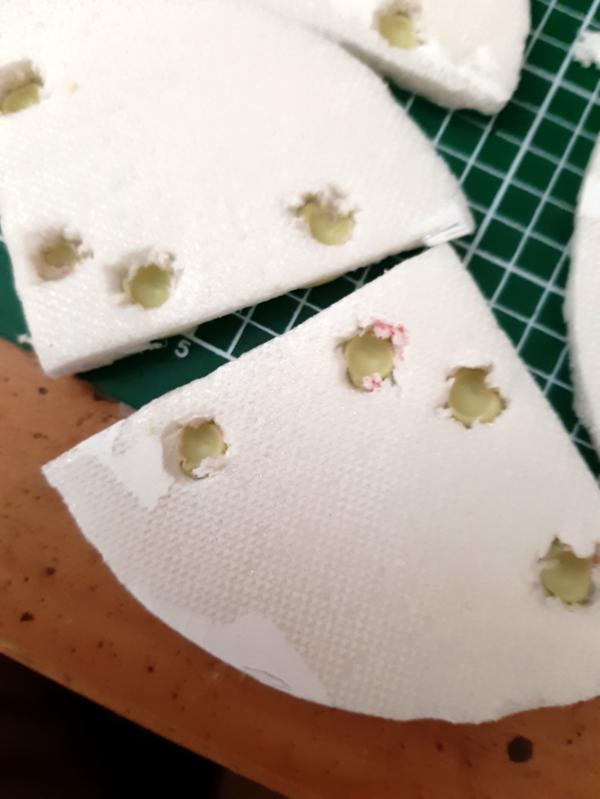
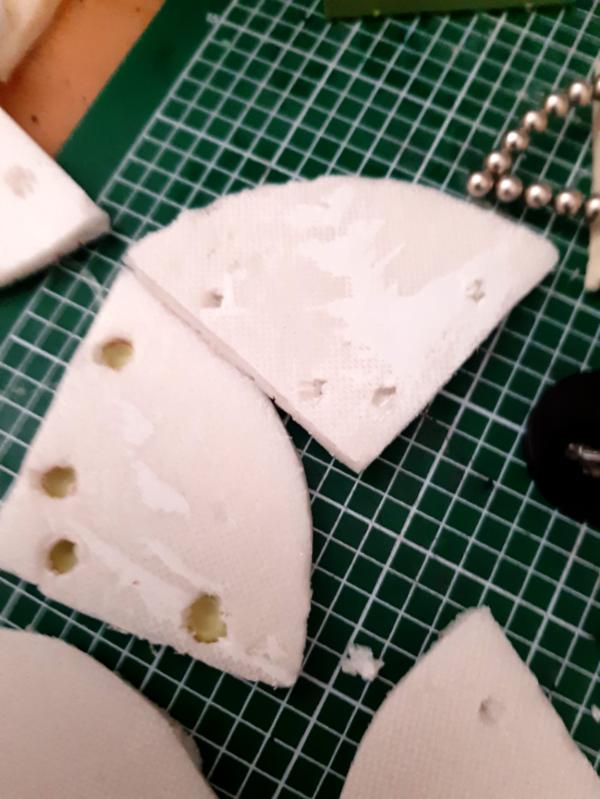
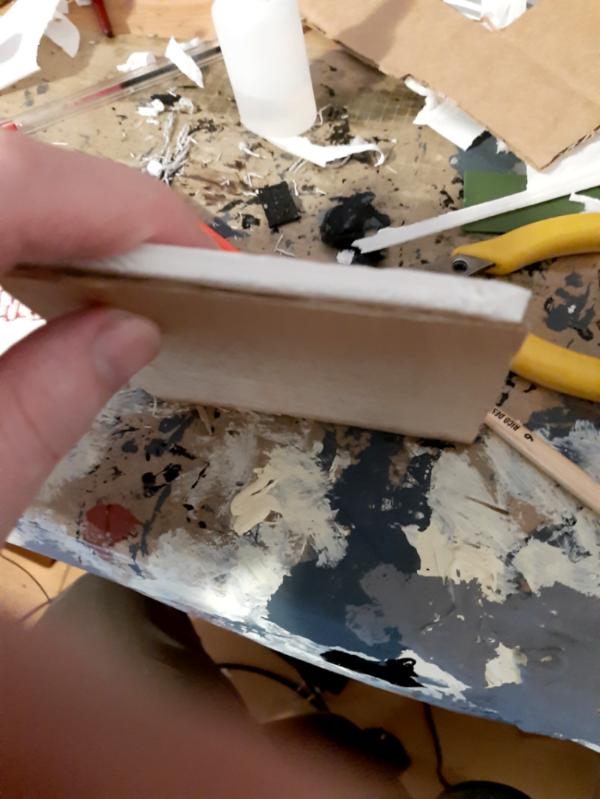
Then I marked on the bases where the magnets had to go to line up with the resin tiles. I cut through the foam a 5mm diameter space for them to sit in. This was fiddly and annoying! Then I put some milliput over the hole and pressed a magnet into it to make a nice smooth impression for the magnets to sit into. I put a lot of force on them to make this as thin as possible and put them as deep into the milliput as possible, but on one of them the magnets still sat quite high up and this made later stages quite annoying. I got the magnet back out again just by holding my craft knife over them, and they just jumped onto the blade.
Left them to dry and worked on my bigger circle tiles...
These tiles are a lot bigger, each quarter circle is two resin tiles across. So the pattern drawing is even more tedious! I will be putting 8 magnets in these ones, following the pattern of 2 of my normal tiles put side by side exactly.
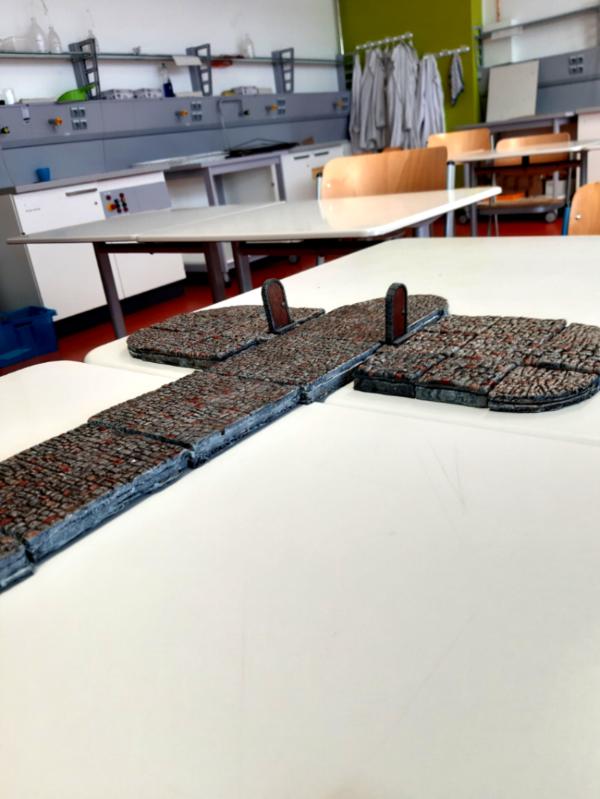
Here is a scale shot:
The worst part of making the 50mm circle tiles was getting the magnets in. Because the 5mm foamboard is just a bit too low, especially with the milliput bottom on there, the magnets sat higher than in my square tiles and they kept jumping onto each other. I had to cover them with my fingers and really do my best to keep them from jumping. I glued them with hot glue, and this had the added bonus of making the gap between top and bottom a bit higher so the magnets would have more room to rotate. You can see here that I had carved a little into the underside of the textured tiles to allow for this, but it was difficult to get this to work as well as I wanted without breaking through to the top part.
The magnets jumped into the hot glue a couple of times, which meant I had to start again. I think to help with this problem, I could use a lot less milliput, the bare minimum, and maybe make a little rim of milliput around the magnet holes to help hold them in place. Will try it on the next set.
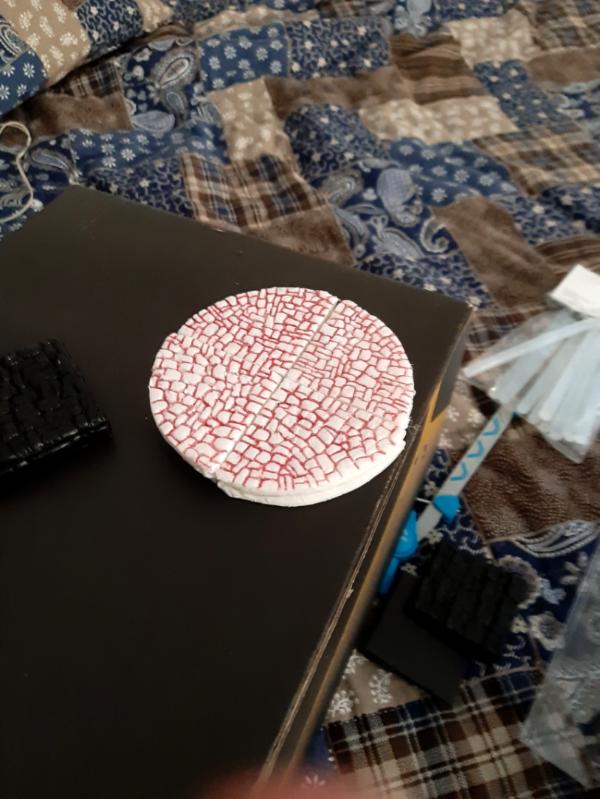
Here is the end result!
As you can see they stick to each other and the resin tiles really well. I am very happy with how they fit in with the set! One of them definitely has magnets at the front that are immobilised by hot glue, but luckily because my set is built to allow every magnet to rotate, the other ones can compensate for that one.
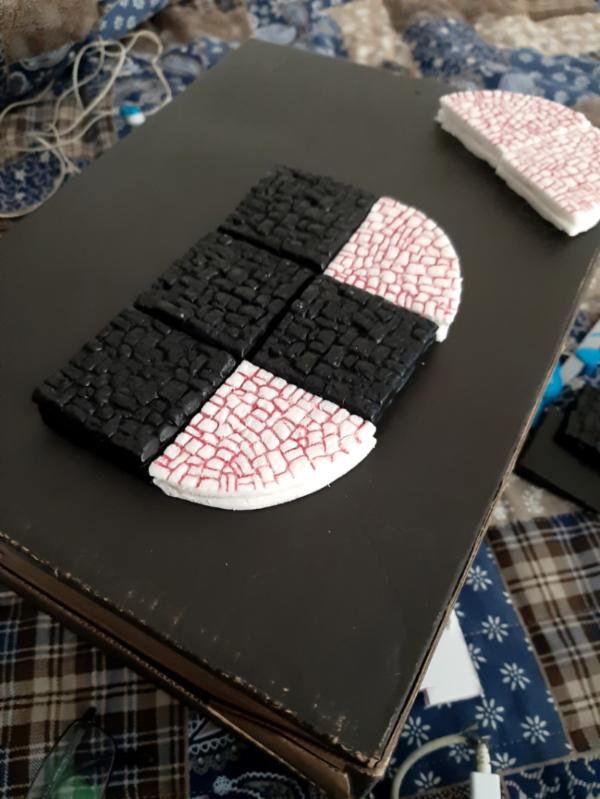
I can also make a 75mm radius "circle" by slotting in some tiles like so:
Next step is making a mix of mod podge and black craft paint to prime this and seal the foam, and then once that is dry it can be painted along with the rest. This was pretty laborious overall, but I think given I only plan on making 8 of these tiles and 8 of the bigger quarter circles it is okay. that will make me make 90% of the layouts in adventures and any of the ones I cannot do exactly I can bulk out by using the method in the last picture there bulked out with two sets of tiles rather than one!
This was interesting because it was my first time trying this stuff with foam, which up to now I had never really worked with much. It was easy, just time consuming and a bit tedious. But I think the result looks decent and I am glad I went to the effort of magnetising these as well, though I think they are likely to have a shorter overall life because of the flimsier material. Making a mold for this and casting it out of resin would have been a real pain and it would have used up a huge amount of resin for the bigger circle, so I think this is the right method.
Sorry to hear it was annoying working on those, they sure turned out nice though. Those big arc ones must have taken absolutely forever. It's nice that they fit in and attach to the tiles, worth all the magnet work, I'd say.
Yeah, I think they did turn out okay. I am just gonna do one of the bigger arcs at a time and eventually I will have 'em all done. Thinking about doing a big 100mmx100mm tile or two the same way, square, just to fill out bigger rooms while using fewer magnets. Might be overkill though...
Might wait and see how hardy the mod podge seal, paint job and varnish make these tiles before committing.
Will you be doing a concave curved floor tile too? (I’d call this type a convex curve as it bubbles out) could be useful for bends in a curved hallway.
LOL, Theo your mind is an amazing place, never change.-camkierhi 9/19/13
I cant believe theo is right.. damn. -comradepanda 9/26/13
None of the strange ideas we had about you involved your sexual orientation..........-Monkeytroll 12/10/13
I'd put you on ignore for that comment, if I could...Alpharius 2/11/14
2019/04/26 16:03:23
Subject: Re:Dungeons and Dragons Blog - DIY magnetic dungeon tiles - circular tiles
Great project with excellent imagination- very much 'out of the box'! I'm ripping off...I mean- taking copious notes with proper attribution to see about trying something similar!
"He fears his fate too much, or his desserts are small, who will not put it to a single touch; to win- or lose- it all."
Montrose Toast
2019/04/26 17:35:51
Subject: Dungeons and Dragons Blog - DIY magnetic dungeon tiles - circular tiles
Thank you! Please steal away. This whole project comes from me stealing ideas and techniques from two different sources, I think the only original thing I came up with is the spacer and wall system.
I hope you have fun if you try it out!
So, mostly been busily finishing off the various tiles, undercoating them and painting them. Just the spacers and walls left to go, but I am so happy with how they came out I wanted to share a layout with you guys. One problem is that the surface of the tiles is a little tacky, so they seem to be sticking to each other when I stack them a bit. I am gonna give them a coat of varnish so that they don't take paint off each other due to this.
I painted these in a simple fashion: Black primer, dark grey, light grey drybrush, pick out stones in tan and reddish brown (most tedious step but I think it adds visual interest to the tiles), drybrush with lighter tan and reddish brown, overall light drybrush with beige, and then a heavy wash with a brown wash. The different coloured flagstones are a bit annoying to do, but they effectively make the tiles all look different to each other despite them being 3 sets of 12 duplicates, and they add some visual interest to the tiles too.
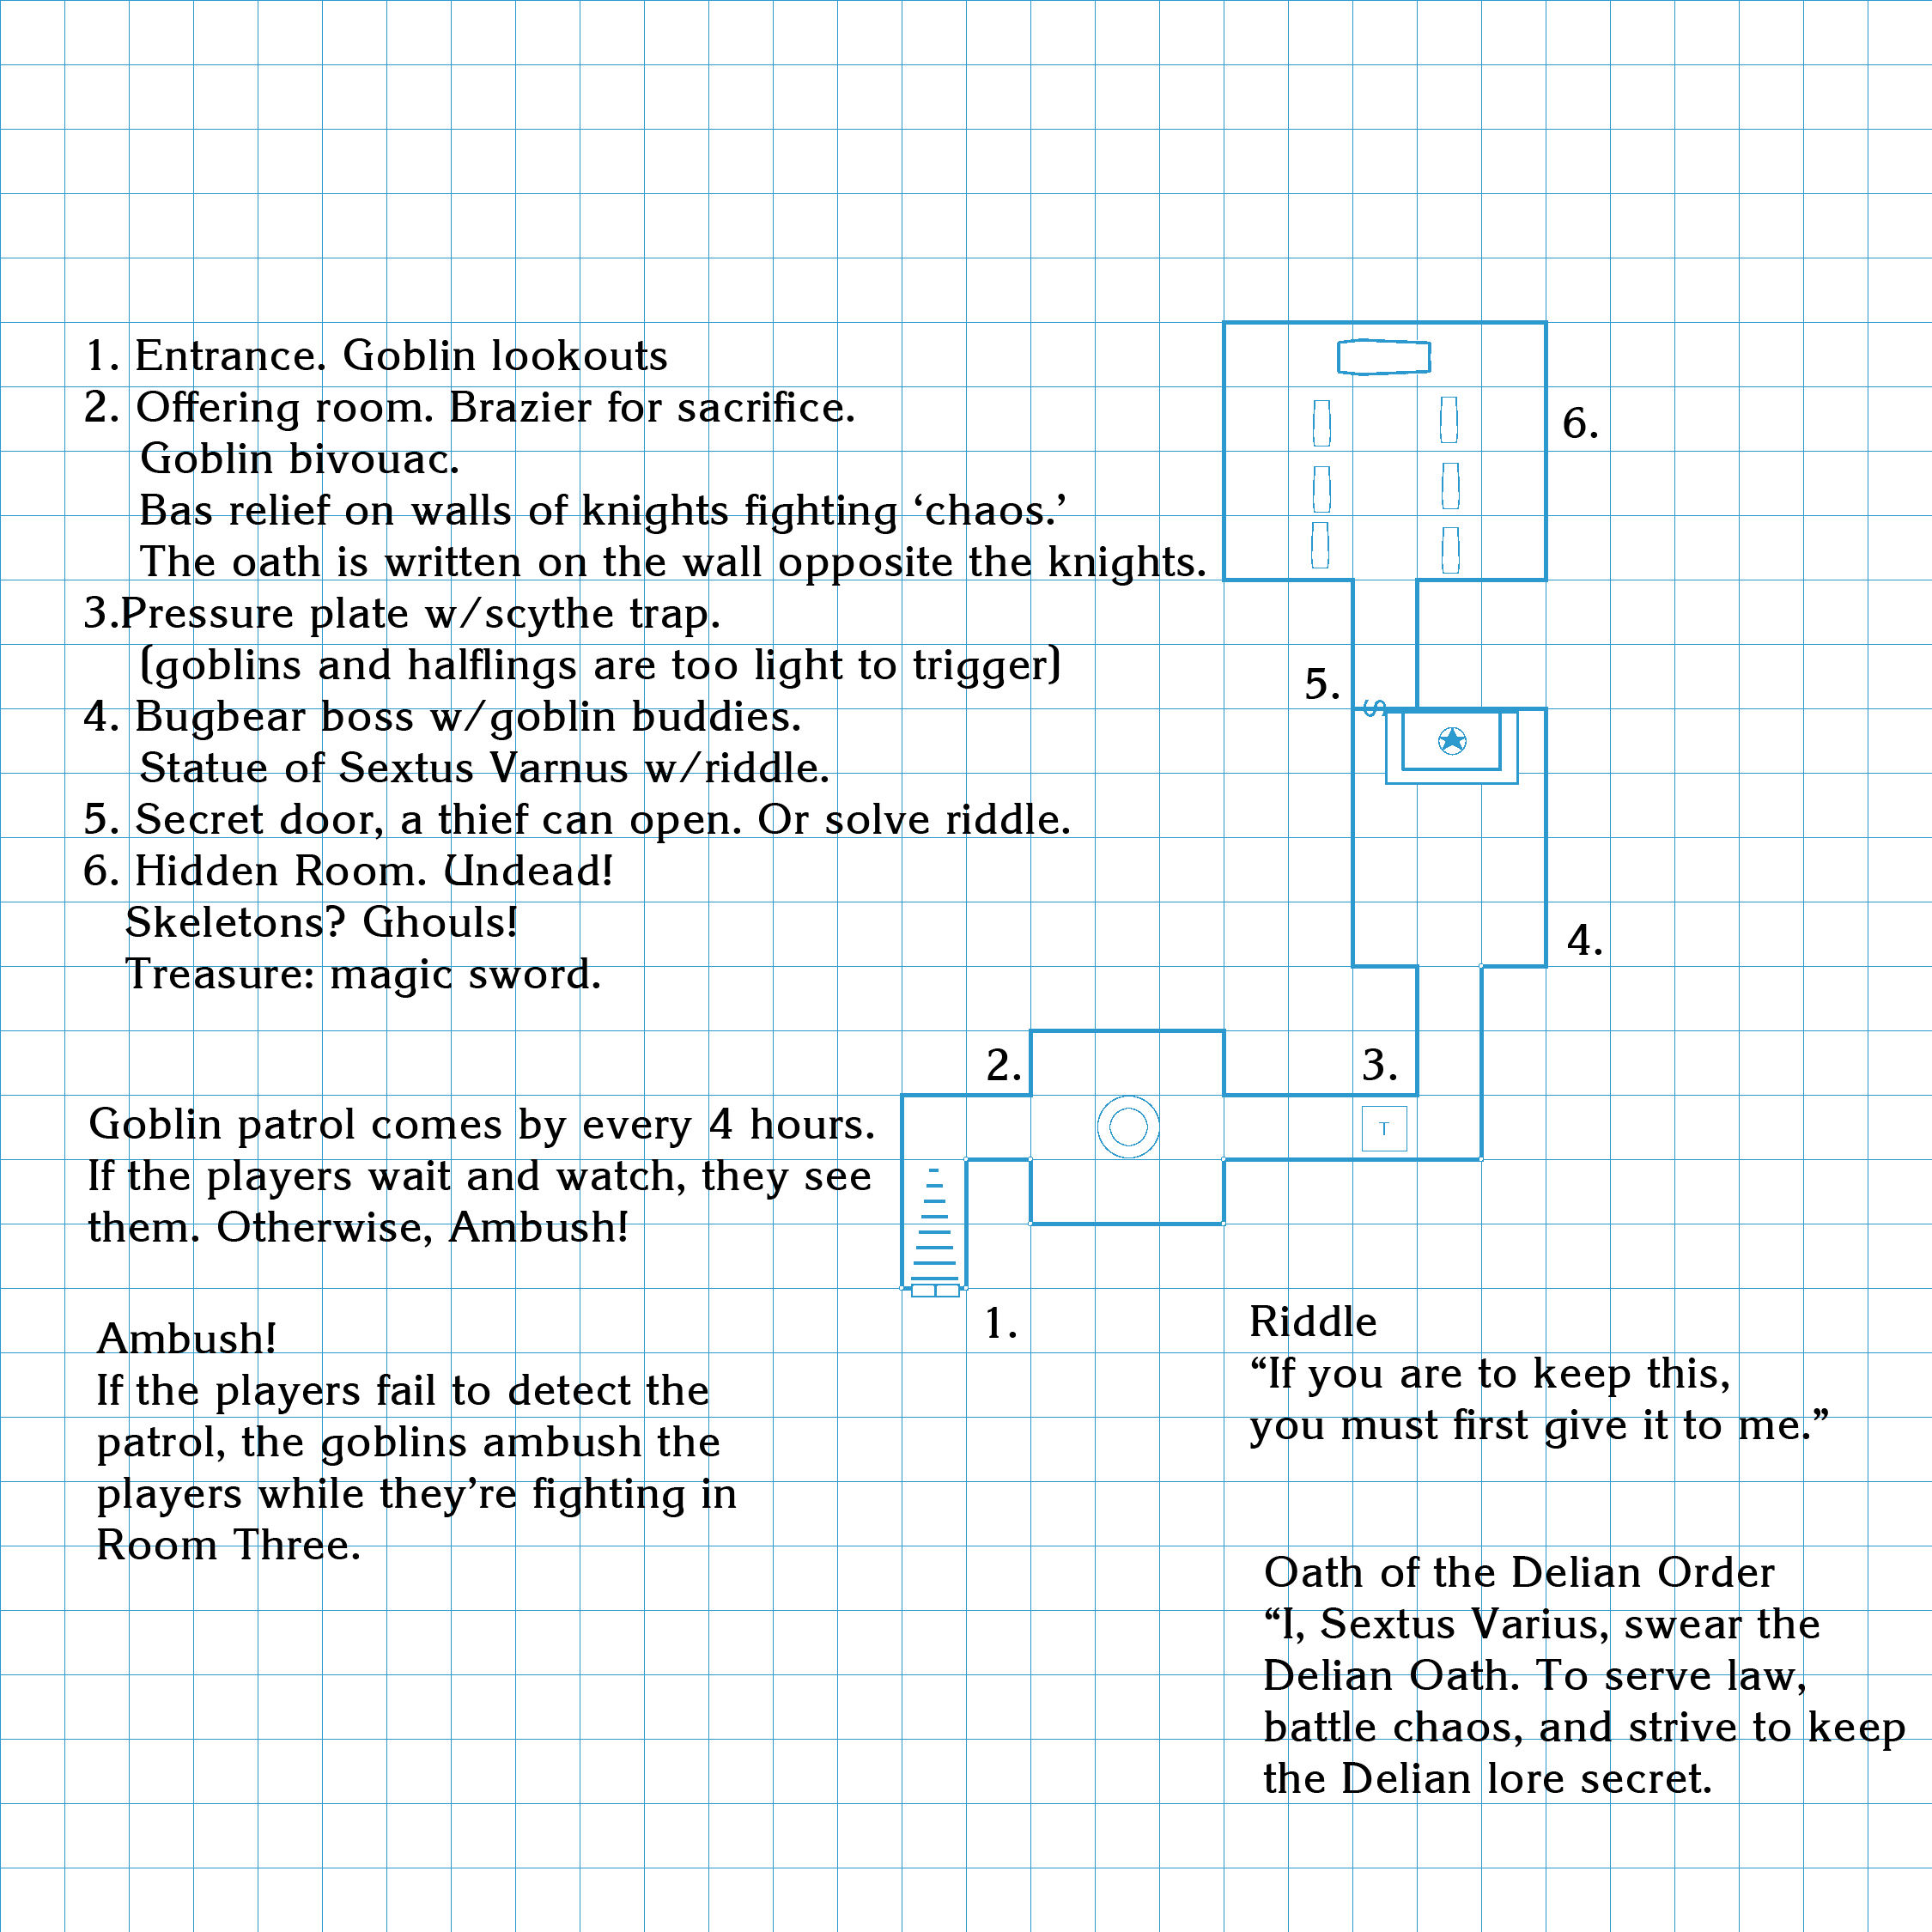
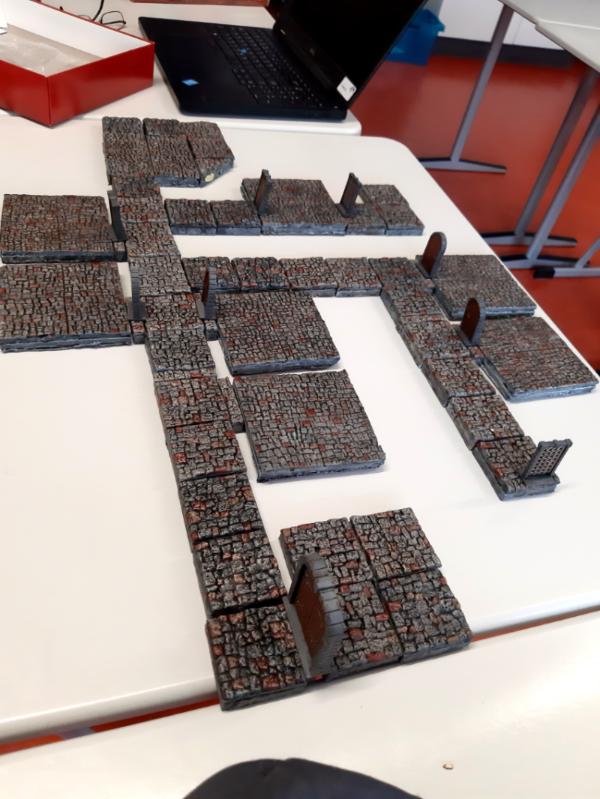
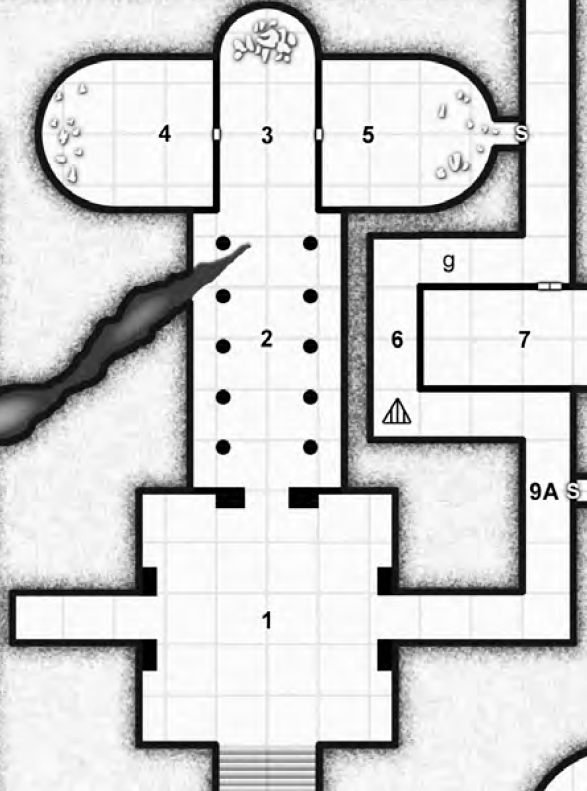
I decided to do the Delian Tomb from Matt Colville's Running the Game series for this layout, as it can be made entirely out of 50mm blocks with no spacers. I also made the tomb a series of connected barrows with circular walls to show off the circular tiles and also because my setting has more barrow mounds than tombs. No furniture yet, but I will get a statue Stormcast in there and some bits and pieces to make the barrows look lived in.
Here is the map:
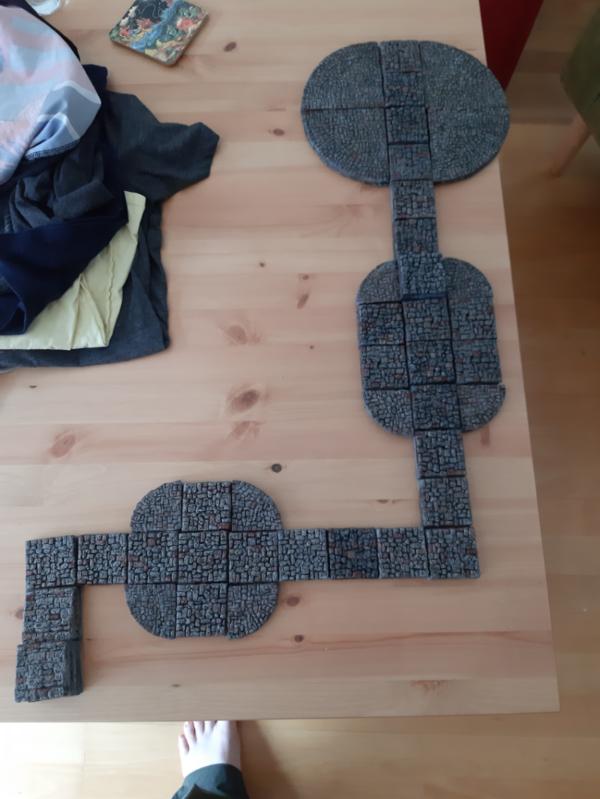
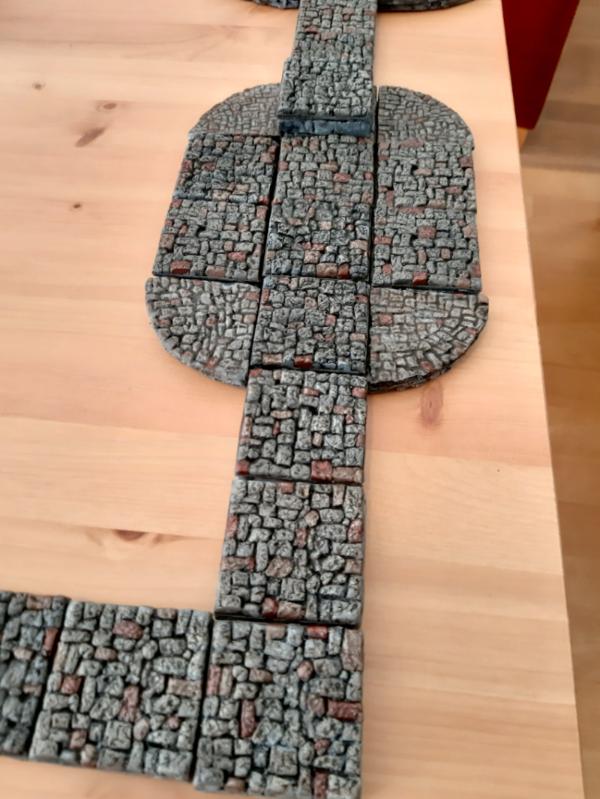
And here is the layout:
The layout went together very easily, under a minute for the whole thing with the pieces just clipping magnetically together. You can push any one room as a block around and they hang together without coming apart. Exactly what I wanted.
Some close ups of the rooms:
This is the entrance room, which has some goblins in it. You can see the resin tiles look better than the foamcore ones, but the foamcore is definitely good enough. These were the first foamcore tiles I made, I think I got better at it as I went along. The stairs I think are okay, probably not as good as I would have liked but they do the job.
Next is the "boss" room, where the Bugbear boss is hanging out. I used a tile as a pedastal for a statue hiding a secret door, planning on putting a Stormcast Eternal on there to represent the famous knight this place is supposed to contain.
And finally the secret room behind the statue, which will be full of sarcophagi and undead. I think the bigger circular tiles came out much better than the small ones, and I am pretty happy with the technique I used to make them. I am thinking about making some 100x100mm square tiles as space fillers that use fewer magnets, and if you don't want to mess with resin foamcore is another way to implement this magnetic tile method without it. I think they will be less durable than the others, but the mod podge primer does harden them up pretty well.
Overall, very happy with how it all came out. I think I will probably do those bigger 100x100 squares, and another set of 36 resin tiles and as many spacers as I can before running out of resin and magnets and call it a finished set! This was a lot more straightforward than I would have thought at the start and I hope provides some inspiration!
That looks great Da Boss! It's cool that you're doing that Matt Colville mission. I'm glad your tiles are working just as intended. It was clever use of the tiles stacking ability for the stairs and pedestal.
Cheers! Once I have the spacers done, I am gonna show a couple more layouts from some of my favourite dungeons. This project has worked out pretty well, and it is definitely the most ambitious project of this sort I have ever tried.
Thanks! That really does make me feel better about how tedious it was!
Unfortunately at the moment I only have 8 walls, but I will set up some scenes with them with some minis and furniture anyway to show them off.
Excellent gaming terrain! Adding the off-color stones is always a right pain in the tuckus- there's just no easy/quick way to do it. Yours came out extremely well.
"He fears his fate too much, or his desserts are small, who will not put it to a single touch; to win- or lose- it all."
Montrose Toast
2019/05/15 10:25:57
Subject: Re:Dungeons and Dragons Blog - DIY magnetic dungeon tiles - painted layout of "The Delian Tomb"
GOing from paper to that adds so much character to the game. Well done
LOL, Theo your mind is an amazing place, never change.-camkierhi 9/19/13
I cant believe theo is right.. damn. -comradepanda 9/26/13
None of the strange ideas we had about you involved your sexual orientation..........-Monkeytroll 12/10/13
I'd put you on ignore for that comment, if I could...Alpharius 2/11/14
2019/05/15 10:58:17
Subject: Dungeons and Dragons Blog - DIY magnetic dungeon tiles - painted layout of "The Delian Tomb"
Thanks for all the kind words! Been working on this a lot but not a lot of time to post, so this is gonna be a big update...
So I decided to save on magnets and help with setting up large spaces quickly by making 9 2x2 tiles. I think I will leave this as the largest size I make to retain the modularity and portability of the set, but each of these uses half the magnets of doing the 4 tiles individually. The most tedious part of it is drawing out the pattern, but I just slapped on some youtube or whatever and got on with it.
I was thinking about what a hassle it was making the other set with the hot glue and milliput, and decided to try and make a better vesion of it. First I made the holes for the magnets using a compass to make small holes in the area I wanted the hole in, and then forcing a large paintbrush handle through to make the hole the right size.
Then I got some thin card of the right thickness and cut out the same size shape and glued it to the bottom with superglue.
This worked A LOT better. The magnets no longer jumped, there was no messing with hot glue, it just worked. Much easier and faster, definitely use this method rather than the first one I tried if you do this! Also cheaper!
Muuuch neater on the sides:
Then I just glued the tops on, and covered up the corragated edges of the cardboard with hot glue. I had to do some trimming to get them to fit together properly on the bottom. But they clipped together like I wanted.
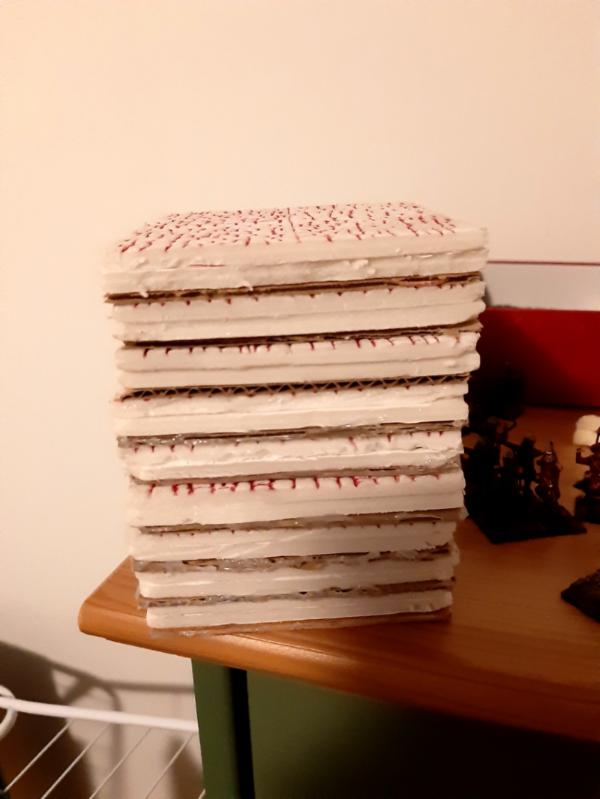
They also hold together really well as a stack:
I painted them the same way as the others - mod podge with black paint as primer to harden them up and protect the foam from the final varnish spray, with some stones picked out in contrasting colours.
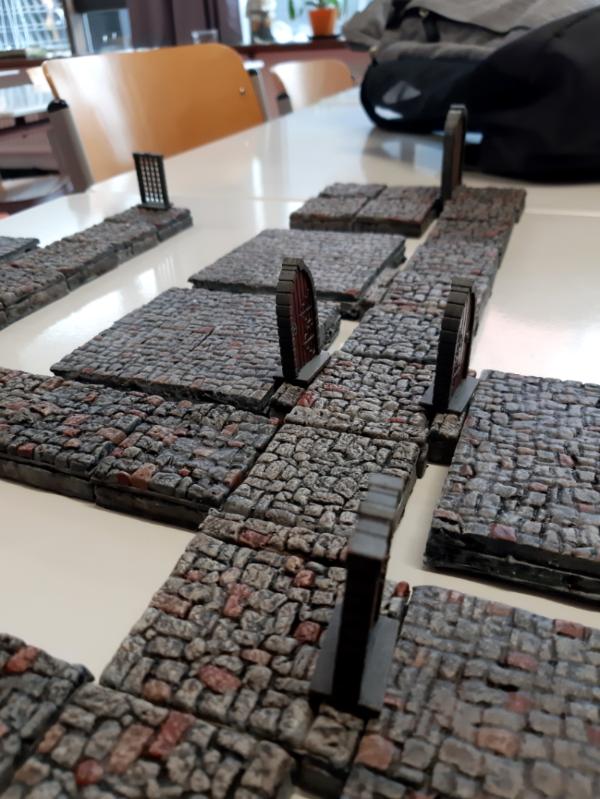
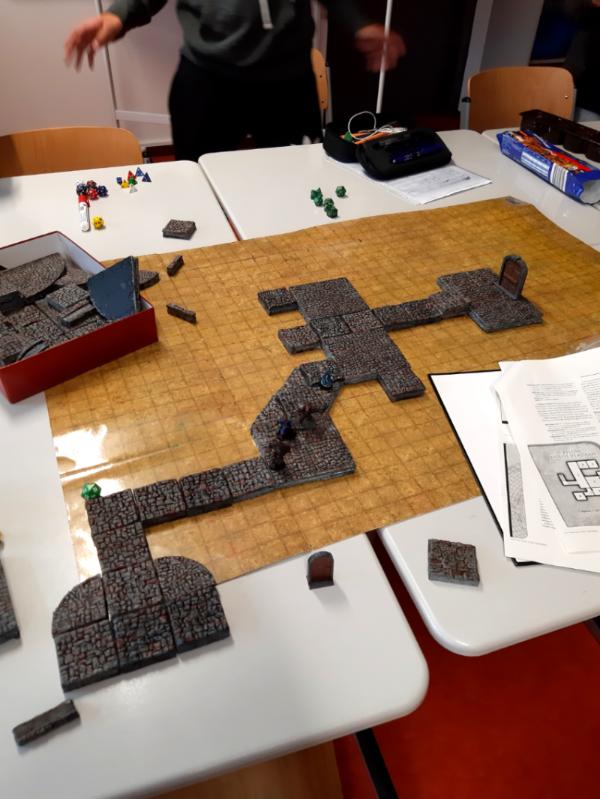
Here are some set ups. First, this is the first few areas of Barrowmaze. I wanted to show this because this is an area with lots of walls and small rooms, and so it shows the spacer system really well.
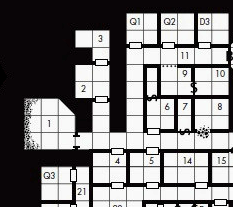
Map
Layout
I think it works really, really well. It does not take long to lay out, almost as fast as drawing, and even with the limited number of tiles (I have 2 1 foot square areas right now) you can get a lot of dungeon done. The problem of the walls is handled pretty nicely by the spacer system. If I wanted, I could insert 3D walls into all those gaps if I cast enough, but for practical reasons I probably would not do that except for some very special set ups.
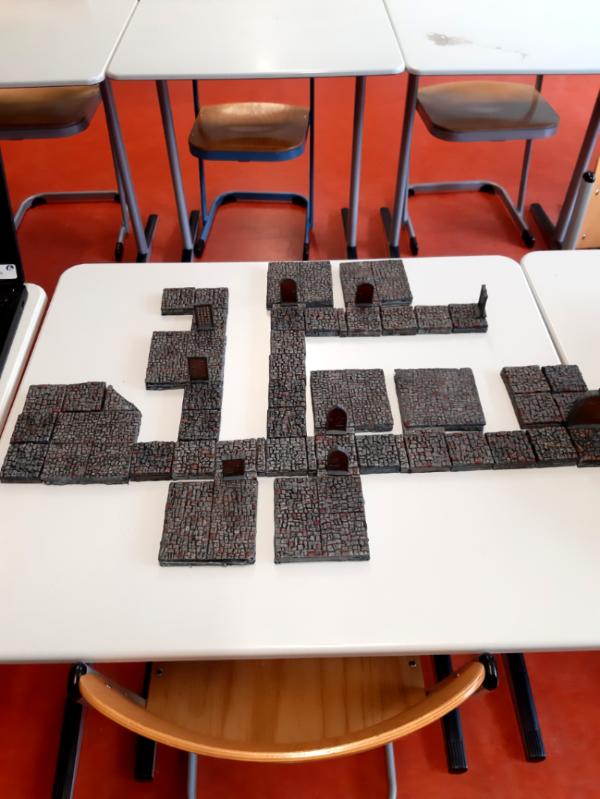
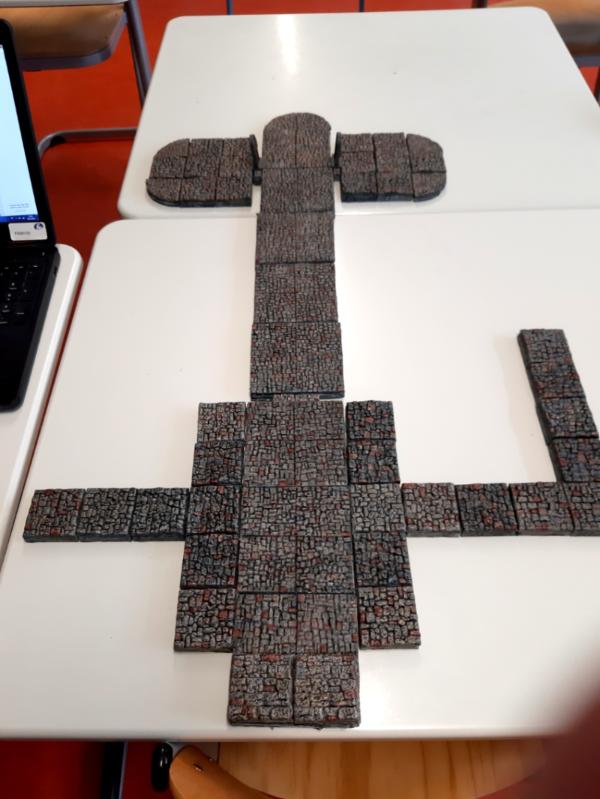
Here is another example, just showing how large spaces can be laid out quickly with the large tiles and how the circular tiles work, from Caverns of Thracia which is a real classic adventure with lots of weirdly shaped rooms. I will make some pillars soon which will make layouts like this even better.
Map
Layout:
(These photos were taken in my classroom before my school D&D club started, hence the lab coats etc in the background)
Again it works nicely. Some pillars and rubble would really enhance the look, so they are next on my agenda.
Finally, here is a shot from our game. This shows the tiles "in play" with me laying tiles only as the group moved through the dungeon, acting as a "fog of war" for exploration.
You can also see the GW hydra box I am transporting them in. Because they all magnetically hold together, they don't rattle around at all and basically sit in the box like one big solid brick, so they are super easy to transport. I just pick that up and put it into my backpack, and it is ready to go. I plan on making a bit of a better storage box, but I am really happy with how easy it is to move them around even without one.
Super happy with these in play. I think I will make another set of 36 single resin tiles, and then probably call the set finished for now. The foam tiles came out very nice, but I think 9 is enough for now along with the semicircles. I also made some small diagonal tiles which you can see in the picture above, and they work fine as well.
Josh: Cheers! The diagonal tiles are made by slicing a resin "top" in half when the resin is still soft after coming out of the mold, and then attaching a base to it made out of foam. Doing the foam bases for these ones was quite fiddly, and I think shows the limitations of the foam for such a small size.
Meer_Cat: Thanks very much! There is a feeling that you need to be able to do an entire dungeon level with the set or it is NOT ENOUGH, but this is definitely enough for play. I just wanna make some more 50mm tiles for options. Special tiles like water tiles are also in the pipeline, but not a priority right now.
Great work on the tiles, the layouts look fantastic
LOL, Theo your mind is an amazing place, never change.-camkierhi 9/19/13
I cant believe theo is right.. damn. -comradepanda 9/26/13
None of the strange ideas we had about you involved your sexual orientation..........-Monkeytroll 12/10/13
I'd put you on ignore for that comment, if I could...Alpharius 2/11/14
2019/05/30 21:47:58
Subject: Re:Dungeons and Dragons Blog - DIY magnetic dungeon tiles - more painted map layouts and tiles in play
Wow the tiles look great, and it's awesome what sprawling dungeons you can create now. I'm glad they're working well for you. It must be quite a treat for your players to play on them. I agree with your decision to leave it more open and only use the wall pieces when you need to make a wall obvious, keeps it more open and easier to see that way. Thanks for all the cool pics
Theo:Thanks!
Syro: My players really like them, yeah. More immersive than the usual battlemat.
I was looking at my layout and thinking that they are missing some cool 3D elements. I had seen this video:
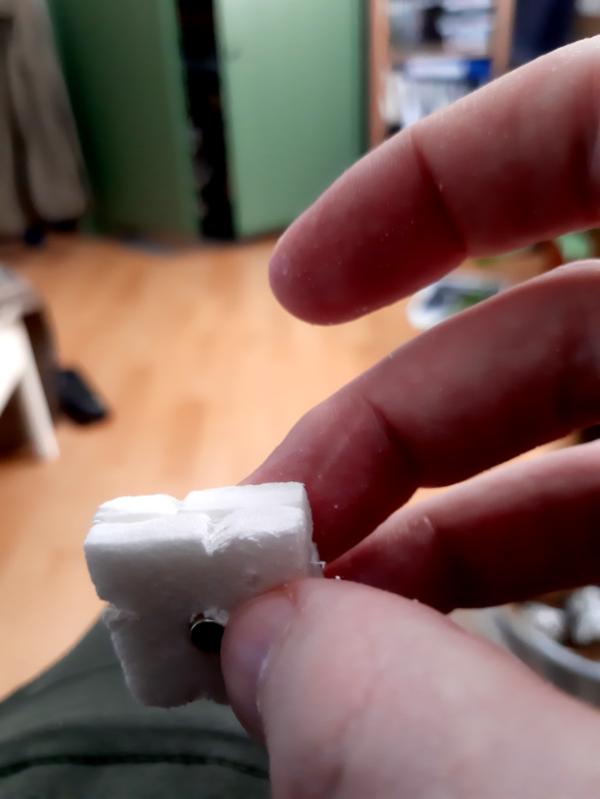
Where the guy made some brick pillars from foamboard. I have a lot of foamboard off cuts left over after my mold making and tile making, and I wanted to put them to use. I also got 10 free large cylindrical magnets when I ordered all my spherical ones, and they seemed too big for most modelling projects. I decided to put them in the base of the pillars as magnetic weights, so they would click onto the surface of my tiles.
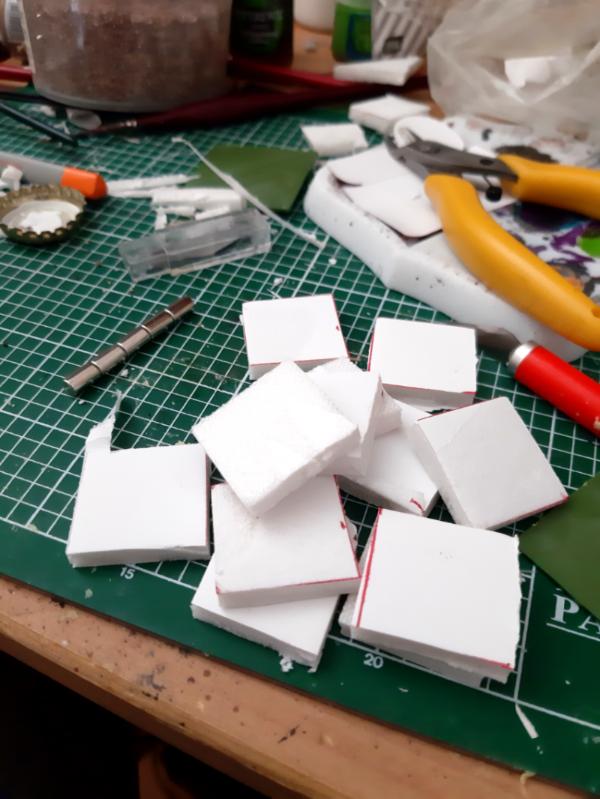
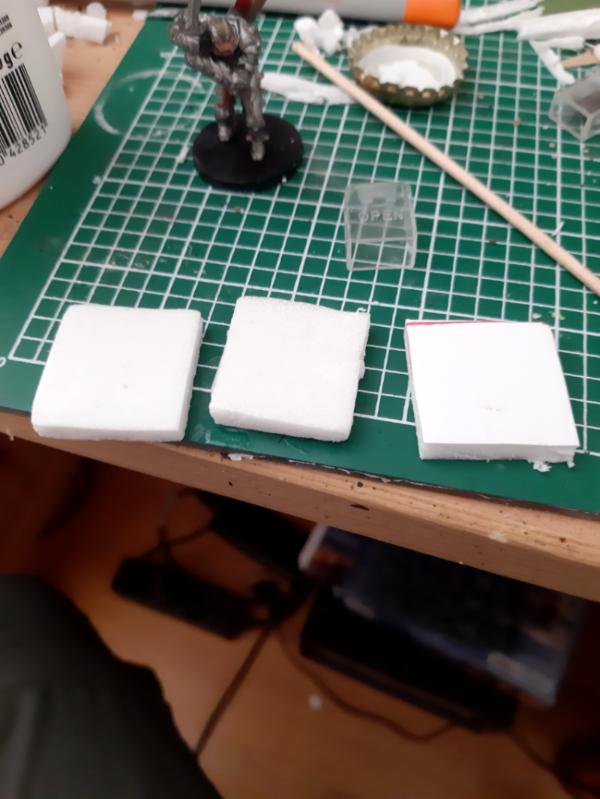
So, I started off by cutting a bunch of 25mm by 25mm squares. I wasn't too worried about getting them exactly right.
Then, I took the squares and dunked them in water and rubbed the paper off. My brand of foamboard has hard to remove paper, but this makes it reasonably easy.
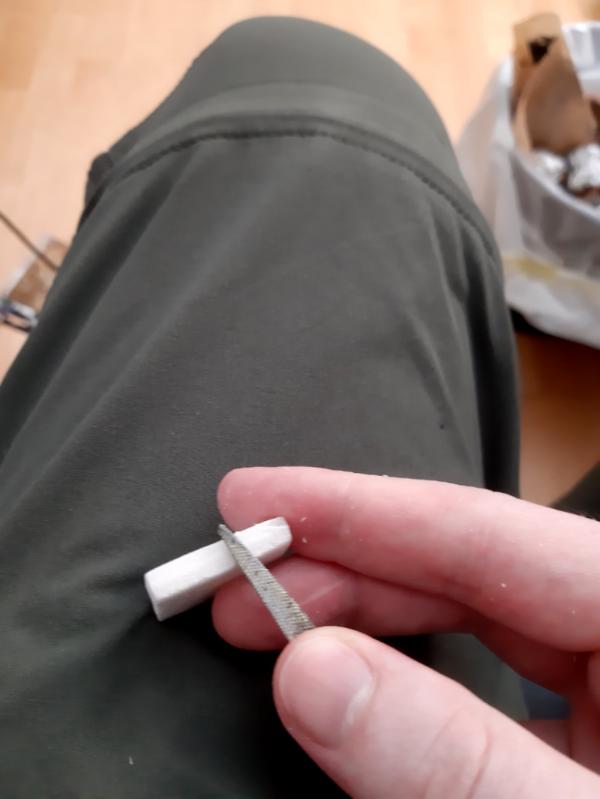
Then, take a file and cut a notch in the side of the tile about a third the way across the tile. Do this the same on all sides, and the same on all tiles.
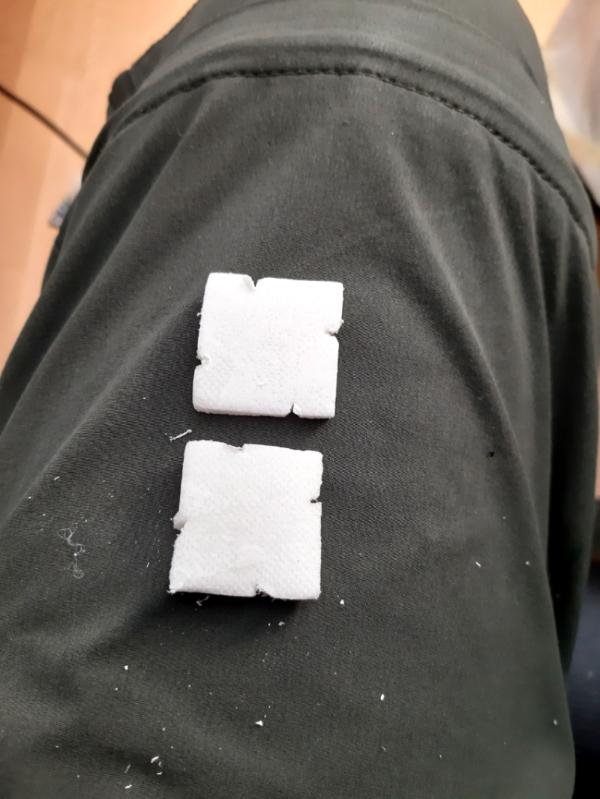
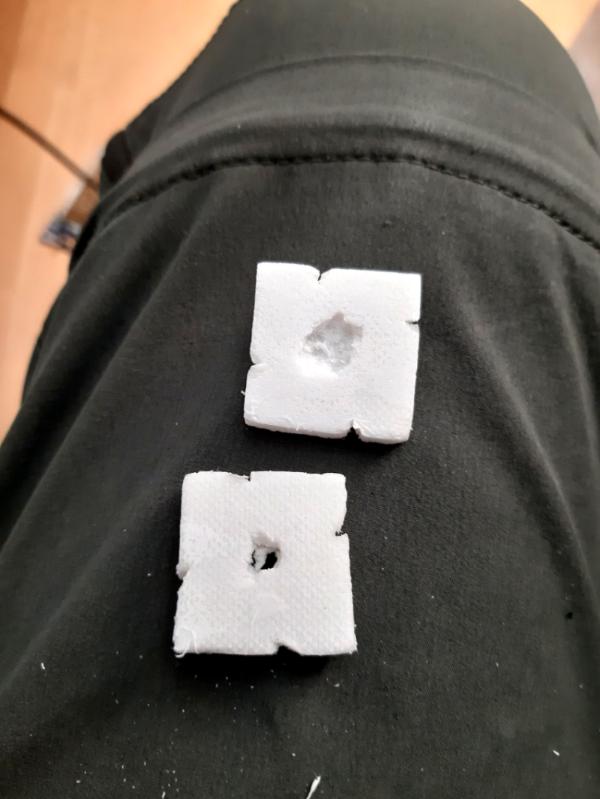
If you don't want to do magnetic tiles, you just have to stack these, flipping every second one to create the brickwork offset. But I wanted mine to take advantage of the magnets in my tiles, and use up my large magnets, so I cut a bed for the magnet into the bottom two tiles:
I wanted the bottom of the tile to be foam, to protect the surfaces it is attached to and also to prevent the magnet from detaching itself. The magnet is glue in place with hot glue (as are the rest of the squares).
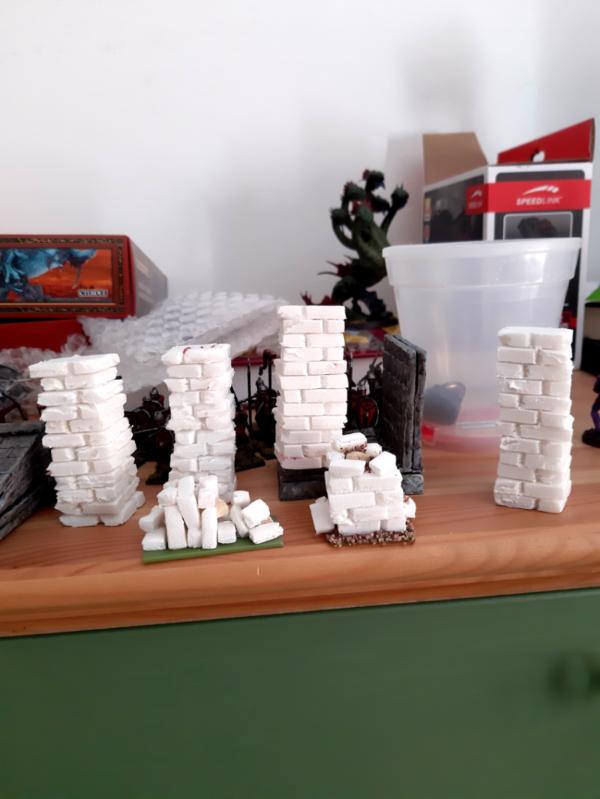
The result is pretty cool. Still have to texture the bricks with some tinfoil, but I am already happy with how they look. Also made a broken pillar using some spare bits on a 30mm base, with some single bricks and some very coarse sand and small pebbles. I made a fallen pillar section entirely from individual bricks glued around a core of pebbles on a 50mm x 25mm base. These don't have magnets in them, because I wanted very firm bases for them due to the individual bits.
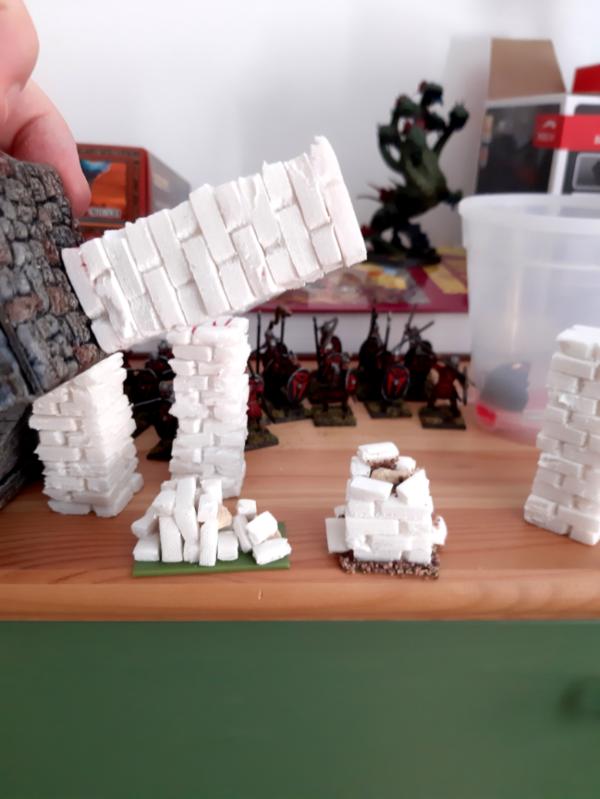
And here is a picture showing the magnetic hold! The pillars are so light they really easily sit on the tiles.
Gonna make 10 pillars, 2 pillar stubs and 4 fallen pillar pieces I think. That uses up all my magnets and should provide some cover and visual interest to the dungeons. This was really easy, so I hope the tutorial was helpful, though the video is probably even better (I just rarely watch video tutorials when I am browsing a forum.)
firstly...it does the eyes a lot of good to see your work!
secondly i am forced to comment due to the works and where you draw your inspiration from (only assumption and projections here on my part as BMC did that for me in this way...)
since you do already wonders it might be a bit redundant to utter helpful words...but since you are working with foam- stuff (styrodur, foamcore etc...) i wanted to inform you, since you live like me in germany... that the retail group called OBI has the cheapest prices of Proxon utilities...meaning while others have to pay considerable hefty prices for a hot wire cutter ...i paid only 80 € ...
I am in and out of Obi all the time because I am building an eco pond with my students in school (remind me never to try bricklaying with 11-14 year olds again). I had seen the Proxon circular saws and stuff, but not the hotwire cutter so that link is very useful!
BMC is a really good channel for this sort of stuff. I also like DMs Craft, but BMC pushes the envelope with his techniques and ideas so there is often a lot to make use of in his videos.
Ingenious with its simplicity. I would have started with a rectangular large block and wasted time and gotten frustrated carving individual layers.
LOL, Theo your mind is an amazing place, never change.-camkierhi 9/19/13
I cant believe theo is right.. damn. -comradepanda 9/26/13
None of the strange ideas we had about you involved your sexual orientation..........-Monkeytroll 12/10/13
I'd put you on ignore for that comment, if I could...Alpharius 2/11/14
2019/06/02 19:04:19
Subject: Dungeons and Dragons Blog - DIY magnetic dungeon set - magnetic foam pillars
(remind me never to try bricklaying with 11-14 year olds again)
that needs some more in depth descriptions (as i am working as a kindergärtner )
also...the sales person at obi told me that all products of proxon are exceptionally cheap compared to the usual market prices as obi has made some really good deals there...(i got me the foot pedal switch too...which is a huge improvement for working with the cutter...)
i have to say my thread is currently a bit dormant...not that i am lazy...i am still productive, but my sharing habits have come a bit on the just lurking side...


 Great work.
