| Author |
Message |
 |
|
|
|
|
Advert
|
Forum adverts like this one are shown to any user who is not logged in. Join us by filling out a tiny 3 field form and you will get your own, free, dakka user account which gives a good range of benefits to you:
- No adverts like this in the forums anymore.
- Times and dates in your local timezone.
- Full tracking of what you have read so you can skip to your first unread post, easily see what has changed since you last logged in, and easily see what is new at a glance.
- Email notifications for threads you want to watch closely.
- Being a part of the oldest wargaming community on the net.
If you are already a member then feel free to login now. |
|
 |
2010/07/30 09:56:30
Subject: Painting Ruins the speedy way!
|
|

Buttons Should Be Brass, Not Gold!
|
Here is a fast way to get a decent wargames finish on ruined brick buildings.
Step 1 - The undercoat
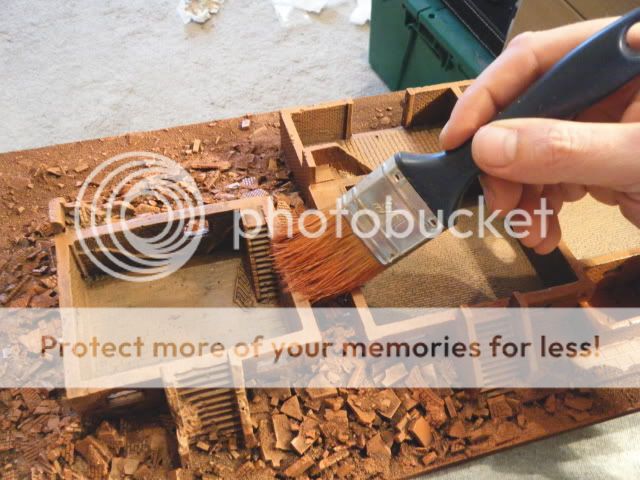
The most important part is getting the right undercoat. I use teo types of brown spray from a maker called Plasticote. I use their Matt Chocolate Brown and the Satin version. The reason I use both is that the Satin finish has a higher red pigment, thus making it useful for areas of heavy rubble. I tend to spray the whole building in the Matt and then overspray rubble with the Satin. This gives a two tone undercoat... Though to be honest it aint really needed. The most important point is to use a brown, not black undercoat to get the right tone.
 Step 2 - Base Colour
For this I use Vallejo Red Leather applied with a heavy drybrush using a large decorating brush. Now you may think that you might not get much from a pot of Vallejo, but I did all my sections using just a single pot! With this stage you can go very heavy but still try to keep the brown undercoat showing through. With each stage of drybrush you want to get lighter and lighter with the amount of paint used.
 Step 3 - The Highlight
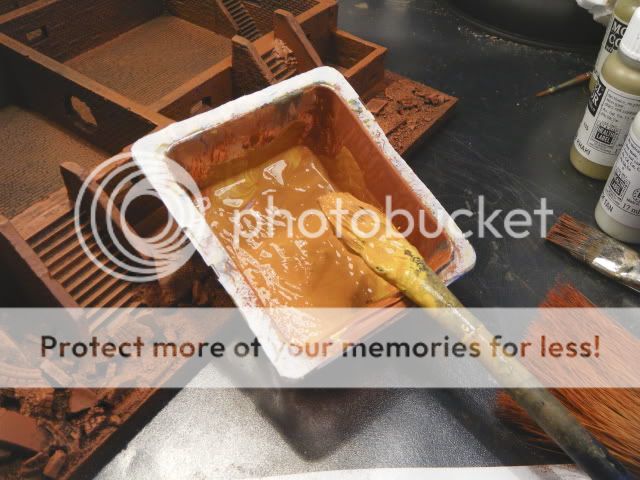
To get the right colour for the highlight make a mix of Vallejo Red Leather and GW Foundation Iyanden Dark Sun are a 50-50 mix. Then once again use the large brush to drybrush it over the entire piece. You can add in further amounts of Iyanden Dark Sun if you wish (or less) to get the desired effect. In my later pieces I have just used this single colour drybrush before moving on.
 Step 4 - Dusting
The final drybrush is using Vallejo Iraqi Sand. I mix this into the colour from the previous stage, at about 80-20 and then lightly drybrush the entire model. For areas of heavy rubble I will then give them a pure Iraqi Sand drybrush and sometimes a drybrush of Vallejo Deck Tan to really make them stand out.
 Step 5 - Detailing
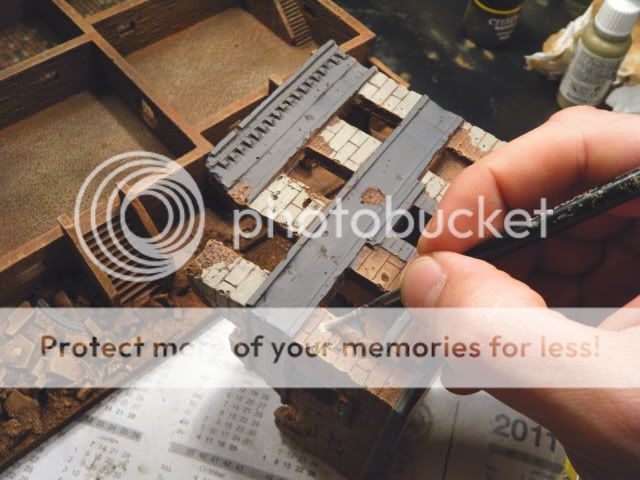
This stage is getting all the details to pop. I use single base colours on the models and have not bothered with any highlighting to speed things up, you could of course do so, or add a final very light off-white drybrush. I use very subtle colours and paint in brickwork, cobblestones, wall facias, window and door frames and anything else that stands out. Finally I use GW Devlin Mud and GW Badab Black washes to redefine areas, often washing entire floors, paving stones and under large overhangs on roofs. You can also use the black to paint interior walls of ruins to give them a burnt look. One important thing to do at this stage is to paint some of your rubble with any colour you are using on the building to tie in the rubble to the actual structure. Again, its up to the individual how much you do, but the good thing with terrain is taht you can always return to it.


I hope thats of some use to people, and my next part of this will cover building the actual bases themselves, another simple process.
|
|
|
|
 |
|
2010/07/30 10:33:00
Subject: Painting Ruins the speedy way!
|
|

[SWAP SHOP MOD]
Yvan eht nioj
In my Austin Ambassador Y Reg
|
Excellent tutorial, many thanks! I look forward to the one on basing!
|
|
|
|
|
|
2010/07/30 11:33:43
Subject: Painting Ruins the speedy way!
|
|
Storm Trooper with Maglight
|
Thanks for the tutorial it will be useful for when i build my board!
|
I apologise to anyone who interacted with me around 2009-2012. |
|
|
|
|
2010/07/30 13:33:56
Subject: Painting Ruins the speedy way!
|
|

Regular Dakkanaut
Ottawa, Ontario, Canada
|
Thanks, that is quite useful -- What colours did you use for the slate roofs? I am having some trouble with that on a building I am painting at the moment.
|
|
This message was edited 1 time. Last update was at 2010/07/30 13:34:12
|
|
|
|
|
2010/07/30 14:42:42
Subject: Painting Ruins the speedy way!
|
|
Buttons Should Be Brass, Not Gold!
|
duncana wrote:Thanks, that is quite useful -- What colours did you use for the slate roofs? I am having some trouble with that on a building I am painting at the moment.
For Slate Roofs I use Vallejo German Grey, drybrushed with Vallejo Basalt Grey.
|
|
|
|
|
|
2010/07/30 15:47:01
Subject: Painting Ruins the speedy way!
|
|
Storm Trooper with Maglight
|
Then will the tutoriual for building the bases be? Also can you make one for the buildings aswell?
|
I apologise to anyone who interacted with me around 2009-2012. |
|
|
|
|
2010/07/30 16:28:36
Subject: Painting Ruins the speedy way!
|
|

[DCM]
-
|
FANTASTIC stuff here - and very helpful too!
Much thanks to you!
|
- |
|
|
|
|
2010/07/30 16:42:37
Subject: Painting Ruins the speedy way!
|
|
Buttons Should Be Brass, Not Gold!
|
indiana1000 wrote:Then will the tutoriual for building the bases be? Also can you make one for the buildings aswell?
Will be doing the basing over the weekend.
The buildings are commercially available resin pieces from a number of sources, the main one being ShellholeScenics.
|
|
|
|
|
|
2010/07/30 16:44:41
Subject: Painting Ruins the speedy way!
|
|
Avatar of the Bloody-Handed God
Inside your mind, corrupting the pathways
|
That is pretty damn effective.
Nice work.
|
|
|
|
|
|
2010/07/30 18:00:07
Subject: Painting Ruins the speedy way!
|
|
Buttons Should Be Brass, Not Gold!
|
...and the finished pics for those that want to see some of the finished pieces...
http://www.dakkadakka.com/dakkaforum/posts/list/308292.page
|
|
|
|
|
|
2010/07/30 23:49:39
Subject: Painting Ruins the speedy way!
|
|
Perfect Shot Dark Angels Predator Pilot
|
whoooaaaa, good job man! ill be using this tuttorial soon
|
Follow me if i advance
kill me if i retreat
Avenge me if i die |
|
|
|
|
2010/08/01 16:59:40
Subject: Painting Ruins the speedy way!
|
|
Irradiated Baal Scavanger
Denver
|
liberated
|
|
|
|
|
2010/08/02 07:42:38
Subject: Painting Ruins the speedy way!
|
|

Ork-Hunting Inquisitorial Xenokiller
|
Very good work, And a helpful turitorial also. Looking forwards to try this one out for my self
|
Lenge leve Norge, måtte hun altidd være fri
Disciples Of Nidhog 2500 (CSM)
Order of the bloodied sword  |
|
|
|
|
2010/08/11 17:43:13
Subject: Painting Ruins the speedy way!
|
|

Chaplain with Hate to Spare
|
please! more tutorials soon? i'm just about to start terrain-ing, Terrain-asizing....making some and this was great! the more info and help from you the better, love your work
|
 Flesh Eaters 4,500 points Flesh Eaters 4,500 points

" I will constantly have those in my head telling me how lazy and ugly and whorish I am. You sir, are a true friend " - KingCracker
"Nah, I'm just way too lazy to stand up so I keep sitting and paint" - Sigur
"I think the NMM technique with metals is just MNMM. Same sound I make while eating a good pizza" - Whalemusic360 |
|
|
|
|
2010/08/12 00:09:50
Subject: Painting Ruins the speedy way!
|
|
Noble of the Alter Kindred
United Kingdom
|
Did you use a primer before the Plasticote (which is coincidently the spraycans I use)
Am about to embark on a fairly big project with polystrene and assume that it will need a primer first.
|
|
|
|
|
|
|
|


