| Author |
Message |
 |
|
|
|
|
Advert
|
Forum adverts like this one are shown to any user who is not logged in. Join us by filling out a tiny 3 field form and you will get your own, free, dakka user account which gives a good range of benefits to you:
- No adverts like this in the forums anymore.
- Times and dates in your local timezone.
- Full tracking of what you have read so you can skip to your first unread post, easily see what has changed since you last logged in, and easily see what is new at a glance.
- Email notifications for threads you want to watch closely.
- Being a part of the oldest wargaming community on the net.
If you are already a member then feel free to login now. |
|
 |
2019/02/10 01:55:40
Subject: Battle Brush Studios' Commission Painting Log - Massive update! 40k, WHFB, Historicals, Infinity, ..
|
|

Martial Arts Fiday
|
The camel guys are nice. Although they're probably all going to die to that Fiday!
|
"Holy Sh*&, you've opened my eyes and changed my mind about this topic, thanks Dakka OT!"
-Nobody Ever
Proverbs 18:2
"CHEESE!" is the battlecry of the ill-prepared.
 warboss wrote: warboss wrote:
GW didn't mean to hit your wallet and I know they love you, baby. I'm sure they won't do it again so it's ok to purchase and make up. 
Albatross wrote:I think SlaveToDorkness just became my new hero.
EmilCrane wrote:Finecast is the new Matt Ward.
Don't mess with the Blade and Bolter! |
|
|
 |
|
2019/02/10 20:02:14
Subject: Re:Battle Brush Studios' Commission Painting Log - Massive update! 40k, WHFB, Historicals, Infinity, ..
|
|

Buttons Should Be Brass, Not Gold!
|
@Dysartes: Next time someone complains about painting horses I'll point them in the direction of painting bloody camels.  The resting camels come with a slightly disgruntled looking handler. Must be him.  @Cpt.Brown: Thanks very much! @Gitsplitta: Cheers. They're pretty much done now, but I have to sort out some confusion about rank insignia. Not exactly sure what goes on the sleeves of the officer and especially the NCO. In the mean time - I played Sellswords and Spellslingers again last Friday, courtesy of Cpt.Shandy who provided figures, table and scenario. All I did was bring my own hero figures and the camera. Sellswords and Spellslingers, released in early 2018, is one of the latest works of industrious veteran rules smith Andea Sfiligoi who also wrote Four against Darkness, Rogue Stars, the legendary Song of Blades and Heroes and its derivates and many other nice things. The rules were published by Ganesha Games. 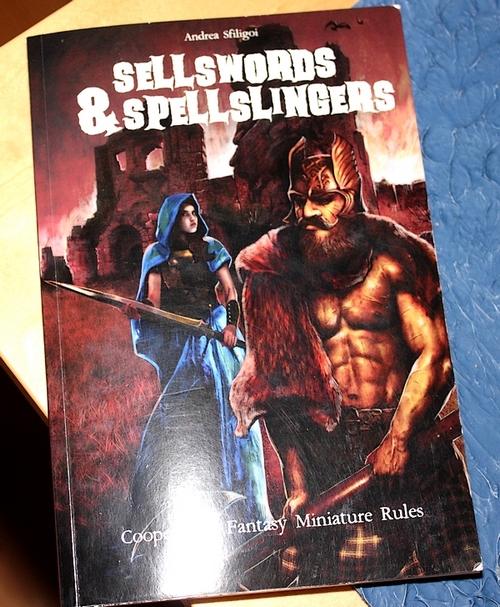 What sets this game apart is that it's a completely cooperative fantasy miniature game. This positions it right between dungeon crawler board games (like Decent and Heroquest) and Pen&Paper RPGS (like GURPS, The One Ring, etc.). Each player plays one or multiple hero characters. Baddies are all played by an AI which is built into the game, which works really quick and efficient. At its core Sellswords and Spellslingers is based on D20 rolls; as with most games written by Sfiligoi everything starts with activation rolls. It's a player's turn, the player chooses one of their characters they want to activate. Then they roll one, two or three d20. 8 or more means the die may be used for a hero action, any dice showing less than 8 means a card is drawn from the events deck. 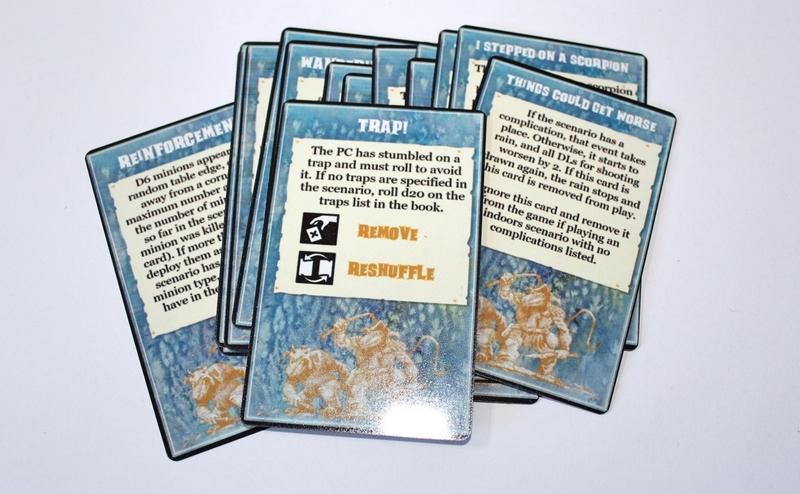 Most of the time these cards will activate or spawn enemy models. Some of them are scenario-relevant event cards. Enemies who get activated act in a very simple manner. Scenario design is a large part of the game, if you don't want to play the same thing over and over. This also means though that you can do ANYTING with these rules and really get some fun adventures going on your games table. The event cards are delivered in pdf form along with the game, so you have to print them yourself. However, you can also order professionally printed decks. Apart from event cards there's also a large number of spell cards, potion cards and monster cards. The base game contains 30 different monster types on cards 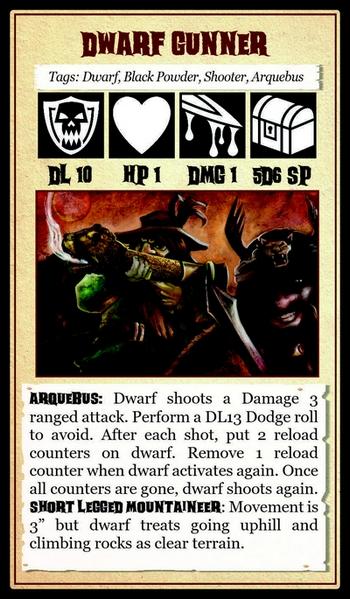 These monster cards give you all the informations about a monster type to play it in the game: the creature's Danger Level (bascially the target of your D20 roll when fighting the creature), hit points, close combat damage, the loot they drop when slain and of course special rules. Based on this simple scheme you can design your own creature types or adapt creatures from other games without a problem. So much for the rules, now let's go on to the game. Beware: it's getting spooky. 
Original artwork by the great Tom Jenkins, cover layout by Eerie Magazine The fishing hamlet Inmutz is overrun by horrible creatures. They crawled out of the sea at night. They look remotely human, but with scaly skin, claws and heads like fish or frogs. They are just known as the Deep Ones. Inhabitants who managed to flee beg a group of adventuring heroes to visit the hamlet to find clues about why these monsters suddenly attacked them and what their motifs could be. 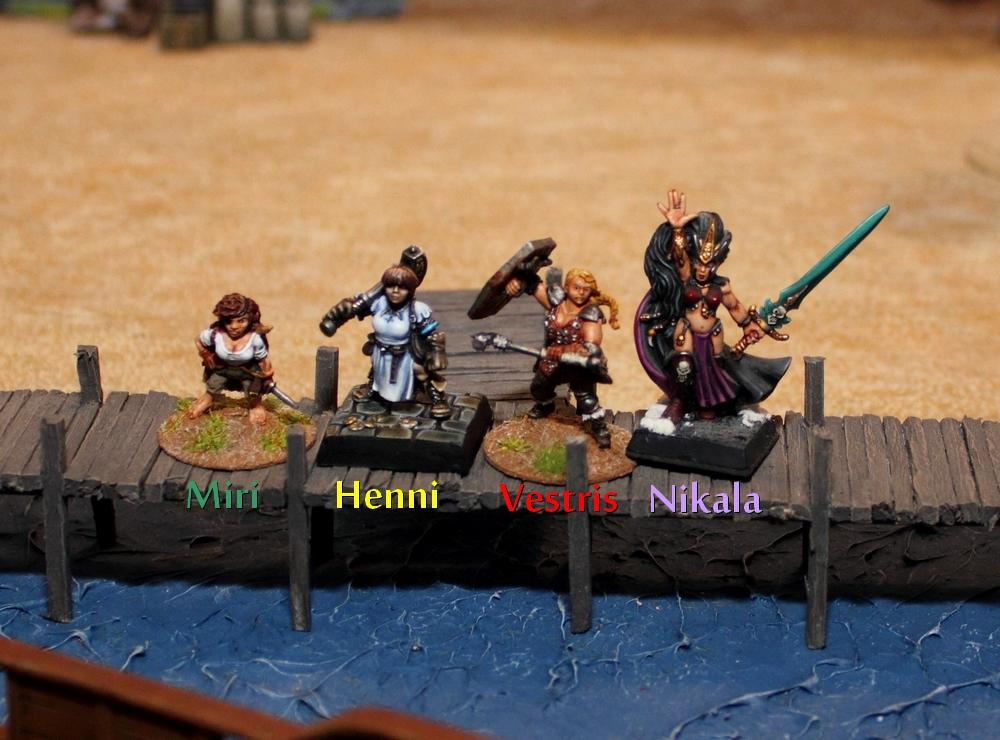 The rag-tag band of heroes consists of: Miri , a halfling thief (bow, dagger, Free Disengage, Greedy) Vestris , a human fighter (Shield, Armour, Warhammer) These two veterans of several aventures are played by Cpt.Shandy. The other two, adventuring newbies, are played by me. Henni Hinkel von Hammerfall , a Dwarf warrior with an extrla large sledge hammer and even bigger ambitions to see the world. (Two-Handed Sledge Hammer, Martial Block, Battlelust, Impulsive) and Nikala, a Dark Elf Soceress (Spells: Magic Dart, Deathcurse), who really only wants to collect money for a passage back to Naggaroth. She doesn't like the beach, and she dislikes the crabs, the sun, sea monsters, long walks, waiting, sand and unfathomable horrors beyond our comprehension even more. To learn about the motifs of the Deep Ones there are five clues strewn across the table. We have to get to as many of them as possible and then interpret them correctly (ie roll an intelligence check). Two of them are to be found in the hamlet, two more on the beach and the fifth is to be found on a mysterious boat lying at the pier.  There are still groups of Deep Ones lurking in and around Inmutz and without a doubt more will show up once alerted. Nobody knows what they are doing. Looting? Are they looking for something? Or are they just lurking? Nobody knows. At the moment two groups of 3 Deep Ones each are in the area, plus a Deep One Assassin and a sort of leader wearing a robe, so he may either be a spellcaster or he looted a nice dress. The two warriors immediately sprint towards the first clue. Nikala follows at half speed, unhappy with what the salty sea breeze is doing to her hair. As a sudden gust of wind ruins her 'do completely. The soceress is really miffed now. Even worse (depening on who you ask) - the wind carried a stray air elemental ashore! 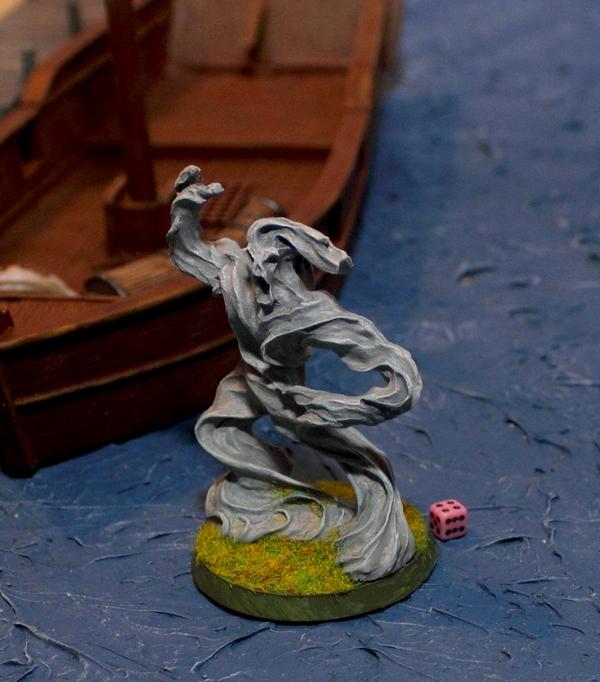 This comes as a surprise, especially seeing as how an air elemental is really tough, especially if all we have is non-magical weapons. The sorceress is tangled up with trying to fix her hair, so the half-hearted magic darts thrown at the air elemental mostly miss. A cunning Deep One uses the opportunity to lunge at Henni who was just about to prepare to combat the air elemental. She loses one hit point (out of 4). 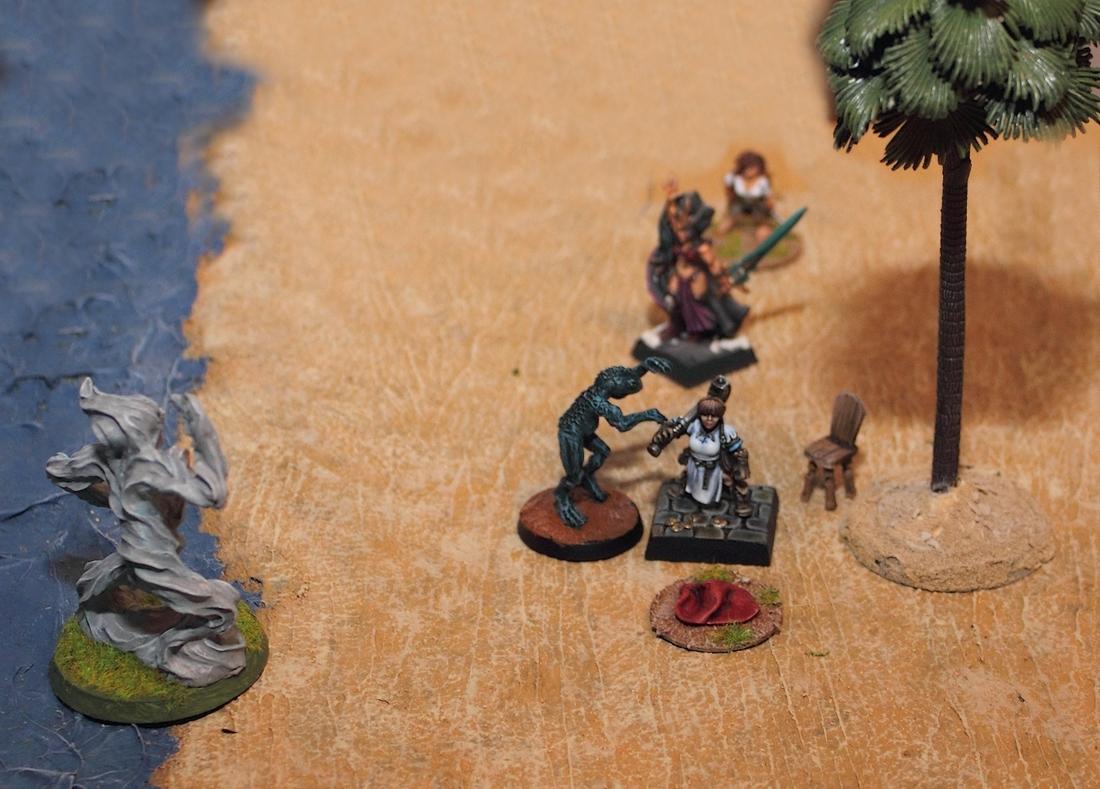 Fortunately repeated hammer blows to the head proves effective against Deep Ones. The air elemental though is drawing ever closer and the magic darts fail to do any serious damage. This will have to be decided in bloody mêlée. Faced with the huge elemental Henni freezes. In the last moment Vestris leaps to her aid and duels the monster. 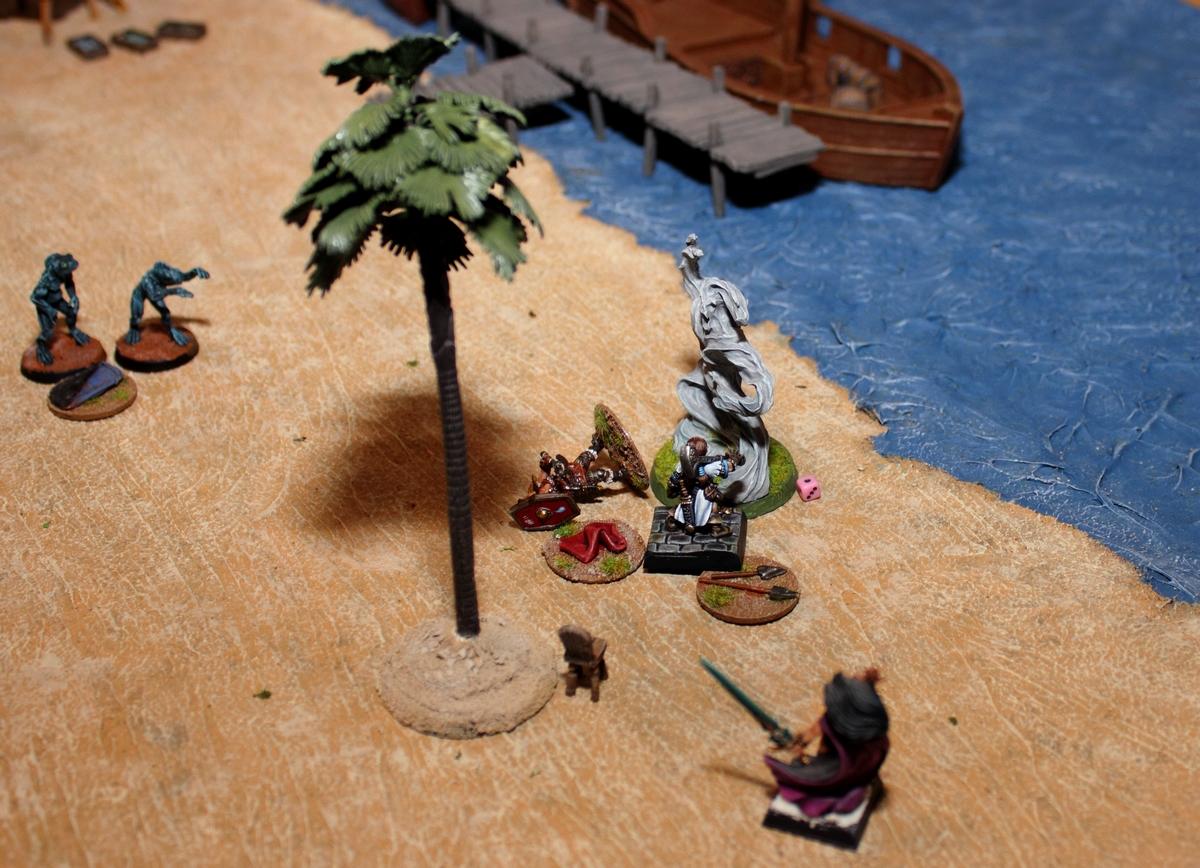 The red towel is the first clue to inspect. The other round markers on the ground are loot markers left by slain enemies. The red towel is the first clue to inspect. The other round markers on the ground are loot markers left by slain enemies. She fights bravely, but eventually the elemental's attacks take their toll on Vestris and the warrior goes down. Henni manages to get herself together and finally kills the elemental. Meanwhile Nikala is embarassed about her lacklustre spellcasting so far and that Vestris got hurt to to this fact. That makes the sorceress angry. A group of Deep ones, drawn in by the noise of combat, fall victim to a mix of Deathcurses by the Dark Elf and Miri's arrows. Now that the most immediate dangers are taken care of Henni looks after her downed comrade. Fortunately Vestris is just KO'd. She'll be out for now, but can be recovered once all the business is done here. So the first clue is being investigated, and then rolled up and put under Vestris' head. For comfort and to pin the clue in place. Now rain sets in. This means two things: Time for drama and a malus for ranged attacks. We've been delayed by the air elemental for too long; now it's time to move. Miri jumps over the stone wall to search the hamlet by herself. The short-legged Dwarf and the Dark Elf with the ill attitude and high-heeled boots would only slow her down. Finally activation rolls go better for us now and our heroines proceed with the mission.  Miri dashes into the cursed hamlet of Inmutz using shadows and debris to stay out of sight. She grabs one of the clues on her way. One more to get in the hamlet, but this one's more tricky. A mysterious lamp next to the former grocery storage building. The place is swarming with Deep Ones; the produce is strewn on the ground and already mostly spoilt. In the mean time Henni sees the mysterious boat which had just appeared the night before the attack slowly drift off to the sea, along with possibly clues. 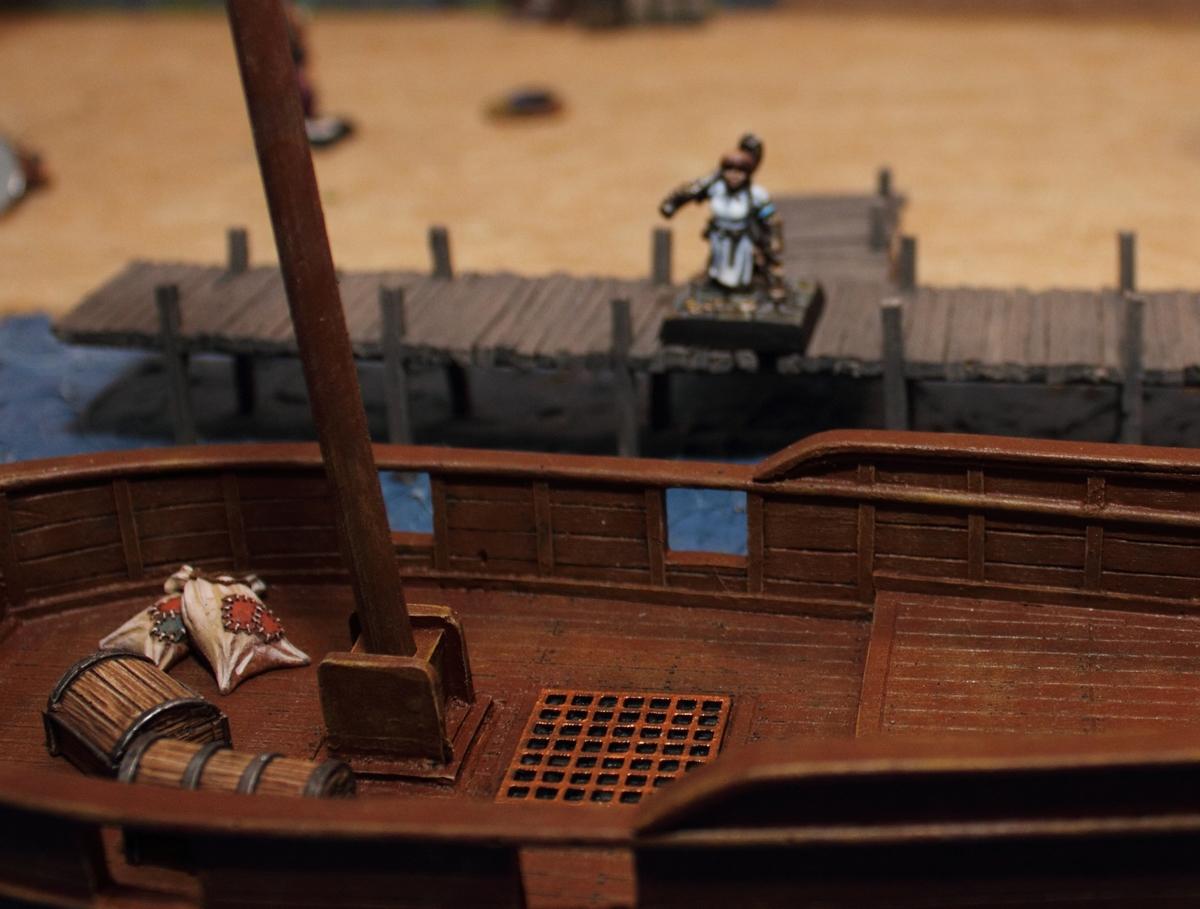 The planks are wet with rain, and Dwarfs have a general disdain for things which force their boots to leave the ground, but a true adventurer has to jump occasionally (so the stories say), so Henni runs up the landing stage and jumps onto the boat. She is enormously proud about this step to be a real adventuring hero. A nasty Deep One who crawls up the prow of the ship to ambush her... 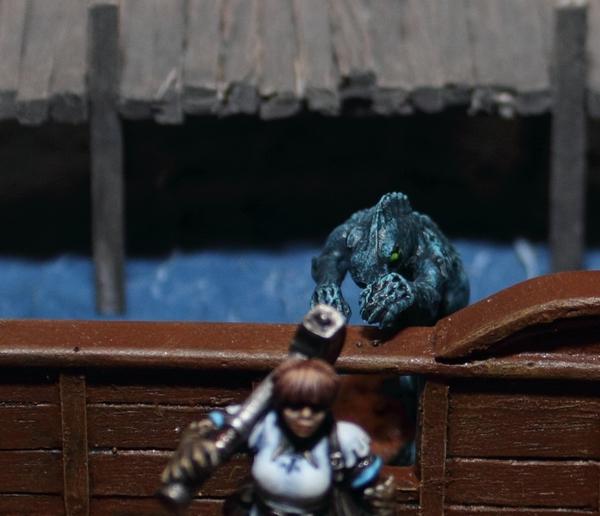 ..is swiftly dealt with by a good whack across the head. With the boat slowly drifting out onto the sea Henni has no time to lose and starts digging through the ship's cargo for clues. She finds something and even makes it safely off the ship moments before it goes off onto open waters. Nikala is having trouble with all of this. The rain killed any hope for her hairdo and one of her boots' heels snapped right off as she almost plummeted into a hole. Now the shower ends and with it the winds of magic turn. She can feel her powers surging and magic energy sparks around her fingertips. The next ugly fishthing or elementalthing or whatever-thing will get a good load of this, she mutters to herself. [That was an event card, strengthening spellcasting rolls for the rest of the game] There she spots the Deep Ones Warlock over at the hamlet's entrance. A sorcerer duel. Delightful. 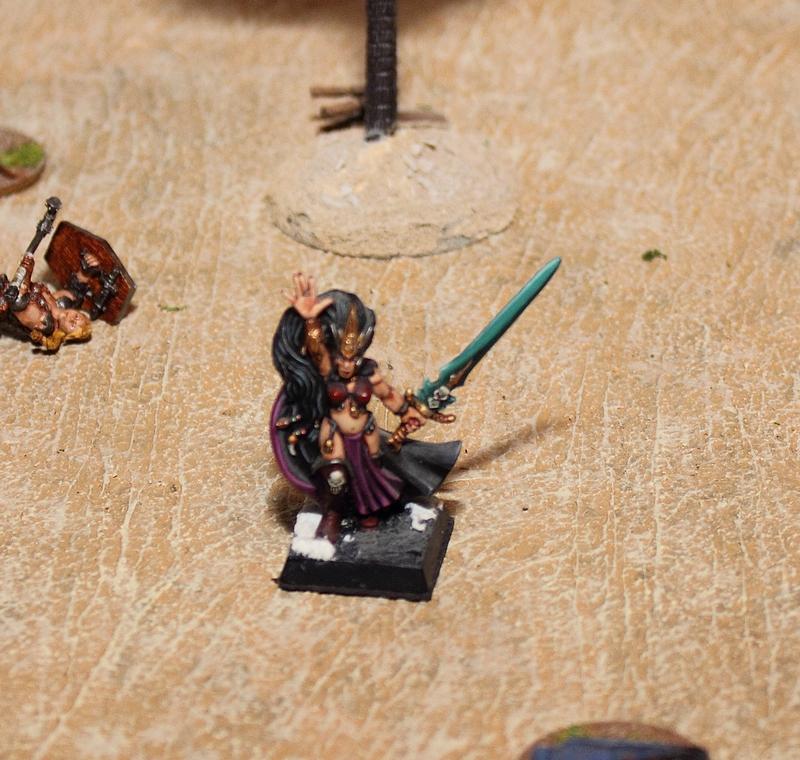 Meanwhile in Inmutz Miri snuck up to the second-to-last clue. While she investigates the shadows around her come to life.  The Deep Ones Assassin charges at Miri from behind. A Rogue duel. Perfect.  Despite the moment of surprise the halfling outsmarts the abomination. She wants to return to investigate the clue, but can't resist grabbing any valuables she can find on the Deep One. This costs important seconds, and just as Miri is done stuffing her pockets and having figured out the clue the horde comes for her.  She manages to flee the onslaught of claws, teeth and scales, but is lightly wounded in the process. The only thing to do now is flee the hamlet. Three hordes of Deep Ones are in hot pursuit, but Miri is faster.  As she gets closer to the hamlet's entrance she hears a torrent of insults and curses being shrieked, howled, bellowed, gargled and croaked. The sorcerer's duel is in full swing, with Nikala clearly coming out on top. The wavering Deep Ones Warlock is finally finished off by a pincer attack of Miri and Henni (who had run up the beach again to help Miri out with her pursuers). Miri, delivering the fatal blow to the warlock, once more couldn't resist grabbing his valuables and a magic potion the creature carried with him. Now it's really time to go home. A bit earlier Henni had used the élan from her boat jumping episode to investigate the final clue at the fisher's hut. 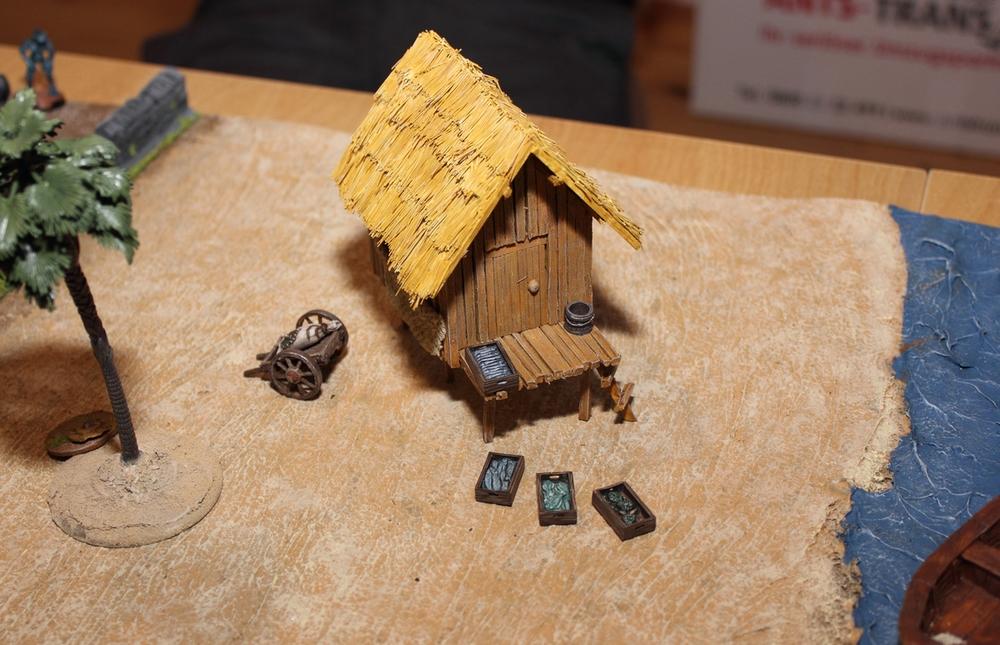 All done. Last thing we have to do was pick up Vestris before the flow sets in and she's pulled out into the ocean and then it's off to the next Inn. Clues have to be put together. Maybe then we'll get a better idea of what the Deep Ones are after. 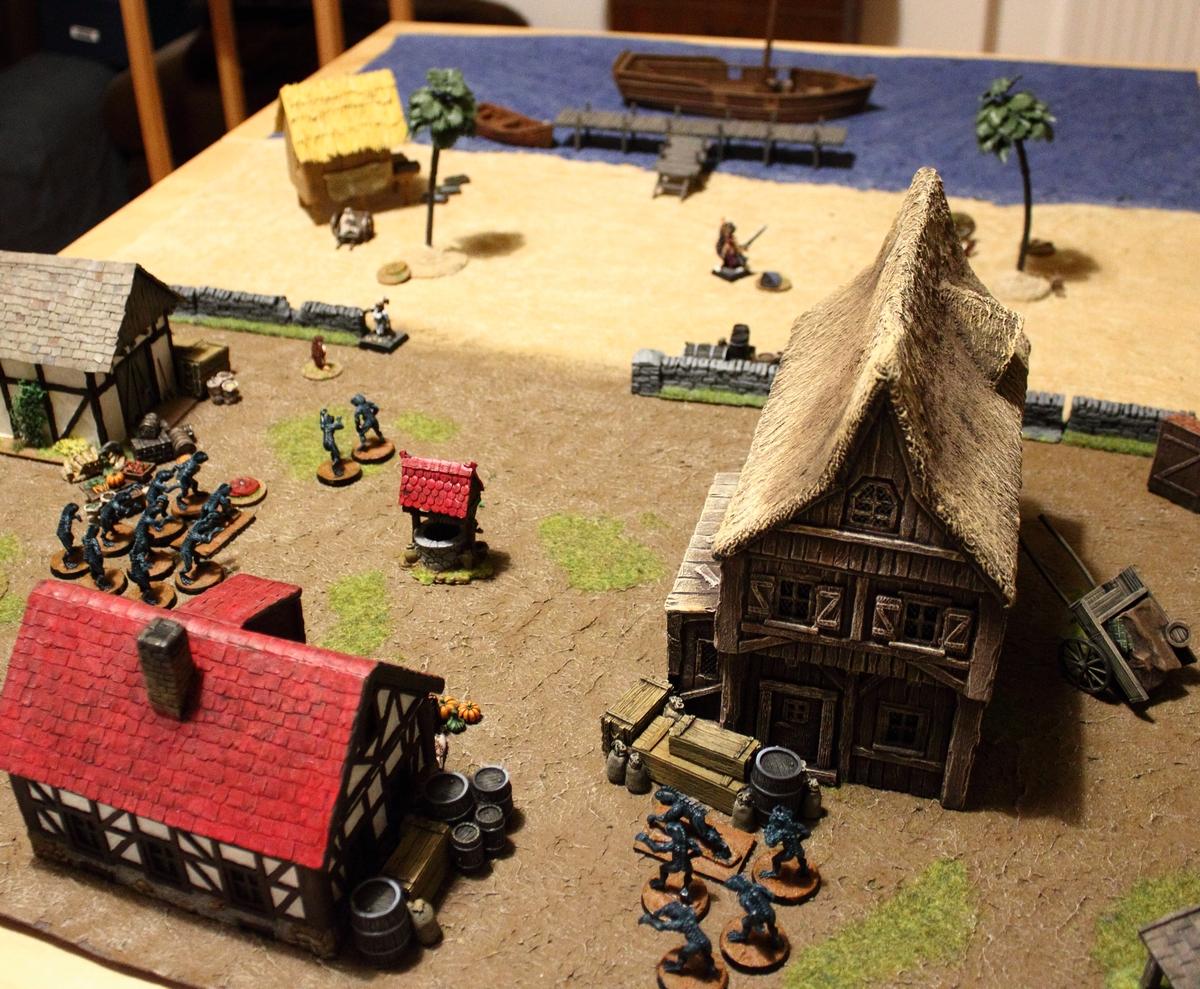 Apart from the fact that Vestris got hurt, the whole thing is a great success. We managed to investigate all the clues, and Miri managed to grab a whole lot of money too. The fact that the air elemental popped up right on turn#1 was of course remarkable, but in hindsight probably for the best as at this point we were still fresh and all lumped together. In my mind Sellswords and Spellslingers is a game which thoroughly succeeds at what it set out to do. Of course it's a bit of a strange one, sitting between two worlds. It requires a bit of preparation, especially if you play more often, so scenarios don't get repetitive and if you want to play it all with miniatures you should prepare a collection of quite a few evil minion models (deep ones, goblins, skeleton warriors, giant spiders, Orcs, etc). For the very last group of Deep Ones who spawned we'd run out of Deep One figures, so a group of Night Goblins popped up as stand-ins! So you either get a whole lot of minis (never been a huge problem for wargamers, I hear), or you make the scnearios fit you collection. OR of course you use printed markers. The rulebook supplies you with hundreds of monster markers in pdf form which you can print and put on the table this way. The Genasha Games website suggests having 3-8 monsters at hand for each player character in the game, as well as 1-2 boss monsters as a general suggestion. Games take place on a 36"x36" sized table, by the way. The event deck is a simple and clever design. Events get discarded after they are played out, so as the game progresses there are relatively more monster activation and monster spawn cardsin the deck. This leads to naturally progressing tension in the game with a climax of hordes of enemies, and thus putting some time pressure on the players to get the job done. Another plus of the event deck is that no DM/ GM/umpire is required. Even to the person who designed the scenario 90% of how the game plays out will be a surprise. Of course it's very important, as with any role playing game, that the game is played as a campaign rather than single games. Then Sellswords and Spellslingers works really well. I hope that you enjoyed this game report! Thanks to Cpt.Shandy for the scenario and another good game. I'm looking forward to more adventures with these characters!
|
|
This message was edited 4 times. Last update was at 2019/02/10 20:05:10
|
|
|
|
|
2019/02/10 20:53:56
Subject: Battle Brush Studios' Commission Painting Log - Massive update! 40k, WHFB, Historicals, Infinity, ..
|
|

Fixture of Dakka
|
I wouldn't've thought, looking at that cover, that this was a recent game, Siggy.
Sounds like a laugh, though, if you've got the right sort of group (and access to a range of monsters, etc).
|
2021-4 Plog - Here we go again... - my fifth attempt at a Dakka PLOG
My Pile of Potential - updates ongoing...
Gamgee on Tau Players wrote:we all kill cats and sell our own families to the devil and eat live puppies.
 Kanluwen wrote: Kanluwen wrote:This is, emphatically, why I will continue suggesting nuking Guard and starting over again. It's a legacy army that needs to be rebooted with a new focal point.
Confirmation of why no-one should listen to Kanluwen when it comes to the IG - he doesn't want the IG, he want's Kan's New Model Army...
tneva82 wrote:You aren't even trying ty pretend for honest arqument. Open bad faith trolling.
- No reason to keep this here, unless people want to use it for something... |
|
|
|
|
2019/02/10 21:30:16
Subject: Re:Battle Brush Studios' Commission Painting Log - Massive update! 40k, WHFB, Historicals, Infinity, ..
|
|
Buttons Should Be Brass, Not Gold!
|
@Dysartes: Yeah, it looks quite different to many other new releases. But then these have to struggle with stuff like hefty page limitations (such as Osprey publications) or having to push miniatures sales (such as Warlord's releases). I like the style of the Ganesha Games illustrations, especially the stuff which is by different artists. Always preferred different art styles in rulebooks as opposed to streamlined, corporate design illustrations of commercial figures available from that company.
|
|
|
|
|
|
2019/02/16 14:47:10
Subject: Battle Brush Studios' Commission Painting Log - Massive update! 40k, WHFB, Historicals, Infinity, ..
|
|
Gargantuan Great Squiggoth
|
That was a great read and sounds like great fun. I miss the days of gaming so much, but it is nice to hear others adventures. Thanks for sharing, and I think that is another one added to the list of maybe one day. Oh and definitely want to look up those deep one models.
|
|
|
|
|
|
2019/02/16 17:04:28
Subject: Re:Battle Brush Studios' Commission Painting Log - Massive update! 40k, WHFB, Historicals, Infinity, ..
|
|
Buttons Should Be Brass, Not Gold!
|
@Cambierhi: Thanks! Almost didn't recognize you there with the new avatar. The Deep Ones are from Black Cat Bases: http://blackcatbases.com/product-category/figures/figures-cthulhu-mythos-monsters/page/2/
|
|
|
|
|
|
2019/03/05 11:53:24
Subject: Re:Battle Brush Studios' Commission Painting Log - Massive update! 40k, WHFB, Historicals, Infinity, ..
|
|
Buttons Should Be Brass, Not Gold!
|
'ello.
Right, let's post some updates. Over the past weeks I've been mostly catching up on small projects I've had scheduled.
1st Grenadier Guards, the Guards Camel Regiment, 1885:

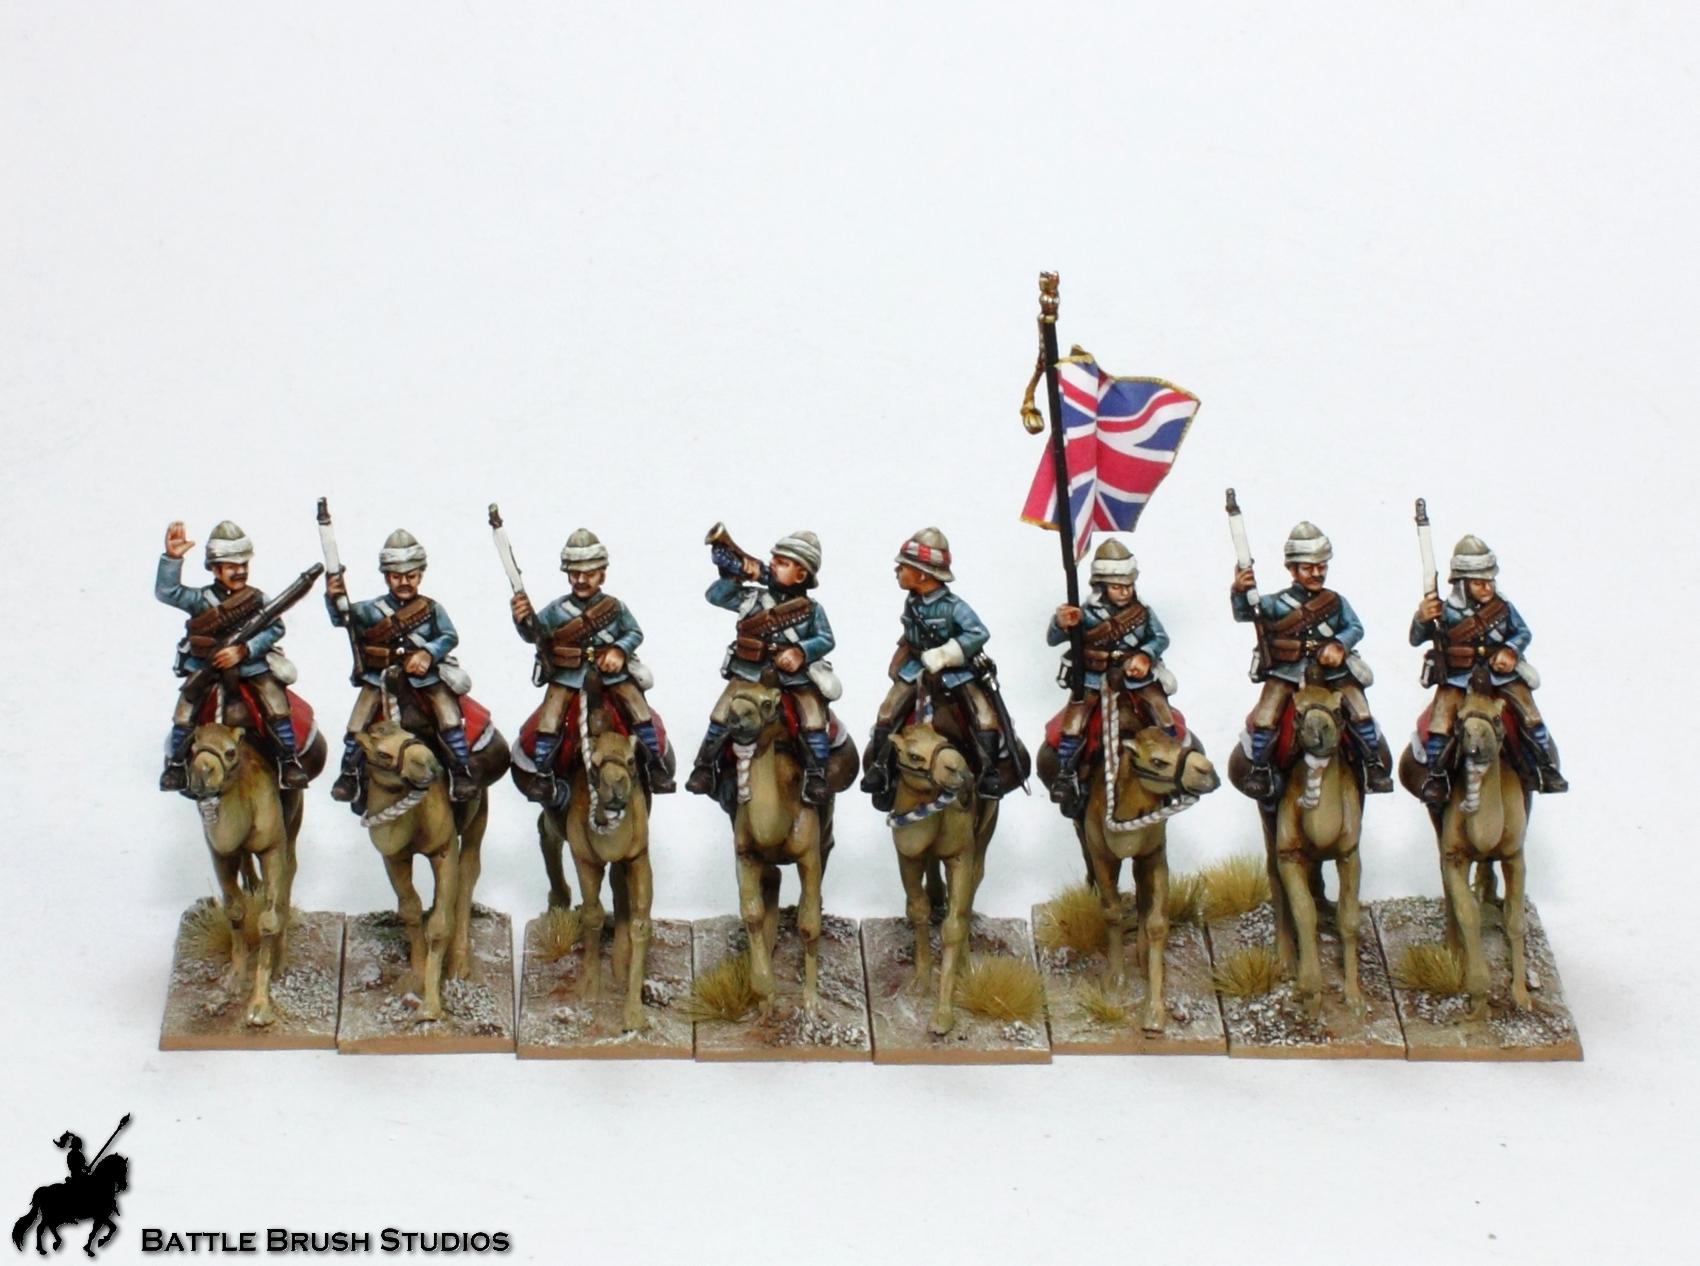
Perry Miniatures, 28mm. Something different for a change.
Bunch of Napoleonic Austrians; Hungarian Infantry (IR32) and 1.Husarenregiment "Kaiser Franz":
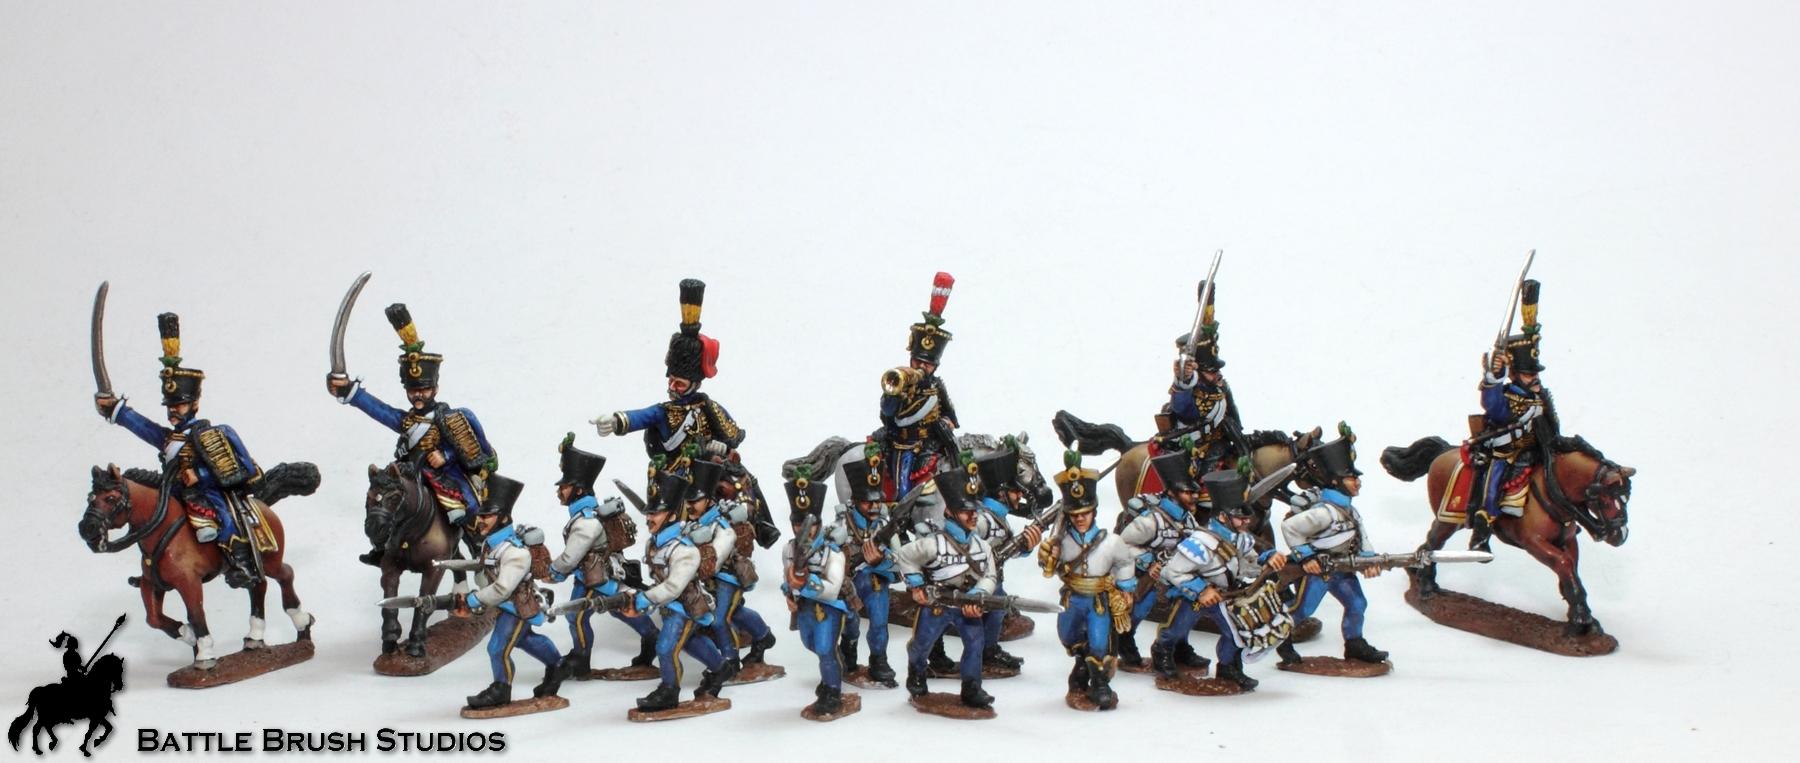
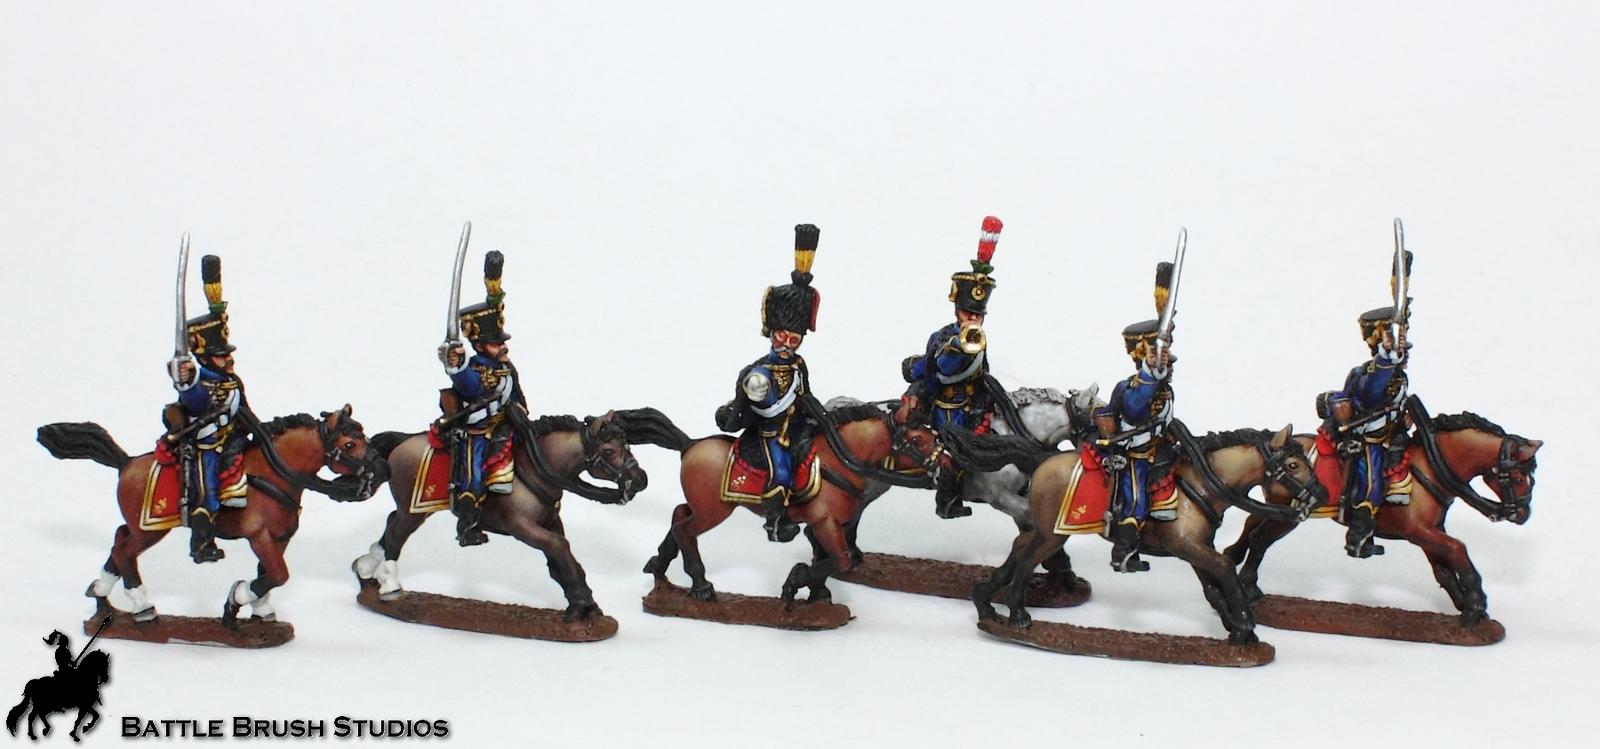

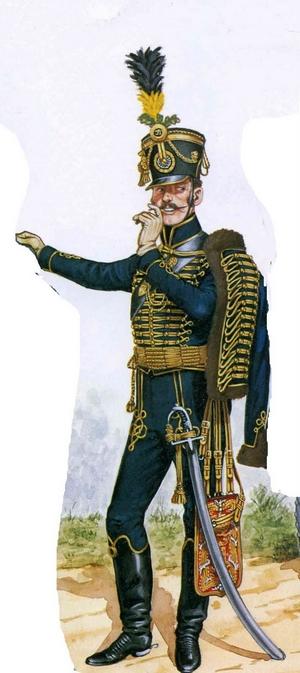
All of these are Front Rank figures. Excellent stuff to work with.
Here's an Austrian gun limber by the Perrys:
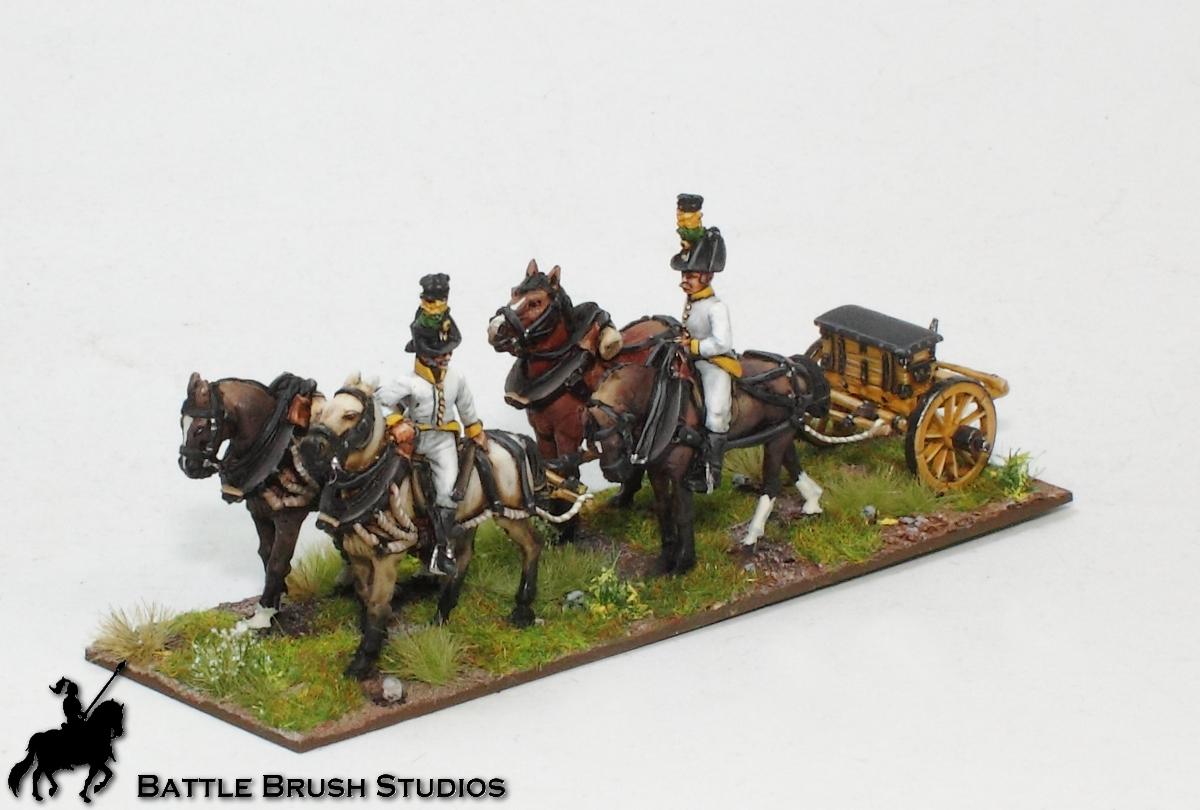
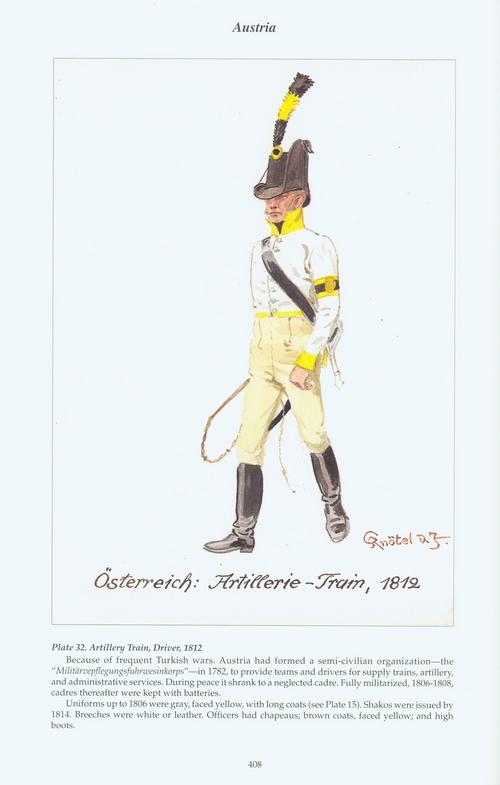
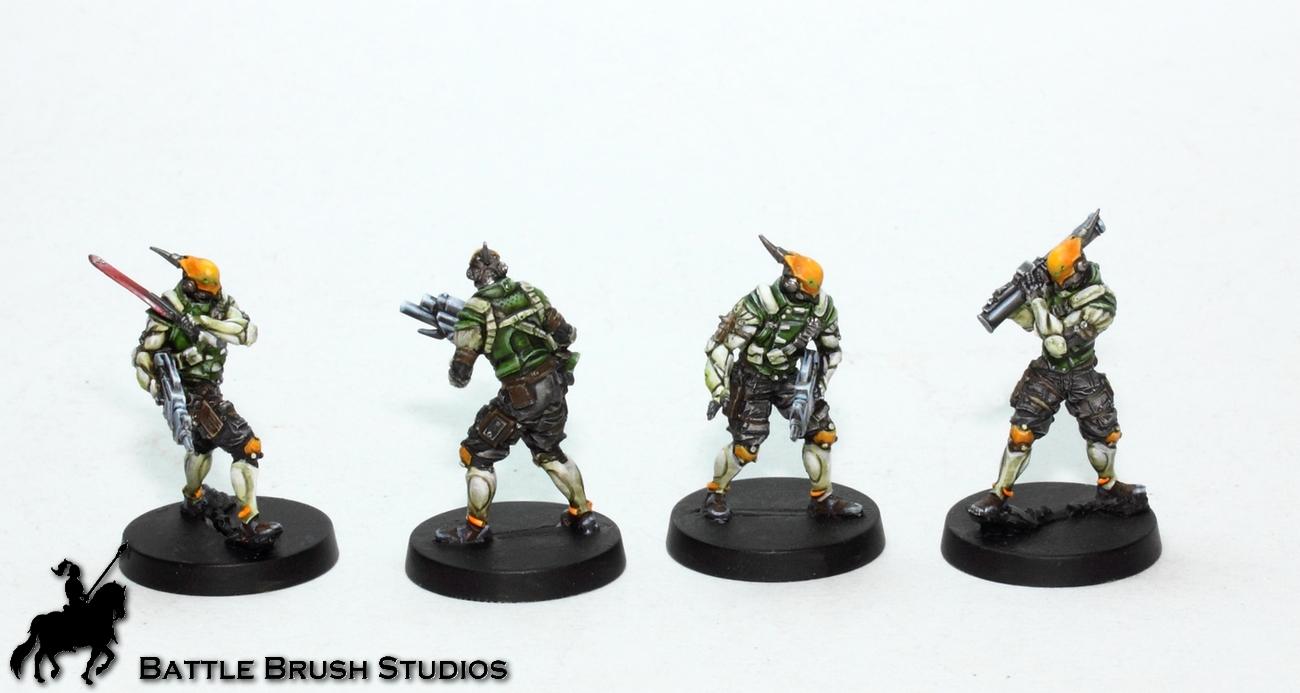
By now I really enjoy painting Napoleonics. Hope you like them! Automatically Appended Next Post: Then there's some more Infinity Figures I've been working on. Quite a few actually, but I don't have proper photos yet. So we're stuck with a WIP shot of that Fat Yuan Yuans:
Unique, fun figures with a pretty charming background and incredible presentation. Gimmicky as hell, but it's something i hadn't seen done before.
|
|
This message was edited 1 time. Last update was at 2019/03/05 11:57:41
|
|
|
|
|
2019/03/05 23:22:53
Subject: Battle Brush Studios' Commission Painting Log - Massive update! 40k, WHFB, Historicals, Infinity, ..
|
|
Fixture of Dakka
|
Good to see you back, Siggy - and with some nice pieces, too.
Though whoever decided cream, white and yellow made for a good uniform needs their head checking.
|
2021-4 Plog - Here we go again... - my fifth attempt at a Dakka PLOG
My Pile of Potential - updates ongoing...
Gamgee on Tau Players wrote:we all kill cats and sell our own families to the devil and eat live puppies.
Kanluwen wrote:This is, emphatically, why I will continue suggesting nuking Guard and starting over again. It's a legacy army that needs to be rebooted with a new focal point.
Confirmation of why no-one should listen to Kanluwen when it comes to the IG - he doesn't want the IG, he want's Kan's New Model Army...
tneva82 wrote:You aren't even trying ty pretend for honest arqument. Open bad faith trolling.
- No reason to keep this here, unless people want to use it for something... |
|
|
|
|
2019/03/06 20:33:11
Subject: Battle Brush Studios' Commission Painting Log - Massive update! 40k, WHFB, Historicals, Infinity, ..
|
|
Mastering Non-Metallic Metal
|
Great job on all the people and their mounts. 
|
     Mastodon: @DrH@warhammer.social Mastodon: @DrH@warhammer.social
The army-                   ~2295 points (built). ~2295 points (built).
 
* -=]_,=-eague Spruemeister General. * A (sprue) Hut tutorial *
Dsteingass - Dr. H..You are a role model for Internet Morality! // inmygravenimage - Dr H is a model to us all
Theophony - Sprue for the spruemeister, plastic for his plastic throne! // Shasolenzabi - Toilets, more complex than folks take time to think about! |
|
|
|
|
2019/03/08 19:41:11
Subject: Battle Brush Studios' Commission Painting Log - Massive update! 40k, WHFB, Historicals, Infinity, ..
|
|
Gargantuan Great Squiggoth
|
I love the camels, really love them. All the work is excellent as normal, but I am off to find those camels. I NEED them.
|
|
|
|
|
|
2019/03/11 19:31:14
Subject: Re:Battle Brush Studios' Commission Painting Log - Massive update! 40k, WHFB, Historicals, Infinity, ..
|
|
Buttons Should Be Brass, Not Gold!
|
@Dr H: Cheers! @Camkierhi: Thank you, Sir! Those are all from the extensive Sudan range by the Perrys. Roight, I'm currently recuperating from last weekend's Go Modelling in Vienna Army Museum. Not sure if I'll manage to cobble together a show report as I was extremely busy at my table throughout the whole weekend. I didn't have time to get up and take some photos at all. Instead for now I'll provide you with another 15mm Sharp Practice battle report. Background Once more Cpt.Shandy invited me over for a game of Sharp Practice 2. The scenario is worked out by him again, and as usual is based on a historical event, specifically the Skirmish at Wall's Bridge. This skirmish happened at the tail end of Grierson's Raid. Since April 17 Grierson's Unionist cavalry had raided in Confederate country from Tennessee throughout Mississippi and into Louisiana. They blew up railways, set fire to Confederate storages, freed slaves and all the other things. This wasn't only to annoy and hinder the Confederate war effort, but also to distract from Grant's planned attack on Vicksburg.  (source: https://warfarehistorynetwork.com/daily/civil-war/griersons-raid-wrecking-the-railroad-with-the-butternut-guerrillas/) The Conferate army had several detachments dedicated to catch the raiders. More by accident 9th Louisiana Cavalry ('Partisan Rangers') managed to do just that on May 1st 1863 at Wall's Bridge. Well, almost. This very event is what we depict in your game. Let's see if they managed at least on the gaming table. Scenario Cpt.Shandy already had tested this scenario a while ago. you can see the report of this game here: https://wargamingraft.wordpress.com/2017/05/12/walls-bridge-sharp-practice-aar/ In this report you can also read a bit more about the background and the special rules of the scenario. Basically it's about this: 7th Illinois Cavalry (the vanguard of Grierson's command) come to the aid of scouts consisting of Butternut Guerillas (Union scouts in confederate uniform) who had been found out and caught in a firefight with actual Confederate scouts guarding the bridge. They are to link up and break through the Confederate force to avoid being caught between them and the larger Confederate force in pursuit of the Grierson's raiders. This is made even harder by the fact that the Union cavalrymen are exhausted. They've been constantly ridin', fightin' and raidin' through unknown enemy territory for weeks (more then 600 miles at that point). Also: The vanguard (the Union force in this scenario) won't show up all together, because the single units are drawn apart by a fair amount. In game terms each side's goal is to reduce the enemy force morale to 0 to win. After a more or less randomly determined number of turns the Union player (Cpt.Shandy) may deploy the main part of the cavalry force. However, the game also ends after a more or less randomly determined number of turns (at the end of each turn a d6 is rolled and added up. If the total amounts to a certain number things happen) the Confederate pursuit force catches up with Grierson's Raiders and the rebels player (me) wins. Advantages for the Union side (Butternut Guerilla Skirmishers, 2x 2 groups of cavalry, 1x Woodruff Gun with crew) is the superior quality of troops and equipment (breech-loading repeating carbines and the [very] light Woodruff Gun). Advantages for the Rebel force (1x Skirmishers, 3x Infantry, 2x Cavalry) are time (which is on my side. Yes, it is.), a slight advantage in numbers and the enemy's exhaustion (= a higher probability of random events happening to Union force) The Game The beginning of the game throws us right into the action: Across the bridge the Butternut Guerrillas, their cover blown, with their leader shot and 2 points of shock, sit in a firefight with Confederate skirmishers across the road. 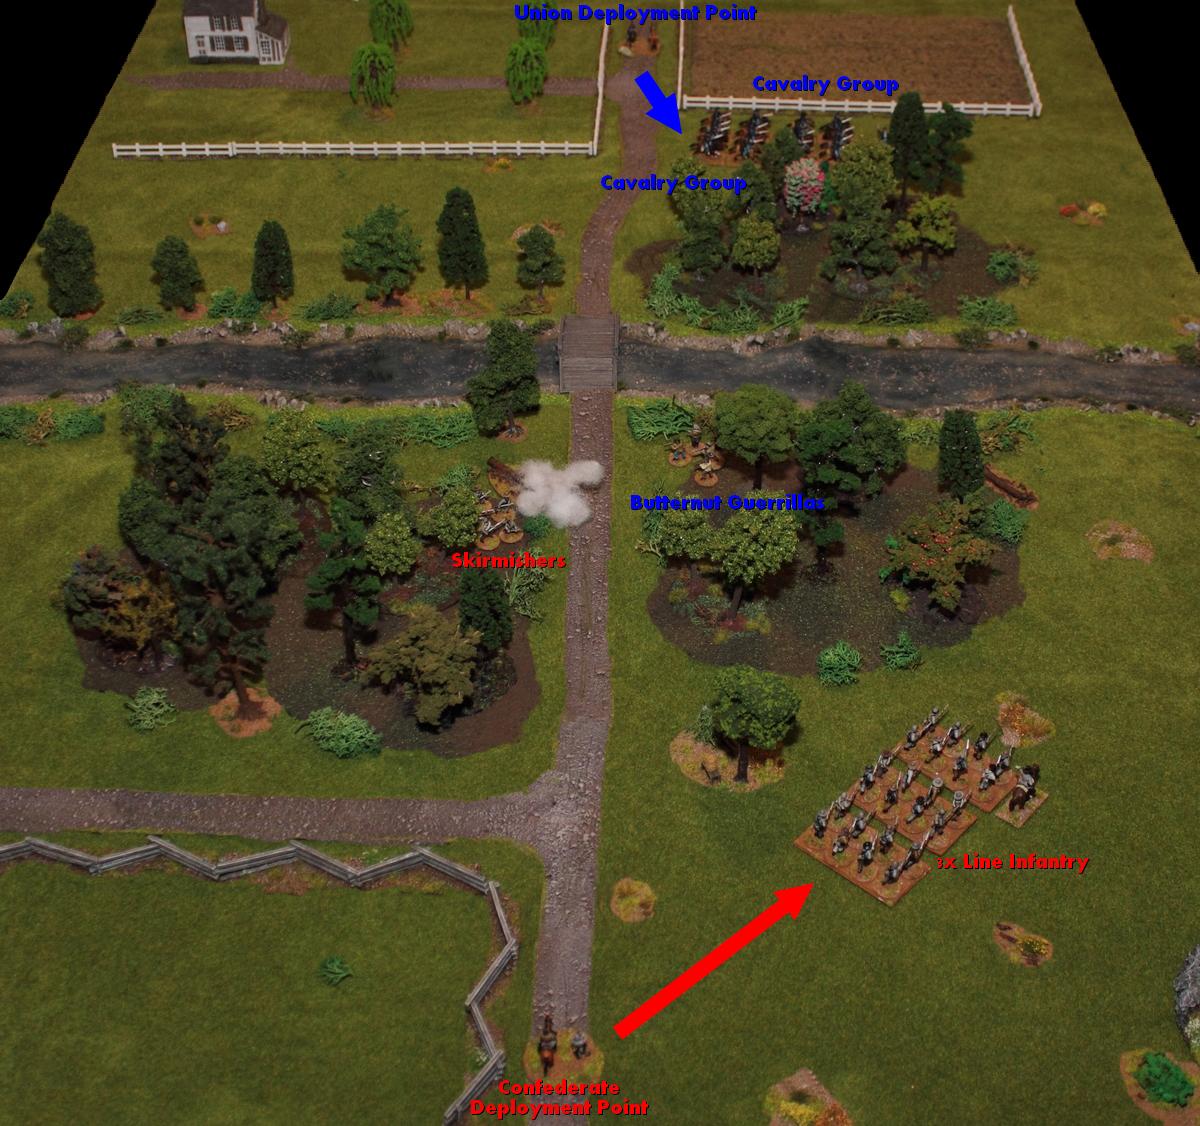 Swiftly Cpt.Shandy gets his first two groups of cavalry on the table and they move toward my right. I react by deploying my 3 groups of infantry (all just militia troops, but oh well) who march off to the right flank to meet the enemy and hinder them from crossing over. Naturally, the Yankee cavalry is faster. They dismount, reach the river bank and deploy in cover. 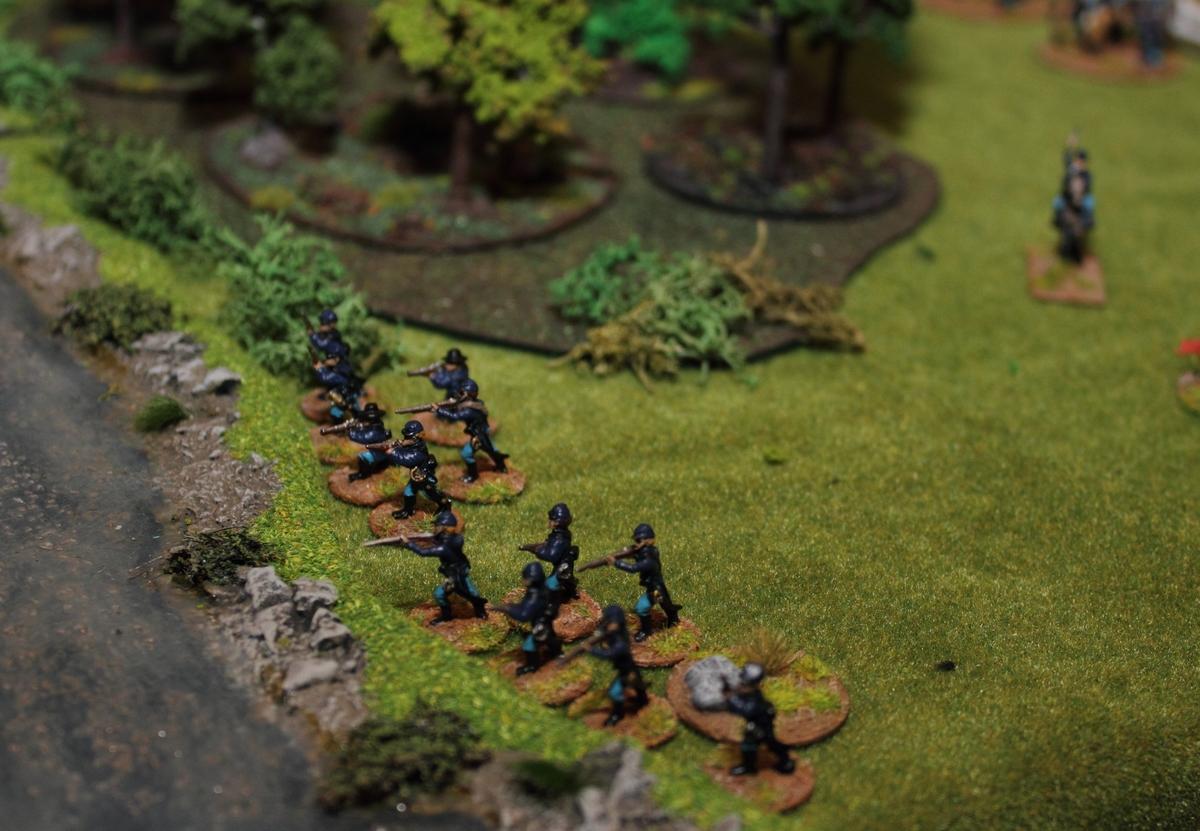 I have encountered smaller groups of Union cavalry with breech-loading carbines before, so I knew that these are potentially very scary. Add to this the excellent cover the dastardly Northern Aggressors have in their position. And the fact that my troops advance far less swiftly than I'd like them to. AS USUAL. Hence I decide no to seek a direct confrontation for now and have my infantry heroically hide behind the forest. In the mean time our skirmishers fight back and forth at the bridge. 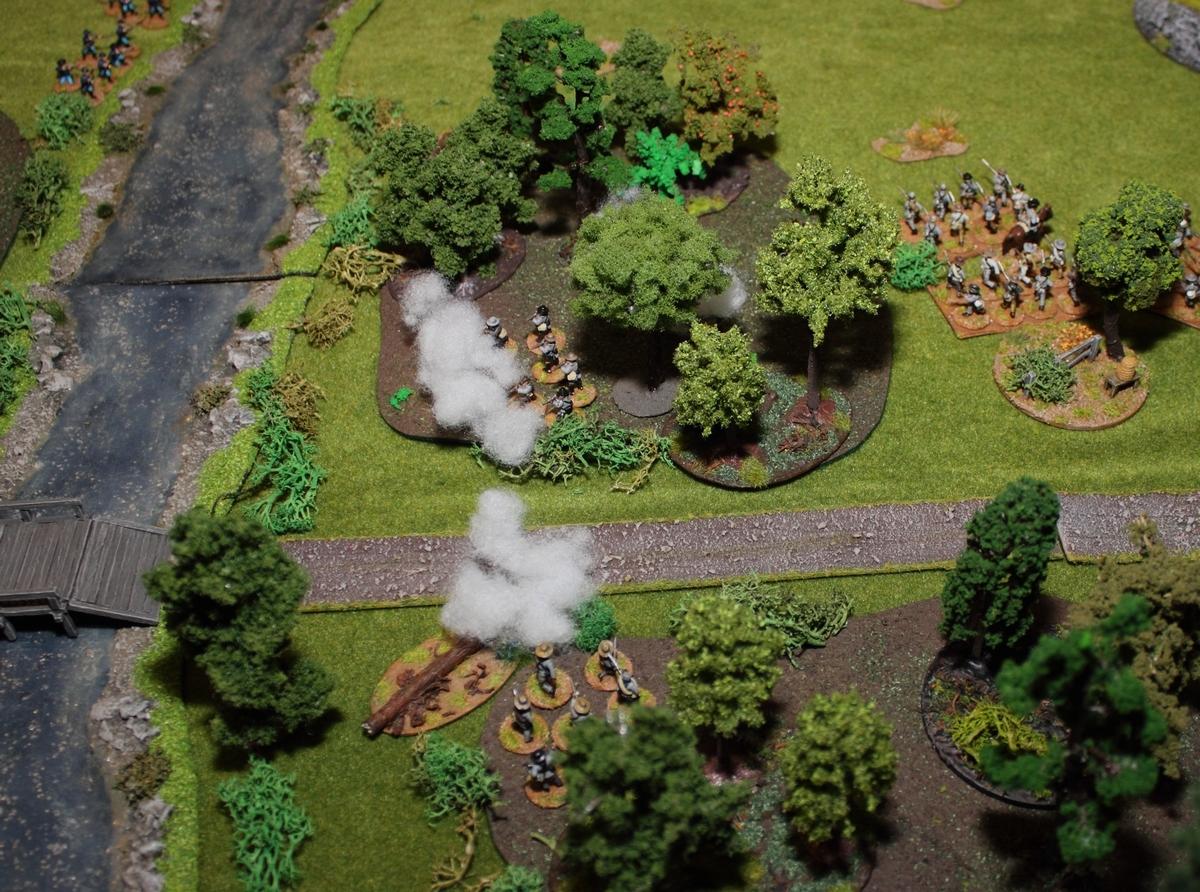 Being a leader short and with starting shock points the Butternut Guerillas are under a lot of pressure. Here's an overview of the starting phases of the game: 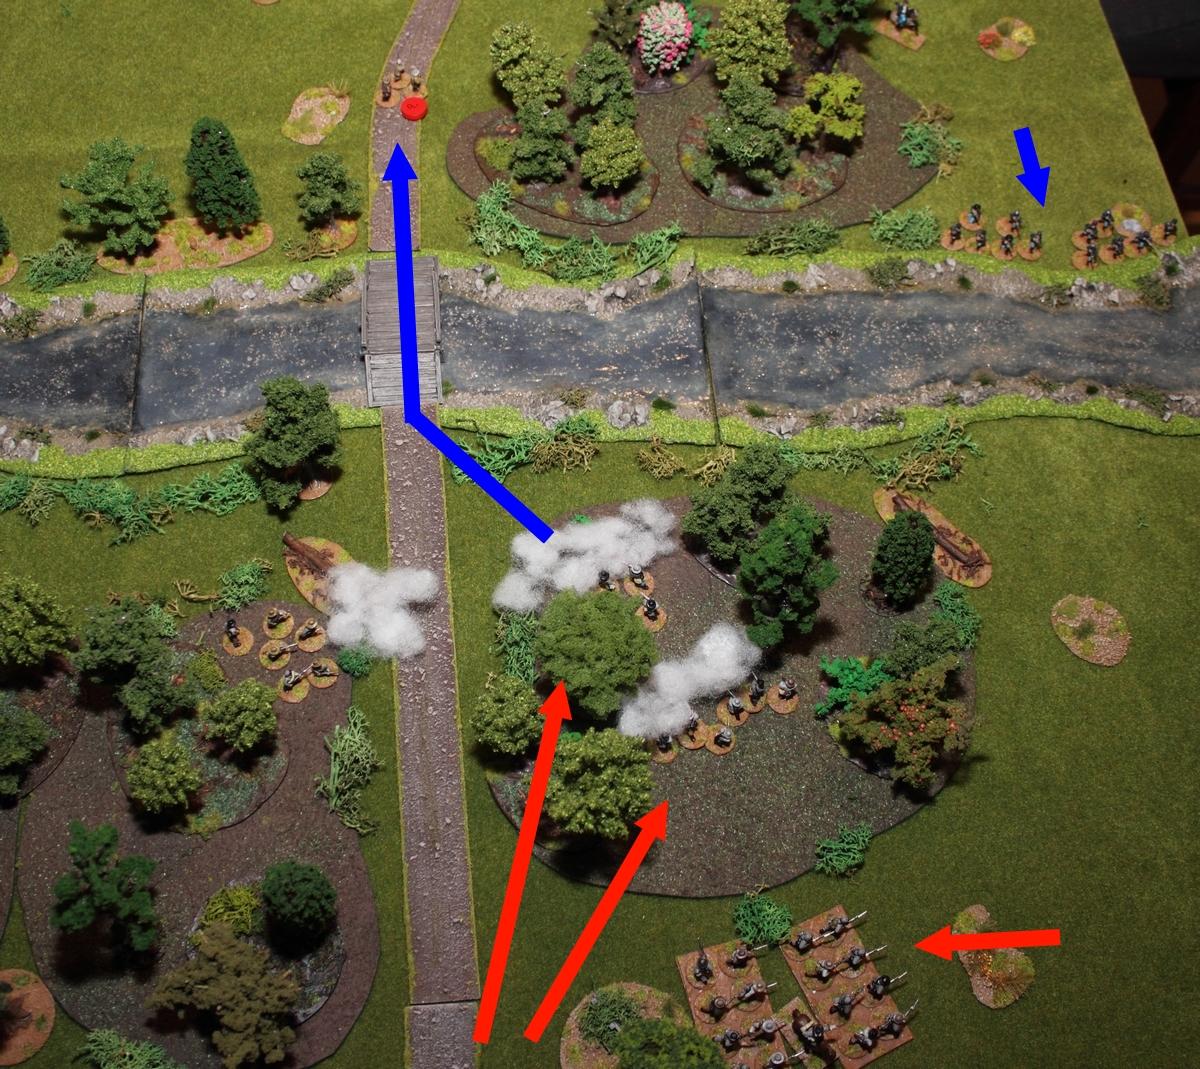 My infantry (lower right) moves back a bit to get out of the enemy fire zone. First I want to deal with the enemy skirmishers at the bridge. My own skirmishers, with the help of 2 groups of cavalry, whom I deploy dismounted, throw the Butternut Guerrillas back across the bridge. They break and flee. Very glad that this went so well Problem is that the rest of the excellent Union cavalry (yeah, usually a weird adjective for Union cavalry, but it's 1863 and by then they'd learned a whole lot) would show up pretty soon. This forces me to decide: Either I seek confrontation with the chaps on my right flank and do a whole lot of damage to them (risking that I get whooped in the process and cavalry in my back) or I dig in, wait and see and then try to delay the whole enemy force with as little casualties as possible until the Confederate army detachment cathes up to them and I win (risking having to face the whole enemy force at once). I decide to do the former and try to get everything I got at the bridge (1x slightly damaged skirmishers, 2x dismounted cavalry using a wide array of shooters, choppers, and things in between) across the river. My plan is to eventually fire at the enemy from the flank and behind.  In the beginning this doesn't go all that well, especially as I try to have my guys unload their guns as soon as they're on the bridge already. My cavalry just isn't good at shootin' them things that's all far 'way like and my skirmishers prefer to just run forward into cover. The Yankee cavalry crosses the river. This of course puts pressure on me and hinders my line infantry to ever deploy in cover at the river bank. On the other hand thus they make it easier for my skirmishers and cavalry to get into the back of the enemy formation. But mainly it sucks for my infantry. 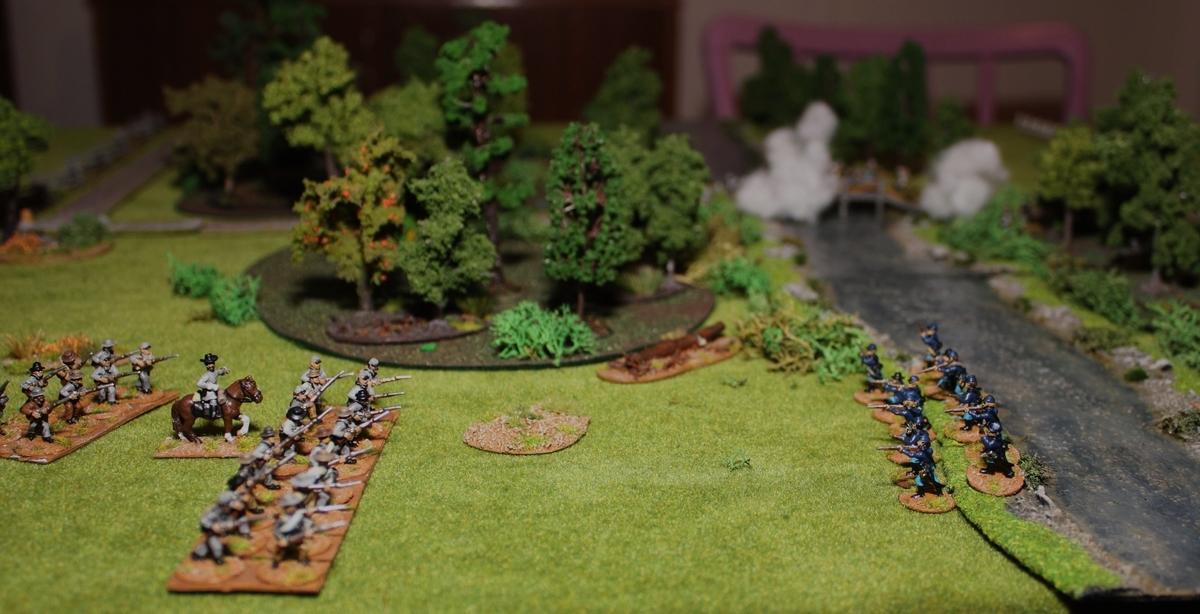 Still, I have to get some casualties and shock on the enemy cavalry groups quickly, so I have my infantry get out into the open and form up into line formation. As they do so the Yankees start unloading their carbines. And they just. Won't. Stop. There's nothing worse than having one's concerns about enemy firepower confirmed. The two foremost of my infantry groups receive a few salvos at short distance. Once they can take this (even though one of the groups has to fall back a bit), but two or three times would see my formation erode quickly. Major James de Brown does his best to keep the troops together and into a firing line. Meanwhile my cavalry and skirmishers advance pretty well, as Union reinforcements (2 more groups of cavalry and the Woodruff gun, limbered up) arrive. 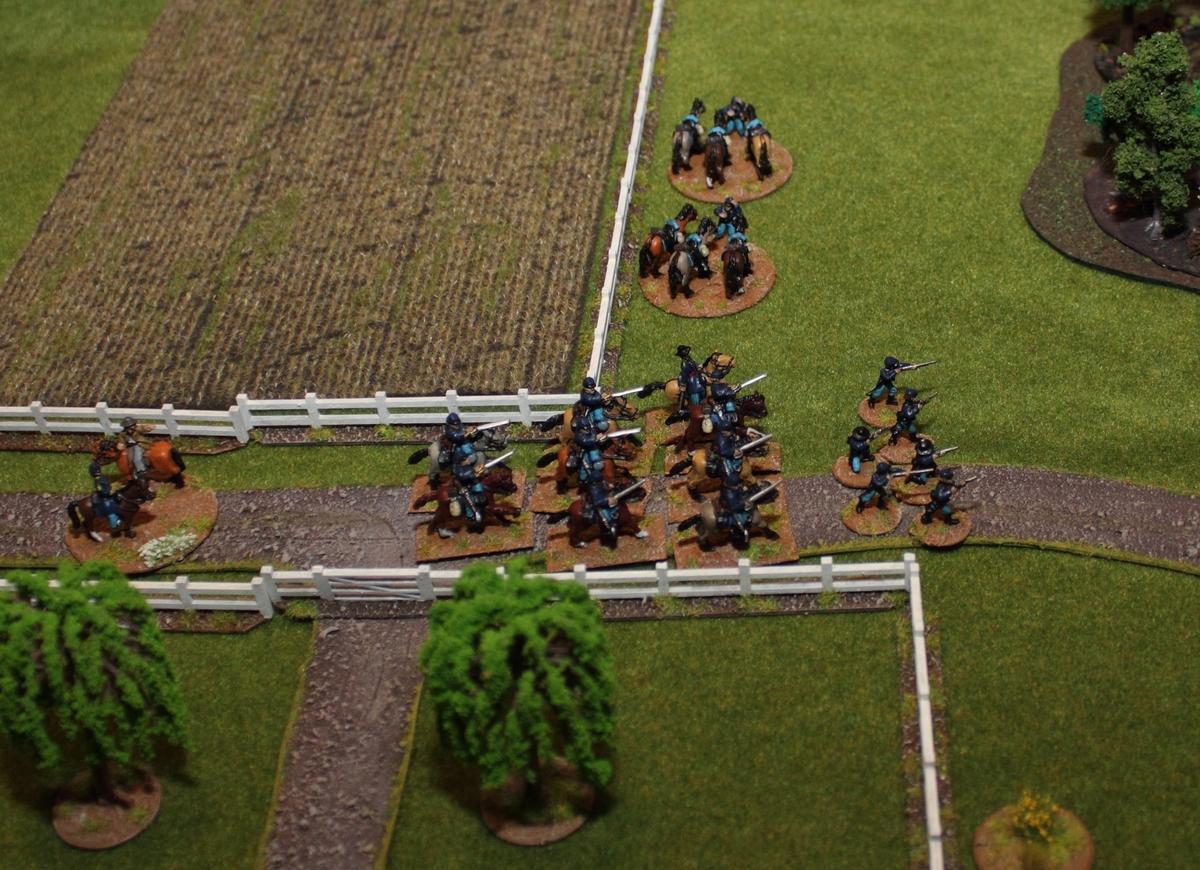 The first group of cavalry deploy dismounted, the second group stay in their saddles. While forming up for battle there's a mishap - one of the STOLEN horses isn't quite used to frontline service yet or just tired, there's a collision, and the leader of the formation, Col.Edward Prince, is tossed off his horse. his group wouldn't do anything for another phase. Same with the gun team, who follow them. Phew. For me this is another point at which I have to make a decision - do I stick to my plan or should I have my skirmishers and cavalry turn tail and get back across the river? For now my skirmishers are covering the advance of my cavalry, but they'd have a really hard time to withstand the Union cavalry for any amount of time. And sacrificing troops like that is potentially very, very costly in Sharp Practice in terms of Force Morale. In larger battles you can afford that and sometimes it may be required, but in what Sharp Practice depicts the men on the ground notce if 100m further down the road a full group of comrades is sent to their death. Speaking of which - I just let the cavalry advance toward the enemy. The skirmishers retreat back across the bridge back to their initial starting point. And then my cavalry managed to do something remarkable - they know that firing their array of weapons doesn't help much, so instead they rush down the river bank as fast as they can to get directly into the back of the enemy. On their way they happen across the leader of the enemy formation who had stayed back at this side of the river! 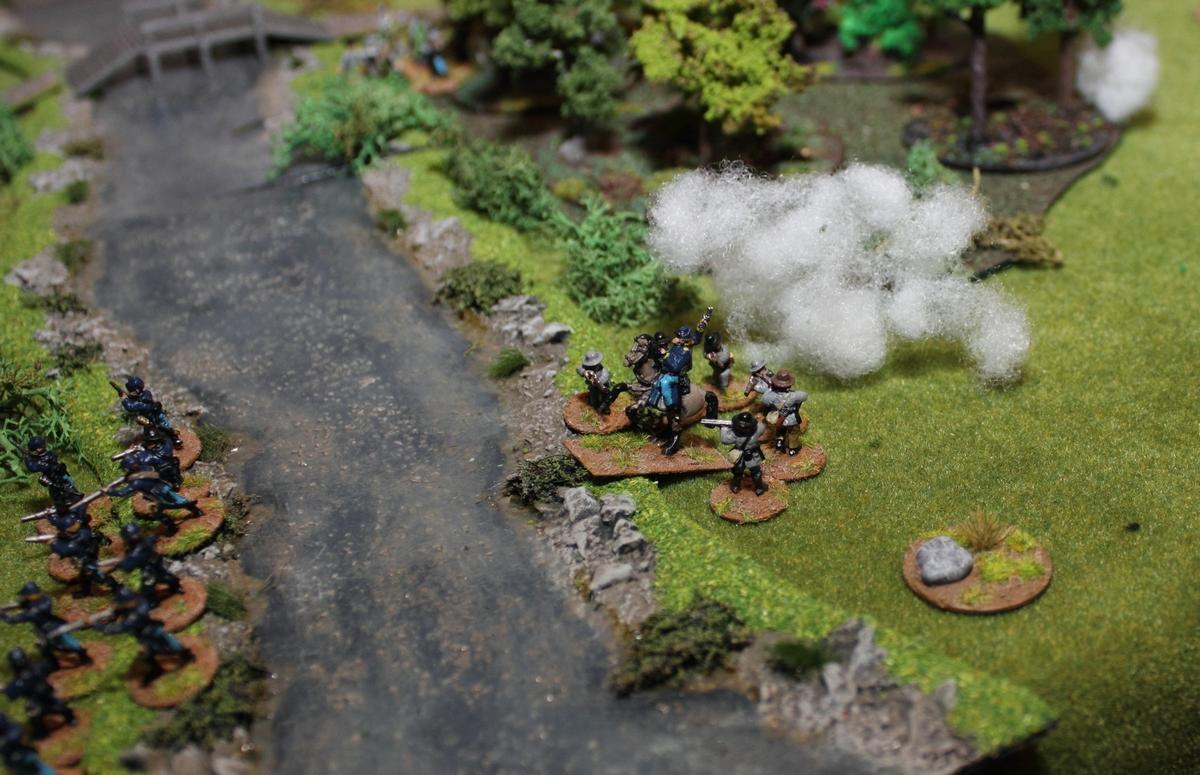 Lt.Styles is quickly overwhelmed and taken prisoner. A blow to my opponent's plans, but now it's his time to act. The dismounted cavalry group advances to my right to remove my cavalry from the back of their pals. To my great relief their carbine salvos are less effective than the first few. Col.Prince, back on his horse and dusted off leads his group towards the bridge at full speed, just moments after my skirmishers had retreated the same way. 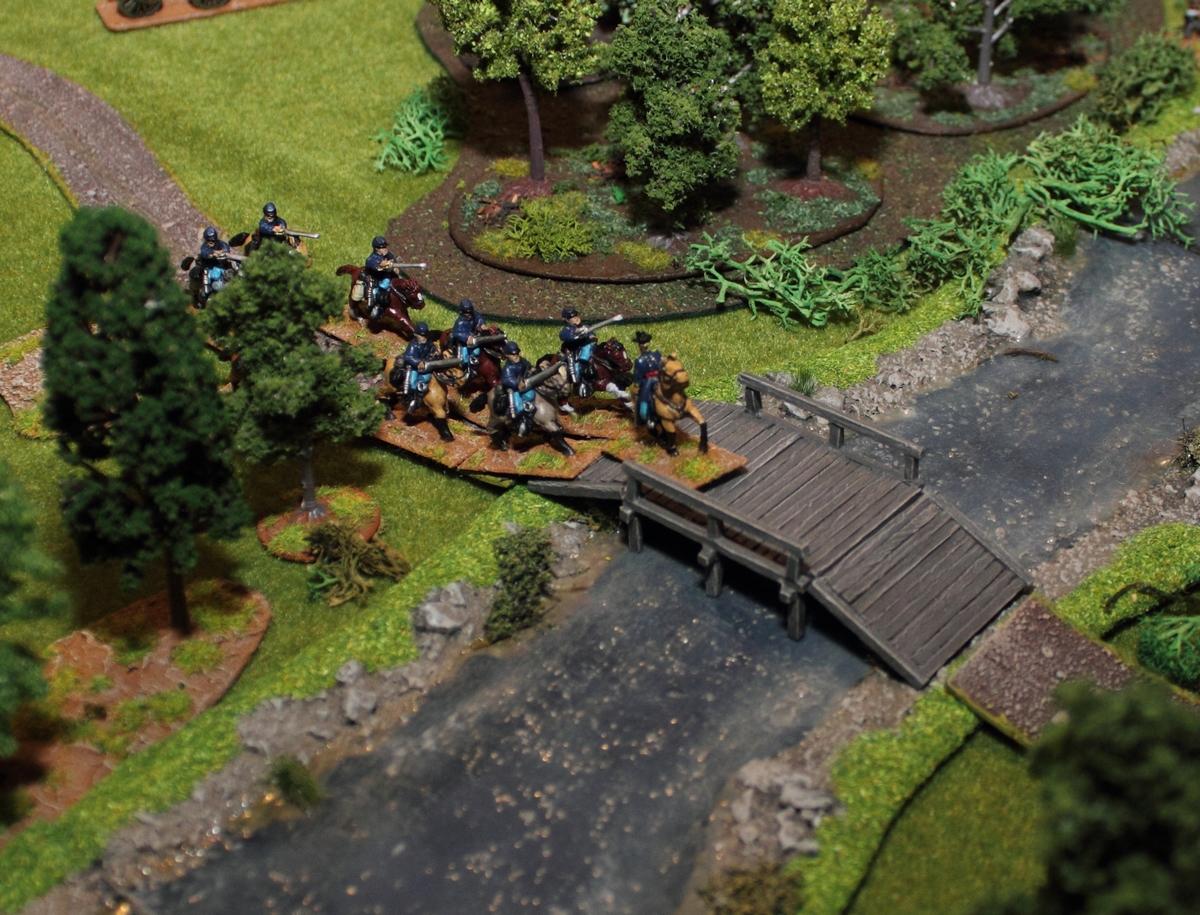 In the meantime my infantry had managed to form into a remarkably neat line, presented and fired textbook salvo into the enemy cavalry at the river bank. 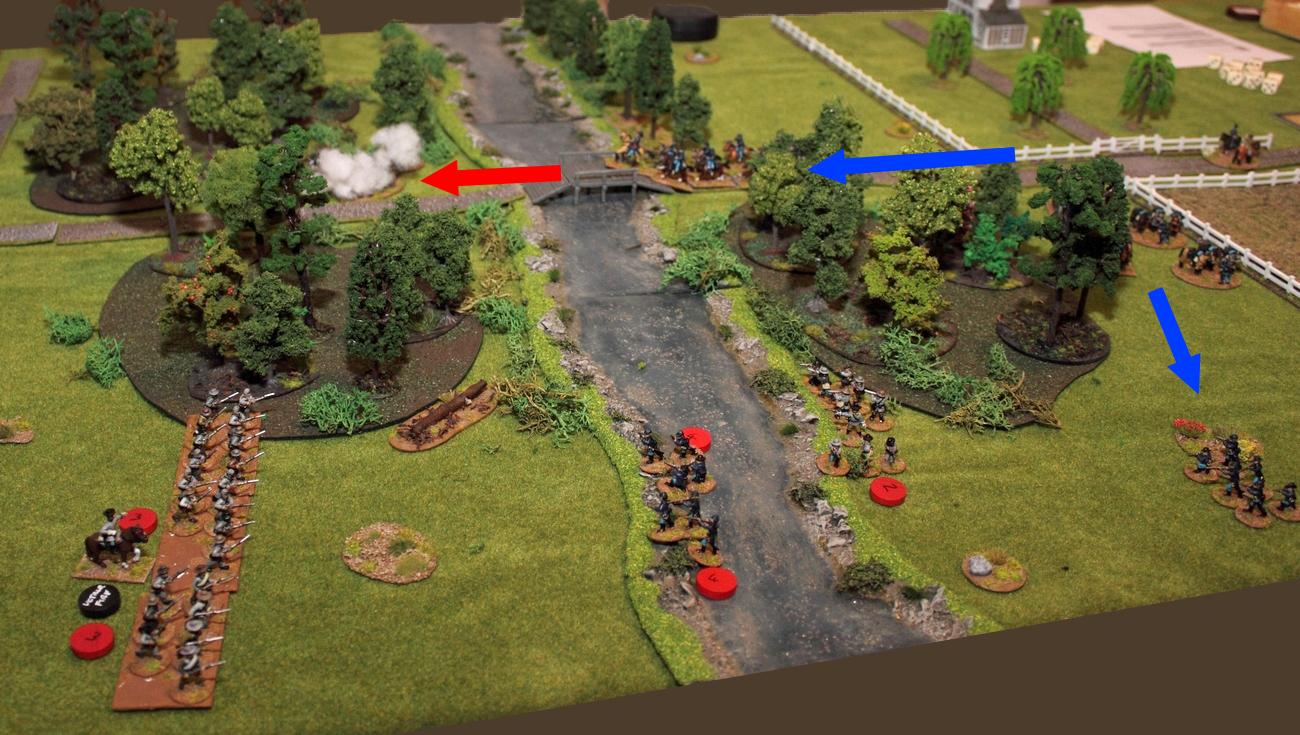 The enemy cavalry is in a bad position now, with the infantry line to the front and the cavalry to their back. My cavalry is so close to the enemy now that they can even use their revolvers and actually give some more effecive fire into the backs of the enemy cavalry, several of whom get taken prisoner. Behind them the Union aid proceeds sluggishly as Col.Smith is overworked trying to get the dismounted cavalry and the gun crew to the frontline at once. In a very cavalry-like move, and ignoring my skirmishers' fire, the mounted group rushes down the road and takes my deployment point. 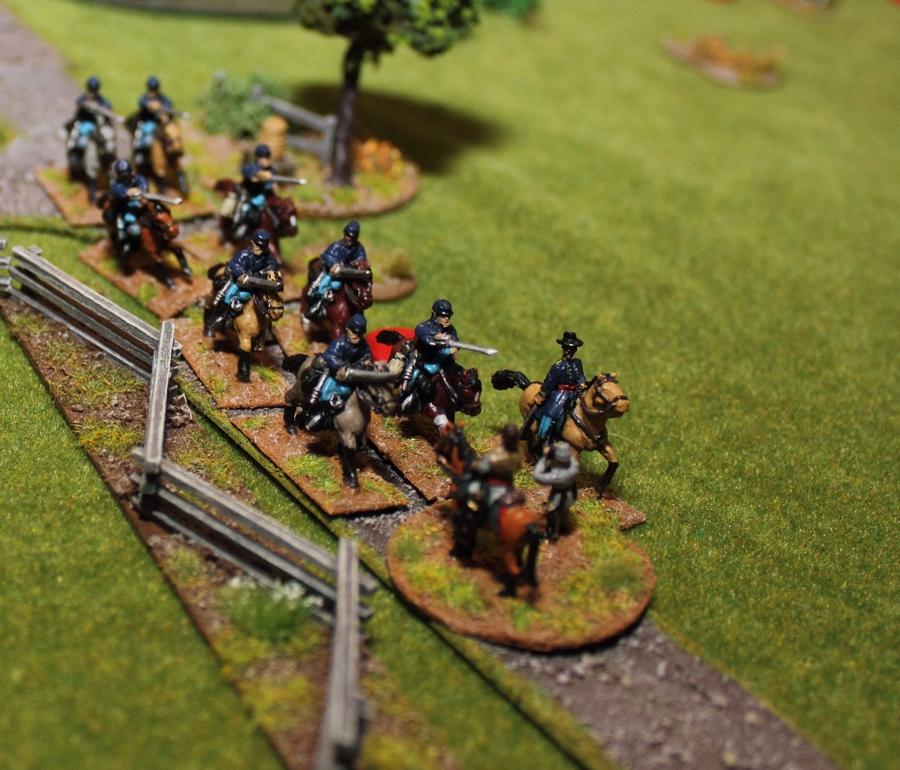 The further plan of course is to turn around and be a pain in the backside of my infantry, but it's too late. Things at the river are decided at this point (at least at my river bank) and my infantry turns around to meet the cavalry. But at this point Union Force Morale is down to 1 while mine's sitting at 7. An overview of the last phases of the game: 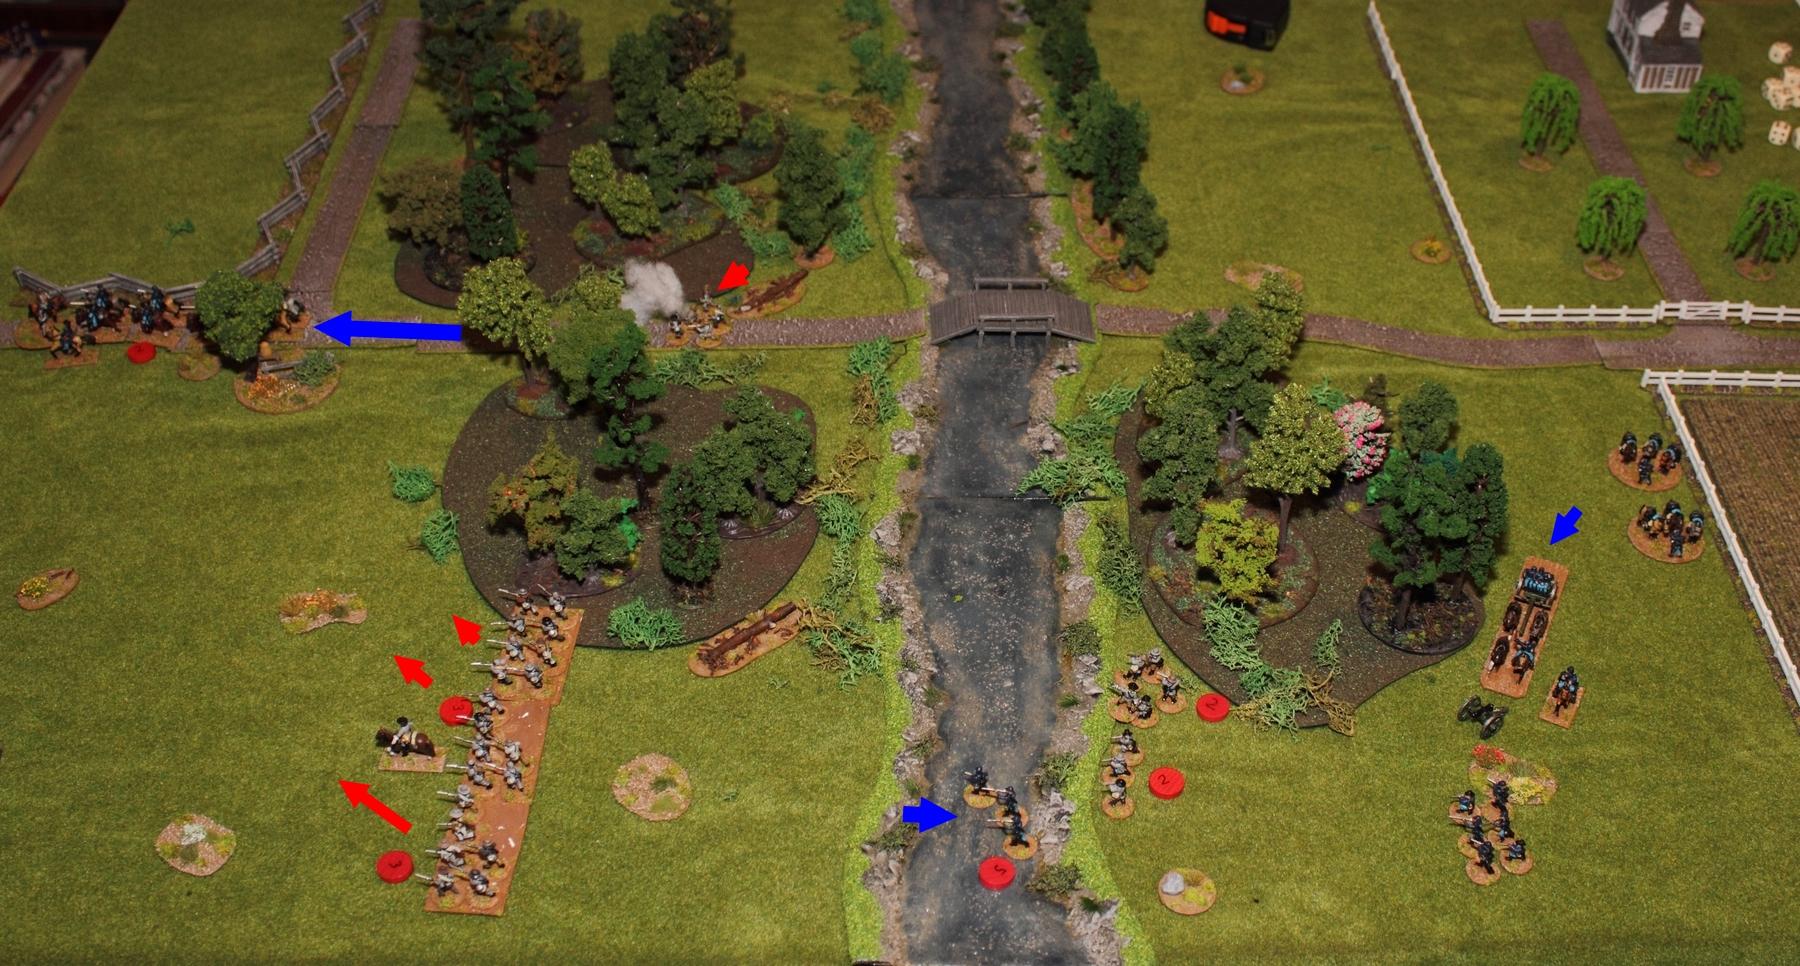 In the left you can see Yankee cavalry taking my Deployment Point. Skirmishers and infantry are turning to fire at them. My cavalry, also already slightly battered, but the main part of "casualties" left battle to guard prisoners. In the right you can see the Woodruff Gun which just got limbered off. The group of dismounted cavalry unfortunately didn't have a chance to have much of an impact on the game. A Win for the Confederaceh. Debriefing That went well. With a good dose of luck. Cpt.Shandy's plan was sound, but it took the second batch of troops too long to arrive. My decision to send the light troops over the bridge asap was a gamble rather than a gambit That one could have had quite different results just as well if a.) Union cavalry groups 3&4 (plus gun) had mobilized quicker, b.) my line infantry' formation and firing hadn't been so good, c.) my cavalry'd been not as quick on their feet, d.) the Union officer'd gotten away. And that's just the possible problems I can think of off the top of my head. In the end Union troops at my right flank was pretty much paralysed, with poor old Cpt.Smith trying to organize various types and bodies of troops. That's the thing - losing leaders/officers in Sharp Practice makes things much harder, because on their own troops get all 'sticky' and pretty unwilling to do anything but (sensibly) staying put, keeping their heads down and fire occasionally in the enemy's general direction. As always a very fun game. Thanks to the ever enthusiasig and patient Cpt.Shandy. And thank you for reading! Hope you enjoyed the battle report. Speaking of whom - here's his report of the whole affair: https://wargamingraft.wordpress.com/
|
|
This message was edited 3 times. Last update was at 2019/03/12 08:52:11
|
|
|
|
|
2019/03/16 17:08:22
Subject: Battle Brush Studios' Commission Painting Log - Massive update! 40k, WHFB, Historicals, Infinity, ..
|
|
Gargantuan Great Squiggoth
|
Thank you for the batrep, enjoyable read.
|
|
|
|
|
|
2019/03/16 23:08:04
Subject: Battle Brush Studios' Commission Painting Log - Massive update! 40k, WHFB, Historicals, Infinity, ..
|
|
Fixture of Dakka
|
Sounds like you had a fun game, Siggy - and the table looked great.
|
2021-4 Plog - Here we go again... - my fifth attempt at a Dakka PLOG
My Pile of Potential - updates ongoing...
Gamgee on Tau Players wrote:we all kill cats and sell our own families to the devil and eat live puppies.
Kanluwen wrote:This is, emphatically, why I will continue suggesting nuking Guard and starting over again. It's a legacy army that needs to be rebooted with a new focal point.
Confirmation of why no-one should listen to Kanluwen when it comes to the IG - he doesn't want the IG, he want's Kan's New Model Army...
tneva82 wrote:You aren't even trying ty pretend for honest arqument. Open bad faith trolling.
- No reason to keep this here, unless people want to use it for something... |
|
|
|
|
2019/03/19 15:11:33
Subject: Re:Battle Brush Studios' Commission Painting Log - Massive update! 40k, WHFB, Historicals, Infinity, ..
|
|
Buttons Should Be Brass, Not Gold!
|
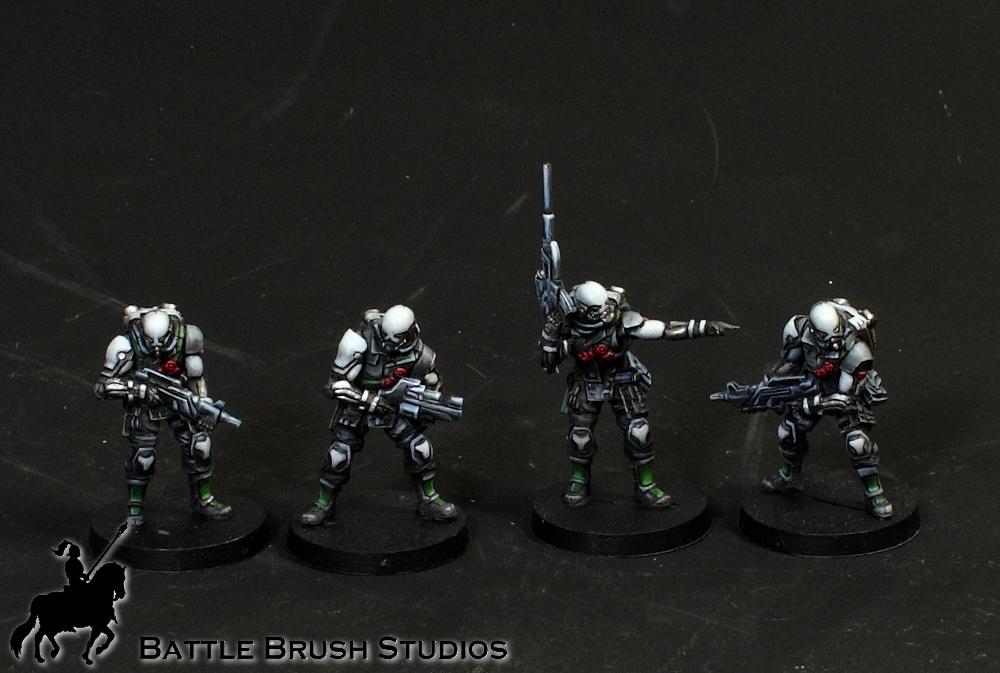
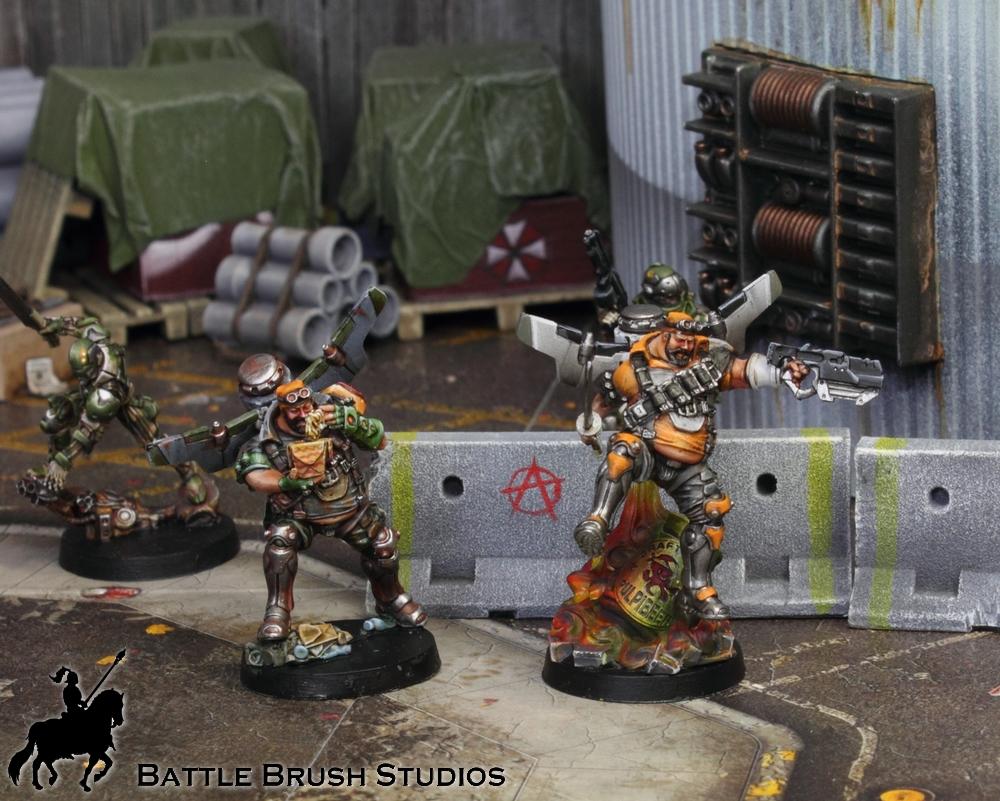
@Camkierhi: Thanks very much! I know that this kind of stuff isn't the most usual for Dakka, but I currently got nowhere else to post those reports since the quick and one-sided demise of skirmish-wargaming.com. Anyway, glad you enjoyed it. @Dysartes: Cheers. Had a great game indeed! Right, I'm back from the first two shows of the year (Vienna Army Museum and Austrian Salute), now that finally all my painting stuff's set up again at home I can get back to work. So what's on the desk? At Austrian Salute I finally got the OK on the Haqqislam colour scheme, so I'll see that I get these finished asap. Here's a WIP of their current state: 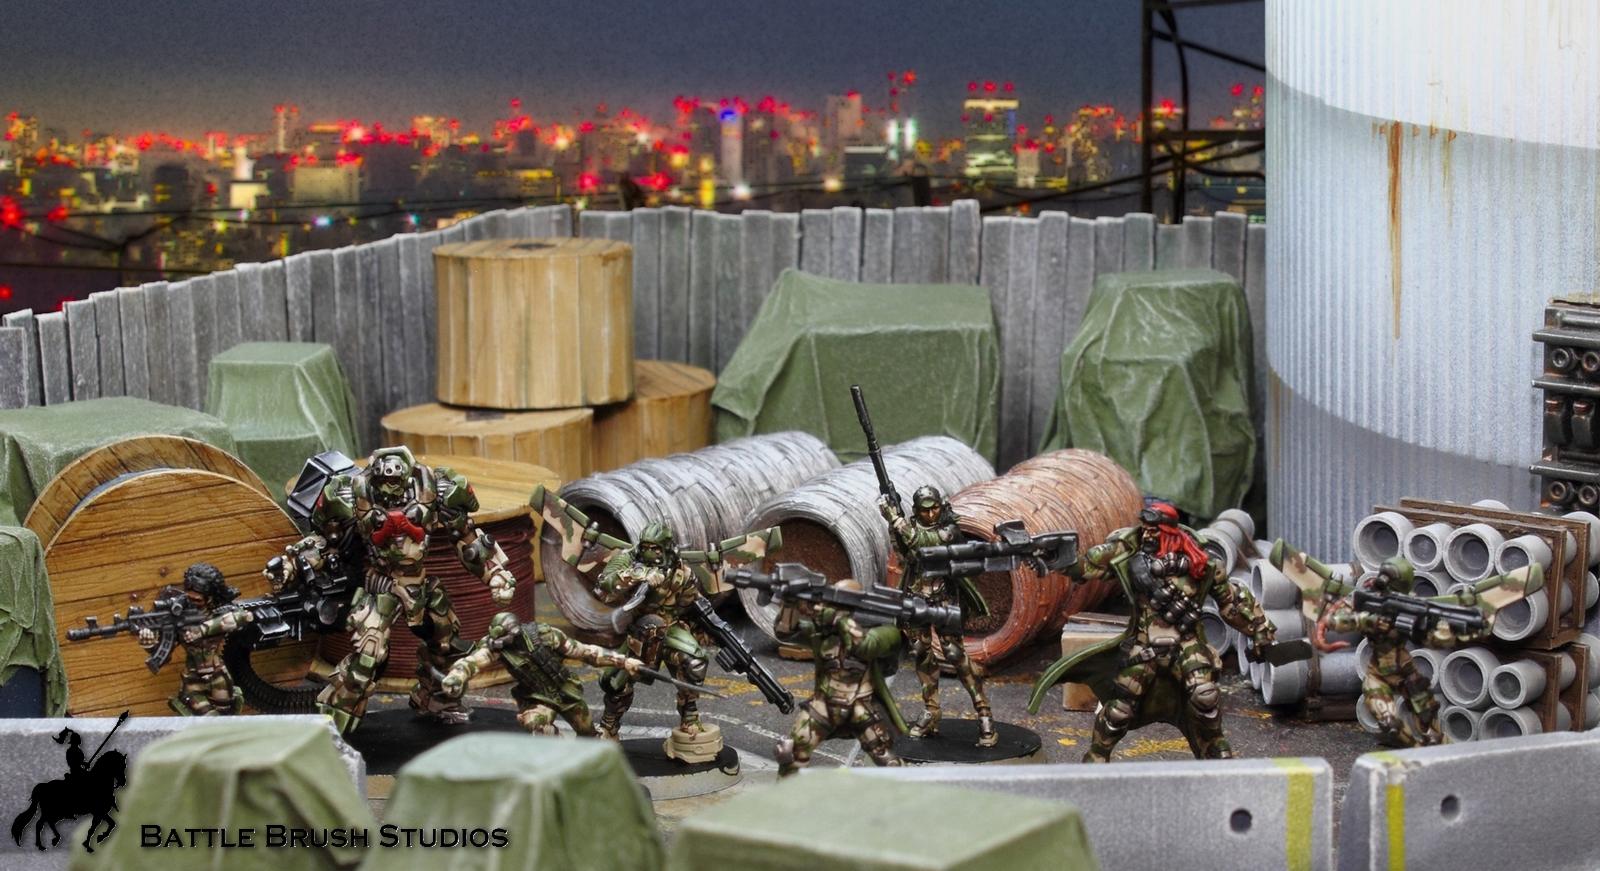 All the other figures for this lot (the two civilian/corporate security figures, Fat Yuan Yuans, KTS and Druze Shock Team) were well received as well. So that's good. Not pictured: 77 Goff Orks (slugga boyz, Kommandoz, Tank Bustaz and a Runtherd) who are standing on my desk. I'd started working on them, then I got a message asking me to rip'em off their 25mm bases and put them on 32mm ones. Yikes. Well, that's done now as well. So I'll see that I get these Infinity figures done, then it's the Ork Boyz, then back to another batch of Infinity figures (about 10 figures I think), and if I'm a good boy I'll have that all done by the time the new Kickstarter figures from Dead Earth Games arrive which then have to be painted asap so they can use those in their promo for the next KS wave for Pirates of the Dread Seas. I've seen the masters already and they look mighty fine. So that's something to look forward to. ...and right in this moment I spotted a Haqqislam lady who had hidden between the horde of Orks to skip the last five painting steps on their comrades. That's what I get for putting too much stuff on the desk. Sigh. Please excuse me.  edit: Oh, and of course I've got the Austrian Salute show report in the works. Still have to put together the photos of my own stall there, then it's going straight online.
|
|
This message was edited 1 time. Last update was at 2019/03/19 15:12:16
|
|
|
|
|
2019/03/19 17:19:43
Subject: Battle Brush Studios' Commission Painting Log - Massive update! 40k, WHFB, Historicals, Infinity, ..
|
|
Fixture of Dakka
|
Quick question regarding some of the terrain in that shot, Sigur - what did you use to get the "draped tarp" look on some of those stacks of crates?
|
2021-4 Plog - Here we go again... - my fifth attempt at a Dakka PLOG
My Pile of Potential - updates ongoing...
Gamgee on Tau Players wrote:we all kill cats and sell our own families to the devil and eat live puppies.
Kanluwen wrote:This is, emphatically, why I will continue suggesting nuking Guard and starting over again. It's a legacy army that needs to be rebooted with a new focal point.
Confirmation of why no-one should listen to Kanluwen when it comes to the IG - he doesn't want the IG, he want's Kan's New Model Army...
tneva82 wrote:You aren't even trying ty pretend for honest arqument. Open bad faith trolling.
- No reason to keep this here, unless people want to use it for something... |
|
|
|
|
2019/03/19 21:00:06
Subject: Re:Battle Brush Studios' Commission Painting Log - Massive update! 40k, WHFB, Historicals, Infinity, ..
|
|
Buttons Should Be Brass, Not Gold!
|
That's just paper tissues cut to size and soaked in PVA and water.
|
|
|
|
|
|
2019/03/19 22:11:19
Subject: Re:Battle Brush Studios' Commission Painting Log - Massive update! 40k, WHFB, Historicals, Infinity, ..
|
|
[DCM]
Boom! Leman Russ Commander
|
Wow! It's been a bit since I dropped in to look around- this is all wonderful work! Now I need to go back through the whole blog to make sure I haven't missed anything.
I must admit, the cover for the Sellswords & Spellslingers rulebook had me all teary eyed with nostalgia for the early days of gaming- 1st Edition D&D, Heroquest, Bolo, etc. It seems odd now, but I got my first copy (still have it) of the original Dungeons & Dragons game at the Waldenbooks in the mall near Elmira, NY (it didn't even have a name then, was just 'The Mall'.
I'll be stopping in more frequently!
|
"He fears his fate too much, or his desserts are small, who will not put it to a single touch; to win- or lose- it all."
Montrose Toast

|
|
|
|
|
2019/03/20 15:58:39
Subject: Re:Battle Brush Studios' Commission Painting Log - Massive update! 40k, WHFB, Historicals, Infinity, ..
|
|
Buttons Should Be Brass, Not Gold!
|
Well, thanks all the more for dropping by again!
I really dig the art style (and mix thereof) in the Ganesha Games fantasy publications. Nowadays most rulebooks have a very standardized look to their artwork (Or rather illustrations in many cases), but I prefer Fantasy rules to be open to any setting and interpretation. So I like having different sorts of artwork within the same rulebook.
|
|
|
|
|
|
2019/03/20 18:27:52
Subject: Battle Brush Studios' Commission Painting Log - Massive update! 40k, WHFB, Historicals, Infinity, ..
|
|

Fixture of Dakka
|
Sigur,
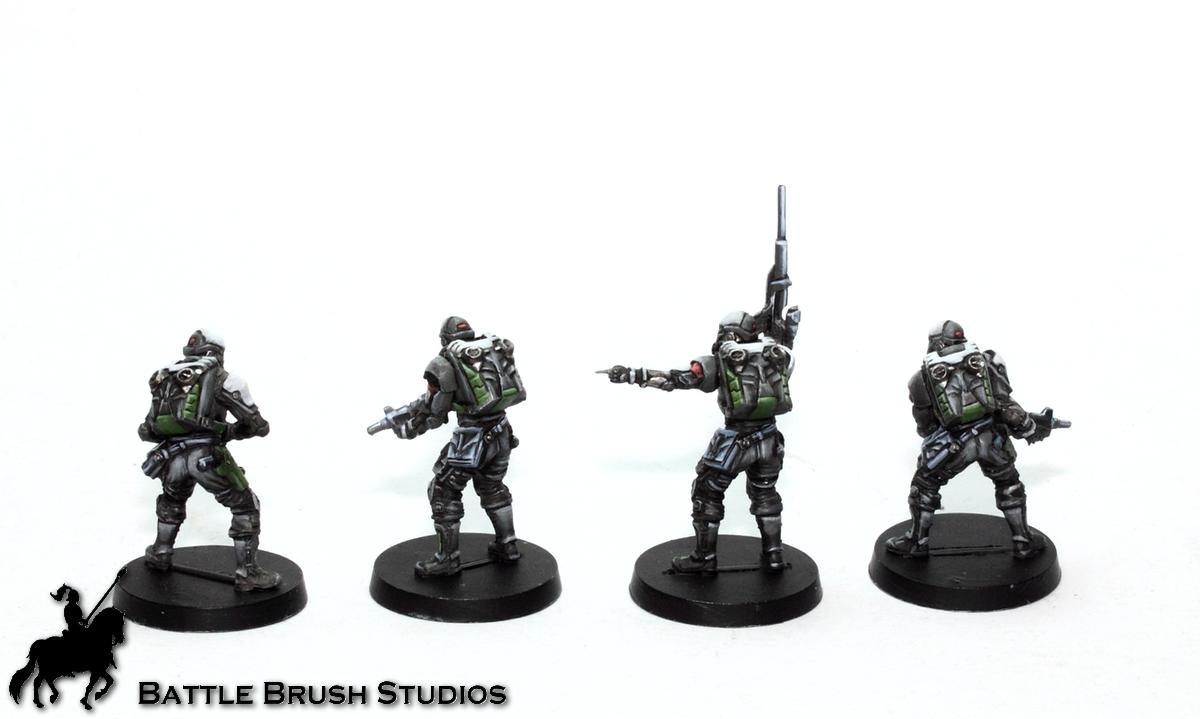
Nice work on the Haqqislam. Nice presentation of some WIP using the terrain to cover the bases.
Cheers,
CB
|
|
|
|
|
|
2019/03/21 11:16:15
Subject: Re:Battle Brush Studios' Commission Painting Log - Massive update! 40k, WHFB, Historicals, Infinity, ..
|
|
Buttons Should Be Brass, Not Gold!
|
Cheers. Gotta do that throughout as it's one of those jobs on which I'm not allowed to do the bases.
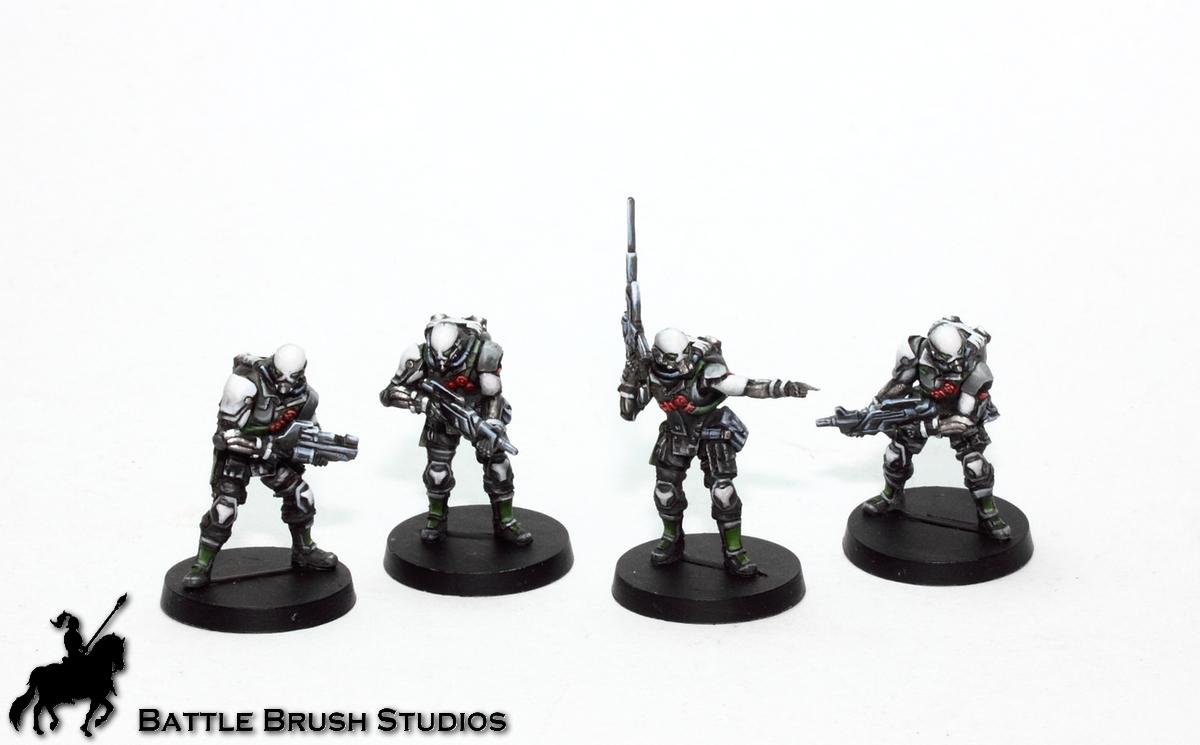
I've been a good boy yesterday and got the Haqqislam figures in a state of almost-finished-ness. So I'm taking half the day off to make some terrain.
|
|
|
|
|
|
2019/03/24 09:05:08
Subject: Re:Battle Brush Studios' Commission Painting Log - Massive update! 40k, WHFB, Historicals, Infinity, ..
|
|
Buttons Should Be Brass, Not Gold!
|
Right, here's my report of Austrian Salute 2019!
https://www.battlebrushstudios.com/2019/03/show-report-austrian-salute-2019.html

It was a really fun event, and it was good to see the guys again. Next on the list: Tabletop Knights' Gaming Day in Southern Bavaria, April 13th.
|
|
|
|
|
|
2019/03/25 09:27:01
Subject: Battle Brush Studios' Commission Painting Log - Massive update! 40k, WHFB, Historicals, Infinity, ..
|
|
Gargantuan Great Squiggoth
|
Thank you for the report, excellent time had by all by the look of it. Nice variety of games covered as well.
|
|
|
|
|
|
2019/03/26 10:53:21
Subject: Re:Battle Brush Studios' Commission Painting Log - Massive update! 40k, WHFB, Historicals, Infinity, ..
|
|
Buttons Should Be Brass, Not Gold!
|
@Camkierhi: Thanks for reading! It was a bit odd this year with two rules sets being represented twice each. But yeah, good stuff. Right, as you could see in my show report I spent a little money at the show on new toys. Among them Last Days, a set of rules for post-apocalyptic Zombie games. It's published by Osprey and from their range of "fancily produced rulebooks". 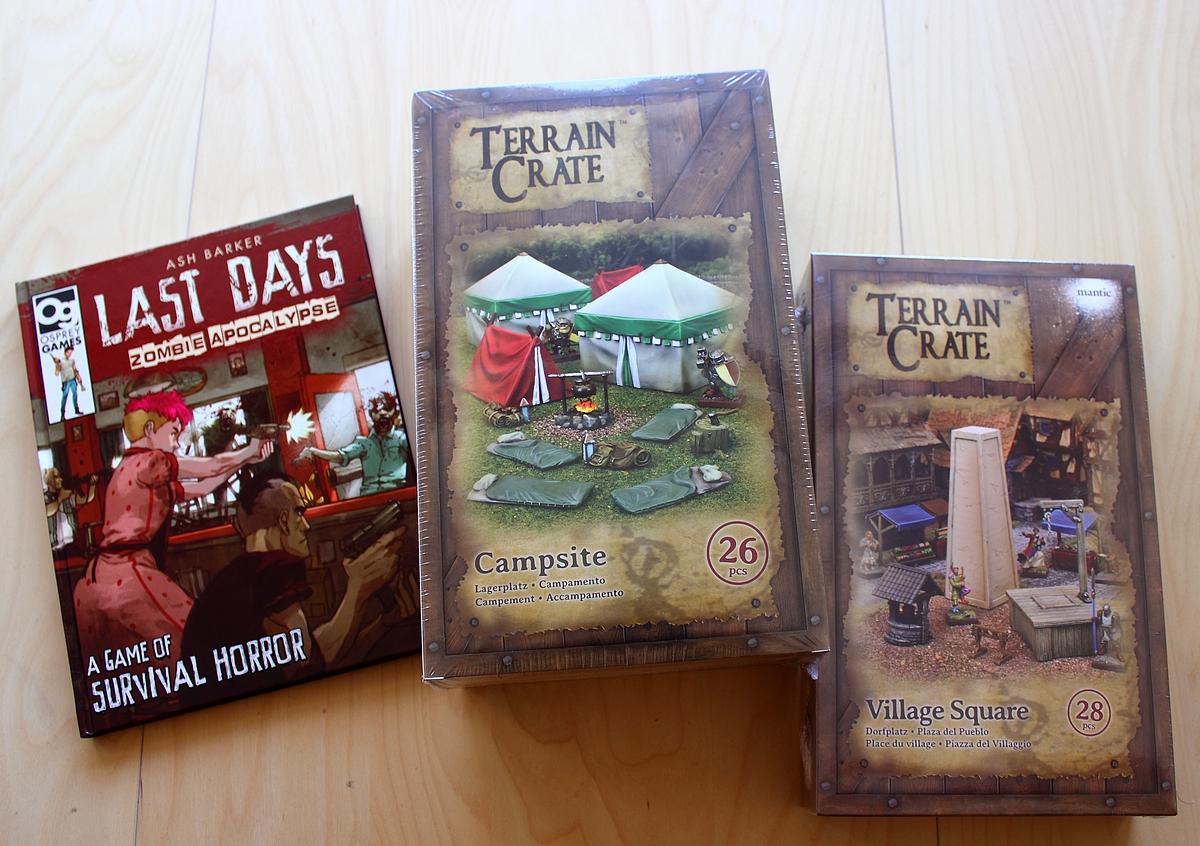 Over the past few days I spent some time with these rules. I've had a collection of Zombie figures for modern Settings as well as a bunch of Survivors. I've played with these figures twice since then, using the All Things Zombie rules by Two Hour Wargames. 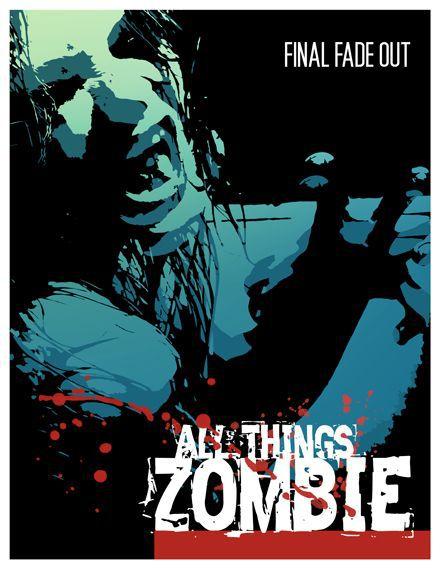 Here's a quick overview of that game: ATZ is based on the unique and excellent Chain Reaction system by THW, fluffed up with a ton of tun, setting-specific extras and events. There is relatively little given to outline your game, so you're pretty free with that. The author uploaded a very good pdf (Day One) to introduce people to the game in a unique way, which I really enjoy: The starting point of the campaign (the zombie apocalypse) is right when and where the players are sitting right now. At your disposal you got what's in the house, players have to agree on what they want to do first and this leads to the in-game events. Great game, maybe I'll write more about it in the future. The problem with ATZ, or rather the character, is that all the events are written to fit with games being set in the US. Apart from that (unless you got the rules printed) they're a bit hard to navigate on a tablet, and last but not least it's pretty much impossible to prepare a gaming table for it. The games which happened in our little campaign took place: At the ATM down at the supermarket, about 10 minutes away from here, a part of Heiligenstädter Straße around the gas station and that gun shop, an art gallery in Vienna's 1st district, and the road in front of a friend's flat. So pretty specific things we know in real life. NOBODY's got terrain to represent that. Of course it could be approached a bit less RPG-like, but it would be a shame to sacrifice part of what makes the game unique and interesting. Either way, it wasn't quite as handy as I'd hoped. It's a geat game, and I'll happily play it again, but it's not exactly 'tight' or 'quick to set up and just have a game'. This is where Last Days comes in.  A few weeks ago Constable had posted a great looking report of his Last Days game with Arcshao on his blog. Shortly thereafter I met both of them, Arcshao told me more about the rules, and subtly nudged me in the exact direction where to find it at the next vendor's (who happened to be 2m next to us. It was at a show.). So I just grabbed it. And then I paid for it too. :p Back home I read the rules to get a general idea of them. The book's been written by Ash Barker. I was told that he creates a ton of Youtube content for which he is quite beloved. Watching wargames/figures related things on youtube isn't something I usually do. It costs me more nerves than it helps, I feel. Every now and then I look at specific videos if I need certain infos, but I rarely do it 'for fun'. But many people say that he's great. Which I'm sure is true. Everybody on youtube is great. The presentation of the rules is pretty much as we'd come to expect from Osprey: roughly US letter sized, 109 pages, full-colour print and illustrations as well as some photos of nice miniatures. This we already know from similar products like Frostgrave or Burrows&Badgers (both of which I own, neither of which I played so far). Structure The book starts with an introduction by the author. A nice prelude in which he explains the history of the rules set, his intentions and so on. 3 pages thereof. In terms of the setting's background there's just a tiny little paragraph on that, because that's all you need really. Then it's right on to how to recruit your gang/ group of survivors. After that we get the actual game rules, rules for Zombies, weapon and character traits, campaigns and in the very back we get 6 scenarios
Assembling your Crew Each player commands a group of apocalypse survivors, consisting of roughly 5-10 characters. These are 'bought' very traditionally by using a points system („Scavenge Points“) from a list of archetypes. There's a nice twist in that you have to start by choosing a leader from 3 different archetypes, called „Everyday Hero“ (a goodie), „Merciless Thug“ (a baddie), and „Professional“ (somebody trained for combat or extreme situations, usually a military type, Cop, or something like that). Depending on their moral philosophy each leader and recruitable archetype is tagged either „Selfless“, „Selfish“, or „Trained“. Recruitable crew members also sometimes come with the „Neutral“ tag. Up to 50% of your group members may be Neutral, up to 25% of them may differ from the leader in terms of philosophy. Merciless Thugs may recruit more Neutral characters than others, but they may not recruit certain archetypes like Cops. Groups led by a Professional may only use high-quality/military grade equipment (which is the only sort of equipment a Professional will consider sensible and safe to use), and as many Trained characters as they like. 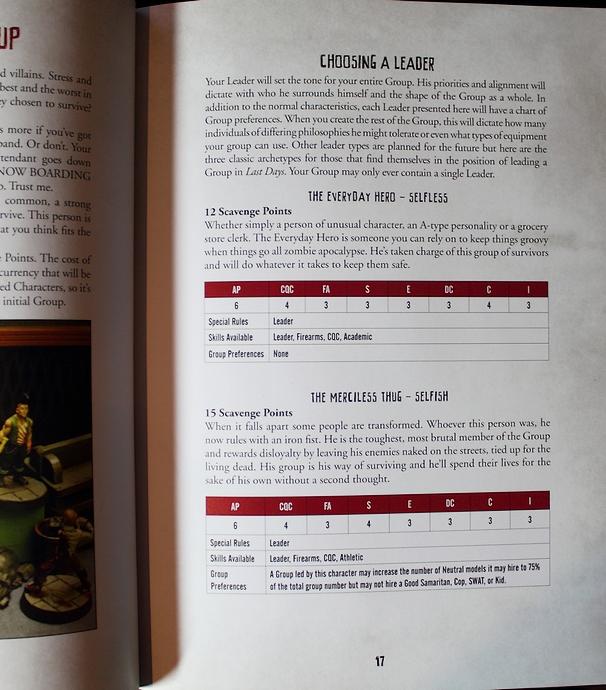 Group members can be chosen out of a list of 15 different archetypes, described as „Rescue Worker“, „Soldier“, „Tough Guy“, „Goon“, „Kid“, etc. In the beginning you can also buy weapons (guns and close combat weapons) and limited equipment (booze and first aid packs) for your crew.  Now that your crew is recruited they'll also need a Refuge to stay in during the campaign. The rulebook gives a choice of 6 different ones. If you've read Frostgrave and Burrows&Badgers it will come as no surprise that over the run of the campaign you can upgrade your Refuge. Another factor in the Refuge is that each only provides space for a certain number of people. During the campaign the Refuge may get overrun with Zombies, so that the crew (if they can escape) have to look for a new one. Game Rules Now we're ready for our first game based on one of the 6 scenarios from the rulebook (or ones you make up yourself). Usually it boils down to 5 Supply Tokens being placed on the table which have to be grabbed and taken off the table. Games happen as a fight between two groups of human survivors. To win you either have to grab more Supply Tokens than they do or get the opposing group to their breaking point and retreat off the table. In the latter case the remaining group automatically gets all Supply Tokens left on the table at this point. Zombies work more as a third faction or rather as a force of nature to create annoyance/pressure during a game. They play a role, but at its core this is a game about small groups of badly equipped humans fighting each other for resources. Each turn starts with a Menace Phase in which you have to roll for new Zombies being drawn onto the table by the noise of the battle, players have to roll for guns having to be reloaded or not and zombies are being moved.  The next phase is the Action Phase, starting with an initiative roll between the leaders. This sets one side as being the Aggressor and the other as the Defensive Side for this turn. The basic difference is that the Aggressor (the side who take initiative and decide to act fast and maneuver to get in a favourable position) get to activate one of their characters first. The Defensive player on the other hand gets to activate first during the following shooting phase. These are the main differences. Now players take turns (starting with the Aggressor) to activate their figures. Each character has a number of Action Points they may spend on a number of actions each turn. Move 1“ per Action Point spent, run 2“ per Action Point (this comes with some drawbacks though, mostly noise and not being allowed to fire in the shooting phase), a gun can be reloaded, they can interact with characters or the surroundings, and so on. The Lock&Load action is worth mentioning here. This basically works like overwatch, i.e. allowing to fire on an opponent's activation. Once a character spent all their action points the other player may have one of their figures act. Now it's time for the Shooting Phase. The Defensive player may choose one figure to shoot first, then the other player may choose one of their figure to fire, and so on. Shooting itself is (as with everything in these rules) very simple: Each character has a Firearms stat, usually 3. If they fire a gun you measure the range and check Line of Sight. If the target is in range and visible a d6 is rolled, the Firearms value is added and modifiers are applied. If the result is 7 or more you got a hit and roll for damage (Weapon strength plus 1d6, divided by the target's Endurance = number of points of damage). For Zombies you don't have to roll for damage; you just check if the head's been destroyed (which kills'em dead for good). If not there's a pretty neat and simple mechanic to translate non-killing shots slowing zombies down into game terms. So basically: The shotgun shell didn't hit the head, but it will still knock the zombie off his feet and he's gotta get up again before advancing. Each shot fired makes a lot of noise and thus adds to the chance of a zombie appearing in the next Menace Phase. Firing an assault rifle salvo at the enemy is pretty neat, but attracting a horde of zombies next turn isn't. On top of that each shot will increase the chance of having to reload next turn.  In a very classic fashion the shooting phase is followed by a Close Combat Phase, which basically works like the foregone shooting phase. Only between figures in base-to-base contact. In the Action Phase characters may spend action points to break up close combat. If a zombie moves in contact with a survivor the latter may panic and spend all of their action phase to struggle in close combat. Annoying, and a nice touch. At the very end of the game turn you have to check if either (or both!) sides reach their Breaking Point from accumulated losses or scenario-specific factors. If they fail this roll they have to retreat immediately and the game ends. After that a new game turn starts with a new Menace Phase, and goes on from there. Campaign Game
Once the game on the tabletop is done we move on to the campaign phase. There's a big table of possible injuries characters who went to the ground during the last game might suffer from. So characters who get taken out in the game (= figures who take damage points in excess of their Damage Capacity) aren't instantly dead. In fact it's not all too likely that they die outright. They may lose a limb, may get infected with the zombie virus, may be captured, or even fully recover! 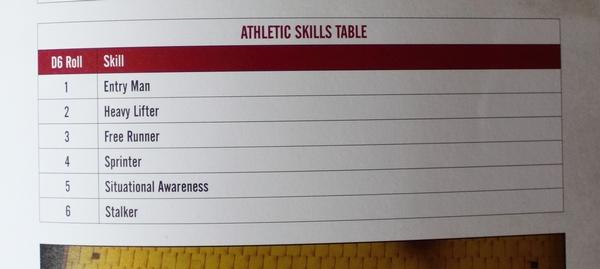 Then it's time for Experience Points. Yay, everybody loves those, right? Characters get XP for surviving the game, eliminating Zombies or opponents, achieving scenario goals and so on. This way characters may level up. If they do that they may either increase one of their stats or gain a new Skill within one of their skill groups. There are 5 skill groups with 6 skills each. Raising stats or attaining a new skill is randomly rolled for, but the result may be modified by spending extra XP. A pretty cool system, although some people may prefer to level up just exactly what they want to. The next step in the campaign phase is to find out what exactly was looted in those supply tokens. This is another big table to roll on and basically feels like unwrapping christmas presents. You'll always get a number of Scavenge Points (= points to buy Refuge Upgrades for or recruit new characters) and, if you're lucky, additional kit such as weapons, upgrades, or other equipment. Then it's back to the grim reality of the apocalypse. Group members who aren't currently recuperating from being wounded are allocated to different jobs around the Refuge. They'll stand guard, work various Refuge perks or build new ones. Leaders also have extra options like recruiting new group members or sit down and have The Talk with one of the group members to try to bring their philosophy in line with their own.  At the end of each campaign phase we have to work out if the Refuge is overrun by Zombies. A simple dice roll, modified by a few factors like how many people you allocated to stand guard, how many people are down in the sick bed, if there are any Refuge Perks like Fortified Windows working in your favour and so on. If your Refuge happens to be overrun you have to look for a new one. Scenarios As mentioned above there are 6 different scenarios („Encounters“) in the rulebook: Bushwhack, Home Defense, Massacre Site, Rescue, Scavengers, The Escape. These aren't incredibly different from each other, but different enough to keep the game fun.  ...and that's it! So what do I think of Last Days? Just from reading this one it looks OK. The basic rules are really simple and along the lines of other 'big' Osprey rules sets: Dice plus Stat (possibly a simple modifier) = result. There's alternating figure activation to keep downtimes to a minimum and replaces possibly complicated reaction systems. It's all very, very straightforward, all of which we've seen a thousand times before. This isn't necessarily a bad thing. This kind of gang warfare between largely untrained combatants just doesn't allow or call for interesting command&control mechanics, and especially in recent times this kind of game usually comes with very simplistic base rules with special rules piled on top to add ...height? Which may be perceived as depth from a certain perspective. Luckily the special rules don't complicate things to large extends. You won't have to combo abilities to achieve great things or stuff like that. This games places the narrative firmly in the foreground. It's not a tournament game, but most figure wargames are. I don't see much of a reason to play this without using the campain rules either. The book is nicely designt and once you start playing you'll find that it's mostly well structured. If I had to nitpick I'd mention the full-page illustrations. This is a thing that's bothered me about Frostgrave already: There's 20 pages of this book dedicated to full page-sized illustrations, so almost a fifth of the whole book. In between we get nice photos of miniatures (Hasslefree, Armorcast, Studio Miniatures, RAFM) on nice gaming tables. Apart from that it feels like every single page is introduced by a little fluff paragraph which I could have done without. This is the things I would mention if I had to be nitpicky. That being said, I relly like the illustrations (although I prefer rulebook illustrations to be of different styles and artists) from a visual standpoint. I hope that you enjoyed this little introduction to the Last Days rulebook. Next I'll post a battle report of my solo testgame in which I checked how the rules translate on the table.
|
|
This message was edited 1 time. Last update was at 2019/03/26 10:54:08
|
|
|
|
|
2019/03/26 14:14:46
Subject: Re:Battle Brush Studios' Commission Painting Log - Massive update! 40k, WHFB, Historicals, Infinity, ..
|
|
Buttons Should Be Brass, Not Gold!
|
Game Report Right, now on to the game. I threw together a table. Against any reason I decided against an inner city setting, but went for something more rural instead. I wanted to see if I could pull of a modern-day rural table.  I guess it's kind of a storage area for a nearby sawmill? Or a carpenter? To the North we got a forested area, lighter and cultivated trees in the West and South. In the Southeasy we got a blueberry field, and in the East we got this area with the white picket fence around it in which they grow...something on dense bushes, about as tall as a man. The scenario, as suggested by the rulebook, is scenario no.5: Scavengers. Both groups of survivors fight for 5 Supply Tokens strewn across the table. In the beginning of the game we got 3 zombies on the table already. The suggested table size for Last Days is 3'x3'. I had read that shooting is very strong in this game (as it makes sense) and rewards a defensive approach. That's not good of course, so I introduced a lot of terrain – as per usual in this kind of game – as well as some slight rule changes. It seemed weird to me that there's just one modifier for being in cover, so I a.) made cover cumulative and b.) introduced 'hard cover' for stuff like stone walls and similar for a better cover modifier. As I do sometimes I look at an all set up table and think „this is nice, but if I just quickly painted up [x], this would look ever nicer“. So the whole test game was delayed while I painted two slightly beaten up civilian cars from that Mantic plastic terrain set as well as a fifth supply token.  Right, NOW we can go on to the game. First I set up the two warring bands. McCoy's Survivors  Left to right: Jens Gäbel (clerk in an electronics store,armed with cricket bat), Rosie (armed with toy gun and a fluffy bunny), Kyle Nightingale (Nurse, armed with shotgun and first aid kit), Chainsaw Charlie (Dishonorable discharge from the army, armed with a chainsaw), Mr.Jacket (nobody knows what he does. He just showed up, always wears the jacket and the hat, doesn't talk, but makes himself useful), McCoy (taxi driver, Leader, Everyday Hero, armed with surplus assault rifle and a knife), Reverend Ralf (founder of the Online Church of Easily Attainable Salvation, armed with semi-automatic pistol), Luke Isberg (Scout Leader, armed with a sporting crossbow and a knife) Toblerone's Troublemakers 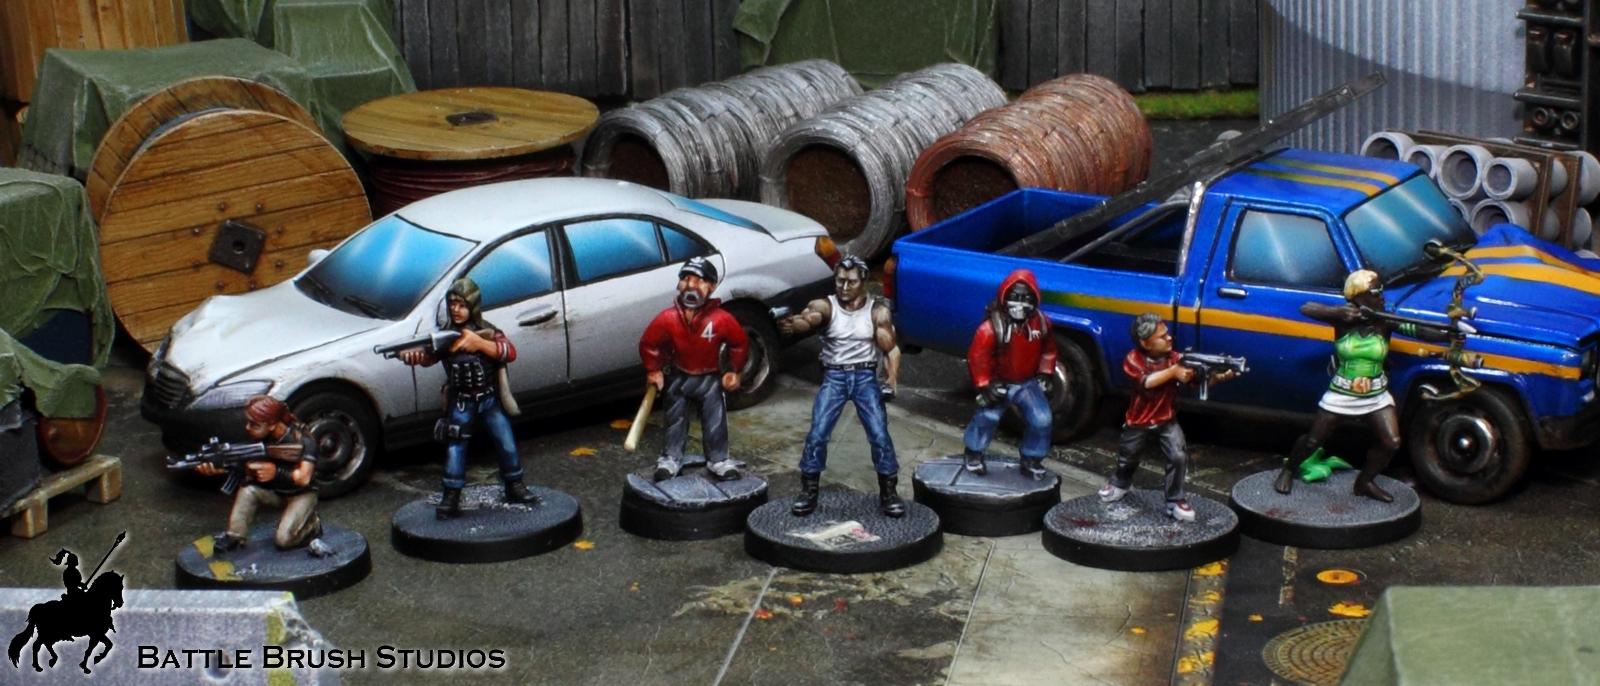 Left to right: Kim (Survivalist, left the NRA because she deemed them to be too illiberal in terms of the right to bear all the arms and too liberal in all other regards, armed with a modified surplus assault rifle and a knife), Ron (Gang Member, armed with a shotgun and a knife), Biff (Gang Member, armed with a baseball bat), Armando Toblerone (Gang Leader, Merciless Thug, armed with a semi-automatic pistol and a knife), Spliff (Gang Member, armed with a knife, carrying a first aid kit), Kid (Gang Member, armed with a surplus sub-machine gun and a knife), Michelle Masters (former olympian, former sports model, former reality tv personality, former singer, fitness youtuber, armed with a sports bow and a knife) The Table Here you see the table again (this time with cars!). McCoy's group's deployment zone is marked in blue, Supply Tokens in purple, and red marks Armando's Gang's deployment zone. You can also see one of the three Zombies already on the table rigth next to the white picket fence. 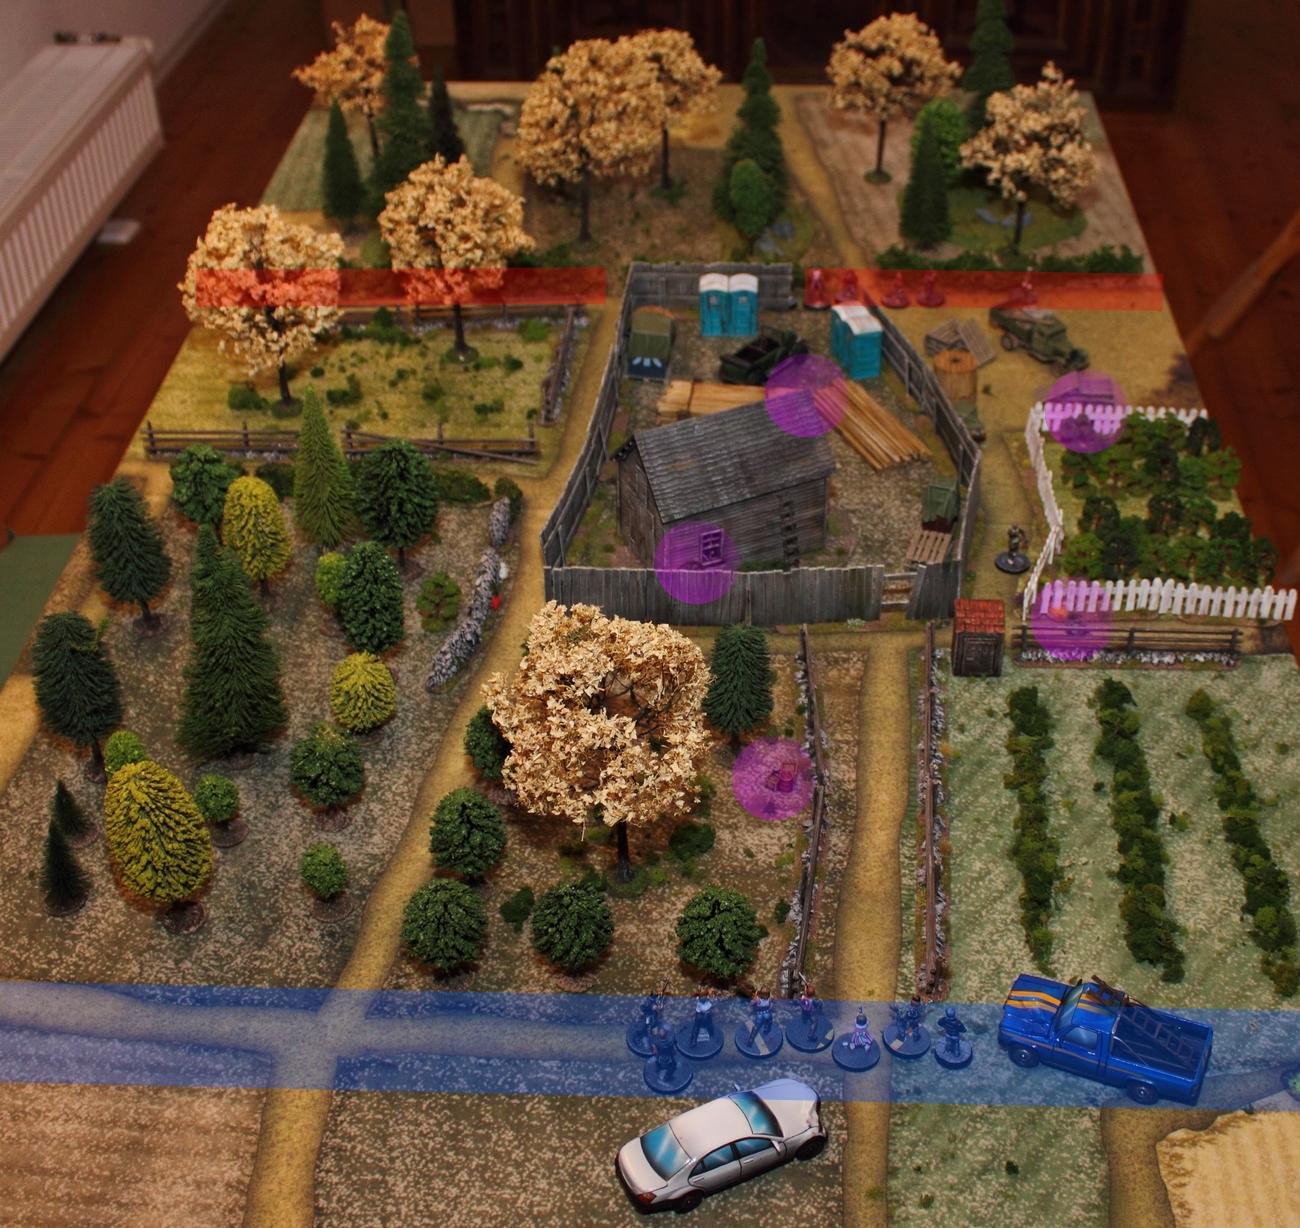 ..the other two zombies are roaming inside of the storage compound: 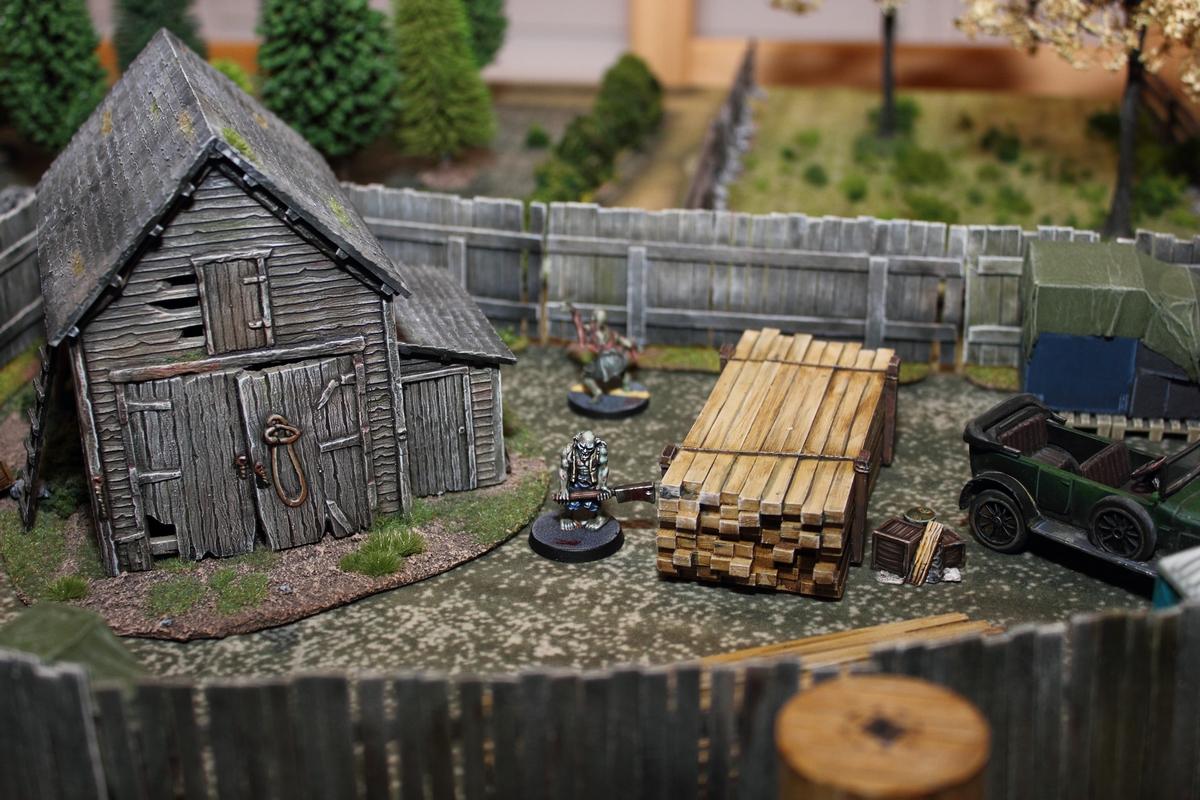 You can also see one of the five Supply Tokens between the stack of wood and the oldtimer. Armando's gang, alerted by the noise of McCoy&Friends' cars, step out of the woods they'd been lost in for a day. Luckily they had run across Kim who promised to help them as long as they didn't get too close. 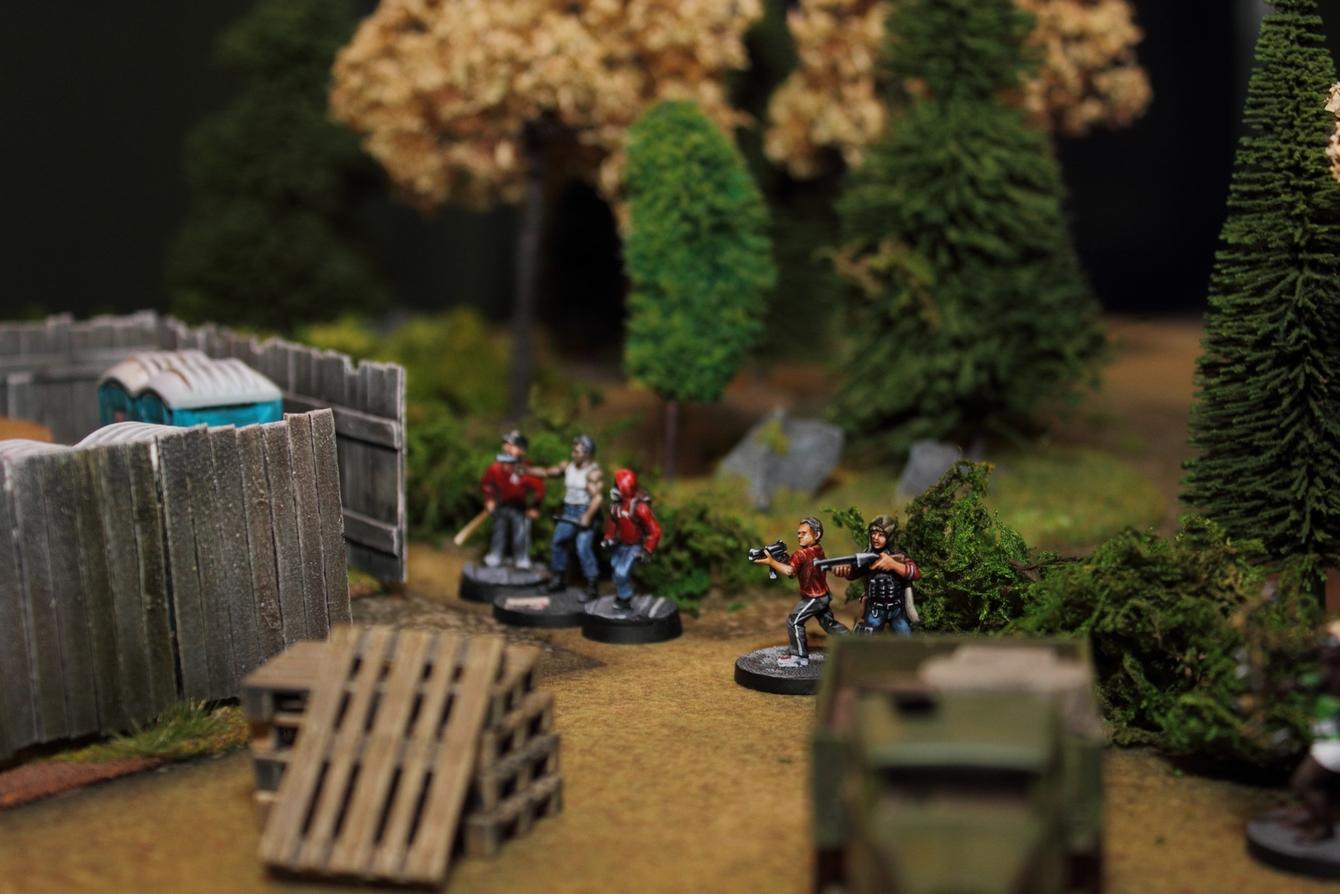 At the opposing table edge McCoy's group get out of the cars and scan the area for signs of opposition. That barn over there looks promising... 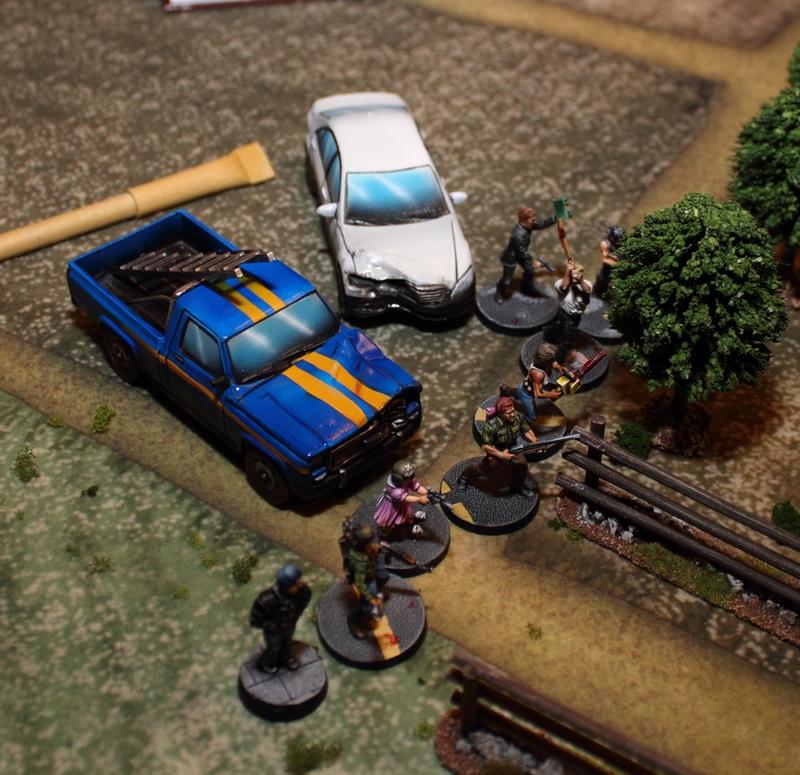 Turn One: 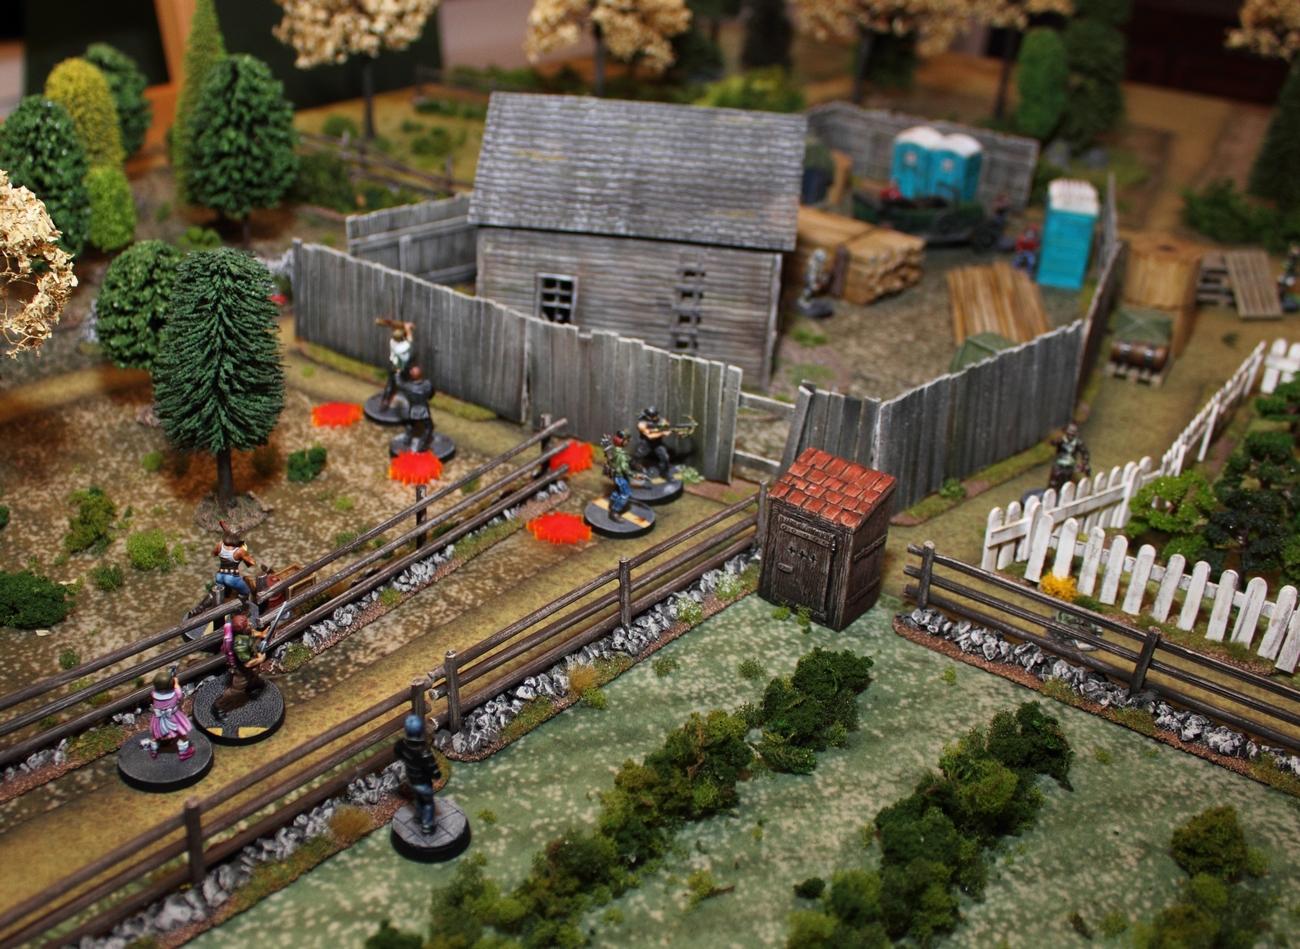 Scout leader Luke and McCoy take the lead and sprint right over to the fenced off compound. Reverend Ralf and Jens take the left flank. Next to them you can see the noise markers generated due to running. Chainsaw Charlie advances more cautiously up to the very first supply token, while Nurse Kyle, with Rosie in tow, advances down the dirt path. Mr.Jacket, hands in his pockets and qietly whistling, wanders down to the blueberry bushes. Armando's gang advance much more cautiously, because they already hear the undead grumble right in front of them: 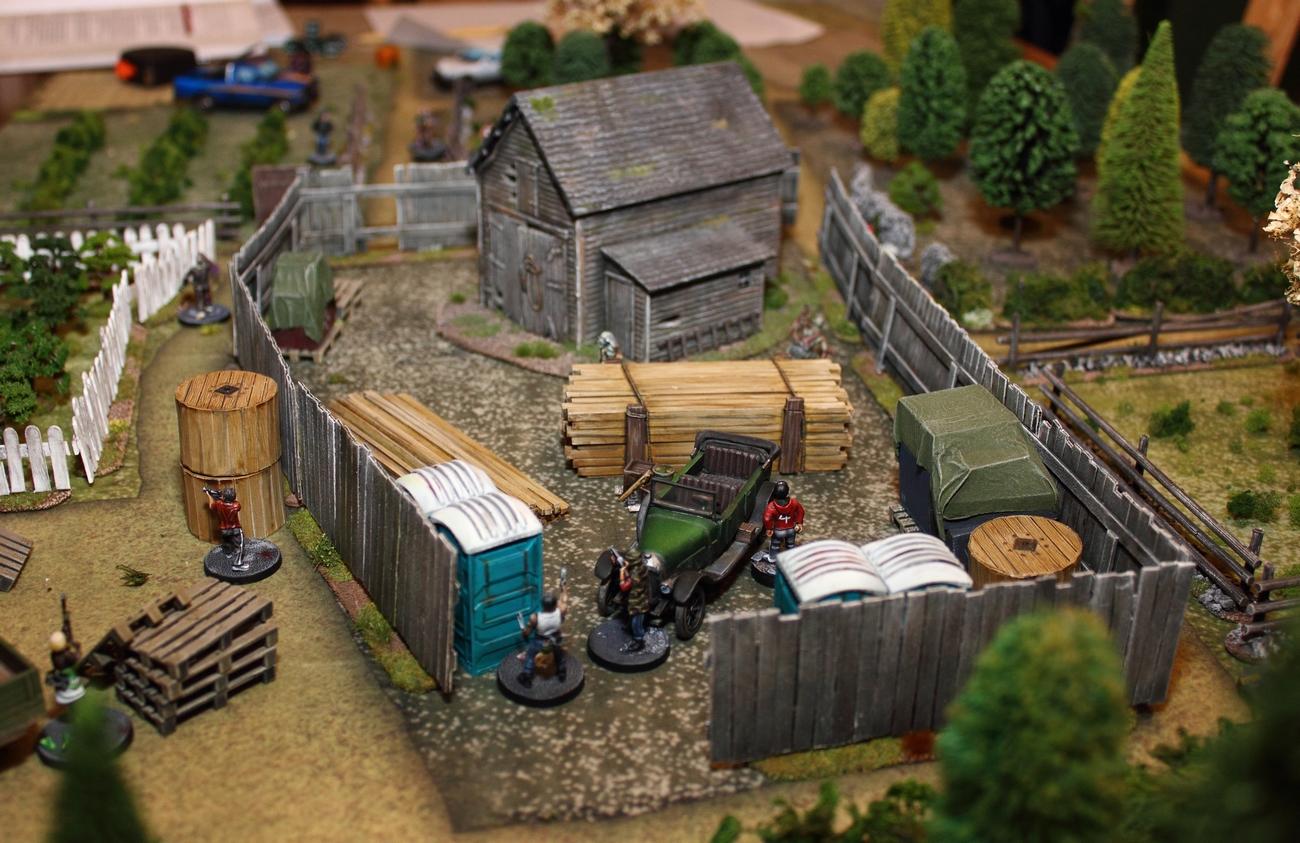 The fearless leader sends Biff, Spliff and Ron forward into the compound to get some info on the situation. To their left Michelle and Kid keep an eye on things and secure a supply token by the truck. Kim sneaks off to the far right on her own (as she's done most of her life) and takes position. Just in case the invaders try to flank. 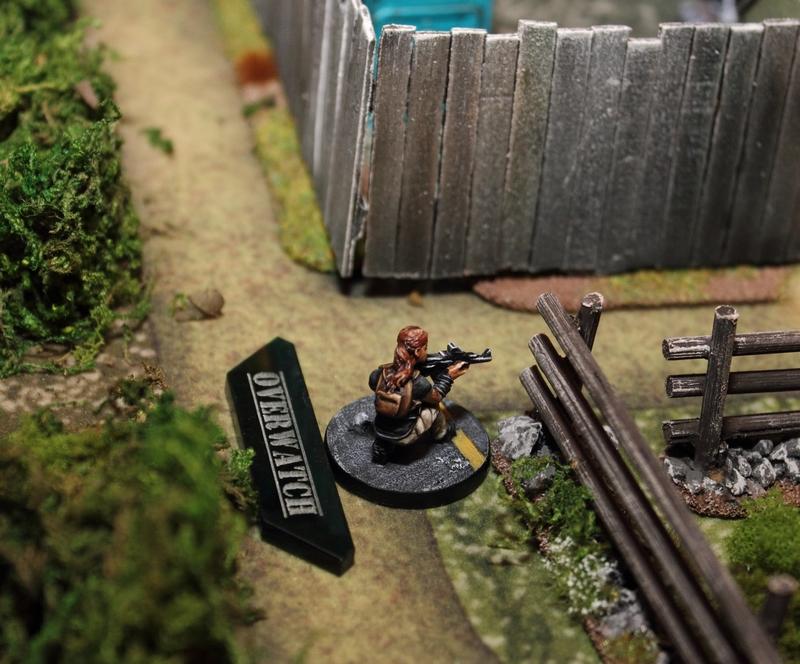 Here's an overview of the action phase of turn 1: 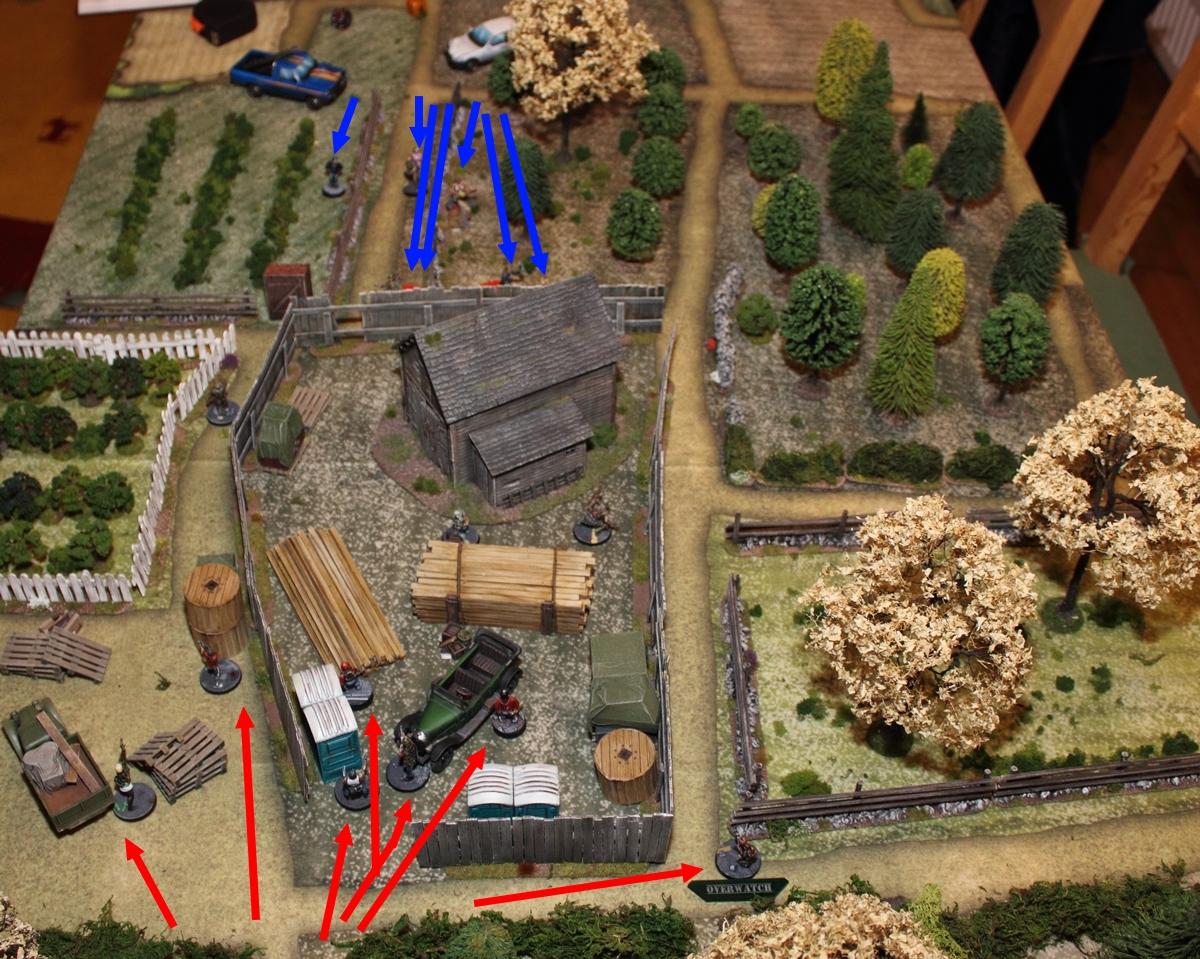 Since everybody's been activated I move on to the game's first shooting phase. Nobody has a target, except for Michelle who gets a target on the zombie shambling next to the white picket fence. She aims, zip, splat, garglegargle. A clean (well, more or less) headshot and Michelle claims the first zombie kill. Kid is massively impressed. The big advantage of the bow is that it doesn't generate noise markers upon shooting. This comes with the fact that bows require reloading very often, and that they lose their punch at higher ranges. There are no close combats, no casualties either, so there won't be any Breaking. The first turn ends and turn 2 starts with the Menace Phase. As McCoy, Luke, Reverend Ralf and Jens made quite some noise running around they had lured a zombie onto the table. The zombies within the compound can't see anybody, but the noise catches their attention as well and they move toward McCoy's group. 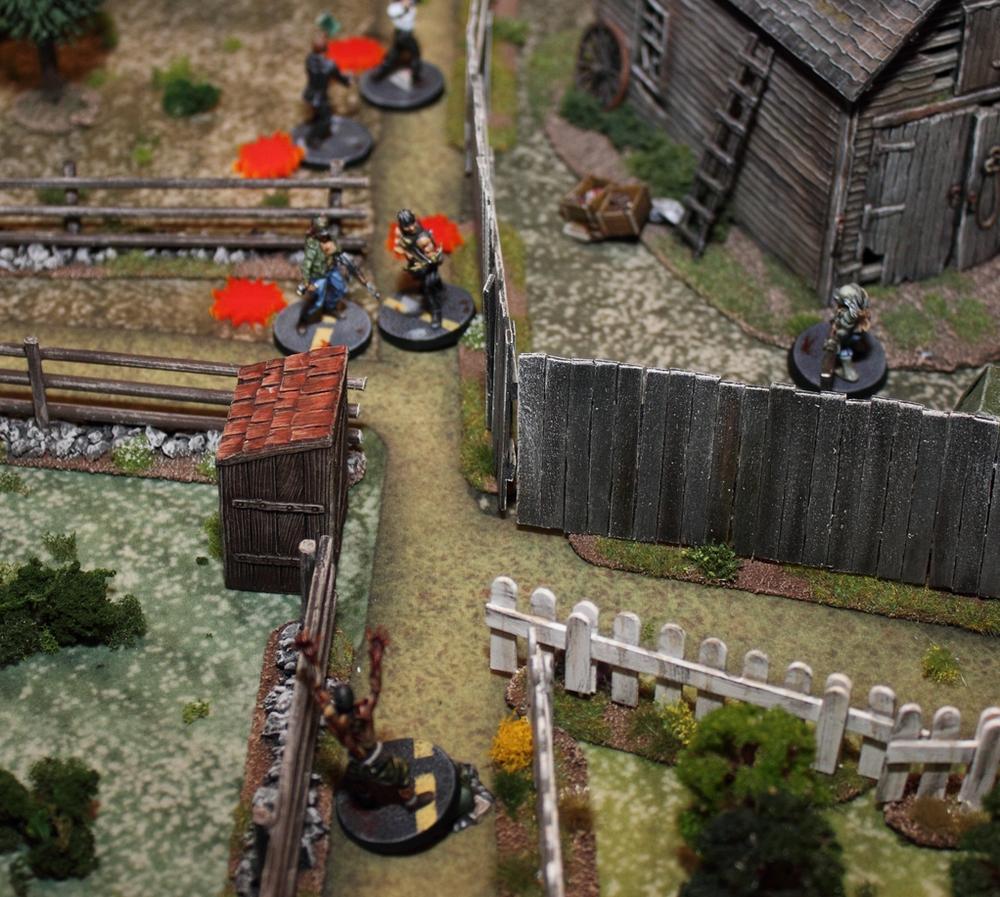 Retaining their initiative, McCoy and Luke slip through a hole in the fence and hide behind the barn, right on the supply token. Luke commences packing up the pile of supplies immediately while McCoy watches out for movement. 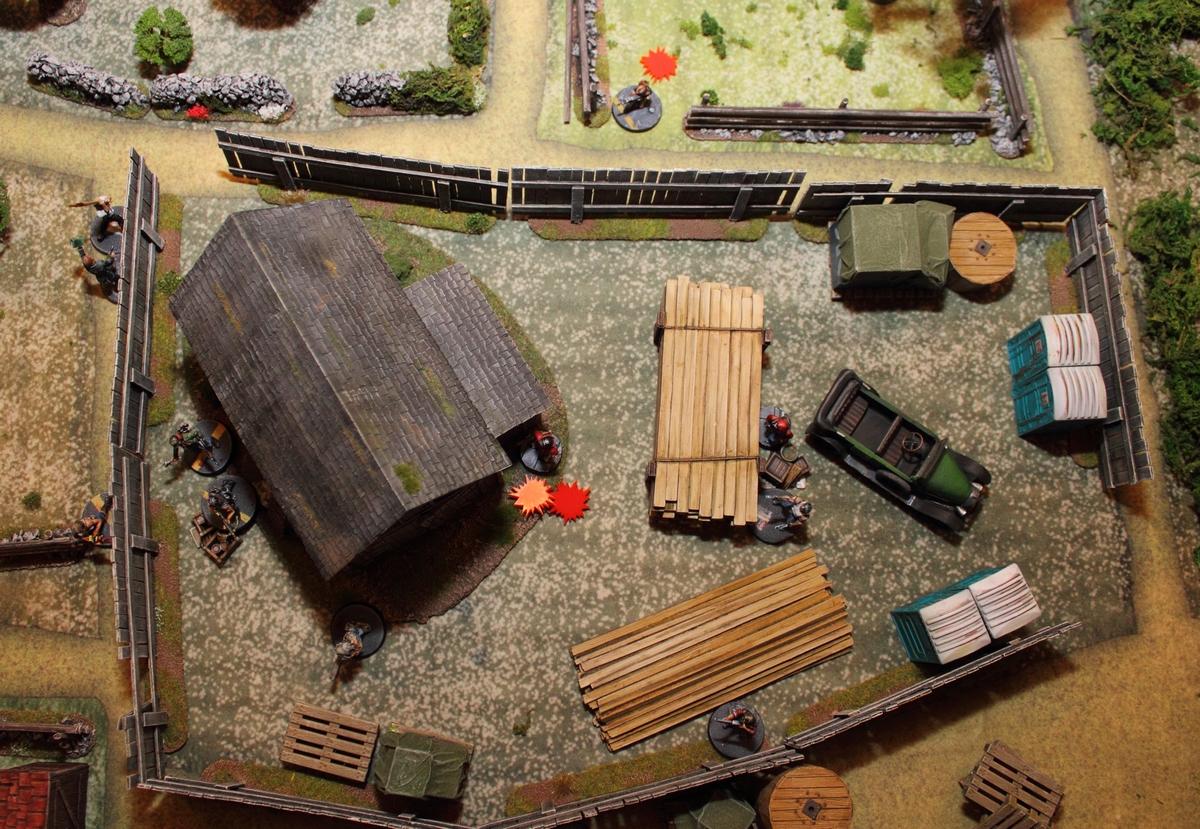 Outside Reverend Ralf and Jens hold their position to whack everything across the head as soon as it comes around the corner. Chainsaw Charlie sneaks up to the hole in the wooden fence to support her comrades on the inside if need be. The Zombie with the weird huge axe spoted Luke and will continue to advance towards him, despite the fact that Biff's making a ton of noise running across the area between barn and wood stack. (* I'd made a mistake there. I had missed the fact that models may run only once per turn. During this turn I let Biff run twice, hence the two noise markers). Spliff and Armando hang back in cover behind the wood stack, while Ron (in the bottom of the photo) takes position behind the smaller wood stack. In the top of the picture you can see Kim advancing swiftly on their right flank. 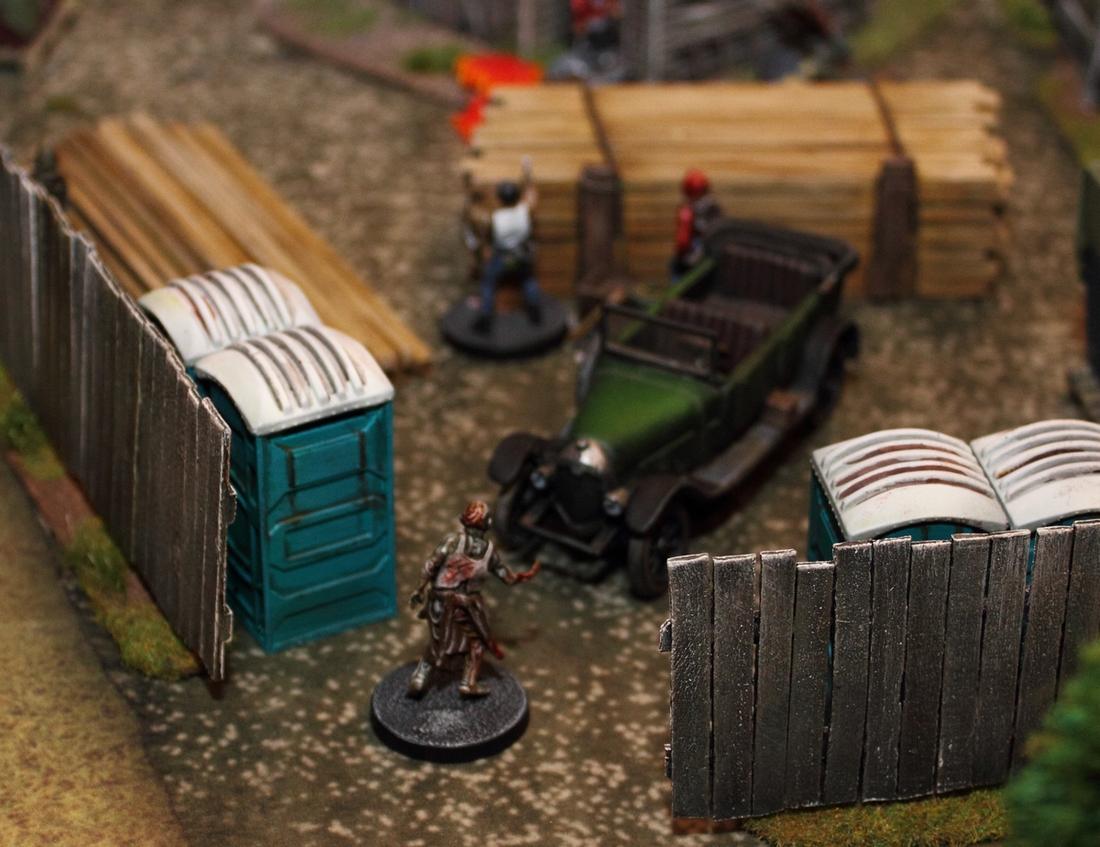 Watch out, Armando! All the noise Biff makes while running around makes another Zombie appear right behind them. Not to worry though, Michelle turns around and, with the help of her trusty bow, takes care of the situation before Armando and Spliff even notice. 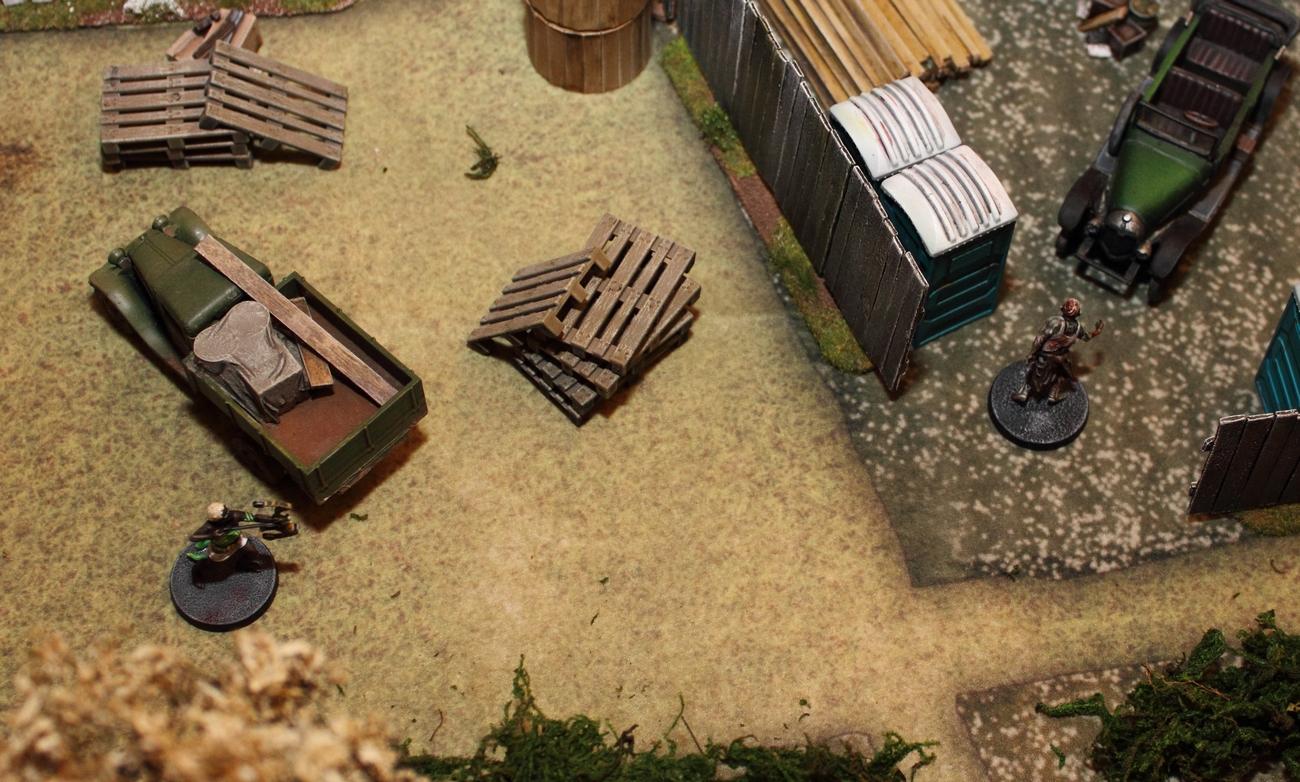 Still, the noise draws in one of the zombies who has been lurking the area since the beginning. 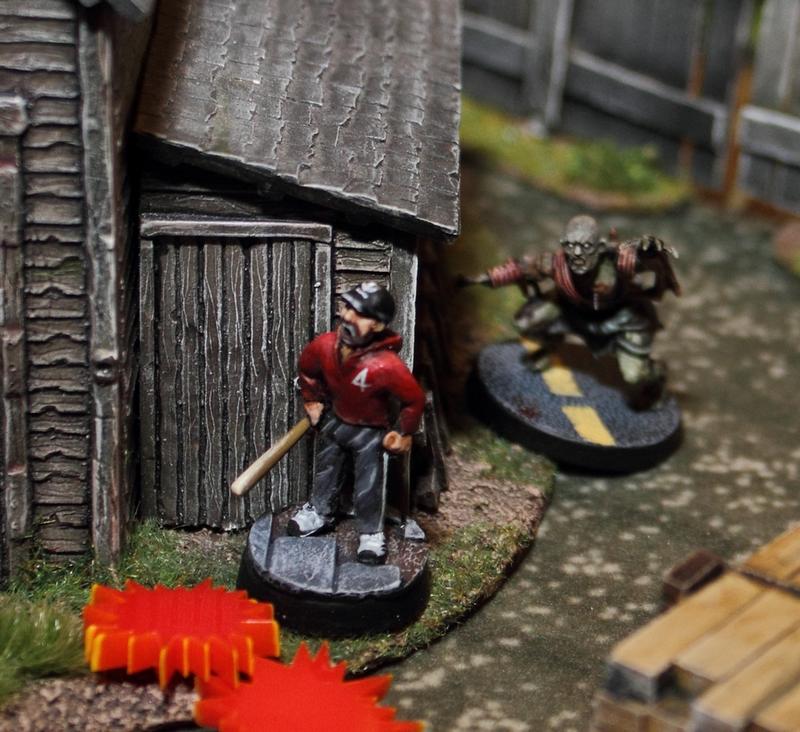 Armando and Spliff won't let their crony be ripped to pieces and solve the situation the best to their abilities: by kicking and stabbing. 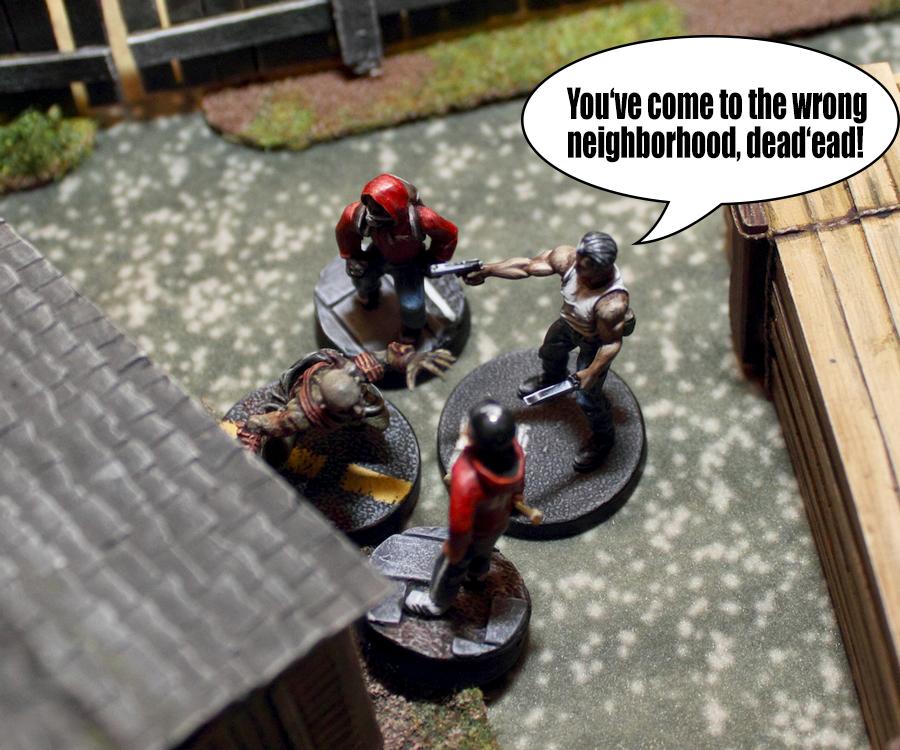 In the mean time somehow everybody suddenly seems to have undead-related trouble. First, Mr.Jacket in the blueberry field:  This happens after Jacket tries to hide right next to the zombie. His plan was to let the undead pass by, then jump across the fence and grab the supply token. Didn't work out so well. Luke and McCoy are still sitting behind the barn, putting everything useful looking into boxes and bags, as the old zombie finally lunges at them.  Unfortunately there's too little space for both of them to fight the zombie. If either stepped away from the barn they'd be in ganger Ron's zone of fire. At their left flank Reverend Ralf and Jens Gäbel make a decision: They have to advance to the flank to stop Kim from doing so, otherwise their whole group would be caught in a nasty crossfire. So both men storm out of their cover and dive behind the stone wall across the dirt path. 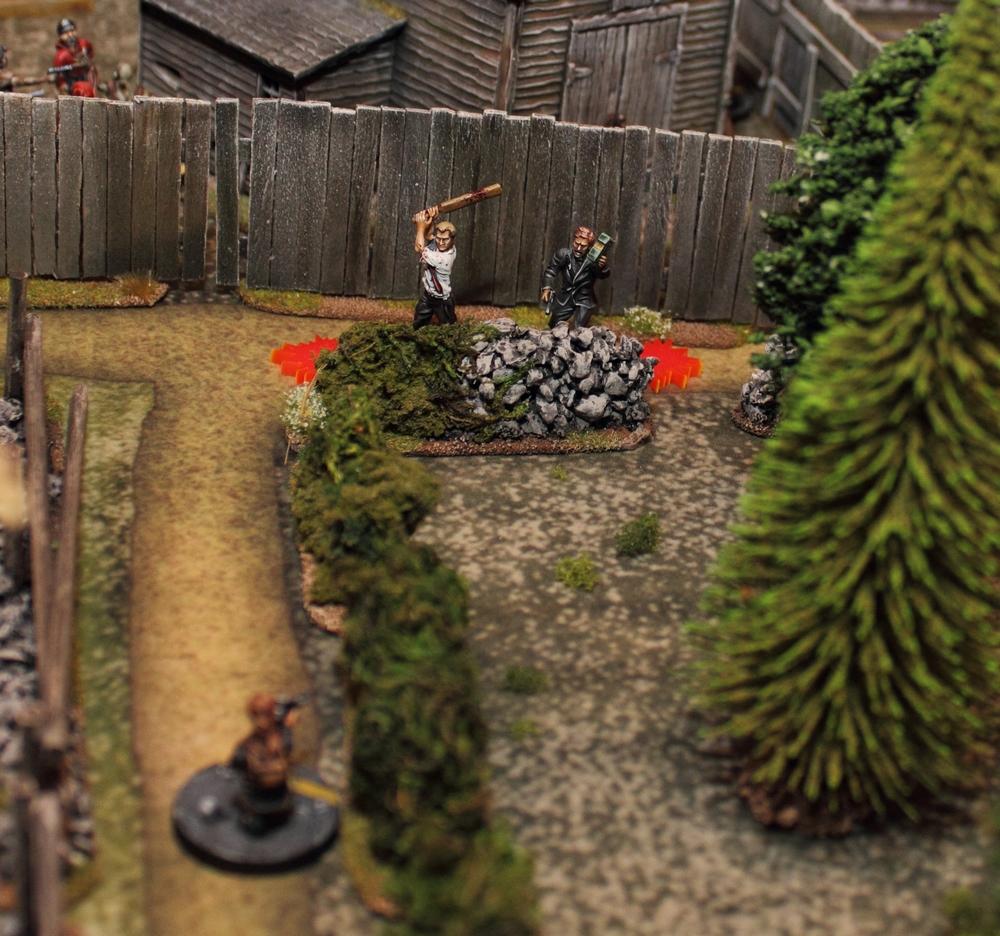 This task force, consisting of online preacher and shop clerk rush forward; the firmer reciting holy litany, the other bellowing his battle cry: „WELCOMETOE-MARTHOWCANIHELPYOU!!“ The whole scene happens too fast for Kim to open effective fire at the two men. She sticks to the plan and sprints further down the flank. Much to her dismay all the noise Ralf and Jens made attract the attention of two more zombies who appear right behind Kim. 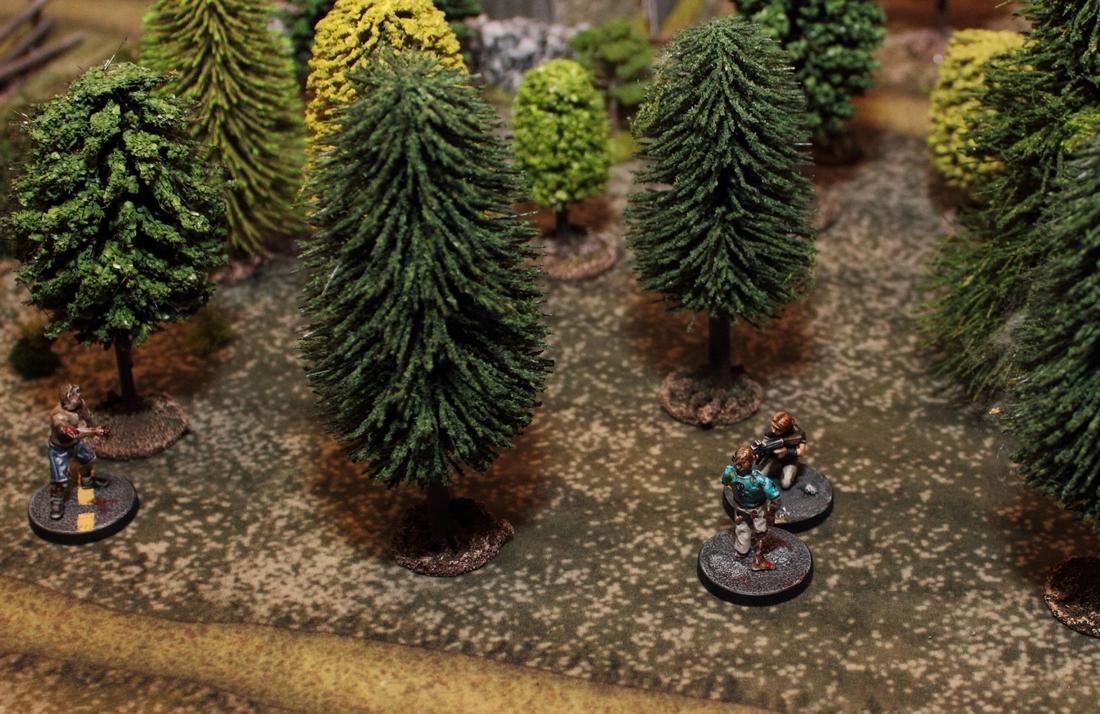 Here's an overview of this phase of the game: 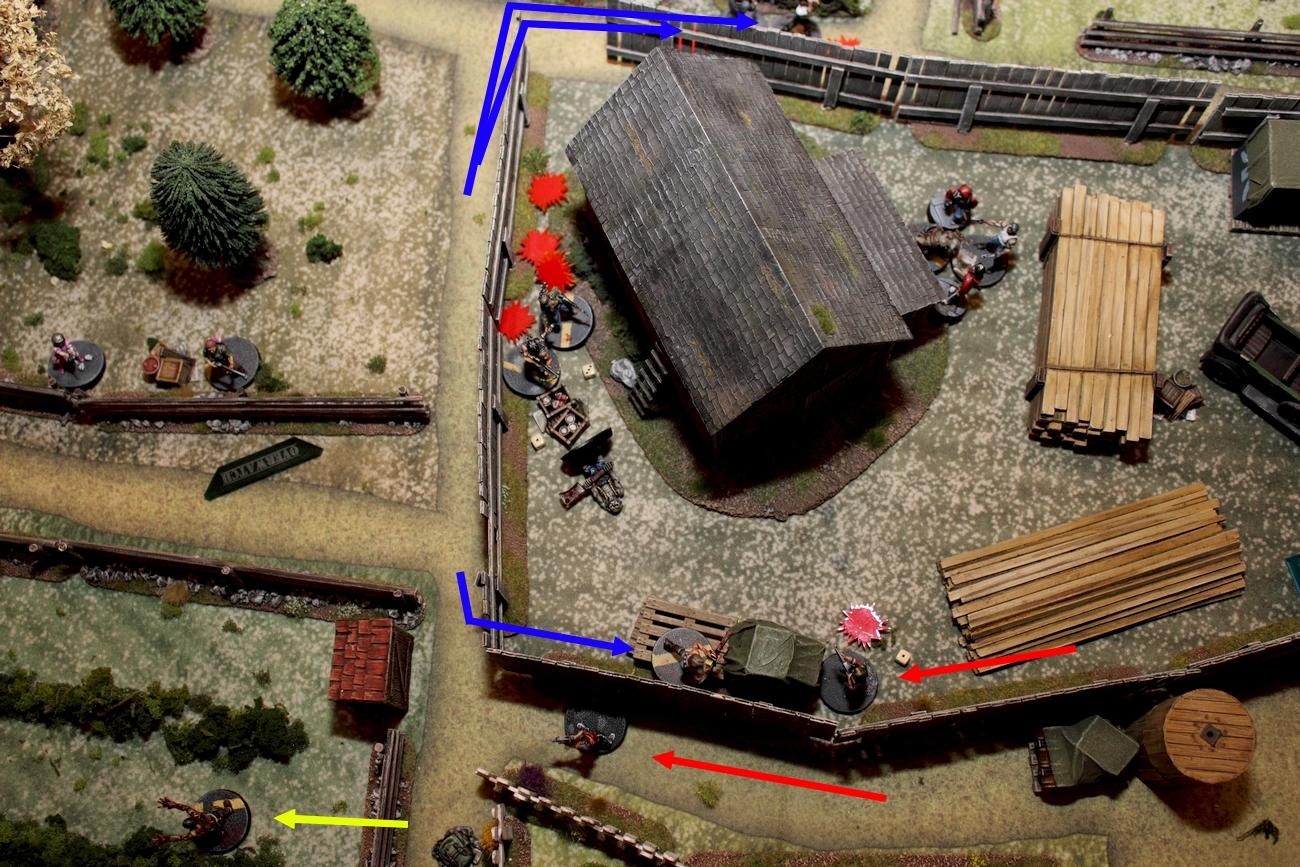 At the top you can see the route Jens and Ralf take. Chainsaw Charlie sneaks into the compond as well and hides behind a box. At the centre you can see the latest developments: the brawl between Luke and the Zombie led to a stalemate, so he pushes the zombie away and shoots him with his crossbow. With the line of sight unobstructed now a firefight between McCoy (look at all the noise markers she generates!) and Ron (below) erupts, but neither does any damage to their opponent. Despite undead and bullets zipping by left and right Luke manages to pick up the supply token. The yellow arrow marks the path of the zombie who hunts Mr.Jacket through the blueberry field. His plan of killing the monster in close combat didn't work out at all; now he resorts to getting away from it and trying to shoot it with a revolver he had produced from his jacket. In the upper right Armando and his cronies are still beating the zombie to a pulp and in the bottom Kid is advancing to take shots at Mr.Jacket while he's busy fighting the zombie. Way in the left there's nurse Kyle, ready to fire at Kid if he was stupid enough to advance any further. In one of his attempts to get away from the zombie MrJacket stumbles into Kid's crosshairs who opens fire with his submachine gun. All the bullets miss their target. Jacket raises his revolver, fires a single shot which hits home and strikes Kid to the ground. 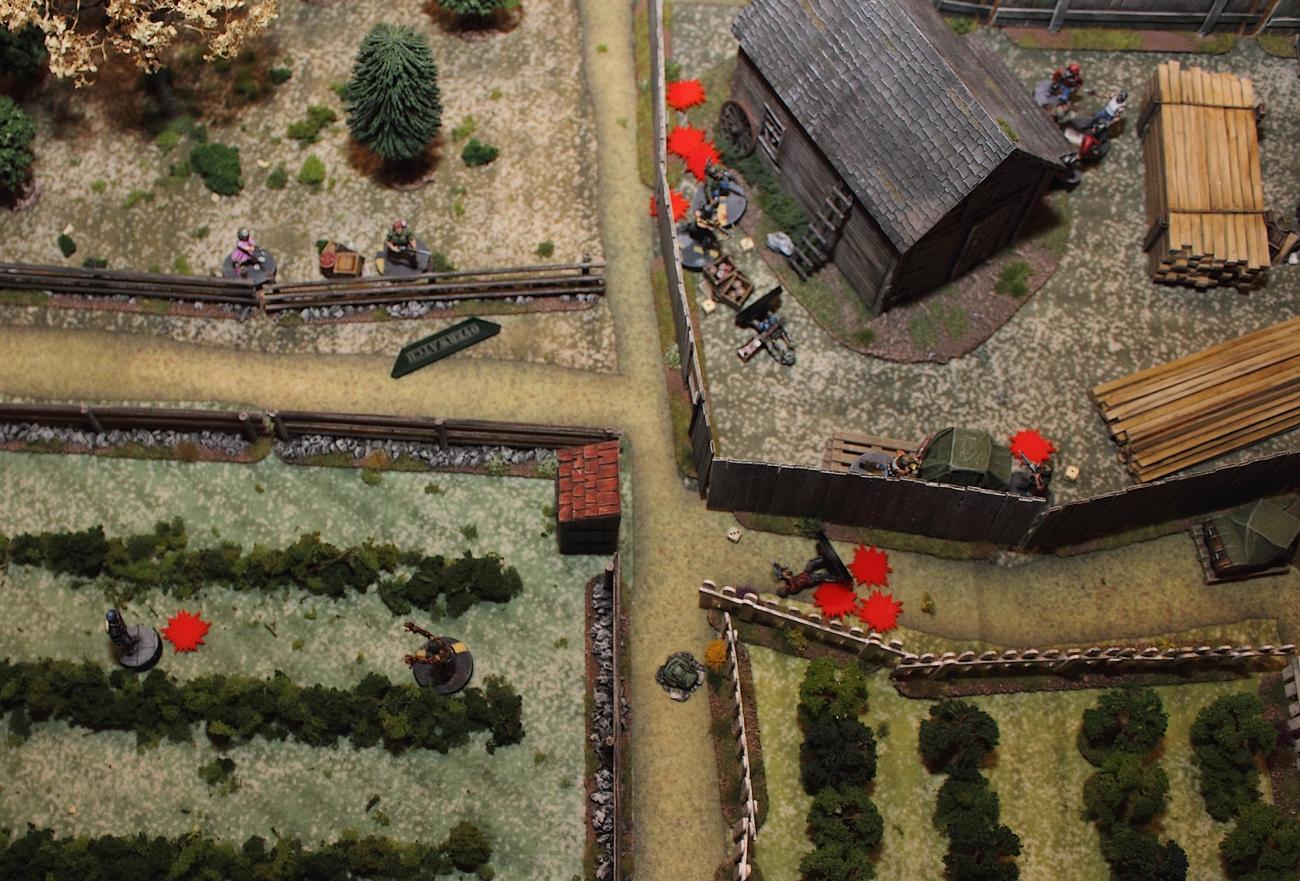 This takes some pressure off Mr.Jacket, but the blueberry zombie's still coming at him. Kyle tries to help out with some covering fire, but fails to do any damage to the undead, so Jacket keeps on stumbling backwards, taking panicked shots, but doesn't hit any of them. The zombie gets into close combat again and Mr.Jacket is severely wounded. 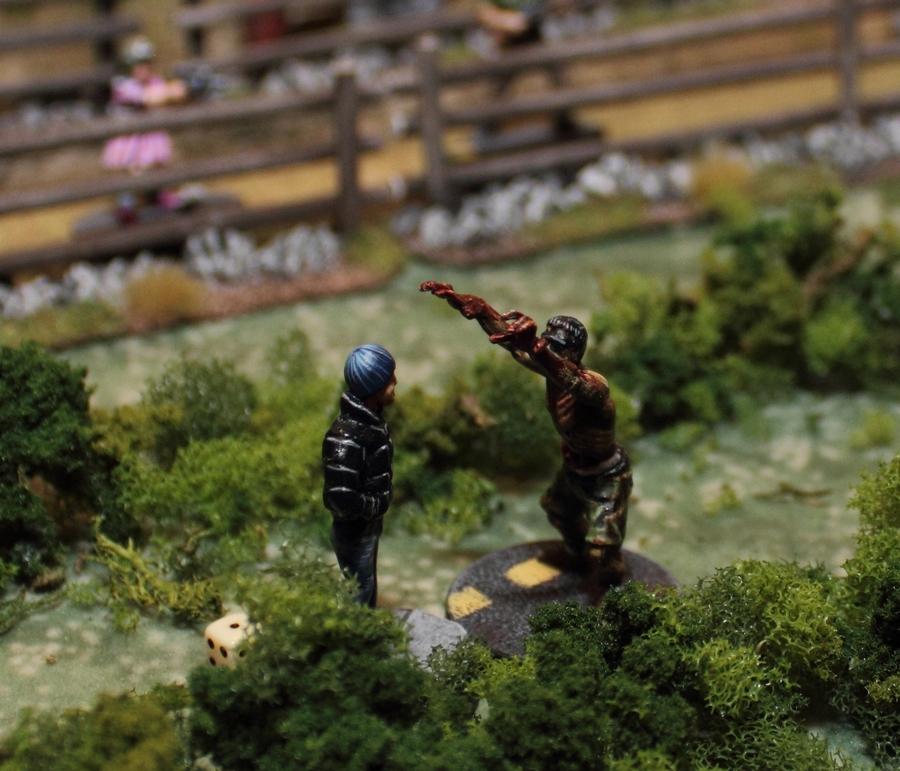 McCoy and Luke manage to flee the sawmill compound back through the hole in the fence, the steaming gang hot on their heels. Luke doesn't stop and runs off the table with the Supply Token. McCoy makes a decision and takes a sharp turn to the left to pick up the supply token by the white picket fence. Jens and Reverend Ralf assume the crazy gun lady to have fled or been eaten by zombies, so they haste back to their group to cover their retreat. Jens grabs the supply marker near the cars and takes it off the table to help Luke load the cars with the supplies. Chainsaw Charlie also flees the sawmill compound, but is too slow and the gang catch up to her. An overview: 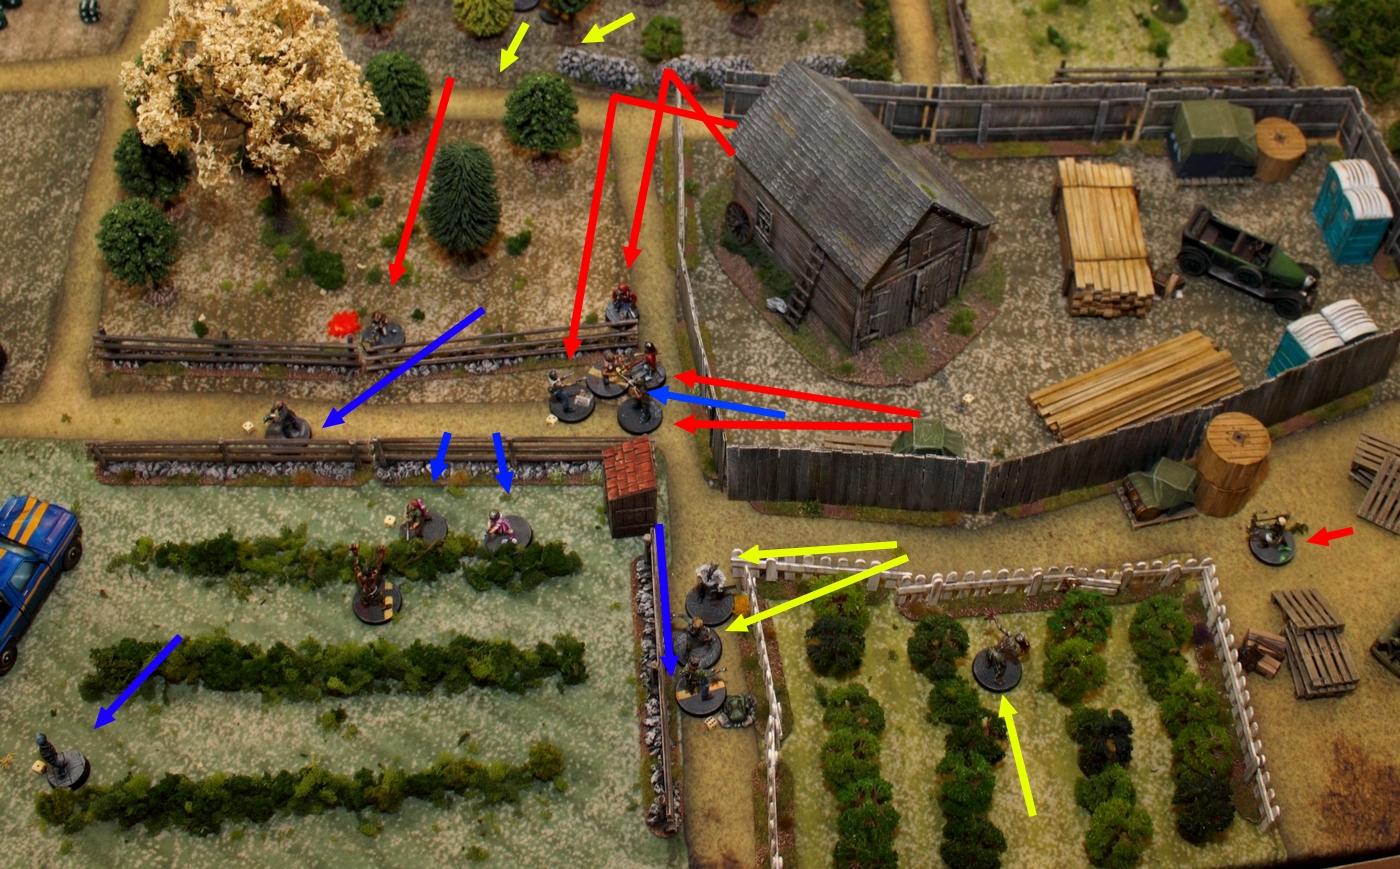 In the lower left, the blueberry field, Mr.Jacket finally gets away from the zombie again. Him, Reverend Ralf and Kyle fire at the creature over and over, but it just won't stay down. In the mean time Kim is back on the scene. She left the two zombies back in the light woods for now. In the bottom of the picture you can see that McCoy's ambition to get a third supply token got her into a sticky situation: She picked up the supply marker, but now she's being pestered by two zombies who make a retreat really tricky. She won't give up the supply token, so he lacks the action points to disengage and hop over the fence. One or two times she kicks them back and fires her assault rifle, but the effect is next to nought and the noise might lead to zombies popping up right behind her, which might end her pretty quickly. In the far right Michelle paces up and down. She doesn't want to get too close, or else she might attract the attention of some roaming zombies herself. So she pretty much stays put and guards the supply token by the truck. The most interesting situation currently of course is the big brawl at the centre of the board. Charlie fires up her chainsaw as she's being cornered by Armando Toblerone, Ron, Biff and lateron Spliff. This doesn't look good. 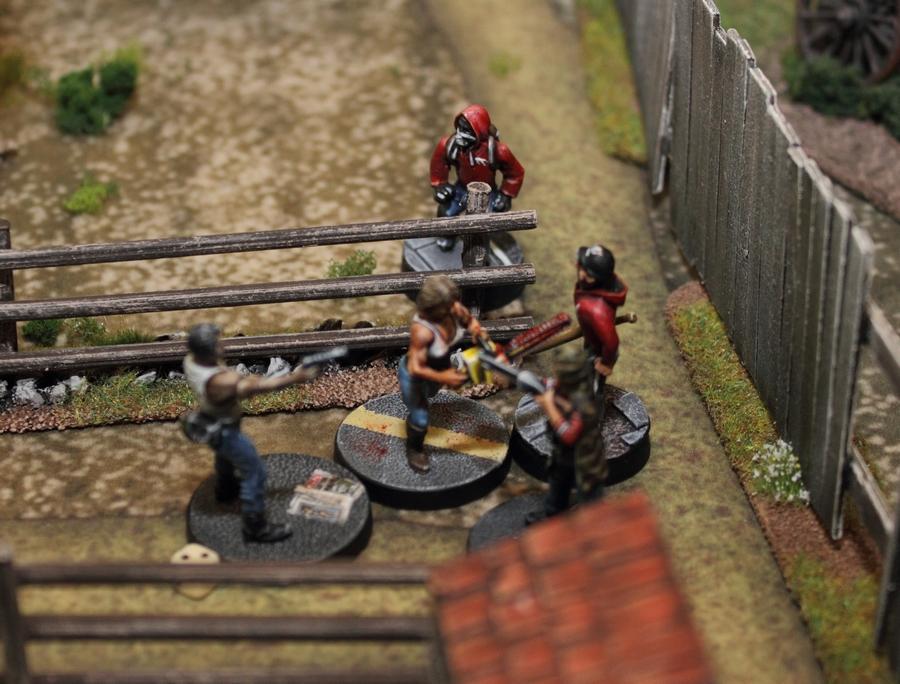 Her comrades won't let her down though. Reverend Ralf and Rosie (of all people) charge at Armando, in part to avoid getting shot at by Kim. But mainly to help out Charlie. Of course.  Here's a slow-motion version of what happens next: Chainsaw Charlie swings her saw at Biff. He manages to block the attack with his baseball bat, swings again and knocks out Charlie. Now Reverend Ralf tries to hit Armando with the handle of his gun, but the gang leader has been in about 500 street fights more than the Reverend has been, so he easily avoids the attack and strikes Ralf down. 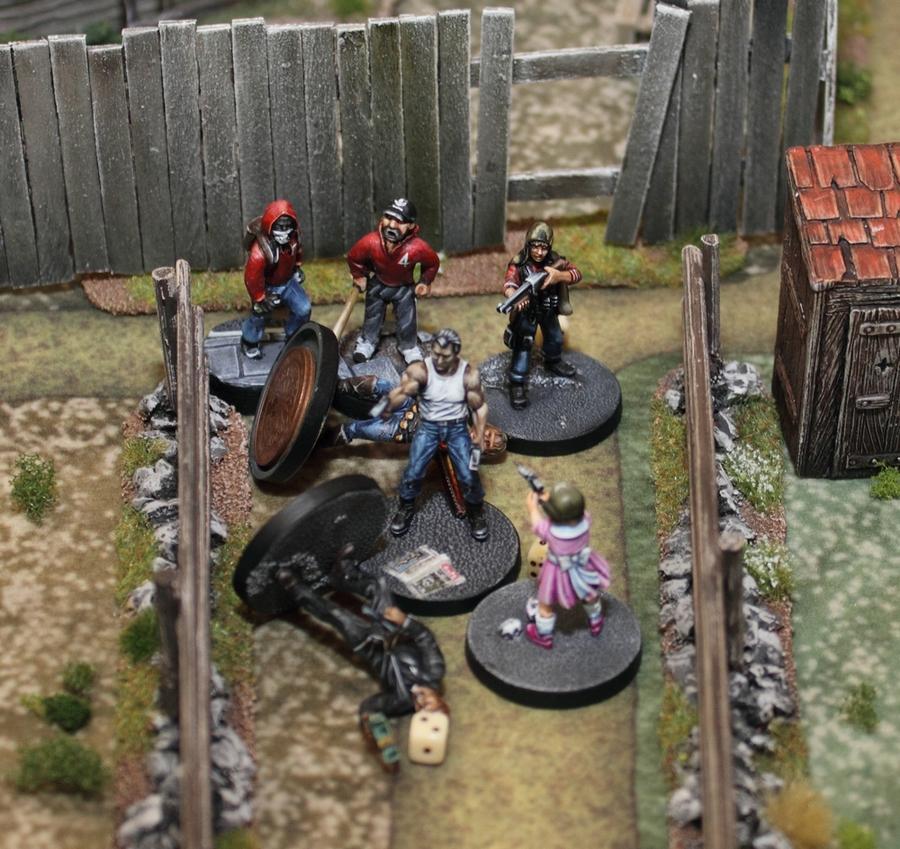 Whom Armando fails to notice is Rosie. She drops the toy gun, grabs hold of her plushie bunny (which contains a big old snowglobe which used to belong to Rosie's mother) with both hands, and starts swinging it around. On the first whirl she hits Armando's leg which makes him stagger to his knees, the second swing hits him in the back of the head and the Merciless Thug goes to the ground. 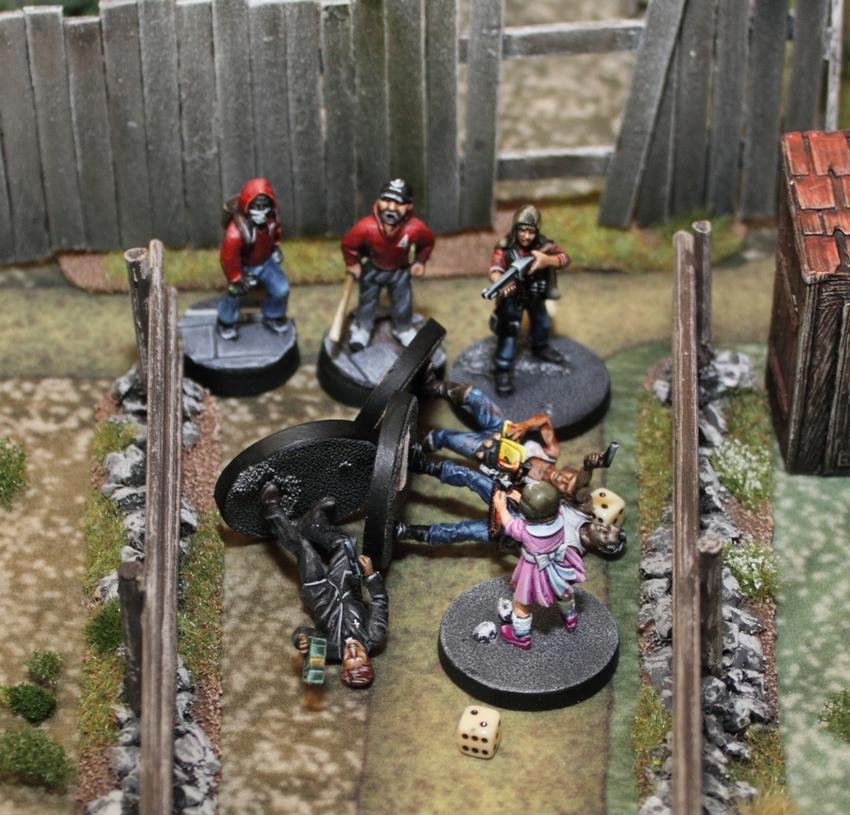 Note: I swear, this is exactly what happened. Note: I swear, this is exactly what happened. The rest of the gang freezes in place. In the mean time McCoy is still all caught up with slowly retreating while fending off the zombie to her front.  A quick overview of the centre of the table: Kim (left, blurry) takes position behind the fence. In reaction to this Kyle (in the right) hides behind the took shed. He takes a few shots at the zombies who isolate McCoy from the rest of the game, but to no avail. He's also much more nervous about Kim's modified assault rifle. To top it all off the zombie from the blueberry field (now there's a film title!) turns his attention from Mr.Jacket, who had fled, to Kyle and they get cought up in close combat. Kyle is cornered between fence, tool shed and zombie, without any chance to get ouf of this without beating the monster down.  At the very centre Rosie is facing all the bad boys on her own. McCoy's group has to win the initiative roll now so Rosie can activate first and run off, otherwise she's in big trouble. Fortunately they do win initiative, Rosie grabs her toy gun, slips through the fence and jumps into the blueberry hedge. Still, McCoy's gang is in a bad place now – the only characters who aren't caught up in close combat with zombies are Rosie and the wounded Mr.Jacket. Then something odd happens. Ron, Biff and Spliff move down the path and between McCoy's and Kyle's combats with the Zombies. Ron is angry and decides to just unload his shotgun in Kyle's general direction. He cocks his shotgun and pulls the trigger at the wild mêlée. More or less by accident he turns the zombie's head into a cloud of fine red (and dark blue ) mist. Kyle, only acting on instinct now, whirls around to Ron and fires his shotgun at him. Kyle is hit and drops to the ground.  Kim and Rosie make ready for a bizarre shootout between Kim's modified assault rifle on the one side and a hedge shouting „bang! Bang!“ on the other.  However, it doesn't come to this quite yet. Kim fires a salvo at Mr.Jacket, but doesn't hit. Biff and Spliff have enough. They shoulder their injured boss and comrades and decide to head back to the oldtimer to grab some supplies on their way home. 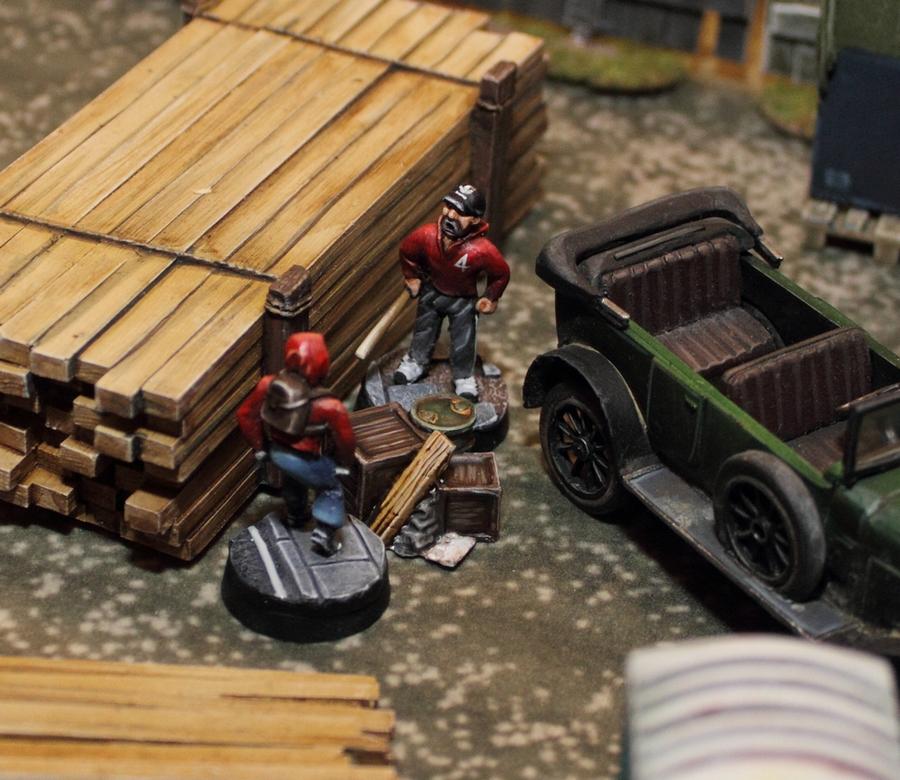 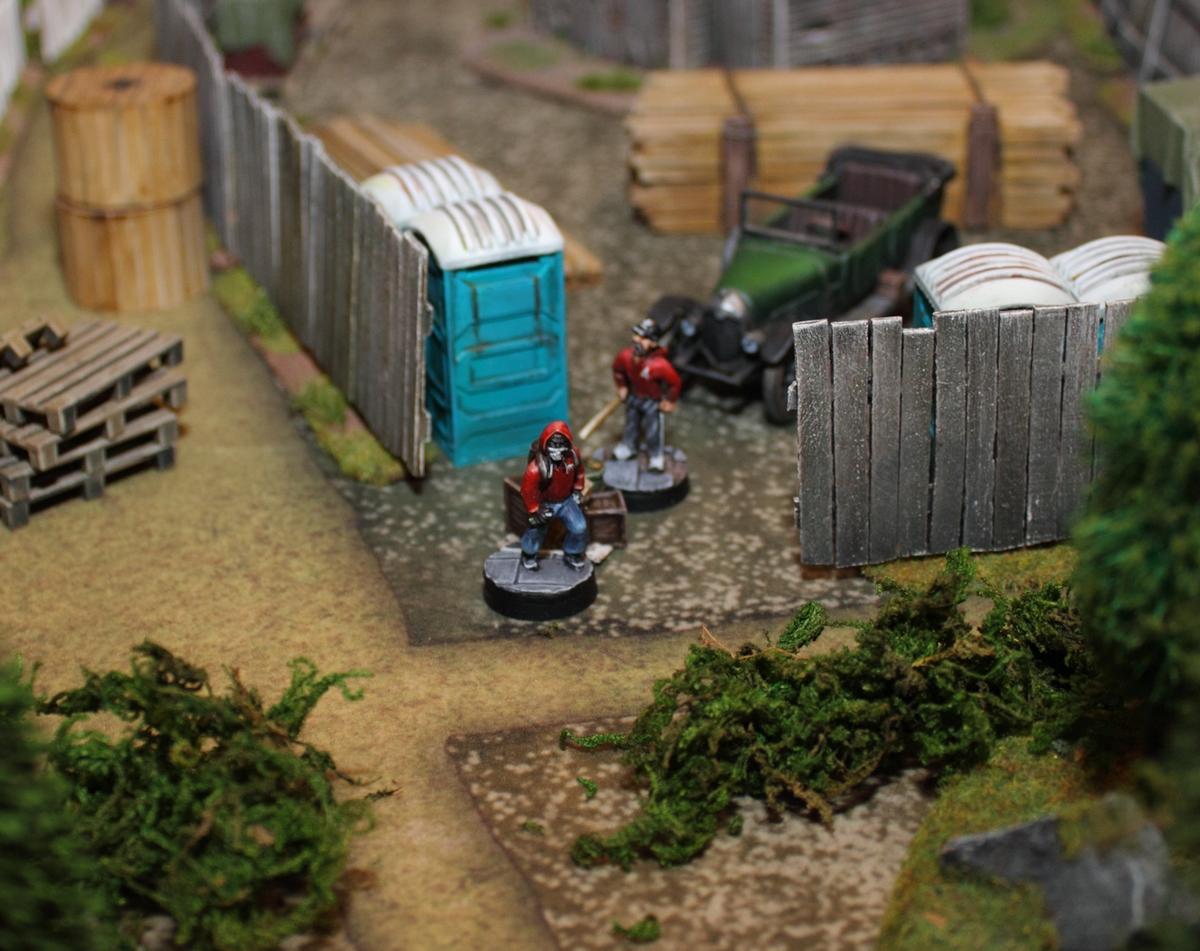 A few turns ago Michelle had a similar idea, takes the supplies she has guarded all game long and leaves the table. 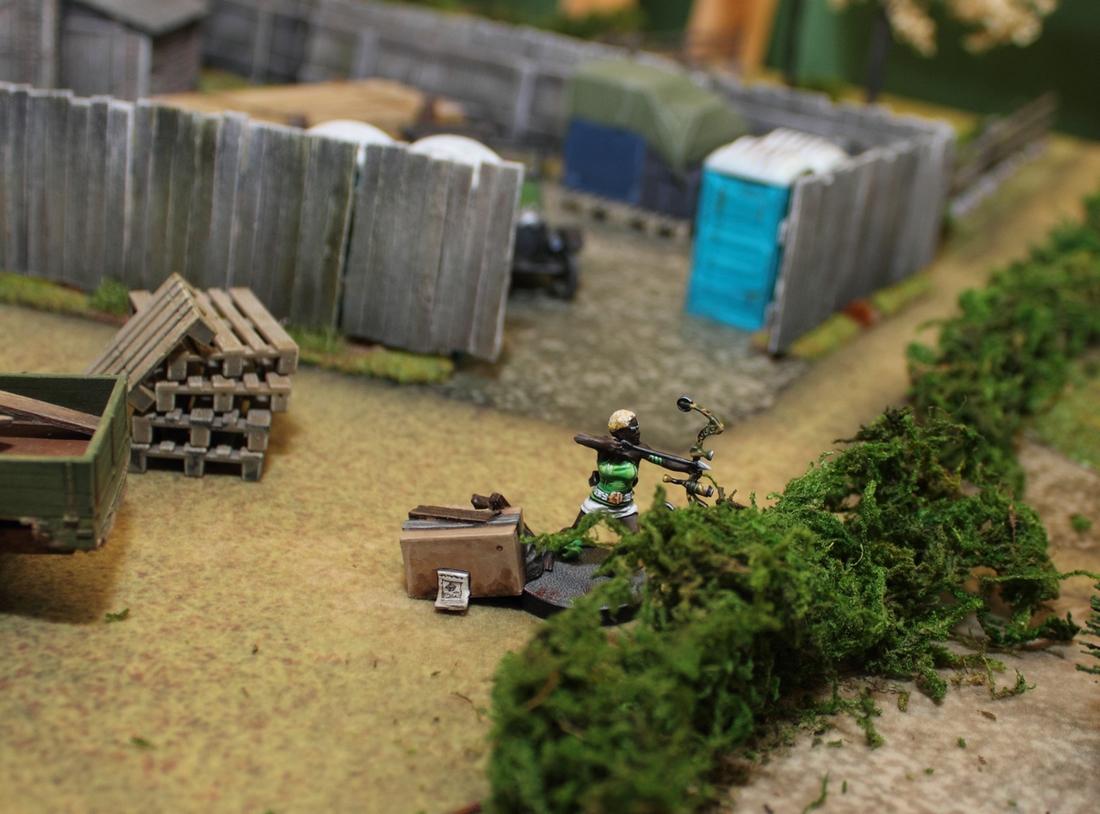 Soon thereafter the zombies Kim avoided so far catch up to her.  She decides to abandon her position, melds into the woodland and disappears. Kyle and Mr.Jacket fire a few more shots at the zombies to maybe get them off McCoy, but get ignored once more.  With a lot of luck (and the supply token!) their leader makes it off the board eventually. The remaining survivors also move back towards the cars.  Thus the game ends. None of the groups reached Breaking Point. McCoy's Survivors: 3 Supply Tokens Toblerone's Troublemakers: 2 Supply Tokens A close victory for McCoy's Group. Automatically Appended Next Post: Debriefing Well, that went surprisingly well, even though it was just a solo game. During the game I've had several situations which were either tense, funny, dramatic or all three at once! I believe that the little modifications I applied to the rules worked out pretty well in combination with a lot of terrain. But again, I think that's a given with this kind of game. Even though my table wasn't quite 3' in width it worked rather well. Zombies had just enough impact on the narrative and gameplay. It's interesting how the most fearsome guns on the table (Kim's and McCoy's assault rifles respectively) were effectively taken out for large chunks of the game. In the end neither of the two had killed anything. Having to consider noise generated by firing multiple shots and this drawing in zombies makes for a nice twist to the whole gunplay. Maybe I've taken this game, which basically was just set up to test the mechanics, a bit far, but a.) all the fluff adds to the narrative, and this is what these games are all about and b.) if I do it I'll rather do it right and test it properly. And I found that despite the simplistic base mechanics this plays really well. I hope that you enjoyed this battle report and that I got what this game is about across somehow. Let me know if you have any questions, critique or comments! Automatically Appended Next Post: campaign phase 1.) McCoy and Friends chose a mall for their Refuge, mainly for all the space and lots of storage rooms. Toblerone's Troublemakers took over a farm which comes with fenced-in gardens.  (photo credit: Joseph Kocher) 2.) Injuries. Both groups haul their wounded back to their refuge and take a closer look at the damage. Characters who get wounded, but still are able to act at the end of the game are assumed to heal their wounds without complications. Each character who gets taken out during the game have to recuperate and I have to roll for possible permanent damage (or worse!) This is where First Aid kits and Medical Training (in the case of Kyle Nightingale) come in extremely handy. Those will let you modify the result from the Injuries Table. As both sides have access to at least first aid kits all of the 5 injured characters (Reverend Ralf, Chainsaw Charlie, Ron, Kid and Armando) all fully recover, apart from the odd scar. Kid even learned something from the event and got extra experience points. 3.) speaking of which, it's time for Experience Points and Level-Ups. As mentioned before, characters receive Experience Points for surviving the game, taking out zombies or opponents or achieving scenario goals. This means that McCoy's group gets a bit more than Armando's. McCoy wants to raise her base stats, rolls on the table, spends some XP to modify the roll a little, and ends up with an extra point in Endurance, which makes her well hard. Luke Isberg opts for training his Athletic skills and learns the Stalker skill (no more noise when running. Handy.), Jens Gäbel gains the Scavenger skill, Mr.Jacket trains his shooting skills and gains Double-Tap. In Armando's Gang only Spliff gets to level up (..and discovers his love for growing pumpkins by acquiring the Agriculturalist skill!), Michelle Masters gains the Sniper skill and Biff becomes a Heavy Lifter. 4.) Now it's time to look through the Supplies. This again is done via a large table in the rulebook. Usually each Supply Token 'contains' a number of Scavange Points (which can be used to recruit new crew members and/or to build Refuge Perks) and sometimes an additional goodie such as equipment, a weapon, and so on. McCoy's crew gets 23 Scavenge Points, a military-grade sub-machine gun and a fire bomb. Toblerone's Troublemakers get 14 Scavenge Points, Booze and – curiously - a Riot Shield. 5.) Refuge Perks! McCoy has her group build a watch tower on top of the mall's roof, which helps fending off attacks by zombies and others. This costs most of their Scavenge Points, but it will be worth it. 6.) Now characters who aren't injured can be allocated to working around the Refuge. They can either work certain Refuge Perks (for instance Spliff is growing pumpkins on the farm's fenced-off garden, generating Scavenge Points for the group). Crew members also have to be allocated to building Perks if you have the scavenge points to afford them. The third option is have crew members stand guard. This is very important, as Refuges are constantly at danger of being attacked by large numbers of zombies. The leader also has the option to either recruit new mebers to the group or sit down with a single member of their crew and have The Talk. In this action the leader will try to convince the crew member of their philosophy. If they succeed the character's moral philosophy will change to the leader's.  7.) the final step in the campaign phase is the inevitable Zombie Attack on your Refuge. It's a simple check you roll for, modified by the number of crew members you have on guard vs. The number of members recuperating from injury. Certain Refuge Perks like reinforced windows and so on will factor into this as well. The chance of getting overrun isn't very high, but it really sucks if it happens just because you didn't allocate enough crew members to guard duty. ...and that's the campaign phase!
|
|
This message was edited 10 times. Last update was at 2019/03/26 20:46:59
|
|
|
|
|
2019/03/27 15:39:55
Subject: Battle Brush Studios' Commission Painting Log - Massive update! 40k, WHFB, Historicals, Infinity, ..
|
|
Fixture of Dakka
|
Quite the report there Sigur.
Cheers,
CB
|
|
|
|
|
|
2019/03/30 11:13:53
Subject: Re:Battle Brush Studios' Commission Painting Log - Massive update! 40k, WHFB, Historicals, Infinity, ..
|
|
Buttons Should Be Brass, Not Gold!
|
@Captain Brown: Well, thanks.
While I'm waiting for primer to dry on the next Infinity project, here's the finished Haqqis:
Hope you like them, more detailled shots to follow!
|
|
|
|
|
|
2019/04/04 11:01:32
Subject: Re:Battle Brush Studios' Commission Painting Log - Massive update! 40k, WHFB, Historicals, Infinity, ..
|
|
Buttons Should Be Brass, Not Gold!
|
|
|
|
|
|
|
2019/04/05 02:54:20
Subject: Battle Brush Studios' Commission Painting Log - Massive update! 40k, WHFB, Historicals, Infinity, ..
|
|
Decrepit Dakkanaut
|
Love them. They're so dynamic... especially the Infinity guys. I do love the fact that the colors are so subdued... just makes them feel that much more life-like.
|
|
|
|
|
|
2019/04/08 09:19:45
Subject: Re:Battle Brush Studios' Commission Painting Log - Massive update! 40k, WHFB, Historicals, Infinity, ..
|
|
Buttons Should Be Brass, Not Gold!
|
@Gitsplitta: Thanks, Mr.Gits! They're just always fun figures to work with. Well, until you get to the details part of the work, that'll always be a bit overwhelming at first. It's all about taking it step by step.
Since I got a ton to do I rushed straight on to painting Space Orks. Finished the 35 Slugga Boyz (pictures of those to follow, possibly not before I got the Kommandoz and Tank Bustaz done, let's see), now I slipped in another batch of Infinity figures, incidently Haqqislam again, but with a slightly different look. Here's a WIP of the figures:
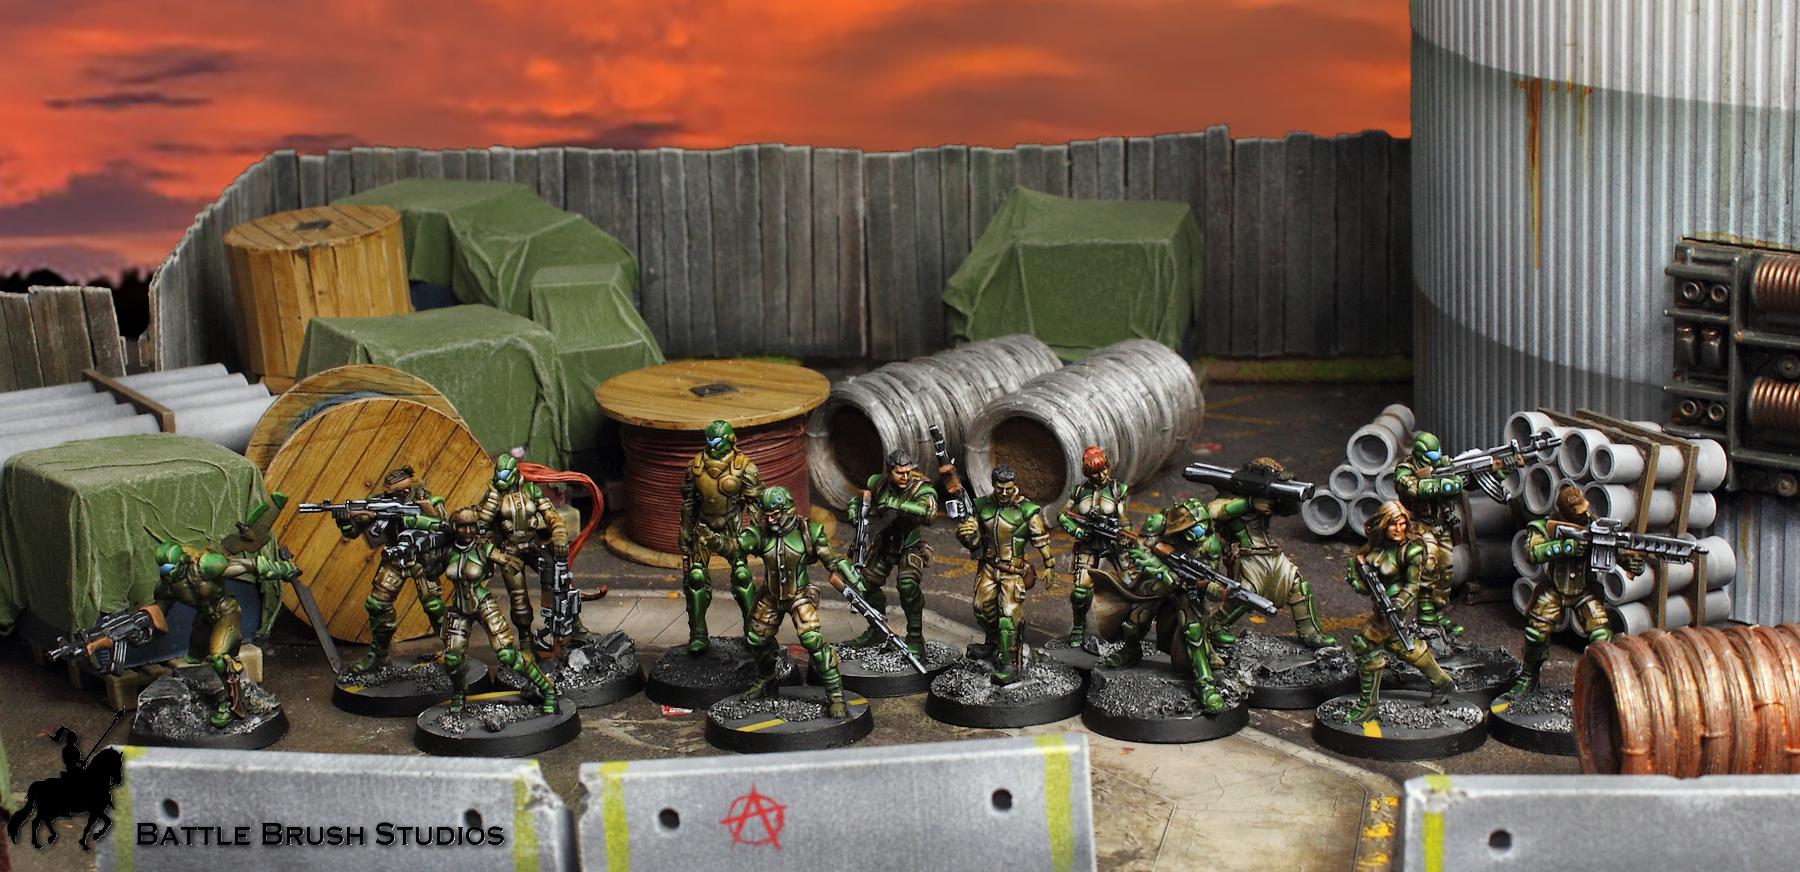
Slowly getting there. Hope you like them so far.
|
|
|
|
|
|
2019/04/08 10:40:59
Subject: Re:Battle Brush Studios' Commission Painting Log - Massive update! 40k, WHFB, Historicals, Infinity, ..
|
|
Buttons Should Be Brass, Not Gold!
|
Well, we had another game of Sharp Practice last Friday. Cpt.Shandy set it all up as usual and christened the event " The Spirit of '61". Having someone who's really passionate about the rules set and the period setting up games really helps. It's the biggest SP2 game we've had so far: 2 on 2 players and a whole lotta leaders and groups of infantry and cavalry. To cater to the larger size of the game the table size was increased and each side even got a +1 bonus to force morale. The number of command cards on each side was the usual 4 each. Virago (C-in-C) and I took on the role of the Confederate leaders, opposing Stephan (C-in-C) and Cpt.Shandy trying to deny us state rights. The C-in- Cs and Cpt.Shandy each got 3 leaders, I got 4 leaders and a whole lot of cavalry and skirmishers (along with 2 groups of line infantry with the trusty old smoothbore muskets. Ehem.) Days before Cpt.Shandy had worked out separate PDFs for each participant with individual backgrounds and orders (along with secret goals for each character for additional victory points). The two C-in- Cs were also allowed to each make a tactical decision beforehand (interrogating locals for information, sending out scouting parties, or just deploying as quickly as possible) which would lead to advantages and/or disadvantages during the game. In addition to this there also would be civilians on the table to interact with. The Scenario Civilians are marked in purple. Yellow marks the game's main objective, the distillery. Both sides have to get there, convince the distillery owner, who is a sort of local hero, to let them proceed and then break down the distillery, load it onto a wagon, and evacuate it off the table. All whilst keeping the enemy from interfering and their own men from taking to the whiskey stash instead of fighting/working.  full size image: https://www.tabletopwelt.de/uploads/monthly_2019_04/5caa2d04329cb_table1schrift.jpg.8b272391689effeff361c746a7cfe8e2.jpg I play Cpt.Bolling Baker. A quick google of the man left me with little info about him. For a while he was a clerk, got command of a company in the 3rd Virginia and later on was promoted to Major. At the point at which the game takes place he just missed the Battle of Big Bethel due to a sudden bout of the gripes. Rumours of cowardice are making the rounds in the camp. Which is why I have to show determination and commitment to the cause, and nothing spells "determination and commitment" like a big scar. Meaning bonus victory points for me if Cpt.Baker gets wounded during the game, and which is why he's got Dr.Howser, the regiment's physician, with him. The Game Here we go. The first hurdle, as so often, is getting our guys on the table and in position quicker than the other guys. Which isn't easy with such a large body of troops and a narrow dirt road and a bridge to cross right in front of us. The Yankees, who opted to forfeit any scouting or info gathering in favour for just taking to the field quickly, get that done a bit more swiftly. They cross the river, cavalry spearheading their advance. 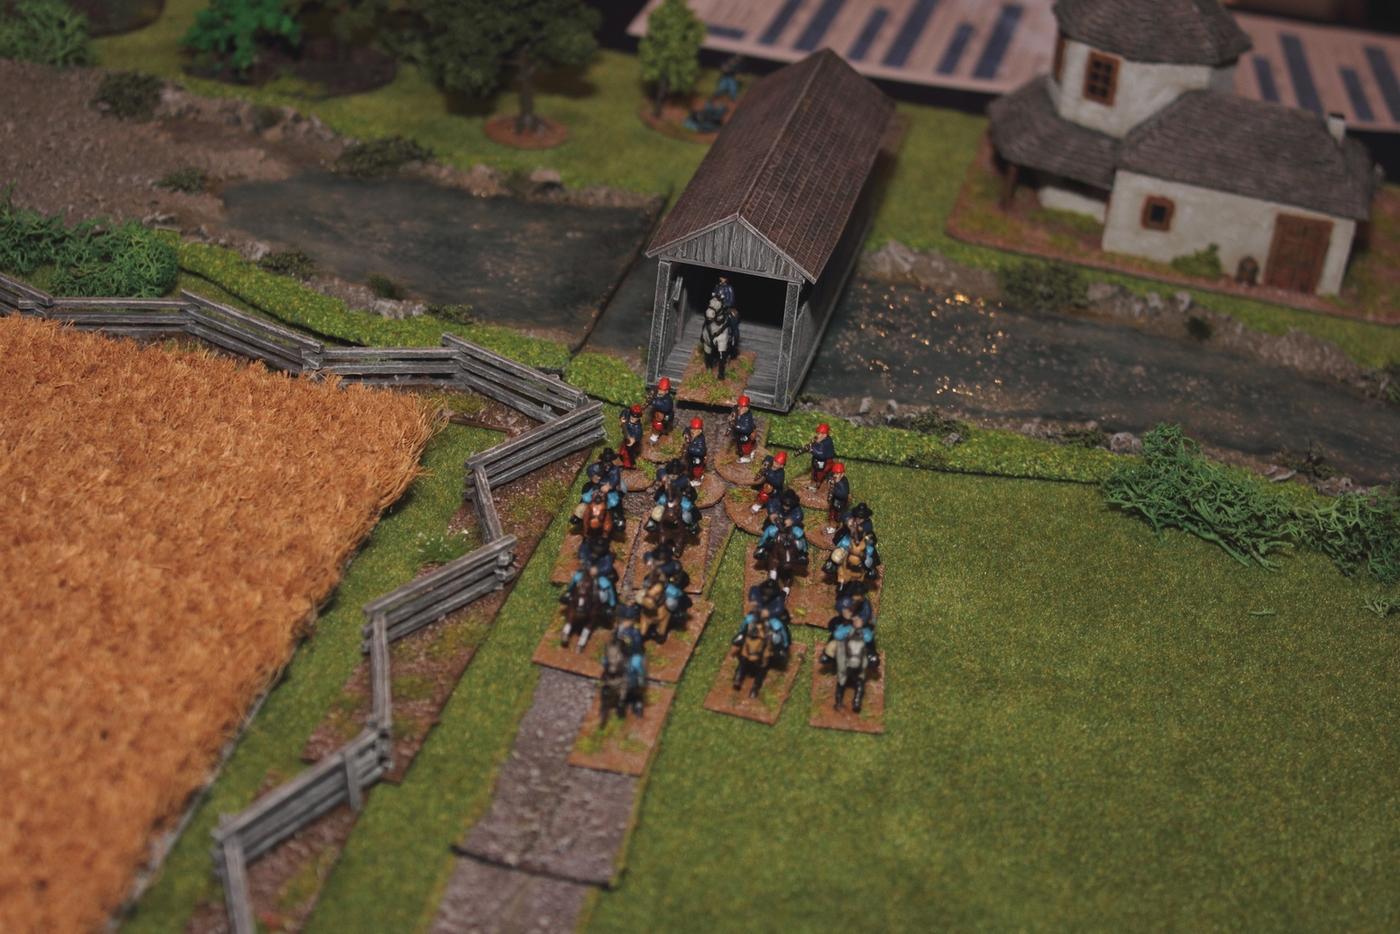 full size image: https://www.tabletopwelt.de/uploads/monthly_2019_04/5caa30ce85fcc_earlygamedeploymentunionbridge.jpg.aef487de1ca73c9e6bd5cd8baa80f2ac.jpg 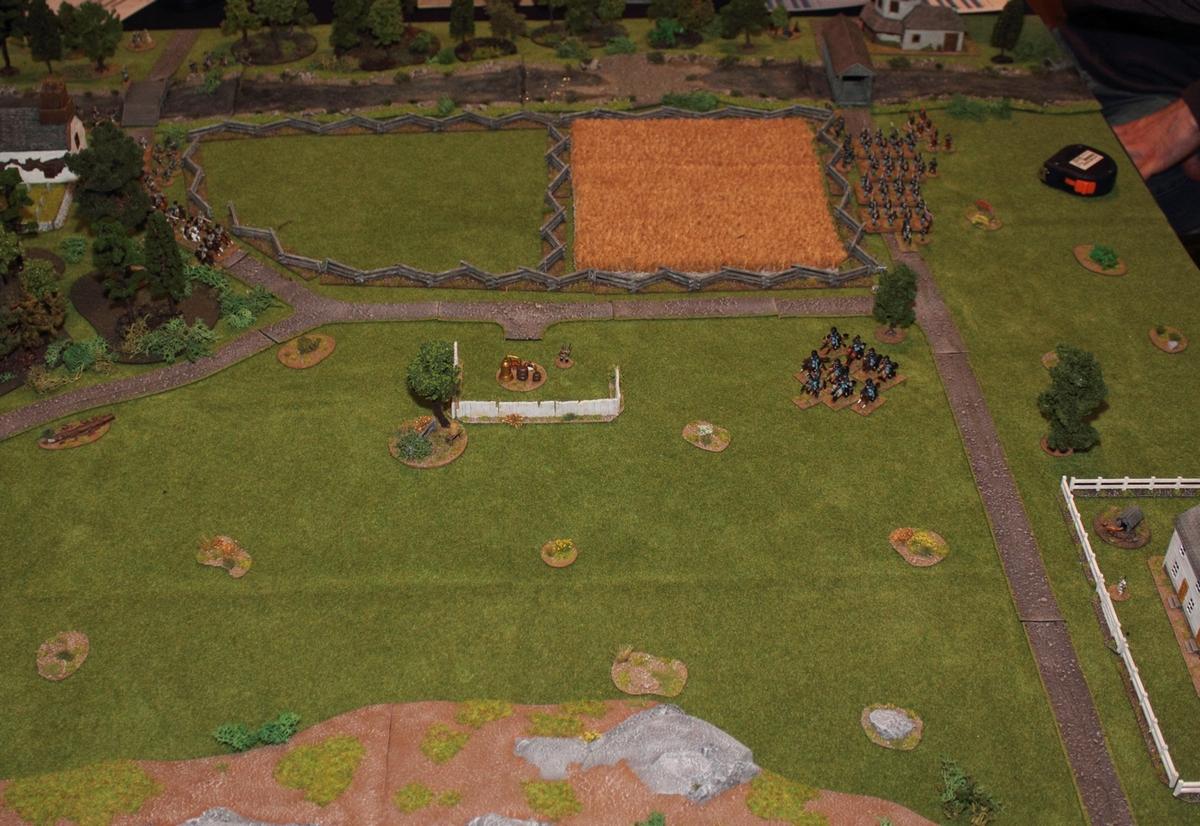 full size image: https://www.tabletopwelt.de/uploads/monthly_2019_04/5caa3117afb46_earlygameoverview.jpg.c29a152035bc26e9bd50a350c005e1f8.jpg After a bit of shuffling, shouting and cursing our boys also get on and across the bridge, also with cavalry to the front and three groups of skirmishers. To meet our advance, Stephan has his impressive formation of 4 groups of line infantry turn about, form line, and advance through the cornfield. Scary. In reaction to this our C-in-C virago has three of his line infantry groups also form line and take position behind the fence. 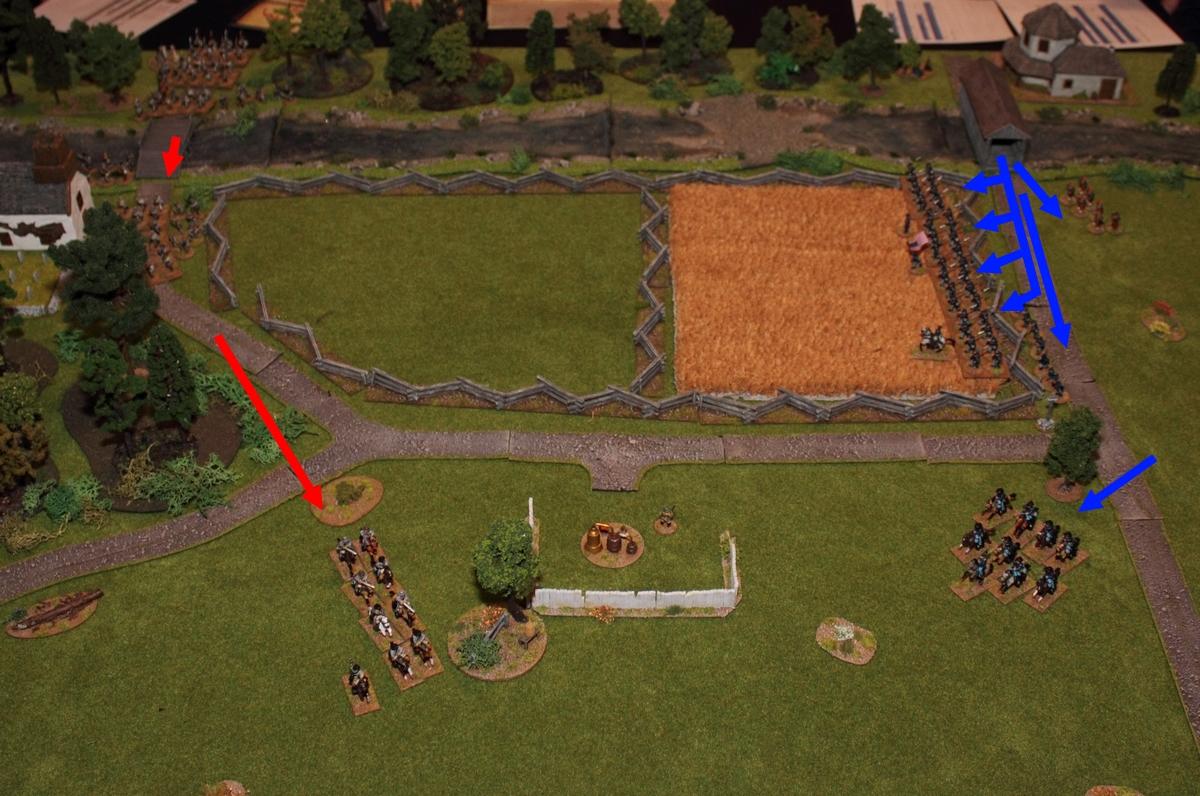 Down the flank and around the distillery both our cavalry groups move up. In their typically chivalrous ways, my cavalry draw swords, make ready for a proper cavalry skirmish. The Union cavalry on the other hand dismounts and opens fire at my unit. Unchivalrously, their officer is hit and knocked to the ground! They also take 2 points of shock. 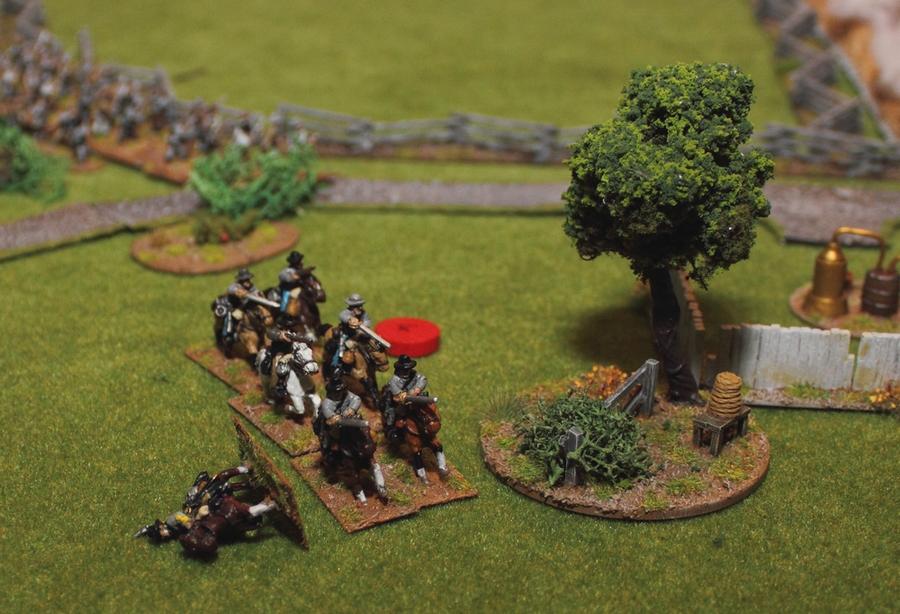 From this point on each time the officer's card is drawn he may roll to see if he gets back up and to his senses. Until then the group's effectively paralyzed (and with their flank exposed), unless I manage to activate them in some other way. Musket fire starts erupting in general now - the two infantry lines start duelling.  full size image: https://www.tabletopwelt.de/uploads/monthly_2019_04/5caa553b12e13_earlygameshootingstarts.jpg.103536f149f25963238e4d264cf52c47.jpg In the left we got our three groups along the fence, plus 2 groups of skirmishers, in the right the massive Union infantry formation of 4 groups, plus a Level 3 and a Level 1 leader AND a flag. On the plus side, our guys got slightly better cover They shoot back and forth for a while. The Yankees take slightly heavier losses, but stand. Meanwhile their reinforcements in the shape of Zouaves of the 5th NY move up and towards the distillery in open column, flanked by more Zouaves in skirmish formation. 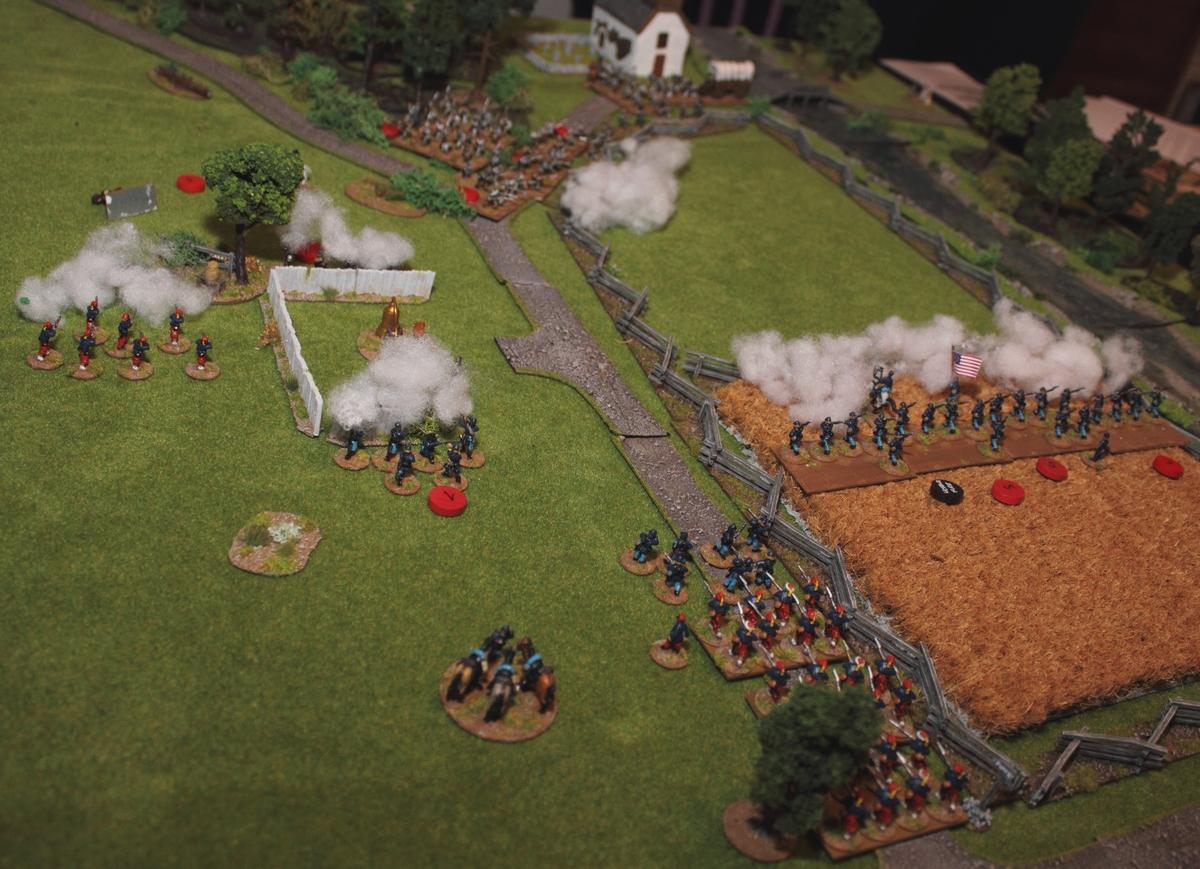 full size image: https://www.tabletopwelt.de/uploads/monthly_2019_04/5caa561b5cdbb_midgameearlyoverview.jpg.470c1070c9d176be5fdfb68d84b502db.jpg My downed cavalry officer fails every single roll to get up again. After some more salvos his cavalry comrades have to withdraw and leave their officer behind. They're effectively out of the game. A group of skirmishers moves up to cover the retreat of the cavalry and to protect the flank, but they have to withstand the combined fire of the Union cavalry and Zouave skirmishers. The distillery owner is assumed to dive for cover. Cpt. Bolling Baker leads his two groups of line infantry through the woods and towards the distillery. In passing he asks the local minister assistance, but he's not impressed. He gives a half-hearted blessing and retires for lunch.  full size image: https://www.tabletopwelt.de/uploads/monthly_2019_04/5caa5750617b9_midgamerebwagon.jpg.628f0c7140fccf84f0c0400fb7a893f6.jpg Ever so slowly our wagon lumbers down the dirt road towards the distillery. Unless we get a grip on things on the flank this could get problematic. If only the big infantry line in the cornfield finally broke. They keep taking casualties, but they're still quite a lot of dudes, led by competent officers who keep them fighting. Then, slowly, they start retreating under the Confederate fire. I ask for my skirmishers to redeploy to the flank, but my C-in-C orders to advance toward the retreating enemy infantry to exploit this little victory. It's the correct call. Our boys climb the fence and keep firing at the retreating enemy.  full size image: https://www.tabletopwelt.de/uploads/monthly_2019_04/5caa57a880423_lategamefight.jpg.7e15fd158311e765364c49c8222ba7ad.jpg Here's an overview of this point of the game: In the cornfield the Union infantry's slowly stepping back, with our infantry following up. At the flank right in front of the distillery Cpt.Baker and his infantry finally get into position and form up. Unfortunately our opponents' Zouaves are faster at doing so, and manage to sit right on top of the objective. There's a short interaction between them and the distillery owner. He's mighty impressed with the Zouave uniforms and, under the condition for him to get a Zouave cap, he gives permission for the distillery to be evacuated and even joins the formation!  full size image: https://www.tabletopwelt.de/uploads/monthly_2019_04/5caa58e46fda7_lategameoverview2schrift.jpg.09fa0914ed0558ae5e5a5f75ebb1e9ed.jpg Now it comes down to a duel between the brave 3rd Virginia and the 5th New York Zouaves. My guys are fewer, but the surplus group on the Zouaves' side can't really intervene anyway due to space constriction. However, at least half of the Zouaves formation is in light cover behind the distillery fence. My advantage is the smoothbore muskets which get a slight bonus at short ranges as compared to the more modern rifled muskets of the Zouaves. Baker has his boys present and fire. The result is slightly underwhelming. Now it's the Zouaves' turn. They seem to be eternally motivated due to sitting on a stash of Whiskey. The tassels on their zouave caps are flying through the air while they load and fire their muskets relentlessly. The 3rd Virginia takes heavy losses and the C-in-C has to ride up to keep the boys fighting. Speaking of riding - Dr.Howser advanced all on his own into no man's land to take care of the still downed cavalry officer, who is either knocked out or opted to just stay down, given all the enemy skirmishers around him. 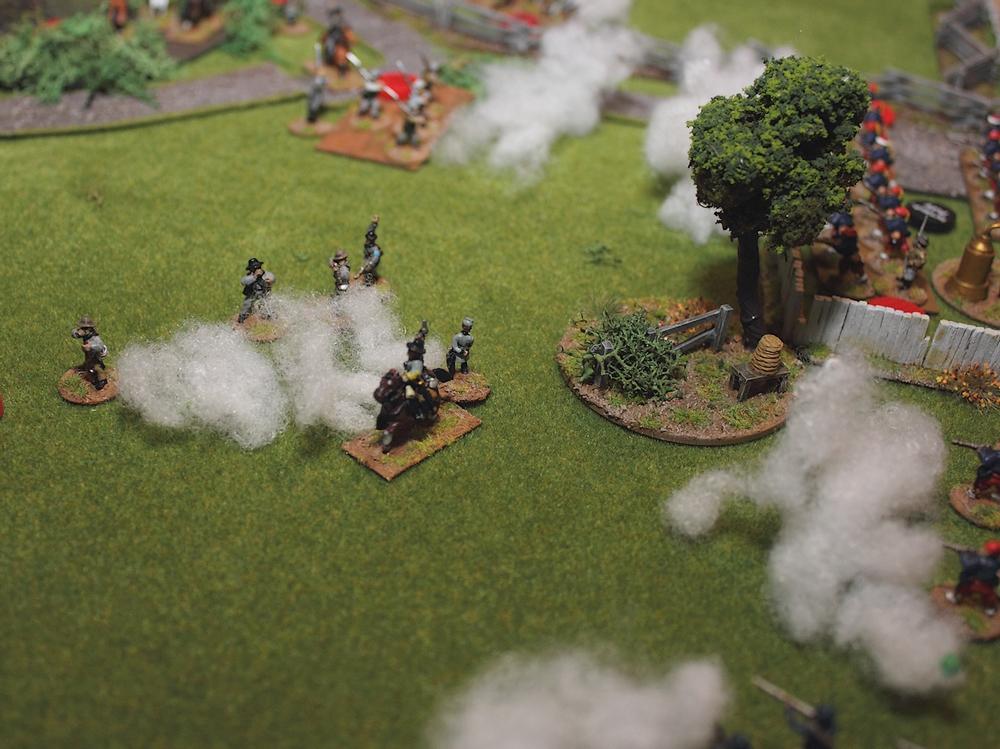 The smelling salts and well-meaning kicking do their job, and Cpt. Robert Johnson of the 2nd Virginia Cavalry rises again, all while the skirmishers try to fend off the enemy cavarly and skirmishers. Chroniclers are divided on why the following happens. Either Cpt.Johnson is a great hero, or his horse got mad due to all the musket firing around them. Either way, next thing that happens is Johnson, alone (apart from this horse), reins between teeth and arms flailing, charges the enemy cavalry. The latter are so surprised by this act that one of them gets ridden down and the rest of the group retreats a few paces. 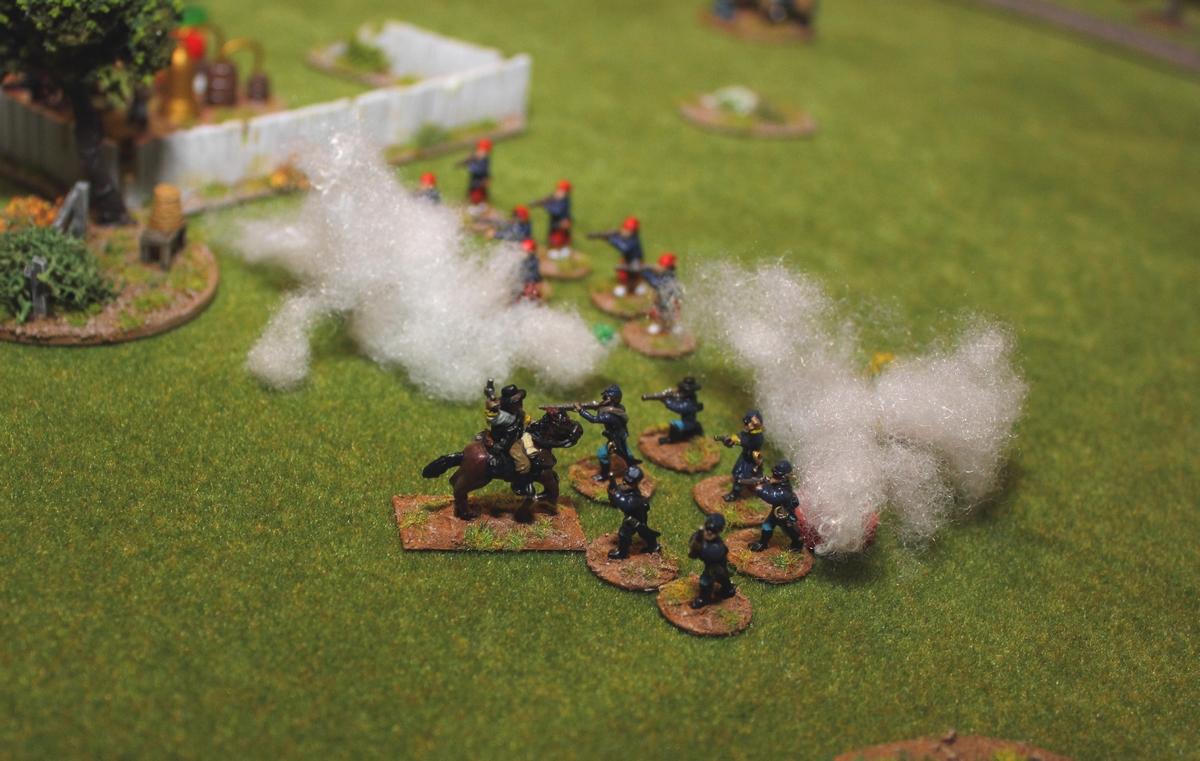 Baker's 3rd Virginia infantry continue to take a licking in front of the distillery, courtesy of the Zouaves. One of my two groups flees (after having accumulated 15(!) points of shock), the remaining group soon is reduced to fewer men than officers present.  full size image: https://www.tabletopwelt.de/uploads/monthly_2019_04/5caa5cbe9bb73_lategamesalvoyikes.jpg.58eb261797032549eb0e7a5f3e18fd2c.jpg At this point we pretty much have to forfeit. Our centre crumbles, our flank's exposed and outmaneuvered. It's a victory for the Union. 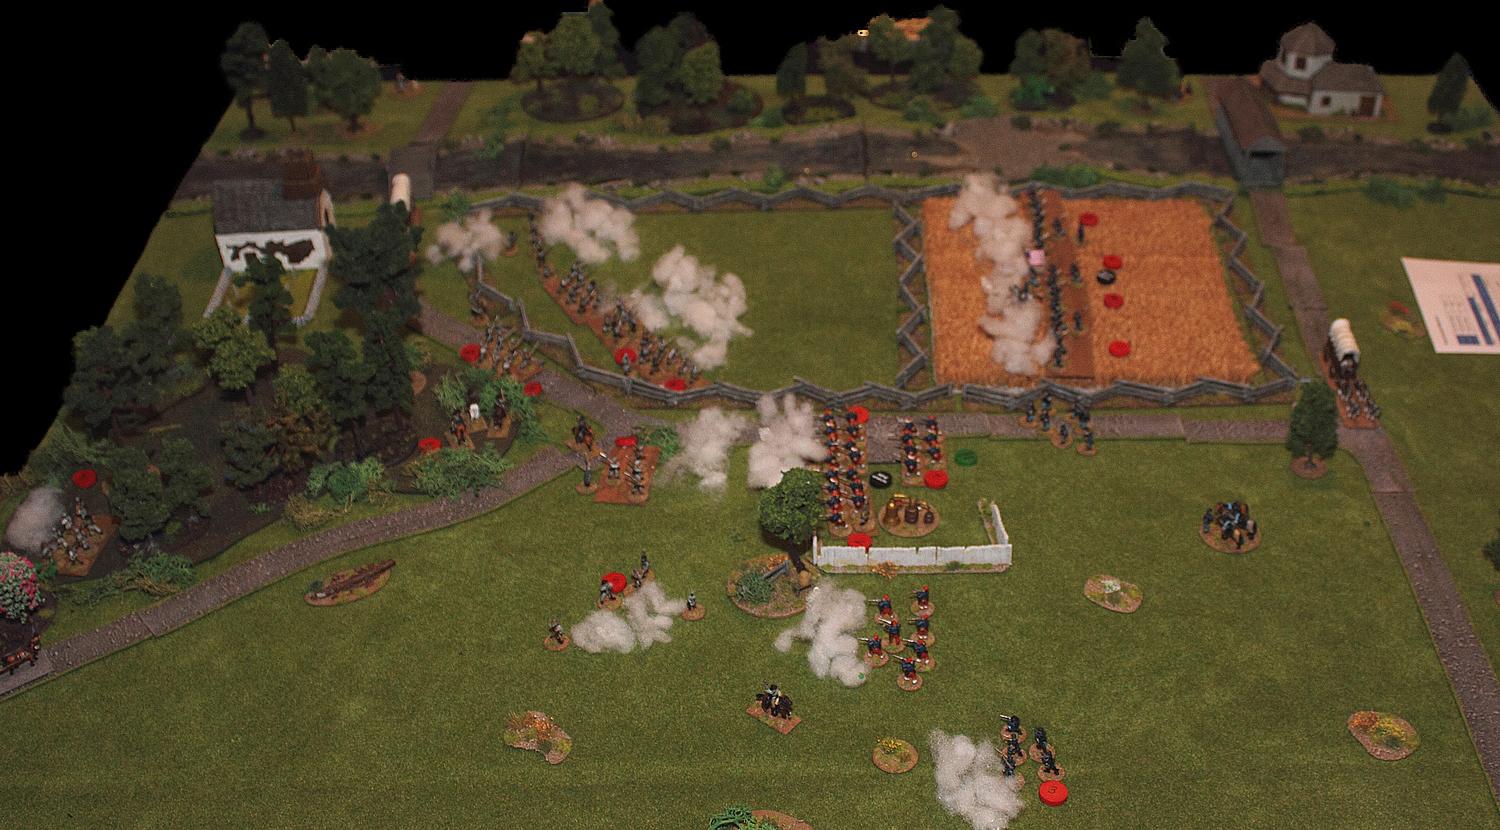 Debriefing Debriefing What a remarkable game. The high number of units and leaders was made up for in some ways, but it still played pretty differently. Command cards were in short supply (however, the Union made excellent use of them when opportunity struck), and more often than usual were used to get leaders activated before the card's drawn Another interesting factor is how line infantry fire is worked out when facing a LOT of enemy units in their field of fire; something that also usually only happens in larger games. All in all it was a very nice game. Space was tight on our side of the table, so our guys didn't get ahead quickly enough. And of course this Union infantry in the cornfield refusing to break was a big factor. Anyway, good game, and next time it's a confederate victory again! Thanks for reading! I hope that you enjoyed this battle report. Let me know if you have any questions or comments. For a slightly different view on the whole affair (I assume, I haven't read it yet, but will do so right now), here's Cpt.Shandy's battle report: https://wargamingraft.wordpress.com/
|
|
This message was edited 1 time. Last update was at 2019/04/08 10:41:40
|
|
|
|
|
|
|
|


 Finished Forge World Elysian Army
  Finished Order of Our Martyred Lady - Sisters of Battle
  Finished Necromundian Imperial Guard Regiment