| Author |
Message |
 |
|
|
|
|
Advert
|
Forum adverts like this one are shown to any user who is not logged in. Join us by filling out a tiny 3 field form and you will get your own, free, dakka user account which gives a good range of benefits to you:
- No adverts like this in the forums anymore.
- Times and dates in your local timezone.
- Full tracking of what you have read so you can skip to your first unread post, easily see what has changed since you last logged in, and easily see what is new at a glance.
- Email notifications for threads you want to watch closely.
- Being a part of the oldest wargaming community on the net.
If you are already a member then feel free to login now. |
|
 |
2010/09/22 02:19:59
Subject: Spam Marines - Dreadnought Drop Pod & Scratch-built ThunderHawk updated 01/11
|
|

Fresh-Faced New User
|
I've only recently got back into 40K after a 2 year hiatus, and as a result have been casting a critical eye over my Space marine army.
First thing I noticed was my dire lack of transports - 50 tactical marines take a while to move across the board when you have no Rhinos, so my first purchase after picking up the Assault on Black reach set was a Razorback and some magnets. Both the new Razorback and my old predator tank got the full on magnetizing treatment, so I can now field them as any combination of rhinos/razorbacks/predator as required. Next on the list is a plastic drop pod or two.
And then that got me thinking - I've got 2 multimelta equipped dreadnoughts (an old metal one I got given years ago and the new AoBR plastic one - they look nearly identical) which are awesome models, but usually dead by the time they can walk to within range of any decent targets.
So lets get them some transport too.
I've been semi-working from plans for a cardboard drop pod off bwc, but I'll be making it a bit more sturdy and adding a few tweaks.
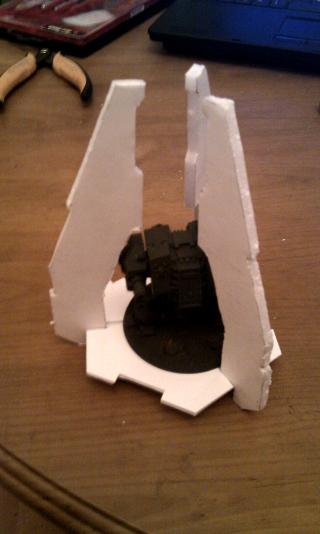
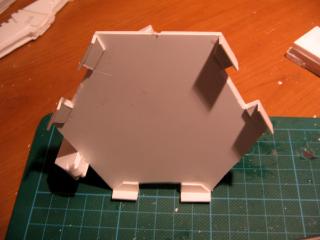
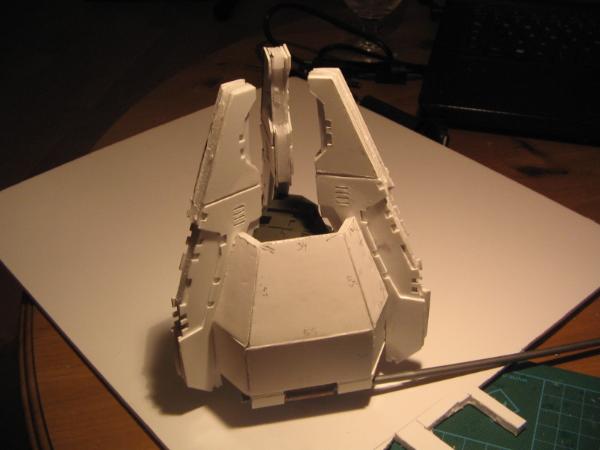
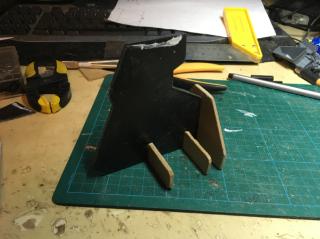
I started by cutting a hex baseplate out of 2mm plasticard, and made it 2 layers thick to make sure it was rigid. Top layer had some slots cut in it too to help with fitting the main struts.
The main struts were then cut from 5mm thick foamboard and glued to the base.
 
Quick test fit of the dread
Now onto covering up that foamboard and adding detailing
 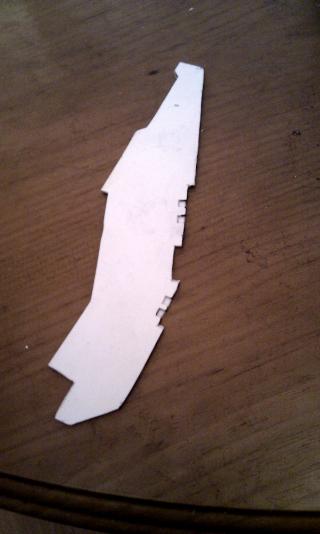
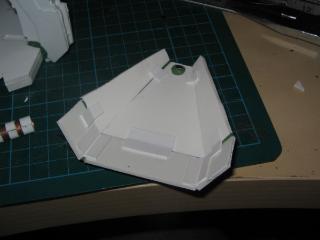
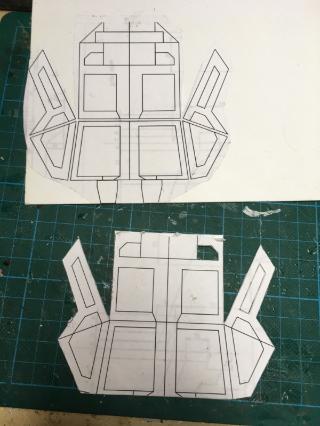
I cut more 2mm thick plasticard using the same stencils as i used to do the foamboard struts, then started cutting notches in them in same style as the plastic drop pod.
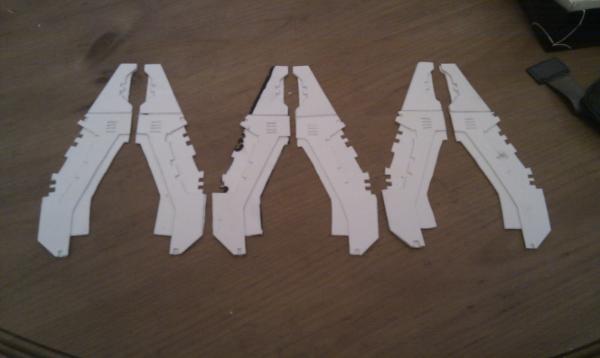
added another layer with even bigger cutouts and vents - all 6 done here ready to get glued onto either side of the foamboard.

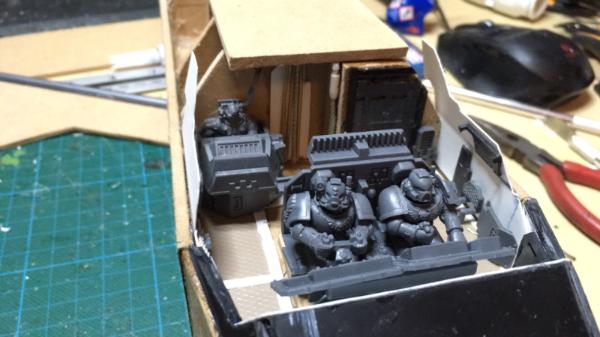
The drop pod so far - more detailing still to be added to the struts. I'm planning on putting a layer of greenstuff over the thin edges of the struts to cover the foam and add some small plasticard strips and squares for detailing.

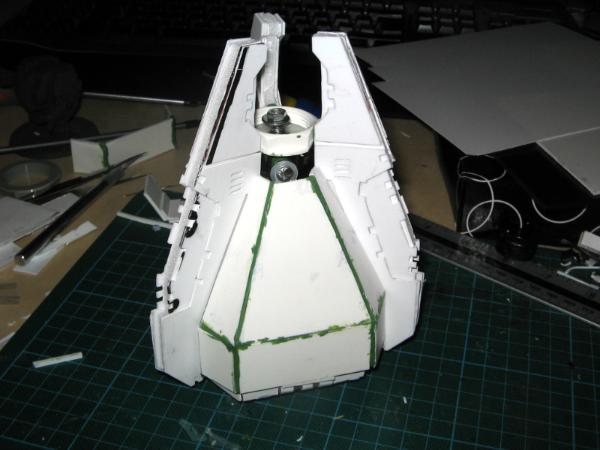
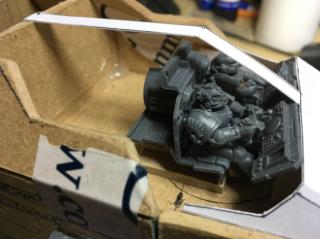
Dreadnought sitting nice and snug in there. I may widen the gap/ cut a small section off the struts on the inside of the pod to allow me to get the dreadnough in and out easier - at the moment I need to angle the dreadnoughts base a bit to get him in and out easy.
|
|
This message was edited 7 times. Last update was at 2019/11/02 00:07:58
|
|
|
 |
|
2010/09/22 04:09:43
Subject: Dreadnought Drop Pod
|
|

Sureshot Kroot Hunter
|
The Detailing is really excellent. Will there be detailing on the floor. Are you planning doors that open?
|
|
|
|
|
2010/09/22 04:44:28
Subject: Dreadnought Drop Pod
|
|
Preacher of the Emperor
|
Wow, the layering for detailing seems to be working out really well, that looks QUITE good. Do you plan on uploading copies of the stencils you used/made?
|
|
This message was edited 1 time. Last update was at 2010/09/22 04:44:46
|
|
|
|
|
2010/09/22 04:46:53
Subject: Dreadnought Drop Pod
|
|
Awesome Autarch
|
Nice one!
I love seeing crazy people do these awesome scratch builds because that is out of my skill range.
Excellent work so far.
|
|
|
|
|
|
2010/09/22 11:32:08
Subject: Dreadnought Drop Pod
|
|
Fresh-Faced New User
|
Cheers for the comments guys 
crimson: Yep, planning on detailing the interior as well - I'm planning to have fully working doors, hence why i'm making sure the dread fits instide first.
Current plan for the doors is to have them magnetised at the top so they are held in place next to the engine. I have a cunning plan for releasing them, as I want the doors to actually 'pop' open to show dread inside when i place the pod on the battlefield.
Zefg: the plans are based on the ones available on BWC-archive, though i'm modifying them as i go along to allow for working doors and fitting the dreadnought inside.
|
|
|
|
|
2010/09/22 12:41:32
Subject: Spam Marines - Dreadnought Drop Pod & other bits
|
|

Thunderhawk Pilot Dropping From Orbit
|
Wow.. thats way out of my skill range.. btw, what colour shceme are they?
Lokking forward to more
|
|
|
|
|
|
2010/09/22 13:48:18
Subject: Spam Marines - Dreadnought Drop Pod & other bits
|
|
Fresh-Faced New User
|
I like doing Green and metallic colours, and I still have all my old paints from my old Orc and Goblin fantasy army, so got a nice selection of those colours.
Not a fan of the fluff for the Dark Angels though, and Salamanders just don't seem very appropriate since I like my fast attack choices and plan on making the army very mobile.
So making up my own codex chapter and colour-scheme.
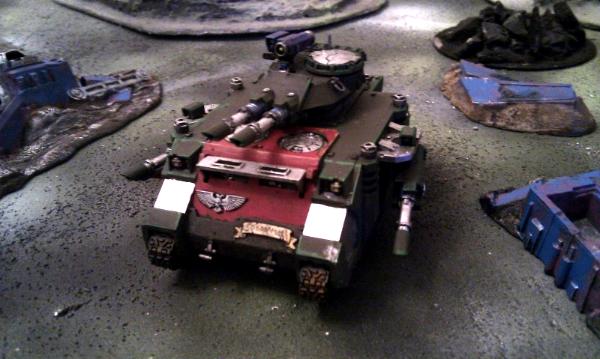
Only got a coupla test ones painted so far, and this is the best picture I have handy:
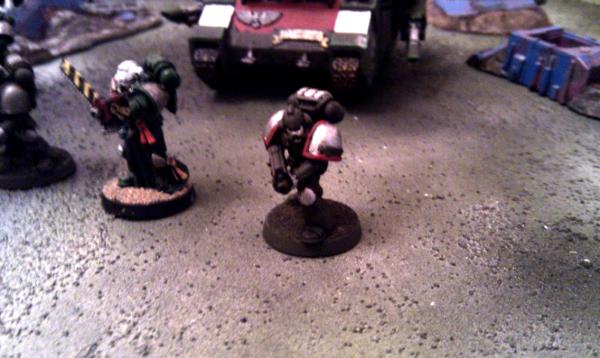
Primed/basecoated with Krylon Fusion Olive Camoflage, shaded with Badab Black Wash, and highlighted with Dark Angels Green, Snot Green, Goblin Green. Pads and helmet faces done with boltgun metal and mithril silver. Red Shoulder trim to denote 3rd Company.
I've got one of my tanks semi-painted up too:
|
|
|
|
|
2010/09/22 14:03:14
Subject: Spam Marines - Dreadnought Drop Pod & other bits
|
|
Angry Blood Angel Assault marine
Kettering, Northants, England, UK
|
If you planning on doing your own Chapter, and you like DP assault and fast vehicle, play Blood Angels all the way, even though everyone play BA atm (Even me)
But Fast Rhinos and Furioso Dreads sound like your style
|
|
|
|
|
|
2010/09/22 14:34:42
Subject: Spam Marines - Dreadnought Drop Pod & other bits
|
|
Fresh-Faced New User
|
And speaking of tanks,
Magnets! Hooo!

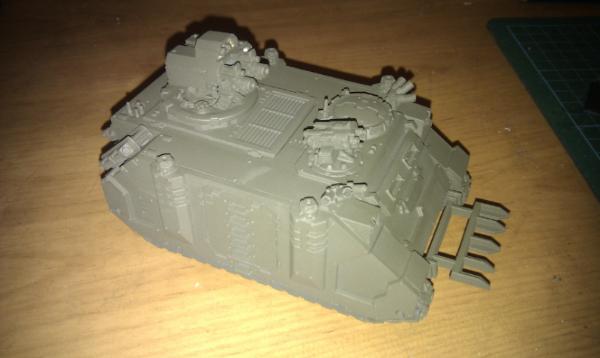
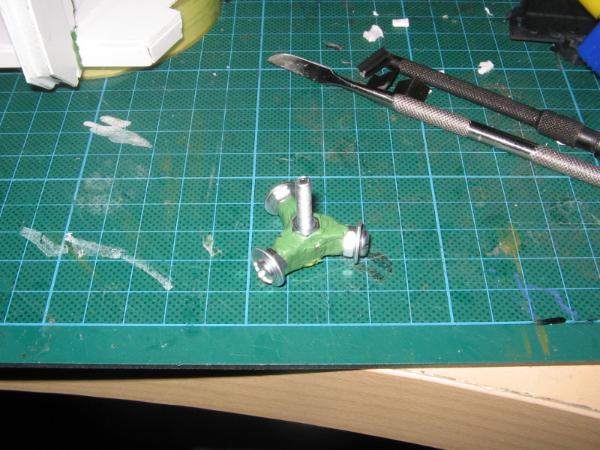
I built the cowl and mount for the Heavy Bolter Razorback turret from scratch as it seemed easier to do it that way than magnetise the heavy bolters themselves and use the same turret for both razorback weapons options. Plus this way I can now use 2 razorbacks in a game if I want.
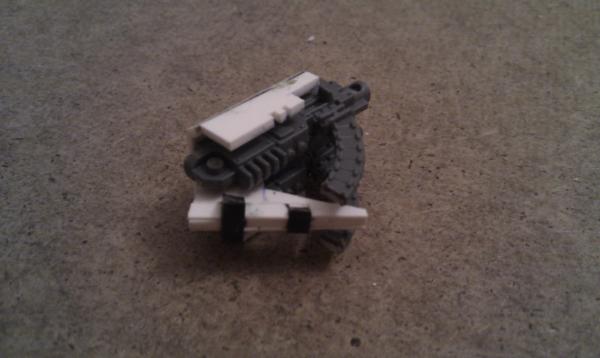
Turret base is made from part of a Hard Disk Drive platter spindle with some washers glued on the inside for the magnet to stick to and part of a 20mm round plastic base on the underside to let it rotate without going out of position.
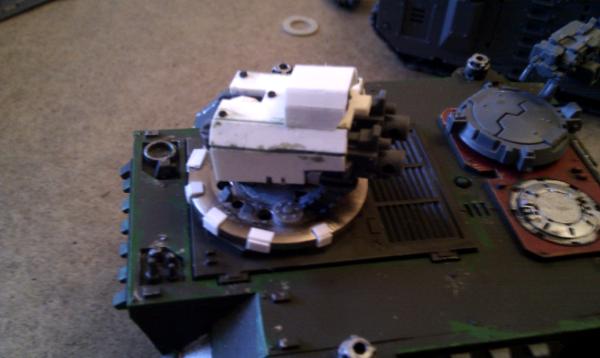

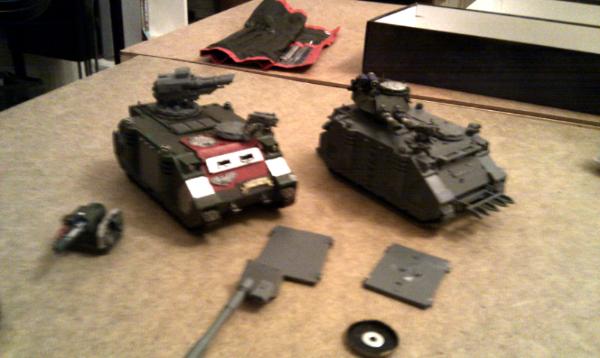
Primed and ready to go:
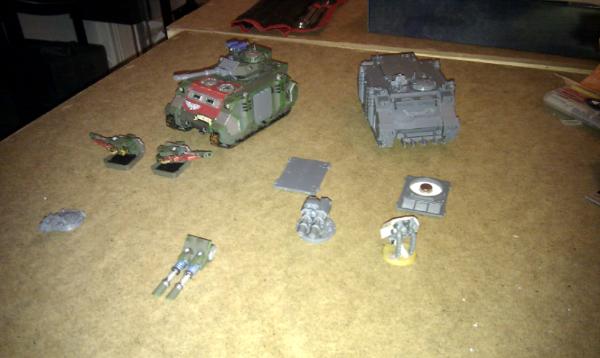
I'm not hugely happy with the trim on the turret base, but it does the job. I may come back to it later with some greenstuff. Automatically Appended Next Post: Crazymez: like you said, blood angels are very popular coupla guys that I been playing with already have ba armies, I want to do something a bit more unique. I'll check out the ba codec tho,might be an idea to run them as a 'counts as' successor chapter. Automatically Appended Next Post: So, some more work done on the drop pod tonight.
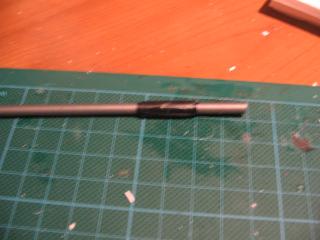
First up, hinge for the doors, a bit of plastic rod (cleaning rod for an airsoft gun) and then a bit of brass tubing cut to go over it. The plastic rod will be glued to base of the drop pod, door glued to brass tube and it should move freely (a bit too freely, hence the tape).
Fixed some l-shaped plasticard to the bottom for holding hinges in place:
and fitted in place with blue-tack

I totally intended to take 2 of the struts off to make measuring easier, honest. The fact that I dropped the pod and they fell off is purely coincidental 
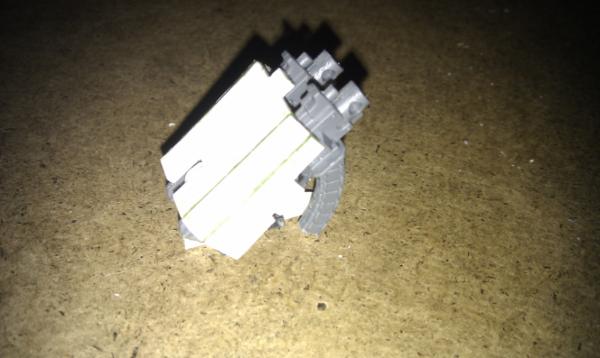
Started work on the doors - did a coupla paper cut-outs first for test fits, then did a quick mock up with foamboard - all held together with blutack at the mo.
Trimmed them down slightly, glued the door together then did a test fit with dreadnaught in place.
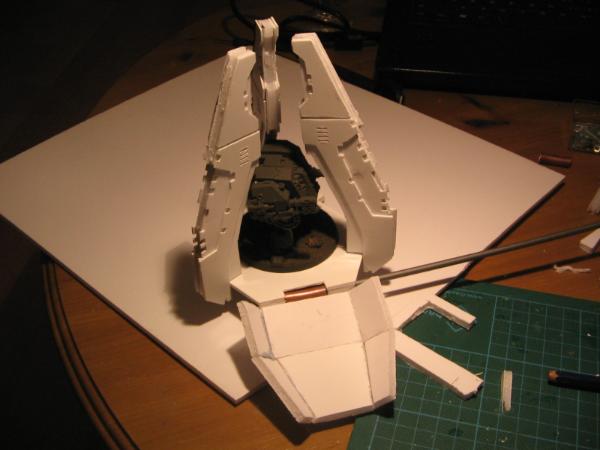
One problem I've noticed with my build so far is that I'm going to be struggling for space above the dreadnought - I was kinda hoping to have enough room there to fit a magnetised storm bolter / missile launcher, but will probably have to leave them out or just pop them in place once I take the dread out during the game.
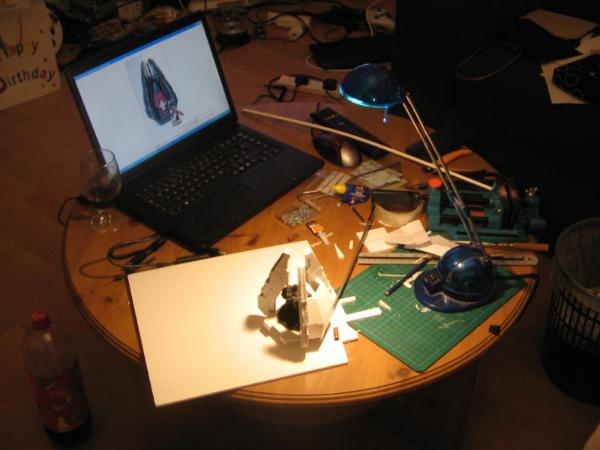
and last picture for the night - my super organised workstation.
|
|
This message was edited 2 times. Last update was at 2010/09/23 00:18:48
|
|
|
|
|
2010/09/29 14:41:16
Subject: Spam Marines - Dreadnought Drop Pod & other bits
|
|
Fresh-Faced New User
|
Update:
Done some more work on the drop pod - redid my test door with plasticard as I didn't like how thick the foamboard was, got the hinges sorted and got the mechanism for the doors working.
Not uploaded any of the pics yet, so will update tonight with details.
|
|
|
|
|
2010/09/29 17:44:12
Subject: Spam Marines - Dreadnought Drop Pod & other bits
|
|
Boom! Leman Russ Commander
|
i like it! 
|
"Reality is, when you stop believing in it, doesn't go away"
-Philip K. Dick
Constant Lurker, Slowly getting back into modelling! Someday a P&M Blog link will lurk here! |
|
|
|
|
2010/10/02 11:51:15
Subject: Re:Spam Marines - Dreadnought Drop Pod & other bits
|
|
Fresh-Faced New User
|
So, not much to update with, but here's how I'm doing my door mechanism for my drop pod.
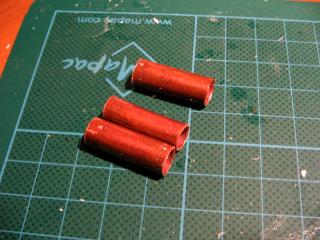
First up - one of those triple AAA battery holders you get in cheap LED torches these days - contacts removed and a hole drilled in top. Add in a long bolt fitted with a spring, coupla washers and some nuts.

Then add a coupla more bolts at the bottom in a Y shape and greenstuff to hold them in place.
The battery holder got chopped down to size then the whole mechanism was glued into place using a large washer and a 32mm Nut off a cable gland which was the perfect size for the engine assembly. (amazing the stuff I have lying about my flat!)
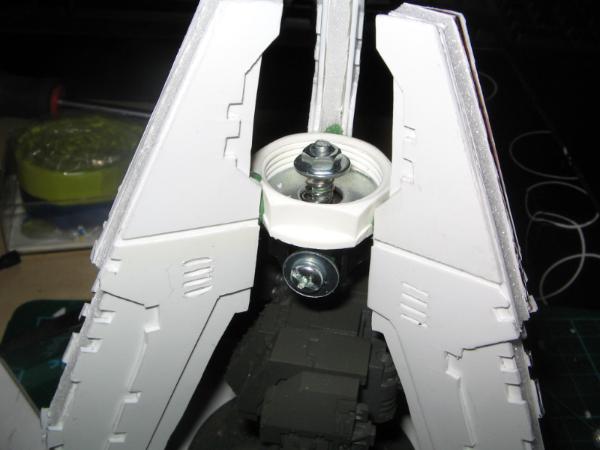
Next, tarted up the brass hinges with some thin strips of plasticard and redid the doors:
Magnet Fitted to door, and also fitted 2 magnets to each side of the release mechanism.
Door fitted in place with the release mechanism shown. Door is currently being held closed by 1 magnet on the bottom of the mechanism attracting the one on door.
When the bolt is pushed down, the top magnet, which is reverse polarity, moves next to the door magnet and pops the door open, Huzzah!
|
|
|
|
|
2010/10/03 18:29:02
Subject: Spam Marines - Dreadnought Drop Pod & other bits
|
|
Longtime Dakkanaut
|
You sir, are gleefully childish in your toymaking, and I salute you!
|
|
|
|
|
|
2010/10/03 18:37:57
Subject: Spam Marines - Dreadnought Drop Pod & other bits
|
|

Phanobi
Canada,Prince Edward Island
|
Nice work on the drop pod, it has very nice detailing. (and you also have the exact same lamp as me!)
|
|
|
|
|
|
2010/10/04 00:21:39
Subject: Spam Marines - Dreadnought Drop Pod & other bits
|
|
Maddening Mutant Boss of Chaos
|
I love your Lucius Drop Pod!
|
|
|
|
|
|
2010/10/04 01:01:38
Subject: Re:Spam Marines - Dreadnought Drop Pod & other bits
|
|

Neophyte Undergoing Surgeries
The Planet Earth. Where Else.
|
Wow I wish I had the skill to do something like this, and that is really cool with the working doors. Very original have not seen someone do that before. Where did you get the stencils to
make the pod or did you hand make those as well just from looking at pictures?
|
|
|
|
|
|
2010/10/04 05:50:49
Subject: Spam Marines - Dreadnought Drop Pod & other bits
|
|
Nurgle Predator Driver with an Infestation
|
The drop pod seems to be coming along great.
|
|
|
|
|
2019/10/02 18:40:04
Subject: Re:Spam Marines - Dreadnought Drop Pod & other bits
|
|
Fresh-Faced New User
|
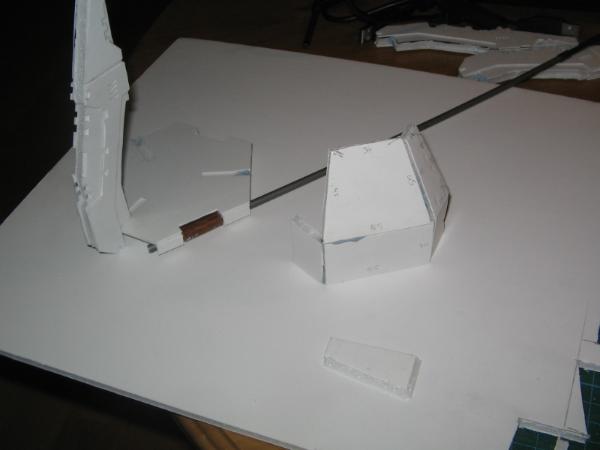
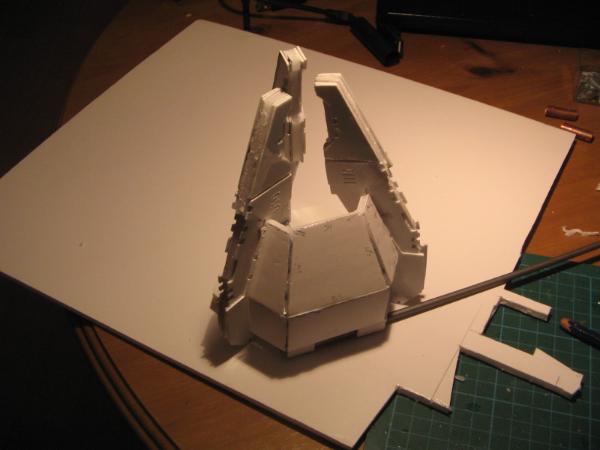
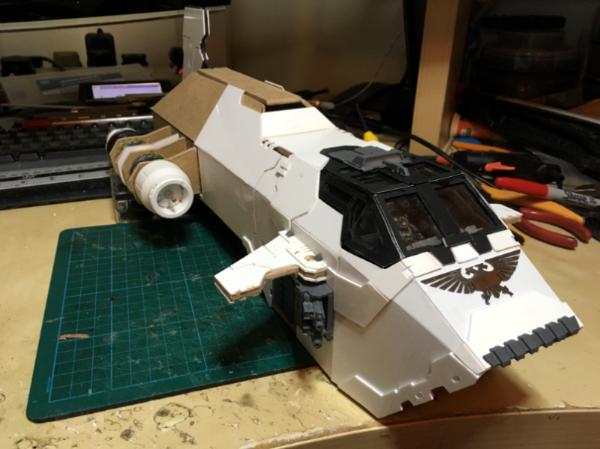
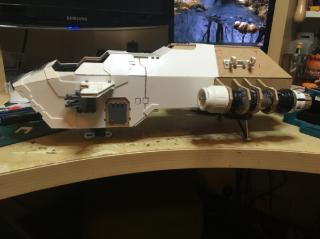
So another lengthy 40k hiatus until 2 weeks ago. Decided to pull this bad boy out of storage and get him built up and painted.  Took about a day of work to get everything cleaned up, de-warped and assembled.  Some background Malcolm in the middle to keep me going. 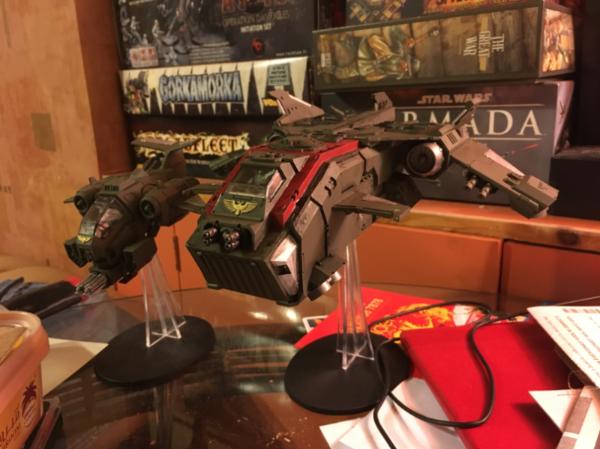 And a start made to the painting. Slapped a base coat on a Stormtalon while I was at it as well. Automatically Appended Next Post: And building the Storm Eagle inspired me! I’ve always wanted a Thunderhawk, but unfortunately cannae afford £475 at the moment. I managed to build one out of cornflakes packets when I was 12 and it was decent enough to sell to my mate for twenty quid then - I’m sure I can do better now. Got loads of foam board and thin plasticard about, but I want something with a strong backbone that won’t break at the drop of the hat, so scrounged up some long sheets of 4mm chipboard that were used as furniture packing. Found plans for the old style THawk, but I love how the 2017 forgeworld hawk looks, so I’m winging it. 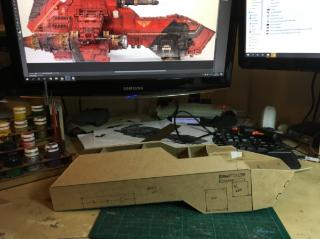 Base airframe made from the chipboard with half a dozen small ikea plastic bookcase shelf supports to keep the sides square with the main spine/floor, then added some ribs on inside to support the upper fusealage- keep that structural integrity.The upper fuselage sides are just held on loosely with tape at the moment so I can fiddle with the internals. 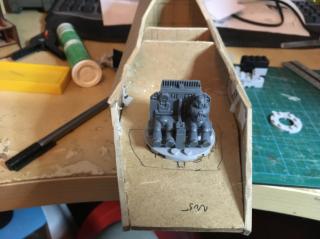 Perks of running a Marine bike army - I bought loads of the ravenwing box sets over the years, so my bits box had a whole unbuilt landspeeder - now the basis of my cockpit! Rough mock up here to get pilot location right. 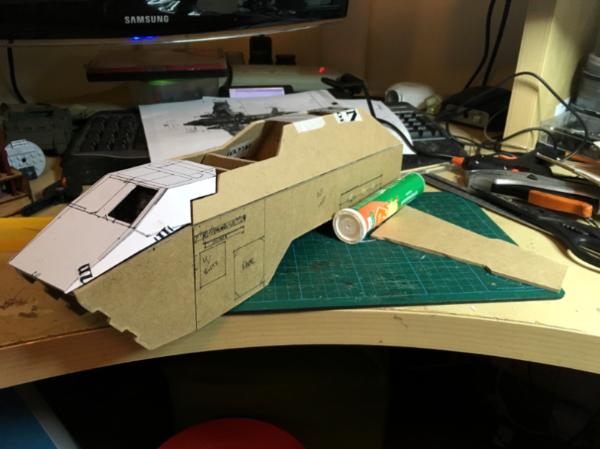 Mark 1 cockpit canopy and nose made out of card to get the angles (so many angles!) and sizes right. Cut out 2 wing pieces as well, but not doing anything with them yet till I get engine design finalised. Deliberately made them long so I cut them to size later if needs be. 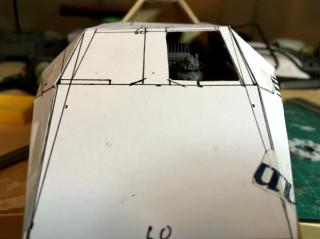 The pilot can see! Yayy! Automatically Appended Next Post: Interlude - some Army glamour shots since I've not updated this thread in years. Sternguard Kitbashes 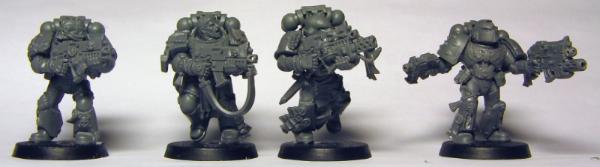 Techmarine / Master of The Forge on Bike 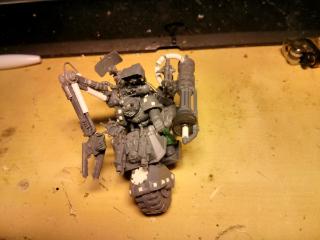 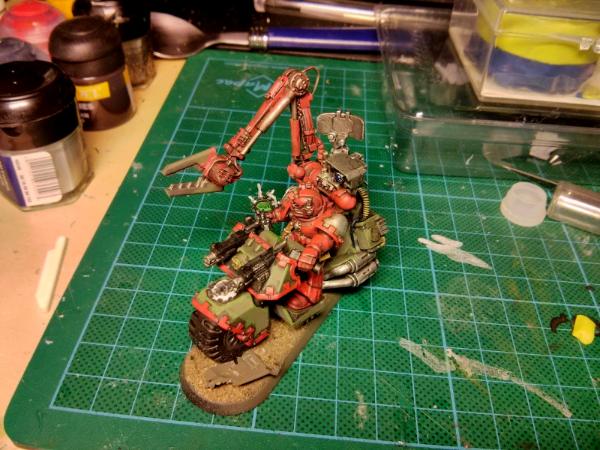 Librarian on Bike  Bikes 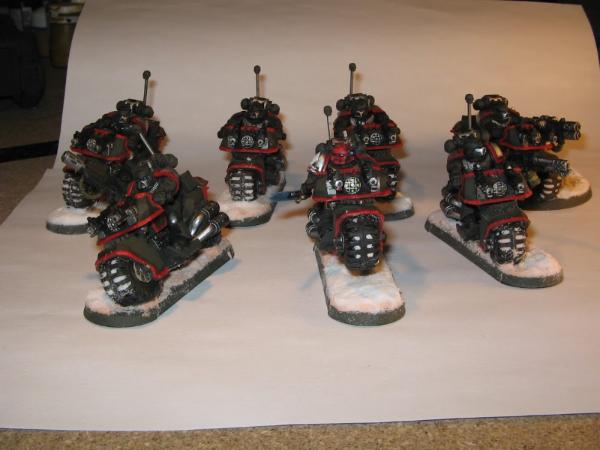 Tac Tac Marines 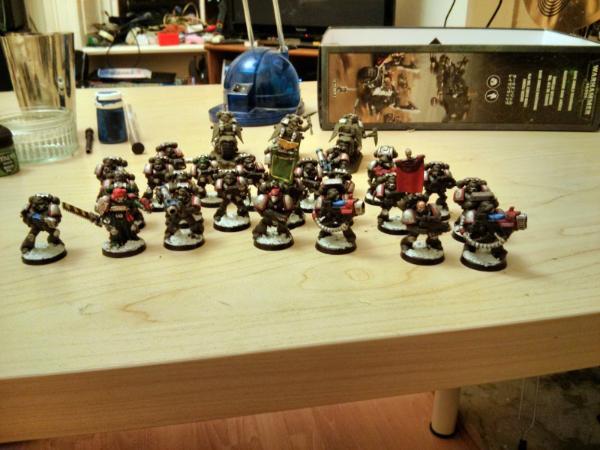 Army group shot ready for a tourney  We will return to your scheduled Thunderhawk building shortly.
|
|
This message was edited 6 times. Last update was at 2019/10/30 23:09:44
|
|
|
|
|
2019/10/03 19:11:31
Subject: Re:Spam Marines - Dreadnought Drop Pod & other bits - Now with added ThunderHawks!
|
|
Fresh-Faced New User
|
Moar Thunderhawk goodness!
First up, built up some heavy bolter sponsons for the front nose - Basically leftover hurricane bolter mounts from the storm raven sprue, with the landspeeder/attack bike heavy bolters fitted.
Then built the pilots and added a flight yoke for guy on right snd control panels from Storm Raven sprues. Also redid the top nose out of cardboard to help support the final version.
Rough fit of everything so far

Next was the tail assembly and the nose done out of my sole sheet of 4mm plasticard. The tail just slots into some chipboard supports to keep it straight and can be glued in place later.

The Storm raven top air intake is probably getting repurposed to become the back end of my thunderhawk cannon mount.
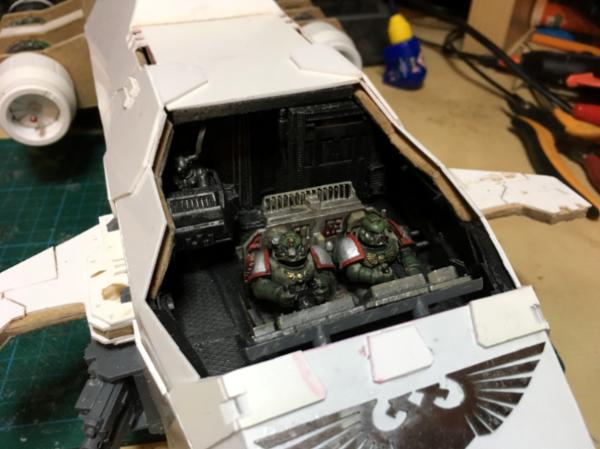
Then I started detailing the cockpit interior - again mostly storm raven / landspeeder spares, random plastic bits and bits of wire and guitar string. In retrospect this was silly of me as I had originally planned to drill through the cockpit sides to pin the front canards in place, but nevermind, I'll just do plan B to make sure they don't fall off/go floppy.
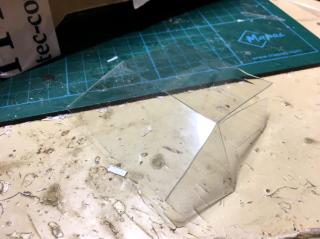
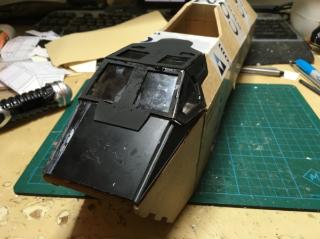
The actual cockpit canopy is a nightmare of angles with very little support and I wanted to do it with clear glass as well, so my mark 1 nose/canopy got cut up, corrected and dumped into photoshop where I redid it all, printed off some templates and cut the new canopy out of plasticard. Plan is to have 3 layers sandwiched together - Inner frame of Plasticard, clear perspex layer from an old large blister pack style packaging and outer frame of plasticard. Outer frame has to be slightly seperated at joins to ensure a fit and also has 2 tabs to help it seat in the right place.
I sprayed the inner and outer frame black before glueing everything together so I don't get any white plastic bleedthrough from the inside. Any gaps on the outside will be easy to fix. The fit isn't 100% perfect - my plasticard skills are nowhere near as good as The_Blackadders, but I'll probably paint the interior, glue the canopy in place then hide any gaps later as I'm cladding the chipboard in plasticard anyway.
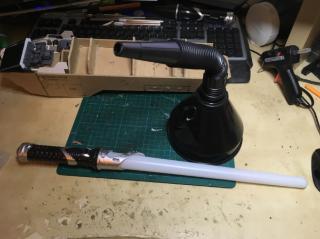
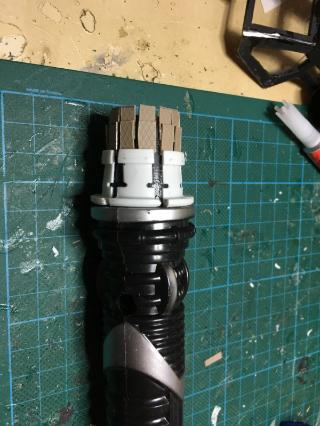
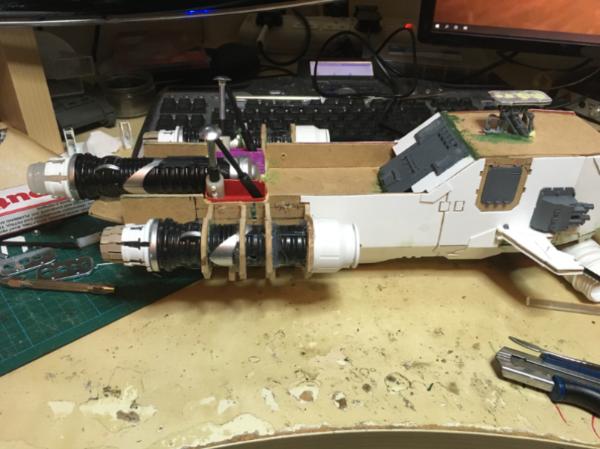
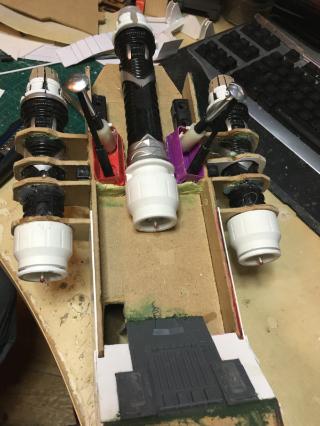
Time to start on the engines. Found these lovely things in the pound shop yesterday while getting more superglue and picked up a couple each of them
A bit of sawing later and et voila. The Engine intake is a plumbers pipe fitting with a plasticard fan blades and a pop rivet centre - idea stole shamelessly from Cain Tiberius's Thunderhawk builds on Age of Strife forums
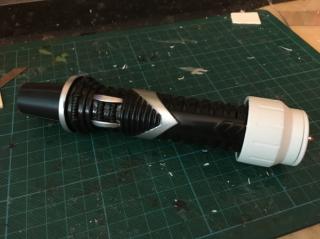 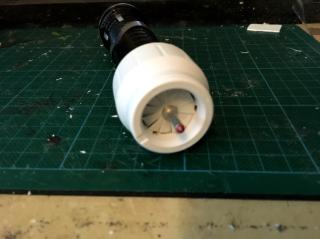
A bit of detailing on the exhaust nozzles later and now I just need to figure out how to mount them.
 Automatically Appended Next Post:
 Time to design some engine mounts.
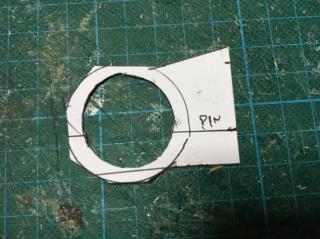
I wanted to be able to drill through both the plastic engine body and the main fuselage so I can put some substantial pins in to support the wings (I've got some 5mm threaded steel rod somewhere that I'll be using if I can find it), so idea is to use a ribbed design and clad it with plasticard later.
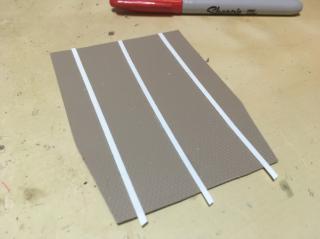
So, one template, then 8 copies cut out of chipboard
Word of warning when working with chipboard - use a very very sharp knife to cut it, and use multiple shallow cuts. It is still very easy to blow out the material and fray the edges to buggery - lots of sanding is usually required. It is NOT recommended to do like I did and try to cut 8 holes at the same time with a drill and holesaw!
A lot of repairing, gluing bits back together, sanding, greenstuffing in gaps, hot gluing even bigger gaps and then hoovering up all the sawdust all over my workdesk, computer and me later and we have:
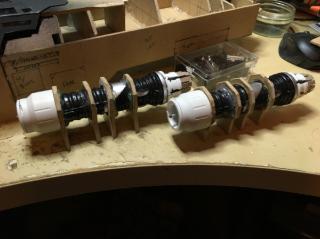 
Clad the mounts in cardboard with a gluestick temporarily to check cowl sizing and looks and cut down one of the wing pieces to a size that more matched the forgeworld model, and I think I'm happy for tonight.

|
|
This message was edited 1 time. Last update was at 2019/10/04 01:39:00
|
|
|
|
|
2019/10/10 00:36:26
Subject: Re:Spam Marines - Dreadnought Drop Pod & other bits - ThunderHawk update 09/10/19
|
|
Fresh-Faced New User
|
Few more pics from my Thunderhawk Gunship build
Found threaded rod and cut it to length and bent it to suit the wing angle. Holes were drilled in the engines and body to suit. I'll get started on the actual wings and mounting method soon.
In the meantime I started plating up with plasticard and fitting some of the bits details - The Imperial eagle on the nose is a brass laser cut piece I got for attending a tourney years ago.
I've filled and sanded some of the lower layer of plastic, still to do more on the upper layer and other bits.
Also built the canards and plated up the bulk of the tail

The pilots got a quick coat of paint, still to do the rest of the cockpit before the canopy is glued on.
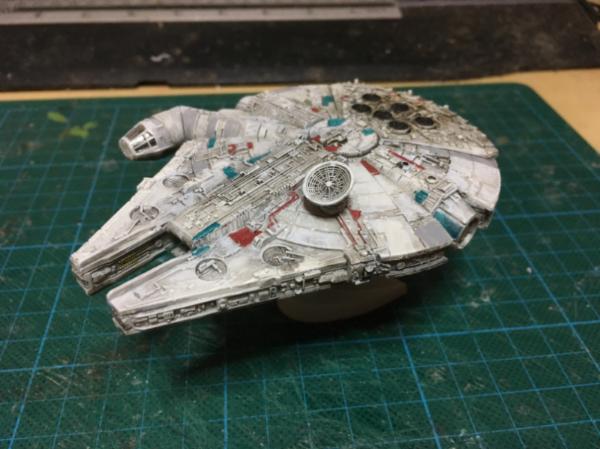
And finally, took a quick break from the Thunderhawk to build this dinky little 1:241 Millennium Falcon I got as a Christmas present at the start of the year since i had the tools and paints out - turned out alright I think.
|
|
|
|
|
2019/10/10 09:36:50
Subject: Spam Marines - Dreadnought Drop Pod & other bits - ThunderHawk update 09/10/19
|
|
Longtime Dakkanaut
|
Loving the scratch builds in here, very nice work!
|
|
|
|
|
|
2019/10/10 19:16:31
Subject: Spam Marines - Dreadnought Drop Pod & other bits - ThunderHawk update 09/10/19
|
|
Ancient Venerable Dreadnought
|
Sweet looking Thunderhawk, but I have to ask; did you ever finish the drop pod?
|
Goberts Gubbins - P&M Blog, started with Oldhammer, often Blackstone Fortress and Void Panther Marines, with side projects along the way |
|
|
|
|
2019/10/11 00:32:53
Subject: Spam Marines - Dreadnought Drop Pod & other bits - ThunderHawk update 09/10/19
|
|
Fresh-Faced New User
|
Ahh, nope, it's still only got one door - I need to stick it back on my to-do list.
|
|
|
|
|
2019/10/12 21:13:16
Subject: Re:Spam Marines - Dreadnought Drop Pod & other bits - ThunderHawk update 09/10/19
|
|
Fresh-Faced New User
|
Lock S-Foils in attack position. Made a start on the Attack wings for the Thunderhawk as I saw some handy bits in my toolbox and got inspired. First up, having a proper look at the images on forgeworld I realised that they aren't actually solid, so rather than trying to cut square holes out of plasticard/chipboard, I decided to make a plastic frame and work from there. Started off with a basic template and made some struts out of cleaned up sprue pieces. 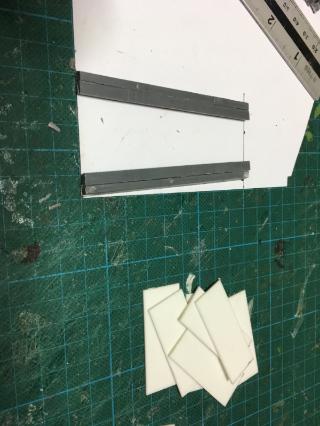 While the glue was drying on them I looked at my hinges for the attack wings as I wanted them to lock in the deployed or stowed positions - hinges are basically made from a nylon spacer from a TV bracket kit with holes drilled straight through (magnets in larger holes on one side, smaller holes in other for pinning to the attack wing). Some plastic hinge fittings from either window blinds or kitchen cabinets are going to be the supports fitted to the main fuselage (I cut the center out of these and saved them for later). A bolt through all the pieces and some extra washers will hold the whole thing together. 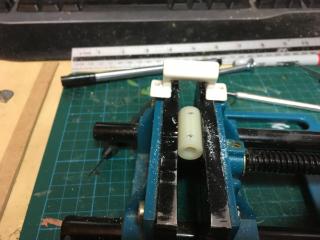 Then glued on some plasticard sheets on one side of my strut frame to hold them in the correct position and some chipboard in the right spot to fit the hinges to. 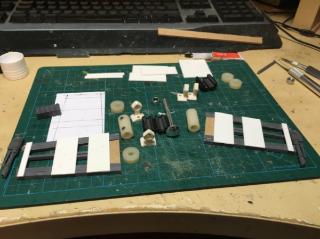 You can see here all the bits I have for the assemblies - the black ferrite beads are the perfect size and shape to get glued to the main hull to give the magnets on the hinge something to lock to. Next up, I build the lascannons - extended the body by simply sawing them in half and gluing on a bit of plastic rod. Mounts were made from the leftover center plastic cylinders from the white hinge fittings, some washers and a couple of nuts to fill the gap between them. Lascannon rods were fitted through the holes then the back bit of body glued in place with plastic glue. Whole thing is fitted very tightly so there is almost no wiggle, but the lascannons still rotate freely. 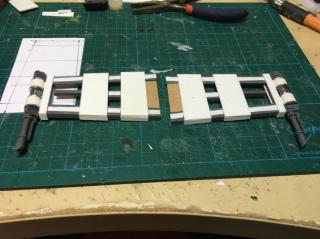 Next bit is a tad cheeky - I wanted to add lascannon power packs to the wings, but only had one spare bit from a predator turret. I also knew I was going to want a bunch of small thruster nozzle type bits to mount underneath the thunderhawk later, so out came the silicon and resin. There's a couple of custom parts in there - mainly the big gear style pieces that will be the caps for my attack wing hinge nuts and bolts. 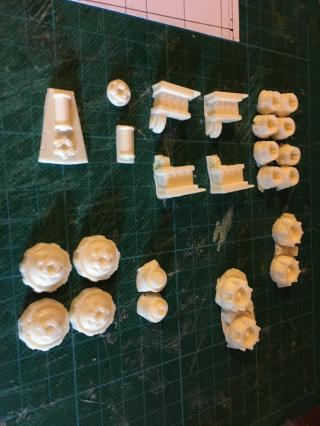 My moulding and castings skills are extremely rusty, but feth it, they'll do the job. The power packs got chopped up and glued in place by the lascannons - you can see the underside of my sprue frame here - doesn't matter that it's messy - the center pieces are just there to hide the gaps and make it look like one solid strut - the rest of the plasticard plates got glued on straight after this photo and covered it all up. 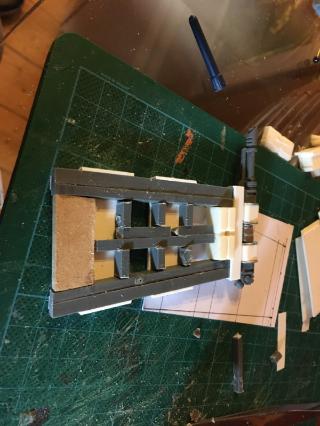 Finally fit some pins in the chipboard, glued the hinge cylinders in place and detailed the guns a bit with some thin slices of styrene tube and guitar wire. 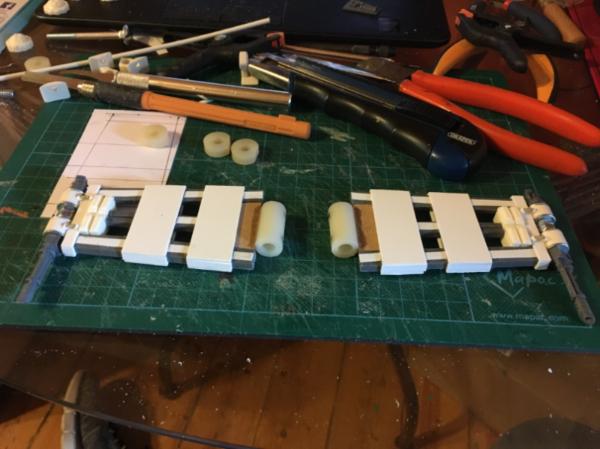 *Edit* Ughh, disappointed - just test fit it all and discovered that the ferrite beads aren't strong enough with the magnets to hold the wings in place while deployed - gonna have to improvise with more magnets! Automatically Appended Next Post: OK, so to get the attack wings locking, I need more magnets - 8 more on each side to be exact! Glued them in stacks of 4 contained in a little plastic cylinder (the screw covers from a 5Amp terminal strip sliced carefully off), cut a piece of L-shaped styrene to the same length as my nylon spacer hinge and lined up the magnets, making sure the polarity was correct and glued them to the L bracket. 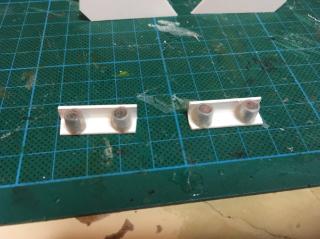 Also started the parts for the attack wing hinge housings - simple template with some bits of L strut glued on so they'll mate up and sit at 90deg of the hull. 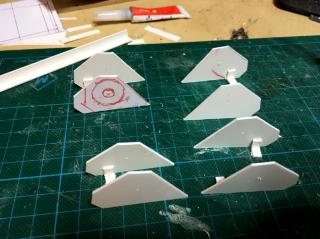 Marked out where everything will go on the hull, glued the magnet L brackets and hinge brackets in place then did a test fit. 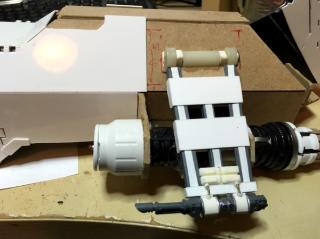 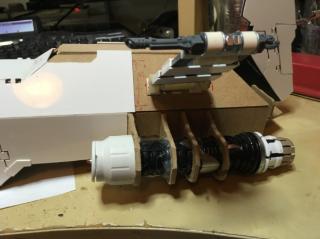 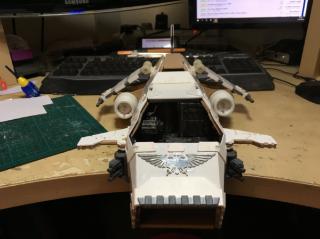 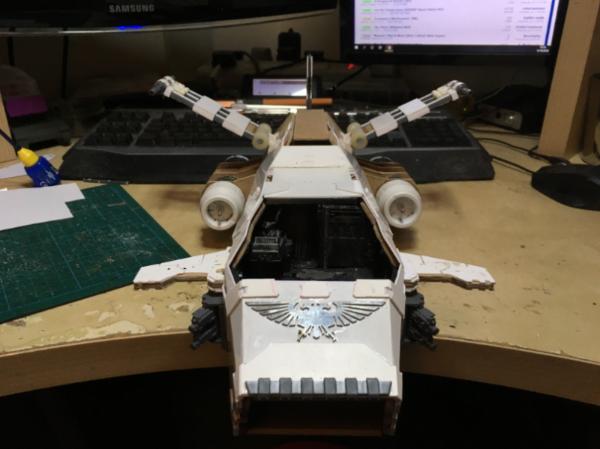 Success! 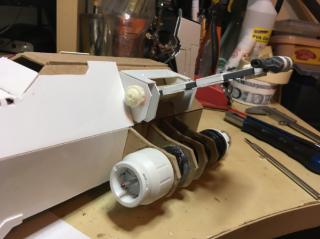 Did a quick test fit of the Hinge housing bits while I was at it - thank god for blu-tack. Bit more work needing done there, but I'm happy with how it's looking. Need to plate up the engine housings now as well before I fit the attack wings properly, and fix the tail plating - as you can see from that last pic I cocked up the angles - woops!
|
|
This message was edited 4 times. Last update was at 2019/10/13 02:55:07
|
|
|
|
|
2019/10/13 10:41:01
Subject: Spam Marines - Dreadnought Drop Pod & other bits - ThunderHawk update 09/10/19
|
|
Ancient Venerable Dreadnought
|
Nice one, pretty rapid progress that you’re making. Especially with the lengths you’re going to to have the moveable parts! Shame about the drop pod, but the hawk is looking great!
|
Goberts Gubbins - P&M Blog, started with Oldhammer, often Blackstone Fortress and Void Panther Marines, with side projects along the way |
|
|
|
|
2019/10/17 00:19:44
Subject: Re:Spam Marines - Dreadnought Drop Pod & other bits - ThunderHawk update 09/10/19
|
|
Fresh-Faced New User
|
I will get back to the Drop Pod at some point - I'm pretty sure after working on the Thunderhawk I can finish it off quick smart.
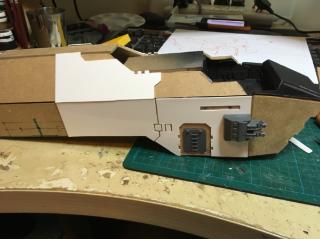
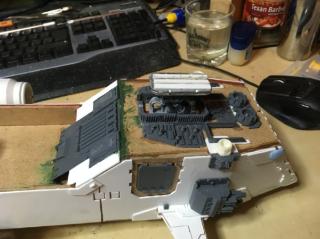
Anyhow, inspiration struck (or more like I keep putting off doing the wings!) and I had some cunning ideas on how to hinge the front boarding ramp and do landing gear, so I started off with doing some quick detailing on the hold interior
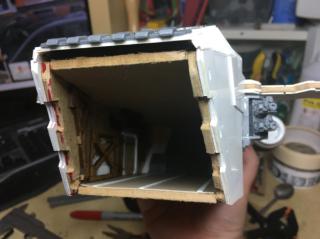
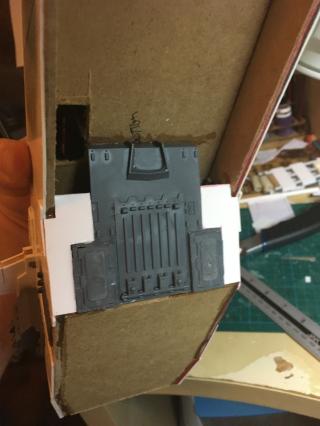
It's basically just detailed up with my ever useful grating textured plasticard for the floor and some bits of plasticard and leftover bits of mdf laser cut walls (I think from the Blotz sci-fi walls / zone mortalis set). The back of the main hold is the arse end of a storm raven I had leftover from my Storm eagle kit, extended with some plasticard and with a ladder and stairs added to give the effect of going up to the cockpit.
Next I jumped over to doing the landing gear - I wanted my model to have the gear deployed so I could use it in game as an objective/scenery, though I do have a flight stand in the works too, and while the weight is still not at resin model levels, it is getting there. So substantial beefy af gear is required.
 
Front gear is a mishmash of one of the rear gear piston pieces from my Storm Eagle kit and the 2 rear gear pieces from the storm raven parts that came with the kit too. Sandwiched all 3 together and glued them to a treadplate which is a metal screw plate that came from a TV bracket mount kit.
Rear gear is a substantial partially threaded bolt screwed through a hole in a lid from a large pack of Tictac mints, detailed with another of the nylon spacers that I used for the attack wing hinges, the outer plastic shell of a pen cut to length and detailed with small pistons on either side made from styrene tube and a bits of thick copper mains earth wire. The other piston is just for looks and is just a bit of 4mm plastic rod with more of that pen shell.
I made two of these, stuck everything in place with blu-tack and then tested the weight - they held up fine. The treadplates for the rear gear will get glued in place, secured with milliput
and detailed much later - It balances on the ball ends of the bolts perfectly just now.
So then I went on full steam ahead and mounted them in place with a combo of glue and milliput to make sure they were rock solid, before dremelling the middle engine to make sure it sat level and fitting it in place too.
It was at this point I realised I had cocked up and installed the landing gear directly over the drilled holes for my threaded rod wing pins. The milliput is not shifting so there is no chance of pulling the landing gear back out to remedy, and my drill bits are not long enough to redrill through the milliput. Bugger.
I glued some more of the plastic shelf brackets on the outside in line with the holes with the wing engines to hopefully take some of the weight, so will just have to see how I get on with them now.
Oh well, lets move on - now that the landing gear was all load bearing I could start doing some fun stuff like detailing the underside and fitting the front ramp door.
 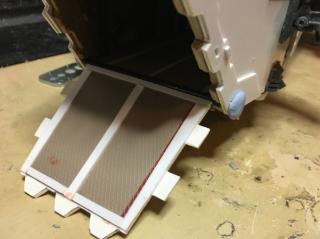
Underside is mainly just leftover landspeeder & stormraven bits, some of my resin mini engine nozzles and random bits of sprue and plasticard. Front ramp was built from scratch out of thicker 2mm plasticard and some more treadplate sheet. It was then glued to another bit of 4mm plastic rod, which had pinholes drilled on either end. I cut away the interior chipboard just enough to get a snug fit for the rod that still rotated, then drillled through the outer plastic wall to pit 2 hinge pins made from more of that earthing wire (these will get glued in place later and covered with greenstuff/detailing, for now I just have them held in with blu-tack).
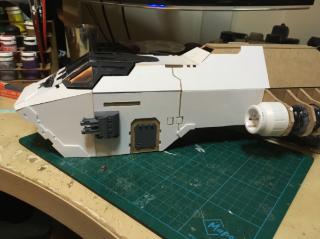
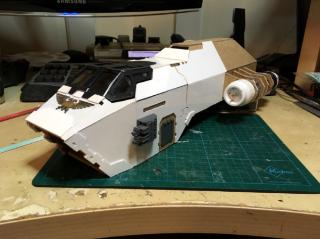
And now some glamour shots of where I am so far:
I really need to get those wings done...
|
|
This message was edited 1 time. Last update was at 2019/10/17 00:23:48
|
|
|
|
|
2019/10/29 01:43:45
Subject: Re:Spam Marines - Dreadnought Drop Pod & other bits - ThunderHawk updated 17/10
|
|
Fresh-Faced New User
|
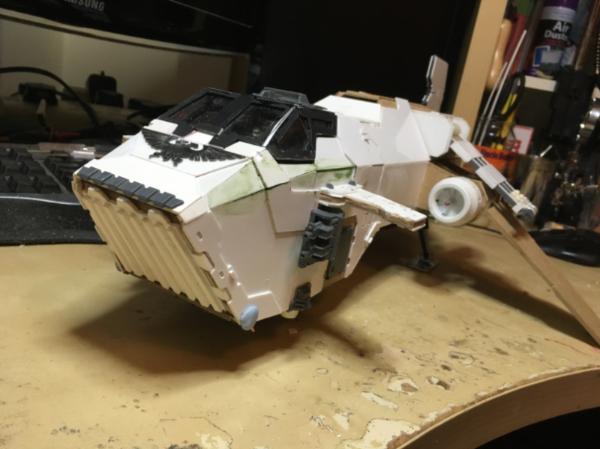
Had a busy week visiting family etc, so not really got much done, but I finally figured out what bothered me about the 2 wing templates I had already cut out and were causing me to drag my heels so much - basically the wing area seemed too small to me, and I kept fiddling with the wingspan - I ended up completely redoing my wing template from scratch and making them deeper - the wing tips are now longer from front to back and the area where it connects to the engines is also bigger. So, new wing pieces got cut out, a couple of the old GW whippy stick measuring rulers got cut up to make the spacers between the wing layers, holes cut for the heavy bolters (I'm going to be doing proper mounts out of plasticard for these, just needed the holes to give ammo belt clearance so they can swivel). The center spacers were placed so my threaded rod wing pins can just slide down in place.  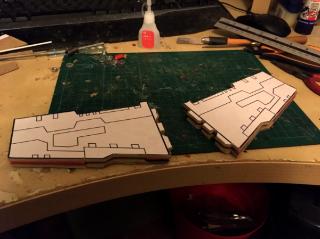 The threaded rod was cut to new lengths and rebent because of my cockup blocking the pin holes on the body earlier - I've managed to get drilled far enough in to support them now and added a washer and nut inbetween the engines and the main hull to hold the rods in place. Wings were just slid on, seated in the right spot and then glued in place with hot glue - decided against using milliput for this as I don't want the fixings to be too brittle - the tiny bit of flex I get from hot glue might make the wings a bit more resilient to knocks/drops while still holding more than strong enough. Plus it set soo much faster and I'm lazy.  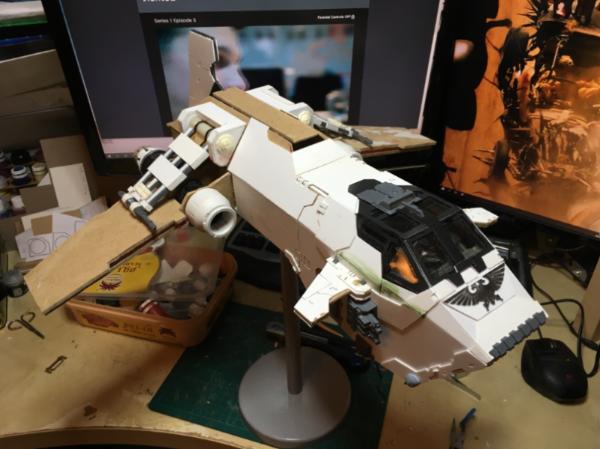 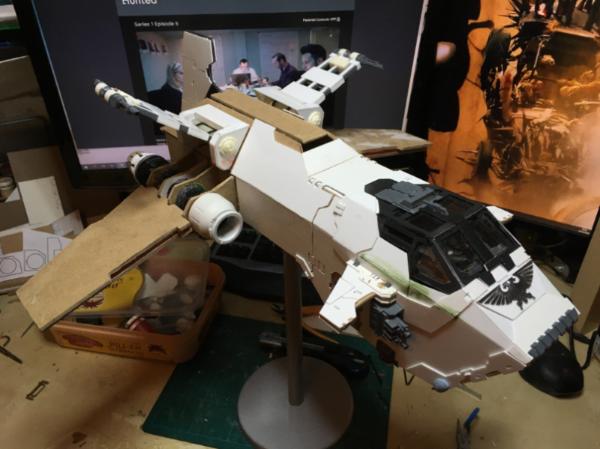 Also bit some minor bits of detailing to the attack wings and their covers, and as you can see in the photos - made a super easy flight stand. £4 kitchen paper towel holder out of Asda (it's solid metal with a good weight in the base and ain't tipping any time soon) with an old empty upside down paint pot glued on top to give me a flat wide surface area to sit the Thunderhawk on - It's just balanced on there at the moment, got my center of gravity fairly ok - will work up the detailing on the underside later so that the paintpot slides into place and doesn't shift around. 
|
|
This message was edited 2 times. Last update was at 2019/10/29 01:50:32
|
|
|
|
|
2019/10/30 13:37:02
Subject: Spam Marines - Dreadnought Drop Pod & other bits - ThunderHawk update 30/10
|
|
Fresh-Faced New User
|
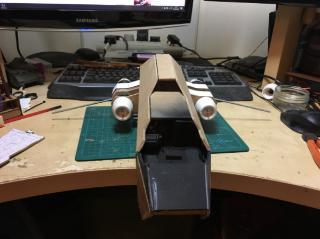
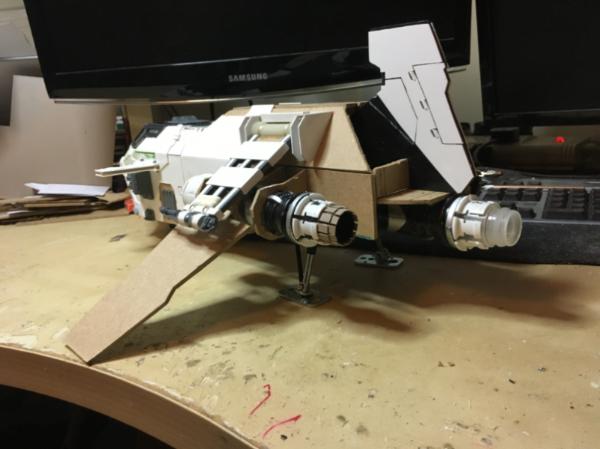
Bit more work done yesterday, first up a pic of my flight stand - was a very quick and dirty job but it works really well so I'll probably stick with it and just neaten up the paint pot/stand join and re-paint it all. 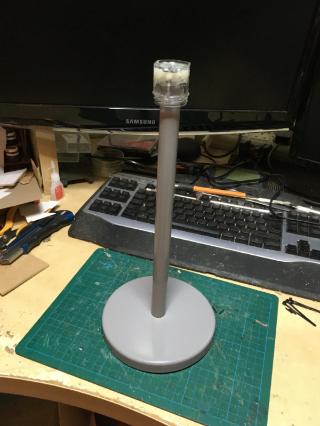 Started doing the wing paneling - used my new templates to cut the shapes out of plasticard and glued them onto the chipboard wings - need to add some more layers or detailing still to give them some depth.  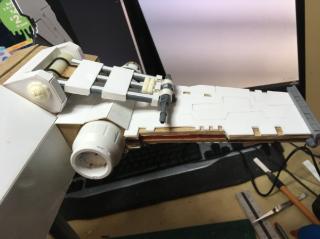 I also paneled up the top of the engine mounts and added some detailing on wingtips and running lights. The heavy bolter wing mounts were next - couple of layers of plasticard glued together, hole milled through with a dremel to the right size and then a frame to cant them at the right angle 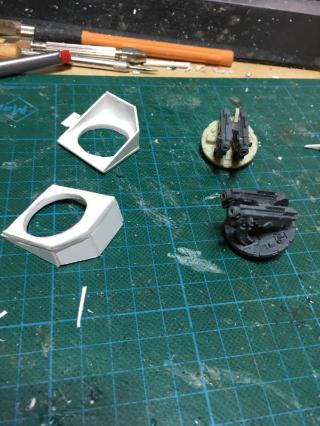 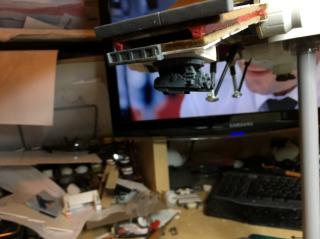 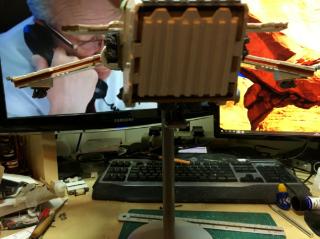 As you can see from the last pic my angle measurement wasn't quite right so they don't sit perfectly level, however they match and the slight cant outwards actually makes for better firing angles on the heavy bolters so I might keep them as is rather than trying to sand them both down evenly. They're just blu-tacked in place at the moment so I can pop them on and off easy - keeps them out of the way while I'm doing work on the main body like I've done with the attack wings, tail and cockpit. Lastly I finished off the wing tips and added some more small detailing here and there - mainly, running lights to the front canard wings and detailing to the top of the hull behind the cockpit.  It's coming together nicely now Next on the to-do list is to redo the intake fans on the engines - I wasn't terribly fond of the long rivets I had used and found some shorter ones so I can have the fan closer to the front. Then got to do more work on the underside.
|
|
This message was edited 2 times. Last update was at 2019/10/30 13:48:19
|
|
|
|
|
2019/10/30 21:43:34
Subject: Spam Marines - Dreadnought Drop Pod & Scratch-built ThunderHawk update 30/10
|
|
Ancient Venerable Dreadnought
|
She really is coming together nicely, and at a fair rate of knots too. The main body looks like it’s nearing completion, aside from the obvious omissions of the main gun and tail. Keep up the great work!
|
Goberts Gubbins - P&M Blog, started with Oldhammer, often Blackstone Fortress and Void Panther Marines, with side projects along the way |
|
|
|
|
2019/10/30 22:57:27
Subject: Spam Marines - Dreadnought Drop Pod & Scratch-built ThunderHawk update 30/10
|
|
Fresh-Faced New User
|
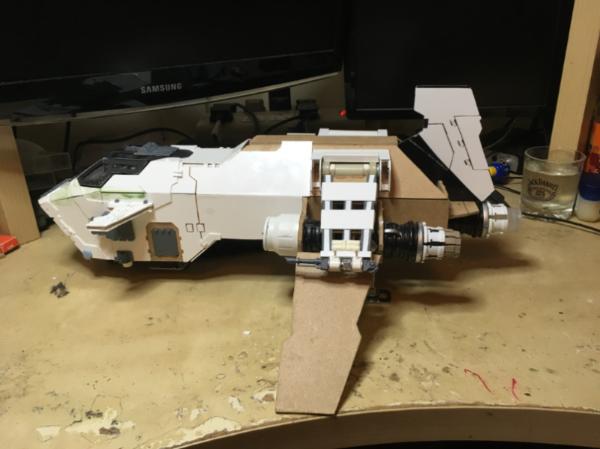
Yeah I really want to get absolutely everything on the underside done before I even think about building the main gun and permanently mounting the tail, partially because I'm keeping my eyes out for spare GW shadowsword/baneblade main gun parts to make my job easy (got a friend who's building one soon that has promised me the pick of his spares), but mainly because I can easily flip the whole model upside down at the moment to work on it - a recipe for disaster if the tail and top gun were done.
|
|
|
|
|
|
|

 Order of the Sable Heart
 Grave Knights
 House Rouen

 Space Marines (Blood Angels) 1500pts
 Chaos Space Marines 800pts