| Author |
Message |
 |
|
|
|
|
Advert
|
Forum adverts like this one are shown to any user who is not logged in. Join us by filling out a tiny 3 field form and you will get your own, free, dakka user account which gives a good range of benefits to you:
- No adverts like this in the forums anymore.
- Times and dates in your local timezone.
- Full tracking of what you have read so you can skip to your first unread post, easily see what has changed since you last logged in, and easily see what is new at a glance.
- Email notifications for threads you want to watch closely.
- Being a part of the oldest wargaming community on the net.
If you are already a member then feel free to login now. |
|
 |
2017/05/07 13:03:06
Subject: Cleatus, the Scratch-building Mekboy -- Project Hopping! Killa Kanz
|
|

Loyal Necron Lychguard
|
Very cool. Always very appreciative of your style, Cleatus. Pretty sure my orks are coming out of storage... lots of walkers and transport vehicles there that need some TLC. Very excited about 8th.
|
|
|
|
 |
|
2017/05/08 06:06:51
Subject: Cleatus, the Scratch-building Mekboy -- Project Hopping! Killa Kanz
|
|

Gargantuan Great Squiggoth
|
Fantastic work bud, would like to see you take the extra minute to stick some rivets about, but they are perfectly passable as is. Certainly a mob of them painted up will be impressive on the battle field.
Your brilliant style reminds me to KISS (keep it simple stupid) Often we over complicate things, These are a perfect example of great looking models don't have to be heaving in silly detail.
|
|
|
|
|
|
2017/05/09 22:49:05
Subject: Cleatus, the Scratch-building Mekboy -- Project Hopping! Killa Kanz
|
|
Mastering Non-Metallic Metal
|
Good job on the card-kans. Look the part at this stage already. 
|
     Mastodon: @DrH@warhammer.social Mastodon: @DrH@warhammer.social
The army-                   ~2295 points (built). ~2295 points (built).
 
* -=]_,=-eague Spruemeister General. * A (sprue) Hut tutorial *
Dsteingass - Dr. H..You are a role model for Internet Morality!  // inmygravenimage - Dr H is a model to us all // inmygravenimage - Dr H is a model to us all 
Theophony - Sprue for the spruemeister, plastic for his plastic throne! // Shasolenzabi - Toilets, more complex than folks take time to think about! |
|
|
|
|
2017/05/10 17:27:14
Subject: Cleatus, the Scratch-building Mekboy -- Project Hopping! Killa Kanz
|
|

Liberated Grot Land Raida
|
Kan wall ftw! Looking good, let's hope they're worth it in 8th
|
A Squeaky Waaagh!!
Camkhieri: "And another very cool thing, my phones predictive text actually gave me chicken as an option after typing robot, how cool is that."'
Meercat: "All eyes turned to the horizon and beheld, in lonely and menacing grandeur, the silhouette of a single Grot robot chicken; a portent of evil days to come."
From 'The Plucking of Gindoo Phlem' |
|
|
|
|
2017/05/11 15:53:25
Subject: Cleatus, the Scratch-building Mekboy -- Project Hopping! Killa Kanz
|
|
Decrepit Dakkanaut
|
Nice Kans!
|
"dave you are the definition of old school..." -Viktor Von Domm    My P&M Blog : My P&M Blog :
It's great how just adding a little iconography, and rivets of course, can make something look distinctly 40K-adamsouza
"Ah yes, the sound of riveting.....Swear word after swear word and the clinking of thrown tools" "Nope. It sucks do it again..."- mxwllmdr
"It puts together more terrain, or else it gets the hose again...-dangledorf2.0
"This is the Imperium, there is no peace, there are only rivets" -Vitruvian XVII
"I think rivets are the perfect solution to almost every problem"- Rawson
More buildings for the Building God! -Shasolenzabi
  |
|
|
|
|
2017/05/12 17:41:02
Subject: Cleatus, the Scratch-building Mekboy -- Project Hopping! Killa Kanz
|
|
Nasty Nob
|
Anpu-adom wrote:Very cool. Always very appreciative of your style, Cleatus. Pretty sure my orks are coming out of storage... lots of walkers and transport vehicles there that need some TLC. Very excited about 8th.
Thanks!
Camkierhi wrote:Fantastic work bud, would like to see you take the extra minute to stick some rivets about, but they are perfectly passable as is. Certainly a mob of them painted up will be impressive on the battle field.
Your brilliant style reminds me to KISS (keep it simple stupid) Often we over complicate things, These are a perfect example of great looking models don't have to be heaving in silly detail.
Rivets are in the pipe, Cam. Hoping to slap some paint on them this weekend.
Dr H wrote:Good job on the card-kans. Look the part at this stage already.
Thank you!
CommissarKhaine wrote:Kan wall ftw! Looking good, let's hope they're worth it in 8th
Me too. Everything I've seen so far has me excited.
dsteingass wrote:Nice Kans!
Haha, thanks! 
|
|
|
|
|
|
2017/05/14 13:39:22
Subject: Re:Cleatus, the Scratch-building Mekboy -- Project Hopping! Killa Kanz
|
|
Gargantuan Gargant
|
The monowheel and Kanz are coming along great. The face plate on the monowheel was a great addition. W
You were correct about the kanz template. A few years back I made a handful of templates for 40k stuff.
It's pretty cool to periodically run into someone using them.
I imagine with 8th reinvigorating Orks, we will see many more great Ork creations out of you in the near future.
|
|
|
|
|
|
2017/05/17 14:00:13
Subject: Cleatus, the Scratch-building Mekboy -- Project Hopping! Killa Kanz
|
|
Growlin' Guntrukk Driver with Killacannon
|
Nice work on them killa kans.
|
|
|
|
|
|
2017/06/10 00:35:20
Subject: Re:Cleatus, the Scratch-building Mekboy -- Killa Kanz!
|
|
Nasty Nob
|
Killa Kanz: Done!
*clank, whirrrr, pop, clang! clang! clang! buzzzzzzz, BOOM! hissssss*
I managed to find several hours of painting time over the last month and committed to painting up the Killa Kanz. I think they turned out really well. Especially considering their humble beginnings. Here you go, ladies and gentlemen:

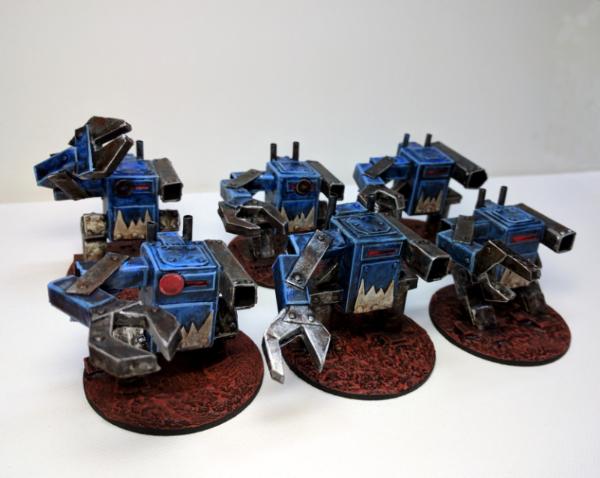

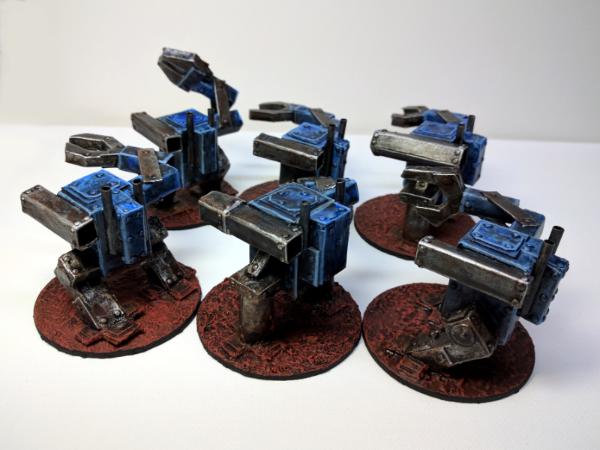
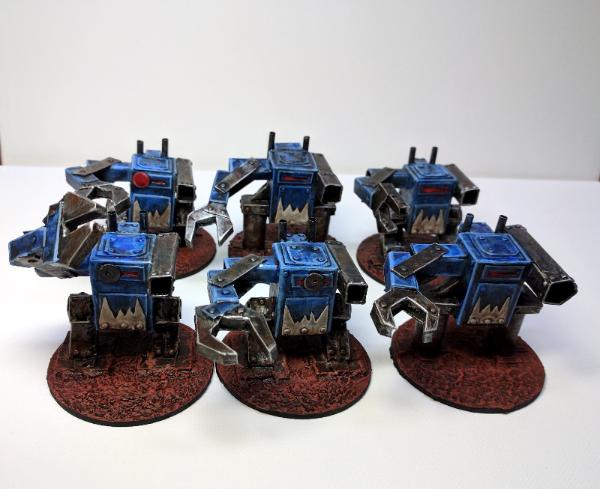
So there you have it!
Kan wall, coming to a WAAAGH! near you.
(Oh yeah, and new avatar pic. I got bored with cybork Cleatus. This blue Nob I painted seems like a good fit.)
|
|
This message was edited 1 time. Last update was at 2017/06/11 11:41:33
|
|
|
|
|
2017/06/12 09:44:18
Subject: Re:Cleatus, the Scratch-building Mekboy -- Killa Kanz!
|
|

Regular Dakkanaut
|
They came out great!
|
|
|
|
|
|
2017/06/12 10:14:38
Subject: Cleatus, the Scratch-building Mekboy -- Killa Kanz!
|
|
Gargantuan Great Squiggoth
|
Kans are looking brilliant bud, really great work. Love the blue. Nice change.
|
|
|
|
|
|
2017/06/12 20:10:02
Subject: Cleatus, the Scratch-building Mekboy -- Killa Kanz!
|
|

Shroomin Brain Boy
|
beautiful execution... tho i have to say a tad too boxy looking for my own taste...
your blue ork avatar is very cool!!!
|
|
|
|
|
|
2017/06/12 21:33:35
Subject: Cleatus, the Scratch-building Mekboy -- Killa Kanz!
|
|

Fixture of Dakka
|
Cleatus,
Great little Killa Kans.
Cheers,
CB
|
|
|
|
|
|
2017/06/12 22:45:59
Subject: Cleatus, the Scratch-building Mekboy -- Killa Kanz!
|
|
Speedy Swiftclaw Biker
|
Can't wait to see the finished monowheel, that thing looks great!
|
 2700 - The Fierce Eye's Hammer 2700 - The Fierce Eye's Hammer
2000 - Grukk's Wrekkin Krew
 1850-Hellcrusha's Fist 1850-Hellcrusha's Fist |
|
|
|
|
2017/06/12 22:47:24
Subject: Cleatus, the Scratch-building Mekboy -- Killa Kanz!
|
|
Decrepit Dakkanaut
|
Very Nice Cleatus! I think Orks would need some sort of mass conveyance to get those little stubby legs up to the frontline with the Waaagh of Boyz though
|
"dave you are the definition of old school..." -Viktor Von Domm My P&M Blog :
It's great how just adding a little iconography, and rivets of course, can make something look distinctly 40K-adamsouza
"Ah yes, the sound of riveting.....Swear word after swear word and the clinking of thrown tools" "Nope. It sucks do it again..."- mxwllmdr
"It puts together more terrain, or else it gets the hose again...-dangledorf2.0
"This is the Imperium, there is no peace, there are only rivets" -Vitruvian XVII
"I think rivets are the perfect solution to almost every problem"- Rawson
More buildings for the Building God! -Shasolenzabi
|
|
|
|
|
2017/06/14 16:33:25
Subject: Cleatus, the Scratch-building Mekboy -- Killa Kanz!
|
|
Mastering Non-Metallic Metal
|
Good job, look the part.
|
Mastodon: @DrH@warhammer.social
The army- ~2295 points (built).
* -=]_,=-eague Spruemeister General. * A (sprue) Hut tutorial *
Dsteingass - Dr. H..You are a role model for Internet Morality! // inmygravenimage - Dr H is a model to us all
Theophony - Sprue for the spruemeister, plastic for his plastic throne! // Shasolenzabi - Toilets, more complex than folks take time to think about! |
|
|
|
|
2017/08/23 14:53:09
Subject: Re:Cleatus, the Scratch-building Mekboy -- Ork Metal Bawkses
|
|
Nasty Nob
|
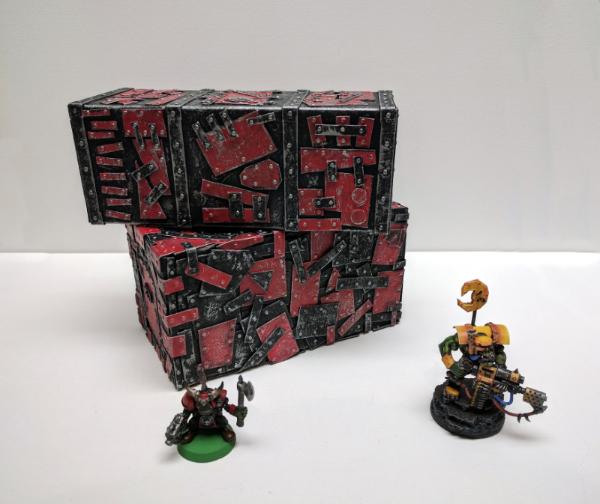
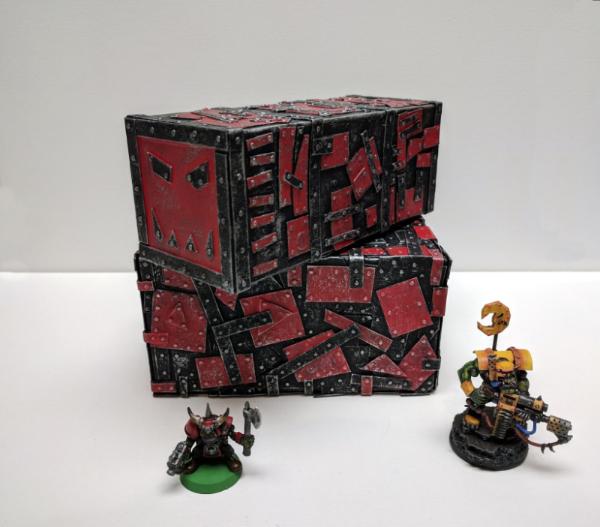
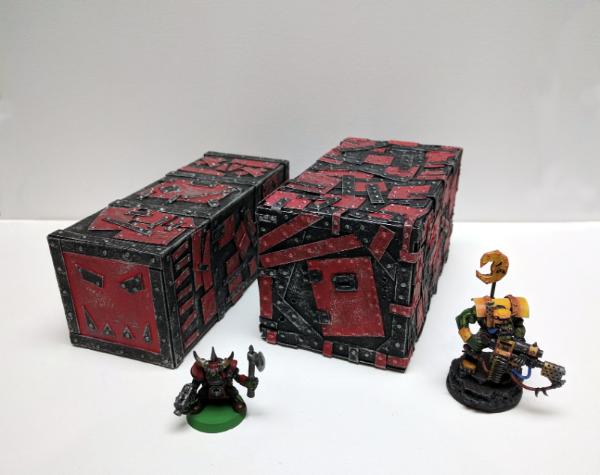
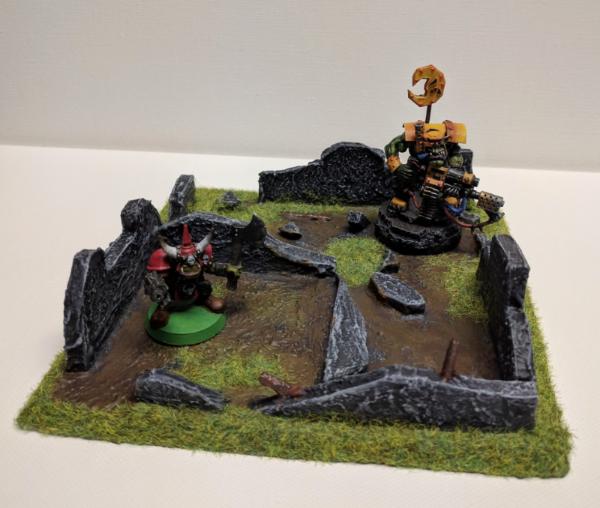
Whew, long time no post. It's been a busy few months for me, but I've managed to squeeze in a little time for hobbies. I did a little gaming, and a little painting too. Here's what I've been working on:
Cargo Containers:
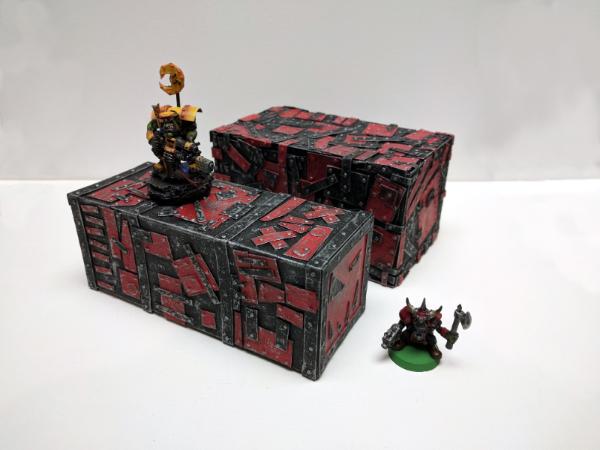
I finally painted my Ork cargo container (aka 'Metal Bawks' ). I actually made a second one at some point in the last... 12 months. Since I had my supplies out, I quickly painted them both. Not super fancy, but I think they turned out pretty good.
 Objective Markers:
I made up some objective markers for my games of 40K.
These are made from cardboard, with some Imperial transfers. They also work pretty well as scatter terrain.
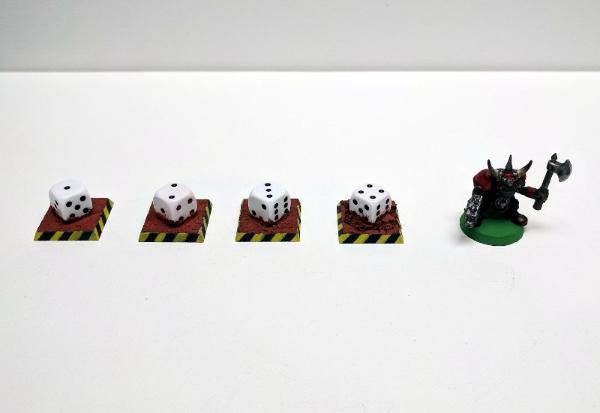
These are old Warhammer Fantasy square bases with dice from the Dark Vengeance box. A little bit of Martian earth texture paint. The hazard stripes too me a while, but I think they came out pretty well and really help the base stand out on the tabletop.
Ruins and Barricades:

I made these pieces of ruined wall from cardboard and masking tape, covered in wall spackle. To be honest, I never really liked green static turf before, but I think it's growing on me (ha!).
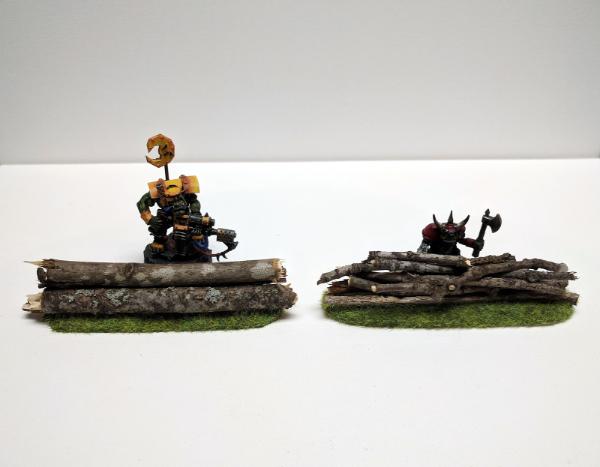
Some log piles / barricades. Made from fallen sticks in my yard and foam board for a base. More static grass.
Work in Progress:
I have a few other things brewing, or in various stages of completion on my workbench. Here's a sample:
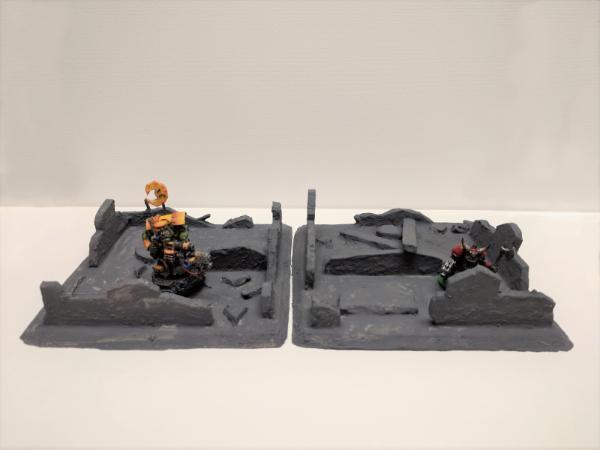
More ruins. Made from foam board and spackle, primed.
Some walls / scatter terrain.
(Credit to Terrain For Hippos for the inspiration. http://terrainforhippos.blogspot.com.au/2011/07/ishoo-firty-for-linear-obstacles.html)
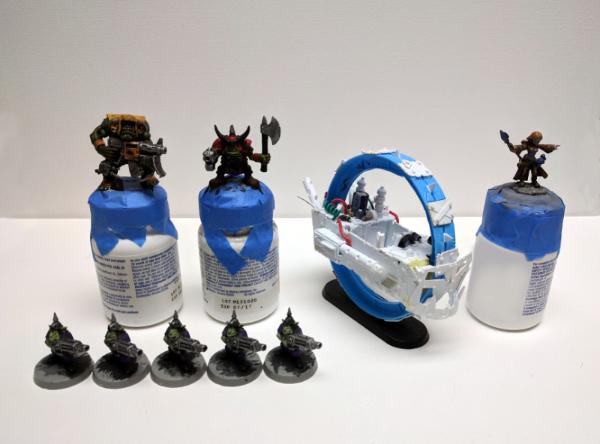
Miscellaneous models on my workbench / painting queue. An Ork Nob with Kombi-Weapon, another 2nd Ed Ork Boy, some 2nd Ed Gretchin, and my Ork monowheel.
Also a Reaper mini "Cassie". She/it did not turn out well, and needs to be redone. Painting human skin is hard when you've been doing Orks for a while. 
Last one, which is really more of a functional storage solution than a "project":
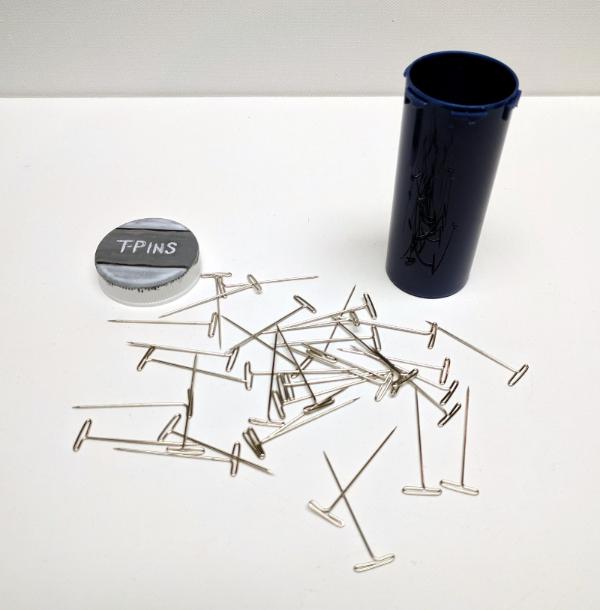
A container for my T-pins. I use these for holding pieces of foam board together while the glue dries, if you were curious. They came in a small package from the $1 store, but once opened I kept spilling them all over the floor. Which is dangerous, and makes the spouse think I'm a clumsy oaf. (More than usual.) So I recycled / re-purposed a prescription bottle as a container for my T-pins. A quickie bit of freehand paint on the lid made it look more "official". Clever? Not really. Original? No. Functional? Yes!
So that's what I've got going on. Trying to make progress and not start too many projects before completing others. Project hopping is dangerous, especially when hobby time is limited.
Thanks for looking!
|
|
|
|
|
|
2017/08/23 15:09:28
Subject: Cleatus, the Scratch-building Mekboy -- Ork Metal Bawkses
|
|
Damsel of the Lady
|
They are lovely and orky boxes. every box should have some good old angry eyes
|
realism is a lie
|
|
|
|
|
2017/08/23 17:48:43
Subject: Cleatus, the Scratch-building Mekboy -- Ork Metal Bawkses
|
|
Decrepit Dakkanaut
|
Boxes are excellent, busy busy busy!
|
Theophony"... and there's strippers in terminator armor and lovecraftian shenanigans afoot."
Solar_Lion: "Man this sums up your blog nicely."
Anpu-adom: "being Geek is about Love. Some love broadly. Some love deeply. And then there are people like Graven. |
|
|
|
|
2017/08/23 19:05:25
Subject: Cleatus, the Scratch-building Mekboy -- Ork Metal Bawkses
|
|
Loyal Necron Lychguard
|
The boxes are great... I especially love the face.
|
|
|
|
|
|
2017/08/24 20:39:10
Subject: Cleatus, the Scratch-building Mekboy -- Ork Metal Bawkses
|
|
Mastering Non-Metallic Metal
|
Nice collection of things to come back with. Good job.
|
Mastodon: @DrH@warhammer.social
The army- ~2295 points (built).
* -=]_,=-eague Spruemeister General. * A (sprue) Hut tutorial *
Dsteingass - Dr. H..You are a role model for Internet Morality! // inmygravenimage - Dr H is a model to us all
Theophony - Sprue for the spruemeister, plastic for his plastic throne! // Shasolenzabi - Toilets, more complex than folks take time to think about! |
|
|
|
|
2017/08/25 07:23:18
Subject: Re:Cleatus, the Scratch-building Mekboy -- Ork Metal Bawkses
|
|
Longtime Dakkanaut
|
Great stuff, Cleatus! Love the shipping containers especially
|
|
|
|
|
|
2017/08/30 11:15:42
Subject: Cleatus, the Scratch-building Mekboy -- Ork Metal Bawkses
|
|
Growlin' Guntrukk Driver with Killacannon
|
Liking the killer cans man haha there sweet!, Should be killa box's though haha.
|
|
|
|
|
|
2017/09/08 13:15:57
Subject: Cleatus, the Scratch-building Mekboy -- Ork Metal Bawkses
|
|
Sneaky Kommando
|
Looks good man. I'm loving the level of detail you're adding and especially like the monowheel contraption. Keep it up!
|
|
|
|
|
|
2017/09/09 09:40:55
Subject: Cleatus, the Scratch-building Mekboy -- Ork Metal Bawkses
|
|
Gargantuan Great Squiggoth
|
Great stuff bud, nice detailing. Missing you round here.
|
|
|
|
|
|
2017/09/14 21:26:15
Subject: Re:Cleatus, the Scratch-building Mekboy -- Ork Metal Bawkses
|
|
Nasty Nob
|
Thanks for the comments and praise, I really appreciate it.
As I mentioned in the LOER terrain comp thread, work has been kicking my astra militarum.
I've been seriously busy. I had a slight reprieve there for a while, but sadly it was just announced that a guy on my team is moving on, and we were already short staffed. No plans to hire more people, sigh. Also classes just started up again. Working full time, going to school at night, plus study time, plus spending time with my family, and various household projects... these really put a lot of strain on hobby time. A common problem I know.
I'll see if I can sneak in some hobby time this weekend, and take some pictures too.
|
|
|
|
|
|
2017/09/17 18:07:15
Subject: Re:Cleatus, the Scratch-building Mekboy -- Incremental Progress...
|
|
Nasty Nob
|
I managed to squeeze in a little time to finish off some easy stuff.
Here's a 6"x6" ruin, painted and flocked:
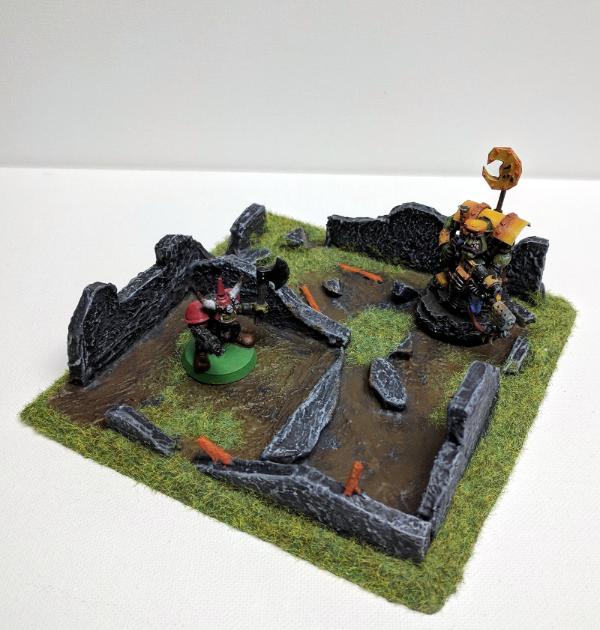
Undecided on the exposed rebar, too orange, or nice contrast?
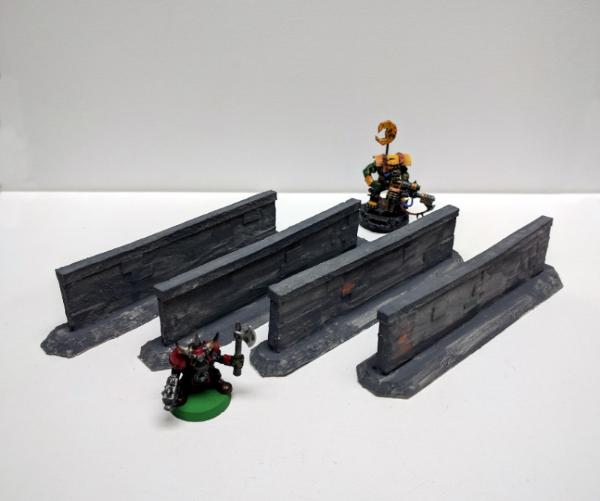
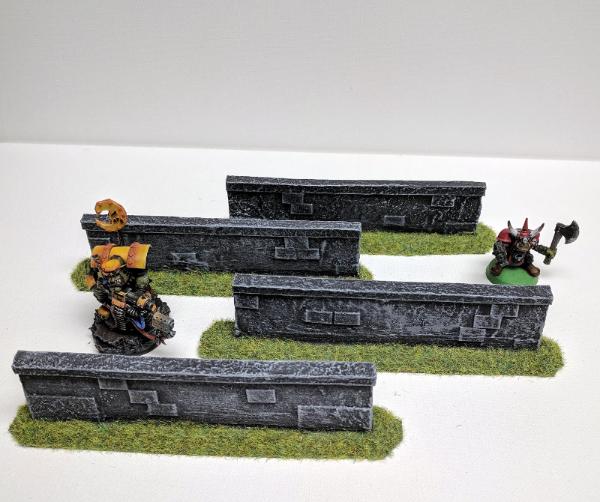
I also finished the four wall sections:
That's all for now. Thanks for looking!
|
|
|
|
|
|
2017/09/17 18:40:36
Subject: Cleatus, the Scratch-building Mekboy -- Incremental Progress...
|
|
Longtime Dakkanaut
|
I think maybe slightly too orange - Maybe a quick boltgun metal drybrush?
|
|
|
|
|
|
2017/09/19 14:11:33
Subject: Cleatus, the Scratch-building Mekboy -- Incremental Progress...
|
|
Loyal Necron Lychguard
|
I second slinky... they are too orange.
Very great scenery, especially considering how quickly you put it together.
How did you do the misaligned bricks in the wall?
PS... love the old school orks.
|
|
|
|
|
|
2017/10/04 11:12:05
Subject: Re:Cleatus, the Scratch-building Mekboy -- Incremental Progress...
|
|
Nasty Nob
|
Hello folks. Thanks for the feedback. Yes, agreed, the rebar was too orange. I toned it down a little, check out the results:

Still a hint of rusty orange there, but not so overwhelming now.
Anpu-adom, I forgot to take any WIP shots of the walls, so I made another one quickly. Each wall section is 5"x1" of foam board. The misaligned bricks are actually just 1/4"x1/2" card stock glued to the foam board.
Then I coated the walls with spackle for some texture, primed and painted.
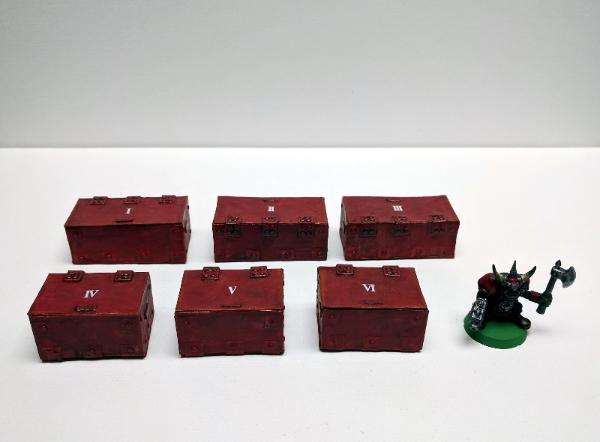
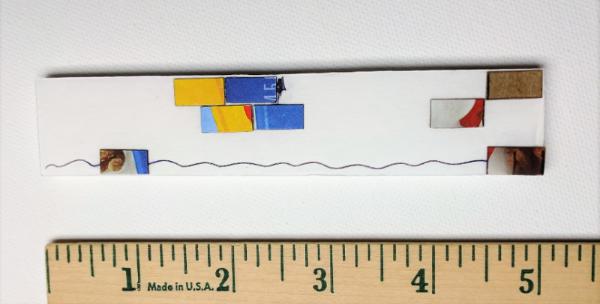
In another thread someone was asking me about how I made the ammo crates. Again in my haste to build I forgot to take photos, so I went back and recreated my process. I hope someone finds this helpful.
How to Build Ammo Crates from Scratch
Start with a template. I like to use graph paper, because it makes measuring easy. I made two different size ammo crates. The small one measures 1.5"x0.75"x0.75", and the large one measures 2"x0.75"x0.75". I based these dimensions on what looked right to me in relation to a 25mm-28mm miniature. I glued my templates to cereal box card stock. You can use whatever materials you wish, or even trace the templates on to styrene. It's up to you.
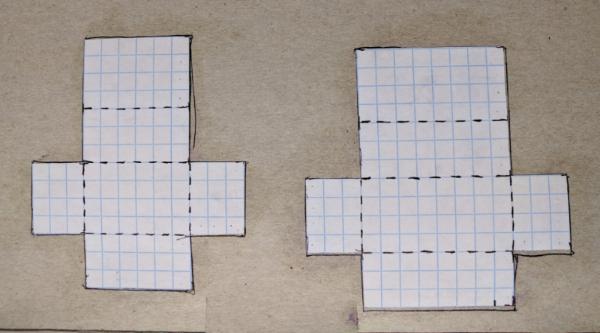
You could just glue the pieces together, and maybe even reinforce from the inside (bracing with supports at 45 and 90 degree angles, etc.), but that takes a long time for such a little box. A faster way is to tape the pieces together with masking tape:
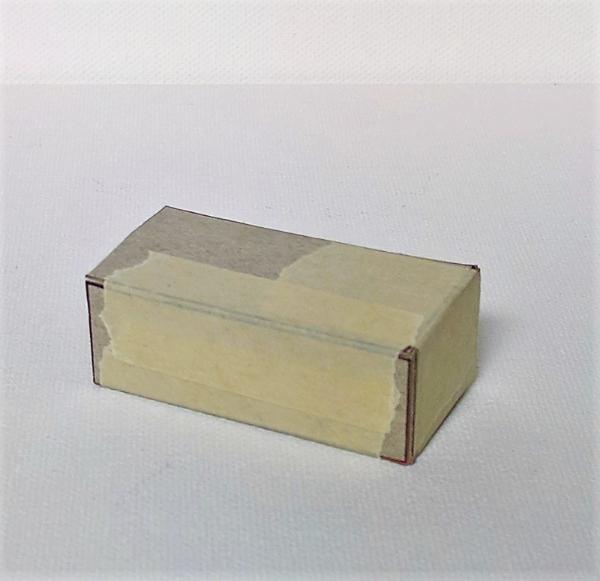
However with no internal reinforcement, the boxes are a bit flimsy and "squish" if you aren't gentle with them. Terrain usually needs to be able to withstand a little punishment, so another way to go is to fill the inside of the box with something sturdy. You could use crumpled up news paper, or if you're willing to spend a little cash, try foam board. I get sheets of this from the $1 store, which is pretty darn cheap. Here I have traced my template and created a stack of four pieces of foam board:
Then glue the pieces of the box to the stack. I use PVA glue. For a more finished edge, you can even use the graph paper to cover the gap where two pieces meet:

Next, add some details to the crates. I added some small pieces of card stock to mine to give the impression of handles and hinges. The handles are 1/8"x1/4", and the hinges are simply made up of two small 1/4"x1/4" pieces of card stock joined at a 90 degree angle. Smooth over the gap with more paper, or PVA glue.

At this point they're looking halfway decent, but you know what would really bring them to the next level?
 RIVETS!
A 1/16" hole punch is perfect for creating rivets at this scale. Again, I'm using card stock from cereal boxes here (cheap and plentiful). I make these in batches. Fire up Netflix and watch something dumb for a while that doesn't require much attention, and crank out a few (hundred) of these. You will want to make more than you need for this project because some will flake and not be usable.

Use PVA glue to stick the rivets to the box. When I say "use", I mean drown. Use twice as much PVA glue as the diameter of the rivet. Cover them in glue. It will soak in to the cardboard, and since PVA both shrinks and dries clear you won't even notice it when they are dry. Give it a few hours. Go watch Netflix. Or go outside.
Once you have applied all of your rivets, you are ready to prime and paint. I use gesso to prime most stuff (personal preference). My crates were painted with craft paints; DecoArt Americana Tomato Red for the base coat, and then some edge highlights with Georgia Clay. I gave them an Agrax Earthshade wash. This helps add some shadows to the rivets and handles. Here is my finished result:
You'll note on my first batch I glued down some extra strips of 1/4"x1/2" graph paper before applying the rivets. This both added structural integrity, and ended up adding a little more detail to the finished product.
I think it took me about an hour to cut out and glue all of these together. Adding the rivets takes a while, but it's absentminded busy work that you can do while watching TV. If you were to use styrene they would cost a little more, but you could use plastic glue to get to an end result faster.
Let me know if you have any questions.
Happy riveting!
|
|
This message was edited 1 time. Last update was at 2017/10/04 11:16:38
|
|
|
|
|
|
|


 Finished Forge World Elysian Army
  Finished Order of Our Martyred Lady - Sisters of Battle
