| Author |
Message |
 |
|
|
|
|
Advert
|
Forum adverts like this one are shown to any user who is not logged in. Join us by filling out a tiny 3 field form and you will get your own, free, dakka user account which gives a good range of benefits to you:
- No adverts like this in the forums anymore.
- Times and dates in your local timezone.
- Full tracking of what you have read so you can skip to your first unread post, easily see what has changed since you last logged in, and easily see what is new at a glance.
- Email notifications for threads you want to watch closely.
- Being a part of the oldest wargaming community on the net.
If you are already a member then feel free to login now. |
|
 |
2018/02/17 07:05:23
Subject: Camkierhi's other stuff blog.....Currently, Necromunda scenery.
|
|

Decrepit Dakkanaut
|
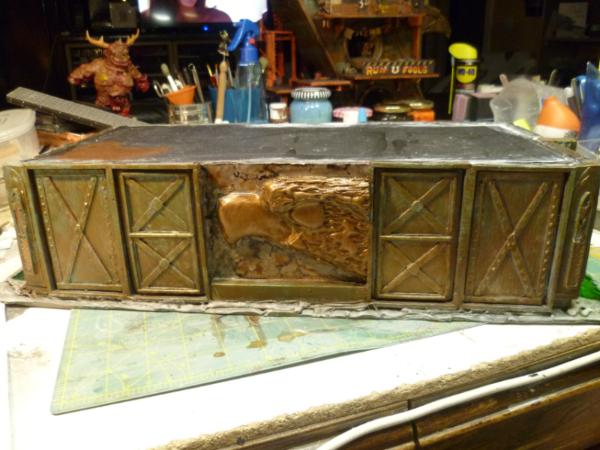
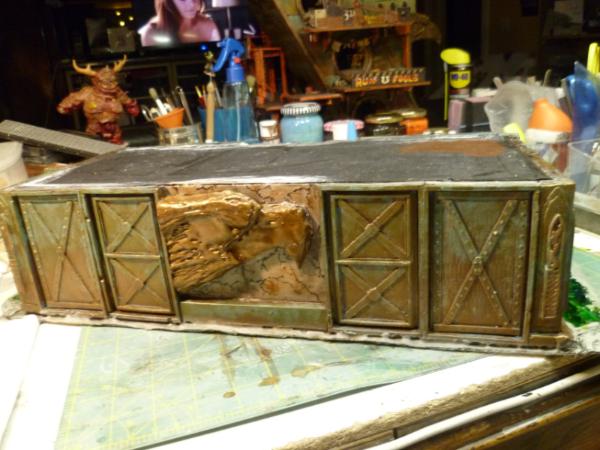
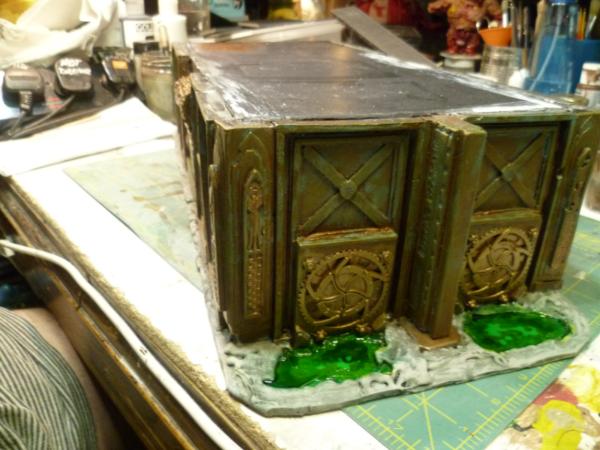
No big deal, just making an amazing perfect rusty crate... 
|
|
This message was edited 1 time. Last update was at 2018/02/17 07:29:16
Theophony"... and there's strippers in terminator armor and lovecraftian shenanigans afoot."
Solar_Lion: "Man this sums up your blog nicely."
Anpu-adom: "being Geek is about Love. Some love broadly. Some love deeply. And then there are people like Graven.  |
|
|
 |
|
2018/02/17 07:13:34
Subject: Re:Camkierhi's other stuff blog.....Currently, Necromunda scenery.
|
|
Gargantuan Great Squiggoth
|
 Camkierhi wrote: Camkierhi wrote:Thank you all.
I ain't no scratch builder either guys, you just got to have a go.
@ Archer, Thanks bud, I do have issues at times with air bubbles, I tend to "high pour" most liquids, that is to pour it from a height and slowly giving it a thin stream and the air comes out ok, most of the time, as you say, I use one piece casts, and the back may get a bit bubbly but it does not really mater. Certainly nothing as fancy as a vacudooom chambler.
@ Red, I have heard of it, but have not bothered. I know for a silly large project it might work out on the price, but to be honest the value I am getting I am happy with. One big advantage over most is the setting and demold times. Only have to wait 15 minutes and I have a piece.
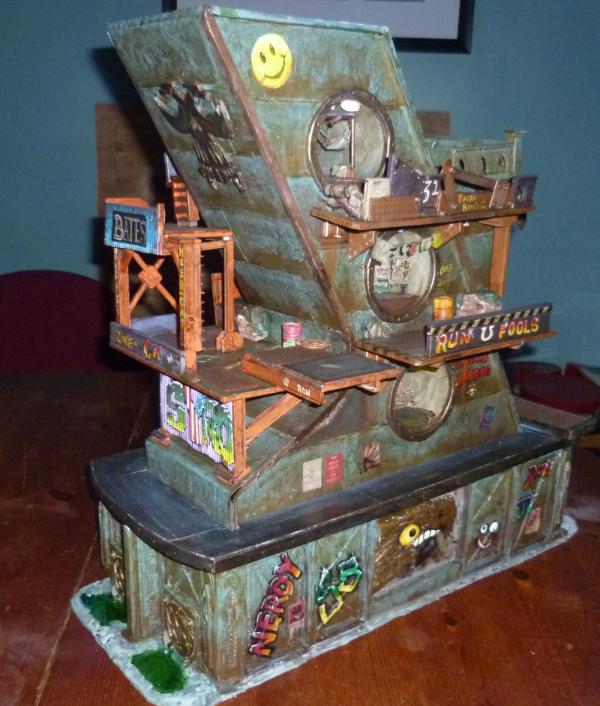
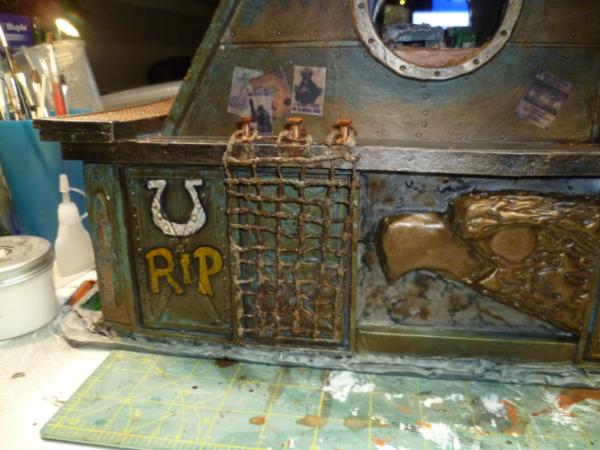
Talking of molds and waiting about.... here is what I did while a bit bored today, this is that base I had that tyre on....
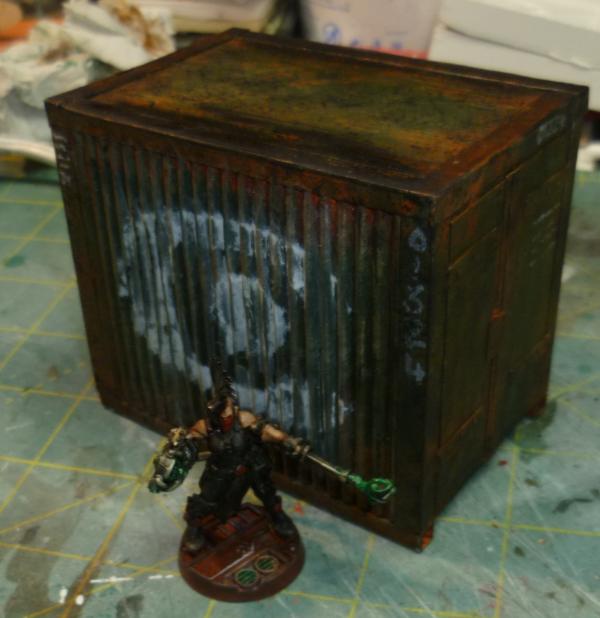
Also while waiting for stuff got a pill box (got a few kicking about at mo.)...
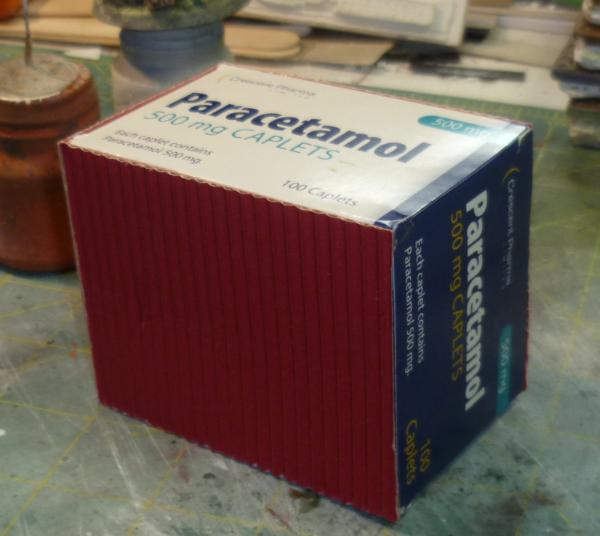
Few added bits of card...
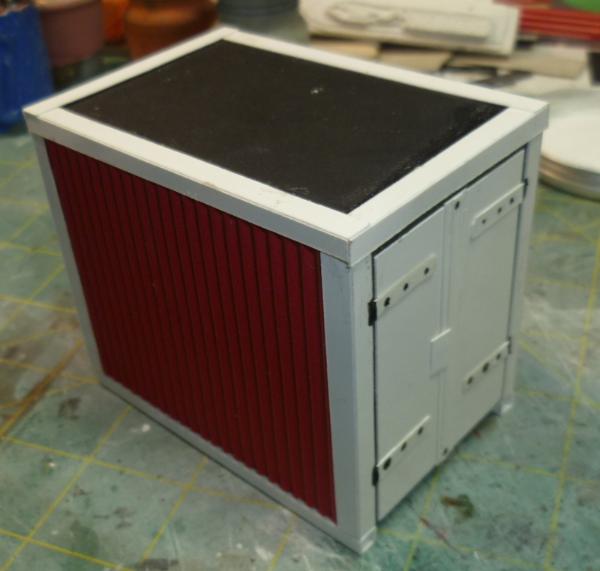
Primed with gesso, then burnt sienna and a drybrush of leadbelcher.
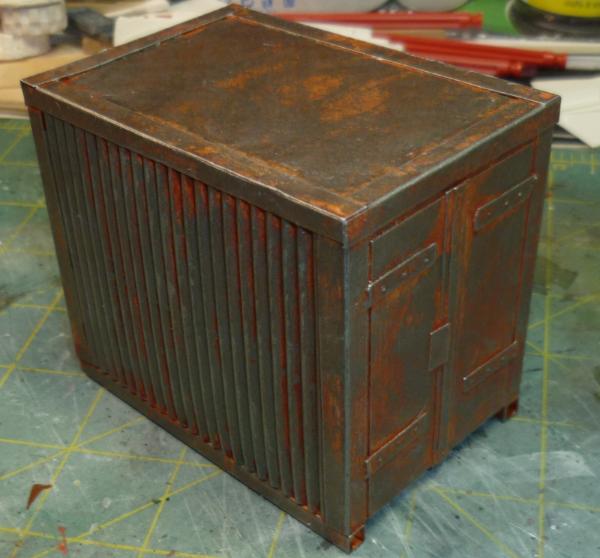
Coat after coat of paint building it up...
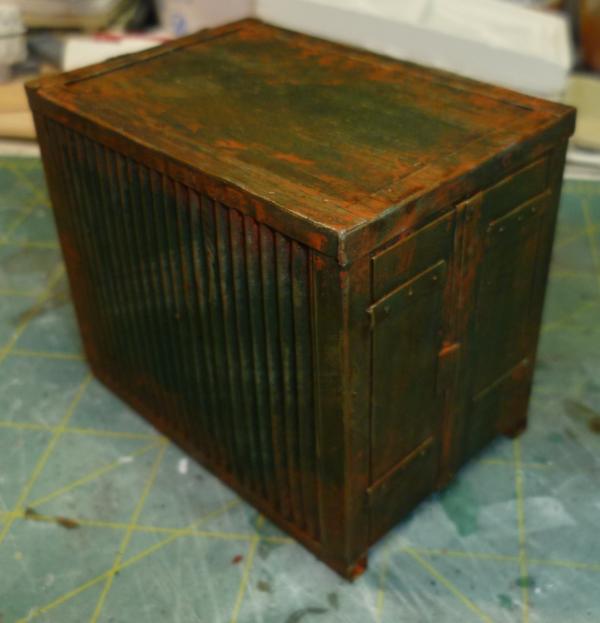

And scratching it off....
Signage...
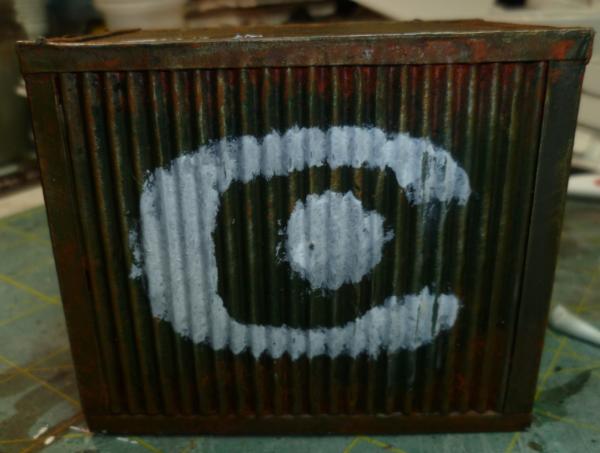
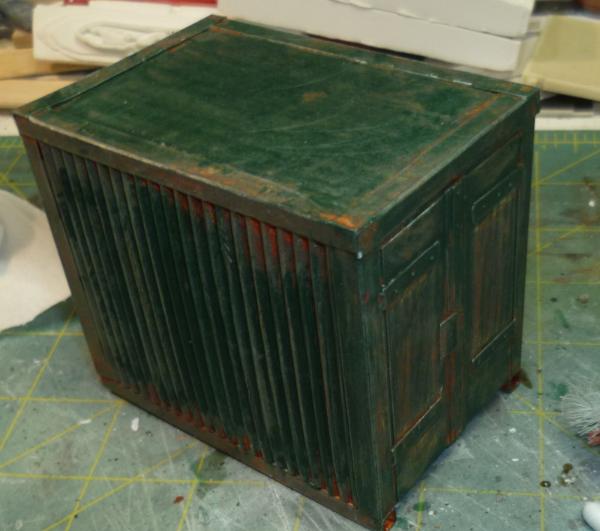
Scuffed up and final shot...
Oh and I did a little work on that plynth once I had a few wall bits....
Thanks for looking folks, thoughts as always welcome....
Repost for page turn.
Thank graven. Hehe
|
|
|
|
|
|
2018/02/17 09:36:42
Subject: Camkierhi's other stuff blog.....Currently, Necromunda scenery.
|
|

Shroomin Brain Boy
|
He has hobby adhd and he's even finishing his projects....seems unfair to me...arghh...man, you're so look productive...your boss probably had to hire four guys to cope with now that you're recovering at home...
|
|
|
|
|
|
2018/02/17 12:39:45
Subject: Re:Camkierhi's other stuff blog.....Currently, Necromunda scenery.
|
|

Krazed Killa Kan
|
Thanks for he tutorial Cam, it was an interesting read and is making me tempted to branch out in my mold making and casting.
Stuff you've been making looks great as always, with the huge amounts of stuff you do, it made me laugh when you called yourself lazy.
|
|
|
|
|
|
2018/02/17 13:09:24
Subject: Re:Camkierhi's other stuff blog.....Currently, Necromunda scenery.
|
|
Nasty Nob
|
Great googly moogly, Cam! So prolific, much scratch building, wow.
Reading back a few posts -- hope you're feeling and doing better.
Keep up the good work, sir! 
|
|
|
|
|
|
2018/02/17 23:32:00
Subject: Re:Camkierhi's other stuff blog.....Currently, Necromunda scenery.
|
|
Mastering Non-Metallic Metal
|
...but there are many who can call themselves pro's (...DrH etc.) ...
 *quickly finds a drink to swig and then spit out in a surprised way* I wouldn't call myself a "pro" when it comes to casting. I've dabbled, and I've read a lot about it. I know the in's and the out's. When it comes to casting I tend to err of the side of over-preparation. I don't open a bottle until I know exactly what I'm going to do and have every possible tool available to hand. I'm not casual enough about it to be a "pro".  But having been called out twice in the same post, and the aforementioned research into the subject, I can add some thoughts. ... but in typical Cam ham fisted fashion, I have a "method" that suits me.
Everyone has their own way. So long as it works, it works. Can't say more than that. ...Bluestuff, or Instant mold sticks...
Or look for Oyumaru. It's the same stuff as Instant mold, direct from China (where it's made) and therefore cheaper. Have I told you how much I love Oyumaru...?! Great for making a quick mould of small/medium sized things. You can cut it or stick bits together for smaller/larger moulds. Picks up really fine details. Reuse it as many times as you like: I bought a 12 pack and have only used 4 ot 5 of them, over and over again. Fantastic for putty casts. Can also be used for plaster etc. but large quantities of plaster or resin may not be good for the mould as those get warm/hot upon curing and can soften the Oyumaru and therefore the mould (may be fine for one cast, but you'll have to re-mould if you want multiples). I typically use milliput with the Oyumaru (have I told you how much I love this stuff?). Milliput is often softer than green stuff and so is easier to press into the details. Once cured (which does take a long time, relatively) it's rock hard. I've also used dental plaster. Is ok and cheap. Look for dental stone if you want harder-wearing casts. Adding PVA to the water when you mix plaster can give slightly more sturdy results, but they are still not going to be bouncing when you drop them.  For resin and silicone, I've only used a couple of offerings from Smooth-On. I get it from Bentley Advanced Materials (although I can never stop thinking about cars) here in the UK. Not the cheapest option, but good quality from what I've seen, and helpful as a company if you have questions. I will advise doing a lot of background research about resin and silicone casting before jumping in. You need to be aware of timings for mixing, pouring and de-moulding (waiting), there are many options available for these and all have their pros and cons. If you are intending on doing a lot of casts (in the 20+ region) I'd give the silicone moulds a chance to "rest" between pours if you are using a quick cure resin. It will "burn" the mould and wear it out prematurely. This is due to the chemical action of the resin, not the heat as you may think. A note of bubbles. The resins and silicone I've used above are sold as not needing de-gassing (the process of using either a vacuum or pressure chamber to remove gasses from the material or minimise bubbles in the mould). Silicone is advised to be poured slowly at a height that will produce a thin stream that doesn't hold bubbles. However, you will still get some in the mould. Tapping is a good way to get it away from your casting surface. Also pour into the lowest part of your mould-box and allow it to creep naturally over the rest of the master. This helps it get into all the details. I've not had any major problems when it comes to making the moulds. Resin. If you are using open-backed moulds like Cam' has shown, just tapping should be enough. The back side of casts like this should be expected to be hidden in some way. Mould design: When it comes to 2-part moulds, for things that don't have a large surface you can hide and/or need details on both sides; planning your mould layout becomes important. The orientation of the item is vital when it comes to where the resin will enter and where it can exit, and anywhere that air can be trapped. The have to visualise how the shape will fill with fluid to find where air can be trapped and either change the orientation or add channels for air to escape. These can be added after the mould is made by cutting into the silicone, but it's better to have these pre-prepared. I gravitated towards using syringes to add my resin to my moulds as I was mostly casting small / thin items that gravity just couldn't force the resin into quick enough. My moulds were designed to accommodate this with certain channels. I won't go into it any more here, but you can find my musings and experiments into moulding and casting in my blogs. Feel free to ask me questions about anything you find there.  Extras: The resin and silicone I've been using is a mix 1:1 by volume, and so I've not had to weigh anything. Read up about the specific materials you are buying beforehand. Mould release: I use Vaseline for the second half of a 2-part silicone mould. I use Talc (unscented) for the inside of my silicone moulds (helps flow or resin and prevents bubbles sticking to the surface). You only need a surface coating, not piles of the stuff. I use water for putty into Oyumaru (have I mentioned how much I love this stuff?) moulds. I have dedicated equipment for my casting adventures, from plastic containers and an old glue spreader for stirring silicone (use a old paintbrush handle for resin). A load of lego bricks for making mould boxes. Great for creating any size, reusable, and colourful. Sulphur-free Plasticine for creating the first half of a 2-part silicone mould. Sulphur-free is important as that can bind to the platinum catalyst used in many (but not all) RTV silicones and make them inactive, preventing your silicone from curing. The good thing with silicone and resin is that they can often be pulled out from the plastic containers so that they can be reused. Silicone in particular will only stick to silicone. ...and DrH, has a small side line of wonderful items for sale, I have bought many...
Just to leave this in for emphasis. I sell things.  That'll do for now. Keep up the good work, Cam'.
|
|
This message was edited 1 time. Last update was at 2018/02/17 23:32:37
     Mastodon: @DrH@warhammer.social Mastodon: @DrH@warhammer.social
The army-                   ~2295 points (built). ~2295 points (built).
 
* -=]_,=-eague Spruemeister General. * A (sprue) Hut tutorial *
Dsteingass - Dr. H..You are a role model for Internet Morality! // inmygravenimage - Dr H is a model to us all
Theophony - Sprue for the spruemeister, plastic for his plastic throne! // Shasolenzabi - Toilets, more complex than folks take time to think about! |
|
|
|
|
2018/02/18 02:37:52
Subject: Re:Camkierhi's other stuff blog.....Currently, Necromunda scenery.
|
|
Gargantuan Great Squiggoth
|
Thank you all, oh and LoL Vik.
@ DrH. Thank you sir, brilliant post.
OK Couple bits...
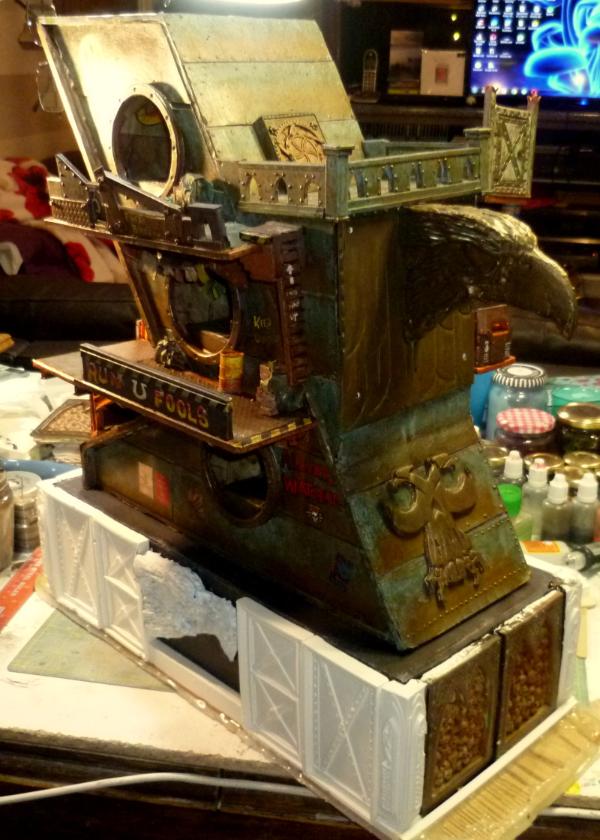
Started laying in some metallic on the Plinth...
That's these two paints over each other. Had a White primer (Gesso) with a black wash over it under the metallic.
So it is currently looking like this..
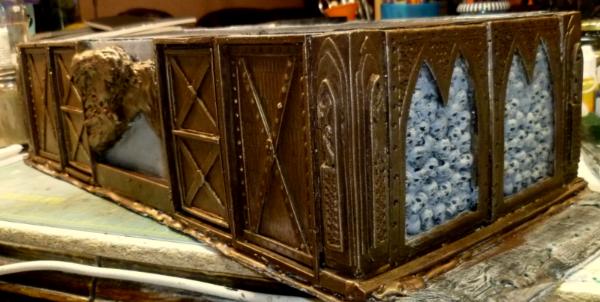
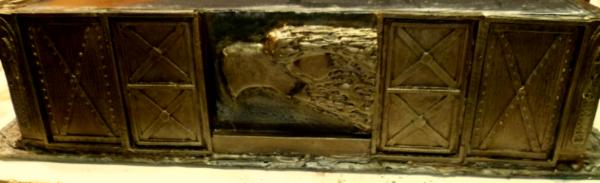
Next working on building up the top , this is just for you Red, covering your edges. I agree with Red you should always do this and reds method is perfect, however, thought I would try something ...
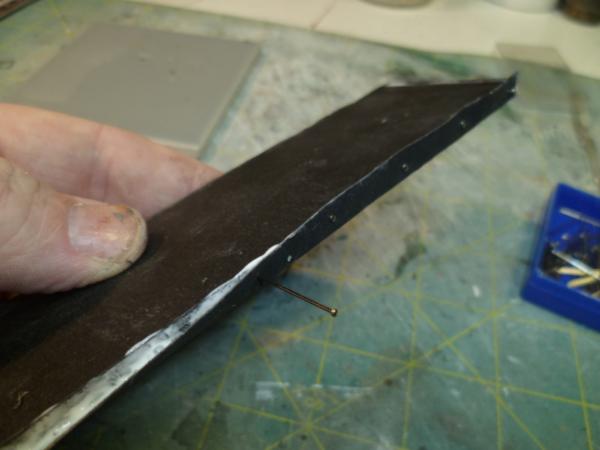
If you are joining a right angle and you don't want to see the edge of one of the sheets, it has been a practice for some time to rebate (rabbit for New Yanky Workshop Fans) one of pieces to accept the other, I thought well what if I do that and fold the paper over....
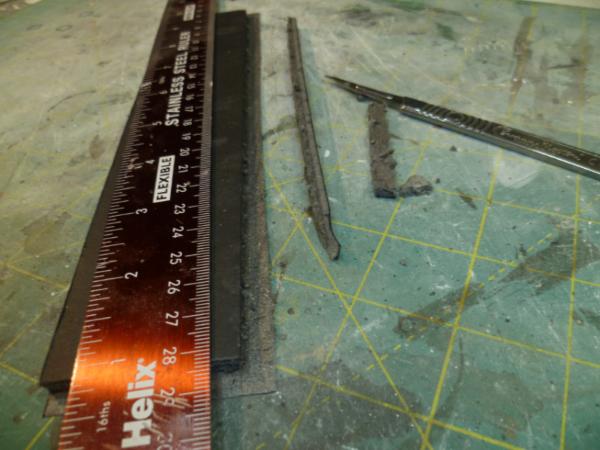
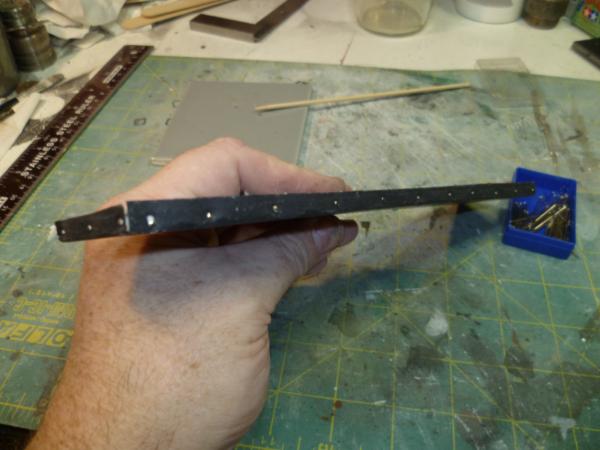
But the fold is going to be difficult to keep in place?? Ah I will rivet it in place then.....
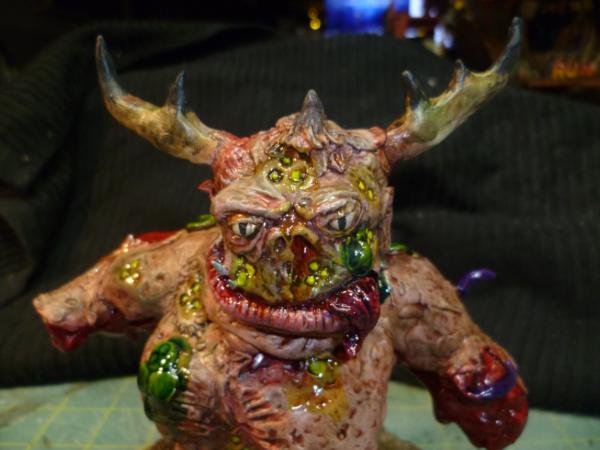
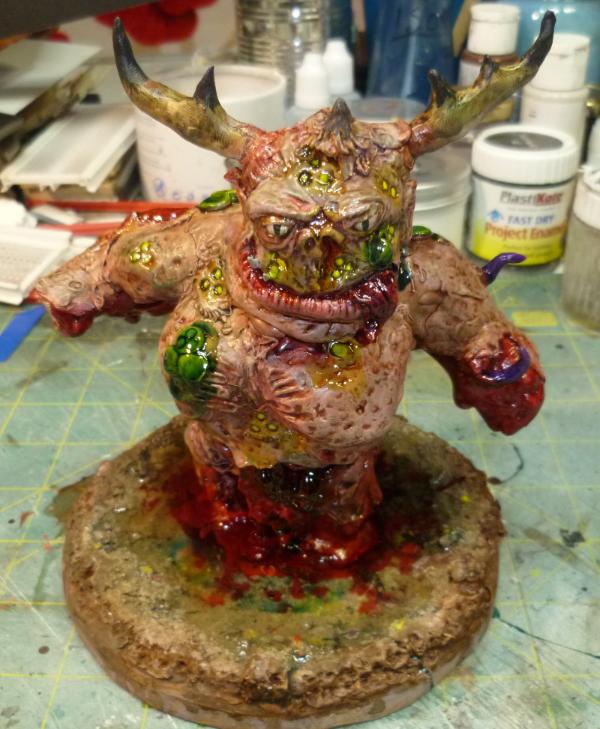
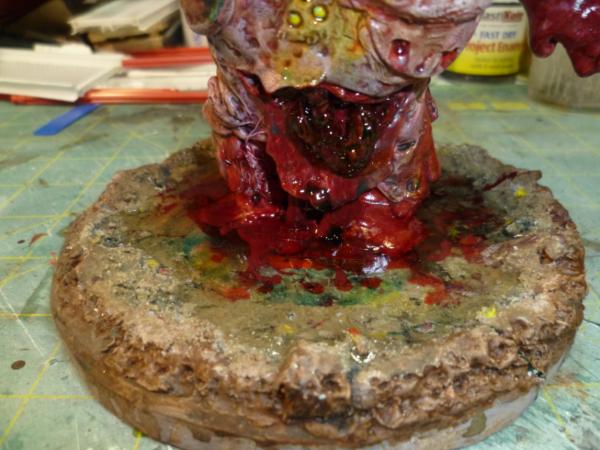
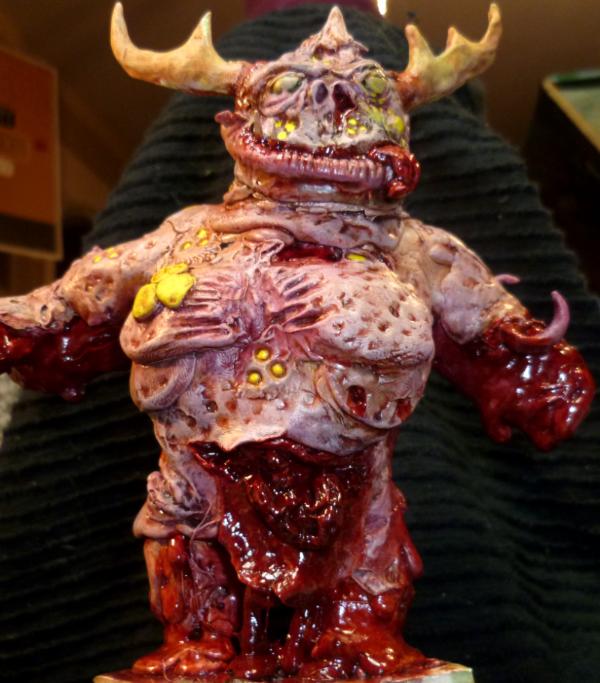
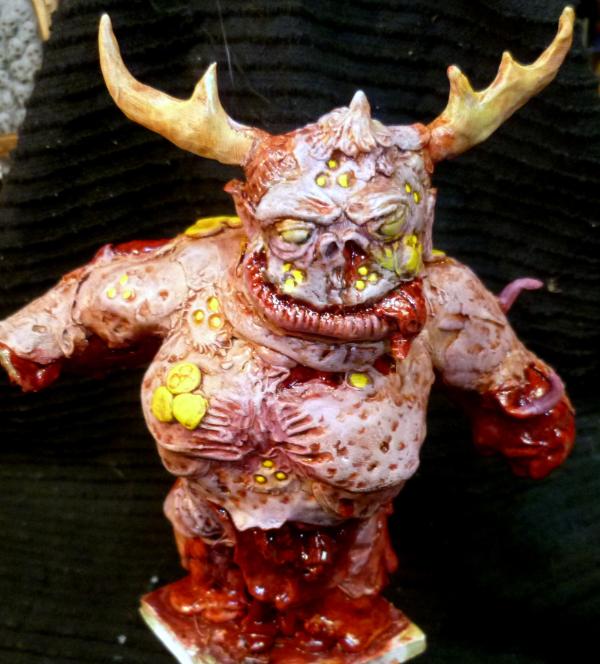
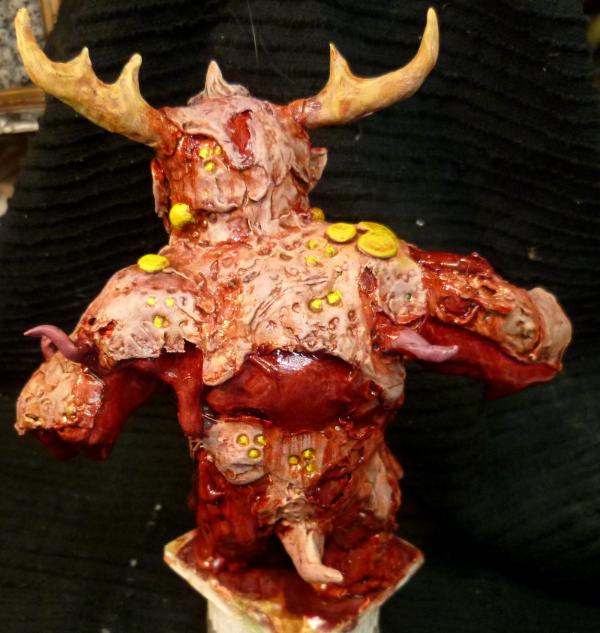
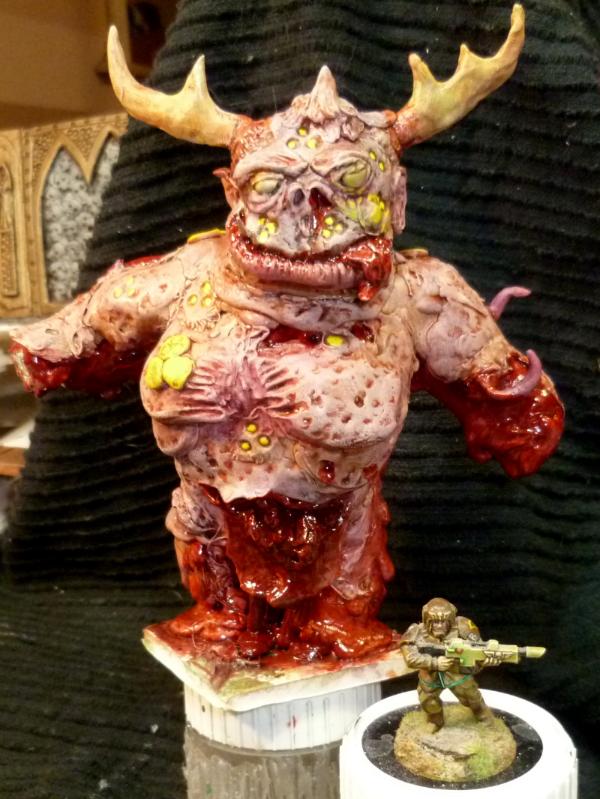
Oh and started making a base for the GUO...

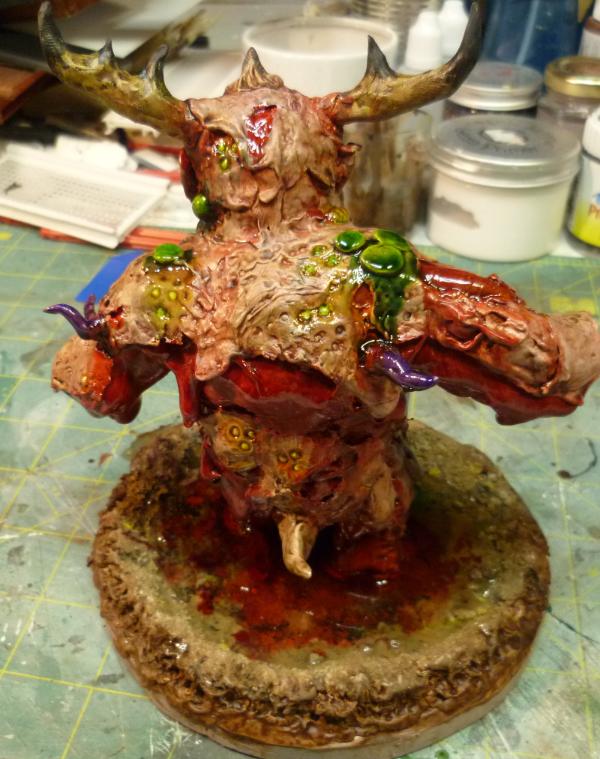
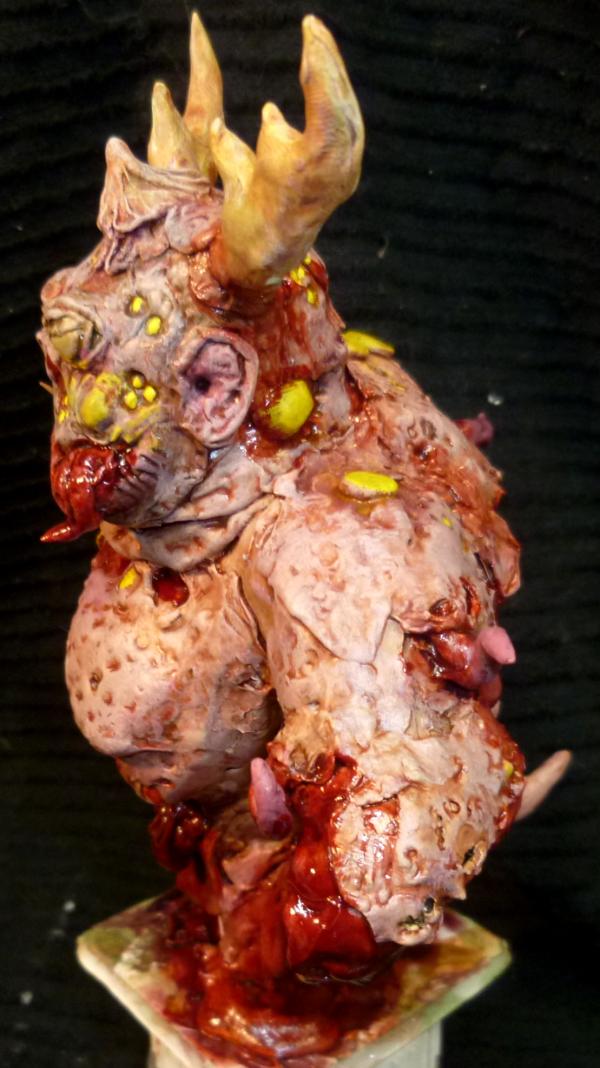
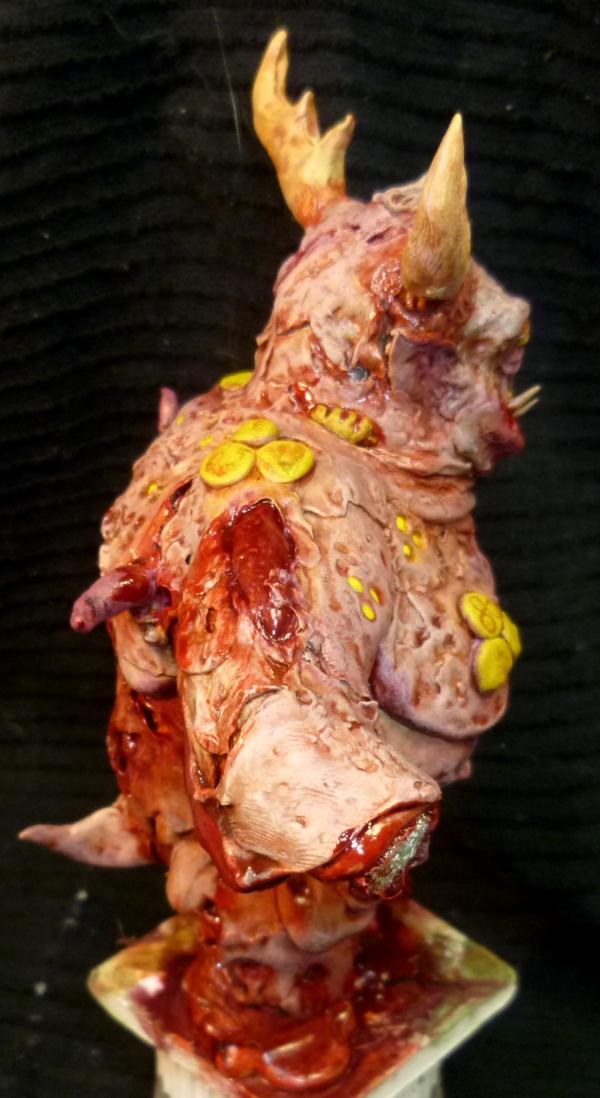
Talking of the GUO, bit more painting done...Spoilering this cus it is not pleasant. I mean it.
It is getting there.
Well yet again, please feel free to comment thank you so much for looking and the feedback is really appreciated.
|
|
|
|
|
|
2018/02/18 03:15:45
Subject: Re:Camkierhi's other stuff blog.....Currently, Necromunda scenery.
|
|
Blood-Drenched Death Company Marine
|
I love the pill box Cam. The added base to the plinth is great too.
As for the Nurgle thing. I do not like it. It is gross and icky. In this case I guess that is a good sign.
|
|
|
|
|
|
2018/02/18 05:37:19
Subject: Camkierhi's other stuff blog.....Currently, Necromunda scenery.
|
|

Tough Tyrant Guard
|
Cool tutorial and a good read Cam,
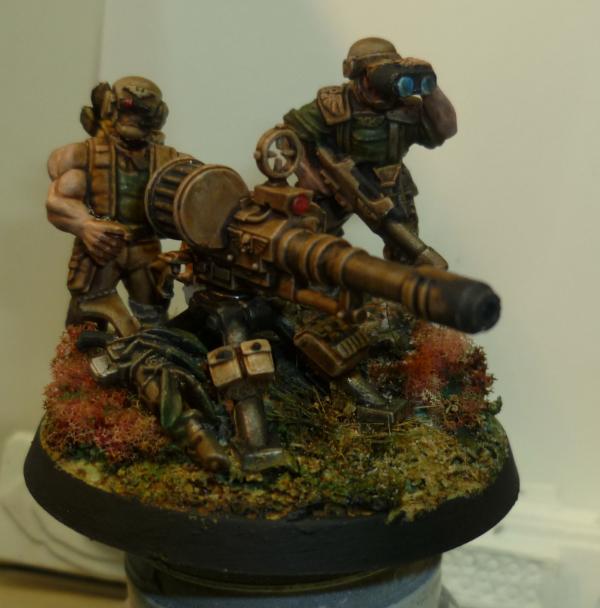
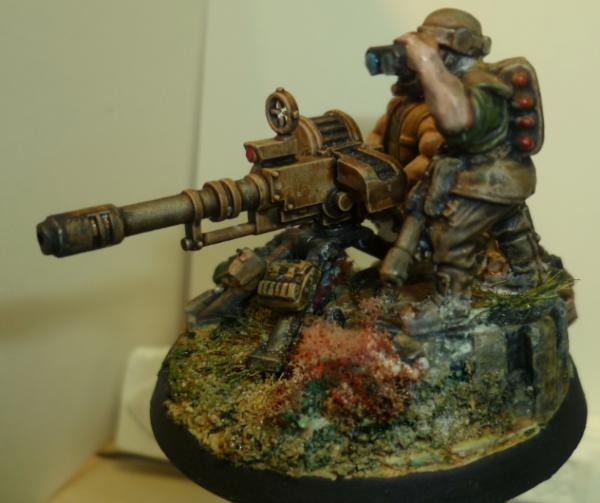
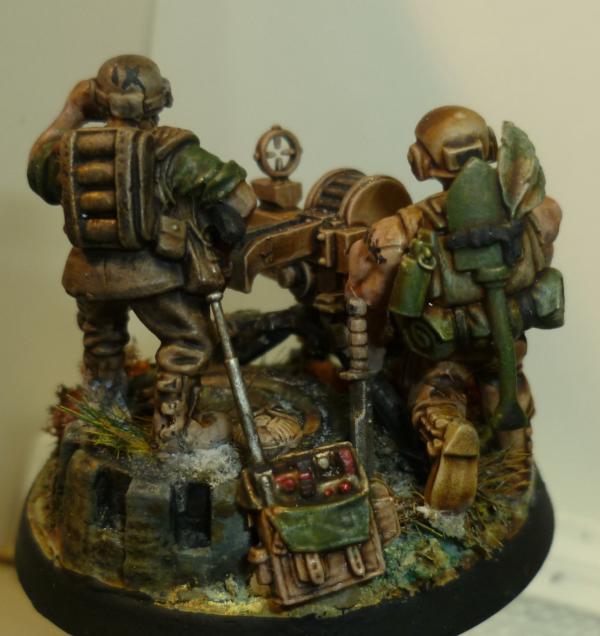
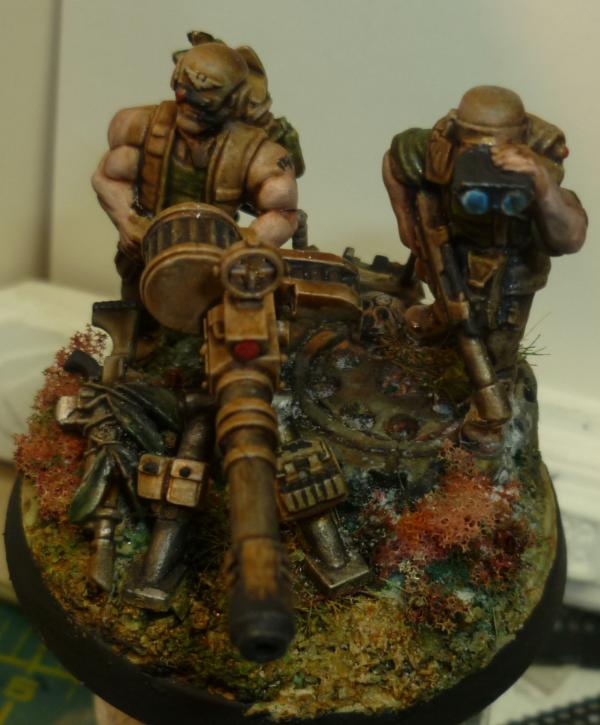
Also the container and the heavy weapon squad look ace, loving your work.
|
|
|
|
|
|
2018/02/18 07:19:59
Subject: Camkierhi's other stuff blog.....Currently, Necromunda scenery.
|
|

Liberated Grot Land Raida
|
Amazing work as usual
|
A Squeaky Waaagh!!
Camkhieri: "And another very cool thing, my phones predictive text actually gave me chicken as an option after typing robot, how cool is that."'
Meercat: "All eyes turned to the horizon and beheld, in lonely and menacing grandeur, the silhouette of a single Grot robot chicken; a portent of evil days to come."
From 'The Plucking of Gindoo Phlem' |
|
|
|
|
2018/02/18 09:57:09
Subject: Re:Camkierhi's other stuff blog.....Currently, Necromunda scenery.
|
|
Krazed Killa Kan
|
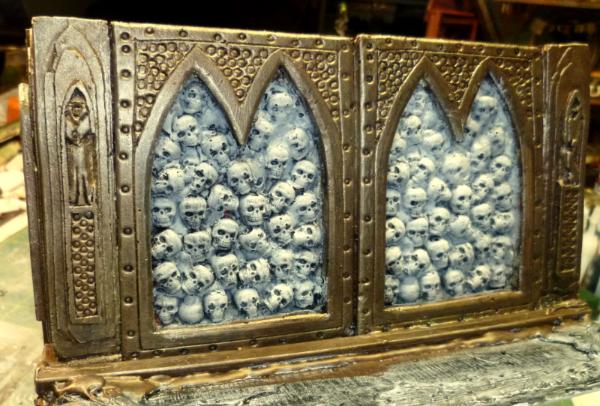
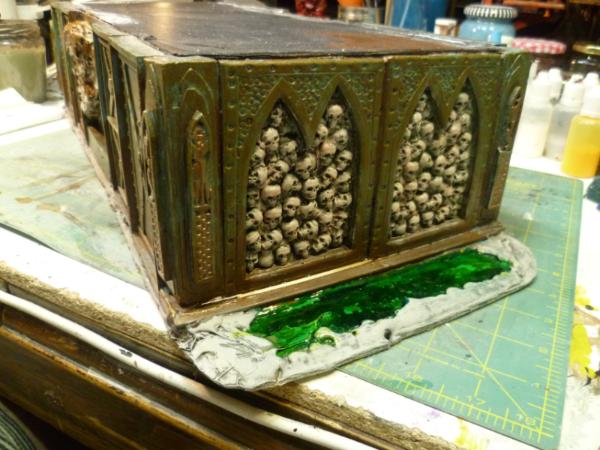
Wow that dude is gruesome! What did you do to make the blood so wet looking? Also I don't remember if I commented on them in the past, but I wanted to make sure you know how impressed I am with the skull archways you made, they are so 40k.
|
|
|
|
|
|
2018/02/18 23:44:01
Subject: Camkierhi's other stuff blog.....Currently, Necromunda scenery.
|
|
Decrepit Dakkanaut
|
Love the guardsmen and that box is amazing! Great work Cam!
|
|
|
|
|
|
2018/02/19 01:48:48
Subject: Re:Camkierhi's other stuff blog.....Currently, Necromunda scenery.
|
|
Gargantuan Great Squiggoth
|
Thanks guys and dolls, much appreciated.
@ Syro, BFTBG bud. But I do not just slap it on I layer stuff up a fair bit. Do you a tut soon.
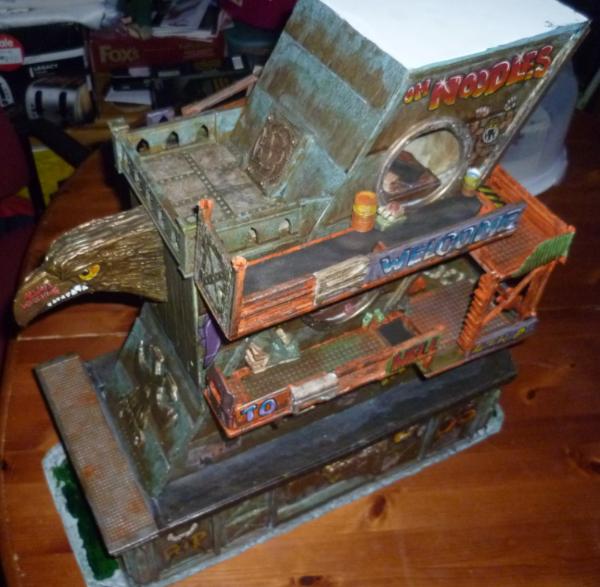
Little progress...
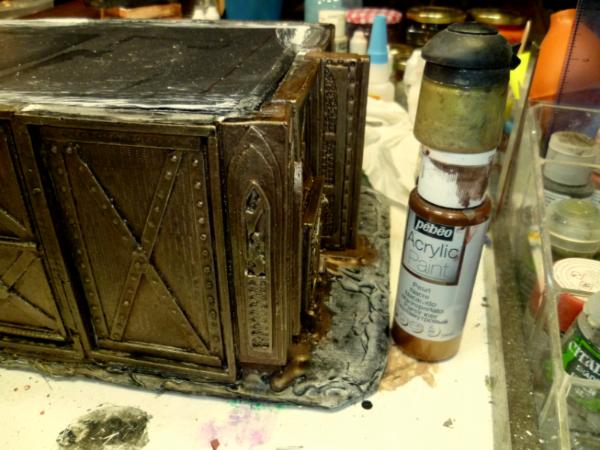
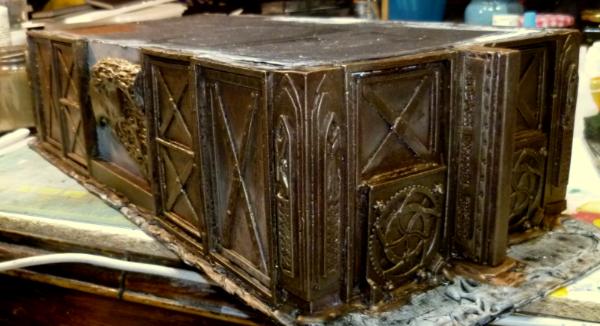
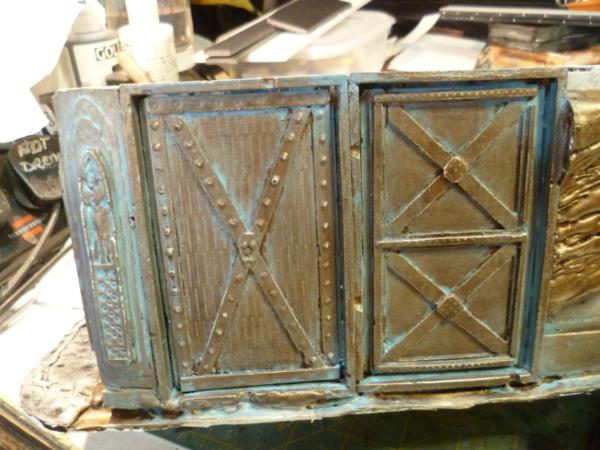
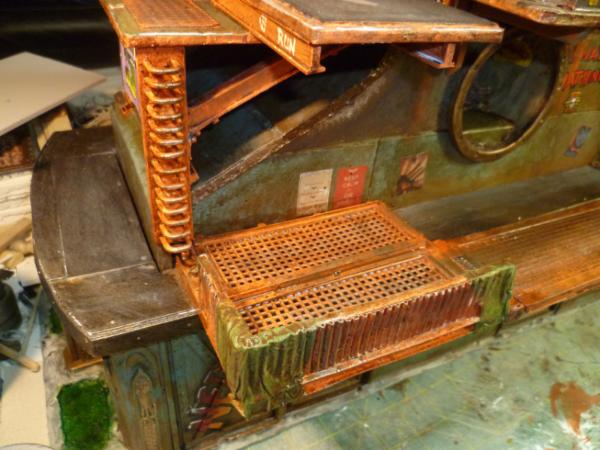
Thought I would show me verdigris method, done it before I think but here you go....
Got my metallics done and dry, so I paint the surface a panel at a time with a light green blue, and then rub it off again...
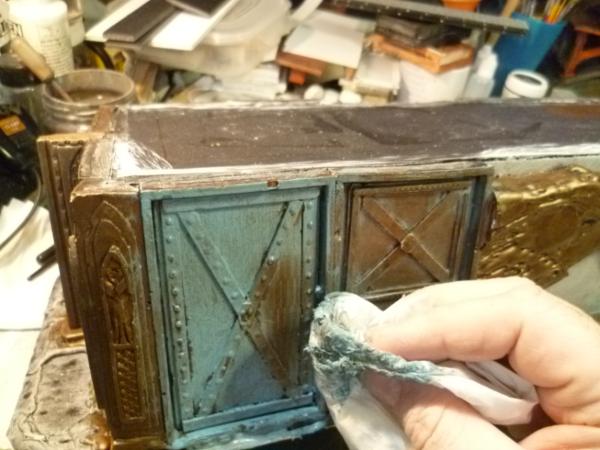
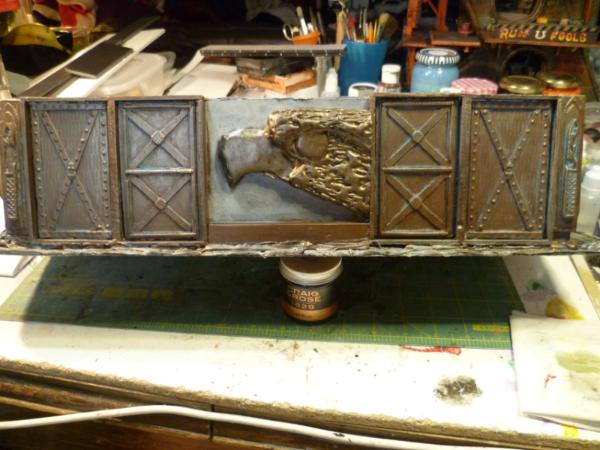
Then dry brush over with the copper..
Then sponge on some mid green...
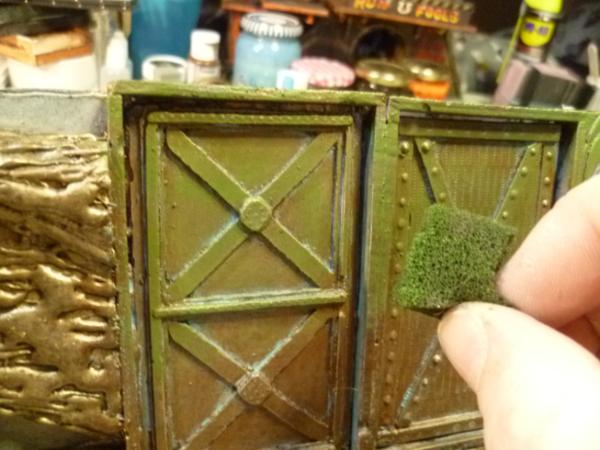
Then sponge over that with the blue.. note I don't do the whole panel.
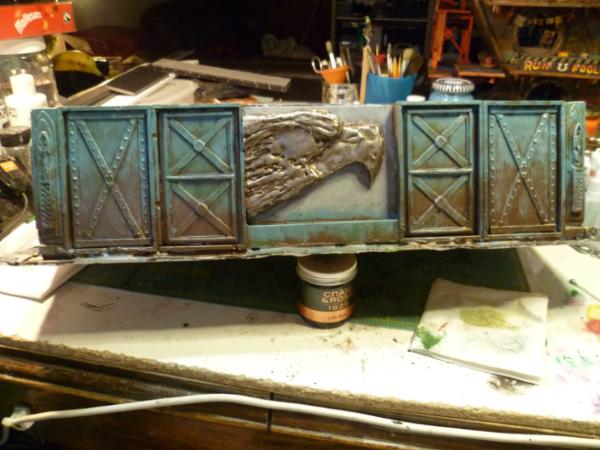
Then hit it with a sepia wash.
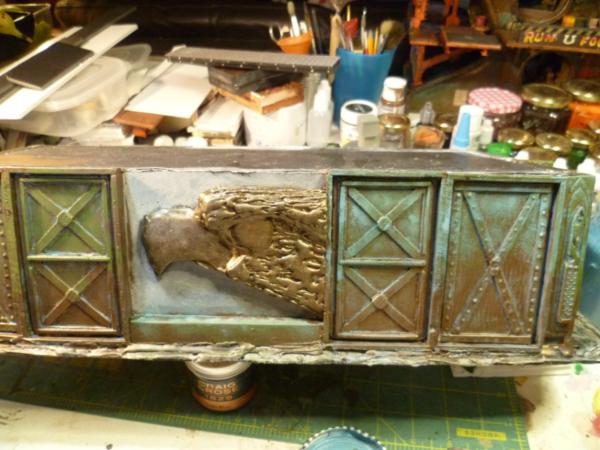
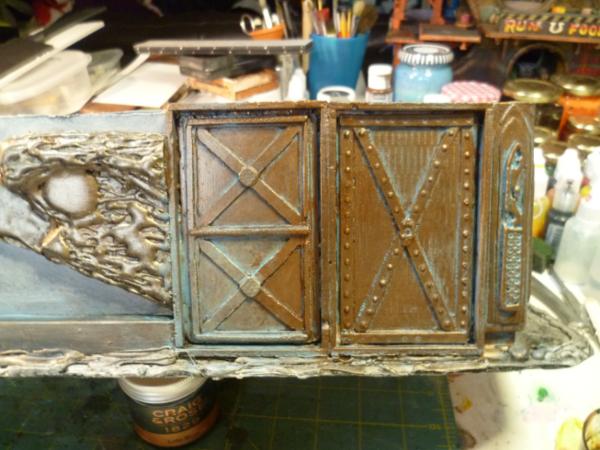
Then a dry brush with a mix of the copper with some ywellow in it...
Between coats was touching up a few bits on the GUO base...
Hope that helps someone.
Thank you all so much for looking at my humble blog, and your wonderful comments really keep me going.
|
|
|
|
|
|
2018/02/19 03:55:01
Subject: Camkierhi's other stuff blog.....Currently, Necromunda scenery.
|
|
Longtime Dakkanaut
|
Excellent work with the AM Heavy Weapon team! Well done all around, but the compliments of colors and highlight detail are what made it an awesome model to me.
The volume of work you do and the level of quality you achieve always amazes me.
I had forgotten about sponge painting. Something so useful and simple completely vanished from my mind. It explains why I have so many sponge brushes. Thank you for showing your WIP.
|
|
|
|
|
|
2018/02/19 14:12:10
Subject: Re:Camkierhi's other stuff blog.....Currently, Necromunda scenery.
|
|
Thunderhawk Pilot Dropping From Orbit
|
I am back from a 4 year hiatus, and its great to see the same great faces still here This is looking great, loved the casting tutorial.
I happen to have been watching the yogscast on you tube playing and painting some necromunda this week, while getting back into my painting.
|
|
|
|
|
|
2018/02/19 19:35:12
Subject: Camkierhi's other stuff blog.....Currently, Necromunda scenery.
|
|
Combat Jumping Ragik
|
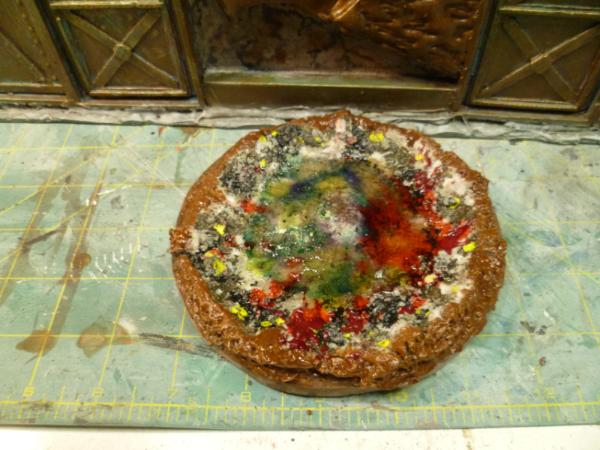
That last photo, did you leave a mini pizza out for too long. It's growing things
Yes, rabbets ( with an e actually) are a fine solution. Now ask me about mitre joints and foamcore. Okay, since you asked, not worth the aggravation. And the rabbet joints will hold up better anyways.
Base for the column(?) looks fantastic. That is a show-stopper of a centerpiece you have. And it's big, really big.
Which is great. Bigger= better.
|
|
This message was edited 1 time. Last update was at 2018/02/19 19:36:16
|
|
|
|
|
2018/02/19 20:24:43
Subject: Camkierhi's other stuff blog.....Currently, Necromunda scenery.
|
|

Fixture of Dakka
|
Camkierhi,
Nice Autocanon team and shipping container.
Cheers,
CB
|
|
|
|
|
|
2018/02/19 21:32:30
Subject: Re:Camkierhi's other stuff blog.....Currently, Necromunda scenery.
|
|
Strategizing Grey Knight Chapter Master
|
That's a great little tutorial on the panels, thanks for sharing that!
|
IceAngel wrote:I must say Knightley, I am very envious of your squiggle ability. I mean, if squiggles were a tactical squad, you'd be the sergeant. If squiggles were an HQ, you'd be the special character. If squiggles were a way of life, you'd be Doctor Phil...
The Cleanest Painting blog ever!
Gitsplitta wrote:I am but a pretender... you are... the father of all squiggles. .
|
|
|
|
|
2018/02/19 22:58:53
Subject: Re:Camkierhi's other stuff blog.....Currently, Necromunda scenery.
|
|
Gargantuan Great Squiggoth
|
|
|
|
|
|
|
2018/02/20 03:26:43
Subject: Re:Camkierhi's other stuff blog.....Currently, Necromunda scenery.
|
|
Krazed Killa Kan
|
Thanks Cam, a tutorial on that would be great when you have the time. Also I was enjoying your "finished" pics of that amazing piece of underhive when I saw you said these are still WIP shots.... where are you possibly going to find something to improve on that?
|
|
|
|
|
|
2018/02/20 05:15:18
Subject: Camkierhi's other stuff blog.....Currently, Necromunda scenery.
|
|
Tough Tyrant Guard
|
Scenery is looking great, and the GUO and the base is looking totally disgusting.
Loving your work!
|
|
|
|
|
|
2018/02/20 07:11:56
Subject: Camkierhi's other stuff blog.....Currently, Necromunda scenery.
|
|
Decrepit Dakkanaut
|
Underhive looks suitably epic. Grats!
|
Theophony"... and there's strippers in terminator armor and lovecraftian shenanigans afoot."
Solar_Lion: "Man this sums up your blog nicely."
Anpu-adom: "being Geek is about Love. Some love broadly. Some love deeply. And then there are people like Graven. |
|
|
|
|
2018/02/20 16:37:45
Subject: Re:Camkierhi's other stuff blog.....Currently, Necromunda scenery.
|
|

Regular Dakkanaut
|
Very cool piece of terrain, and thanks for sharing your techniques!
|
|
|
|
|
|
2018/02/20 18:37:37
Subject: Camkierhi's other stuff blog.....Currently, Necromunda scenery.
|
|
Liberated Grot Land Raida
|
Still WIP he says... That thing is magnificent Cam, can't wait to see what more you'll add if this isn't 'finished' enough for you
|
A Squeaky Waaagh!!
Camkhieri: "And another very cool thing, my phones predictive text actually gave me chicken as an option after typing robot, how cool is that."'
Meercat: "All eyes turned to the horizon and beheld, in lonely and menacing grandeur, the silhouette of a single Grot robot chicken; a portent of evil days to come."
From 'The Plucking of Gindoo Phlem' |
|
|
|
|
2018/02/20 19:45:19
Subject: Re:Camkierhi's other stuff blog.....Currently, Necromunda scenery.
|
|
Longtime Dakkanaut
|
No piece of terrain is every truly finished, we just stop working on them. Cam is far more tenacious than most.
|
|
|
|
|
|
2018/02/20 19:54:49
Subject: Re:Camkierhi's other stuff blog.....Currently, Necromunda scenery.
|
|
Strategizing Grey Knight Chapter Master
|
Wow wow wow, that GUO is amazing!
|
IceAngel wrote:I must say Knightley, I am very envious of your squiggle ability. I mean, if squiggles were a tactical squad, you'd be the sergeant. If squiggles were an HQ, you'd be the special character. If squiggles were a way of life, you'd be Doctor Phil...
The Cleanest Painting blog ever!
Gitsplitta wrote:I am but a pretender... you are... the father of all squiggles. .
|
|
|
|
|
2018/02/20 22:55:36
Subject: Camkierhi's other stuff blog.....Currently, Necromunda scenery.
|
|
Regular Dakkanaut
|
Looking good, especially that terrain peace.
|
|
|
|
|
2018/02/20 23:30:58
Subject: Re:Camkierhi's other stuff blog.....Currently, Necromunda scenery.
|
|
[DCM]
Boom! Leman Russ Commander
|
Wait, wait, wait! You mean as demonstrated here in this blog that the secret to modeling and figure painting success is:
- An innovative flair for looking at the world sideways and doing what others don't?
- Meticulous attention to detail?
- Arduous, multi-step processes that add fine and minute detail at each stage?
- Constant practice and development of skills?
That's it, I'm out! 
More seriously- a truly impressive bout of work coming out of you Cam- really good stuff and got me thinking of what I' going to try and incorporate myself.
Thank you for the tutorials!
 
|
"He fears his fate too much, or his desserts are small, who will not put it to a single touch; to win- or lose- it all."
Montrose Toast

|
|
|
|
|
2018/02/21 00:59:31
Subject: Camkierhi's other stuff blog.....Currently, Necromunda scenery.
|
|
Decrepit Dakkanaut
|
Jesus Cam, Do you have any idea how much top shelf stuff you've produced since I've trimmed my beard last? You should leave some time for commenting between amazing drops
|
"dave you are the definition of old school..." -Viktor Von Domm    My P&M Blog : My P&M Blog :
It's great how just adding a little iconography, and rivets of course, can make something look distinctly 40K-adamsouza
"Ah yes, the sound of riveting.....Swear word after swear word and the clinking of thrown tools" "Nope. It sucks do it again..."- mxwllmdr
"It puts together more terrain, or else it gets the hose again...-dangledorf2.0
"This is the Imperium, there is no peace, there are only rivets" -Vitruvian XVII
"I think rivets are the perfect solution to almost every problem"- Rawson
More buildings for the Building God! -Shasolenzabi
 |
|
|
|
|
2018/02/21 02:01:55
Subject: Re:Camkierhi's other stuff blog.....Currently, Necromunda scenery.
|
|
Gargantuan Great Squiggoth
|
Thank you all. 
You lot are nuts....maybe nearly as nuts as me!!!!
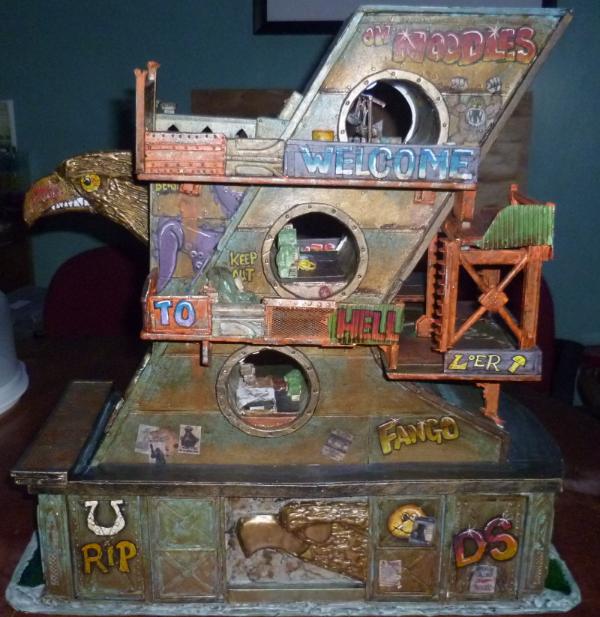
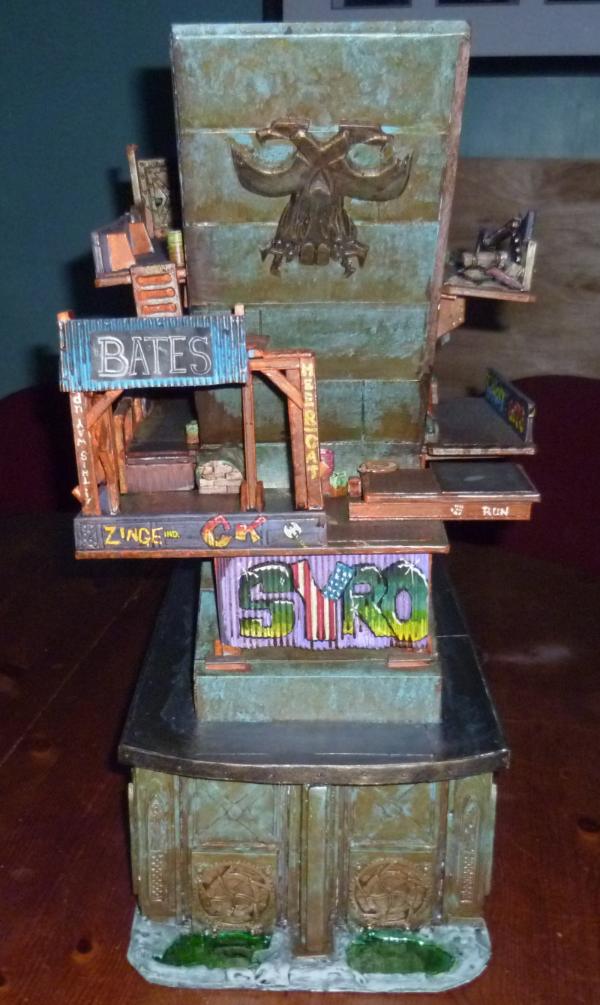
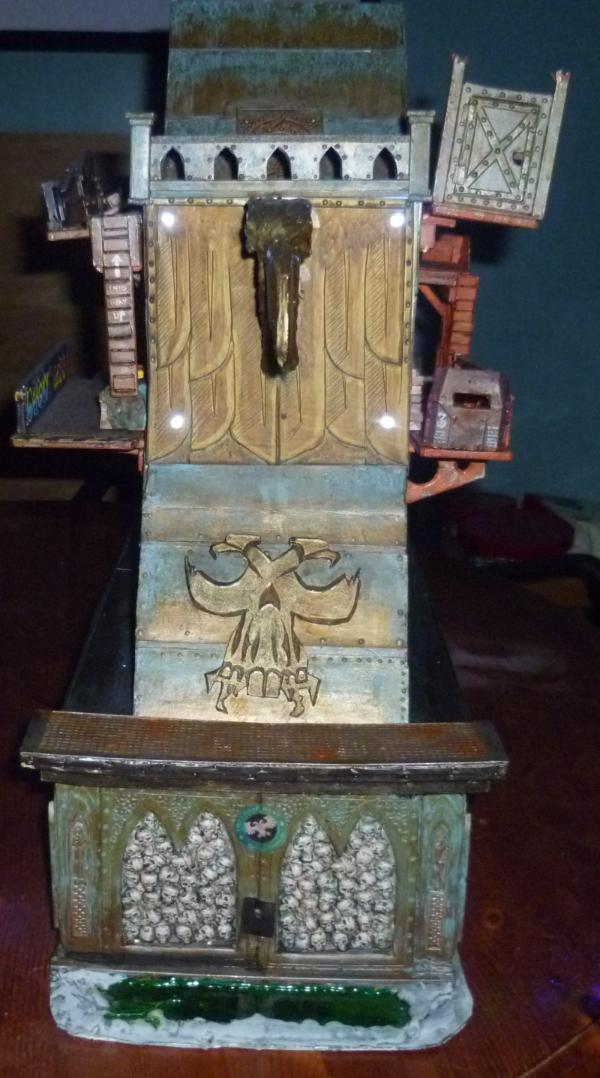
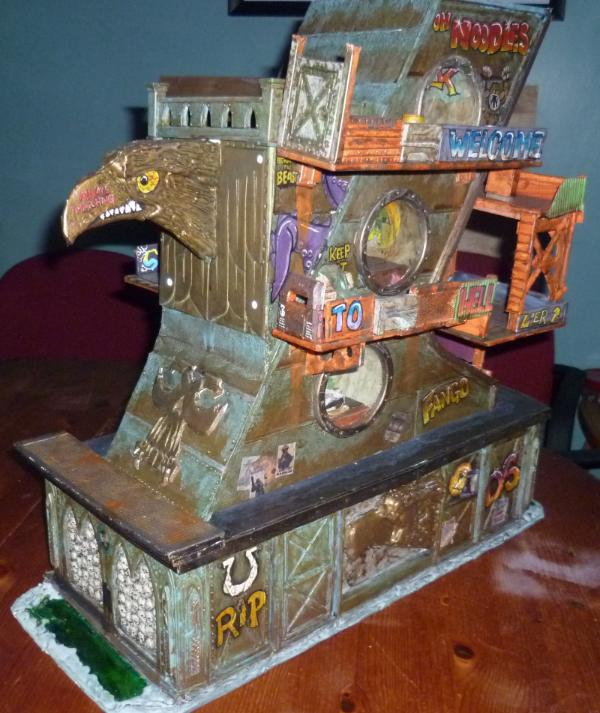
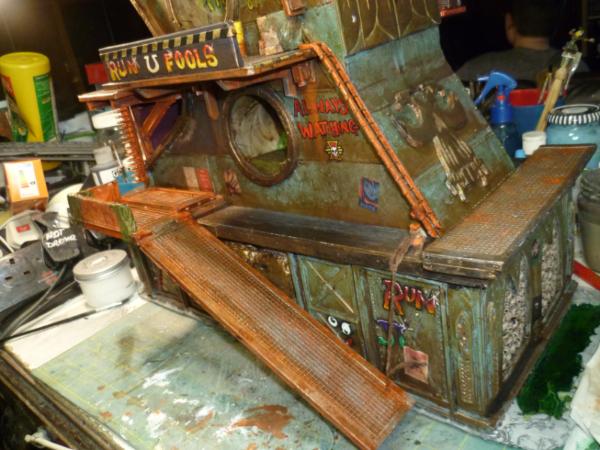
What to add? Well STILL WIP here, but here's todays additions.......
Well you need some way of accessing the upper levels don't you....
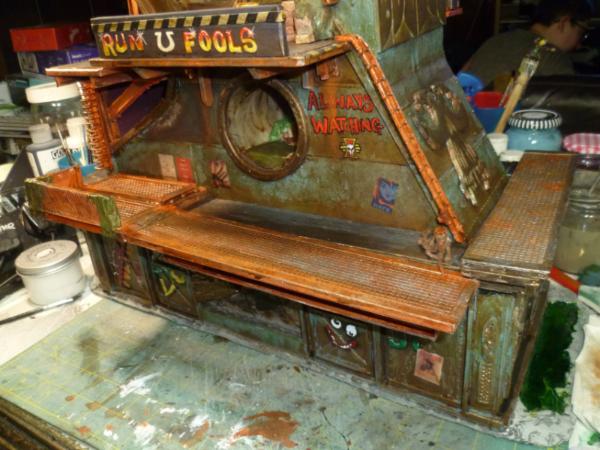
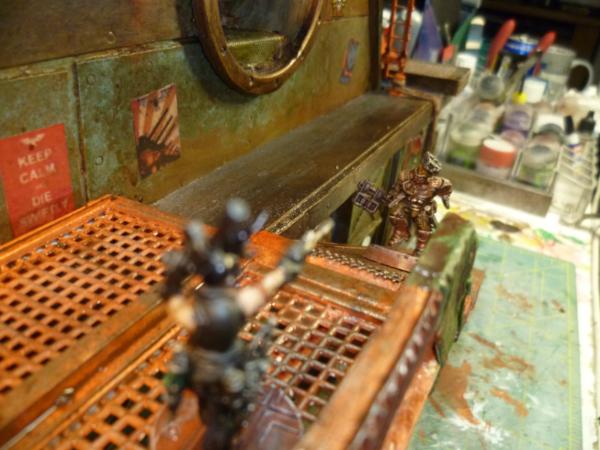
And yes models stay put on the ramp...
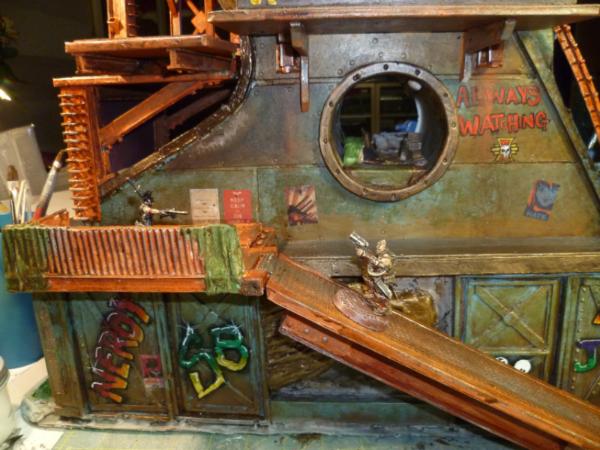
This guy is in trouble...
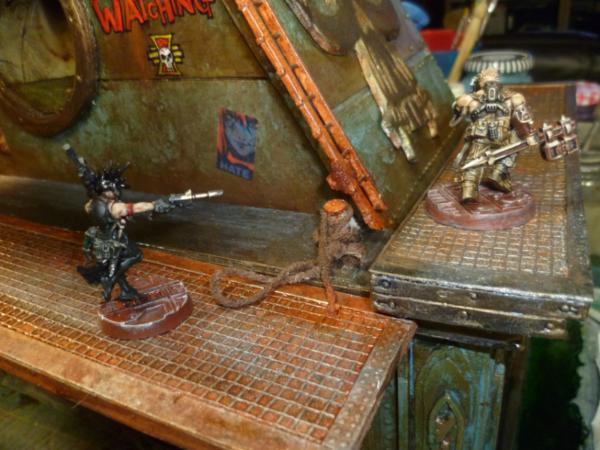
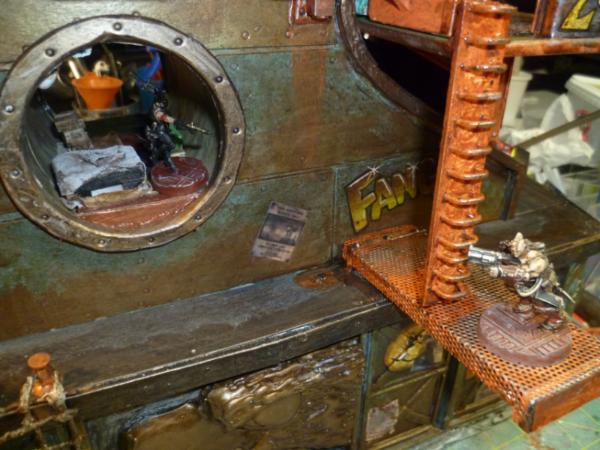
So the other side..
Thank you all for looking, and the wonderful comments.
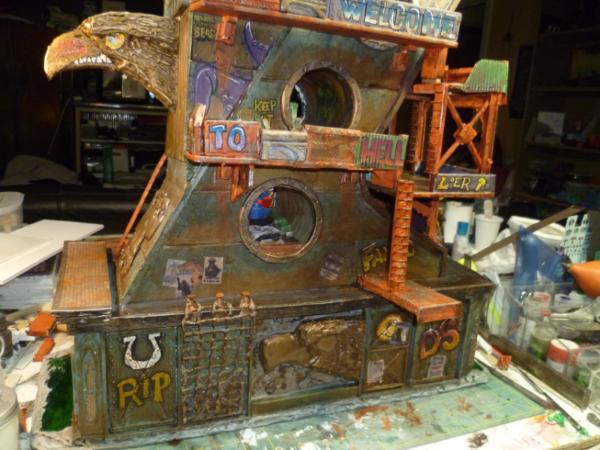
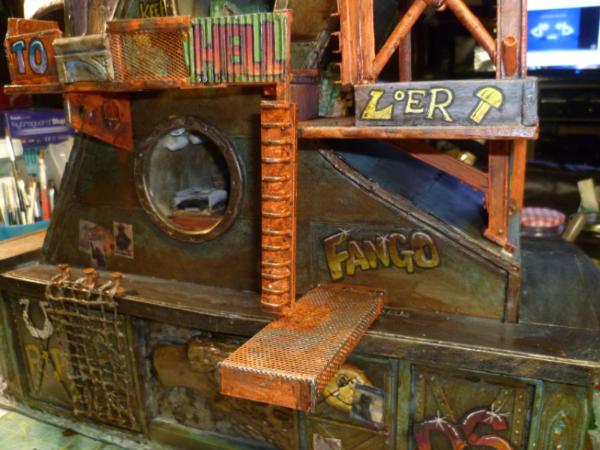
This is getting close now, few details to add the the lower half, and sort the base. Anyone think of anything I have missed?
Now a serious question, this thing being so big, I aint got room, so anyone want it, just have to cover postage.
Lastly, honestly guys I aint nothing special, most of you are better painters, and better modellers, a lot of what you see is inspired from you all, admittedly I am a slightly warped individual, so strange stuff comes out now and then. My point is any of you could do this, honestly. I spend hours a day ploughing through your blogs, and enjoy every minute of it. You are all amazing.
|
|
|
|
|
|
|
|


 Finished Forge World Elysian Army
  Finished Order of Our Martyred Lady - Sisters of Battle