| Author |
Message |
 |
|
|
|
|
Advert
|
Forum adverts like this one are shown to any user who is not logged in. Join us by filling out a tiny 3 field form and you will get your own, free, dakka user account which gives a good range of benefits to you:
- No adverts like this in the forums anymore.
- Times and dates in your local timezone.
- Full tracking of what you have read so you can skip to your first unread post, easily see what has changed since you last logged in, and easily see what is new at a glance.
- Email notifications for threads you want to watch closely.
- Being a part of the oldest wargaming community on the net.
If you are already a member then feel free to login now. |
|
 |
2011/01/24 22:28:10
Subject: Rubber & Resin - Custom Resin Bases & Custom Disk of Tzeentch
|
|

Regular Dakkanaut
|
Greetings Dakka Residents!
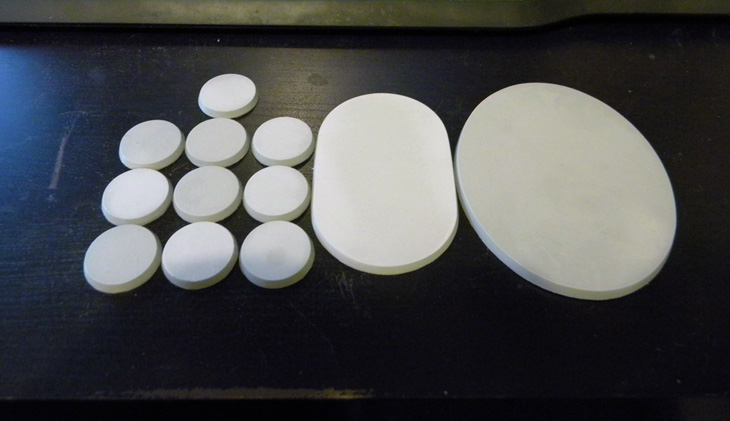
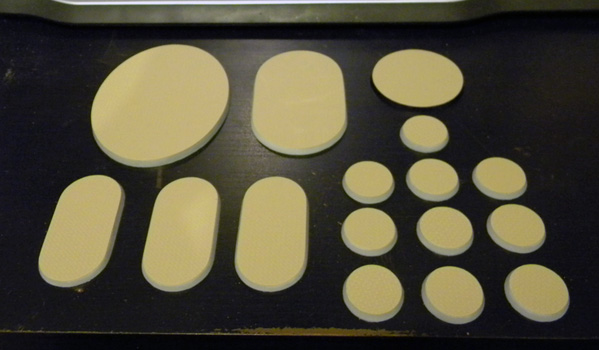
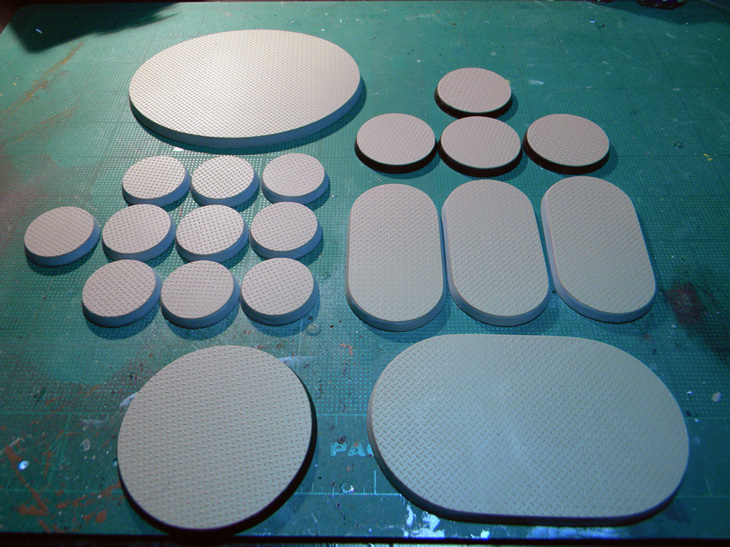
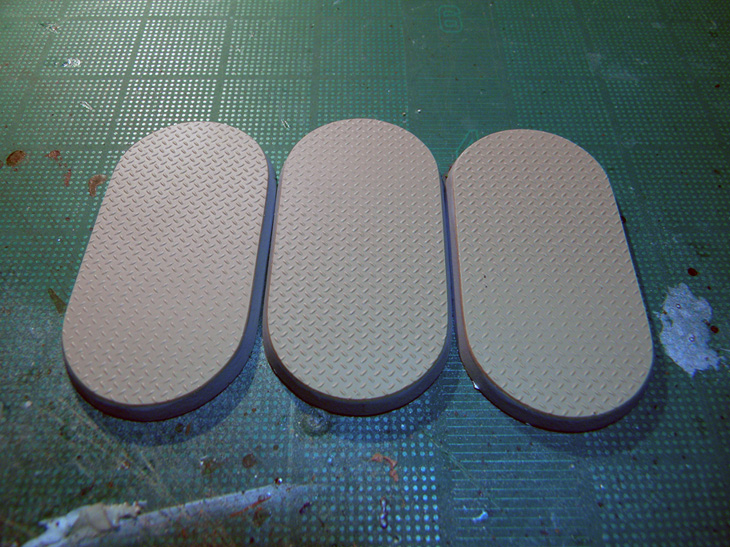
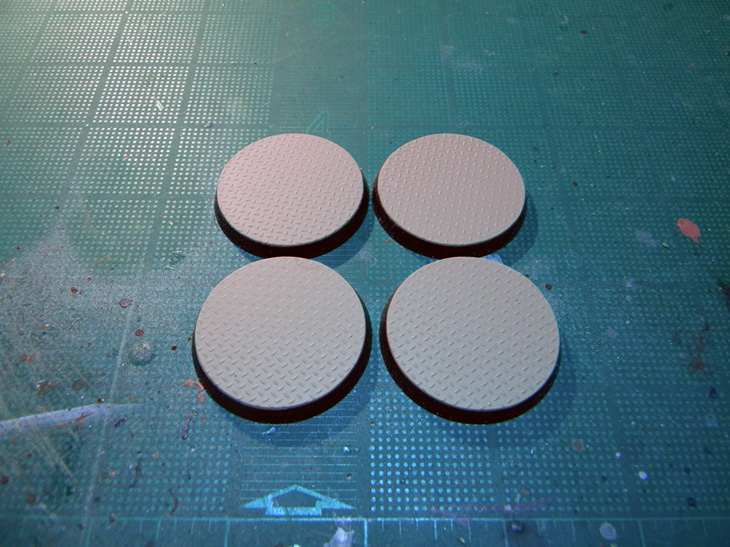
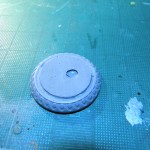
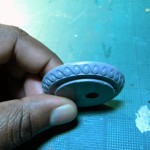
I wanted to take a stab at making my own resin bases. I have two paint schemes that I wanted to show off and the bases I have in mind would be perfect for displaying both. I’ve decided that my first, and likely only, base series will be a diamond plate design. I wanted a base that didn’t distract from the design so this style will be perfect.
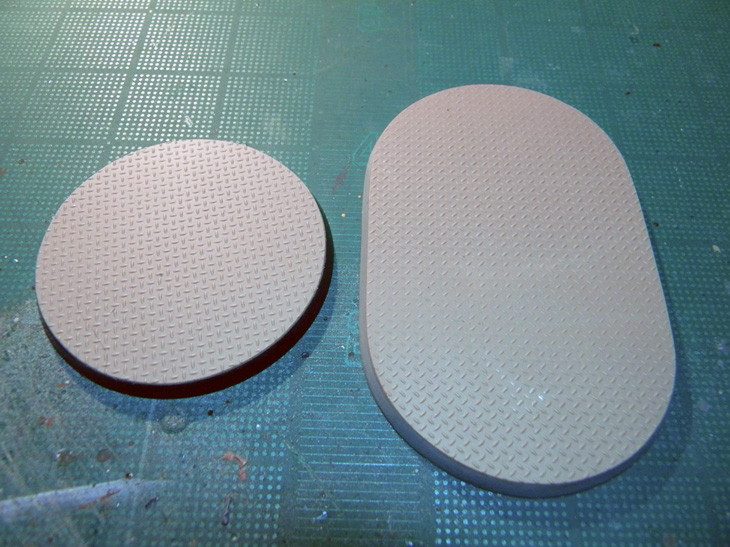
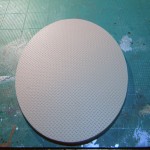
I started with some resin blanks from Dragonforge. Jeff Wilhelm created some blanks to for you to craft your own custom bases. I picked up some bike bases, 30mm rounds, and 2 large oval blanks for my set. The 25mm & 40mm will come from my base box.

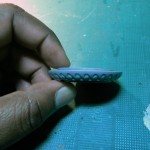
I will be using plasti-card sheets with diamond plate detail for these bases (Plastruct PS-155). I needed the sheet to adhere to the bases as securely as possible so smoothed the top of each base with fine grade sandpaper.
I only had 1 whole sheet and 1/2 of another I needed to plot out carefully how many bases I could get from each. It turns out I had EXACTLY the amount I needed. Lucky me!
Using a T-Square I measured and cut enough for each base and glued them down with superglue. I used a paper towel to clean up excess glue under the sheets. The larger pieces were set to cure under a heavy book.
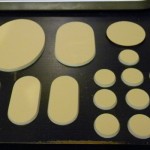
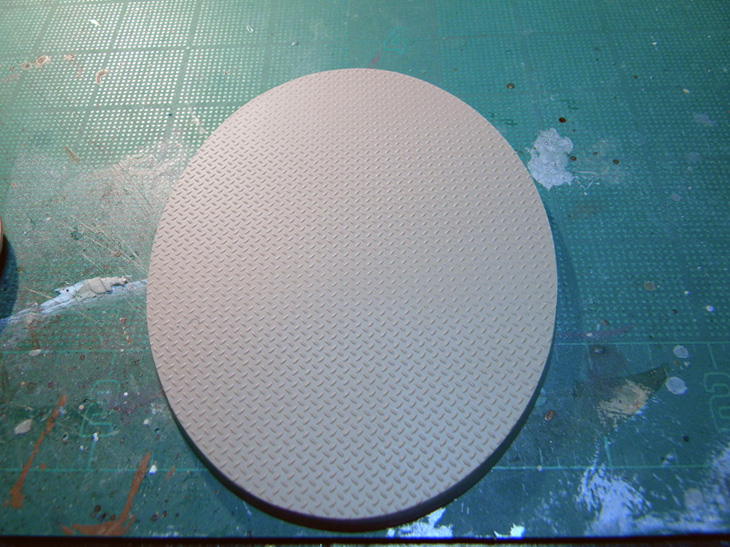
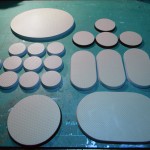
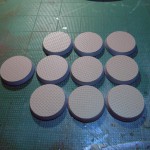
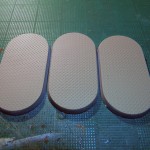
The next part was the easiest but most time consuming. I trimmed away most of the excess sheet with a fresh x-acto knife. I started with cutting the corners away then picking the bases up and trimming as close as I dared. I left a little rim of excess sheet because I don't know about you but I find it difficult cutting a perfect circle with a razor blade. The rest of the styrene sheet was filed away with one of my flat hobby files. This allowed me to get a perfect seamless rim to all of my bases.
This part took forever, but the results were very satisfying! Take your time here and file in one direction down towards the bottom of the base. Going in the other direction will only pull off the sheet and piss you off rightly.
The next phase is the casting phase. I'll be ordering some silicone rubber this week so I can make some molds of these bad boys. I think the time I took to get the edges smooth will pay out nicely with some seamless base edges.
I'll take some more close-ups of the finished masters when I get home this evening.
Stay Tuned!!!!
|
|
This message was edited 1 time. Last update was at 2011/01/25 15:34:26
|
|
|
 |
|
2011/01/25 14:53:18
Subject: Re:Rubber & Resin - Custom Resin Bases
|
|
Regular Dakkanaut
|
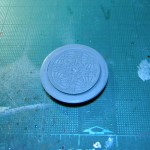
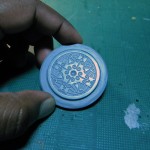
Update - I took some high-res pictures of the masters last night.
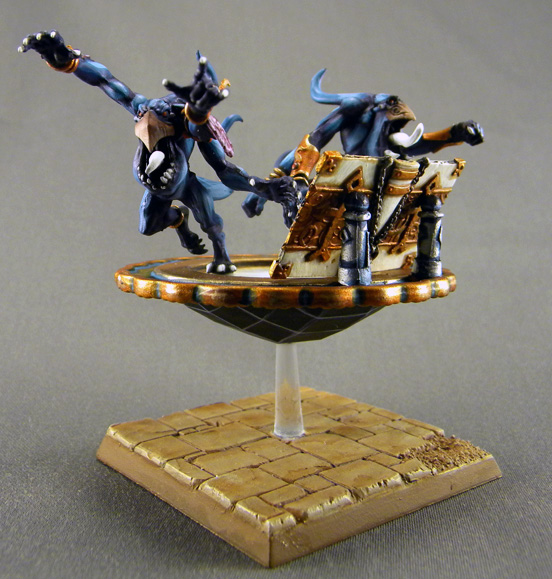
 Automatically Appended Next Post: Automatically Appended Next Post: I was asked back in November if I could recreate the Blue Scribes conversion I did for a in-store tournament in September.
Unfortunately the answer to that is no. The broach I used for the disk in that conversion is likely gone forever. I’ve gone back to Michael’s no less then 10 times trying to find it without success. I don’t think they sell it anymore. So screw them! I’m making my own!
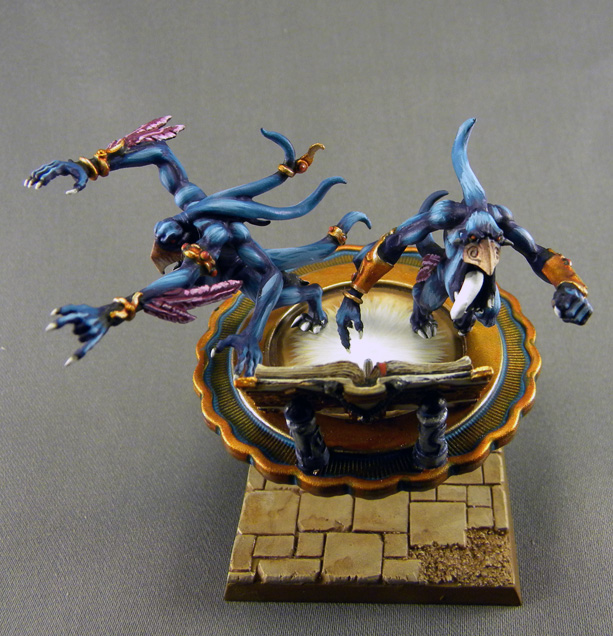
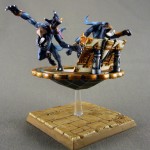
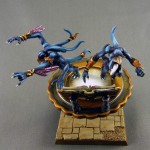
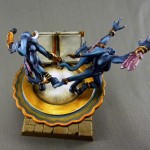
The Disk of Tzeentch is a mount akin to Khorne’s Juggernaut or Slaanesh’s Boobworm, but the disk model GW has released is very uninspired IMO. This conversion will allow me to give the disk the appropriate amount of painting attention I feel it deserves.
I know this design is not very demonic but my logic is solid. By GW's own fluff, Sorcerers have to catch and transform a screamer into a new form in order to gain this mount. I'm going with an arcane flying platform to represent my disks which I feel is fitting for a servant of Tchar.
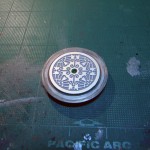
Here is my current master:
|
|
This message was edited 1 time. Last update was at 2011/01/25 15:37:00
|
|
|
|
|
2011/01/31 23:31:27
Subject: Rubber & Resin - Custom Resin Bases & Custom Disk of Tzeentch
|
|
Regular Dakkanaut
|
Order for resin/rubber placed.
I've been using Smooth-On rubbers and resins for the few small projects I've worked on an I've been satisfied.
Resin - I went with Smooth Cast 305. I normally go with SC-300 but I've found the that version sets VERY quickly and I have little time to work out air bubbles. I also picked up some pigment to make the resin gray.
Rubber - I've had great success with Mold Max 30 so I stuck with it. You'll need a scale to use this stuff if you are looking to get some of your own BTW.
Can't wait for this stuff to arrive!
|
|
|
|
|
|
2011/02/01 00:12:42
Subject: Rubber & Resin - Custom Resin Bases & Custom Disk of Tzeentch
|
|
Excellent Exalted Champion of Chaos
Lake Forest, California, South Orange County
|
I use those exact products for my bases and casting projects. I could go for some pigment though as it's hard to find miscasts in pure white.
Oomoo 25 works well for those who don't want to use a scale as well.
|
"Bryan always said that if the studio ever had to mix with the manufacturing and sales part of the business it would destroy the studio. And I have to say – he wasn’t wrong there! ... It’s become the promotions department of a toy company." -- Rick Priestly
 |
|
|
|
|
2011/02/01 01:58:43
Subject: Re:Rubber & Resin - Custom Resin Bases & Custom Disk of Tzeentch
|
|
Posts with Authority
Boston-area [Watertown] Massachusetts
|
You have just solved my problem for making Discs of Tzeentch. I <3 you forever and ever. TO MICHAELS!
Also, Sub'd.
--Brian
|
Falling down is the same as being hit by a planet — "I paint to the 20 foot rule, it saves a lot of time." -- Me
ddogwood wrote:People who feel the need to cheat at Warhammer deserve pity, not anger. I mean, how pathetic does your life have to be to make you feel like you need to cheat at your toy army soldiers game?
 |
|
|
|
|
2011/02/04 19:35:46
Subject: Rubber & Resin - Custom Resin Bases & Custom Disk of Tzeentch
|
|
Regular Dakkanaut
|
The resin & rubber arrived yesterday! Now I can get this thread rollin'!
@aerethan: I looked at the Oomoo and will have to give it a try next restock. I tend to buy the trial kits as a gallon of rubber would be over kill.
@Briancj - LOL! I'm glad it helped. I've been trying to find the perfect disk for years and almost gave up. A double-take in Michael's changed that forever.
|
|
|
|
|
|
2011/02/04 23:35:08
Subject: Re:Rubber & Resin - Custom Resin Bases & Custom Disk of Tzeentch
|
|

Nurgle Chosen Marine on a Palanquin
Dumbarton, Scotland
|
Wow, disc looks great!
|
 Karyorhexxus' Sons of the Locust: 1000pts Karyorhexxus' Sons of the Locust: 1000pts |
|
|
|
|
2011/02/05 07:56:04
Subject: Rubber & Resin - Custom Resin Bases & Custom Disk of Tzeentch
|
|
Excellent Exalted Champion of Chaos
Lake Forest, California, South Orange County
|
I only use trial kits as well. $30 gets a decent number of molds done.
|
"Bryan always said that if the studio ever had to mix with the manufacturing and sales part of the business it would destroy the studio. And I have to say – he wasn’t wrong there! ... It’s become the promotions department of a toy company." -- Rick Priestly
|
|
|
|
|
2011/02/07 22:53:57
Subject: Re:Rubber & Resin - Custom Resin Bases & Custom Disk of Tzeentch
|
|
Regular Dakkanaut
|
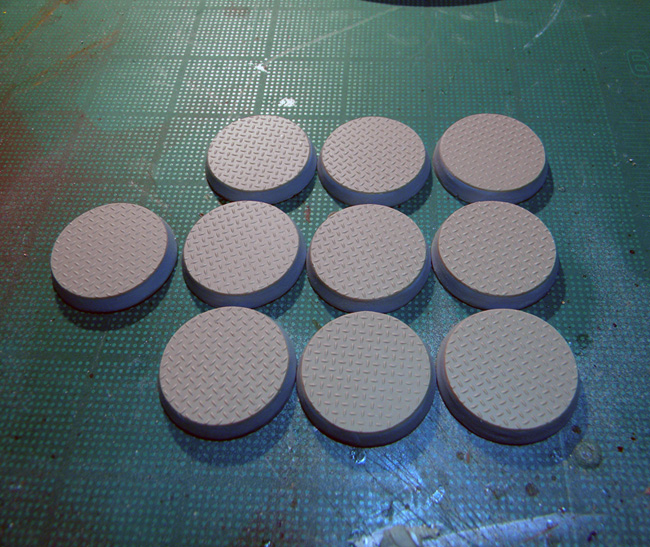
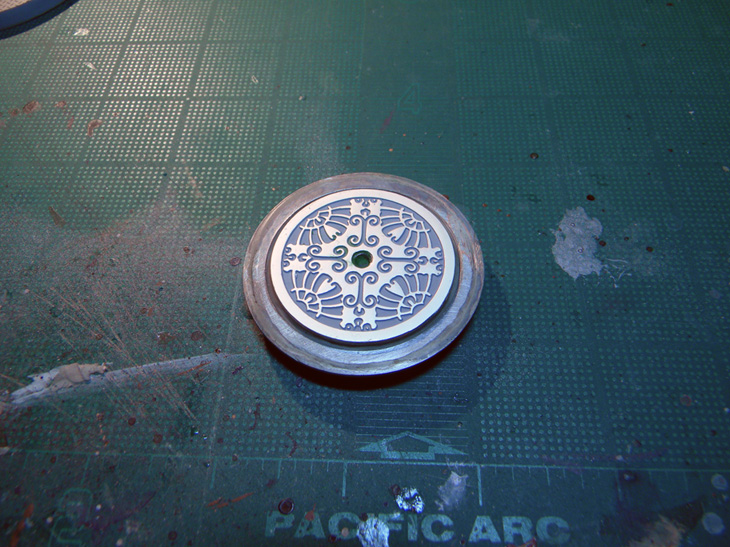
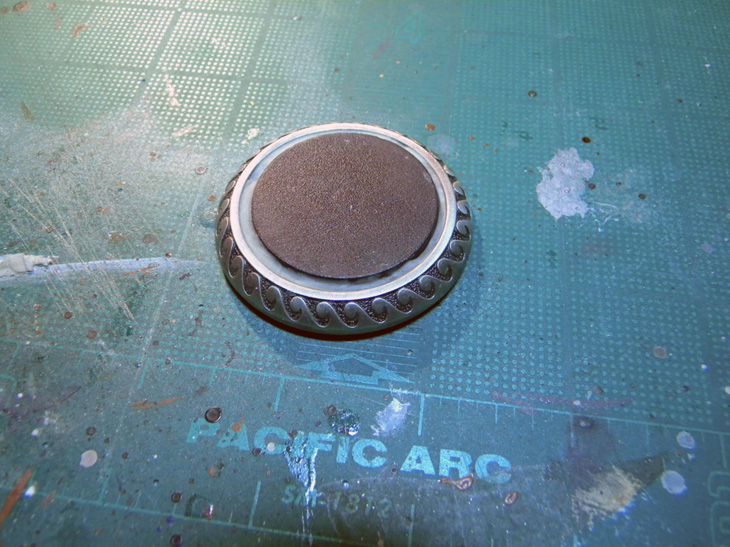
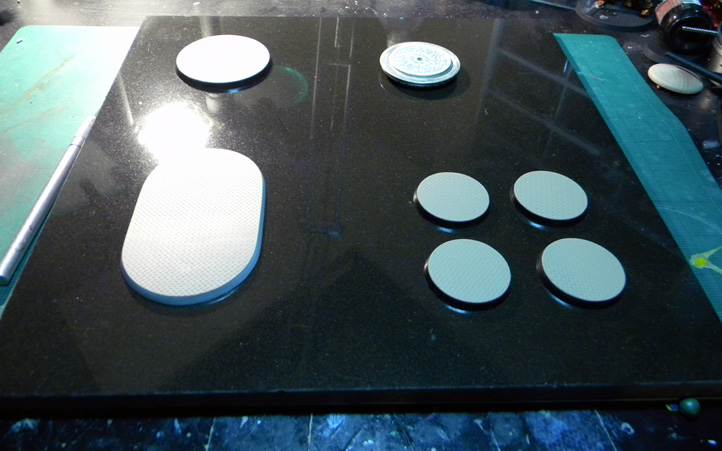
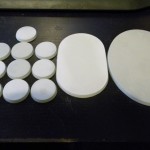
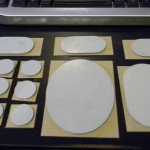
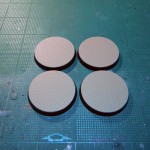
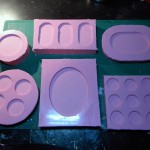
Welcome to Part II of my custom resin base project. I’ve been waiting for almost 2 months for this part and I couldn’t wait to get started, so here we go!
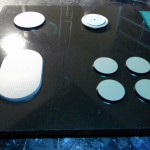
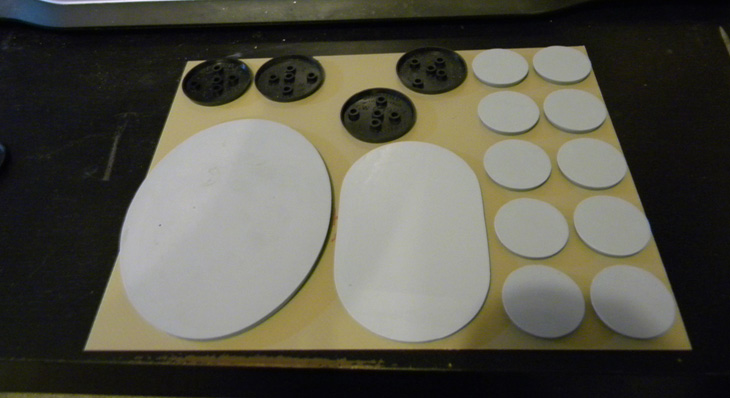
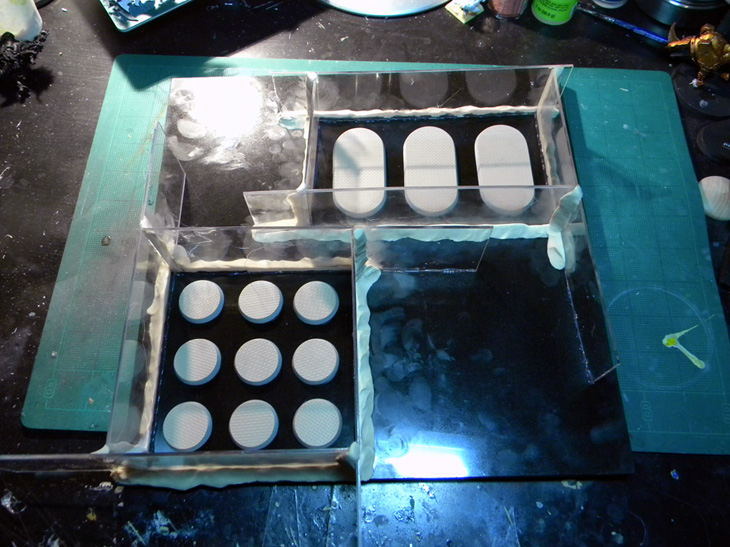
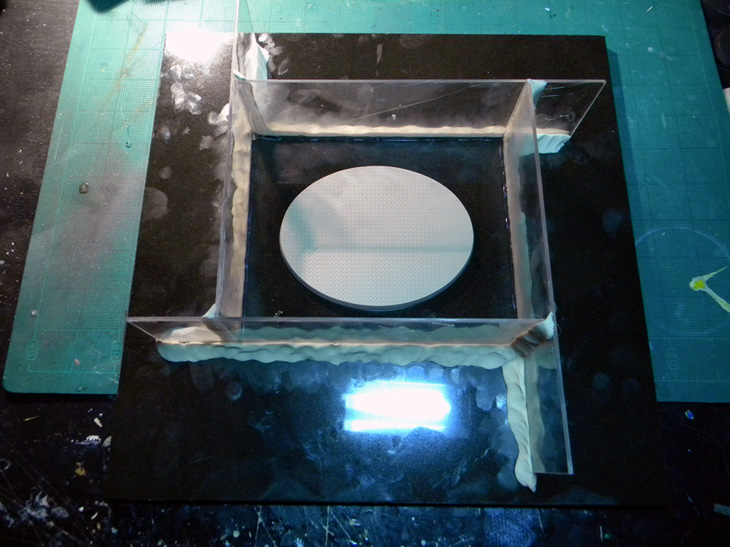
A few weeks back I picked up some granite tiles from Lowes for use in this project (and they worked perfectly). I plotted out real estate for each object to be casted on a tile.
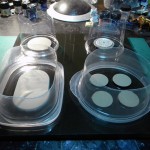
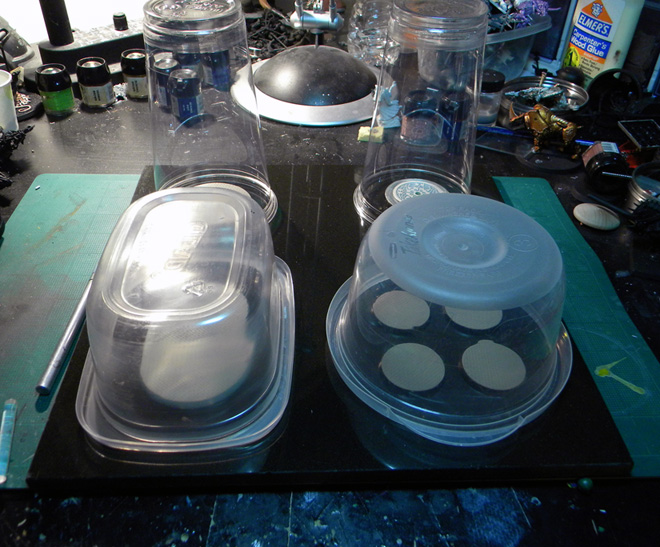
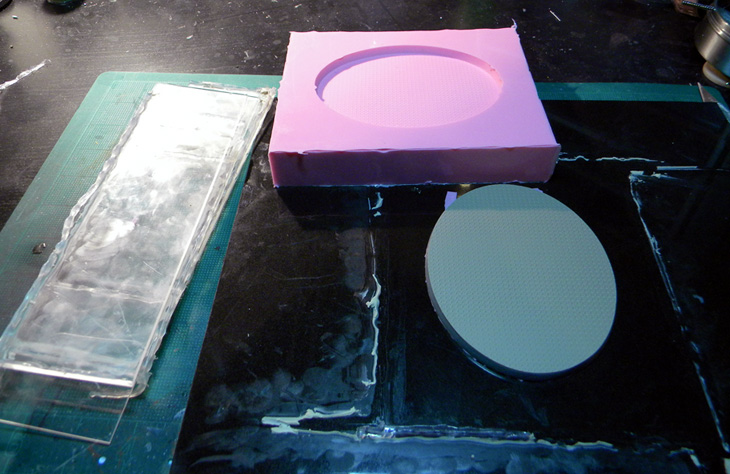
After each was roughly in place, I placed their respective “mold boxes” down so I could gauge the room each would need. My mold boxes being a pair of plastic cups and old plastic bowls. The tops of each were cut off with a X-Acto knife.
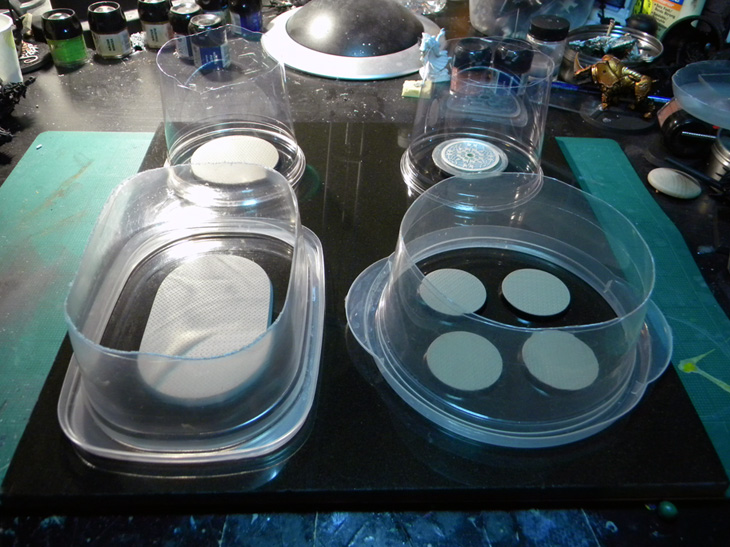
With a hot glue gun affixed each set to the tile followed by each mold box. This part was pretty annoying as I had real difficulty getting the bases to lay flush on the tile without any gaps. I anticipated this problem and tried crazy glue but it would not cure for some damn reason (I assume it needs air to cure?). Gaps will allow for rubber to get under the object and give you cleanup work after the mold has set. I only managed to get the 40mm and 60mm sets to sit flush. All the others had small gaps. I’ll need to find a better solution…
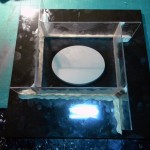
I need again sing the praises of acrylic sheet. It makes for perfect mold box crafting material, as it’s cheap, easy to cut, and most importantly CLEAR. I used 3 10x8 inch sheets for the last three boxes and cut them into 2.5x10 inch strips. I glued the bases down (cursing the gaps), built/glued the boxes around them and sealed the edges with non-drying clay to prevent leaking.
I then brushed some mold release to avoid possible sticking.
Rubber pouring stage en route so stay tuned!
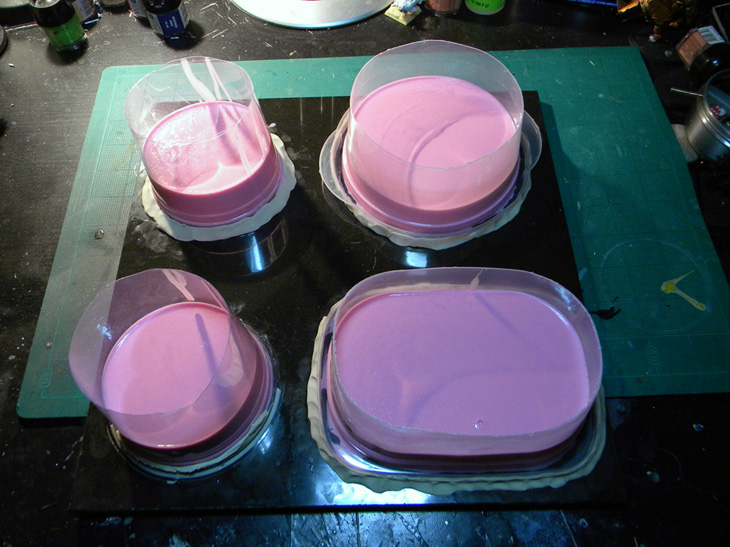
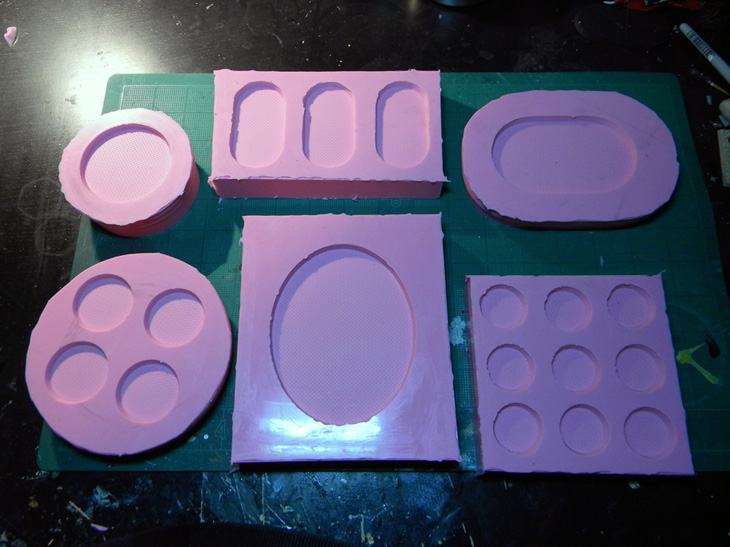
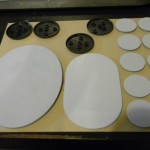
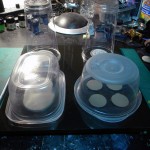
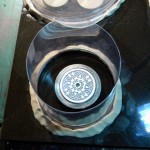
Shawn G. (SoI) Automatically Appended Next Post: Welcome to Part III of my custom resin base project. Mold Making!
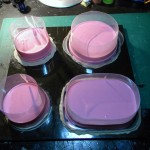

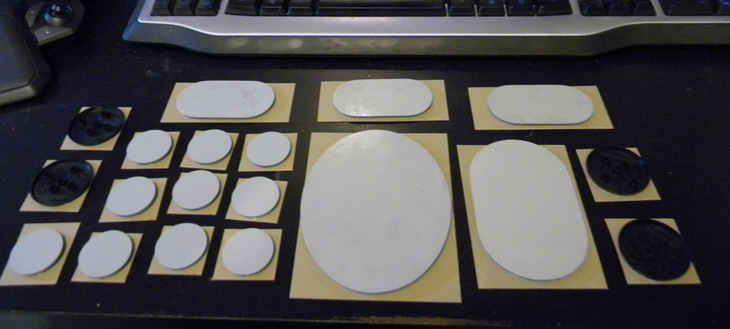
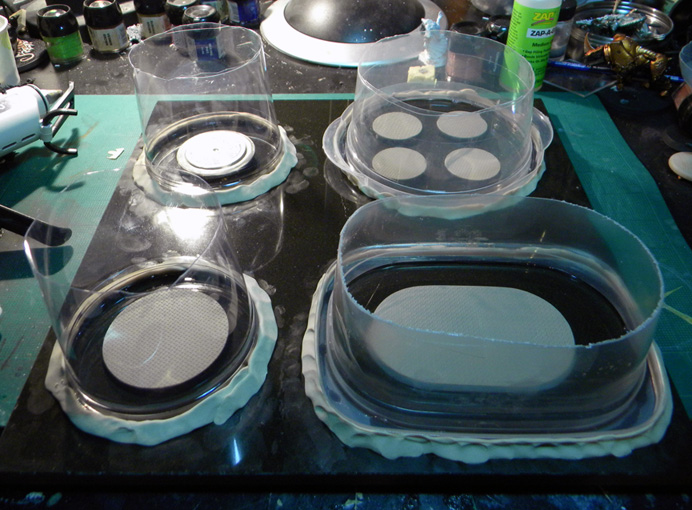
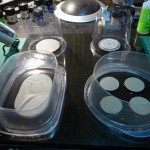
I mixed up the rubber in a large plastic paint pot. Now this stuff usually needs a scale to measure out the 10:1 ratio but as I was using the whole trial kit that was not necessary. Each mold was poured slowly in a very thin stream into a corner (if it had one) so the rubber could work it’s own way around each base. This method prevents air bubbles.
It took 2.25 trail kits for these 7 molds (had to whip out the scale for the last bit). I made sure that each one had at least 3/4 ‘s of an inch of rubber padding. Each mold performed excellently and there were no leaks (I did spill a little on the side of a few). I allowed each base to cure for 22 hours. I usually give it a full day but I was really impatient this time.
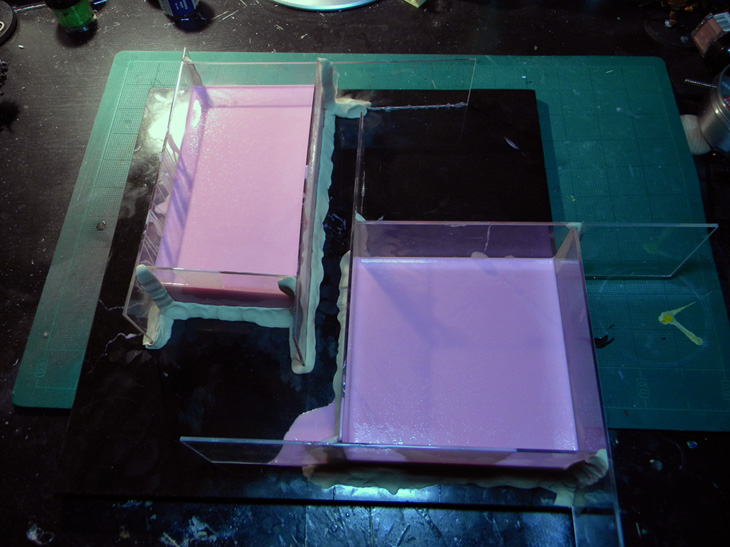
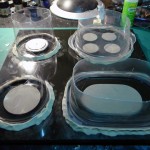
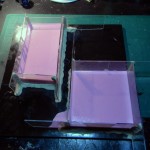
Demolding was easy. I recovered the clay and saved it for future projects in a ziplock bag, then GENTLY pried the mold boxes of the round set off of the tile. The hot glue came away from the granite with ease. Be sure you take your time here. You don’t want to go yanking the molds up as you can tear the rubber and ruin the mold.
The acrylic boxes took a little more time. I had to cut the sides a little with an X-Acto and then peeled each side away. As expected rubber seeped under some of the bases and I had a bit of cleanup work to trim all that extra rubber away.
All and all, these came out well!
Casting to follow…
Shawn G. (SoI)
|
|
This message was edited 1 time. Last update was at 2011/02/07 23:28:00
|
|
|
|
|
2011/02/08 20:00:13
Subject: Re:Rubber & Resin - Custom Resin Bases & Custom Disk of Tzeentch
|
|
Regular Dakkanaut
|
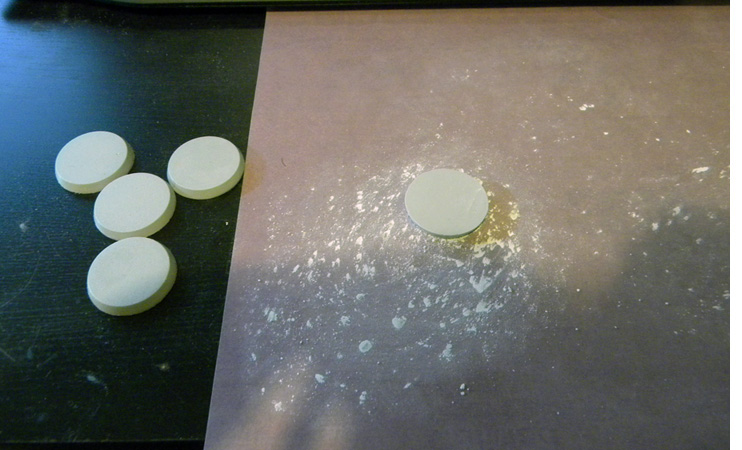
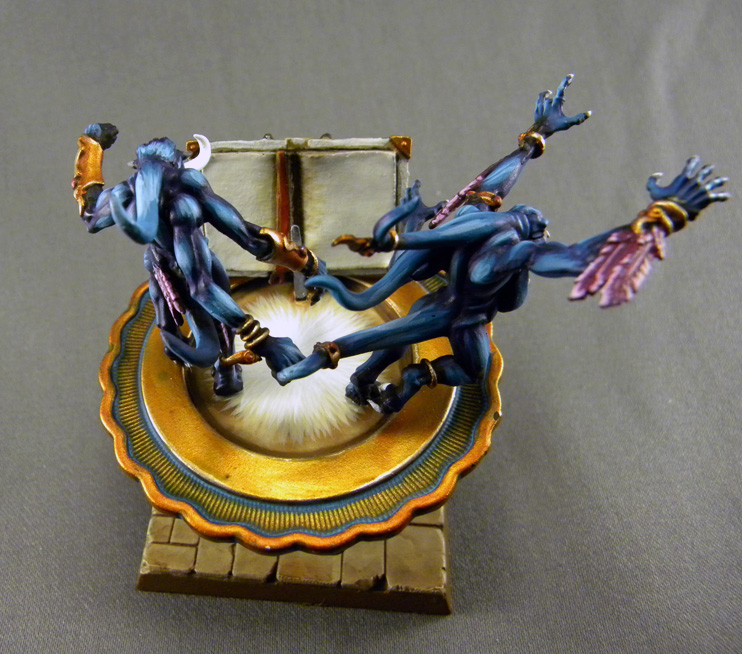
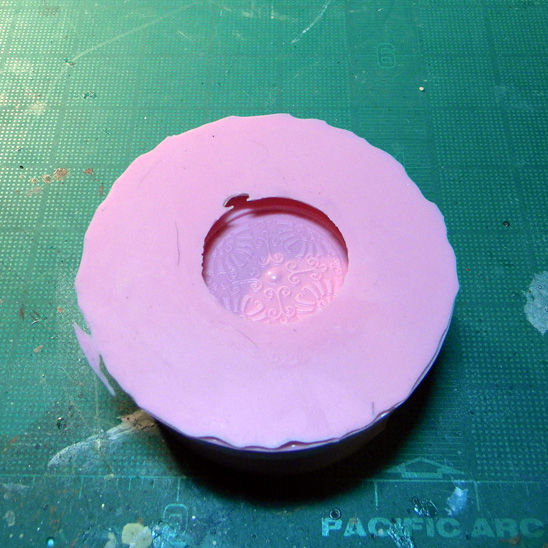
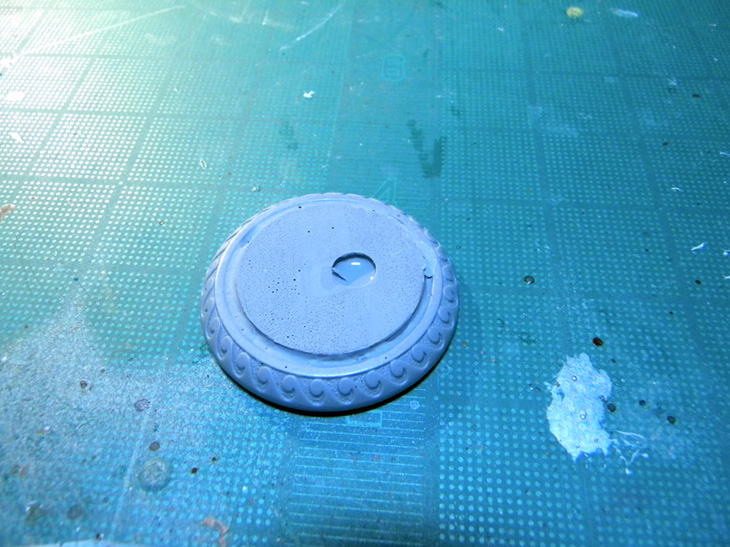
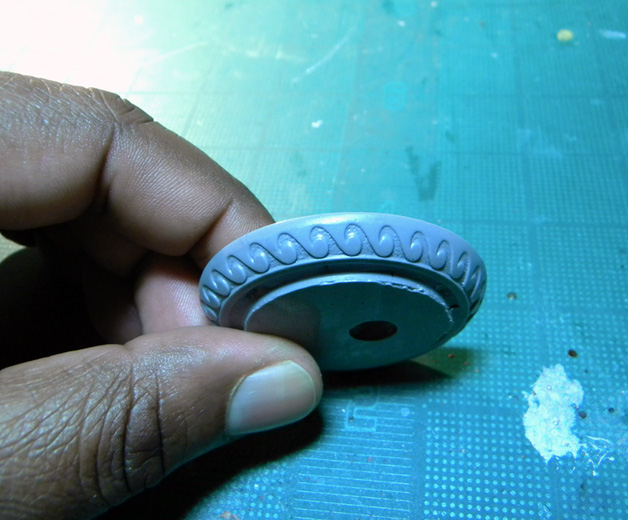
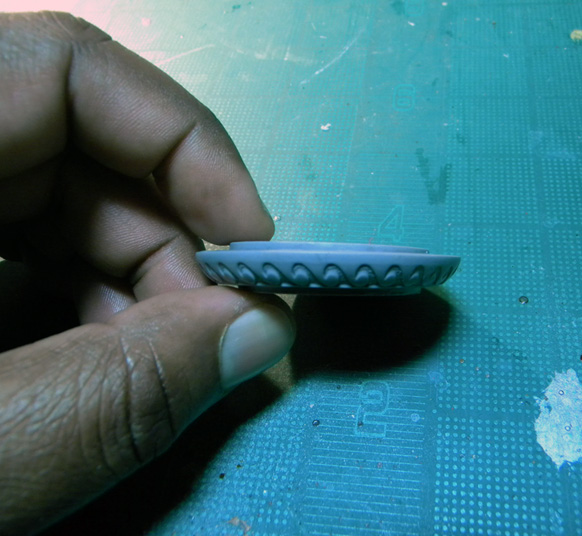
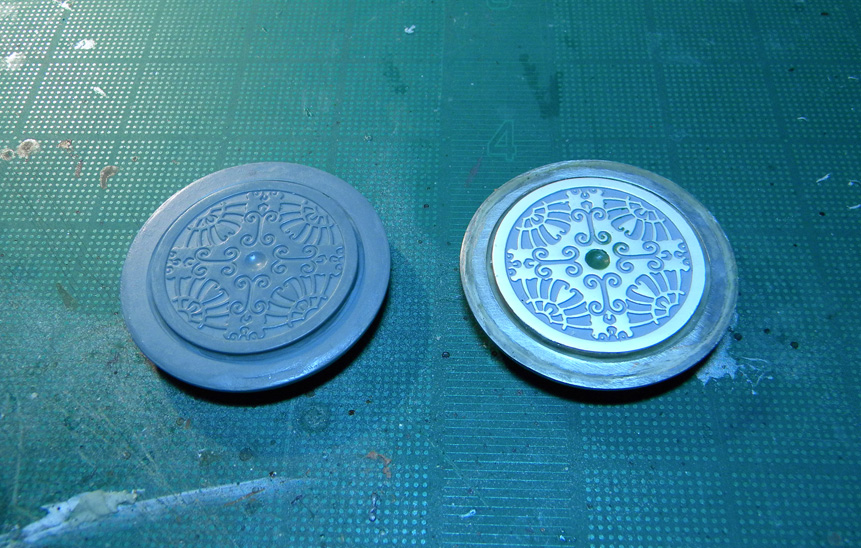
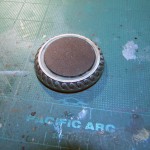
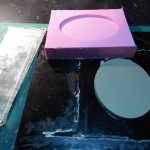
Disk of Tzeentch update.
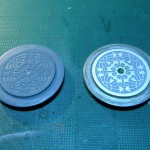
Part II of my Disk of Tzeentch project! I worked on this disk for about 2 days sanding, gap filling, and filing and sanding again. It took a while for me to get it to a acceptable standard for casting. I’ve never been more pleased with a projects outcome.
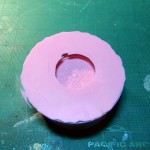
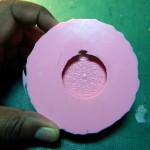
It did have some points of serious concern for molding. First of all, I was not completely sure it was watertight. I really didn’t want rubber flowing into the disk and screwing every thing up so I gap filled with Apoxy-Sculpt and filed it smooth where I could.
Second, it has a considerable undercut. This could pose a real problem with air bubbles and getting the resin out of the mold. The undercut does taper/slope towards the center so air bubbles were not a problem. The longer set time for the resin REALLY shined here and I was glad I made the switch. The rubber I chose is very strong so the undercut should was not an issue.
Molding was easy. I discovered there was a trapped air bubble in the rubber after demolding but I could see this would not be a problem.
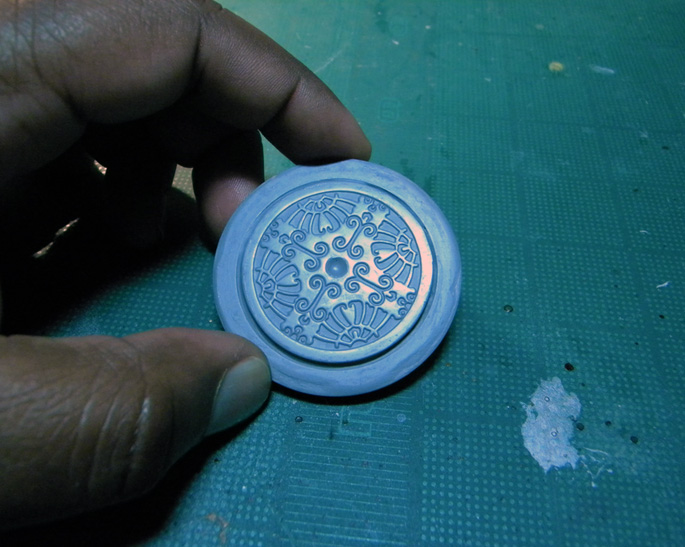
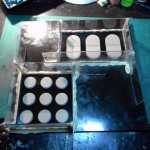
I dared a cast last night, and it came out perfectly. I’ll need mold release as this resin sticks to my tiles with a death grip. I was lucky to get this off the tile while it was still barley soft. The first cast of my bases did not survive. They could not be removed from the tile. Had to throw it away. /sadpanda
I can’t wait to paint this up!!!!
|
|
|
|
|
|
2011/02/10 17:50:58
Subject: Rubber & Resin - Custom Resin Bases & Custom Disk of Tzeentch
|
|
Regular Dakkanaut
|
Now that this tutorial (kind of?) is done, I've decided to add 2 Tzeentch heralds to my army as disk riders and I'll be using my new resin casts.
I'll be opening a new thread in the Paint Blog section.
|
|
|
|
|
|
2011/02/13 17:49:08
Subject: Rubber & Resin - Custom Resin Bases & Custom Disk of Tzeentch
|
|
Horrific Horror
|
It might be overkill but when I pour a mold I will usually place the mold in a TV dinner tray and then place a mid-sized fan in the tray also. Once you turn that sucker on it will vibrate the crap out of your mold--Which will cause air bubbles to break free and rise up. Usually I only let it sit there for 2-3 hours. By that point if an air bubble hasn't come loose it probably won't.
On topic:
Amazing walkthrough! Very helpful for first timers.
|
|
This message was edited 1 time. Last update was at 2011/02/13 17:49:50
If that upsets your fluff stomach, buy a case of "it's just a game"-bizmo and get over it.
-Mahu
Men are like steel. When they lose their temper, they lose their worth.
-Chuck Norris |
|
|
|
|
2011/02/14 23:11:28
Subject: Rubber & Resin - Custom Resin Bases & Custom Disk of Tzeentch
|
|
Regular Dakkanaut
|
@Mosg: Glad you liked!
The resin I used has a 7min setting time. I also dust the insides of my molds with baby powder as it improves the flow of the resin and really helps with de-airing (pesky air bubbles)
|
|
|
|
|
|
2011/02/15 02:29:31
Subject: Re:Rubber & Resin - Custom Resin Bases & Custom Disk of Tzeentch
|
|
Dakka Veteran
|
Briancj wrote:You have just solved my problem for making Discs of Tzeentch. I <3 you forever and ever. TO MICHAELS!
Also, Sub'd.
--Brian
Did Micheal’s have the resin and rubber molding stuff when you went there? The selection at mine was less than adequate, but might try another store in the suburbs if I hear other places have a better stock.
Mosg wrote:
It might be overkill but when I pour a mold I will usually place the mold in a TV dinner tray and then place a mid-sized fan in the tray also. Once you turn that sucker on it will vibrate the crap out of your mold--Which will cause air bubbles to break free and rise up. Usually I only let it sit there for 2-3 hours. By that point if an air bubble hasn't come loose it probably won't.
On topic:
Amazing walkthrough! Very helpful for first timers.
I've had great luck with putting my stuff on top of the washer or dryer and doing a load of laundry. 
The rubber phase anyway, I have the same resin Soul is using (which among other things really isn;t suitable for indoor use).
|
|
|
|
|
|
2011/02/15 03:19:50
Subject: Re:Rubber & Resin - Custom Resin Bases & Custom Disk of Tzeentch
|
|
Posts with Authority
Boston-area [Watertown] Massachusetts
|
Alas, I was referring to using buttons/pendants as the basis for the disks. It was something I simply had not thought of.
As for resin supplies, the few times I've worked with it, I've ordered off of the internets, instead of buying retail.
I used one of those vibrating 'massagers' you can buy in drug stores/Walgreens/CVS/your local Chemist Shoppe against my resin-holding box, the vibration takes care of the air bubbles very well, and the things are dirt cheap. I know people who have used, on larger project, a vibrating sander (without sandpaper, natch) to do the deed.
|
Falling down is the same as being hit by a planet — "I paint to the 20 foot rule, it saves a lot of time." -- Me
ddogwood wrote:People who feel the need to cheat at Warhammer deserve pity, not anger. I mean, how pathetic does your life have to be to make you feel like you need to cheat at your toy army soldiers game?
|
|
|
|
|
2011/02/15 13:42:09
Subject: Rubber & Resin - Custom Resin Bases & Custom Disk of Tzeentch
|
|
Regular Dakkanaut
|
@Requia: Michael's may sell some stuff but it won't be any quality product. You are better off ordering it online. I have not had any problem with the resin/rubber I've used. What trouble are you having?
|
|
|
|
|
|
2011/02/19 18:31:35
Subject: Rubber & Resin - Custom Resin Bases & Custom Disk of Tzeentch
|
|
Excellent Exalted Champion of Chaos
Lake Forest, California, South Orange County
|
http://www.theengineerguy.com/cgi/commerce.cgi?display=home
for those looking for smooth on products sold online. Michaels carries crap products for casting. The resin they have doesn't set properly at 1:1. You'd be better off ordering online.
|
"Bryan always said that if the studio ever had to mix with the manufacturing and sales part of the business it would destroy the studio. And I have to say – he wasn’t wrong there! ... It’s become the promotions department of a toy company." -- Rick Priestly
|
|
|
|
|
|
|