| Author |
Message |
 |
|
|
|
|
Advert
|
Forum adverts like this one are shown to any user who is not logged in. Join us by filling out a tiny 3 field form and you will get your own, free, dakka user account which gives a good range of benefits to you:
- No adverts like this in the forums anymore.
- Times and dates in your local timezone.
- Full tracking of what you have read so you can skip to your first unread post, easily see what has changed since you last logged in, and easily see what is new at a glance.
- Email notifications for threads you want to watch closely.
- Being a part of the oldest wargaming community on the net.
If you are already a member then feel free to login now. |
|
 |
2020/02/17 07:24:25
Subject: Re:Mac's P&M Shenanigans-- 2/14: 7:22 pm. Wife out of town. Children in bed. Six pack in fridge.
|
|

Preacher of the Emperor
|
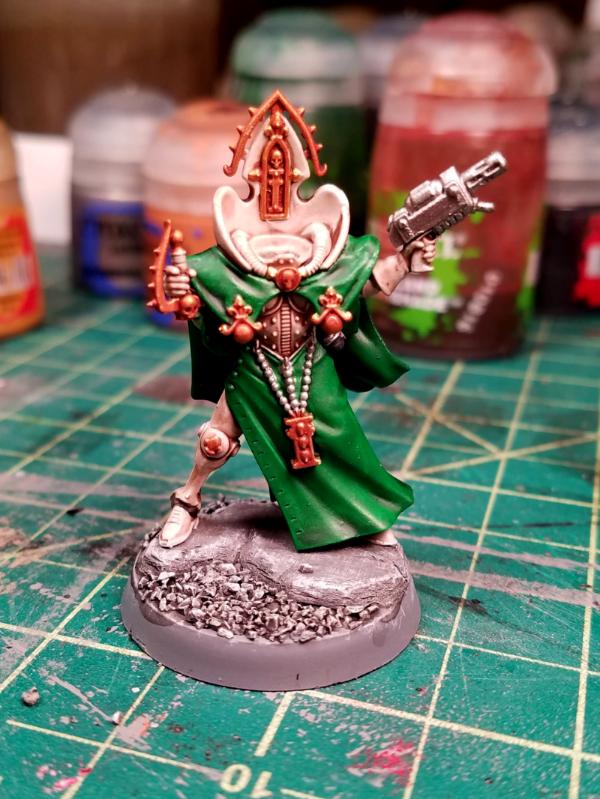
I've got the Canoness mostly assembled... she's on her new base and has her new arm and inferno pistol. Next are the head and chainsword, and paint is well underway. I have a bad gap that may need closing at one of the armor joins, a result of the amount of pre-assembly painting I did. Otherwise I'm pretty pleased with how she went together, even with all the modifications. My green stuff arm and sleeve painted up all right, at least. Getting close now!
|
|
|
|
 |
|
2020/02/19 23:48:47
Subject: Re:Mac's P&M Shenanigans-- 2/17: Converted Canoness built and starting paint
|
|
[DCM]
Boom! Leman Russ Commander
|
I like that green- great build! 
|
"He fears his fate too much, or his desserts are small, who will not put it to a single touch; to win- or lose- it all."
Montrose Toast

|
|
|
|
|
2020/02/20 04:55:43
Subject: Mac's P&M Shenanigans-- 2/17: Converted Canoness built and starting paint
|
|
Preacher of the Emperor
|
Thanks, MeerCat! She'll be done in time for a game this Saturday, so final pics will be around this weekend.
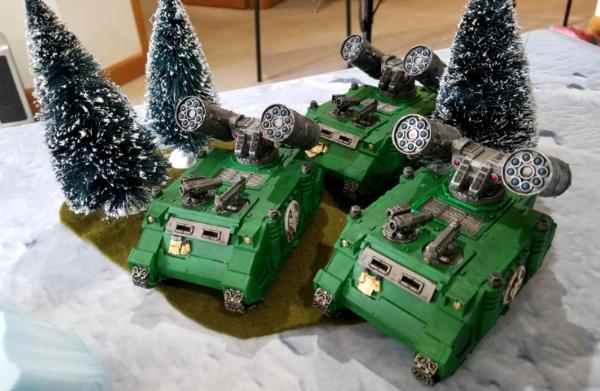
Also, I built and basecoated six heavy bolters so I can retrofit Exorcists & Immolators (thanks, GW!). They're AM heavy weapon team heavy bolters that, funnily enough, I had clipped the barrels from to convert into multi-melta Immolators when I had no real options other than the GW kit. I was unhappy with my converted melta barrels and never ended up using them-- flamers were too good anyway. Now the same darn tanks need the original guns back, so here I was gluing styrene rod onto the spots where I'd trimmed them years ago. We've come full circle, heavy bolters! Now go shoot stuff for the Emperor!
|
|
|
|
|
|
2020/02/20 05:13:51
Subject: Mac's P&M Shenanigans-- 2/17: Converted Canoness built and starting paint
|
|
Walking Dead Wraithlord
|
Look forward to seeing her done. Funny thing, this hobby. Some projects seem to have a life all their own.
|
|
|
|
|
2020/02/20 23:18:22
Subject: Mac's P&M Shenanigans-- 2/17: Converted Canoness built and starting paint
|
|
Preacher of the Emperor
|
 youwashock wrote: youwashock wrote:Look forward to seeing her done. Funny thing, this hobby. Some projects seem to have a life all their own.
Man, tell me about it. If only our past selves could see the future of a project. Save that bit, I'm going to need it! Don't use plastic cement, I'll be talking that apart in three years! Throw out those sprues, I'll never get around to grinding them up for rubble! Pin it now or fix it later! Just buy the good lamp!
|
|
|
|
|
|
2020/02/21 00:37:35
Subject: Mac's P&M Shenanigans-- 2/17: Converted Canoness built and starting paint
|
|
The Marine Standing Behind Marneus Calgar
|
 MacPhail wrote: MacPhail wrote: youwashock wrote:Look forward to seeing her done. Funny thing, this hobby. Some projects seem to have a life all their own.
Man, tell me about it. If only our past selves could see the future of a project. Save that bit, I'm going to need it! Don't use plastic cement, I'll be talking that apart in three years! Throw out those sprues, I'll never get around to grinding them up for rubble! Pin it now or fix it later! Just buy the good lamp!
It’s just a sub-set of life. Wisdom is what we gain right after we need it. If I could go back and talk to past-me, I’d have quite the bit to say. Some of it hobby related.
|
|
|
|
|
|
2020/02/23 07:15:49
Subject: Re:Mac's P&M Shenanigans-- 2/17: Converted Canoness built and starting paint
|
|
Preacher of the Emperor
|
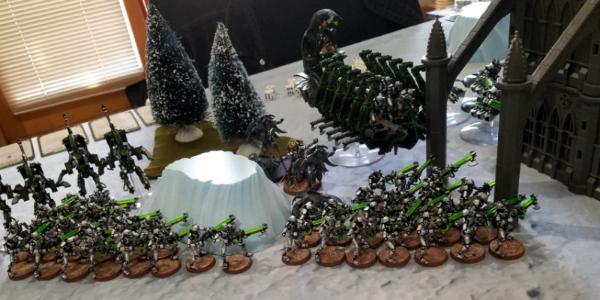
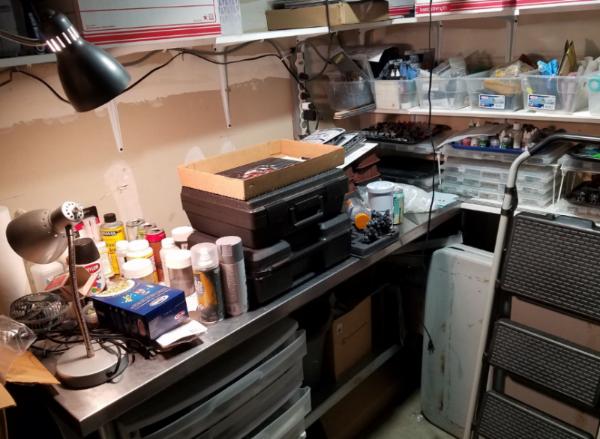
I got in a great game today against my friend Doug's Necrons... I'll try for some sort of battle report sometime, but here are some photos of the game, plus a dirty bench / clean bench combo. I still need to finish paint on the Canoness, but she had a nice inaugural outing wading through dozens of Necron Warriors with Beneficence.
The xenos invaders must be purged and the shrine reconsecrated:
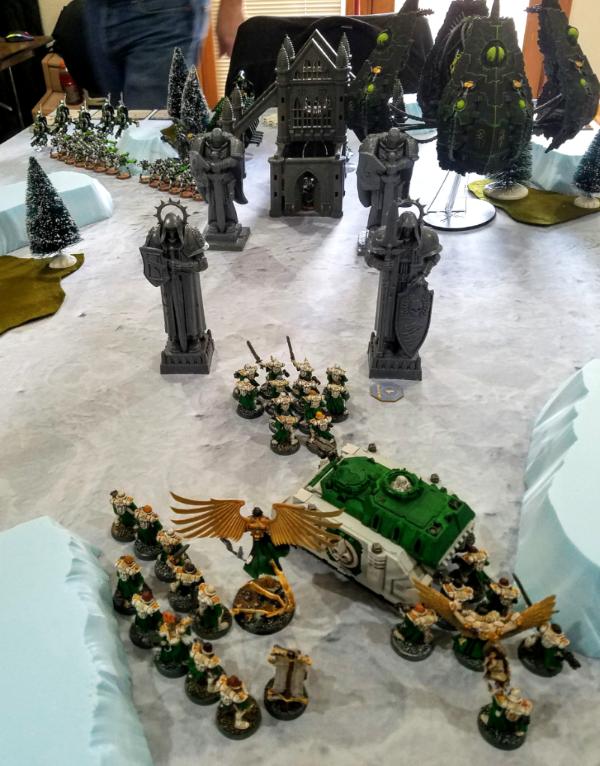
I had to quickly throw together some heavy bolters to stay wysiwyg.
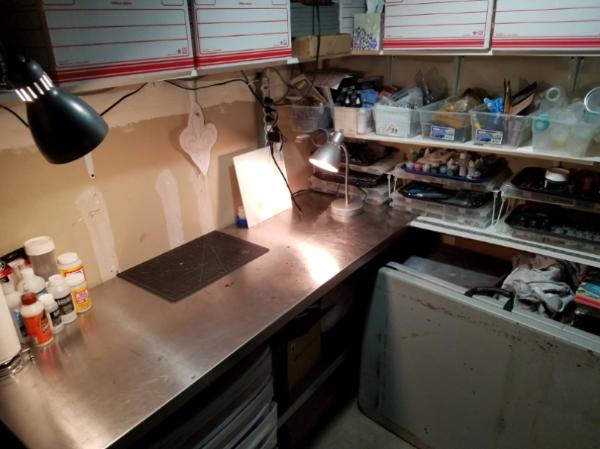
And, the bench was getting out of control.
|
|
|
|
|
|
2020/02/23 09:35:05
Subject: Mac's P&M Shenanigans-- 2/23: game photos, bench cleanup
|
|

Longtime Dakkanaut
|
Battle pics look great, nice to know that canonness had an impact.
And nice clean work area, here‘s to keeping it cluster free!
|
|
|
|
|
2020/02/23 15:01:19
Subject: Mac's P&M Shenanigans-- 2/23: game photos, bench cleanup
|
|

Grisly Ghost Ark Driver
|
Nice hill terrain, makes for really interesting canyon-like play there!
|
|
|
|
|
|
2020/02/23 15:36:46
Subject: Mac's P&M Shenanigans-- 2/23: game photos, bench cleanup
|
|
The Marine Standing Behind Marneus Calgar
|
Nice to see the army on the field.
A clean bench is an unnatural thing. Soon the universe shall right it into its proper clutter. Nice while it lasts though...
|
|
|
|
|
|
2020/02/24 02:41:01
Subject: Mac's P&M Shenanigans-- 2/23: game photos, bench cleanup
|
|
Preacher of the Emperor
|
Thanks Viterbi... but that work space work won't last. Nevelon is right... it will last until next weekend, when I wrap up this month's painting contest and get serious about the Spring LoER terrain contest. There will be plastic and foam everwhere.
Gwyn, those are far from the best canyons my host has... they're basically raw blue foam, and the sanctuary was unpainted too... that's his "in progress" table, a frozen shrine world. I'll dig up a pic of his other foam canyons on his desert table, which are a real work of art. He has about a dozen battle mats and is working on terrain to match each. He's already done desert, swamp, urban ruins, tech complex, lava, and green alien stuff. Next are ice world, temple complex, and forest. He's a madman, and a great host!
|
|
|
|
|
|
2020/02/25 03:45:10
Subject: Mac's P&M Shenanigans-- 2/23: game photos, bench cleanup
|
|
Fixture of Dakka
|
It that not an unwritten rule somewhere?
"Complain not about the terrain of thy host...unless you bring your own."
Cheers,
CB
|
|
|
|
|
|
2020/02/25 11:53:58
Subject: Mac's P&M Shenanigans-- 2/23: game photos, bench cleanup
|
|
The Marine Standing Behind Marneus Calgar
|
 Captain Brown wrote: Captain Brown wrote:It that not an unwritten rule somewhere?
"Complain not about the terrain of thy host...unless you bring your own."
Cheers,
CB
I fondly remember fighting through corridors made from stacks of encyclopedias. Carved styrofoam hills were a beautiful upgrade. And little copses of wrong scaled trees. We’ve come a long way as a hobby, it’s not just the minis that have gotten better over the ages, but the ground they fight upon!
(Does anyone even own encyclopedias these days? Sad for impromptu battlefields)
|
|
|
|
|
|
2020/02/25 13:03:13
Subject: Re:Mac's P&M Shenanigans-- 2/23: game photos, bench cleanup
|
|
Preacher of the Emperor
|
Oh man, did that come across as complaining? It should have been more like bragging. I love playing at his house-- he makes awesome terrain, and this just isn't quite done yet. He's going to buy and build a few more boxes of that ruined shrine stuff and finish it and the blue foam hills to blend with the battle mat. It'll be an awesome ice world when he's done.
Check out the "Orktown" desert board I was talking about that he built with our Ork player... Doug did the rocky spires, and Denny did the MDF buildings and scatter terrain.
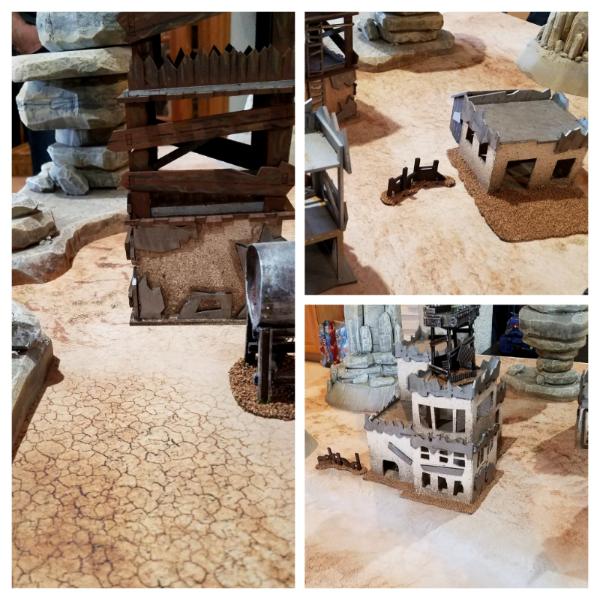
Nevelon, one of our biggest problems when we started was remembering which Cokes we were drinking and which were terrain. Getting a new piece of home electronics meant getting a weird piece of styrofoam to slather with house paint. As we outgrew childhood toys, they got smashed with a hammer, melted with a lighter, and spray painted gray. Those were the days.
|
|
|
|
|
|
2020/02/26 18:34:44
Subject: Mac's P&M Shenanigans-- 2/23: game photos, bench cleanup
|
|

Ancient Venerable Dreadnought
|
Those were the days indeed! I remember getting in trouble for using some deodorant as a flame thrower for some real authentic damage on a burnt out factory we’d made. By burnt out factory I mean large cardboard box with some partial floors taped in. Your friends scenery is a real step up from that!
|
Goberts Gubbins - P&M Blog, started with Oldhammer, often Blackstone Fortress and Void Panther Marines, with side projects along the way |
|
|
|
|
2020/02/28 22:54:00
Subject: Re:Mac's P&M Shenanigans-- 2/23: game photos, bench cleanup
|
|
Fixture of Dakka
|
MacPhail wrote:Oh man, did that come across as complaining? It should have been more like bragging. I love playing at his house-- he makes awesome terrain.
No, just a good quote for those who do. 
Cheers,
CB
|
|
|
|
|
|
2020/02/29 07:42:01
Subject: Re:Mac's P&M Shenanigans-- 2/23: game photos, bench cleanup
|
|
Preacher of the Emperor
|
Two updates:
I posted a battle report on my showdown with the Necrons: a short narrative, a lengthy report, and a handful of photos.
https://www.dakkadakka.com/dakkaforum/posts/list/785908.page
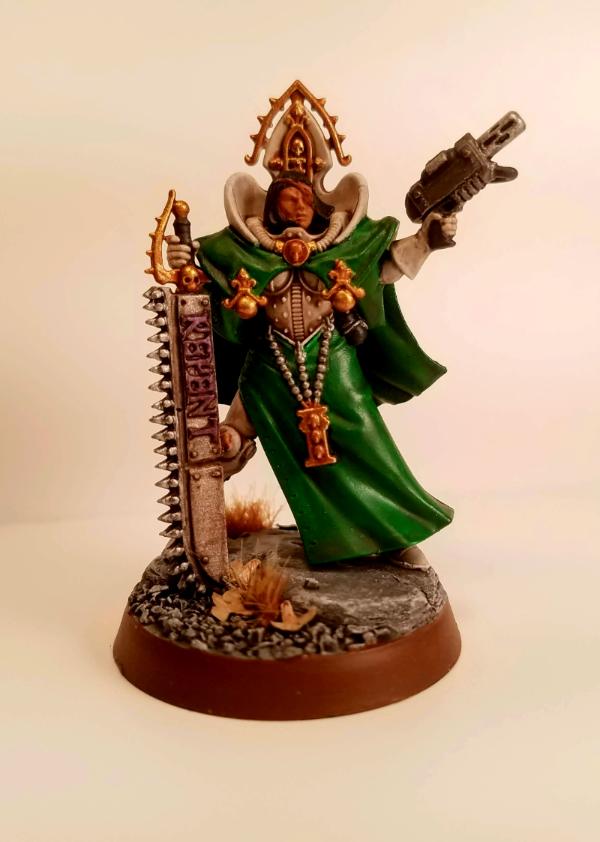
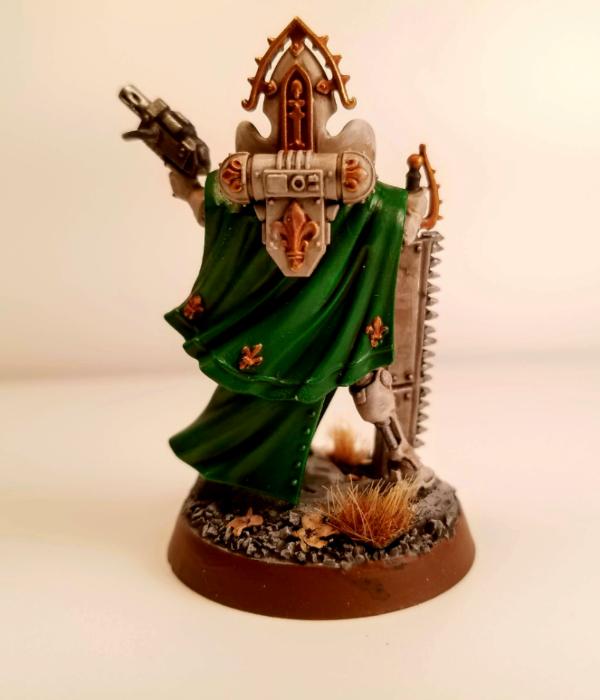
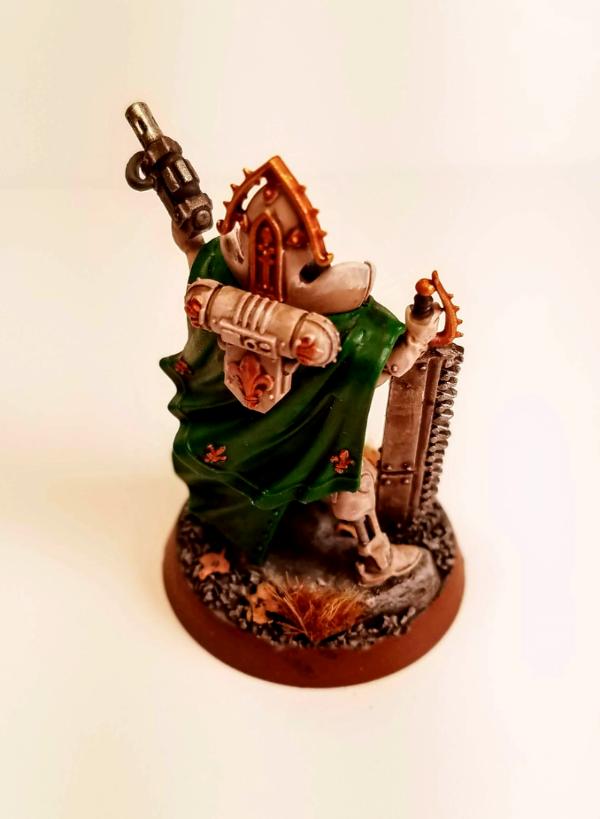
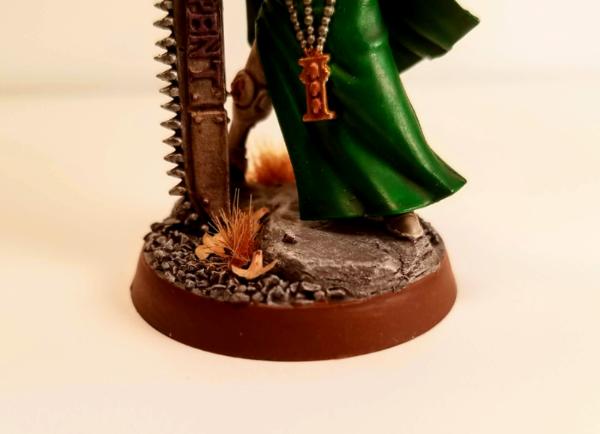
And I got done with the Canoness with chainsword conversion I did for the monthly painting contest. The theme this month was "Final Boss." This is a Canoness of the Bloody Rose wielding the relic chainsword Beneficence. I swapped the head, scratch built an arm, swapped both weapons, simplified the cape, and customized the base. I'm looking forward to any feedback anyone can offer. Thanks!
|
|
|
|
|
|
2020/03/01 11:12:37
Subject: Mac's P&M Shenanigans-- 2/29: Canoness conversion for painting contest, plus battle vs. Necrons
|
|
Longtime Dakkanaut
|
Lovely work and happy, that she hasn't let you down on the battlefield! The purple "REPENT" is ace!
I said it in another thread, I personally hate painting eyes and sure as hell botch them up every other time, but I believe her face would really profit, if you gave it a try to paint it in..
|
|
|
|
|
2020/03/01 18:41:10
Subject: Mac's P&M Shenanigans-- 2/29: Canoness conversion for painting contest, plus battle vs. Necrons
|
|
Ancient Venerable Dreadnought
|
She looks great Mac, one bit of feedback would be to increase the depth on her face. Not sure whether a highlight or shade would work best, maybe both? That sword is MEGA though! You did a great job fitting it in so well
|
Goberts Gubbins - P&M Blog, started with Oldhammer, often Blackstone Fortress and Void Panther Marines, with side projects along the way |
|
|
|
|
2020/03/01 20:15:35
Subject: Re:Mac's P&M Shenanigans-- 2/29: Canoness conversion for painting contest, plus battle vs. Necrons
|
|
Preacher of the Emperor
|
Thanks, I really appreciate it. Of course you're totally right on the face and eyes. I tried the night of the deadline to try to figure out the eye, completely blew it, and had to start over on the face after I wrecked it. It only got two thin coats of Elf Flesh and a wash of Reikland Fleshshade before I had to call it a night, snap photos, and beat the deadline. I'm definitely not happy with and would love any ideas, both for eyes and skin tones. I actually have the perfect opportunity to practice, which is a bunch of Ogryns... I don't have to work quite as small.
|
|
|
|
|
|
2020/03/02 15:32:02
Subject: Mac's P&M Shenanigans-- 2/29: Canoness conversion for painting contest, plus battle vs. Necrons
|
|
Grisly Ghost Ark Driver
|
Practicing on the larger models is smart, I'm currently doing the same on a Terminator sarge before I have to try working with tiny elves, and it's really helping to get the technique down first.
Other than the face, great looking mini! The cape came out really nice, and your white armour looks good, which is hard to get right!
|
|
|
|
|
|
2020/03/02 15:57:36
Subject: Mac's P&M Shenanigans-- 2/29: Canoness conversion for painting contest, plus battle vs. Necrons
|
|
Regular Dakkanaut
|
I like your conversion much more than the unaltered army box canoness.
Good thing about the head choice is: just one eye, so the risk of making her cross eyed is quite low. Skin is ok already IMO, maybe a few small highlights on the tip of the chin, forehead, cheek bone, nose and some dark lining on the contact of the dark hair and the skin. Then it's mostly eyes, brows and lips. I usually use the vallejo face painting set.
|
|
|
|
|
2020/03/02 17:50:49
Subject: Mac's P&M Shenanigans-- 2/29: Canoness conversion for painting contest, plus battle vs. Necrons
|
|
Walking Dead Wraithlord
|
A few more highlight passes and she is going to really rock. If you are looking to revisit her now that the deadline has passed, that is. The foundation is solid, so a couple tweaks and you are golden.
|
|
|
|
|
2020/03/02 23:05:16
Subject: Mac's P&M Shenanigans-- 2/29: Canoness conversion for painting contest, plus battle vs. Necrons
|
|
Ancient Venerable Dreadnought
|
I agree with Max, a lining of the hair and eye patch would work well, then touch up and add some highlights in a couple of spots. Eyes aren’t my forte, unless your after a disjointed stare!
|
Goberts Gubbins - P&M Blog, started with Oldhammer, often Blackstone Fortress and Void Panther Marines, with side projects along the way |
|
|
|
|
2020/03/03 00:42:56
Subject: Mac's P&M Shenanigans-- 2/29: Canoness conversion for painting contest, plus battle vs. Necrons
|
|
Fixture of Dakka
|
MacPhail,
Eyes are difficult on the smaller models, especially the new Sister's heads which seem even smaller.
The method I have posted several times is the black, white black method. Paint the eye black in a small oval shape, then paint a smaller white oval eye shape inside the black one (so you have a thin black edge around the white), then a dot of black in the center of the white, that black dot should reach the top and bottom of the original black edge...that will prevent your eyes look like they are starring.
Hope that helps,
CB
|
|
|
|
|
|
2020/03/03 02:01:29
Subject: Mac's P&M Shenanigans-- 2/29: Canoness conversion for painting contest, plus battle vs. Necrons
|
|
Preacher of the Emperor
|
Thanks, everyone! All your guidance is really appreciated. I am going to try to fix/finish the Canoness, maybe even before I practice on Ogryns. I think going back with the base tone (Kislev) and hitting cheeks, brow, nose, and chin might do it. Should that be a thinned down line on the high point or a very light drybrush? Next time, should I try 50/50 Kislev and something (Pallid Wych Flesh?) highlight before the Fleshshade wash? Not sure what the default technique is...
On the eyes, I may go for a darkened hollow and a fine dark line on the brow. I'll practice eyes and pupils on the Ogryns... there might even one with an eyepatch who won't go cross eyed!
Thanks again, you all are a font of hobby wisdom!
|
|
|
|
|
|
2020/03/04 07:46:39
Subject: Mac's P&M Shenanigans-- 2/29: Canoness conversion for painting contest, plus battle vs. Necrons
|
|
Regular Dakkanaut
|
MacPhail wrote:I think going back with the base tone (Kislev) and hitting cheeks, brow, nose, and chin might do it. Should that be a thinned down line on the high point or a very light drybrush?!
IMO thinned down paint, because it will blend better (I often don't thin enough). Not sure about GW colors, but drybrushing skin with my Vallejo face set does not work very well. It easily gets too grainy or patchy at least when I do it.
MacPhail wrote:Next time, should I try 50/50 Kislev and something (Pallid Wych Flesh?) highlight before the Fleshshade wash? Not sure what the default technique is...
Don't think there is a default technique. Depends on what skin tone you'd like to achieve. I think the base skin tone of your Canoness looks good, but if you really want a paler color, mixing with wych flesh should work. What also works are the contrast skin colors over a light grey base (don't need a wash).
MacPhail wrote:
On the eyes, I may go for a darkened hollow and a fine dark line on the brow.
I tend to use mixed colors for the eyes, e.g. brown and black instead of just black for the first layer as CB described and very light cream color instead of pure white for the eyeball. I think it makes them less comic.
Have fun and good luck with the eyes!
|
|
|
|
|
2020/03/09 03:57:23
Subject: Re:Mac's P&M Shenanigans-- 2/29: Canoness conversion for painting contest, plus battle vs. Necrons
|
|
Preacher of the Emperor
|
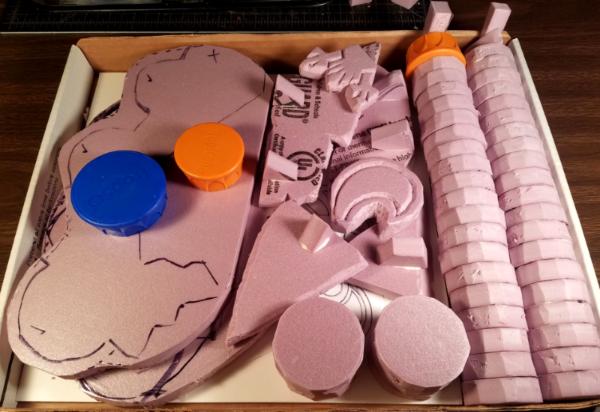
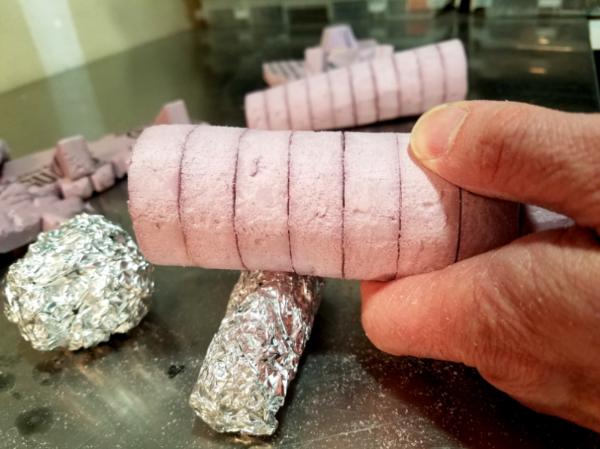
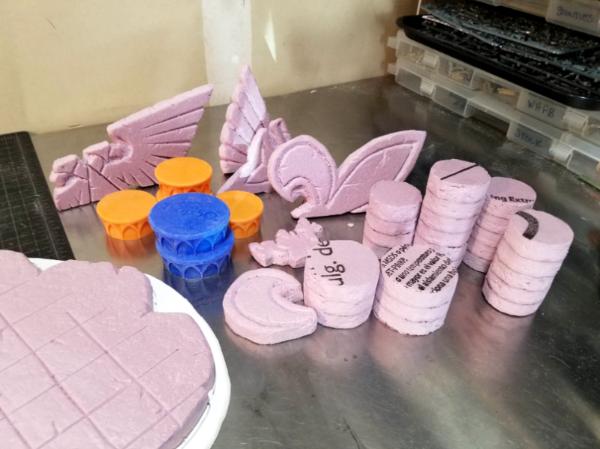
Well, I haven't made it back to the eyeless Canoness yet, but I did carve up a whole lot of pink foam for the LoER contest. I cut bases to fit my planned layouts, built some little wedge braces and attached them to the backs of the now-shattered imperial icons, cut dozens of little pink discs to build columns, and glued them into stacks. Next up: some kind of box or can full of rocks from the yard, because there's no way I'm detailing all of this by hand. The last bit of fabrication will be PVC discs to cover the logos on the lids and styrene bases for the foam to sit on. Then it's on to paint and assembly!
Below: one of the mockups, plus all of the cut and pre-assembled components... now I'm glad I started with just two of the planned pieces!
|
|
|
|
|
|
2020/03/16 04:41:02
Subject: Re:Mac's P&M Shenanigans-- 3/8: building foam columns and ruins for the LoER contest
|
|
Preacher of the Emperor
|
Time for a pretty big update... I pulled a couple of late nights this weekend and then my wife threw me a few hours of kid-coverage this afternoon. Her logic is that I'll be out of work and out of school with a two-year-old and a four-year-old for at least a few weeks, and that maybe my mental health needed some preemptive looking after. I think her words were "why don't you go drink a beer and make a mess of the garage..." Check and check!
I worked a couple of nights in the living room, which is a hassle because everything has to be set up and torn down nightly (due to the above-mentioned man-cubs). Here's my temporary set-up:
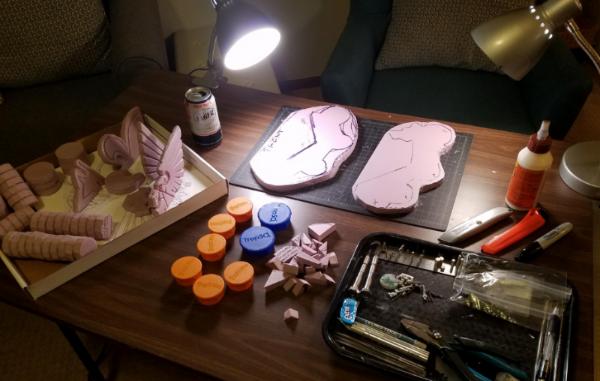
I had all the parts for my LoER contest entry cut and pre-assembled last week, so I just needed to detail them and I'd be mostly ready for paint. First I drew a couple of different floor tile patterns on the base platforms. I struggled with the diagonal one, as I had misplaced my right-angle steel ruler and I couldn't get the pattern to lie along the front edge. After a few tries I went with what I had and started cutting.
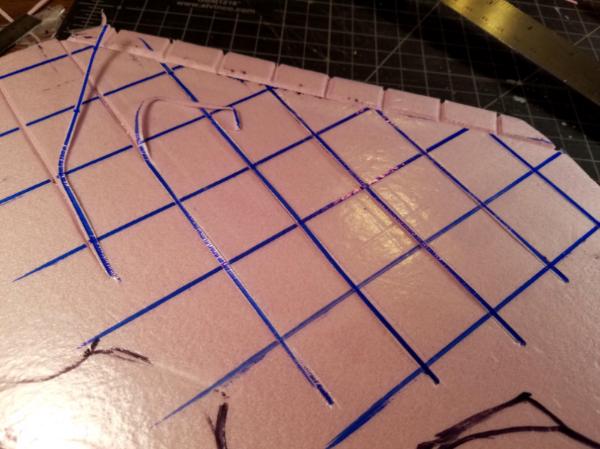
After cutting the tile and brickwork, I put a fresh blade in my hobby knife and went once through everything, cleaning up little burrs and adding chipped tiles and crumbling stones to everything. Fast-forward to the garage today, where I can generate a radius of dust and scraps not fit for the living room...
I sanded all the columns to knock off the most misaligned edges, but left them far from smooth. Then I added more texture with some crumpled aluminum foil. Another ball of foil got rolled over the surface of all the pieces just so there's a little texture to grab a drybrush and shade. At this point, the beverage bottle caps that got me here in the first place were looking a little too glossy, so I put two handfuls of decorative rock from my driveway in a Amazon box and shook all the caps around for a few minutes, which knocked off a bit of the sheen.
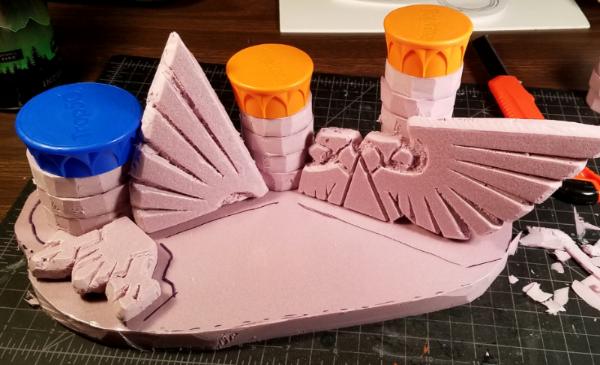
I cut footprints for each piece from foamed PVC in order to add rubble and vegetation around the base and to tie them in with my table. The 3mm PVC cuts fairly easily with a box knife, and I beveled the edges with a grinding bit on the Dremel. The two fallen columns I'd made didn't end up fitting on the main pieces, so I cut two more PVC bases and made them into scatter terrain. Since I was on my bench in the garage, I had room to assemble it all:
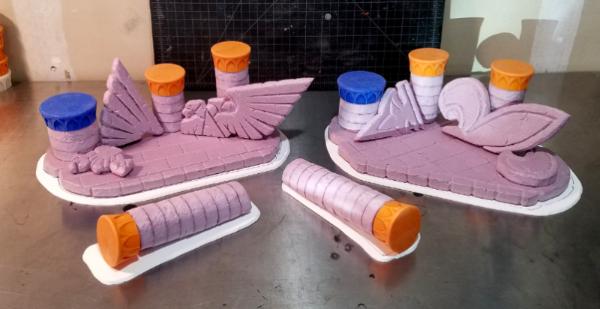
Most of what's left in the build phase is to add the rubble and wreckage. I'm going to start with scraps of foam, then broken bits of cork, and finally railroad ballast. I'm hoping I can do it with the columns and icons loosely attached so I can still pull them off to do the first round of paint/drybrush/shade with things flat on the table and then assemble them once they've dried. The last component is the PVC discs to cover the Tropicana logos... I'm going to rest my hands for a few days before I tackle those. By then the 8 oz. tube of Neutral Gray Value #5 acrylic paint I ordered should be here and we can get down to business.
|
|
|
|
|
|
2020/03/16 22:28:25
Subject: Re:Mac's P&M Shenanigans-- 3/15: LoER contest foam terrain nearly ready for paint
|
|
[DCM]
Boom! Leman Russ Commander
|
That is really shaping up very nicely! I could envision generally what you were aiming for when you starting sawing up disks, but the reality is much better. You just need Boris Karloff chasing some lady around crying 'Anksunahmen! Anksunahmen!" and your mummy movie scene is complete!
|
"He fears his fate too much, or his desserts are small, who will not put it to a single touch; to win- or lose- it all."
Montrose Toast
|
|
|
|
|
|
|

 Ultramarines, 3rd Co. and friends, 16k+
  4k
4k  2k Points
 Competition Index
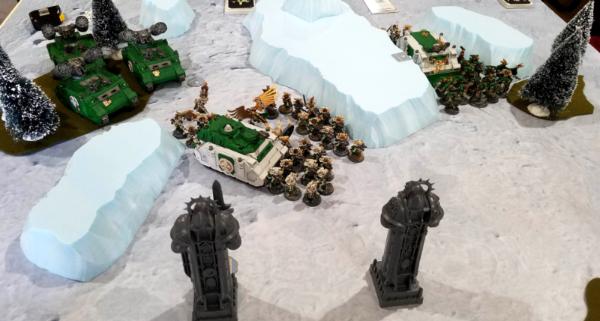
 Finished Forge World Elysian Army
  Finished Tau Sept Cadre
  Finished Ork Waaagh |
  Alaitoc Eldar Warhost
  Finished Order of Our Martyred Lady - Sisters of Battle
  Finished Necromundian Imperial Guard Regiment