Forum adverts like this one are shown to any user who is not logged in. Join us by filling out a tiny 3 field form and you will get your own, free, dakka user account which gives a good range of benefits to you:
No adverts like this in the forums anymore.
Times and dates in your local timezone.
Full tracking of what you have read so you can skip to your first unread post, easily see what has changed since you last logged in, and easily see what is new at a glance.
Email notifications for threads you want to watch closely.
Being a part of the oldest wargaming community on the net.
If you are already a member then feel free to login now.
2011/08/17 05:35:36
Subject: Brotherhood of the Rook Chapter (Updated 10/10/2016 - Retribution of Scyrah)
August 5, 2012: This is my entry for Girlpainting's "Design Your Own Space Marine Chapter" painting contest. I won 2nd place!
The Brotherhood of the Rook get their gene seed from Jaghatai Khan, primarch of the White Scars legion. They are of the 19th founding, and are direct descendants of the Storm Lords chapter. They organize themselves in accordance with the Codex Astartes, but make a few thematic alterations. The Brotherhood embraces the corvid symbolism so often found amongst Space Marine chapters. They call each Company a "Parliament", and each squad within them is called a "Flight". The figure shown below of a member of the 2nd Battle Company, 4th Tactical Flight. The Brotherhood is a fleet based chapter that specializes in long-range combat. They are specialized xenon hunters, and have recently gained particular expertise in battling the Necrons.
The Brotherhood of the Rook views the Emperor of Mankind as a superhuman, rather than a god. Because of this, as well as unconfirmed rumors about mutations in their gene-seed, the Brotherhood as come under the suspicion of the Ordos Hereticus. Under the guise of of investigating a Necron incursion into a remote sector of the Imperium, an ambitious young Inquisitor has requisitioned the entirety of the 2nd Battle Parliament, as well as portions of the 1st and 10th Parliaments, in the hopes of catching the Brotherhood in acts of heresy.
Here is my most recent figure, uploaded July 13th:
Click on the "spoiler" button to see the original first post, which I have hidden behind a tag because it is a block of photos and text, and I think scrolling through is tedious to some. It definitely shows off how far I've come though!
Spoiler:
I've been table-top gaming for years. RPGs, CCGs, Board Games, you name it. Miniature gaming was the final frontier. After several years in the work force, I decided to go back to graduate school. When I got to my new college town, I started looking around for a gaming group. All I could find at first was a 40k club. I thought I would give it a go, but was immediately hit with a profound sense of sticker shock.
Instead of buying new, I bought a army's worth of random spare marine off of Dakka's Swap page not knowing anything about the game. Then I bought the marine half of an AoBR set from one of the club members. I've received a few donations of random loose Space Marines from friends back home. Counting only models, I have spent $115 on 40k to date. I own about 40 tactical marines, 1 devastator squad, a dreadnought, a land raider, and a few captain-eque figures. All of them are used figures that came assembled and without additional bitz. Most were unprimed, a few were painted in very special ways.
This blog is my journey into the war gaming hobby. My goal is to eventually assemble a complete, playable, and attractive army using only second-hand figures.
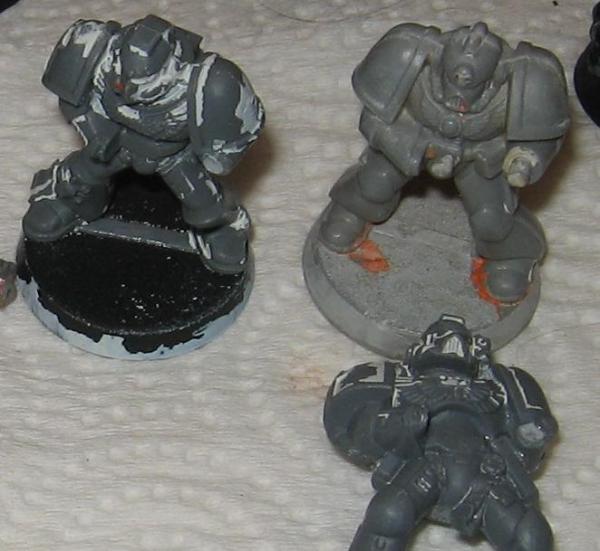
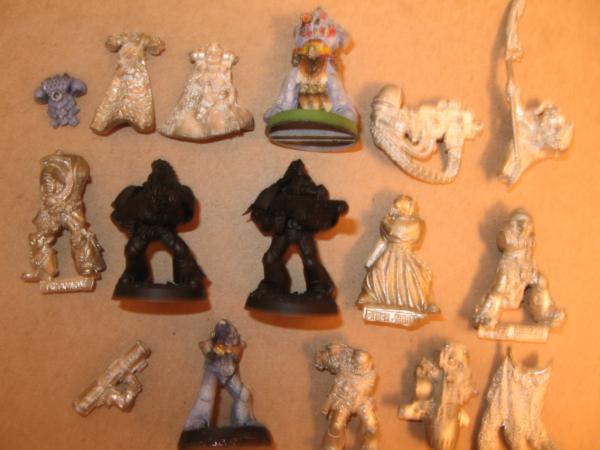
I didn't think to start this blog until recently. My biggest regret is not taking "before" pictures of some of the models I had acquired. Everything has been soaked in Simple Green and scrubbed, but this picture still shows remnants of the most "special" figures I own:
A friend of mine donated to my army 5 space marines he had had lying around for years (he in turn had gotten them from someone else. My friend did not paint these). They were 2nd edition box set figures - 4 bolter marines and one really neat looking Missile Launcher guy. They were coated in a thick layer of fluorescent orange and pink paint, completely obscuring all the details. It was as if their original owner had simply dipped them in tempura paint found in a child's art room during the most "radical" part of the early 90s. These are the guys I regret not photographing the most, but you can still see some lingering remnants of the beautiful horror that was this small little combat squad.
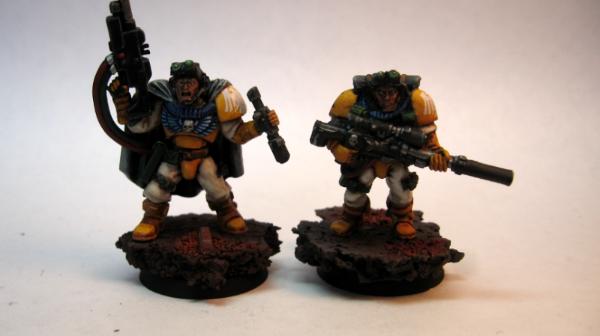
Because of the original "paint job" and the humorously squat and short old-school look, I have been affectionately referring to these 5 marines as the "Derp Squad." You can see two of them below following their transformation. They may just be my favorite models in my collection of 40k stuff.
I am sure most of you have a drawer full of stripped marines, but here are a few shots of the way most of my collection looks at the moment. Yes, I've been cutting/pulling/forcing off the backpacks and bolters in order to paint them separately and get an over-all clearer paint job.
I experimented with paint schemes for a while. Most of them involved green in some way because it is my favorite color. I was all-set to do a Salamanders army when I decided I just didn't like the way my test models were coming out. I watched a youtube video by GirlPainting on how to paint Imperial Fists (her videos got me started with painting, she's awesome). I really liked the way the yellow looked, and decided to paint up a home-brew chapter, substituting the Imperial Fist red secondary color for blue.
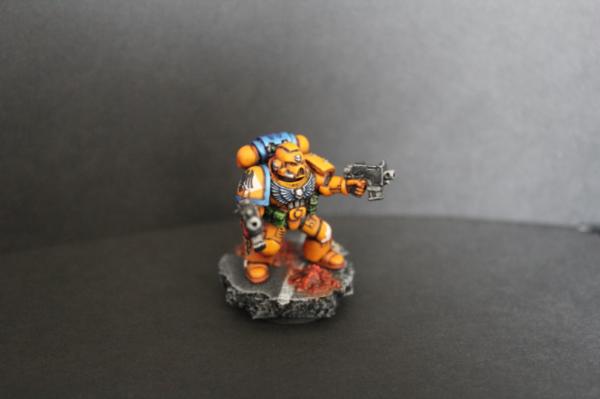
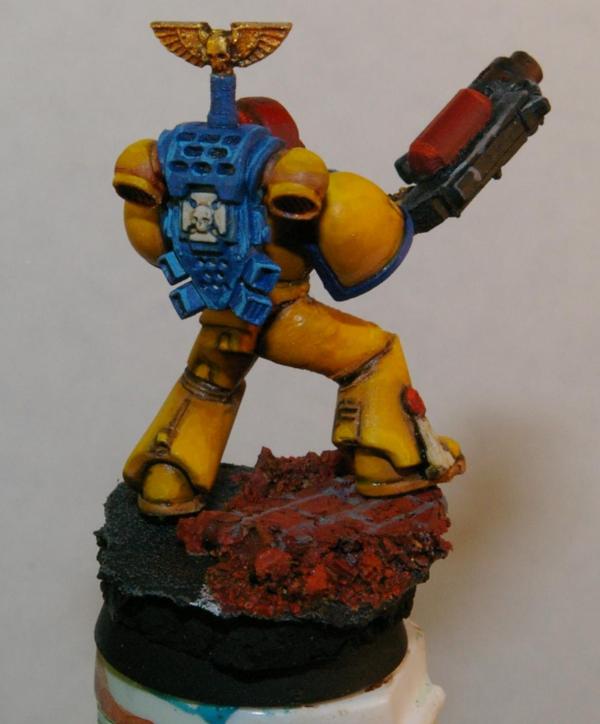
Here is my first completed model:
I posted this guy over on the P&M forum here, and got some feedback. The most valuable of which was that I was going overboard a bit on the scenic base.
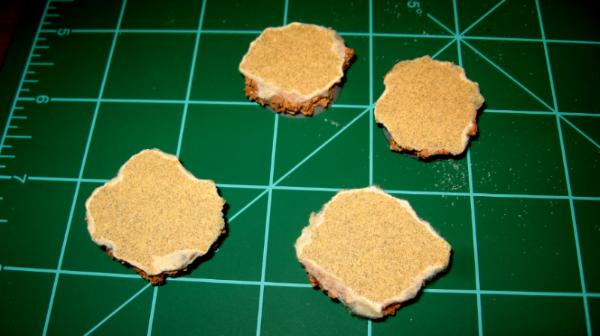
I really liked the asphalt effect (once again, props to GirlPainting for showing it to me), so I tried again on subsequent figures. Here is a WIP shot of the bases, in case you are curious how they're made:
That is cork with fine-grit sand paper glued on top. After that, just just prime it black and dry brush gray over the top. Then you use masking tape to create painted lines in the street, and add ruiney flair to your heart's content.
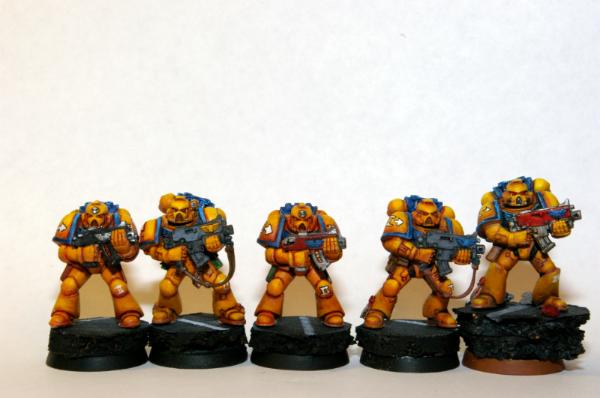
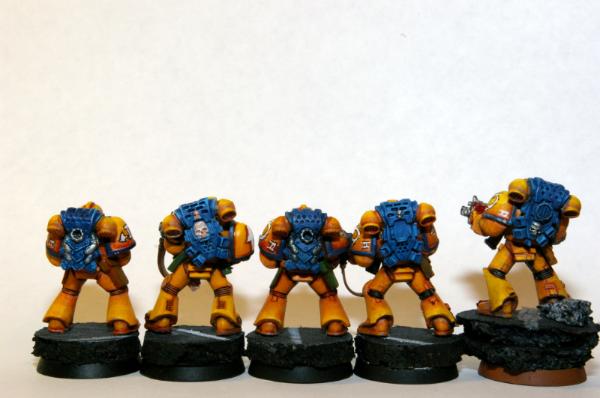
Then, over the past two weeks, I have completed 4 more figures, giving myself my first combat squad of Space Marines.
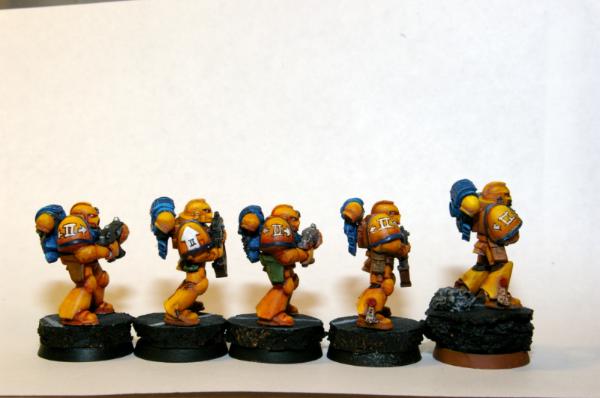
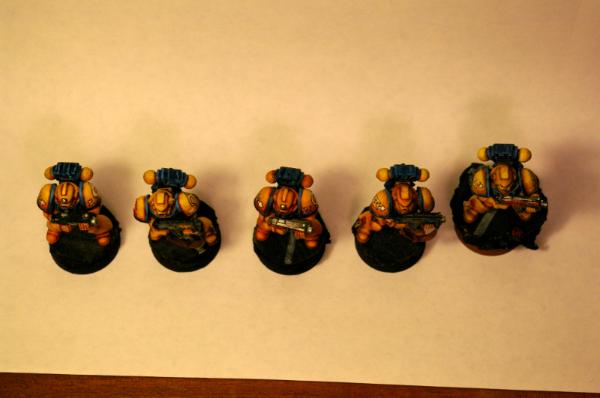
I have named my custom chapter the "Storm Legion", and have adopted the meteorological symbol for hurricane as the chapter symbol. All of the figures I have painted belong to the 2nd Company, 2nd Tactical Squad. Below are two pictures (one left oblique, one right oblique) of each marine in order of completion. Following that are a few group shots.
(Note: On these, order of completion is from right of screen to left of screen)
I haven't been painting for very long. I started mini painting as a hobby a little before I got into 40k, but I've only completed about 20 models total in this time, including the above squad of Grunge Marines. This blog is not intended to show off my "mad skillz" (which I painfully lack!), but rather to share my zest for the modeling hobby with all of you, and to document my progress as I practice painting, and slowly assemble an army out of used parts.
I will update this blog as I complete more figures. I've begun doing some conversion work on a model that will become the sergeant for this squad, his update should be fun. I've remembered to photograph the WIP this time!
I would be greatly appreciative of any comments, constructive criticism, or advice you may have. Thanks for looking!
This message was edited 40 times. Last update was at 2016/10/10 17:00:45
Wow, your Marines are looking awesome, i love the yellow. It has come out so well, i have always had trouble with the yellow on my necrons. I wish it came out as good as yours. Keep up the good work
Excellent yelloW |They look greeeaaaatt in the words of Tony the Tiger. I had real difficulty painting yellow with my not long abandoned Imperial Fists. well done!
RandomSauce19 wrote:Excellent yelloW |They look greeeaaaatt in the words of Tony the Tiger. I had real difficulty painting yellow with my not long abandoned Imperial Fists. well done!
Thanks! The yellow isn't that hard to achieve, but the way I've been doing it uses a bit of an unusual color palette. The trick, I think, is to start with brown tones. These guys are done like this:
1) Prime white
2) Ink entire model reddish brown (I use Liquitex Burnt Sienna; I think old-school GW Chestnut Ink is almost the same color)
3) Basecoat Vomit Brown
4) 1st Highlight Golden Yellow
5) 2nd Highlight 50/50 Golden Yellow and a bright yellow (I use Tamiya Flat Yellow)
6) 3rd Highlight pure bright Yellow.
If you look at the group shots of my figures, you can probably see a fair amount of variation between them. I am still experimenting with colors to improve my results.
Does anyone have an opinion of which marine has the best yellow color? Are the darker, more orangey ones better than the brighter ones?
This message was edited 1 time. Last update was at 2011/08/17 14:50:22
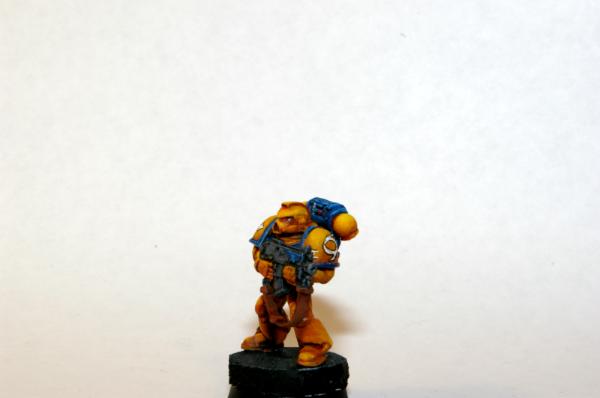
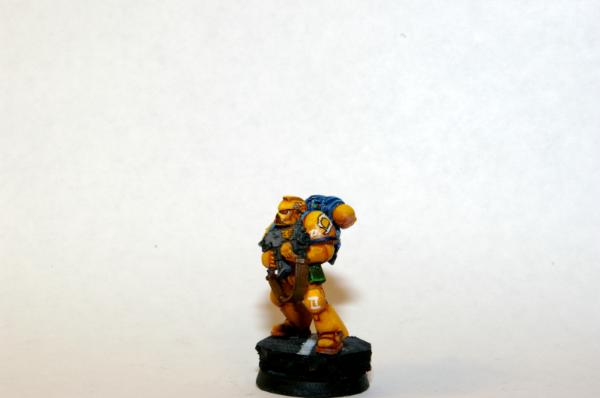
I just finished another bolter marine for this Tactical Squad. I still have to base it, but the paint job is complete.
After finishing the first 5 marines displayed in my first post, I decided I was happy with the primary yellow color and the blue on the shoulder pads. I was not happy with the yellow on the backpack, however. I couldn't figure out how to get a nice-looking blue highlight on the top, and had resorted to lining the edges instead. For this model, I tried again to highlight the backpack normally, although I did resort to some lining as well. I am still unhappy with the way the backpack in general looks. The giant blue field is very boring.
I also paid special attention to the accessories around the belt. I worked hard to try to create a color transition on the drab-green pistol holster. I am happy with the way the lining turned out on this part.
Finally, I tried a different technique for the free-handed shoulder pad insignia than before. Previously, I had painted white, and then lined it with a Micron technical pen. If everything went perfectly, this looked pretty good. One slip of the pen was disastrous though. On this 6th model, I first painted black, and then tried to paint white inside of that, creating a pen-free black-bordered white. I think it looks terrible. I suppose it could improve with practice, but I'm not sure I'm brave enough to try it again. I will go back to using the technical pen until I come up with a better solution.
Thoughts?
This message was edited 1 time. Last update was at 2011/08/20 20:41:07
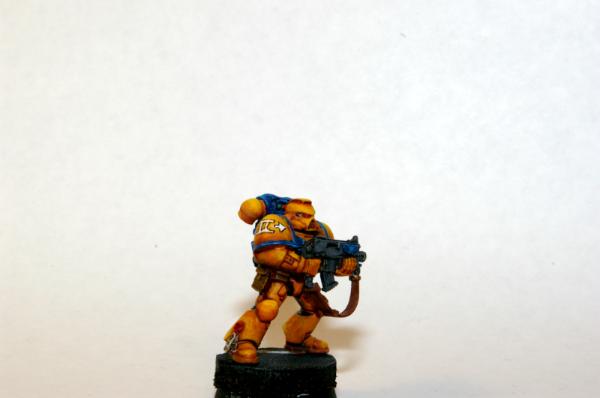
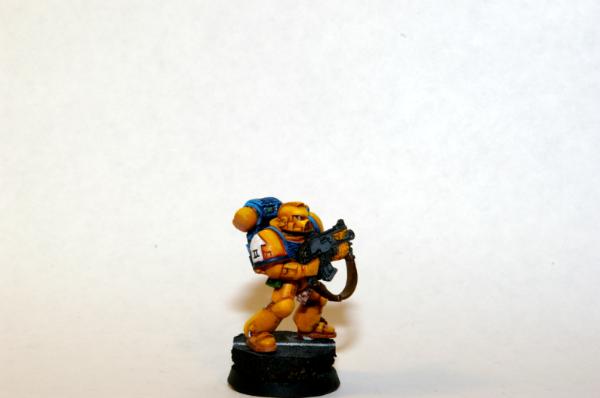
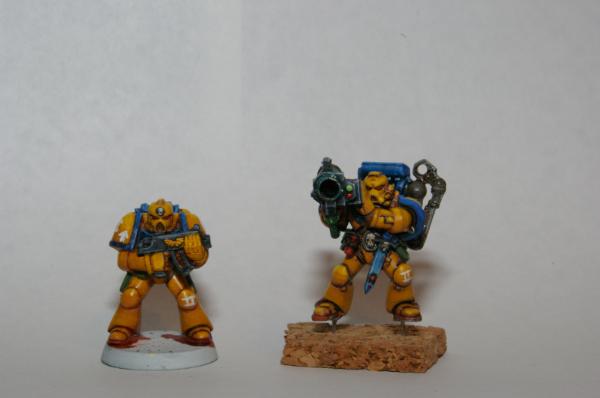
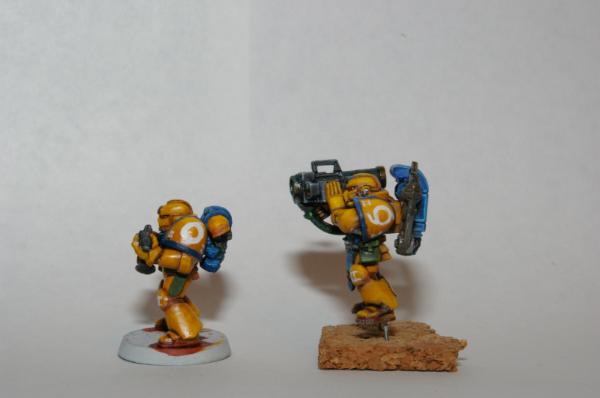
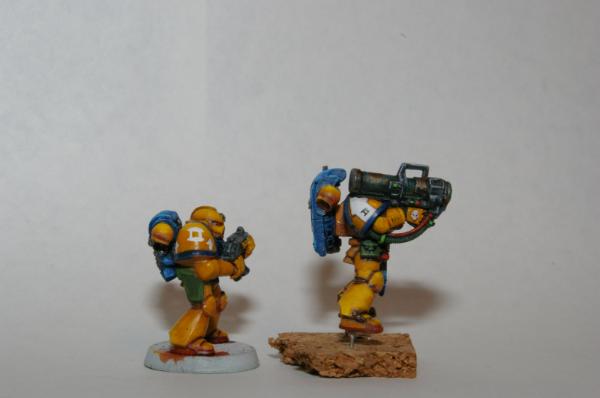
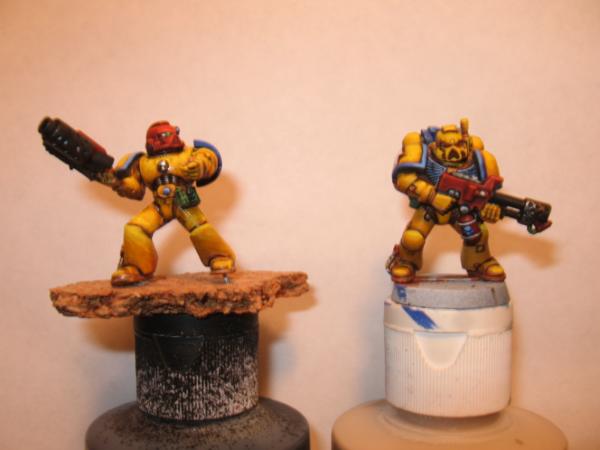
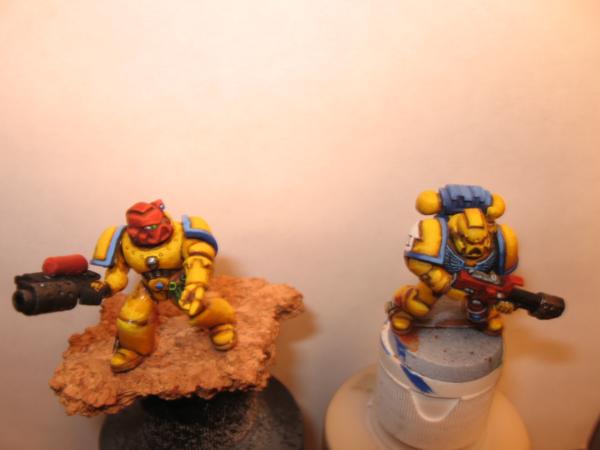
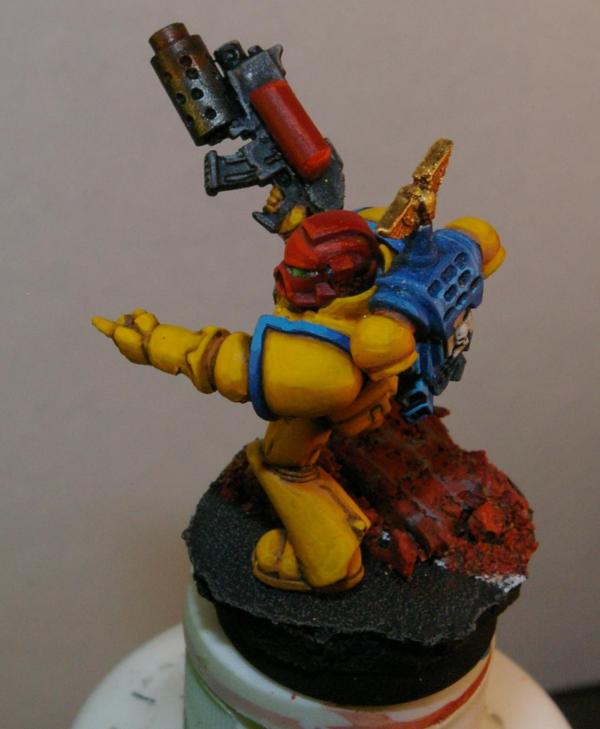
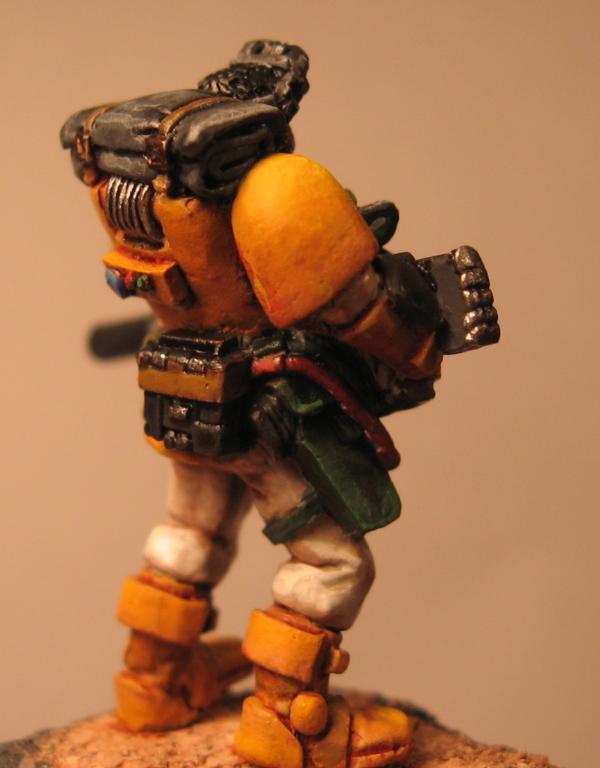
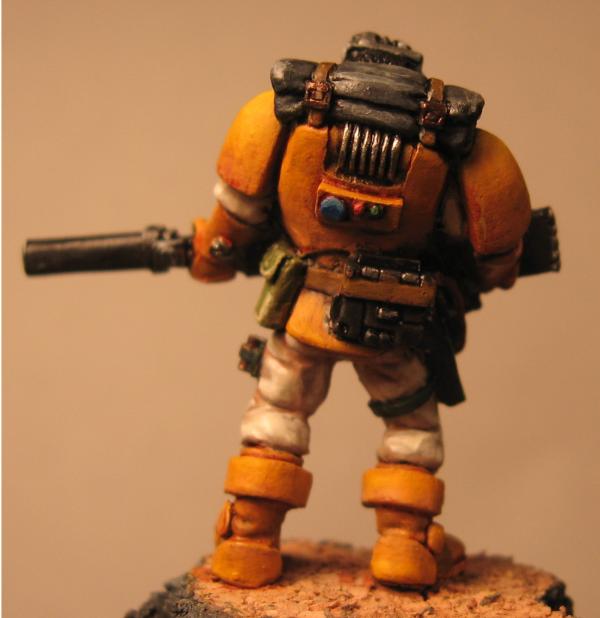
It has been a few weeks since my last update, but school has recently started again. In addition, the heavy weapon marine for my first tactical squad has taken me an agonizingly long time. The weapon arm alone suffered much fiddling before I was even minimally satisfied. Without further ado, here are my two most recent models:
The bolter marine is fairly standard. I've mostly gotten my technique for painting the yellow armor to a point that I am happy with. The blue trim is still giving me trouble. I went from using two hues of blue to create the highlights to three, adding Ultramarine Blue to Tamiya's XF-8 Flat Blue and Reaper's Sky Blue. I am fairly happy with the results. I feel I am getting better at painting bolters and belt accessories as well, both of which were giving me a lot of trouble in the beginning.
One place that I am still having a lot of difficulty is in the free-handed insignia. I feel I can produce a fairly decent freehanded Chapter symbol and company designation in white, but I feel I often ruin it when I try to outline with black technical pen. On the other hand, I feel the insignia look much better when outlined in black. I have left these two models unlined for the time being in the hopes of getting some outside opinions.
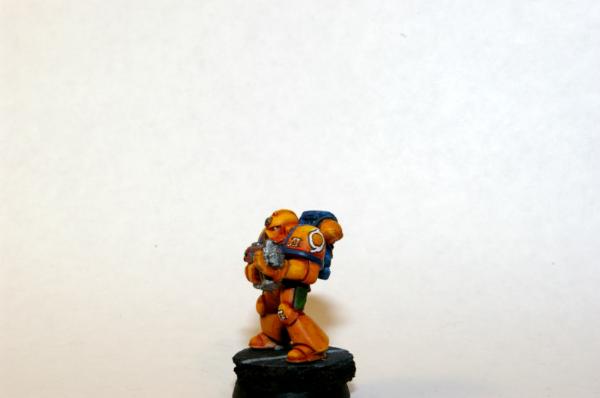
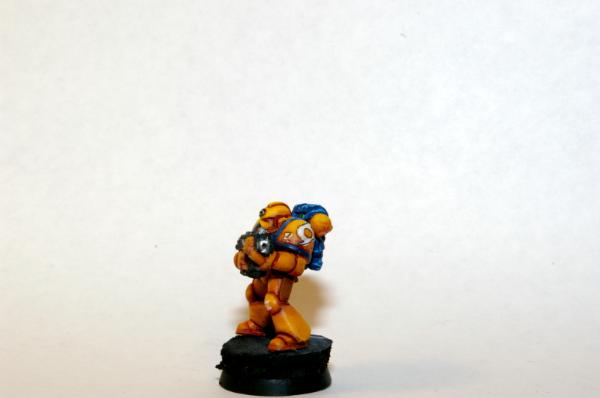
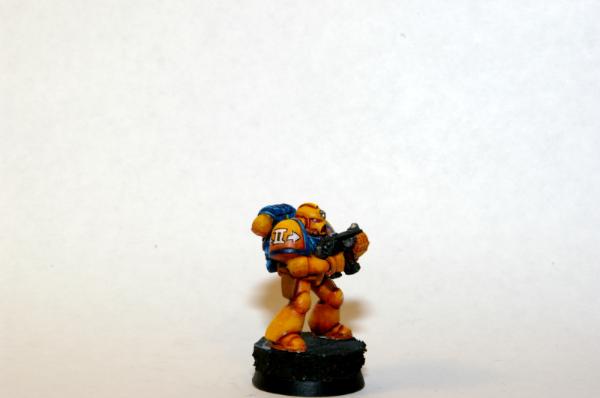
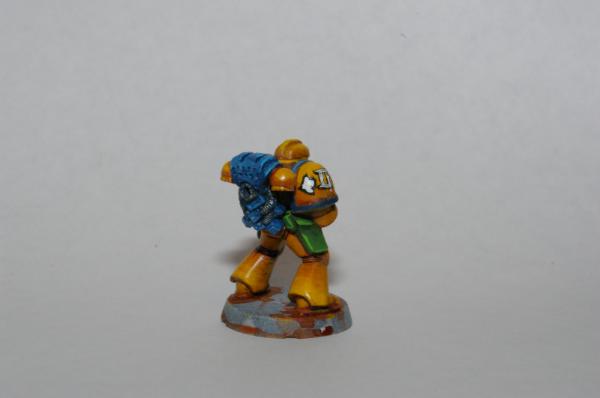
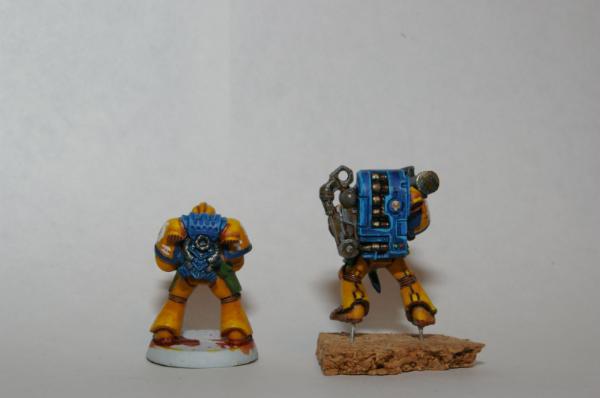
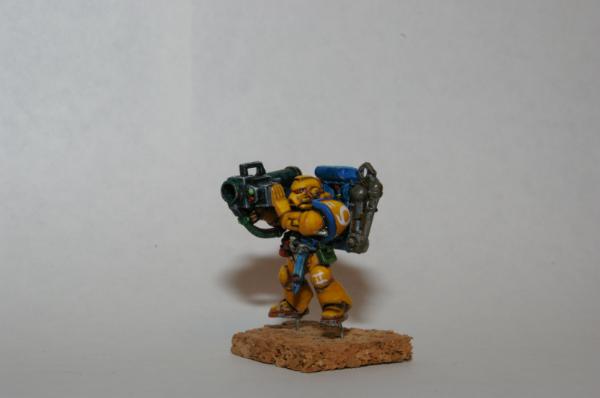
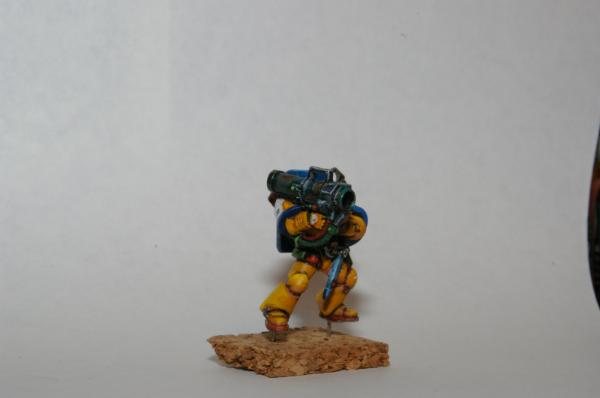
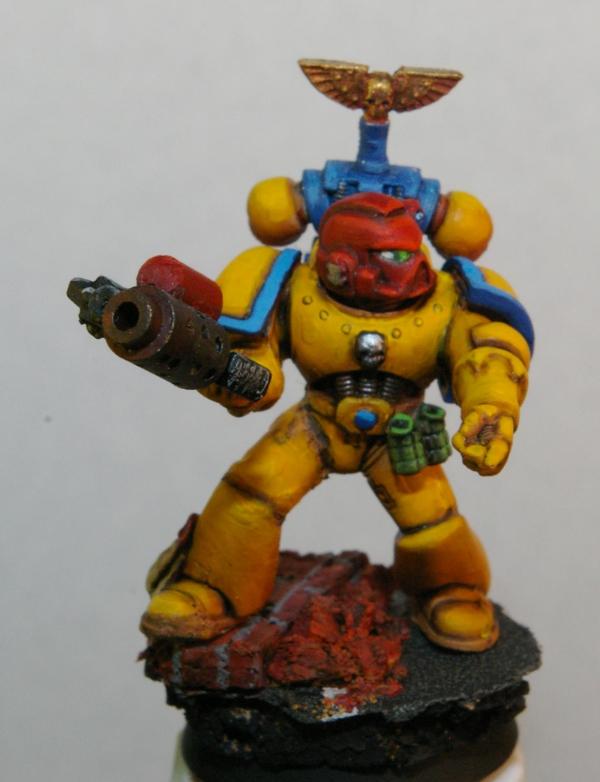
Finally, here are a some further images of my best model to date, the heavy weapon brother of the 2nd Tactical Squad:
I screwed up the early yellow undercoats a bit, resulting in this guy not having as dramatic a color transition as most of his bolter brothers. On the other hand, I think the lightest highlights are blended much better than on my previous attempts. I attempted to blackline (with washes, not technical pens) most of the fine details on this guy, something I hadn't tried before. I really like the results, I think the helmet particularly benefited.
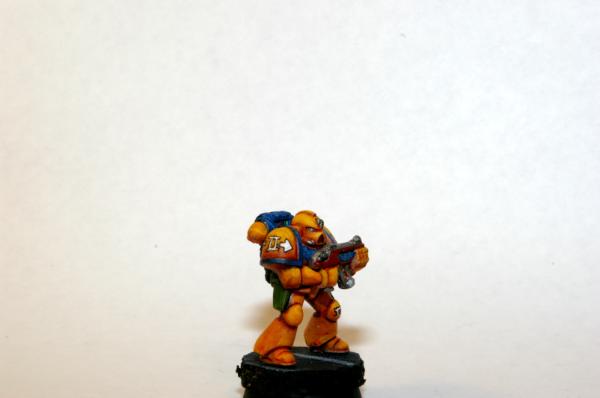
I am still not 100% satisfied with the missile launcher itself. I couldn't decide what color the launcher should be. I opted for a black casing over dark metallic components, and I think it came out too dark. Edge highlighting in white helped that issue a bit, but I'm not sure how I'll do the next one. I am still trying to figure out how best to highlight flat surfaces. Edge lining a la the 'eavy Metal style isn't the look I really want to go for, but I know it works and I'm unsure of what other techniques to try. I am still pretty bad at edge lining (as you can see), but I'm working on it.
The vision I had for the missile launcher the whole time was an ancient weapon that has been in use for centuries and seen many battles. I wanted to try my hand at oxidized copper. I think it turned out reasonably well for my first attempt.
Feedback is welcome, thanks for stopping by!
This message was edited 1 time. Last update was at 2011/09/07 05:52:02
I hope to get an actual painting update posted soon, school is in session again and it is beating my face in. The special weapon and sergeant are coming along slowly, I will post the flamer marine when he is done, and the WIP photos of my unpainted sergeant when I finish the conversions I'm doing on him.
To avoid letting the blog get cold, I decided to do a quick update to foreshadow some future feature models.
As a birthday present to myself, I bought myself some new (used!) toys on Bartertown. I am very excited about the modeling prospects down the line with these. Even better, they allow to actually play the game now, even if only one nearly-finished Tactical Squad is all that is presentable at the moment.
Tanks, special weapons, and a messy, messy desk:
Two meltagun marines (who turned out to be Space Wolves; will have to remove molded-on SW insignia), and a heap of exciting SW/SM bits:
Sorry the pictures are sub-par, I took them with my point-and-shoot camera free-handed on the macro setting (which accounts for the blurriness). I didn't have time to bust out the (borrowed) good camera and do the whole set-up I use for the photos of my finished models.
Norn King wrote:TBH, i hate using white primer, but hey, they look very good indeed!
Thanks! I haven't been overly happy with my white primer. The consistency and coverage of my black primer is so much better, but I thought that painting yellow over black primer would be an exorcize in frustration. I have since heard good things about grey primer. I want to give it a try, but I'm afraid it would drastically change the end result of my paint scheme. Perhaps I will try it on one of the Rhinos or Dreadnoughts; I'm less concerned with them perfectly matching the infantry.
I like theoxidisation you have done on your ML guy, it looks cool. Maybe use a little tin bitz in the base coat next time to bring out a more coppery feel to the under coat. But the actual blue oxidisation is very cool indeed
I have never used White primer, only Black so i cant really comment, But i do have trouble building up to yellow (i tend to give the ara a coat of codex grey first) But on my current marines i want them to look darker so the black under coat is fine.
I am looking forward to seeing your Yellow tank
2011/09/15 12:49:33
Subject: Re:The Grunge Marines (Updated September 14, 2011 with new Grungey acquisitions)
M0rdain wrote:I like theoxidisation you have done on your ML guy, it looks cool. Maybe use a little tin bitz in the base coat next time to bring out a more coppery feel to the under coat. But the actual blue oxidisation is very cool indeed
Tin Bitz already forms the base coat on the ML, but I applied so many washes and dry brush layers on top of that trying to get a look I liked, the overall coppery effect may be lost a bit. Hopefully next time it'll work better!
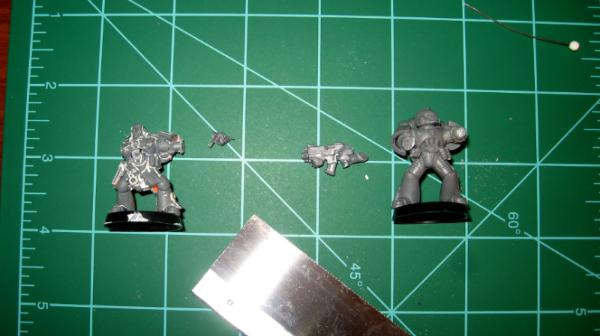
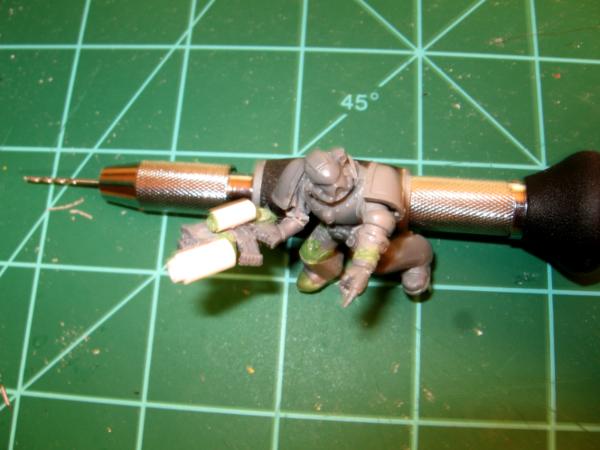
I've been slowly working on my sergeant for a while, and he now looks like the start of something presentable. Once again, I failed to take an initial photo, but he started out as an already-assembled (with plastic cement, no less) standard bolter marine. I wanted something a bit more dynamic. The vision I had was for the sergeant to have one leg perched on a rock or something while the sergeant pointed his men towards their next target. He needed to have a bad-ass combiweapon. Here are my current WIP photos:
I "borrowed" the pointing hand from one of the AoBR sergeants (and ultimately his backpack as well, this isn't shown):
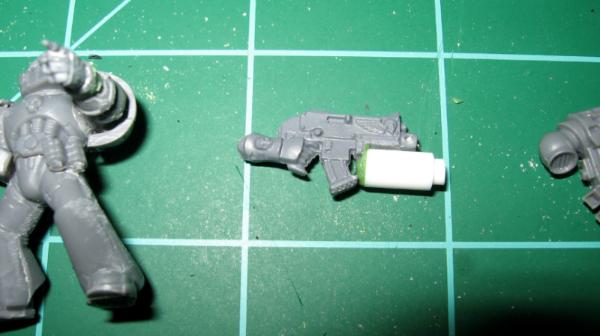
Started creating a secondary weapon barrel for my homemade combi-weapon conversion. It was originally going to be a melta, but I decided to go with flamer instead.
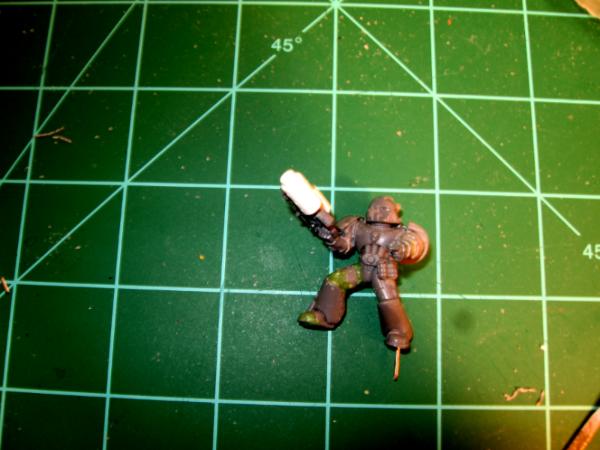
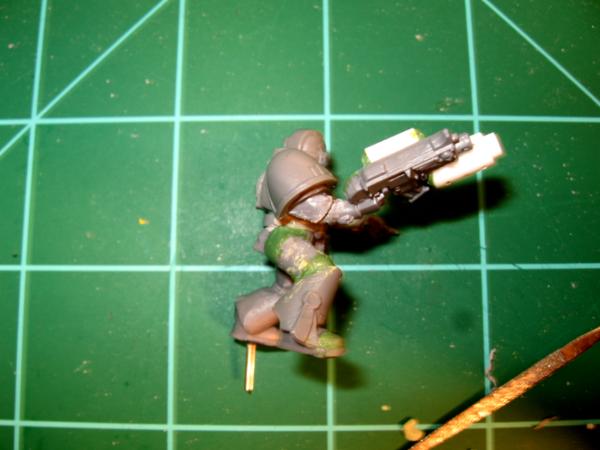
And a whole bunch of pinning and greenstuffing later, here are 3 photos of my mostly-assembled sergeant:
Obviously I have more detail green-stuffing and cleaning to do, but he looks like a sergeant now, so I decided to show him off.
I just wanted to fire off a quick and dirty WIP photo of my nearly-completed Flamer Marine and my Sergeant. Both are missing a few bits of detail work. The Sergeant obviously lacks a backpack, but it is going to require some greenstuffing to get on, and that is more than I can do tonight.
Still, I wanted to get some photos posted to keep my motivation up. Hope you like them!
It has been too long since my last post. I haven't had a lot of time to paint recently, and the time I've had I've spent starting my 2nd tac squad instead of putting the finishing touches on the first one. But without further ado, here is my first completed sergeant. He is made from a standard bolter marine that has been cut up and repositioned, the AoBR sergeant (the hand and backpack), some plastic tubing for the flamer barrel, and a bit of greenstuff. The rest of my first squad is done, I just want to do some more work with the bases before posting them. Note that the shoulder pads are left blank intentionally. I realized that I wasn't happy with the results of my freehanding insignia, and so decided to use custom-made decals instead. It will probably be a while before I get to making those, so while the sgt isn't 100% complete, it is the most it will be for a while. Anyway, I hope you enjoy the pictures, feedback is appreciated.
This message was edited 1 time. Last update was at 2011/10/12 04:57:13
Red Corsair wrote:Always had a soft spot in my heart for yellow marines... These look good mate, you get better with every guy
Thanks, I really appreciate it! Every kind word gives me just that extra bit of motivation to keep practicing. Looking back at my first Marine from this summer (of which I was very proud), I too am amazed by how much I have improved in just 10 models.
Of course, I am still hyper-critical of my own work. The highlighting on the bolter and backpack on the sergeant is a mess...edge highlighting is a technique I still suck at. But I'm practicing!
So, it's been 7 months since I updated this blog. I've been slowly working on the Grunge Marines the whole time (emphasis on slow), but I haven't posted anything because I didn't feel like I had anything worth posting. The last thing this blog needed was more pictures of bolter marines, and everything else was in a perpetual WIP stage. But I finally finished my first 4 scout snipers, and a landspeeder is coming along nicely, so I thought I'd post an update. I have to admit that since I last posted, I realized how frustrating second hand models were to deal with if you're trying to do high-quality, fine-detail painting. Often there are chunks of paint left behind from the previous owner that are damn near impossible to get off. The poses may be undesirable, but cemented in place. It is really hard to get into minute spaces with the model already assembled. So I admit I broke my own "grunge" rule and just bought a few new-on-sprue kits that I like and wanted to do well. Namely the Scout Snipers and the Landspeeder.
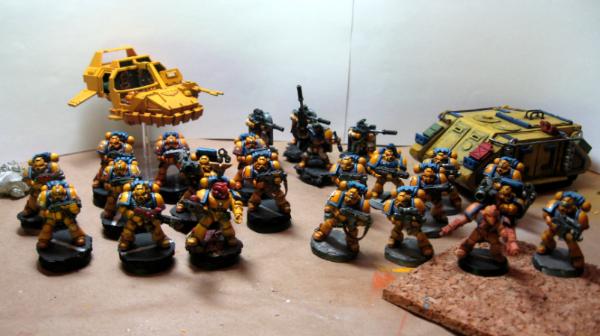
Here's a group shot of everything for my army that has paint on it:
On the left is the completed tactical squad you've already seen. On the right, is a nearly completed [ML guy needs a base, Sgt is only wearing a base coat] second tactical squad which you have not seen. In the back are the first 4 of a 10-man scout sniper squad I'm working on, and flanking them are two WIP vehicles, a magnetized Landspeeder and an old-school grunged Rhino. The Rhino is hideous, which is why I'm having a hard time finishing it.
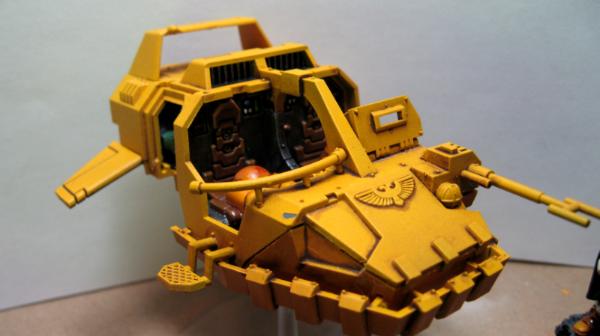
On the other hand, I'm pretty happy with the way the Landspeeder is coming along. This is my first attempt at oil washing:
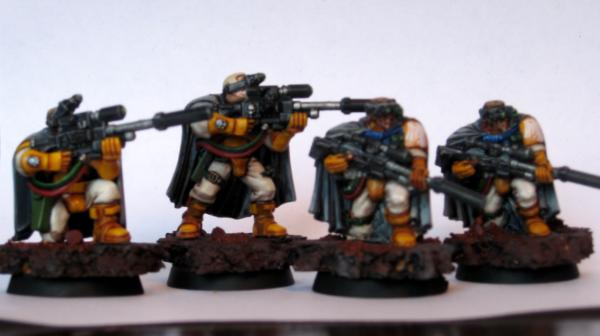
Sorry about the bad lighting on the scout squad, I need to set up a proper light booth when I get a chance:
Hopefully this close-up of one of the guys gives you a better idea:
Yes, he's very shiny from gloss varnish. I'm going to put a layer of Dull Coat on him before he's officially "done". Also, I am stumped for what to do with the scouts' bases. I'm trying to convey the sense that they are fighting in a bombed-out city covered in rubble, ala anywhere-in-Germany-circa-1945. I'm at a loss for how to do that in the allotted space without distracting from the figure itself. Any thoughts?
Thanks for looking, C&C are appreciated!
This message was edited 1 time. Last update was at 2012/05/15 17:47:35
These look great - it's nice to see these mistreated models getting a new lease of life. With the bases - it's nice if they aren't overcrowded, some mossy growth might work, but less is more, or go for the painted lines you mentioned earlier. If you really must put objects on the base then try civilian bits that might have been dropped in panic (rather than a random skull, lasgun or IG water bottle!) e.g. a little toy rabbit (GS will work for it), or a can of fizzy drink/bottle (plastic tubing makes that easy enough). It might bring home the abandoned city element more.
Looking forward to more updates!
Laney
2012/05/15 06:34:49
Subject: Re:The Grunge Marines (Long overdue update with Army Shot, Scouts, and a Landspeeder WIP!)
Have you considered some rubble made from chopped up sprue? If you paint it a dull red it will look like bricks and also compliment the yellow/ blue armour.
I really like your work so far - yellow is a TOUGH mutha to work with and these Marines have come out really well!
Also, you appear to have avoided several pitfalls that new painters fall into i.e. mould lines and thick paint. Very well done so far
And good grief!!! You managed to get FOUR old school Rhino hulls? Nice
P.S. The Sergeant looks very cool - the only thing I dislike is the small Terminator Honour on his backpack. I don't like it being white - perhaps gold like the Aquila?
02Laney wrote:These look great - it's nice to see these mistreated models getting a new lease of life. With the bases - it's nice if they aren't overcrowded, some mossy growth might work, but less is more, or go for the painted lines you mentioned earlier. If you really must put objects on the base then try civilian bits that might have been dropped in panic (rather than a random skull, lasgun or IG water bottle!) e.g. a little toy rabbit (GS will work for it), or a can of fizzy drink/bottle (plastic tubing makes that easy enough). It might bring home the abandoned city element more.
That is a fantastic idea! As you say, less is more, and I fear that civilian items would be a bit distracting on the standard infantry base. I've got a couple of dreadnoughts coming down the pipe, however, and I think I will use this idea on those nice 60mm bases.
Jihad_Ragsta wrote:
Have you considered some rubble made from chopped up sprue? If you paint it a dull red it will look like bricks and also compliment the yellow/ blue armour.
I really like your work so far - yellow is a TOUGH mutha to work with and these Marines have come out really well!
Also, you appear to have avoided several pitfalls that new painters fall into i.e. mould lines and thick paint. Very well done so far
And good grief!!! You managed to get FOUR old school Rhino hulls? Nice
P.S. The Sergeant looks very cool - the only thing I dislike is the small Terminator Honour on his backpack. I don't like it being white - perhaps gold like the Aquila?
Thanks for the kind words! The chopped up sprue is a great idea. As you can see on the sergeant, I tried to replicate a ruined brick wall with cork. I think it worked on that figure, but I am going to take your advice and give sprue a try on the scouts.
This message was edited 1 time. Last update was at 2012/05/15 17:50:56
I know I'm late on the draw but the home-brew combi-flamer is really cool. As are the rest of your models to be honest, but I especially like that little conversion.
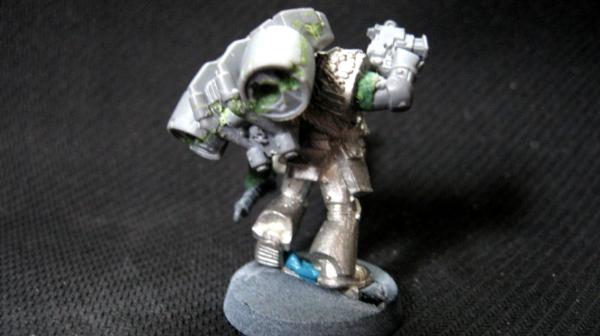
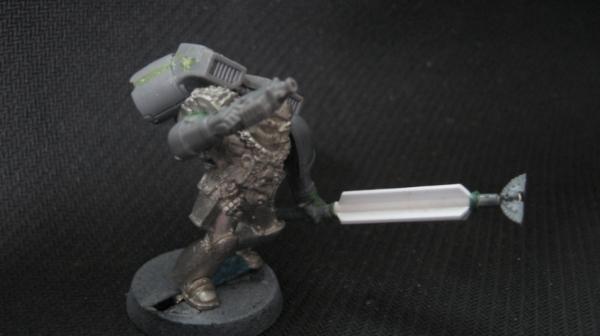
Here are a few WIP photos of my latest model. He's the sergeant for my 2nd Tactical Squad.
Go ahead. Make my day.
Doing a Sasquatch impression:
A crappy picture that doesn't blur out his bling:
A view from the rear:
And finally, from the left side:
The body of this guy started life as what I think is an old 2nd edition metal Death Company marine. The bolt pistol arm and backpack are both plastics from the modern tactical squad sprue. The Combi-melta arm and back banner are both metal bits whose origin is unknown to me. Anyone have any ideas? All the parts for this figure came out of a Space Marine bitz box I bought off of a fellow dakka member a while back.
Anyway, C&C appreciated! Anyone have any ideas for what to put on the banner?
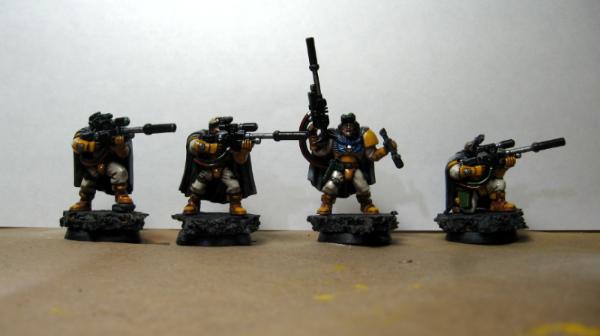
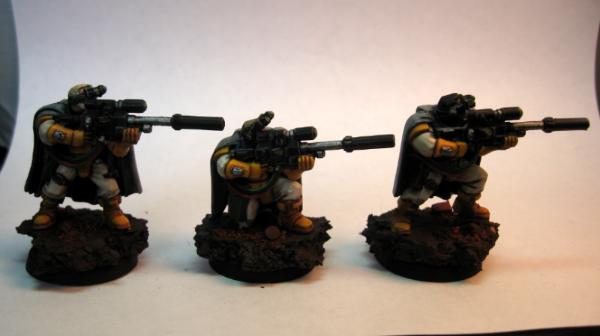
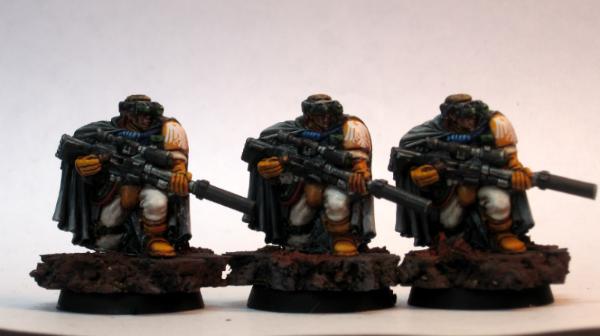
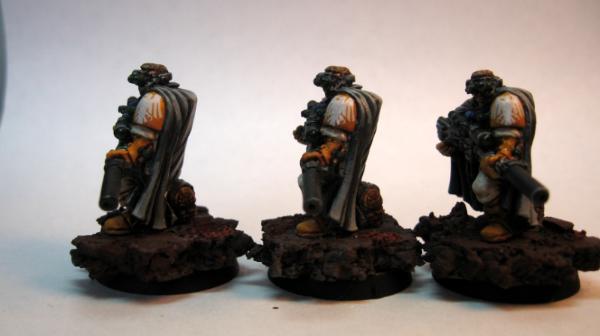
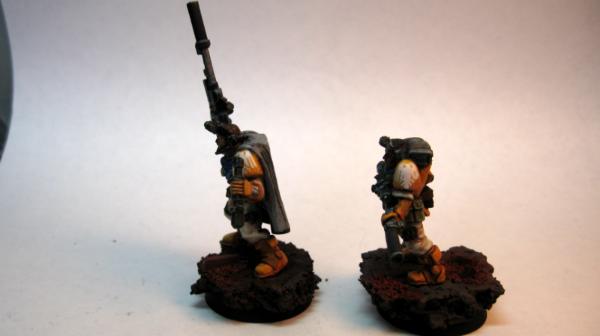
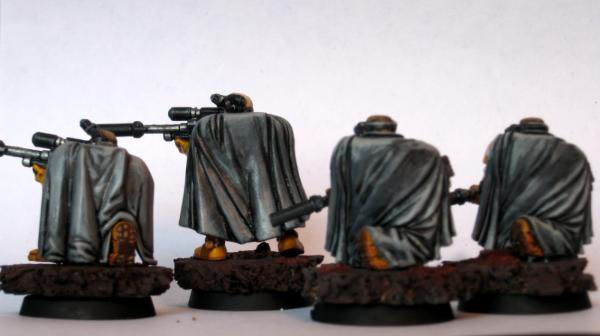
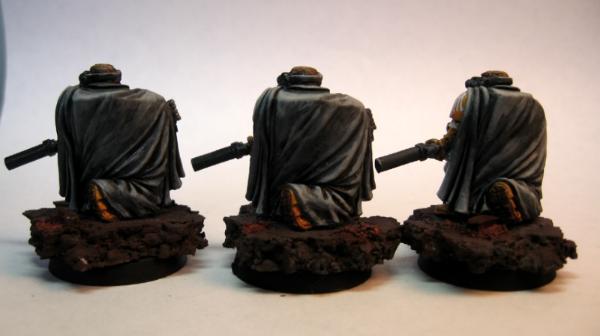
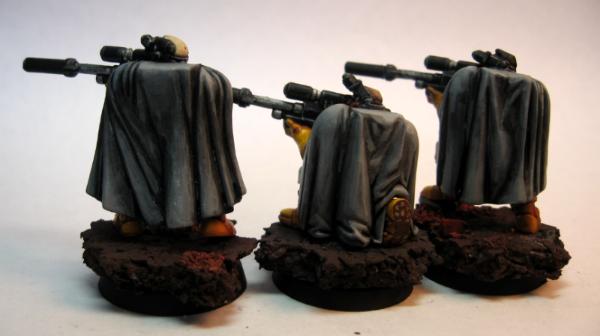
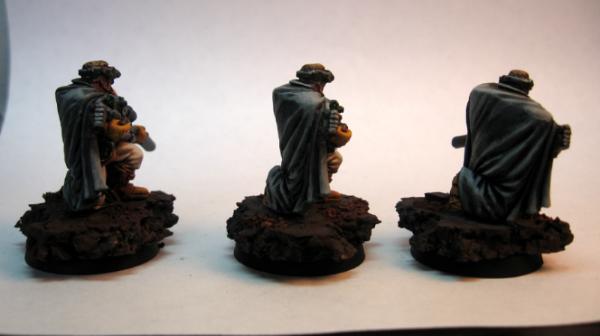
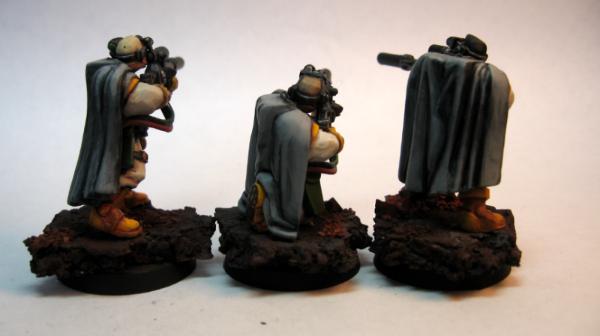
I'm just finishing up scout snipers 5-8. These are all old metal figures. If I'm not mistaken, there are only two sculpts of it, the one below with his camo cloak folded on his shoulders, and a crouching one with his cloak fully deployed. I must say I like the one below much better. Trying to get the details on the crouching figure (of which I have 3) is proving to be an absolute nightmare. In addition, the cloaks are taking me a very, very long time, because I'm trying to get interesting highlights while maintaining smooth color transitions. Working with paint this thin, it is very difficult to keep it out of the folds where I want there to still be shadow. Hopefully soon I will be able to post decent pictures of all 8 finished snipers together. Then I'll be on to a scout with a missile launcher, and a converted counts-as Tellion to round out the squad.
Wow, when you zoon in on those images, you can see every mistake I made during the painting process. I'm torn between metal and plastic models. Metal has an agreeable "heft" to it, as feels more "proper", but I love the ability to paint plastic kits in pieces before assembly. You're able to paint a lot more detail that way.
I think I've finally decided on a chapter logo. I'm going to use the Raven Guard raven (also used by the Hawk Lords and a few others, so there's precedent for stealing it), and call my Chapter the Storm Ravens. Once I get some practice with water transfers on some spare models, I'll order the Raven Guard transfer sheet from Forge World.
Anyway, feedback is greatly apprecited, thanks for looking!
This message was edited 1 time. Last update was at 2012/05/30 06:20:48
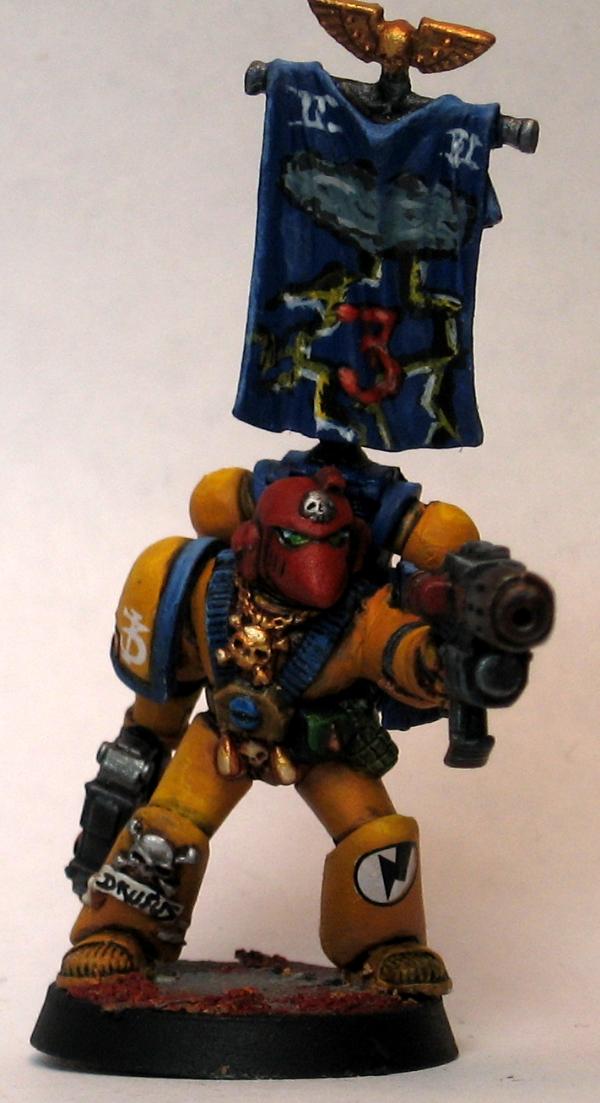
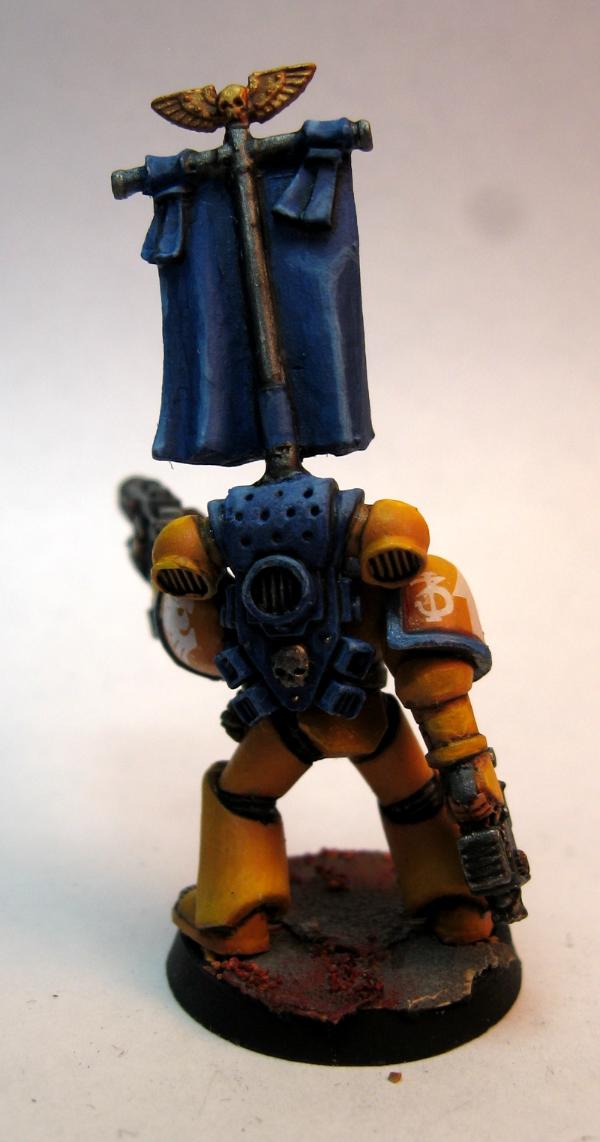
These are my first 9 models that I have completely finished, with decals, and a finished base. They might need another layer of dullcoat, but that's about it. Constructive Criticism Appreciated!
Brother Sergeant Drusus, Leader of The Second Company's 3rd Tactical Squad:
8 Scout Snipers:
This message was edited 2 times. Last update was at 2012/06/07 19:23:27
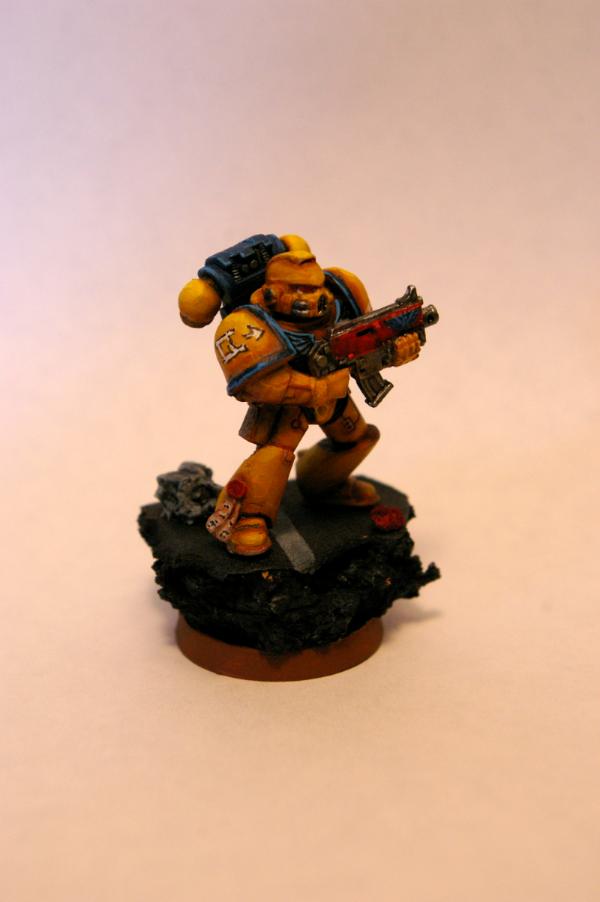
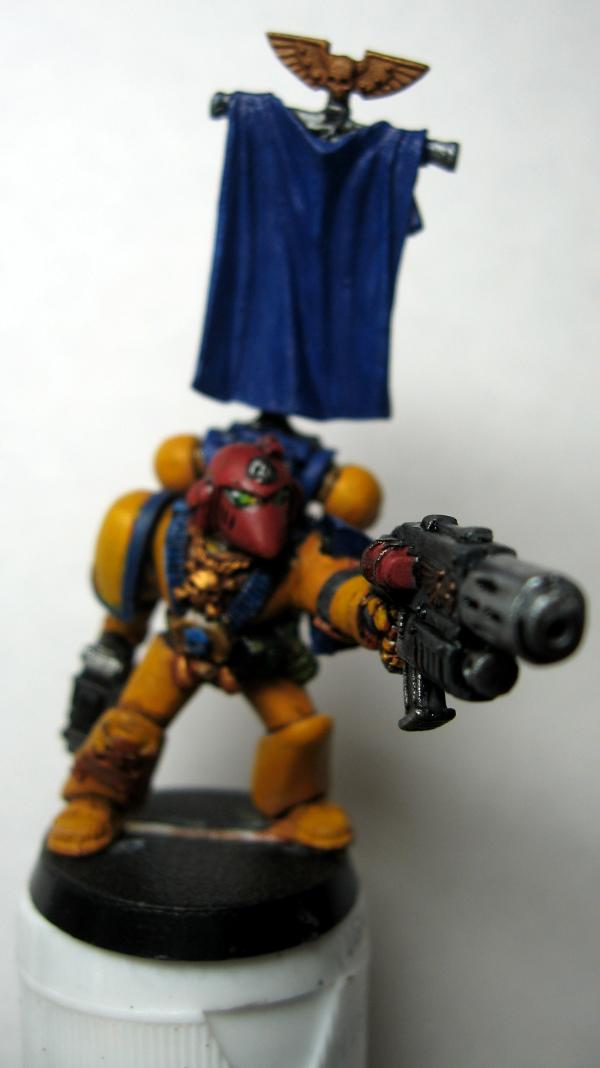
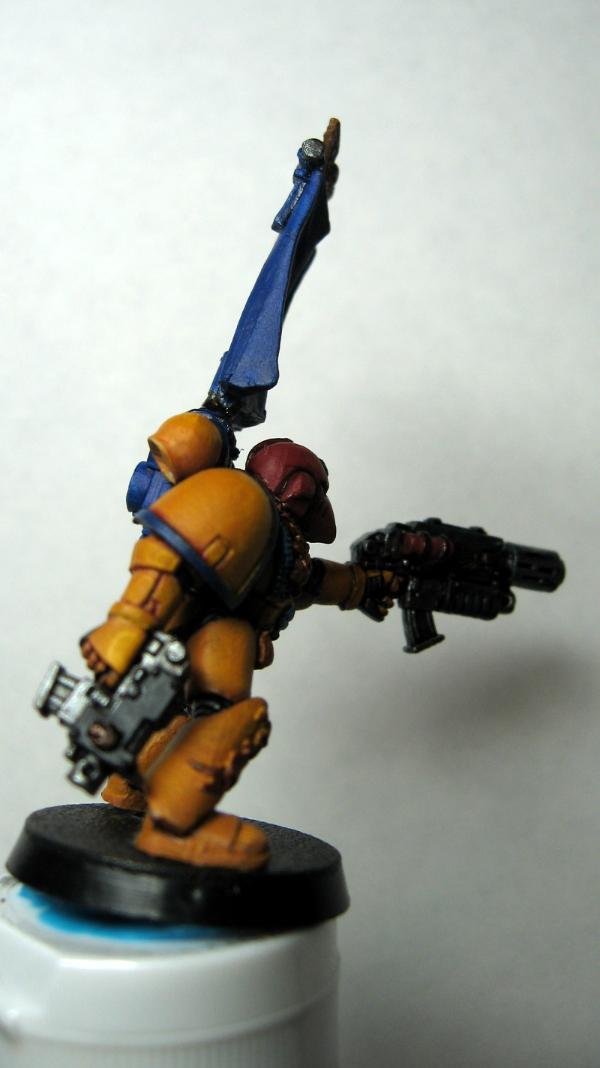
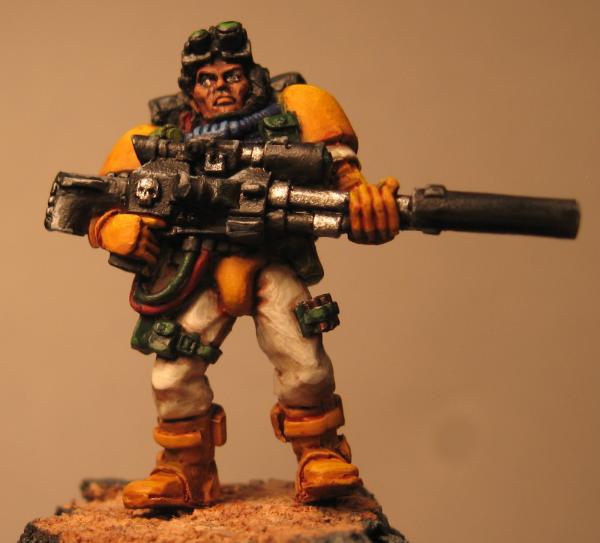
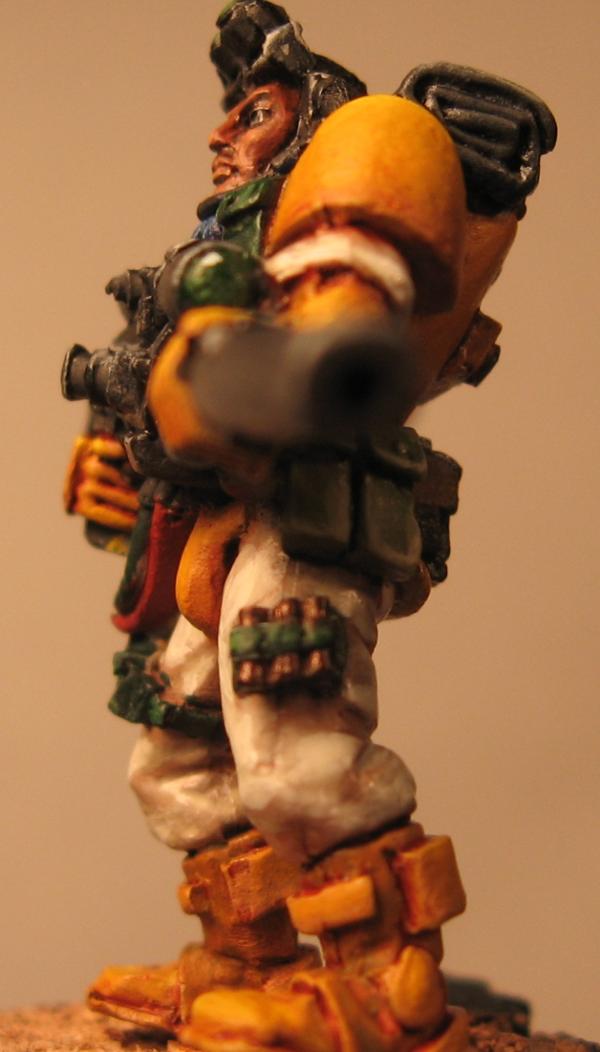
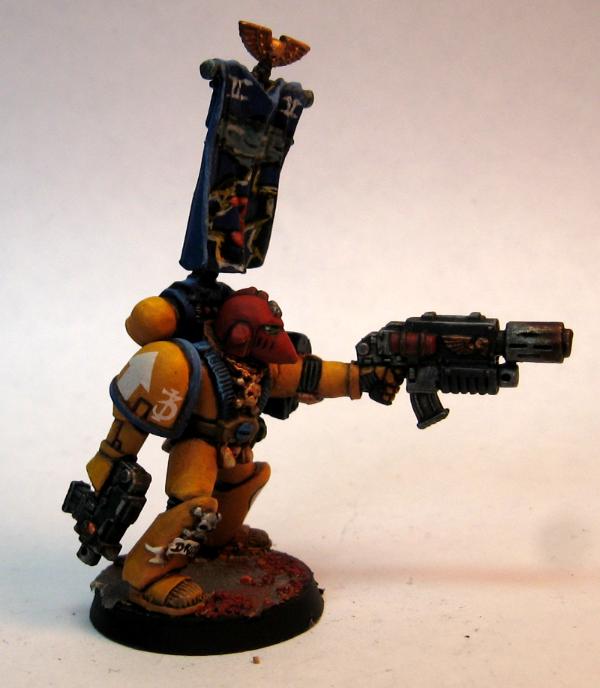
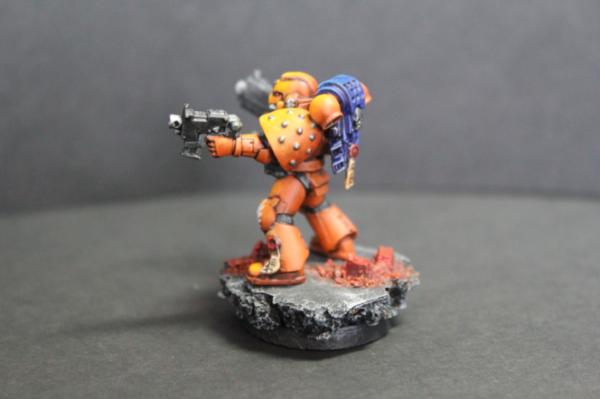
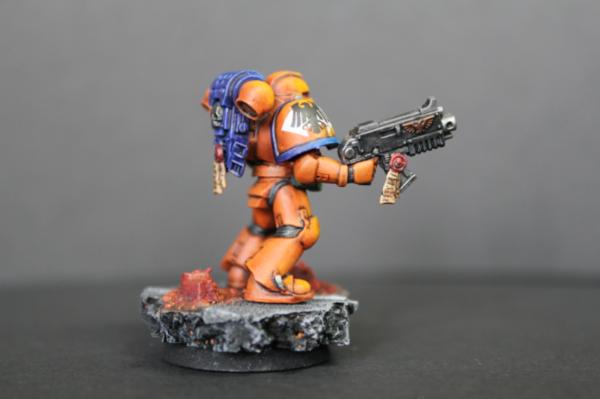
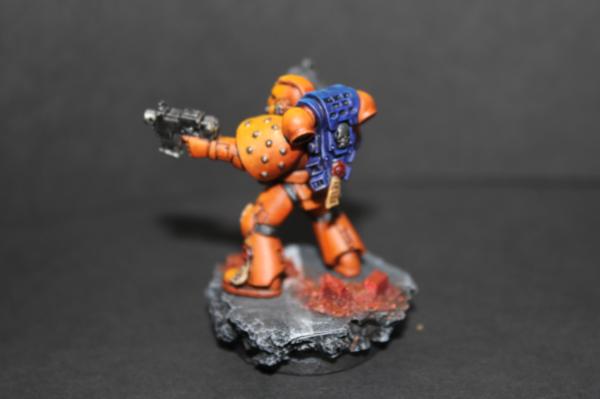
Here is my latest figure, which I completed for a painting contest. I spent an absurd number of hours on this guy. I wanted to get across the impression that he is involved in a nighttime fight, with the lights of battle lighting his body from the front. In my imagination, he is forming a firing line with his battle brothers, and the collective muzzle flashes are the source of the light. I missed one mold line on the inside of his right leg, but by the time I noticed it, it was too late to fix it. I know it's a minor thing, but it is vexing me.
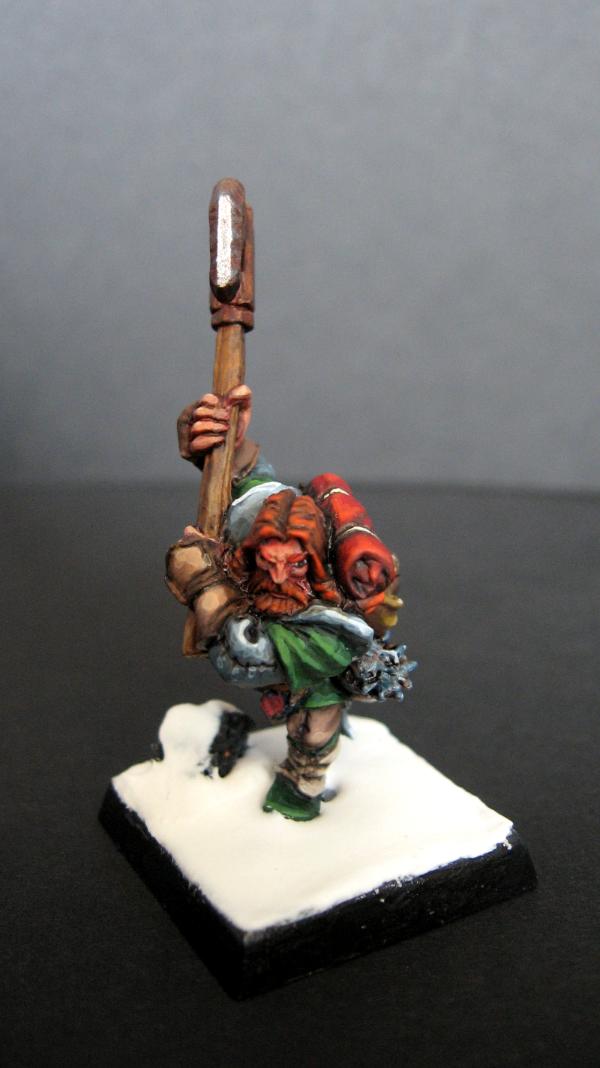
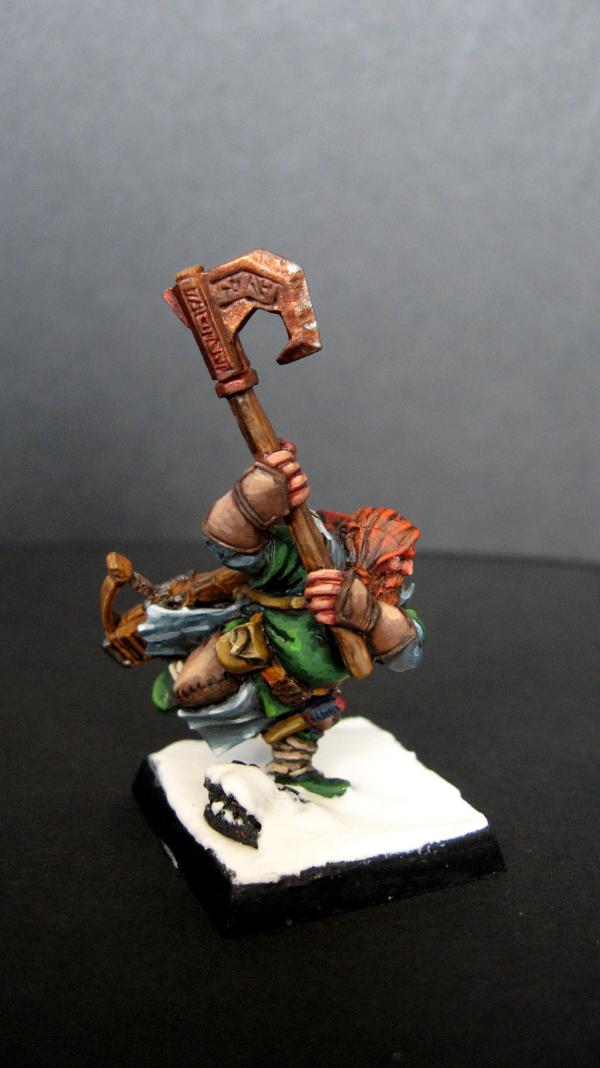
I also recently finished this dwarf figure, which is from Reaper Miniature's Pathfinder line. To avoid burn out, I'm doing one non-40k figure for each piece for my army. I think the variety is really helping me improve as a painter.
Thanks for looking, as always, comments and constructive criticism are greatly appreciated!
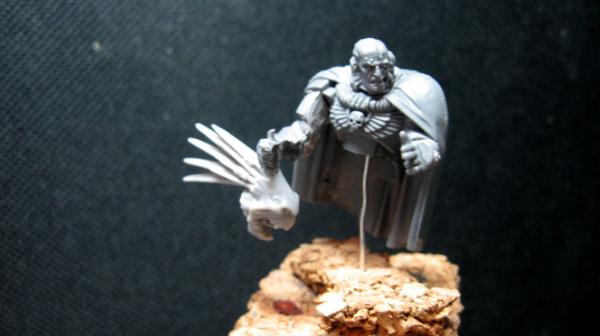
The best investments I've made in my 40k hobby were buying bitz boxes from two different people for $20 each. They were loaded with awesome random goodies, like an old 2nd edition metal Chaplain without arms. What I think used to be his mace arm had been unceremoniously clipped off by a previous owner. I decided to fix him up into a proper HQ choice for the Brotherhood.
With 6th edition, the Crozius Arcanum that a Chaplain carries is listed as a "power maul". I hate the Crozius Arcana that modern Chaplain models have. I think they are boring and don't look anything like a maul. So I took the ax arm of what I think is a WH Fantasy Chaos Warrior, cut off the blade, and attached the hand to a standard Space Marine hand. I then applied plasticard to get a "holy baseball bat of JUSTICE" kind of Crozius Arcanum. The winged skull on top is from the sergeant's backpack from the AoBR kit. It still looks absurd, but Space Marines are a bit over the top anyway. I've taken to calling his weapon, "The Ridicustick". I like it better than the stock model, at any rate. Then, I magnitized him to a jump pack from one of my bitz box purchases.
He's going to need a little more filing and fine-tuning until he's ready to be primed, but I'm pretty proud of this guy and wanted to share.
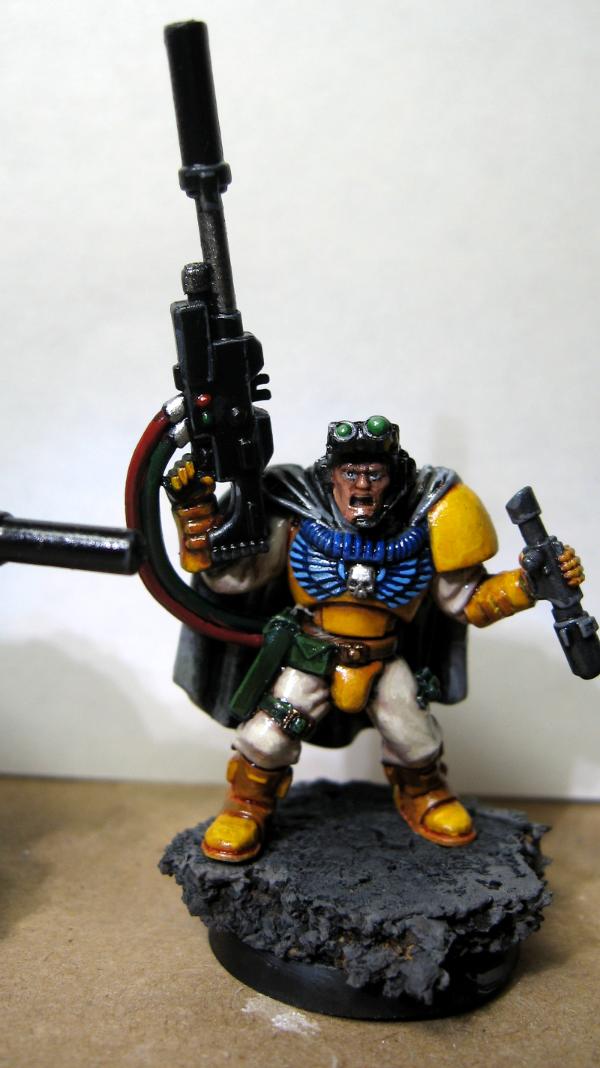
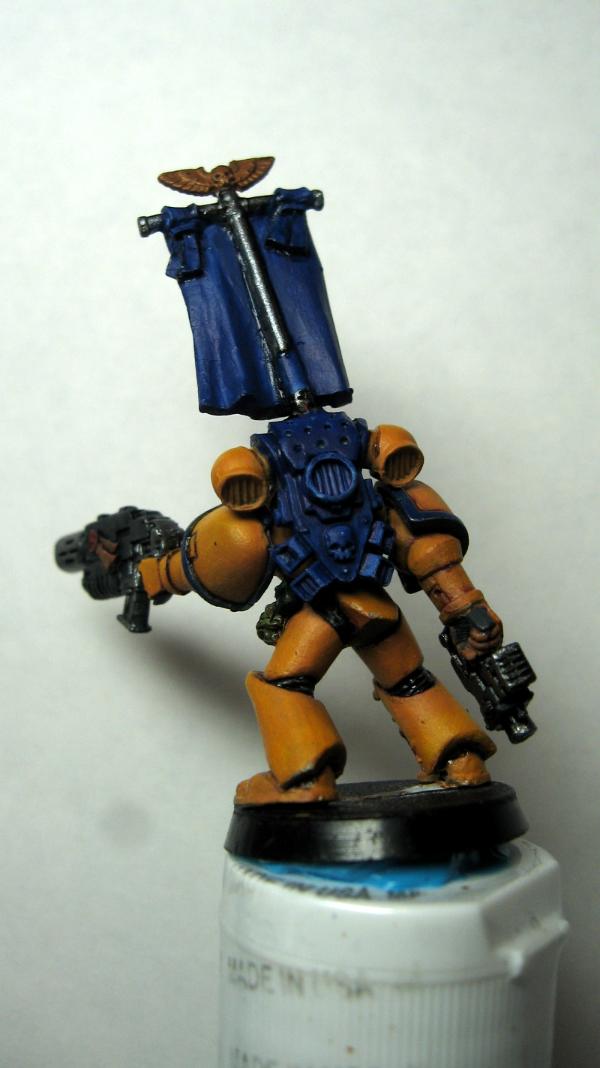
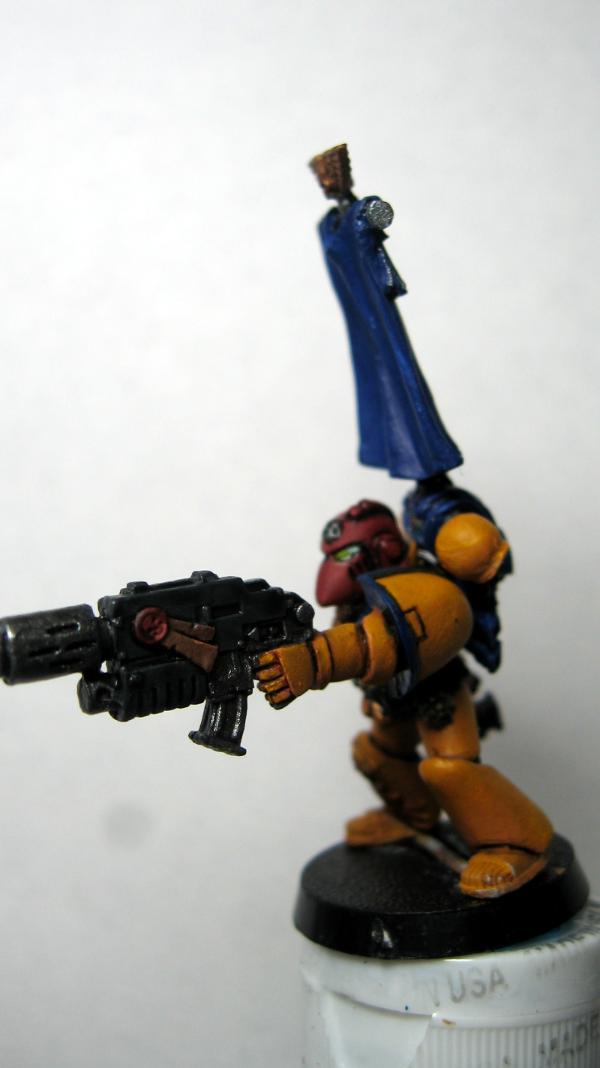
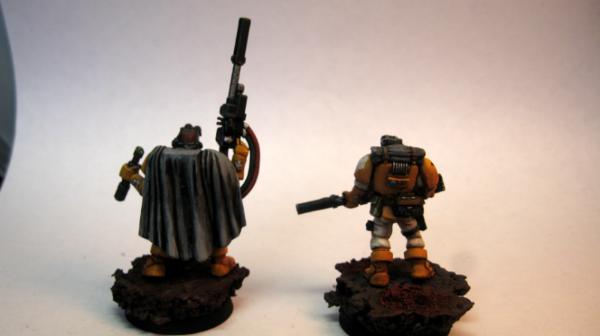
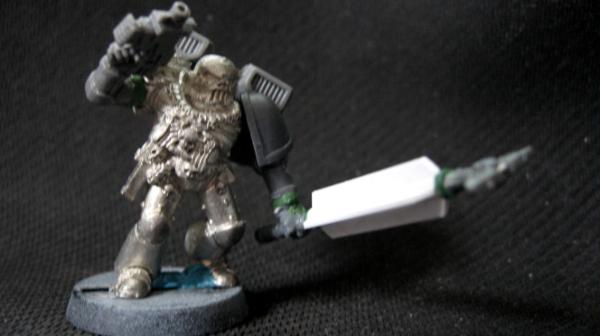
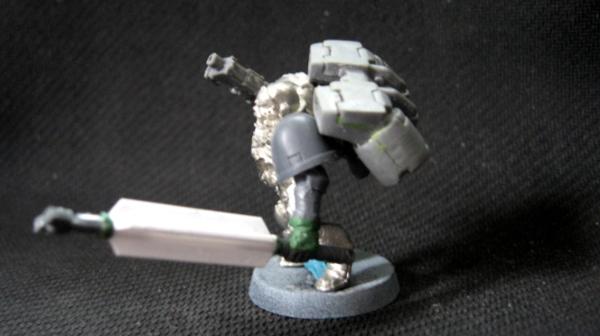
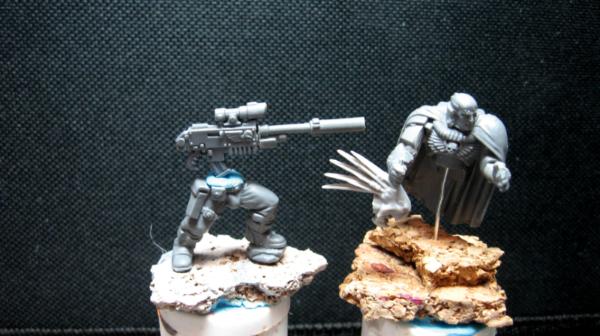
Here's what I've been tinkering with when I find the time. I'm modeling Captain Seneca of the 10th Parliament, Master of Novices. In game, he's a counts-as Sgt. Telion.
Anyway, I wanted the figure to tell a story, and have some character, so I'm modeling him using his "voice of experience" to give a lecture on the proper way to shoot a Kroot.
The big trouble I'm having right now is how to attach the gun so that the model is appropriately WYSIWYG. I like the idea of it being strapped across his back, but can't figure out how to do it and have it look good. The strap would cause folds in the camo cloak that would be too hard to model. Any thoughts on a work-around?
There is a lot of green stuffing that remains to be done. Filling in all of the gaps in the arms/filling out arm definition, sealing the gaps around the head, etc. He's got the Kroot by one of its top head feathers, so I need to model that feather coming out the top of his right fist.
Any thoughts on "bling" for him to have to denote his high rank as a Captain? At the same time, I feel he's the Master of Novices and leads scouts from the front lines, so his insignia should not compromise his ability to be stealthy. I'm torn.
The count as Telion looks good to me, not such a big fan of the chaplains weapon, it just looks a little to unwieldly for a jump pack model. Other than that the rest looks great imho
Young Logan
30K Blog: hobbyfromtheaett.blogspot.com
Bran Redmaws Great Company - 5500pts 30K Space Wolves - 1500pts Deathguard -2300 pts


 I know it's a minor thing, but it is vexing me.


 Bran Redmaws Great Company - 5500pts
 Deathguard -2300 pts