| Author |
Message |
 |
|
|
|
|
Advert
|
Forum adverts like this one are shown to any user who is not logged in. Join us by filling out a tiny 3 field form and you will get your own, free, dakka user account which gives a good range of benefits to you:
- No adverts like this in the forums anymore.
- Times and dates in your local timezone.
- Full tracking of what you have read so you can skip to your first unread post, easily see what has changed since you last logged in, and easily see what is new at a glance.
- Email notifications for threads you want to watch closely.
- Being a part of the oldest wargaming community on the net.
If you are already a member then feel free to login now. |
|
 |
2011/08/18 06:12:36
Subject: Warmachine Jungle Ruins Terrain Project - GenCon 2011 (Finished!)
|
|

Regular Dakkanaut
|
Ah, another project log! And like many of our sorted and twisted tales, this one begins with an E-mail from a fascinating person who has traveled the world.
We were contacted with a request to make a series of themed terrain pieces for our client’s upcoming Warmachine tournament which he was organizing for GenCon 2011. This immediately piqued our curiosity, because we’ve been itching to work on something besides The Grim Darkness Of The Future for a long time, but since that’s all we’re asked to make, we haven’t had a lot of opportunities to spread our wings and try different styles. (Also, GenCon! wheeee!)
Some commissioned projects are rather simple and pretty much go like this:
* Them: MAEK ME TERRAINS!!!1
* Us: Ok. Monies please k thx bye.
And we then design something that we think looks awesome and send it off and everything’s great. But in this case we were dealing with the flavor rich world of Warmachine, and a specific plan for a full-blown campaign event with an actual narrative.
We had a crash-course learning about the ancient, mysterious and barbaric Orgoth and the origin of the Iron Kingdoms.
The storyline for the campaign was that an ancient Orgoth artifact had been discovered in the jungle, and an excavation had begun by the Khador, a militaristic empire. But when a later expedition arrives, they find the camps deserted, tools dropped and scattered, and the sense that something evil had been released.

Terrain-wise, the original plan called for about five pieces, including the huge, main centerpiece, which would feature the uncovered artifact (which was left up to us to decide on and design) and the signs of an abandoned archeological dig. The other pieces were a shattered stone seal of some kind, like a giant medallion that had been broken from within, an archeological dig site, a Khador Encampment, and a ring of standing stones.
Also, all of these pieces were to have a jungle ruins theme.
Yeah, so at this point we were bouncing off the walls with excitement. Our client provided us with some pictures he took himself from his own travels around the world, as inspiration for the look and feel of the terrain. Here are a few.


We also dug up some of our own inspiration, looking towards jungle ruins of the far east. One of the primary features that Mismuse, my main partner in this, wanted to include were Boddhi trees, the giant tropical trees that form from vines and have extensive root systems that flow all over everything.

While we eventually had hundreds of pictures of photo reference, this particular picture of Angkor Wat turned out to be one of my favorites for designing the individual components of the ruins, but more on that later.
Before I could begin hacking my fingers to pieces and pulling all-nighters at the workbench, we needed to come up with a design. Mismuse and I had a series of lengthy discussions about things like “balancing composition against playability” and “Which of us is a bigger butt.” But eventually we started sketching out some plans.
We realized that our usual standby of Sketchup would not be our primary tool for designing something as organic as a jungle setting, but we did use it to sorta, kinda make a rough, weird overhead diagram of our layout.

I think this may have confused our client and each other more than helped. So it was time to break out the traditional pencil & paper designs. Our general plan was a fallen Orgoth tower, with a claw-like structure on the fallen portion. Over the centuries, people built ruins around the tower which also crumbled over time.

This was my first sketch. The annotations are by Mismuse.

From Mismuse’s actual notes: “ Where on God’s green earth is my Boddhi Tree?” was my reaction when I saw this supposedly alternate view (closeup) of the ruins. I also didn’t like the multiple entrance to nowhere.”
Frustration imminent, I made one more attempt after another 3:00 AM coffee and donut session.

This was more like it. From here we were able to shake hands at last. This sketch captures the look we were going for, with crumbling ruins laid out in a tactical, playable layout. You can see the trees, roots, ruins and the excavation scaffolding, with the mysterious hole in the ground.
From here we could decide what we needed to do to make this a reality, and we went in separate directions. Mismuse vowed to engineer and design the trees, roots and foliage, while it was my task to make the landscape, ruins and Orgothian decor come to life.

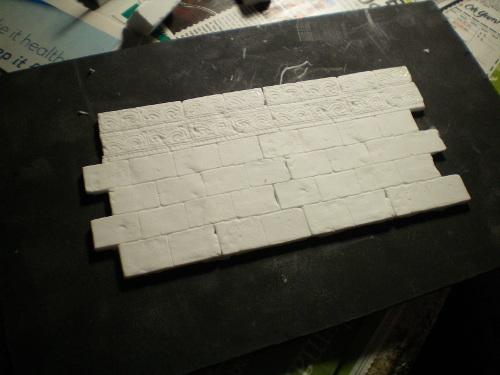
Step 1. Using my favorite picture of Angkor Wat as a study guide, I started crafting what basically amounted to a custom building-block set, starting with the angular, decorative trim pieces for the ruined walls. This began with a long block of carefully cut “extra firm” super sculpey, a medium I like to use for stone and concrete sculpting.
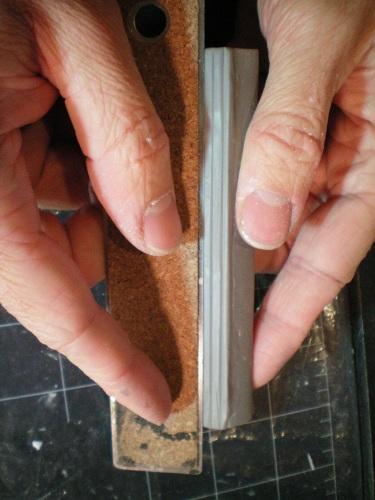
With a metal straight edge, I made grooves along the length of the block, which I then used other tools to smooth into rounded grooves and bumps.
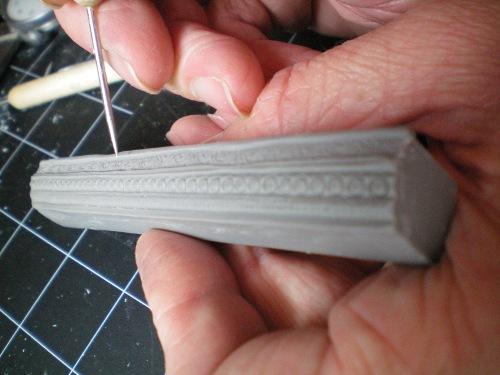
Using my fine detail tools, I started etching in the detail work. The back half of this block has already been baked, that’s why I can hold it without it flopping over.
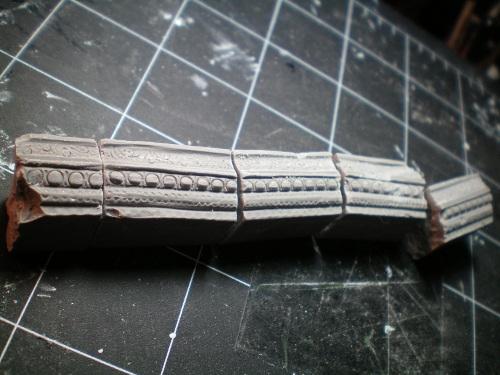
Finally, using a miter box, I cut the strip into even blocks and then chipped away a the edges with a hobby knife to simulate centuries of wear and tear.
Next, longer decorative blocks to lay on top of the previous set. These had some kind of flower pattern on each piece.
[img]http://images.dakkadakka.com/gallery/2011/8/18/259996_md-Jungle%2C%20Khador%2C%20Orgoth%2C%20Ruins%2C%20Terrain%2C%20Warmachine.jpg/[img]
Here you can see how the sets will look when used together.
[img]http://images.dakkadakka.com/gallery/2011/8/18/259997_md-Jungle%2C%20Khador%2C%20Orgoth%2C%20Ruins%2C%20Terrain%2C%20Warmachine.jpg/[img]
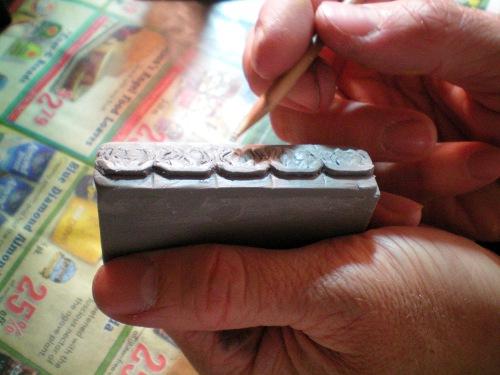
Then columns. I baked pieces, assembled the pieces, sanded until flush, then filled in the gaps, smoothed out the angles and baked again.
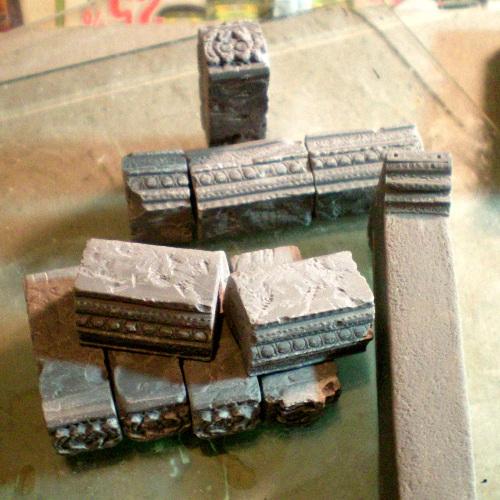
After this, I gave all the pieces another round of sanding with fine grade sandpaper to make the chipped parts less sharp and more aged.
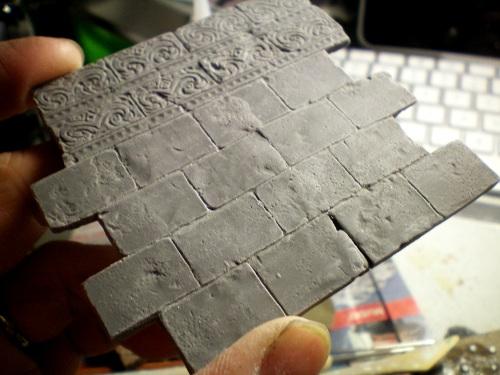
Then I sculpted the wall sections themselves. Instead of stacking the hundreds of blocks I would need, I opted instead to make a flat piece that I could clad foamcore walls with. In addition, I made a lot of loose blocks of various sizes and shapes that I could use to blend these flat pieces into crumbling sections.
[img]http://images.dakkadakka.com/gallery/2011/8/18/260000_md-Jungle%2C%20Khador%2C%20Orgoth%2C%20Ruins%2C%20Terrain%2C%20Warmachine.jpg[img]
Of course, I wouldn’t be sculpting every single block on this monster by hand, or I would be barely be done in time for SpaceGenCon in 2130 AD. The blocks were set for making silicon molds using foamcore forms.
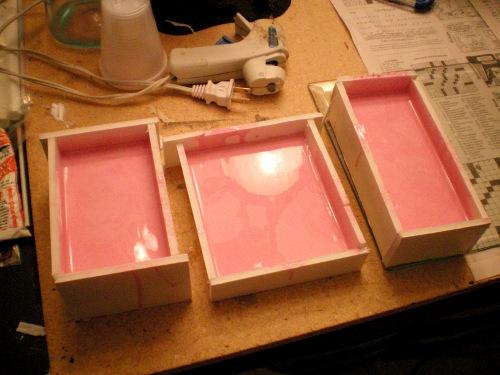
The silicon was de-gassed and poured, and then de-gassed again before being left to set overnight.

Once cured and the originals popped out, I used scissors to carefully cut off any excess silicone.
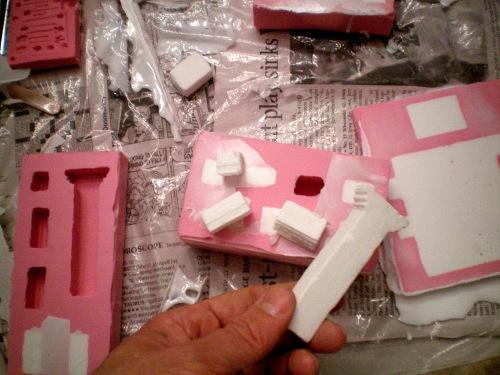
First resin casting. Looks good so far!
The wall pieces fit together perfectly. At this point we were communicating with our client about one of the other pieces, specifically the Broken Seal. We needed to come up with a design to be engraved on the seal, and our client asked if it would be possible to make a copy of the seal, whole and intact, that he could use for a trophy in his campaign. So I knew I had more drawing and sculpting to do.
To be continued…
|
|
This message was edited 3 times. Last update was at 2011/09/28 11:06:36
|
|
|
 |
|
2011/08/18 06:34:16
Subject: Warmachine Jungle Ruins Terrain Project - GenCon 2011
|
|
Fanatic with Madcap Mushrooms
|
Great stuff!
I do especially love Warmachine themed terrain, looking forward to the Khador camp ground!
|
|
This message was edited 1 time. Last update was at 2011/08/18 06:34:21
Some people play to win, some people play for fun. Me? I play to kill toy soldiers.
DR:90S++GMB++IPwh40k206#+D++A++/hWD350R+++T(S)DM+
WHFB, AoS, 40k, WM/H, Starship Troopers Miniatures, FoW
    |
|
|
|
|
2011/08/18 06:38:54
Subject: Warmachine Jungle Ruins Terrain Project - GenCon 2011
|
|

Morphing Obliterator
|
Wow, first to comment? Amazing work dudes, I look forward to seeing more. LOVE your project logs.
Automatically Appended Next Post:
Edit: NINJA'D!!
|
|
This message was edited 1 time. Last update was at 2011/08/18 06:39:08
|
|
|
|
|
2011/08/18 07:57:52
Subject: Warmachine Jungle Ruins Terrain Project - GenCon 2011
|
|
Krazed Killa Kan
|
Looking great so far, I love watching people build huge complex and beautiful gaming tables!
Consider this subbed!
|
DR:80S---G+MB---I+Pw40k08#+D+A+/fWD???R+T(M)DM+
My P&M Log: http://www.dakkadakka.com/dakkaforum/posts/list/433120.page
 Atma01 wrote: Atma01 wrote:
And that is why you hear people yelling FOR THE EMPEROR rather than FOR LOGICAL AND QUANTIFIABLE BASED DECISIONS FOR THE BETTERMENT OF THE MAJORITY!
Phototoxin wrote:Kids go in , they waste tonnes of money on marnus calgar and his landraider, the slaneshi-like GW revel at this lust and short term profit margin pleasure. Meanwhile father time and cunning lord tzeentch whisper 'our games are better AND cheaper' and then players leave for mantic and warmahordes.
daveNYC wrote:The Craftworld guys, who are such stick-in-the-muds that they manage to make the Ultramarines look like an Ibiza nightclub that spiked its Red Bull with LSD.
|
|
|
|
|
2011/08/18 08:05:04
Subject: Warmachine Jungle Ruins Terrain Project - GenCon 2011
|
|
Shadowy Grot Kommittee Memba
The Great State of New Jersey
|
Ah, can't wait to see the rest, I <3 good terrain!
|
|
|
|
|
|
2011/08/18 08:48:04
Subject: Warmachine Jungle Ruins Terrain Project - GenCon 2011
|
|
Calculating Commissar
|
This sounds like a fun project, which is already out stripping anything I can do in terms of terrain. Looking forward to seeing it come together
|
|
|
|
|
|
2011/08/18 14:45:20
Subject: Warmachine Jungle Ruins Terrain Project - GenCon 2011
|
|
Preacher of the Emperor
|
That's looking really awesome so far. Your presentation of it is great too, haha. I'm very excited for the rest of this.
Have you considered casting up extra blocks from the molds you made so that you might sell them to unsuspecting hobbyists with delusions that they could make terrain even half as cool as yours? Or would that be horning in on your own territory too much?
|
|
|
|
|
|
2011/08/19 18:03:50
Subject: Warmachine Jungle Ruins Terrain Project - GenCon 2011
|
|
Rampaging Reaver Titan Princeps
|
Aha!
Terraformer + Warmachine = Awesomeness, as usual..  
Looking forward to this immensely.
|
|
|
|
|
2011/08/19 23:22:51
Subject: Warmachine Jungle Ruins Terrain Project - GenCon 2011
|
|
Regular Dakkanaut
|
Zefig wrote:Have you considered casting up extra blocks from the molds you made so that you might sell them to unsuspecting hobbyists with delusions that they could make terrain even half as cool as yours? Or would that be horning in on your own territory too much?
We've thought about selling sets of resin-cast blocks and pavers and such but were not sure how many folks would want them.
|
|
|
|
|
|
2011/08/20 08:03:32
Subject: Warmachine Jungle Ruins Terrain Project - GenCon 2011
|
|
Prescient Cryptek of Eternity
Mayhem Comics in Des Moines, Iowa
|
I'll be curious to see how this turns out as playable terrain given Warmachine's tighter regulations on movement compared to Warhammer's more free form that your previous terrain is built for. Regardless I'm sure it'll look awesome.
|
|
|
|
|
|
2011/08/20 08:18:28
Subject: Warmachine Jungle Ruins Terrain Project - GenCon 2011
|
|
Regular Dakkanaut
|
Aduro wrote:I'll be curious to see how this turns out as playable terrain given Warmachine's tighter regulations on movement compared to Warhammer's more free form that your previous terrain is built for. Regardless I'm sure it'll look awesome.
Basically my plan going in was to make a couple wide movement areas through the piece, surrounded by hills. This should allow units to move through unobstructed for the sake of completing storyline objectives, and creating a bottleneck for attacking/defending units. For more specialized units there would be a few strategic paths and positions through the piece. In the end it seemed to work out very well, but that's a story for later
|
|
|
|
|
|
2011/08/20 08:39:15
Subject: Re:Warmachine Jungle Ruins Terrain Project - GenCon 2011
|
|

Virulent Space Marine dedicated to Nurgle
|
Whow! Now that is some sweet  !! I'm going to keep my eyes on this thread. Seems very resourcefull!
|
|
|
|
|
|
2011/08/20 09:52:24
Subject: Re:Warmachine Jungle Ruins Terrain Project - GenCon 2011
|
|
Fresh-Faced New User
|
Mismuse here. While Terraformer was working on sculpting and sketching the stone components of this project back in part 1, it was going to be my duty to come up with a way to make the foliage and trees and roots that would define this as a jungle setting.
The big feature would be the Boddhi trees with roots pushing through the jungle ruins, and this proved to be a big task, because we had to make not only the roots, but the whole trees with canopies of leaves, all on the same scale.
I also had a few key inspirational pictures, this is one:

Here is a bonzai of a Boddhi tree. I love these things.
Since I couldn’t plant one of these in the terrain piece and grow it to shape and size in time for GenCon, I had devise a way to build one. Also, we prefer terrain that doesn’t need to be watered and left in sunlight.
This is a test run for making the Boddhi tree leaves.
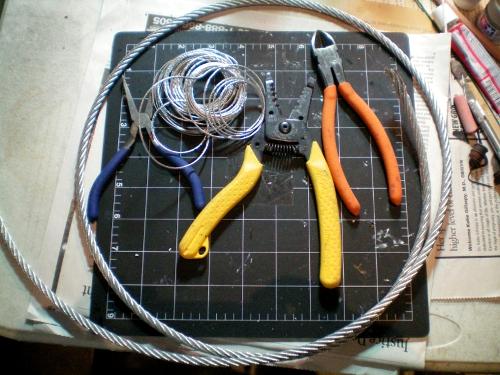
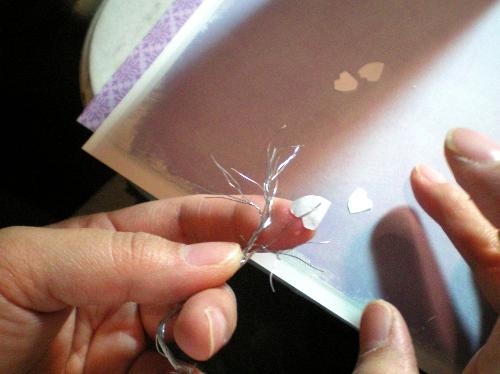
Plan#1: Paper cut outs. For a test branch I’m going to use picture hanging cable. Also in the background is about a few feet of cable for bigger branches to be used later on and a couple of wire cutters.
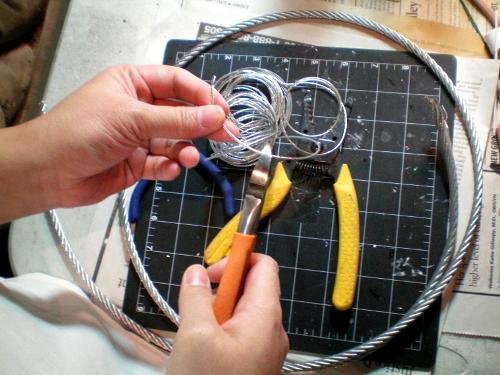
I cut about a couple of inches of wire. I bend one end to keep it from fraying. I really don’t need a heavy duty wire cutter for this. The metal strands are so delicate I can use scissors to cut it.
I unwind about 5 or so strand at a time to about half an inch from one end and using a finger, I twist to wind a couple of groups together and do the “branching” forks. It’s basically a lot of winding and unwinding the ends to get the effect.
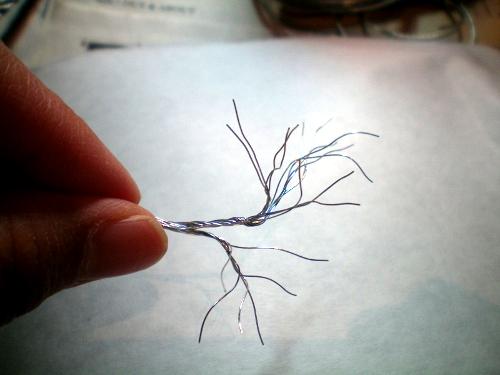
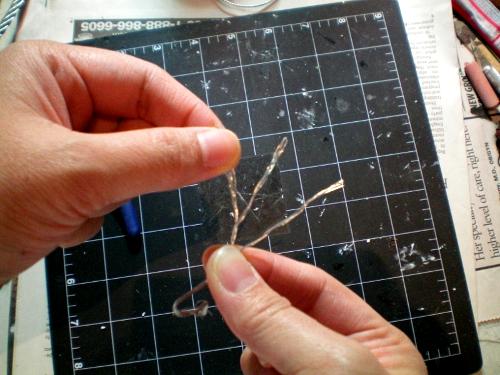
Hastily done because it is only a test branch but you get the gist
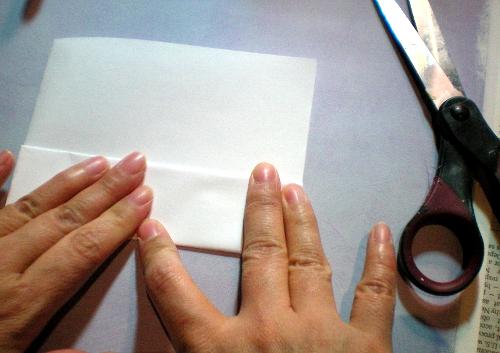
Now the actual leaves. I’m folding regular white printing paper so that I can cut out multiple leaves of different sizes at once.
Heart shaped small leaves.
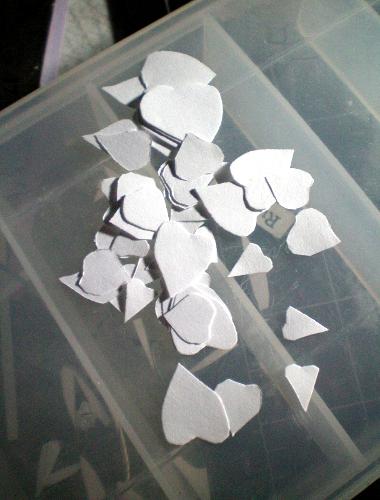
Lots and lots of lil hearts! Okay I know this doesn’t help with any stereotypes of what girls can accomplish in this hobby, that barely halfway through my part of this project log and I’m already spending a whole chapter just cutting out paper hearts. Don’t worry, this is going somewhere cool, I promise.
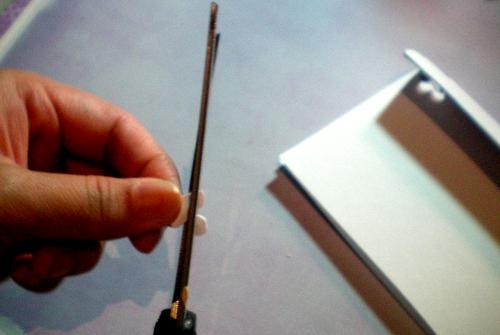
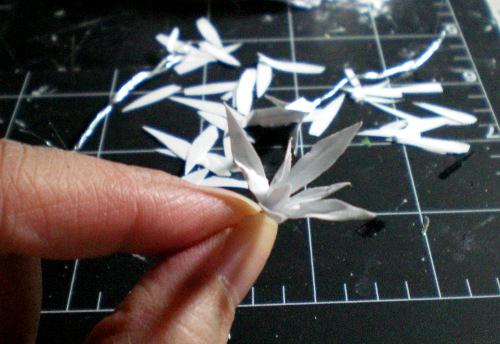
Using pva glue I slap together two heart shaped leaves, sandwiching the ends of the wires.
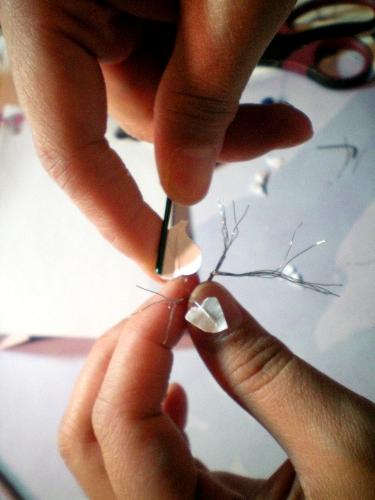
Using a piece of metal rod to curl the leaf into shape.
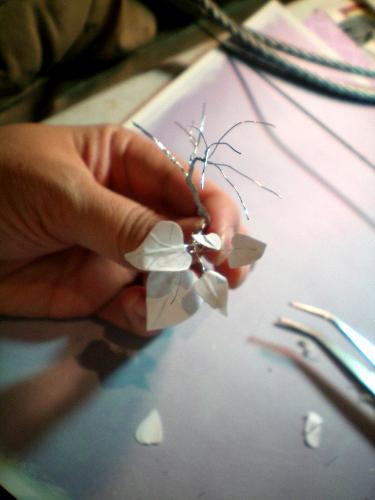
I’ve cut different variations of the heart shaped leaves and in different sizes. The biggest of the leaves has extra wires as ribbing. The metal spine makes it easy to shape and curl the leaf. Terraformer agrees that this first try is already looking potentially awesome but my main concern was time. It took me about 15-25 minutes just on the leaves alone and it was little bit clumsy and slow at first. We calculated the time it would take to do one Boddhi tree and we both agree that it seemed insane, which tells us that it’s right up our alley. Next stop, painting.
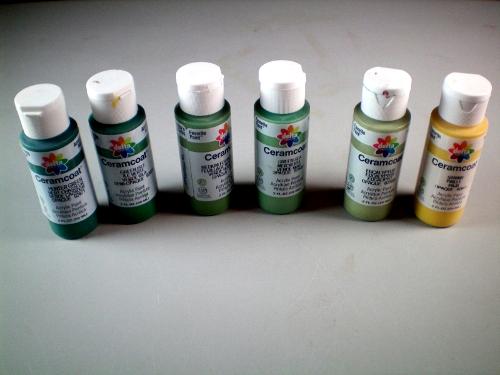
I passed the task of painting to Terraformer. He then gathered a handful of Delta Ceramcoat paints ranging from green to yellow tones.
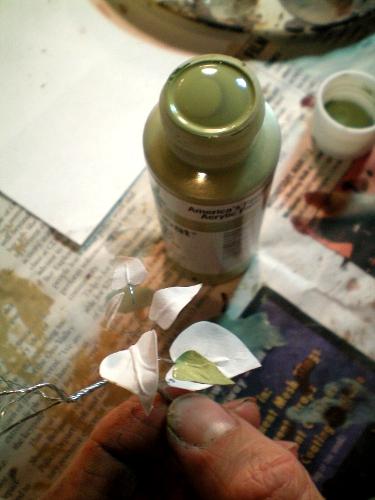
He started with light basecoat. Here he used Eucalyptus Delta Ceramcoat.
Because not all leaves on a tree are the same color always, the largest leaf got a base of Straw, also by Delta brand acrylics.
He then worked the shading down to darker colors towards the inside of the leaf.

Ribbing was picked out with the color Straw and Straw mixed with Off White- Delta acrylics.
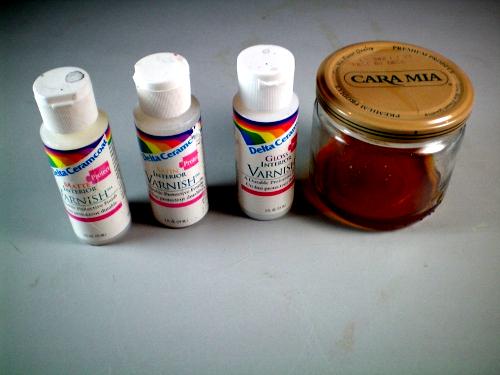
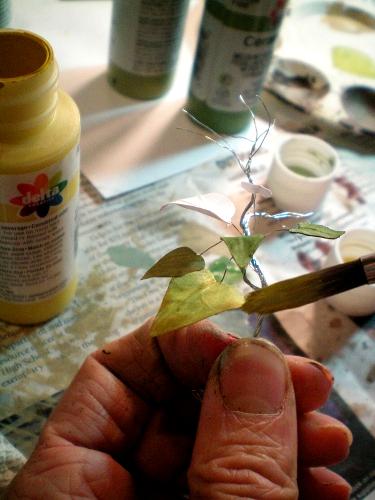
The leaves look great but they were very matte and looked a bit off and definitely needed a little shine. We lined up a few variety of varnishes and decided to test them all per leaf. The range of varnishes from Matte, Semi gloss, Glossy and Natural shelac. (bug juice!)
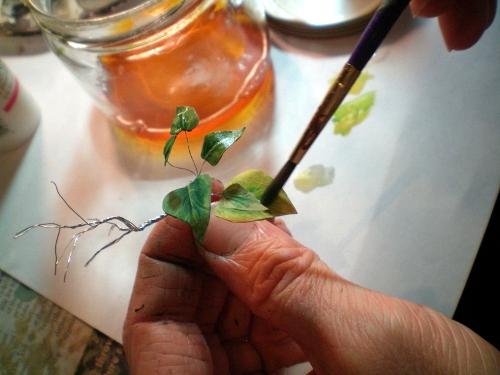
After mixing a fresh batch of Dewaxed blonde Shelac, he tried it on the largest leaf. It hardened after a few minutes but I didn’t like the super gloss look of it. Then he tried the water base Glossy varnish and although it is less glossy than the natural shellac it was still a bit off. Semi gloss wasn’t any better and I finally asked Terra to use matte varnish and only dab it sparingly close to the middle of the leaf. the last varnish and technique seemed to have achieved the look I was hoping for.
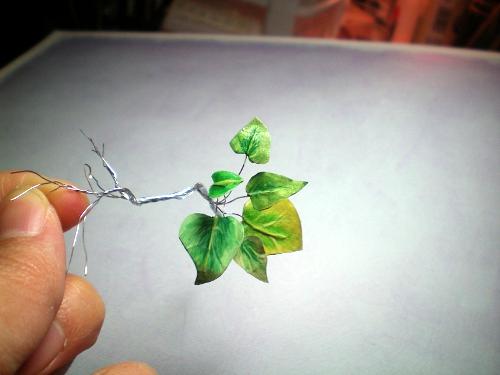
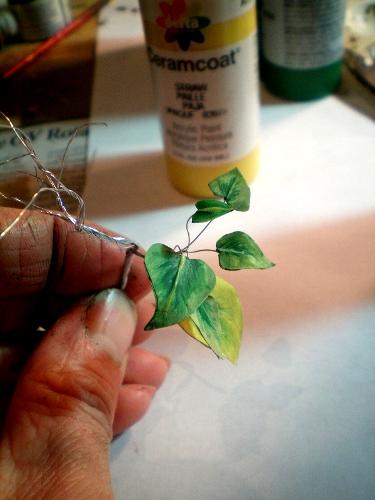
Here is the final shot after re varnishing the rest of the leaves. Success! Terra gave it a thumbs up. Although this might be the route we are going for I will still have to try a couple more techniques before committing to this one.
Now since I was cutting paper, it was time to play around with more styles of leaves for different kinds of plants that would be on the final piece. Terra sketched up a few various designs that popped into his head.

I decided that the design on the middle right side with the broad, tropical leaves could will tie in well with the Boddhi leaf. I used to play with these kinds of plants when I was little. Water beads up on the leaf due to micro hairs. Forgot what they’re called (remind self: Look it up!)
Some of the designs were totally crazy, and some were plain but we needed a good mix. Not every design was practical but we would try to use at least a few different plants on the final pieces.
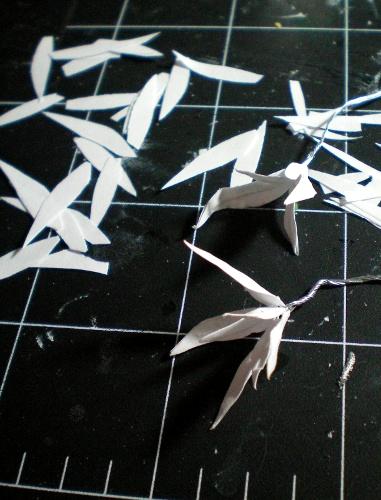
Here I started with the plants using the same paper and wire technique. The challenge is to make them smaller and smaller and smaller.
Another view of some practice plants. haven’t decided on the colors yet but whatever they are it will be awesome.
Now the next challenge in our practice sessions:

We needed to work out a technique for the roots and vine-like trunks. Really we just needed more experience sculpting trees and plants so that’s what we each started doing.
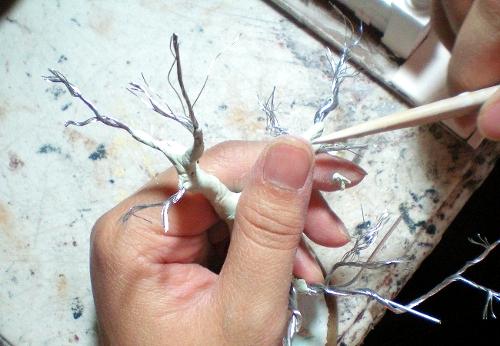
Here I’m doing a test run on hand sculpting a tree using a mix of greenstuff and milliput. This should give a good mix of texture, strength and flexibility.
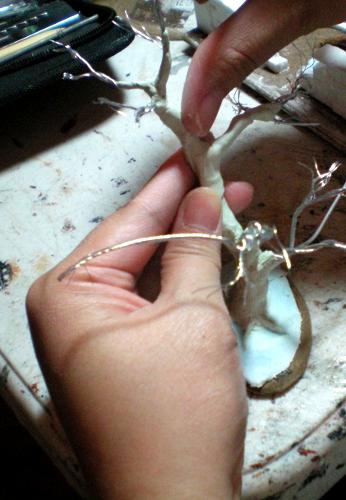
I have about an hour or two at the most before the putty hardens too much to use, so I have to sculpt the trees in sections. I figured that it would take multiple sessions and multiple days to sculpt one Boddhi tree. Also it’s wise to not separate the wires till the end to keep from lacerating your fingers when doing this. :|
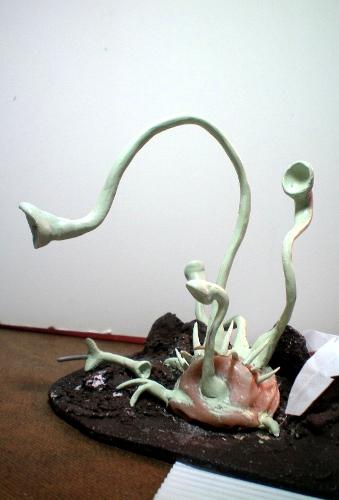
I ran into Terraformer using an old textured base we had laying around and fiddling with some putty, rolling them between his fingers in different sizes and so out of curiosity I asked what he was doing. He said that he was gearing to make another DIY:How to Make Eye Balls for the coming weekend and so I asked him if I could use this opportunity to test something for the Orgoth project. So we agreed on a concept of a plant with a stalk that evolved into a venus fly trap looking monster. I absolutely had to incorporate some leaves as well.
After building a firm steel wire armature and bending it to the shape I wanted them in, Terra wrapped some mixture milliput/greenstuff and started sculpting the stalk. I asked him to make it as smooth as possible (like how I wanted the Boddhi vines to look) We argued a little about how smooth the stalks, and eventual Boddhi vines should be, but he eventually came around. This baby was now ready for priming.
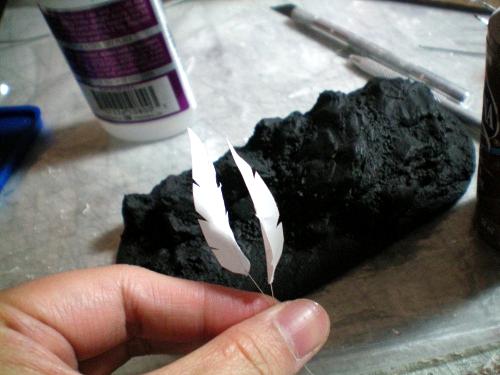
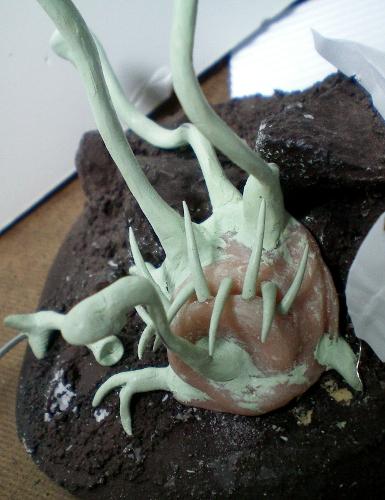
Here are the kind of leaves we’ll be using as well as the base in the background, now cleaned up a little, sans-monster plant while Terra worked on it.
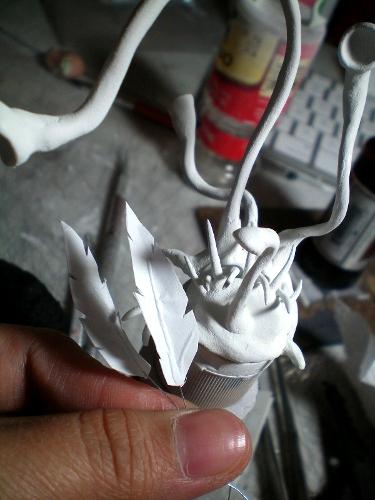
Minor disaster as you can see after using a GW primer the nozzle was defective or clogged and created that nasty textured look. Acetone and Q tips averted this disaster and Terra was able to save it.
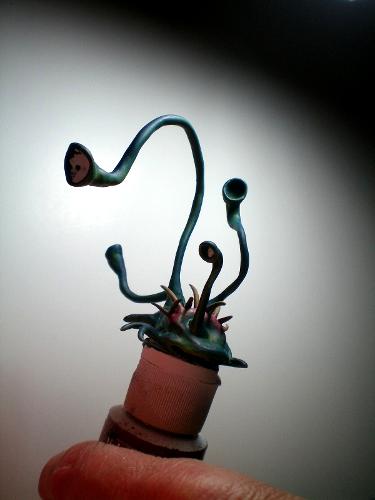
Oh Terraformer, when will you ever not go over board. This one day practice-project turned into 3 days.
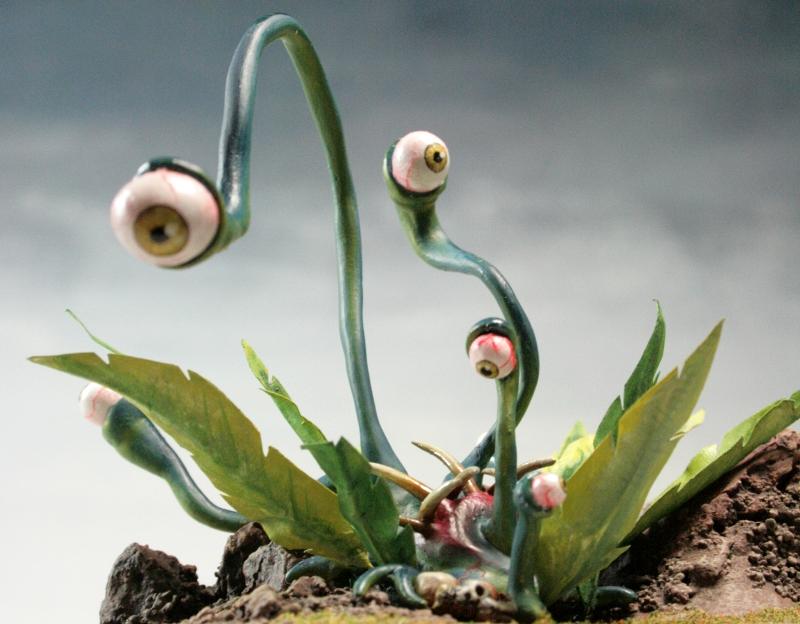
This is the kind of stuff that comes from our practice sessions. Next chapter, we start compiling our techniques and start assembling the real thing.
To be continued…
|
|
|
|
|
|
2011/08/20 10:01:14
Subject: Warmachine Jungle Ruins Terrain Project - GenCon 2011
|
|
Hacking Shang Jí
|
WOW!
The whole thread is awesome! Looking forward to more!
Exalted!
P.s thanks for all the in-progress pictures!
|
Need more  's in my life! 's in my life!  |
|
|
|
|
2011/08/20 16:45:32
Subject: Warmachine Jungle Ruins Terrain Project - GenCon 2011
|
|
Preacher of the Emperor
|
Wow, that's all looking absolutely fantastic! It's interesting seeing the other perspective on this project too.
Terraformer wrote:Zefig wrote:Have you considered casting up extra blocks from the molds you made so that you might sell them to unsuspecting hobbyists with delusions that they could make terrain even half as cool as yours? Or would that be horning in on your own territory too much?
We've thought about selling sets of resin-cast blocks and pavers and such but were not sure how many folks would want them.
Well I can't speak for anyone else, but I'd certainly be interested. Have you used dental plaster before? I'm not sure how it compares to resin price-wise, but I know Hirst recommends it for their cast blocks for pure durability in a play surface. Speaking of Hirst though, that business model certainly seems to be working out for them. I have no clue if they'd be up for collaboration, but maybe a similar technique could work for you too.
Haha, anyway, enough of my musings on commercializing other people's property. Keep up the amazing work! Looking forward to seeing how it all turned out.
|
|
|
|
|
|
2011/08/20 17:16:02
Subject: Warmachine Jungle Ruins Terrain Project - GenCon 2011
|
|
Shadowy Grot Kommittee Memba
The Great State of New Jersey
|
Screw the blocks, you guys should do a book! No, a series of books! Look, if GW can sell a crappy how to make wargames scenery book that doesn't really even teach you anything, then you guys can make a killing!
|
|
|
|
|
|
2011/08/20 19:31:29
Subject: Re:Warmachine Jungle Ruins Terrain Project - GenCon 2011
|
|
Fixture of Dakka
|
Wow the stuff you have going on here is amazing. I've been looking for things to do for a future army project that would be jungle based and I'm going to be going back to this thread for inspiration for sure.
Looking forward to seeing what you do next.
|
|
|
|
|
|
2011/08/21 03:18:11
Subject: Warmachine Jungle Ruins Terrain Project - GenCon 2011
|
|
Regular Dakkanaut
|
chaos0xomega wrote:Screw the blocks, you guys should do a book! No, a series of books!
Ok.
|
|
|
|
|
|
2011/08/21 05:28:28
Subject: Warmachine Jungle Ruins Terrain Project - GenCon 2011
|
|
Automated Rubric Marine of Tzeentch
|
Great as usual, Terraformer!
|
|
|
|
|
2011/08/22 02:17:34
Subject: Warmachine Jungle Ruins Terrain Project - GenCon 2011
|
|
Grisly Ghost Ark Driver
|
Terraformer wrote:Zefig wrote:Have you considered casting up extra blocks from the molds you made so that you might sell them to unsuspecting hobbyists with delusions that they could make terrain even half as cool as yours? Or would that be horning in on your own territory too much?
We've thought about selling sets of resin-cast blocks and pavers and such but were not sure how many folks would want them.
http://www.kickstarter.com/ might be of use here. You would propose a project, set pledge levels and a funding target. If the target is met, then the project is produced. If the target is not met, then no money changes hands. To quote Kickstarter:
Kickstarter wrote:Q: Why is Kickstarter funding all-or-nothing?
A: On Kickstarter, a project must reach its funding goal before time runs out or no money changes hands. Why? It protects everyone involved. This way, no one is expected to develop a project with an insufficient budget, which sucks. Remember you set your own funding goal, so aim to raise the minimum amount you'll need to create your vision. Projects can always raise more than their goal, and often do.
One problem about niche markets like ours is that lots of people say they will buy something, but when push comes to shove, few really do, and so the company which took the chance is out a lot of development time and material costs. This might be a way to minimize the risks. If we the potential customers like your project, we will fund it and then get terrain pieces out of it.
As for this project, looking forward to seeing more of it. Especially like the fact that it is both in a jungle and using non-European sources for inspiration. Even though I've a degree in Early Modern European history, seeing yet another pseudo-Gothic castle is tiring. Lots of other cultures to draw on for inspiration. As for the jungle part, as I have a Lizardman army, I'm interested in the "how-to" of modeling jungles. (Not that I have storage for 6' x 4' of jungle terrain. Someday, perhaps.)
|
Kings of War: Abyssal Dwarves, Dwarves, Elves, Undead, Northern Alliance [WiP], Nightstalkers [WiP]
Dropzone Commander: PHR
Kill Team:  Deathwatch Deathwatch  AdMech AdMech  Necron Necron
My Games Played |
|
|
|
|
2011/08/22 03:40:09
Subject: Warmachine Jungle Ruins Terrain Project - GenCon 2011
|
|
Regular Dakkanaut
|
Really, really good stuff. I don't have much to add, this is just impressive beyond mesure. I love threads that I bookmark just for the skills being shown, your tutorials are really easy to follow.
I would buy a book.
|
God sends meat, the devil sends cooks |
|
|
|
|
2011/08/22 03:56:44
Subject: Warmachine Jungle Ruins Terrain Project - GenCon 2011
|
|
Flashy Flashgitz
Underneath your painting desk
|
Once again, amazing stuff. It's actually really disheartening knowing that my terrain will never be half as good... Anyway I totally add my name to the book buyers-to-be. I could seriously use something like that.
|
|
|
|
|
|
2011/08/22 07:32:26
Subject: Warmachine Jungle Ruins Terrain Project - GenCon 2011
|
|
Renegade Kan Killin Orks
|
Subscribed!
That's awesome work. So for, I'd say this is a very exciting blog.
|
|
|
|
|
|
2011/08/22 08:16:34
Subject: Warmachine Jungle Ruins Terrain Project - GenCon 2011
|
|
Krazed Killa Kan
|
That plant is awesome!
Can't wait to see more, the techniques you have used have really shown good results!
|
DR:80S---G+MB---I+Pw40k08#+D+A+/fWD???R+T(M)DM+
My P&M Log: http://www.dakkadakka.com/dakkaforum/posts/list/433120.page
Atma01 wrote:
And that is why you hear people yelling FOR THE EMPEROR rather than FOR LOGICAL AND QUANTIFIABLE BASED DECISIONS FOR THE BETTERMENT OF THE MAJORITY!
Phototoxin wrote:Kids go in , they waste tonnes of money on marnus calgar and his landraider, the slaneshi-like GW revel at this lust and short term profit margin pleasure. Meanwhile father time and cunning lord tzeentch whisper 'our games are better AND cheaper' and then players leave for mantic and warmahordes.
daveNYC wrote:The Craftworld guys, who are such stick-in-the-muds that they manage to make the Ultramarines look like an Ibiza nightclub that spiked its Red Bull with LSD.
|
|
|
|
|
2011/08/22 08:59:07
Subject: Re:Warmachine Jungle Ruins Terrain Project - GenCon 2011
|
|

Strategizing Grey Knight Chapter Master
|
Omg omg omg, another Terraformer blog! omg omg omg.
Humor, great pics and awesome scenery incoming!
Oh and Mismuse is pretty cool as well
|
IceAngel wrote:I must say Knightley, I am very envious of your squiggle ability. I mean, if squiggles were a tactical squad, you'd be the sergeant. If squiggles were an HQ, you'd be the special character. If squiggles were a way of life, you'd be Doctor Phil...
The Cleanest Painting blog ever!
Gitsplitta wrote:I am but a pretender... you are... the father of all squiggles. .
|
|
|
|
|
2011/08/22 12:22:21
Subject: Re:Warmachine Jungle Ruins Terrain Project - GenCon 2011
|
|
Regular Dakkanaut
|
Okay here comes a another big installment, get ready for a wall of pictures. I have so much material to cover that you should not expect my usual wacky derailments and digressions. Truly, if you’re expecting me to post some wacky stuff about Darth Vader riding Scooters, please go somewhere else. This is serious business.
In the last chapter, Mismuse was working hard on becoming a polymer horticulturist, and I made a plant monster. Now it was time to get back to sculpting.
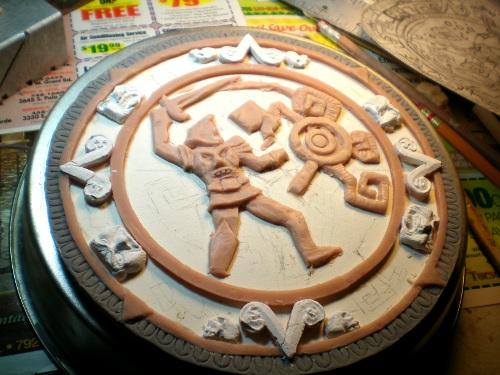
But first, I had to work out a finalized design for the broken seal that would be used both as a terrain piece and a trophy for the campaign. I spent a great deal of time looking at South/Central American carvings, stellas and designs, and eventually sketched up something I thought would fit with the theme.

I wanted the seal to tell the story of a great warrior who did battle with the Unnamed Evil, which was spreading across everything like an infection.I had the warrior gripping one of the monster’s tentacles with one hand, and holding a lightning bolt with the other.
I submitted this sketch to my client for approval, but his reply brought me back on track, reminding me that these pieces needed to have a more distinct Orgothian look, with armored warriors, and lots of ugly, snarling faces all over everything, and this design was too Central American for that theme. I agreed completely, and reworked the design.

Mismuse helped me redesign the warrior to something more sword & sorcery, with the trademark ugly Orgoth faces. I sent this sketch back and got the green-light for this re-design. Time to hit the sculpey again.
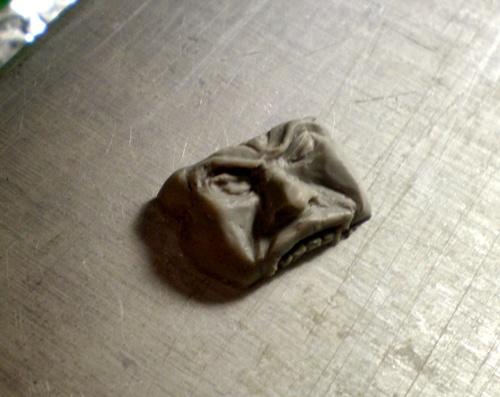
This is a much smaller face, shown before I added stone texture by veeeery carefully pressing with sandpaper and real rocks. I had to make these little faces roughly rectangular in shape so they could be used on blocks, and fit nicely into the seal.
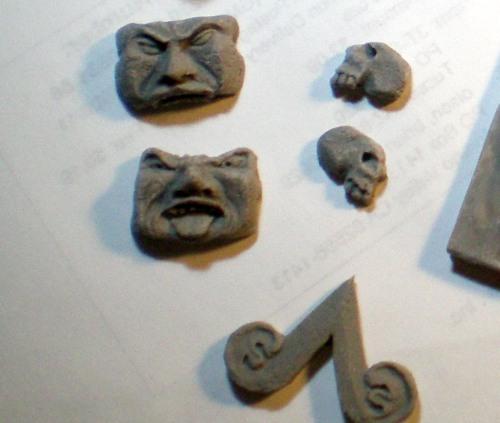
I also sculpted a few decorative skulls and chevrons for the seal trim, to be cast in resin or plaster.This saves time and makes the seal trim look nice and uniform.
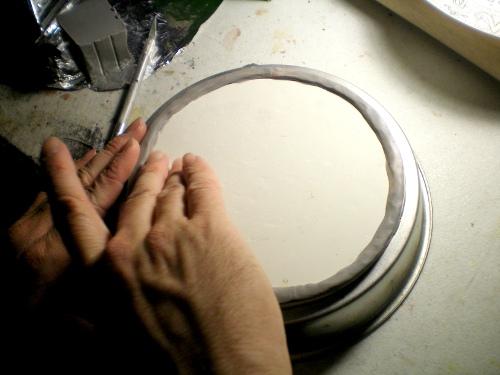
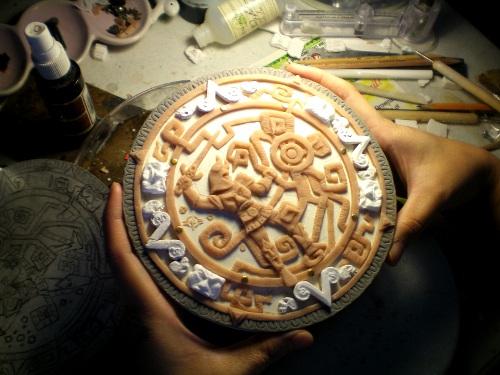
For the background of the seal I rolled a large sheet of sculpey onto a textured surface with a kitchen rolling pin, flipped the sheet over and cut it into a circle before baking it. I’m working on the back of a pie tin because it fits nicely into our little sculpey oven. With the background hard, I then started applying the outer trim, baking it, then moving to the next inner trim piece and repeating.

The faces, skulls and chevrons cast in plaster, because it’s safe to bake plaster.
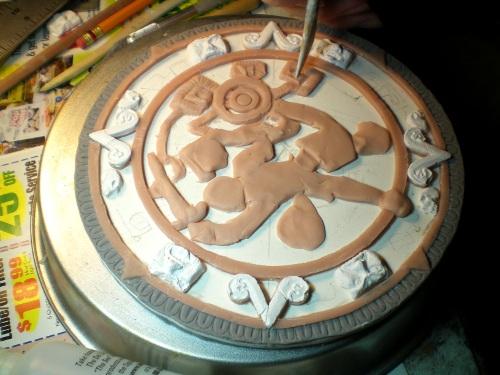
I slapped a bunch of super sculpey down in blobs and flattened them out roughly to the shape of the warrior and tentacle monster, then began to carve away excess, shaping the monster first, then the warrior.
Here you can see it starting to take shape.
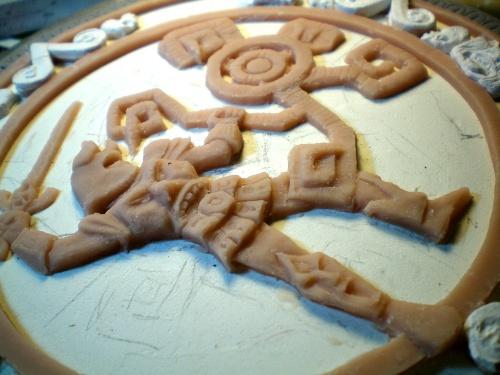
Here the warrior and monster have been textured. The sun was up and I decided to call it a day just as Mismuse was coming in.
“Tag me out! tag me out!”
When I came back I saw that she had finished all of the tentacles. I tagged her out and then went to work finishing up the last details like the smaller decorative chevrons and brass rivets.
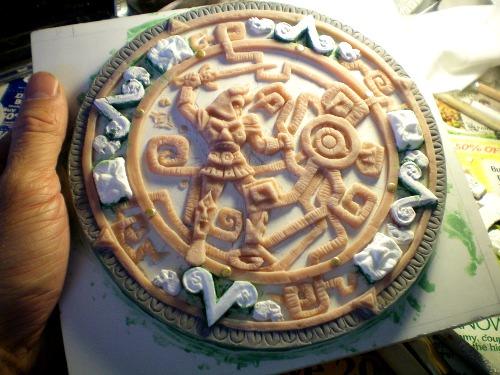
The final step was filling in all the seams and any tiny gaps before casting. Everything received a very light sanding to take off any sharp, unnatural edges. We constantly worked on this thing in shifts, night and day. That’s just how we roll.
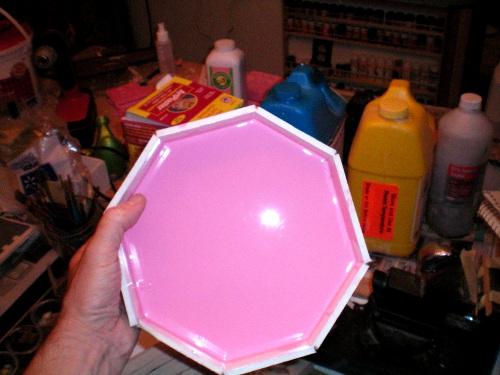
Here the silicon has been poured and set in my peculiar shaped mold form.
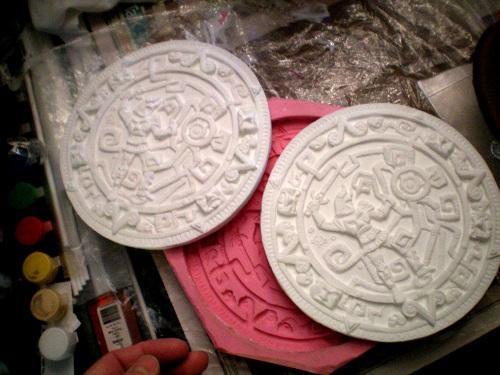
Several cups of resin later, I had the front and back of my trophy piece. I sanded the back of each half smooth and glued the two pieces together.
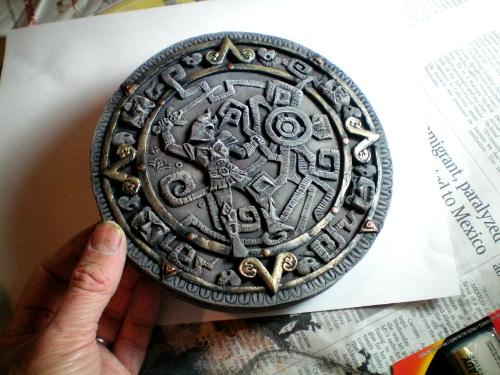
I primed and painted the seal in a few natural stone colors, picking out details in the trim with brass and gold to help it really stand out as a trophy.
I cut a pair of brass strips to size and applied a long bead of Green Stuff to each. Green Stuff makes one of the strongest, most effective adhesives for mixed applications, like metal to resin.
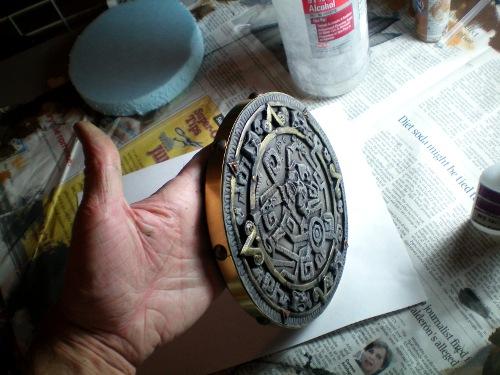
I drilled holes through the plates and into the seals as I applied the brass plates, attaching these copper colored, decorative upholstery rivets. Besides looking really cool, they also helped hold the brass plates in place while the Green Stuff set.
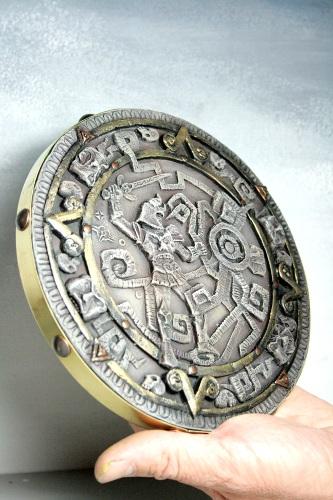
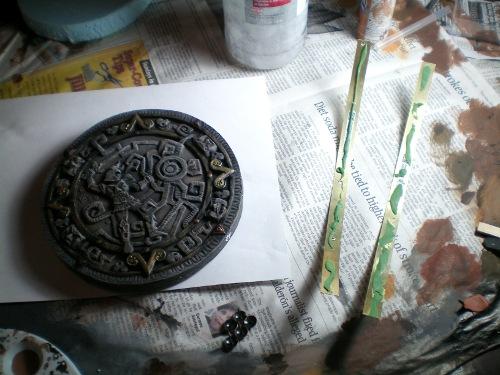
And finished. This would be the prize for the winner of the campaign. I set it aside and moved on to the next chapter.
Okay, okay. I’ll include ONE picture of Darth Vader on a scooter. But that’s it.

To be continued…
|
|
|
|
|
|
2011/08/22 12:42:22
Subject: Warmachine Jungle Ruins Terrain Project - GenCon 2011
|
|

Pyromaniac Hellhound Pilot
|
Things are looking great! :thumbs up: I'll be tuned in with interest!
Keep it up!
Cheers,
Rawson
|
 The 104th Vostroyan Mechanized The 104th Vostroyan Mechanized
 Rawson's Reboot Rawson's Reboot

Viktor von Domm: nope... can´t do that for the sake of all lving creatures that dwell on earth....
dsteingass: That's like saying "I forgot to tell you who your real father is"
nerdfest09: Rawson speaks the truth! |
|
|
|
|
2011/08/22 18:24:33
Subject: Warmachine Jungle Ruins Terrain Project - GenCon 2011
|
|
Avatar of the Bloody-Handed God
Inside your mind, corrupting the pathways
|
This will be awesome - I really love those old Cambodian temples that have been reclaimed by the jungle and am really looking forward to seeing them come together
|
|
|
|
|
|
2011/08/22 18:39:41
Subject: Warmachine Jungle Ruins Terrain Project - GenCon 2011
|
|

Hacking Shang Jí
Calgary, Great White North
|
Absoultely love the plants, and can't wait to see the temple progress.
|
|
|
|
|
|
2011/08/22 18:59:20
Subject: Warmachine Jungle Ruins Terrain Project - GenCon 2011
|
|
Hacking Shang Jí
|
Great update!
p.s i'd also buy a book!
|
Need more 's in my life! |
|
|
|
|
|
|


 Order of the Sable Heart
 Grave Knights
 House Rouen
 : Catachans
 : Chaos Space Marines


 Goldakka's Waaagh!!: 5000 pts

