| Author |
Message |
 |
|
|
|
|
Advert
|
Forum adverts like this one are shown to any user who is not logged in. Join us by filling out a tiny 3 field form and you will get your own, free, dakka user account which gives a good range of benefits to you:
- No adverts like this in the forums anymore.
- Times and dates in your local timezone.
- Full tracking of what you have read so you can skip to your first unread post, easily see what has changed since you last logged in, and easily see what is new at a glance.
- Email notifications for threads you want to watch closely.
- Being a part of the oldest wargaming community on the net.
If you are already a member then feel free to login now. |
|
 |
2010/12/13 15:48:36
Subject: Malfian IVth (IG / =I= Blog) (WIP tanks... very WIP.)
|
|

Storm Trooper with Maglight
|
fair enough endtransmission
|
|
|
|
 |
|
2011/02/06 22:10:39
Subject: Re:Malfian IVth (IG / =I= Blog) (WW )
|
|

Calculating Commissar
|
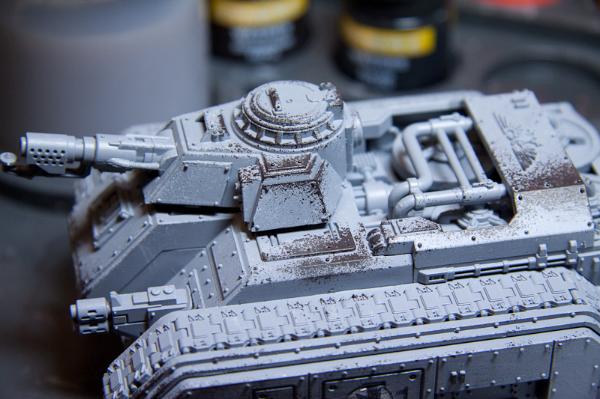
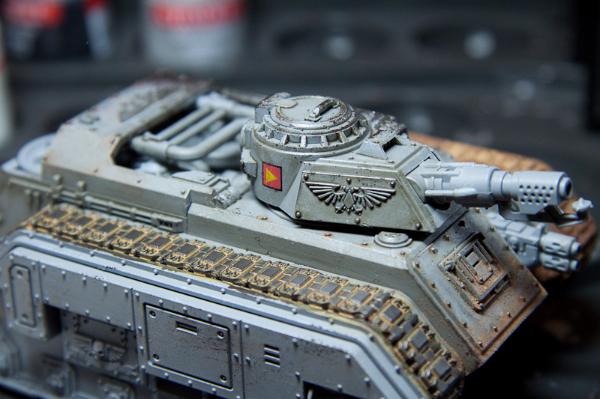
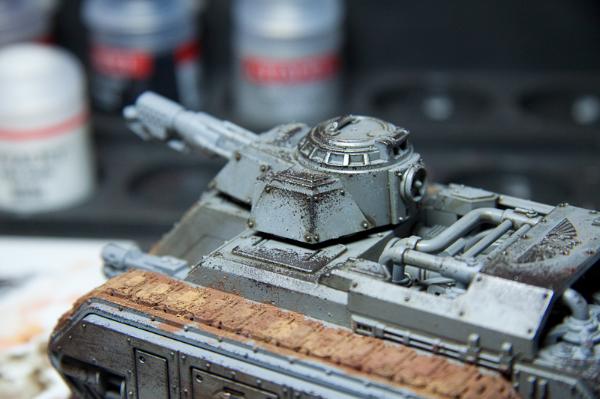
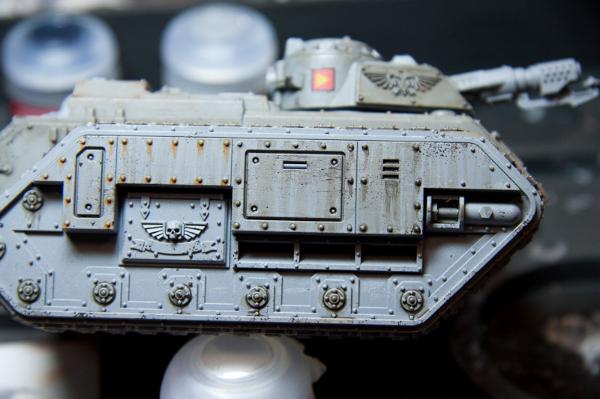
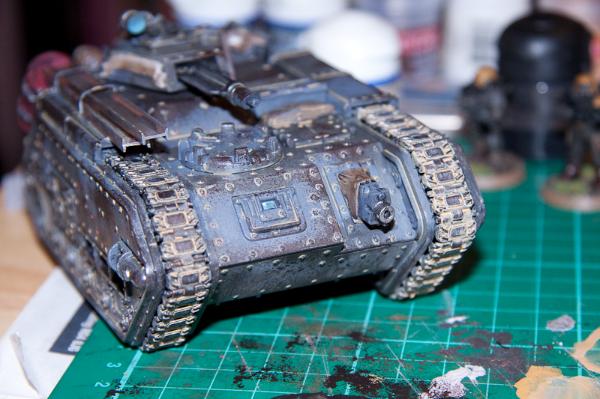
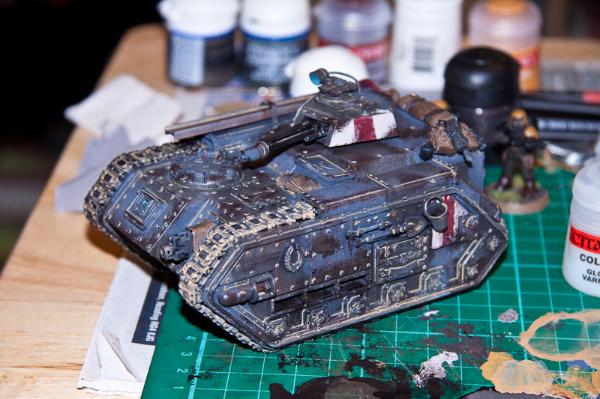
It's been ages since I did an update on anything, which is a bit embarrasing. So what have I been up to? Not a lot mostly, but this weekend myself and Arakasi went to the first Masterclass session run by Forgeworld. The Masterclass was run by Phil Stutcinskas and Mark Bedford and was taking people through some of the may tips and tricks that they use to paint tanks for the Imperial Armour books. they are investigating a number of other courses to run which also sound fun. Painting a battalion in a day and airbrush techniques.
It became a running joke throughout the day that Phil and Mark obviously had shares in Gloss Varnish as it's used in pretty much every technique they took us through. Annoyingly they shop hadn't been aware of this and had sold out of gloss varnish; I think everyone on the course had gone to try and buy them and found the rack empty.
If you ever get the chance to go, GO. While there wasn't anything that isn't in the Masterclass book, it was much clearer being taken through it all step by step in person, Mark and Phil were really nice guys and I had a brilliant time. As part of the course we got a prebuilt, undercoated and varnished Hellhound to practice all the techniques on as well as a set of brushes and powders.

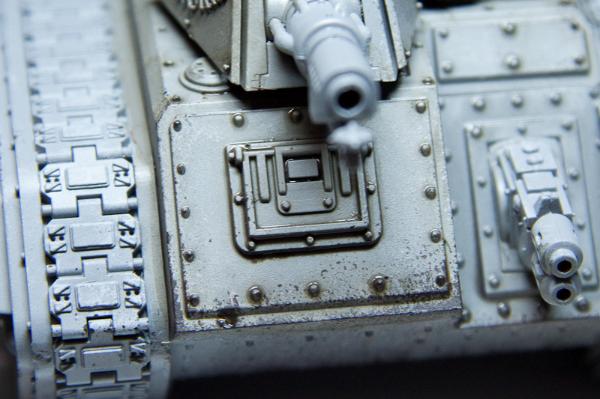
The first thing they took us through was how to apply transfers so that they don't peel off and don't look fake. I've avoided using transfers for ages as they always have a slightly silvery look and you can see a slight raised edge when the light catches it. The trick to fixing both these is magic. Well, not really. Before applying transfers, give your model a thin coat of gloss varnish; this give you a nice smooth surface to put transfers onto as the silvery finish is down to tiny pockets of air being trapped under the transfer. After you've placed the transfer and let it dry, painting the panel that contains the transfer with another thin coat of varnish seals it all, so it's never coming off. This varnish also smoothes out the raised edges of the transfer a bit too. I'm converted! They offered some hints and tips on placing transfers onto marine pads, so I'll have a go at those over on my Scorpions blog at some point.
Chipped paint was next up on the agenda. I've tried to do chipping with a sponge before, but never got it looking nice. turns out I'd not quite got it. The first step is a stippling of a lighter colour, then a mix of dark brown and black for the undercoat over the top of that. Putting chipping over the transfers also helps blend them into the mode more effectively. I'd also been underdoing it…
You can also use the sponge for doing scratches, dragging the sponge along the surface will give some nice simple effects.
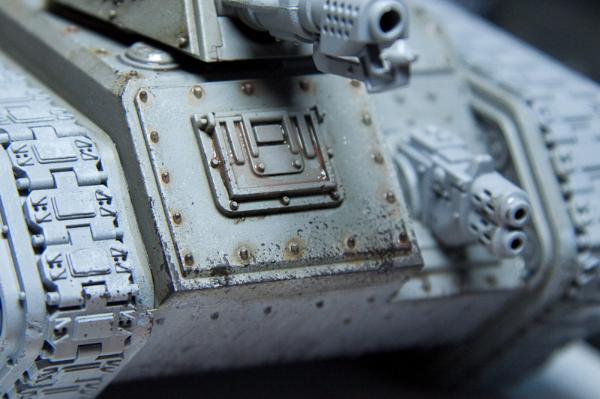
Aging the tank and starting to build up grime around rivets was an eye opener and something I need to go back and revisit my chimera with for it's simplicity and scale/range of effect you can do quickly.
Tip 1.[/b[ Forgeworld don't like Devlan Miracle, they think it's too grey and takes the life out of models, so they use a mixture of Gryphonne sepia and black for a richer, more vibrant brown.
[b]Tip 2. In order to control the wash more effectively and give you more working time, don't just add water as this will separate the pigments faster. Adding some of Magic, multitool Gloss Varnish as well will create a slightly thinner version of the wash that won't separate the pigments. You can also use gloss varnish to make washes out of any other paints in case there isn't one for the colour you need.
When placing the wash onto the model, work on it one horizontal plane at a time so you don't get the washes flowing down and creating tide marks. For each area we washed it with the mixture and then used a clean brush to carefully remove the wash from the larger flat areas that wouldn't get so much staining.
By adding in oranges/yellows you can create simple rust effects around rivets (very pleased at this point as Phil was very impressed with mine at this stage  )
 Tip 3
Tip 3 If you've got a dark tank, don't make the washes darker. As mentioned earlier, we can create washes with gloss varnish and any paint, so with a nice sandy colour we can start building up dust around rivets and in crevaces instead. I havn't got a photo of this as it doesn't show up very well on the light grey tank… but it's something I'll try on my own.
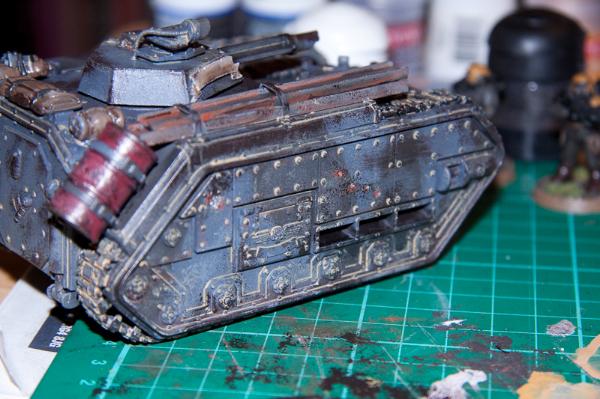
The main area that I wanted some help with was weathering powders as I've not quite got the hang of this on my own. Turns out I was nearly there. They demonstrated two ways of using the powders.
The first one (see the track area) is some gloss varnish (see, it gets used for everything!) with some powder mixed in, blobbed in so it clumps up. While it's still wet, put some dry powder on in random blotches so you get a mixture of tones. The wet varnish will soak into this dry powder and stick it on.
The other way of doing it is to apply the powder dry and then carefully put some white spirit onto the area (see rear panel above). You can then use a clean brush and some white spirit to clean up some areas that you don't want as much powder on as well as rubbing a bit off with your fingers.
A light coat of spray varnish over the top will seal it all on forever.
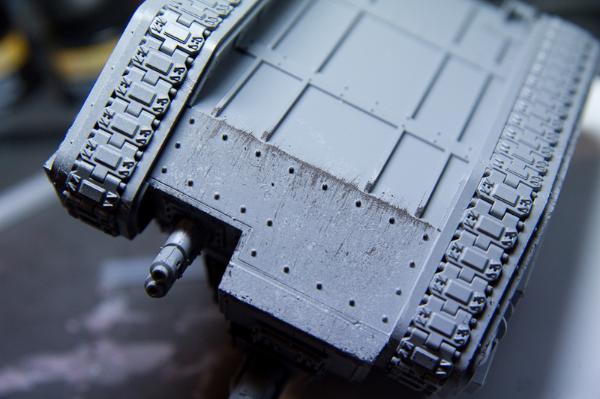
The other option, for a cleaner, but still weathered, track look is to wash the track (painted a dark brown) with a mixture of a light sandy colour and… surprise! gloss varnish. Gently wipe off
the excess so you've only got the brighter colour in the crevaces. Once the wash has dried, gently rub some of the Dark Iron weathering powder (or graphite powder as that's cheaper) over the tracks to give the raised surfaces a nice metallic look.
Rubbing this powder over other raised edges, especially where you've chipped the paint also gived you a nice metallic effect.
The last thing they went through was water stains and running oils. Take a wild guess. Yep, you got it. Gloss varnish and whatever colour you want to stain your tank with. Make this wash very very thin and just do multiple layers, building up the layers.
Some other amusing bits we learned was that Phil and Mark don't seem like the StornRaven either
|
|
This message was edited 1 time. Last update was at 2011/02/06 22:18:53
|
|
|
|
|
2011/02/06 22:25:14
Subject: Malfian IVth (IG / =I= Blog) (Masterclass Painting)
|
|
Avatar of the Bloody-Handed God
Inside your mind, corrupting the pathways
|
Thanks for taking us through what you learned
I have the masterclass book, but as you say it is good to hear it from the horses mouth, as it was.
|
|
|
|
|
|
2011/02/06 22:33:35
Subject: Malfian IVth (IG / =I= Blog) (Masterclass Painting)
|
|
Calculating Commissar
|
Now I just need to start applying all of this to my tanks so I can see it all in action.
Mark and Phil demonstrated some non tank miniatures that they had applied the same techniques to to great effect, so I'll be trying these out on my guard as well.
Oh... and I should have a nice shiny new Macharius Vulcan arriving this week too
|
|
|
|
|
|
2011/02/06 22:35:39
Subject: Malfian IVth (IG / =I= Blog) (Masterclass Painting)
|
|
Avatar of the Bloody-Handed God
Inside your mind, corrupting the pathways
|
Nice - I look forward to seeing everything
I would be interested to see the airbrushing masterclass as I really want to use mine more (and well... better ).
|
|
|
|
|
|
2011/02/06 22:38:54
Subject: Malfian IVth (IG / =I= Blog) (Masterclass Painting)
|
|
Calculating Commissar
|
Yeah, they suggested contacting the Warhammer World events team and suggesting sessions as it shows interest. I know a number of people's ears perked up as soon as they mentioned an airbrush session.
There's also an 'Eavy Metal masterclass day in July... still undecided about that one. Mark was a little bemused about the idea, suggesting that it would most likely be a day teaching you paint a jewel or something equally tiny. He was utterly bemused by the upper echelon's idea to run a Stormraven masterclass though as it's exactly the same techniques as we did on the tank day... I couldn't help but wonder if they had too much stock of the stormraven and needed space in the warehouse
|
|
This message was edited 1 time. Last update was at 2011/02/06 22:41:50
|
|
|
|
|
2011/02/06 23:10:46
Subject: Malfian IVth (IG / =I= Blog) (Masterclass Painting)
|
|
Using Inks and Washes
|
Thanks so much for posting your powder tutorial - I've been using them completely wrong for a while, it seems! Can't wait to see the effects on your armour pool
|
|
|
|
|
2011/02/07 08:30:37
Subject: Malfian IVth (IG / =I= Blog) (Masterclass Painting)
|
|
Calculating Commissar
|
I think everyone uses the powders in a different way. For instance the gloss varnish route is Mark's preferred method, whilst the dry powder and white spirit is Phil's.
There was also mention of making a paint out of pigments and water, or a wash out of pigments and white spirit. I couldn't for the life of me manage to get the wash with white spirit to work though. Maybe I didn't have enough white spirit in the palette. Who knows...
|
|
|
|
|
|
2011/02/07 22:25:10
Subject: Malfian IVth (IG / =I= Blog) (Masterclass Painting)
|
|

Longtime Dakkanaut
|
That weathering technique is awesome...
I think I might have to buy some pigments & try it out...
|
My WiP  -affiliated Traitors - War on Tranch : Renegades -affiliated Traitors - War on Tranch : Renegades
The World Tree's offsprings - Various WIPs : Skavens, Tzeentch & Nurgle CSMs, Marine Swap
My first tutorial - Object Source Lighting
What will I achieve in 7 months? : Radio Omid is online
"Squat Hulk- in space no one knows you no longer exist." - Gitzbitah
"Now you're just being silly, everyone knows red paint tastes fasta." - monkeytroll
"Both servers are on different continents so space meteors or thermonuclear war will not be enough take out dakka hopefully." - legoburner
Please remember to tick the "Disable Voting" box, if the pics you are uploading do not deserve votes (ie. early WIP, blurry pics, batreps, ...) Thanks in advance. |
|
|
|
|
2011/02/09 23:50:12
Subject: Malfian IVth (IG / =I= Blog) (Masterclass Painting)
|
|
Ragin' Ork Dreadnought
|
Note: When mixing Gloss Miracle in with other paints it makes the palette harder to clean afterwards!
|
|
|
|
|
|
2011/02/10 08:01:34
Subject: Malfian IVth (IG / =I= Blog) (Masterclass Painting)
|
|
[DCM]
Acolyte of Goodwin
|
That's a hell of a return update! Great stuff!
|
|
This message was edited 1 time. Last update was at 2011/02/10 08:02:03
|
|
|
|
|
2011/02/10 09:06:38
Subject: Malfian IVth (IG / =I= Blog) (Masterclass Painting)
|
|
Calculating Commissar
|
Now I need to do a decent followup followup post 
|
|
|
|
|
|
2011/02/10 09:23:11
Subject: Malfian IVth (IG / =I= Blog) (Masterclass Painting)
|
|
Avatar of the Bloody-Handed God
Inside your mind, corrupting the pathways
|
Best get cracking 
|
|
|
|
|
|
2011/02/10 10:18:11
Subject: Malfian IVth (IG / =I= Blog) (Masterclass Painting)
|
|
Calculating Commissar
|
Well a Macharius Vulcan should be arriving sometime this week. Does that count?
I need to decide if I'm going to redo all my tanks with a slightly less drab camo scheme, or if I just weather them as they are and carry on with the brown/grey scheme for future tanks as well.
I think the basic foot troops need to be brightened up a little though as they really do look boring on the tabletop, but I"m not sure how as the brown uniform seemed to fit the miner aspect...
|
|
|
|
|
|
2011/02/10 10:36:47
Subject: Malfian IVth (IG / =I= Blog) (Masterclass Painting)
|
|
Avatar of the Bloody-Handed God
Inside your mind, corrupting the pathways
|
Did you think about painting the air tanks with brighter "warning" colours?
You can also add in some hazard stripes I'm sure
|
|
|
|
|
|
2011/02/10 11:41:55
Subject: Malfian IVth (IG / =I= Blog) (Masterclass Painting)
|
|
Calculating Commissar
|
SilverMK2 wrote:Did you think about painting the air tanks with brighter "warning" colours?
You can also add in some hazard stripes I'm sure
I may have to, yes. Currently they are the correct colour for oxygen tanks, which I thought was nice... but it does introduce a big black blob into the figure.
One suggestion that Mark made on the tank painting workshop was to put lots of light coloured weathering onto them so it looks like dust has settled in the creases of the clothing in order to lighten it without actually changing the colour scheme at all. So that's on my list of things to try too
|
|
|
|
|
|
2011/02/10 19:09:05
Subject: Malfian IVth (IG / =I= Blog) (Masterclass Painting)
|
|
Lone Wolf Sentinel Pilot
where am I? *looks around* Well i'm...errr...I...I...don't know!
|
When diluting the washes here, is it solely with gloss varnish or do you add a little water as well? Really nice. I will try some of them!!
|

MAY YER BOLTER NAE FALTER!!!! |
|
|
|
|
2011/02/10 19:17:28
Subject: Re:Malfian IVth (IG / =I= Blog) (Masterclass Painting)
|
|
Rampaging Reaver Titan Princeps
|
Most of those templates I was talking about are easiest toget at here, just sign up and they are there. http://paperhammer40k.com/. The Hellhounds looking really nifty. Nice to see some subtle weathering rather than the extremes of pristine or not been maintained for a decade looks.
|
"But me no buts! Our comrades get hurt. Our friends die. Falkenburg is a knight who swore an oath to serve the church and to defend the weak. He'd be the first to tell you to stop puling and start planning. Because what we are doing-at risk to ourselves-is what we have sworn to do. The West relies on us. It is a risk we take with pride. It is an oath we honour. Even when some soft southern burgher mutters about us, we know the reason he sleeps soft and comfortable, why his wife is able to complain about the price of cabbages as her most serious problem and why his children dare to throw dung and yell "Knot" when we pass. It's because we are what we are. For all our faults we stand for law and light.
Von Gherens This Rough Magic Lackey, Flint & Freer
Mekagorkalicious -Monkeytroll
2017 Model Count-71
|
|
|
|
|
2011/02/10 22:32:41
Subject: Malfian IVth (IG / =I= Blog) (Masterclass Painting)
|
|
Ragin' Ork Dreadnought
|
You can add a little water as well. As I understand it, the gloss varnish makes the wash easier to control and gives you time to touch it up, remove it or blend it. Water, as always, reduces the pigment concentration.
|
|
|
|
|
|
2011/02/10 22:43:27
Subject: Malfian IVth (IG / =I= Blog) (Masterclass Painting)
|
|
Calculating Commissar
|
Arakasi has it right. If you just use water to dilute paint, the pigment particles start to migrate towards each other and the paint separates. Using some gloss varnish in the mixture as well prevents (mostly) this separation of liquid and pigments so it's easier to control where the paint is going to go.
At least that's how I remember that part of the talk going...
|
|
|
|
|
|
2011/02/11 18:00:18
Subject: Malfian IVth (IG / =I= Blog) (Masterclass Painting)
|
|
Calculating Commissar
|
This afternoon has been a bit of a rollercoaster. I both love Forgeworld for saving me time and hate Warhammer world for wasting my time.
On the plus side... I LOVE the Cadian hostile environment set that's just about to be released. It's pretty much what I've been aiming at for my guys and not quite managing to reach. I have a feeling that I may be about to blow rather a lot of money on these guys rather than trying to make something that's pretty much the same... but not quite as good. It would certainly make it easier to add new units in and allow me more time on the tanks.
At the masterclass Phil was asking what I played, so I told him all about making my own bodies (which he thought was cool) that had respirators, oxygen tanks and hazard suits. He went quite quiet and moved on at that point... related, or co-incidence?
On the down side. The Macharius that I ordered from Warhammer world last saturday *still* isn't here as the redshirts in the shop never passed the ******* order through to Forgeworld to complete. In fact, the guy I just spoke to had no idea where the paperwork even was for my order as it was on the computer, but not in any of the order paperwork!?! Glad I phoned up to check where it was now... *grrr*
|
|
This message was edited 4 times. Last update was at 2011/02/11 18:35:37
|
|
|
|
|
2011/02/11 18:48:17
Subject: Re:Malfian IVth (IG / =I= Blog) (Masterclass Painting)
|
|

Posts with Authority
Boston-area [Watertown] Massachusetts
|
Color me very unimpressed with those Cadian torsos. If they just sold the backpacks, maybe, sure. But a little guitar wire or green stuff, and filling in the 'vox head' off of the cadian sprues, and make your own backpacks.
Not like some of the Voidsuit conversions folks have done here.
Anyways, enjoying your work, thanks for sharing the Masterclass lessons!
|
Falling down is the same as being hit by a planet — "I paint to the 20 foot rule, it saves a lot of time." -- Me
ddogwood wrote:People who feel the need to cheat at Warhammer deserve pity, not anger. I mean, how pathetic does your life have to be to make you feel like you need to cheat at your toy army soldiers game?
 |
|
|
|
|
2011/02/11 22:56:52
Subject: Re:Malfian IVth (IG / =I= Blog) (Using the masterclass on my own tanks)
|
|
Calculating Commissar
|
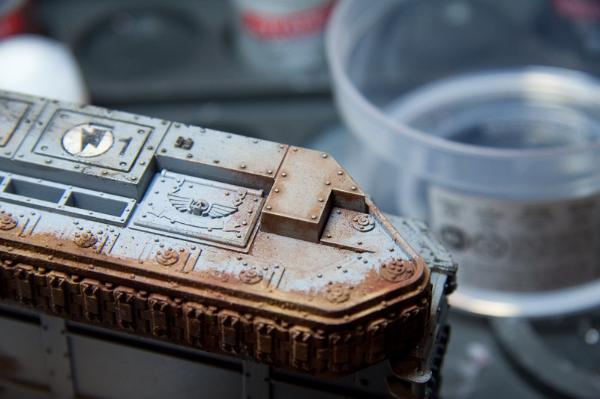
While Dakka debates the Cadian environmental suit upgrades I decided to start weathering one of my Chimera to start practicing.
One thing that you'll have noticed right off the bat is that the tank we got taught on was very light in colour. Mine are pretty damn dark, which meant that a lot of the techniques didn't quite work as practiced on the model. Thankfully they did give some tips on reversing the colours for darker tanks, so instead of adding dark dirt around the rivets... start packing in lighter coloured dust instead.
First I added four layers of chipping to cover up the original silver chipping. One was a lighter grey, another a lighter granite, next was scorched brown/black and finally there were a few dots of scorched brown/black/vomit brown to add a little bit of extra texture. Sadly I forgot to take a picture with just the chipping, so you'll have to just look at the end of evening picture and work out what's chipping. Unfortunately the chipping isn't all that visible on the darker tank either, which I suppose would be reasonable.
Over that I started to add in a wash of Vomit brown/Dheneb stone/gloss varnish/water to simulate dust and sand getting encrusted around everything. There's also a wash of vomit brown over the tracks, but I'm not sure I diluted it enough . We shall see once the Dark Iron weathering powder goes on at the end I guess.
Anyway. You came for pictures, not inane ramblings.
First up is how it looked before hand
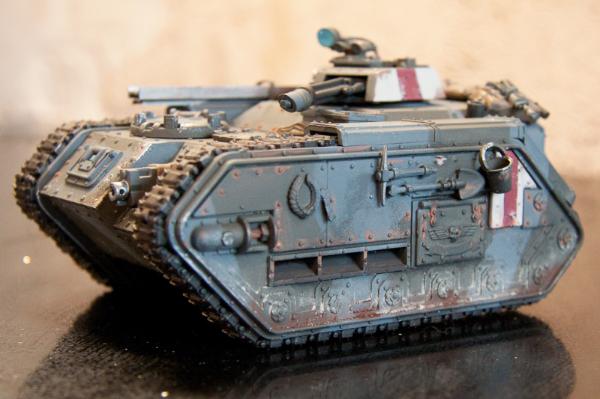
then we've got it at the end of this evening's work.
Some of the things I've learned tonight are:
1) Weathering a dark tank is much harder than a lighter coloured tank
2) I don't like the colours I chose for the camo any more... they look too similar under most forms of light, except daylight. Which is a problem...
3) I quite like the look of the light grey of the test tank.
4) The "add dust to the recesses" technique doesn't work so well on a soldier. At least not yet. I think more practice is needed there.
So basically I'm contemplating changing the colour scheme to be a light grey with a contrasting camo colour. The current platoon can stay with the browns, but future platoons are going to be lighter. I just need to work out what the contrasting colour is.
|
|
This message was edited 1 time. Last update was at 2011/02/11 23:05:16
|
|
|
|
|
2011/02/12 07:24:57
Subject: Malfian IVth (IG / =I= Blog) (weathered Chimera)
|
|
Ragin' Ork Dreadnought
|
Looks like you really did a number on it. Sadly, I think I prefer the before pic - though that may just be the photos. I notice you didn't try putting any decals on? I think those, and/or picking out the few details on the sides might add something to it...
It may be worth trying out your colour schemes on the Hellhound test tank from the class - you could put several tests in close proximity, weather, and see which one you like best.
|
|
|
|
|
|
2011/02/12 09:13:32
Subject: Malfian IVth (IG / =I= Blog) (weathered Chimera)
|
|
Calculating Commissar
|
Arakasi wrote:Looks like you really did a number on it. Sadly, I think I prefer the before pic - though that may just be the photos. I notice you didn't try putting any decals on? I think those, and/or picking out the few details on the sides might add something to it...
yeah, sadly so do I. I know it's not finished, but I'm really not liking the lighter coloured sand thing this morning; which is just typical. Still. I had to try it and see if it worked; I think the answer is clearly not. There were some decals on there already, but I mostly wanted the markings to be the red and cream stripes. Before I scrap this completely I"ll try picking out those little details onthe side, but I'm not sure they will be enough to save it.
|
|
|
|
|
|
2011/02/12 12:02:48
Subject: Malfian IVth (IG / =I= Blog) (weathered Chimera)
|
|
Ragin' Ork Dreadnought
|
Of course I'm watching not as a personal friend but for my Trukks - it would have been nice to see the dark base work *before* starting on my Trukks! Hopefully I have more success to share...
|
|
|
|
|
|
2011/02/12 12:27:48
Subject: Malfian IVth (IG / =I= Blog) (weathered Chimera)
|
|
Lone Wolf Sentinel Pilot
where am I? *looks around* Well i'm...errr...I...I...don't know!
|
Yeh, I'd agree there, the before pics do look better to me as well...
If you want some freshly covered dust though get hold of the tamiya weathering powders, they come with a brush and you just apply it dry, looks good, the Leman russ in my gallery had that done to it...
|
MAY YER BOLTER NAE FALTER!!!! |
|
|
|
|
2011/02/12 12:37:31
Subject: Malfian IVth (IG / =I= Blog) (weathered Chimera)
|
|
Calculating Commissar
|
Weathering powders would have come later. The washes are to create the first layer of dirt and grime, with weathering powders tying together everything nearer the end. I just don't feel like going as far as the powder stage as the colours look wrong and you can't see the camo any more.
I have no idea why the camo scheme seems to have vanished. Maybe it's just the gloss varnish over the paint. Either way, I'vebeen thinking of a colour change for a while now anyway as they do look rather dull on the tabletop. This just seals the deal
|
|
|
|
|
|
2011/02/12 21:10:47
Subject: Re:Malfian IVth (IG / =I= Blog) (weathered Chimera)
|
|
Fixture of Dakka
|
Might be the gloss as you say. The two colours seem to have a fairly low contrast in the before pic, glossiness isn't going to help that at all. Hopefully when you matt it back down the camo will 're-appear', although as you already were thinking about changing the scheme that's probably a moot point.
That second shot looks awesome though, nicely worn and aged.
How did you find covering up the previous weathering? I've been playing with sponges a bit and I'm guessing I'll be using it on my urban guard (whenever I get back to them ), which already have some scratches and chips on.
|
|
|
|
|
|
2011/02/12 21:30:44
Subject: Malfian IVth (IG / =I= Blog) (weathered Chimera)
|
|
Journeyman Inquisitor with Visions of the Warp
|
Weathering on both the before and after shots look great to me , thanks for sharing your tips, i shall be sure to invest in some gloss varnish ;-)
|
|
|
|
|
|
|

 Da Dark Angelz
 Arakasi vs Infinity

