| Author |
Message |
 |
|
|
|
|
Advert
|
Forum adverts like this one are shown to any user who is not logged in. Join us by filling out a tiny 3 field form and you will get your own, free, dakka user account which gives a good range of benefits to you:
- No adverts like this in the forums anymore.
- Times and dates in your local timezone.
- Full tracking of what you have read so you can skip to your first unread post, easily see what has changed since you last logged in, and easily see what is new at a glance.
- Email notifications for threads you want to watch closely.
- Being a part of the oldest wargaming community on the net.
If you are already a member then feel free to login now. |
|
 |
2012/08/13 19:03:58
Subject: Building double-wide rhinos
|
|

Stalwart Space Marine
|
In which I discover that explaining is way harder than doing.

So, I've had a few people asking how these things get built - hopefully this will prove informative.
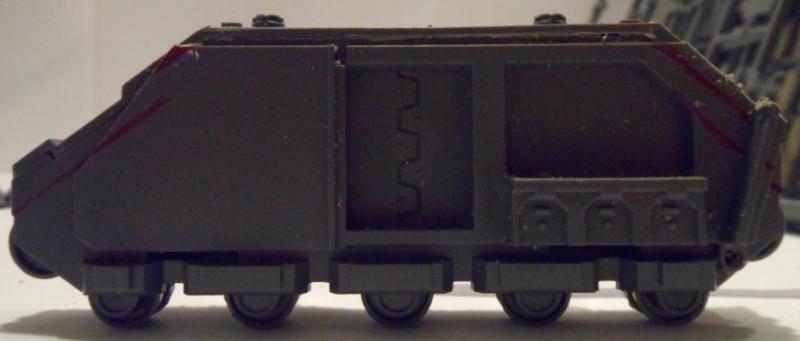
If you want to build one, I'll leave you to choose how you want to source your bitz - Hoard-O-Bits has usually been a good to me, but you may find it easier to simply buy two tanks. You will definitely need one rhino-based tank kit - this is your core vehicle. Beyond that, you need: another top piece (the part that comprises the roof and the tops of the track housings)left and right INSIDE track housings (the bits that have the little seats on the inside of the transport compartment)a full set of left + right tracks
I want to take this moment to point out that all mould lines and glue messes get cleaned up after I'm done building. I also want to point out that I am nowhere close to having this conversion down to a science. My method was arrived at through making it up as I went along, and if you can see moments in the process where you could do things better, I absolutely encourage you to do so. I'm no engineer. Just a dude with a big saw. If you read this and think "hey, wouldn't it make more sense to...?" Yeah, man. It probably would. Finally, very important: read the whole tutorial before you start. Anyone who ever built a piece of Ikea furniture will know this already, but it does bear repeating
That said, build your core vehicle.
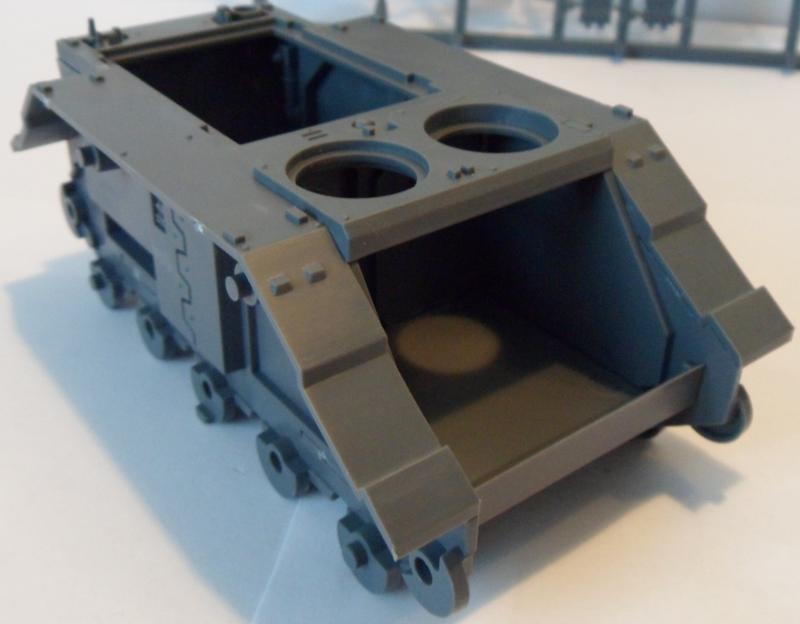
This is what you start with. Floor, roof, inside track housings, the rear door and that weird bulkhead that goes in the middle. Next, get all your tracks together. You want to take every one of these bits and arrange them so that the little guide prongs that help fit them onto the wheels properly are on the outside. Then, glue each left piece onto a corresponding right piece. You want to end up with this:

That's the simple, easy stuff done. Go get your saw.

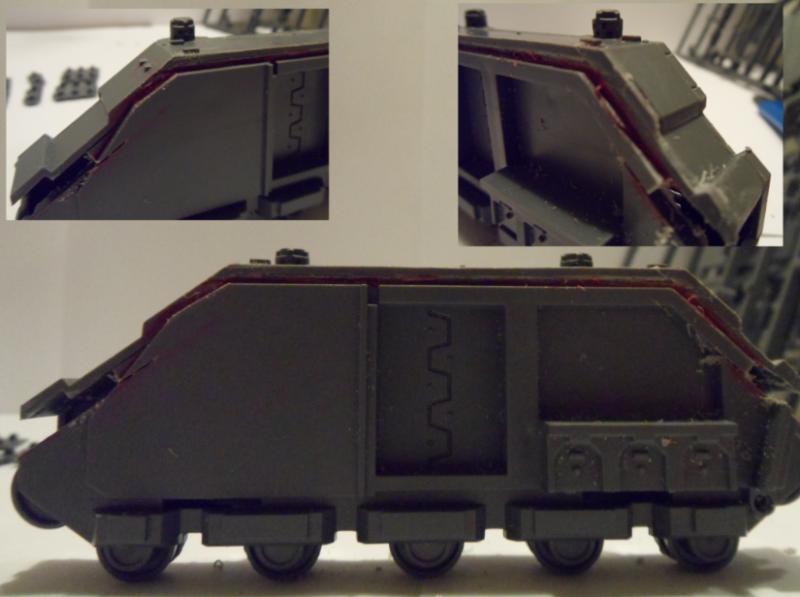
What we have here is an inside + outside track housing attached to a top piece, which has then been brutally sawn in half. This is purely because I find it easier to deal with the halves one at a time. What follows deals with the part on the left, but you'll obviously need to repeat everything for the right.
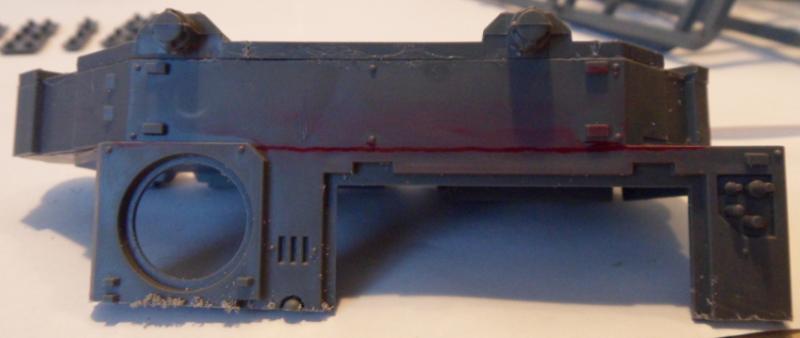
This is the difficulty: you need to cut along that red line - what's problematic about this is that the line (even though I haven't drawn it that far) passes right along the edge of the transport compartment and the little hatch bit. This makes it a little difficult to make sure that you're cutting a straight line along the edge of the track housing. The easiest way I've found is to press your saw blade flat against the little bit of track housing that overruns the transport compartment (what I've outlined red below) and then start cutting very, very gently. Don't try and force the thing or you'll end up with the saw skipping all over the place.
Once you've got a nice groove to guide you in a straight line, gradually shift the saw up and around so that you go from cutting toward the front of the tank to cutting toward the bottom.
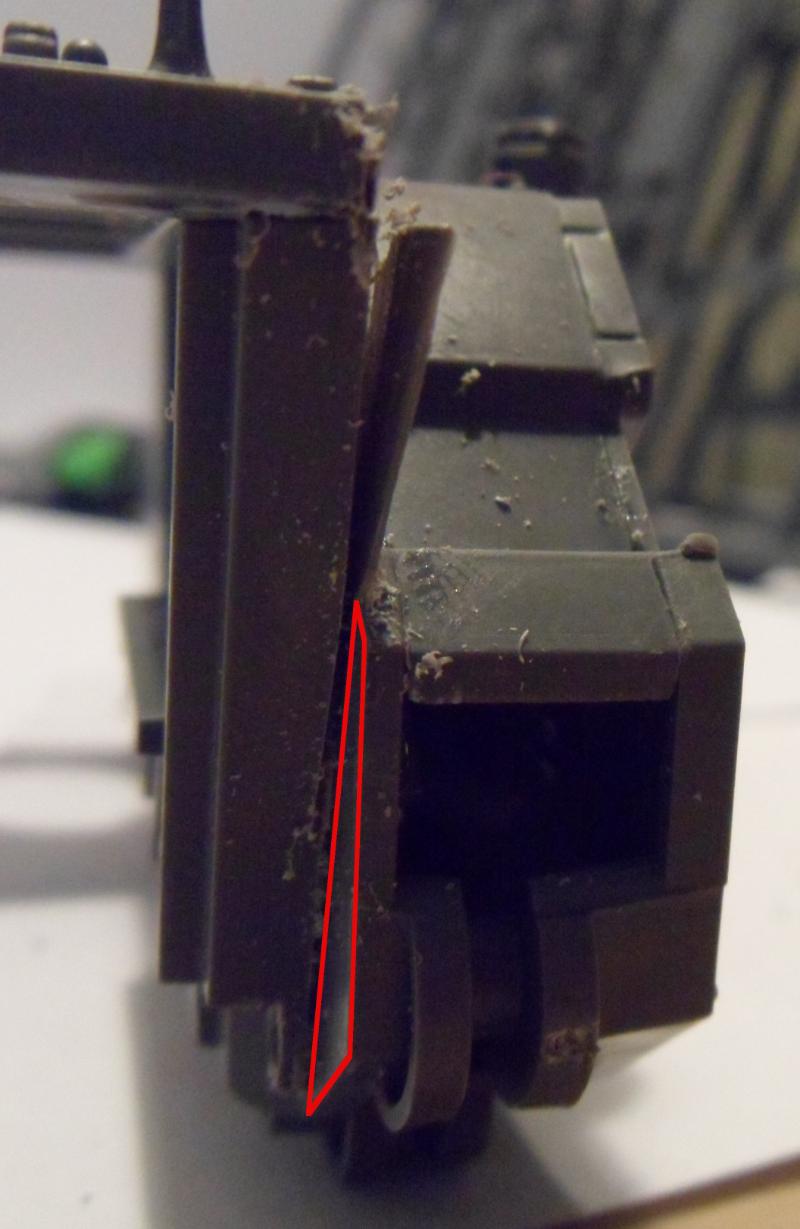
You want to end up with this.
This image shows a point at which I've cut down through the top piece enough that I can simply peel the unnecessary part away from the track housing, leaving a nice little ledge that will tuck under the track guard of the core vehicle - with a few adjustments. Those are the red bits. Again, you want to be cutting along the red bits. The top parts are cut and shaved away so that you can fit them inside the track guard of the core vehicle. The lower red lines indicate cuts that you need to make to accomodate the tracks. Cut along the red line at an angle, being careful not to cut through the outside of the track housing. Then you should be able to simply pull and break off what's above the cut. It's best to cut off a bit more than you need - you've got a fit a two-long piece of track up this gap. Test the fit as best you can with one of the assembled track pieces.
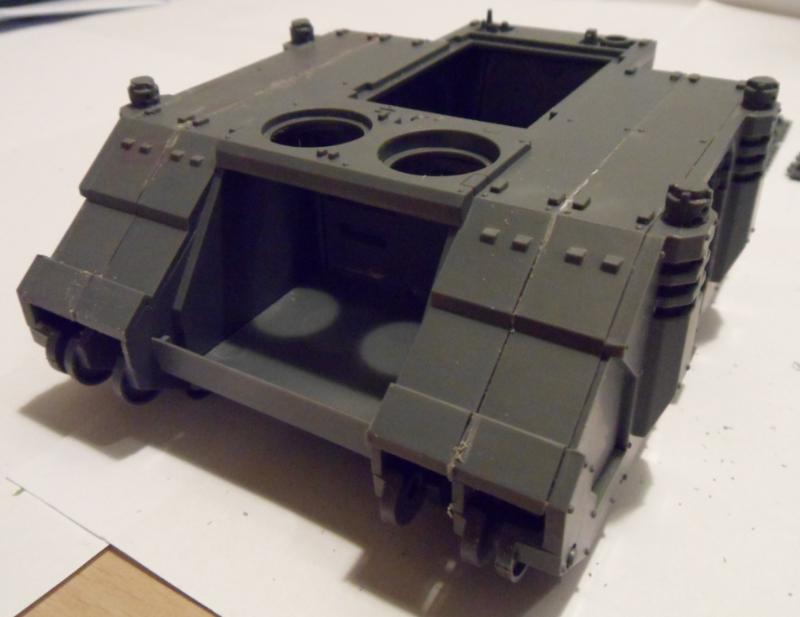
We want to end up with left + right versions of this:
And that's the end of the hard stuff! Attach your track housings...
And attach your tracks!
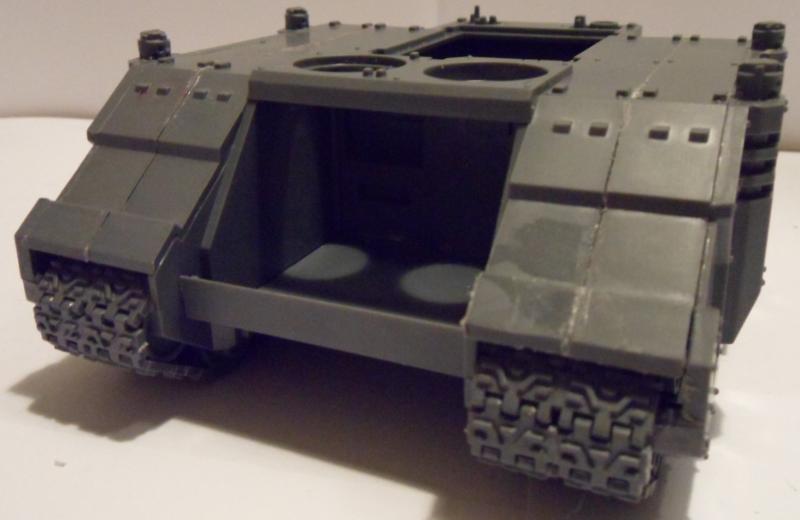
At this point you're ready to attach whatever turrets, demolisher cannons, sponsons or whatever else you want to use to complete your tank.
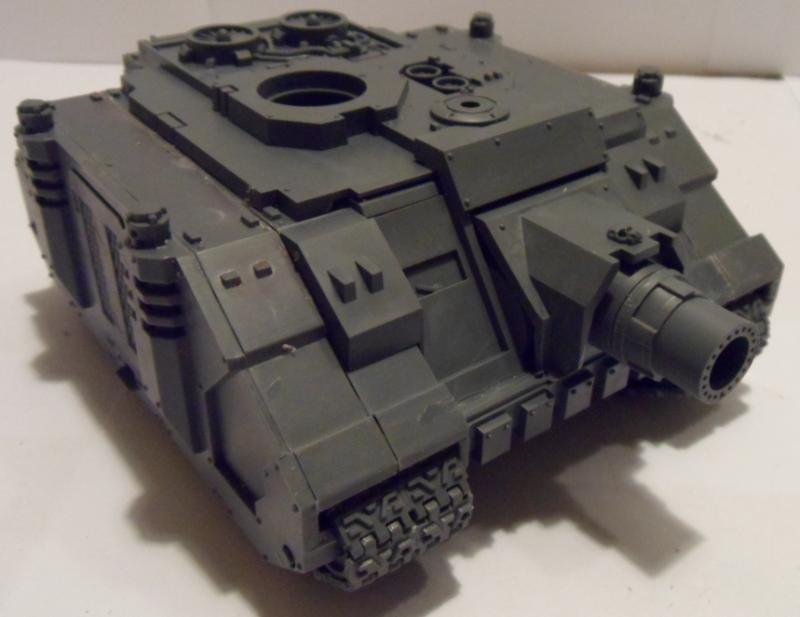
Now get your green stuff / glue remover / whatever else and do whatever clean-up work you need to do and that will be IT. You've done it. You're the man. Enjoy your new tank!
|
|
|
|
 |
|
2012/08/13 22:04:31
Subject: Re:Building double-wide rhinos
|
|

Speedy Swiftclaw Biker
Sydney, Australia
|
Thank you sooooo much for posting this, I've have been waiting and nail-biting in anticipation for this tutorial!
Much obliged! You are a credit to the hobby!
|
 Snake-eyes, everybody wins!! Oh, no, wait, my bad.. Oops.. Snake-eyes, everybody wins!! Oh, no, wait, my bad.. Oops.. |
|
|
|
|
2012/08/14 00:40:54
Subject: Re:Building double-wide rhinos
|
|
Stabbin' Skarboy
|
Really nice work dude, those tanks look "Proper" I really like them, first SM tanks I've seen that a: don't look gay next to a Leman Russ/Land Raider and b: look cable of withstanding the recoil from firing a demolisher cannon, or withstanding the weight of 10 space marines inside. Will definitely be doing this mod in the future!! 
|
Nat, the Reactor Mek 
Pariah Press wrote:Help! Jervis just jumped through my window, wearing a ninja costume! He's taking my 4th edition rule book! He's taking my 4th edition rule book!
|
|
|
|
|
2012/08/14 02:33:22
Subject: Building double-wide rhinos
|
|
Scarred Ultramarine Tyrannic War Veteran
|
Amazing! At first glance I thought you were using Land Raider chassis, which makes me wonder how would this would work on a Land Raider. Thanks for distracting me from my armies and making me work on an expensive side project!
|
|
This message was edited 2 times. Last update was at 2012/08/14 08:06:40
  "Whilst we stand, we fight. Whilst we fight, we prevail. Nothing shall stay our wrath" "Whilst we stand, we fight. Whilst we fight, we prevail. Nothing shall stay our wrath"
 Guilliman and the Ultramarines are like Manchester United, everyone hates them because they are so awesome! Guilliman and the Ultramarines are like Manchester United, everyone hates them because they are so awesome!
|
|
|
|
|
2012/08/14 13:39:28
Subject: Building double-wide rhinos
|
|

Chalice-Wielding Sanguinary High Priest
Arlington TX, but want to be back in Seattle WA
|
Your tanks look so badass, but that looks like entirely too much work (not to mention the price for the additional parts) to interest my in doing it myself. Good tutorial though.
|
 4250 points of Blood Angels goodness, sweet and silky W12-L6-D4 4250 points of Blood Angels goodness, sweet and silky W12-L6-D4
 1000 points of Teil-Shan (my own scheme) Eldar Craftworld in progress 1000 points of Teil-Shan (my own scheme) Eldar Craftworld in progress
 800 points of unassembled Urban themed Imperial Guard 800 points of unassembled Urban themed Imperial Guard
650 points of my do-it-yourself Tempest Guard
 675 points of Commoraghs finest! 675 points of Commoraghs finest!
The Dude - "Jackie Treehorn treats objects like women, man."
Lord Helmet - "I bet she gives great helmet."
|
|
|
|
|
2012/08/15 11:42:17
Subject: Building double-wide rhinos
|
|

Automated Space Wolves Thrall
|
This looks perfect to make some looted vehicules!
|
|
|
|
|
2012/08/15 12:44:38
Subject: Building double-wide rhinos
|
|
Leader of the Sept
|
Those look really nice. Its amazing how the wider aspect makes them look so much more mean 
|
Please excuse any spelling errors. I use a tablet frequently and software keyboards are a pain!
 Terranwing - w3;d1;l1 Terranwing - w3;d1;l1
 51st Dunedinw2;d0;l0 51st Dunedinw2;d0;l0
 Cadre Coronal Afterglow w1;d0;l0 Cadre Coronal Afterglow w1;d0;l0 |
|
|
|
|
2012/08/26 07:25:15
Subject: Building double-wide rhinos
|
|

Furious Raptor
|
Really cool conversion... I will give it a shot asap! A Vindicator build like this would be a perfect addition for my Iron Warriors...
Thumbs up!
|
Astra Militarum
Iron Warriors Army: Enyo Company
Enyo (Greek: Ενυώ, English translation: "warlike" in Greek mythology; Roman: Bellona), was an ancient goddess of war, acting as a counterpart and companion to the war god Ares. She is also identified as his sister, and daughter of Zeus and Hera in a role closely resembling that of Eris; with Homer in particular representing the two as the same goddess. As goddess of war, Enyo is responsible for orchestrating the destruction of cities
Death Korps of Krieg
 |
|
|
|
|
2012/09/06 20:25:54
Subject: Building double-wide rhinos
|
|
Jealous that Horus is Warmaster
|
Really nice. Ill see if I can find the bitz on ebay 
|
People I have traded with sucessfully
Rurouni Benshin, Eternalhero1983, Shas'O Dorian, Tsilber, Grimku, Rothrich, Frankenberry, Thecupcakecowboy, Bottomfeeder, Ephrael, Ted234521, Kai, XghostmakerX, Pretre, Threedguru, labmouse42, zeke48, AnnomanderRake, badguyshaveallthefun, Kavik_Whitescar, Dependence, Malaur, Greyguy13, ultraatma |
|
|
|
|
2012/09/07 01:20:10
Subject: Re:Building double-wide rhinos
|
|
Anointed Dark Priest of Chaos
|
They look amazing.
|
|
|
|
|
|
2012/09/08 02:11:39
Subject: Building double-wide rhinos
|
|
Regular Dakkanaut
|
So tempted to try this on something like a baneblade...I know it won't end well though...
|
|
|
|
|
2012/09/08 02:58:35
Subject: Building double-wide rhinos
|
|
Lone Wolf Sentinel Pilot
|
^ lol, it's definitely tempting to at least turn those things into Land Raiders. Amazing work!
|
Seeing a squad of veterens swoop in in a Vendetta, secure the area, deliver that math assignment, and extract within 2 minutes would be freaking sweet.
|
|
|
|
|
2012/09/08 21:40:15
Subject: Building double-wide rhinos
|
|

Esteemed Veteran Space Marine
|
BAD @$$ !!!
damn this is good looking stuff!
|
|
|
|
|
|
2012/09/27 09:34:29
Subject: Building double-wide rhinos
|
|
Stealthy Dark Angels Scout with Shotgun
|
pretty cool could doubles as an ares patter raider too. just need 2 shields or maybe one
|
My Dark Angels Variant chapter
Midnight Dragon Angels
Kabal of the Sacred Creed
|
|
|
|
|
2012/09/27 13:02:34
Subject: Building double-wide rhinos
|
|
Missionary On A Mission
|
Currently trying this out myself. Just waiting on a few extra parts then I should be good.
|
 : 4500pts : 4500pts
Lothlorien: 3500pts
Rohan: 1500pts
Serpent: 2000pts
Modor: 1500pts |
|
|
|
|
2012/09/27 19:17:23
Subject: Re:Building double-wide rhinos
|
|
Ork-Hunting Inquisitorial Xenokiller
|
 Nuclear Mekanik wrote: Nuclear Mekanik wrote:Really nice work dude, those tanks look "Proper" I really like them, first SM tanks I've seen that a: don't look gay
next to a Leman Russ/Land Raider and b: look cable of withstanding the recoil from firing a demolisher cannon, or withstanding the weight of 10 space marines inside. Will definitely be doing this mod in the future!!
Is that necessary?
Moving on, those tanks look neat. if I can find the parts, Id be very tempted to do that. Aww yiss.
|
|
|
|
|
2012/10/03 11:00:37
Subject: Building double-wide rhinos
|
|
Focused Fire Warrior
|
Very Nice.
Might have to see what that big momma cannon looks like on one of these.
|
|
|
|
|
2012/10/22 06:06:57
Subject: Building double-wide rhinos
|
|
Steadfast Grey Hunter
|
The tanks look soooo cool and mean.
It does look a bit of a pricey conversion unless you can pick up the bits cheaply, but the end result is amazing.
Land Raider next anyone!
|
When you can't see the drunk guy at a party, you should look for the nearest mirror.  |
|
|
|
|
2012/10/22 10:54:18
Subject: Building double-wide rhinos
|
|

Death-Dealing Dark Angels Devastator
Linho, Sintra
|
Consider yourself shamelessly plagiarized for whenever a Command Squad of mine needs a Rhino!
|
=====Begin Dakka Geek Code=====
DC:80+S+G++MB-I+Pw40k03#D++A++/areWD286R+T(S)DM+
======End Dakka Geek Code======
WH40k 5000 pts +/-
WHFB:  6000pts +/- 6000pts +/-
|
|
|
|
|
2012/10/22 18:52:18
Subject: Building double-wide rhinos
|
|

Nasty Nob
|
Do you get any complaints about the size giving you some advantages?
|
ERJAK wrote:
The fluff is like ketchup and mustard on a burger. Yes it's desirable, yes it makes things better, but no it doesn't fundamentally change what you're eating and no you shouldn't just drown the whole meal in it.
|
|
|
|
|
2012/10/23 02:57:59
Subject: Building double-wide rhinos
|
|
Stalwart Space Marine
|
davou wrote:Do you get any complaints about the size giving you some advantages?
It's never happened yet. To be fair, they're a bit easier to hide behind - they also make it much more difficult to avoid terrain, requiring me to take dozer blades all the time in order to avoid constantly immobilizing myself. Ultimately, I've never played in a competitive enough situation that anyone would actually care either way and most people are just happy to run up against a fully-painted and converted army.
Glad everyone's enjoying the tutorial - for a guy who makes most of his stuff on instinct and trial & error, actually having to explain my madness to other people was hard work.
|
|
|
|
|
|
2012/11/12 05:44:49
Subject: Building double-wide rhinos
|
|

Perfect Shot Dark Angels Predator Pilot
|
 ssspectre wrote: ssspectre wrote:davou wrote:Do you get any complaints about the size giving you some advantages?
It's never happened yet. To be fair, they're a bit easier to hide behind - they also make it much more difficult to avoid terrain, requiring me to take dozer blades all the time in order to avoid constantly immobilizing myself. Ultimately, I've never played in a competitive enough situation that anyone would actually care either way and most people are just happy to run up against a fully-painted and converted army.
Glad everyone's enjoying the tutorial - for a guy who makes most of his stuff on instinct and trial & error, actually having to explain my madness to other people was hard work.
Great conversion! And I appreciated that last statement of yours - I myself am starting out and customizations are on top of my list!
|
Mixed-Wing army has positive results thus far!
"Belial SMASH!"
3,500+ point fully painted army of Unforgiven goodness
Wins 17 Draws 4 Losses 36 Abandoned 1 Hopeless 1
"Never Forgive! Never Forget!"
So I dub thee Unforgiven |
|
|
|
|
2012/11/12 17:51:03
Subject: Re:Building double-wide rhinos
|
|
Drop Trooper with Demo Charge
kent uk
|
Nice tut thanks i might give it a go
|
1500 wip
 500 500
 1000 wip 1000 wip
 2000 2000
200 on the backburner
 150 150
 next project next project
warmachine khador 9 points current project
|
|
|
|
|
2012/11/13 17:49:53
Subject: Re:Building double-wide rhinos
|
|
Mekboy Hammerin' Somethin'
|
Does anyone reckon this would work with a land raider?
|
|
|
|
|
2012/11/15 08:09:13
Subject: Building double-wide rhinos
|
|
Shas'ui with Bonding Knife
Leeds, Uk
|
Wow this is awesome. Wish I some rhinos now.
Peace Spud
|
I am Gamesworkshop! |
|
|
|
|
2012/11/22 12:39:47
Subject: Re:Building double-wide rhinos
|
|
Fresh-Faced New User
|
Absolute kudos!
I will definitely be giving this a go on a spare kit I have lying around, really enjoying the menace of the vindicator
|
|
|
|
|
2012/11/24 06:06:22
Subject: Building double-wide rhinos
|
|
Quick-fingered Warlord Moderatus
|
I wish the kits came stock like this. :(
Have you had anyone take issue with the extra size of the hulls in a game?
|
Click here for my Swap Shop post - I'm buying stuff!
DR:90-S++G++M+B++I+Pw40kPbfg99#+D++A++/eWDR++T(T)DM+
 Black Legion/Iron Warriors/Night Lords Black Legion/Iron Warriors/Night Lords  Inquisitorial Friends & Co. (Inq, GK, Elysians, Assassins) Elysian Droptroops, soon-to-add Armored Battlegroup Inquisitorial Friends & Co. (Inq, GK, Elysians, Assassins) Elysian Droptroops, soon-to-add Armored Battlegroup  Adeptus Mechanicus Forge World Lucius Adeptus Mechanicus Forge World Lucius
|
|
|
|
|
2012/11/24 08:38:55
Subject: Building double-wide rhinos
|
|
Bounding Assault Marine
Layton, Utah
|
I love the way that looks. Great idea and thanks for sharing it!
|
Hopefully one day i'll have an army! |
|
|
|
|
2012/12/09 20:37:28
Subject: Building double-wide rhinos
|
|

Homicidal Veteran Blood Angel Assault Marine
|
This is awesome.
I will definetely have to steal this idea for my custodes army.
Already ordered the bits. ^^
|
|
|
|
|
|
2012/12/09 23:11:05
Subject: Building double-wide rhinos
|
|

Liche Priest Hierophant
|
These looked really good. A bit bad I would have to pay twice as mutch.
|
|
|
|
|
|
|
|