| Author |
Message |
 |
|
|
|
|
Advert
|
Forum adverts like this one are shown to any user who is not logged in. Join us by filling out a tiny 3 field form and you will get your own, free, dakka user account which gives a good range of benefits to you:
- No adverts like this in the forums anymore.
- Times and dates in your local timezone.
- Full tracking of what you have read so you can skip to your first unread post, easily see what has changed since you last logged in, and easily see what is new at a glance.
- Email notifications for threads you want to watch closely.
- Being a part of the oldest wargaming community on the net.
If you are already a member then feel free to login now. |
|
 |
2017/04/21 18:27:10
Subject: Re: Multi-level city terrain, marine v nid bases (4/21: lego mould time. P1)
|
|

Dakka Veteran
|
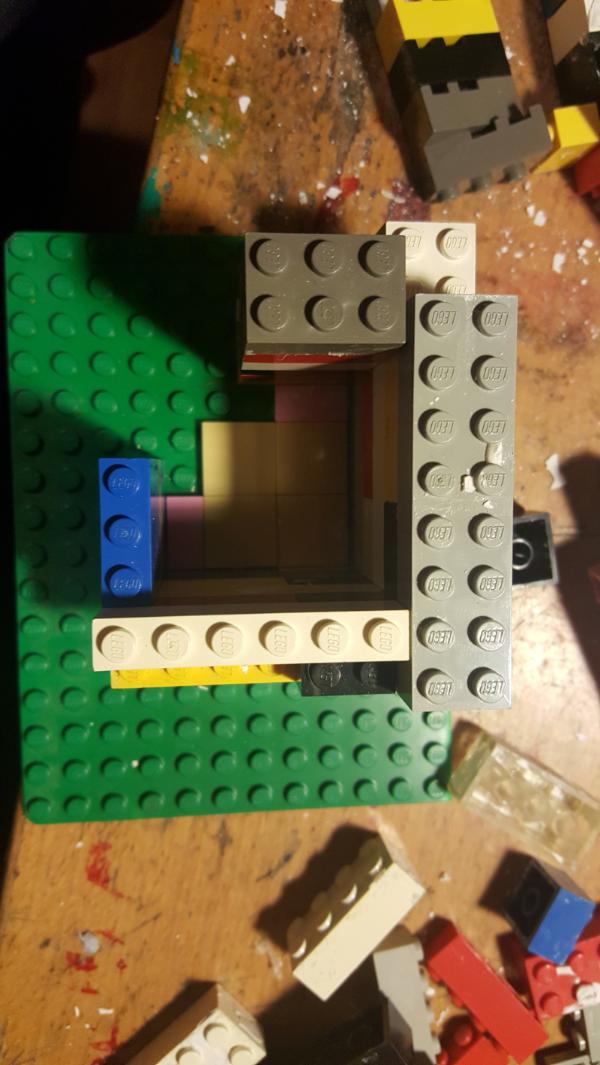
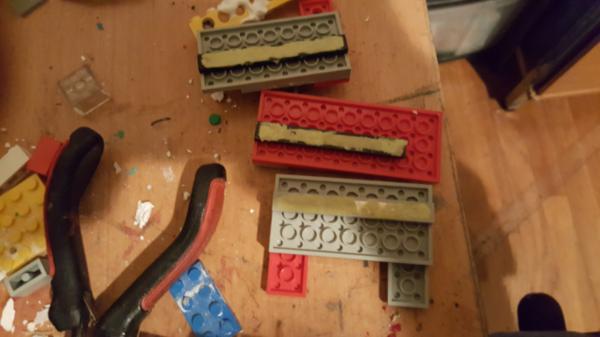
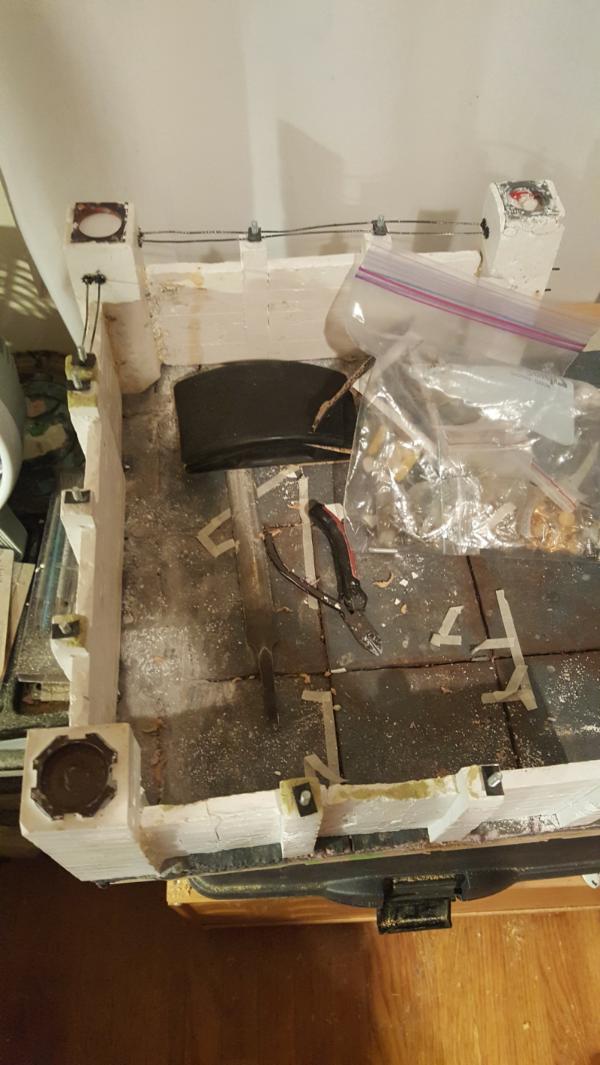
So we're back to lego mould making! Its been a while, at least a year? Turns out a year gap with no notes inbetween leads to some mistakes which I'll talk about. But for now its just the innocence of putting together legos.
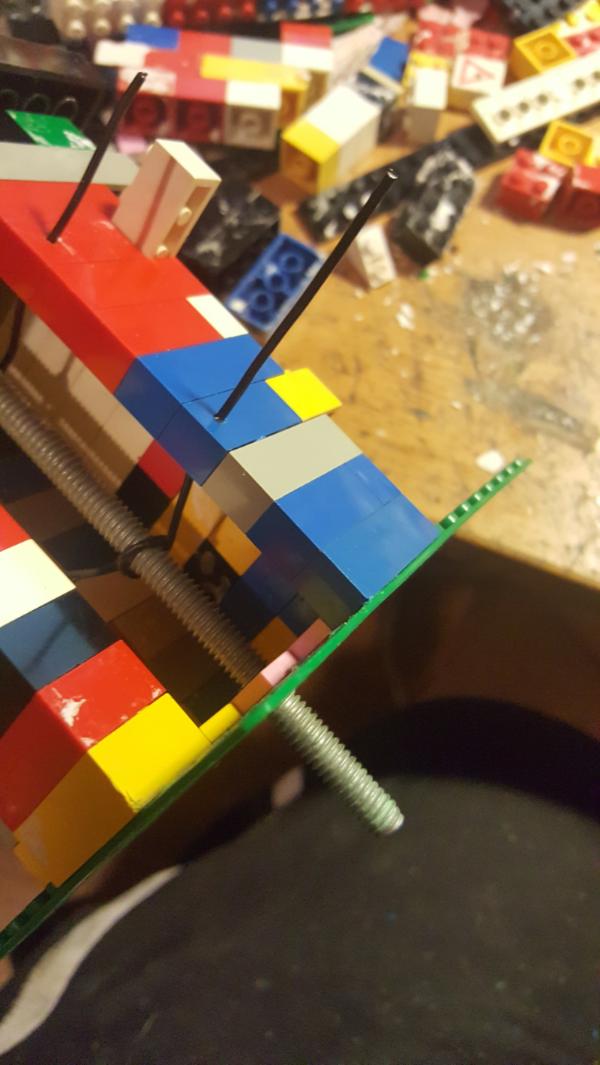
First up is the main tower. Now one thing different I'm doing with these moulds is emebdding the wire sticking out first. That way there is half as much drilling later one. THe consequence of that is the mould has to basically be completely taken apart but hopefully its still at least stronger than before.
For these main towers I'm also using a much, much thicker bolt. The idea is to bolt this to the wood tile below, not just glue.
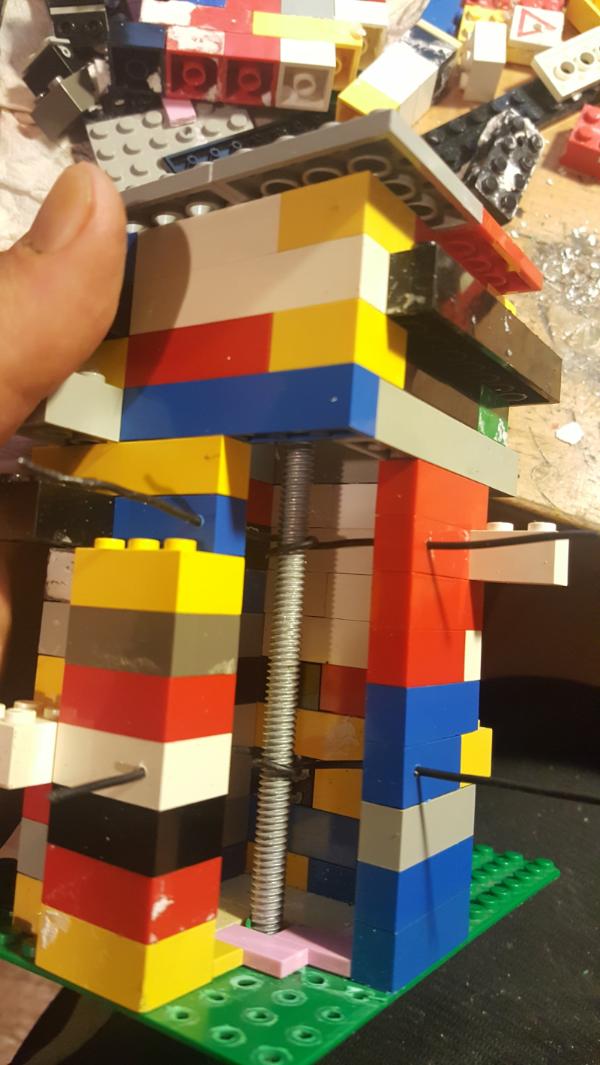
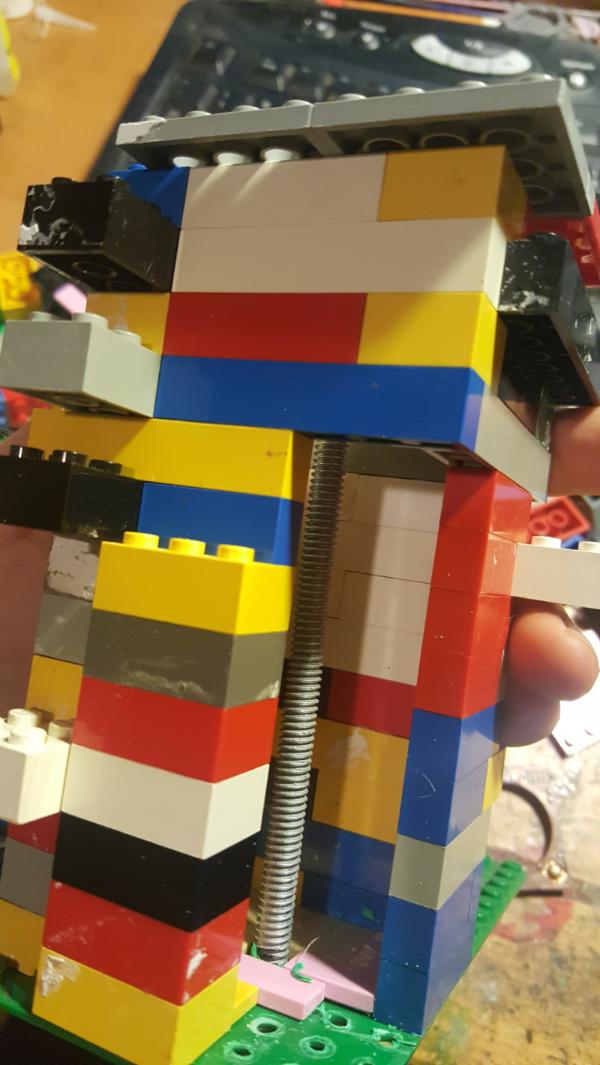
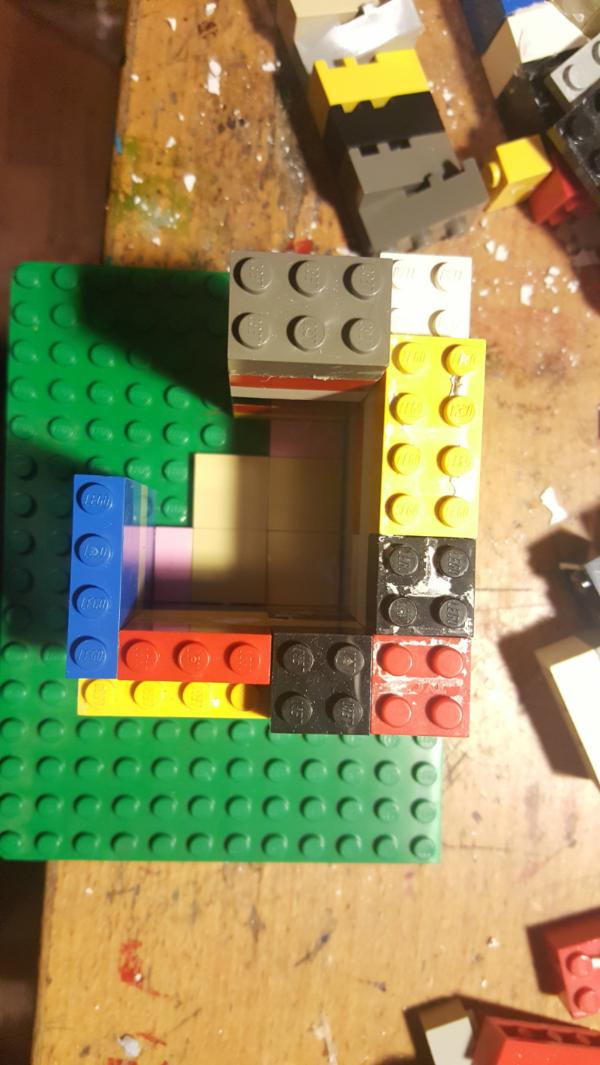
The layers as I build them up:
|
|
|
|
 |
|
2017/04/24 20:28:52
Subject: Re: Multi-level city terrain, marine v nid bases (4/21: lego mould time. P2)
|
|
Dakka Veteran
|
Bit of a delay, I get distracted updating this on wekends trying to keep working! lol.
Anyways we also have the first wall mould.
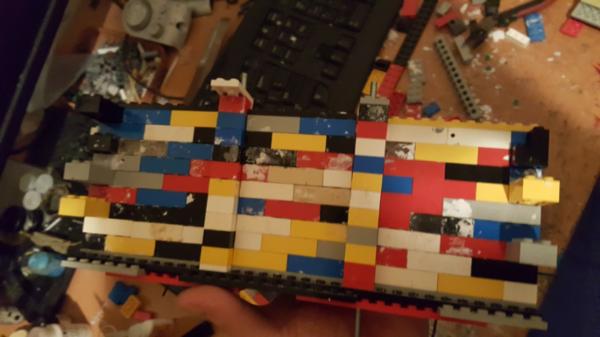
Adding in my wires:
I also tried to help deal with the tops being rough by filling in some legos, to make smooth "cover" pieces:
|
|
|
|
|
|
2017/04/25 21:55:33
Subject: Re: Multi-level city terrain, marine v nid bases (4/22: first wall castings)
|
|
Dakka Veteran
|
So, time for a lesson. It's been a while since I had messed with Hydro stone (at least a year), and one thing I didnt do from last time was write notes as to what I should and shouldn't do for later. I even went back over my blog for that time and it was basically "this stuff is awesome! it works well with legos" and thats about it.
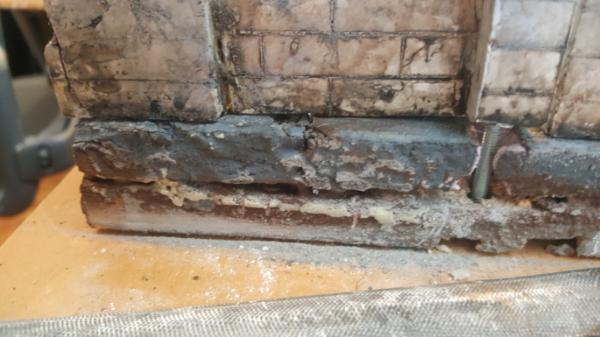
The key lesson I should have written down is the ratio of water to hydrostone to use, and what kind of consistency you want to cast with. The answer is.. very very solid.
What I remember from my first go at this was that it worked well, required being "pressed" into the mould and required some but not too much cleanup of the legos. So I mixed it up this time for this first mould and it ended up being runny, okay fine no huge I can just pour it in instead, even easier.
Yeah it went.. everywhere. Every crack, every hole in every lego, and even IN BETWEEN the lego joints, filling in some of those gaps.
See the white on my table? thats just remnents of what poured out.


It took.. a while to fix all this. The cast looks great, as always, but the cleanup after took.. a long time. The legos had to be cleaned off before they could be used again, and this would be a feature EACH time I remade a mould. Unfortunately, due to the fact that none of the wall lengths are consistent, i had to rebuild the mould EACH time. So the casting process, alone, took like 4-5 days for all this. I also started added wire poking out to help me with assembling everything, so I ahve less to drill. Unfortuantely that also lead to having to take apart the entire mould to get he wires out after each cast. This just took.. forever. Even when I made the mixture less runny it still needed to be thick enough to pour for the tower moulds (no real easy way to "press" it in I could think of, not with a giant bolt running down the middle), which mean it went up into the lego joint cracks that were there from the previous cleaning not being perfect. Ugh.
|
|
|
|
|
|
2017/04/26 01:37:16
Subject: Multi-level city terrain, marine v nid bases (4/22: first wall castings)
|
|
Ragin' Ork Dreadnought
|
I like the "rebar" effect.
|
|
|
|
|
|
2017/04/26 18:42:43
Subject: Re: Multi-level city terrain, marine v nid bases (4/22: first wall castings)
|
|
Dakka Veteran
|
It's actually pretty critical, I should have done more of it.
This stuff is basically concrete, it has the same PSI (4000) which is great for accidental scratches and stuff BUT on the flip side still is just as vulnerable to cracking/bending/etc.
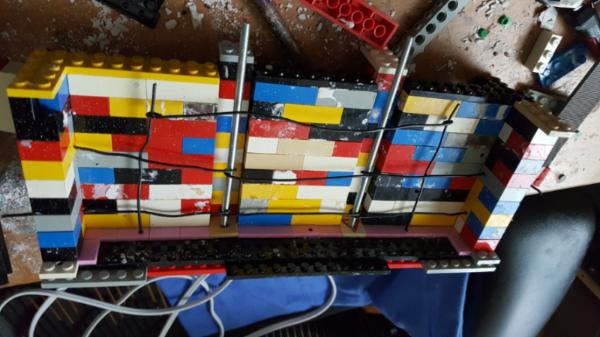
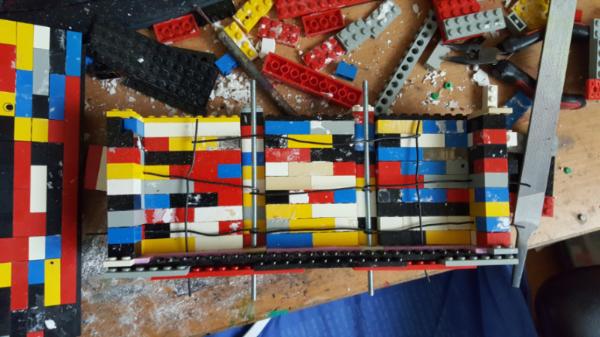
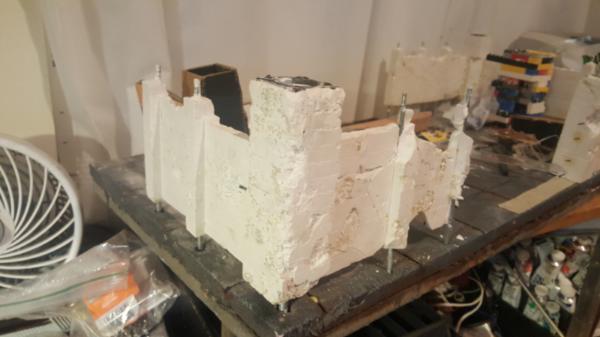
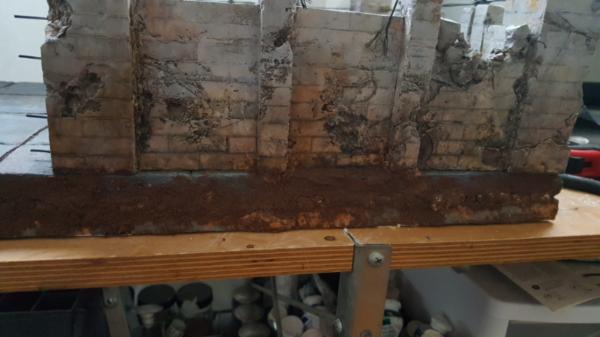
So the rebar helps keep it together once you start cracking it for various effects. Automatically Appended Next Post: So this skips forward (technically) about 4-5 days worth of casting process. Just as an FYI. Still yay progress!
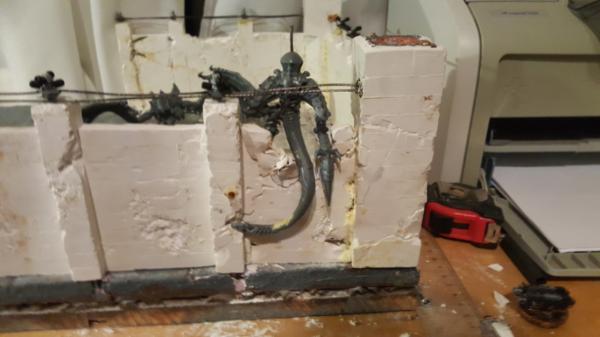
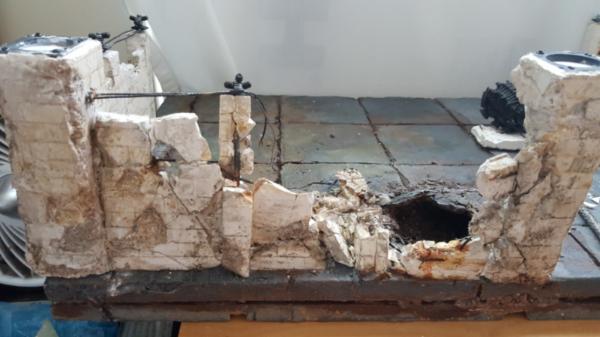
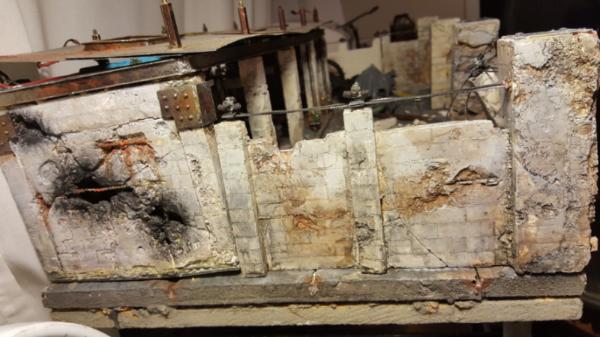
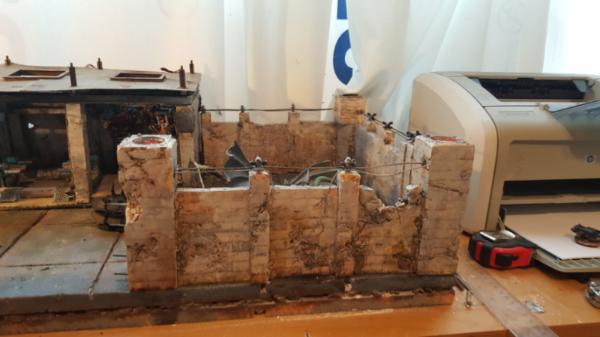
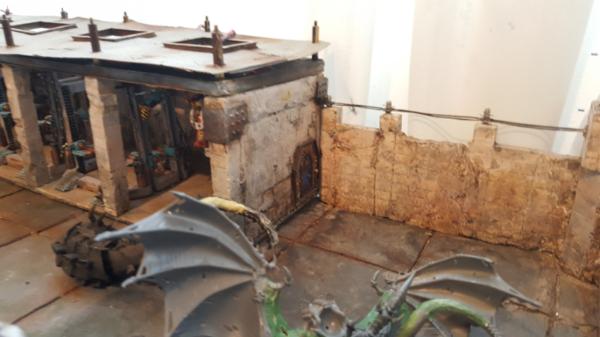
Walls are up and assembled! Unlike the garage I cast the walls in much, much bigger chunks, pretty much the whole wall at once between the giant pillars.
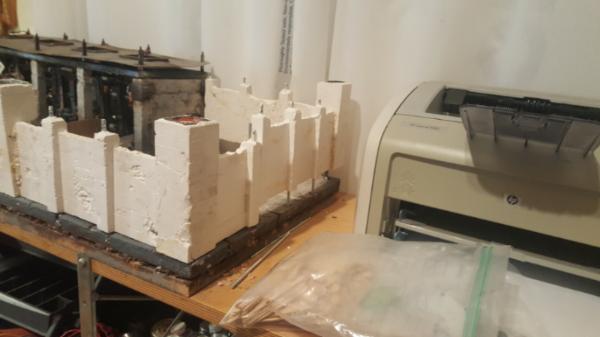
The other side is the mawloc side, so after casting it I started to hammer out the areas where its bursting through and tearing down the walls. You can see here why more rebar would have been good (i would have normally but accidentally got my casts mixed up in terms of which side the small pillars were on, so I ended up with the lighter rebar wall being destroyed instead of the heavier rebar one) because it would have meant that the top and bottom chunks that are missing would have broken into smaller pieces and stuck to the rebar. While i can easily glue those pieces back on its still not quiitteee as realistic.
|
|
This message was edited 1 time. Last update was at 2017/04/26 20:31:57
|
|
|
|
|
2017/04/27 22:26:29
Subject: Re: Multi-level city terrain, marine v nid bases (4/27: destroying walls and electrified wall tops)
|
|
Dakka Veteran
|
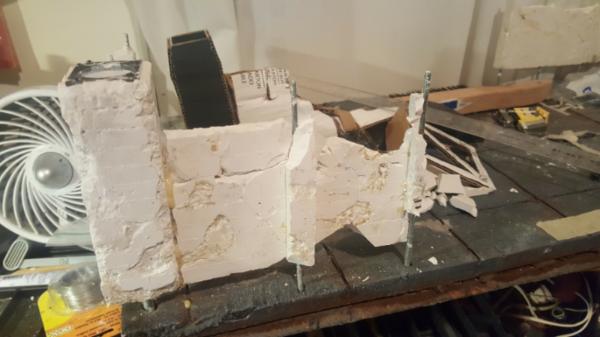
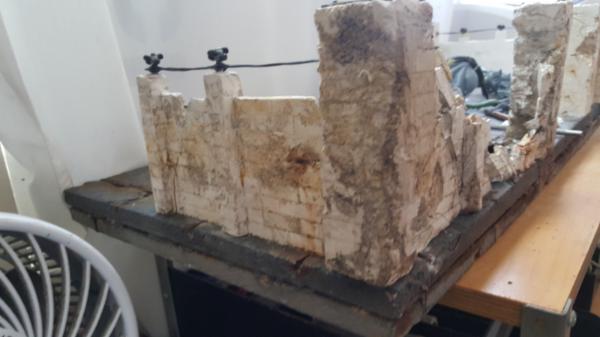
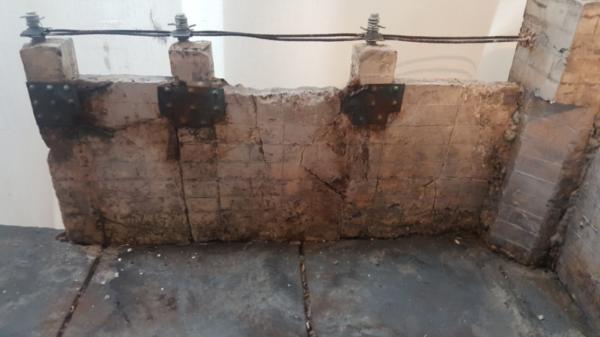
So with the setup of the previous pre-cracked wall I thought id go ahead and try and finish it off by bending it into its final collapsed position.
Yeah it pretty much all fell apart. Actually the post i bent thats in the middle of the wall which has a metal rod through it actually snapped so that was.. interesting. I'll have to recast that.
Still i took out some of the bigger chunks of the rubble and got out my jigsaw puzzle skills and rebuilt where i could to get a decent result:
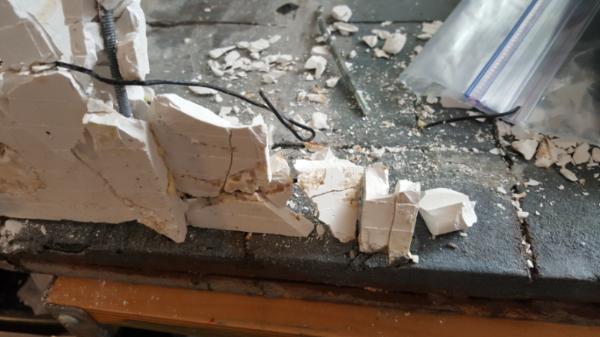
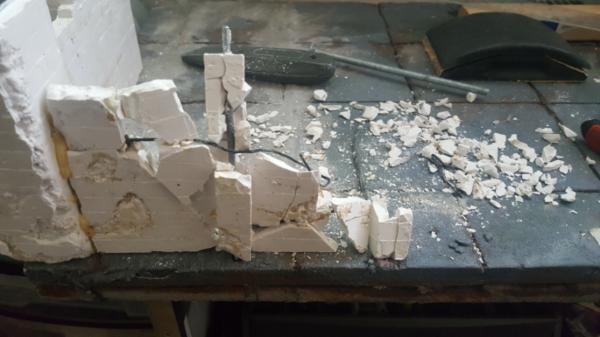
So you can see the base of the wall-post that will have fallen over with the wall section collapsed next to it. The other side of the wall I have to figure out because thats where the Mawloc will have burst through, so its unclear which direction that would be falling. Technically onto the other tile? Ergh. Hmm.
I also worked on the tops of my walls, adding some elecrified line to thematically match the fencing type on the other tile. Im happy with how it turned out.


|
|
|
|
|
|
2017/04/27 22:48:08
Subject: Multi-level city terrain, marine v nid bases (4/27: destroying walls and electrified wall tops)
|
|
Ragin' Ork Dreadnought
|
It looks awesome.
|
|
|
|
|
|
2017/04/27 23:10:12
Subject: Multi-level city terrain, marine v nid bases (4/27: destroying walls and electrified wall tops)
|
|
Legendary Master of the Chapter
|
Man looks really good
cant wait to see paint on it.
|
 Unit1126PLL wrote: Unit1126PLL wrote: Scott-S6 wrote: Scott-S6 wrote:And yet another thread is hijacked for Unit to ask for the same advice, receive the same answers and make the same excuses.
Oh my god I'm becoming martel.
Send help!
|
|
|
|
|
2017/04/28 11:38:12
Subject: Multi-level city terrain, marine v nid bases (4/27: destroying walls and electrified wall tops)
|
|

Agile Revenant Titan
|
Sweet! That looks excellent 
|
|
|
|
|
|
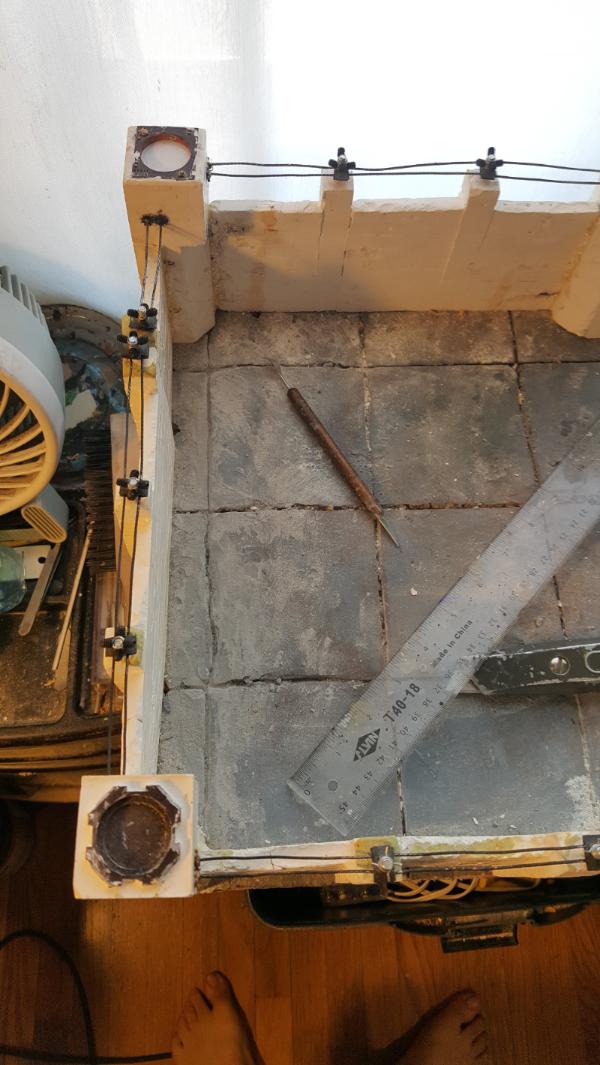
2017/04/28 22:18:11
Subject: Re: Multi-level city terrain, marine v nid bases (4/27: bolting down my walls)
|
|
Dakka Veteran
|
Thanks!
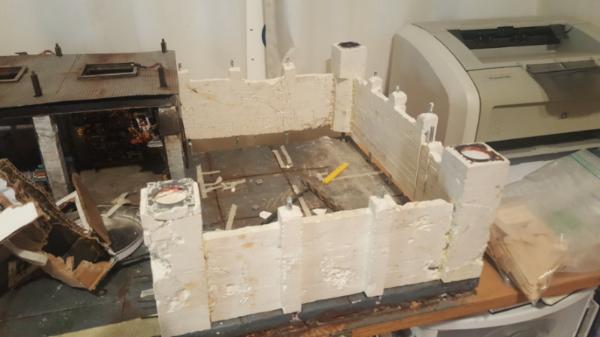
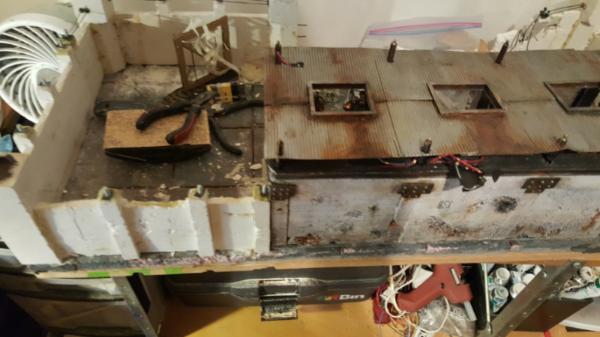
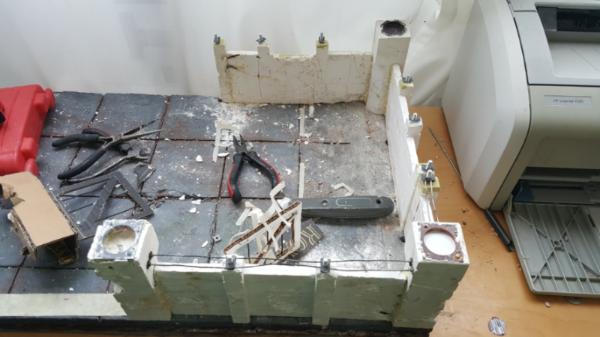
Here's a top down view:

And progress on the other walls:
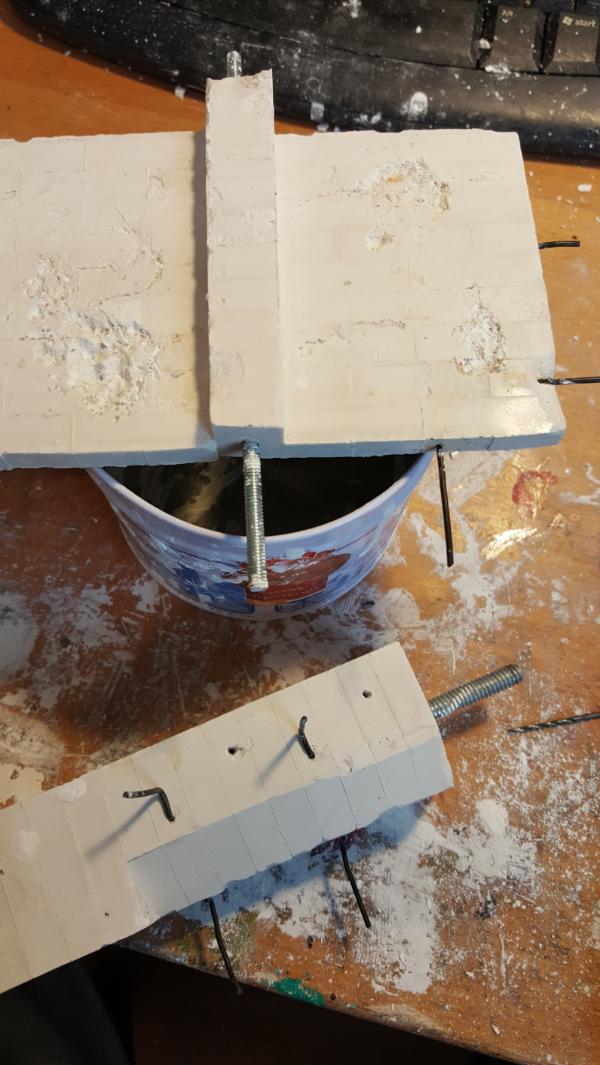
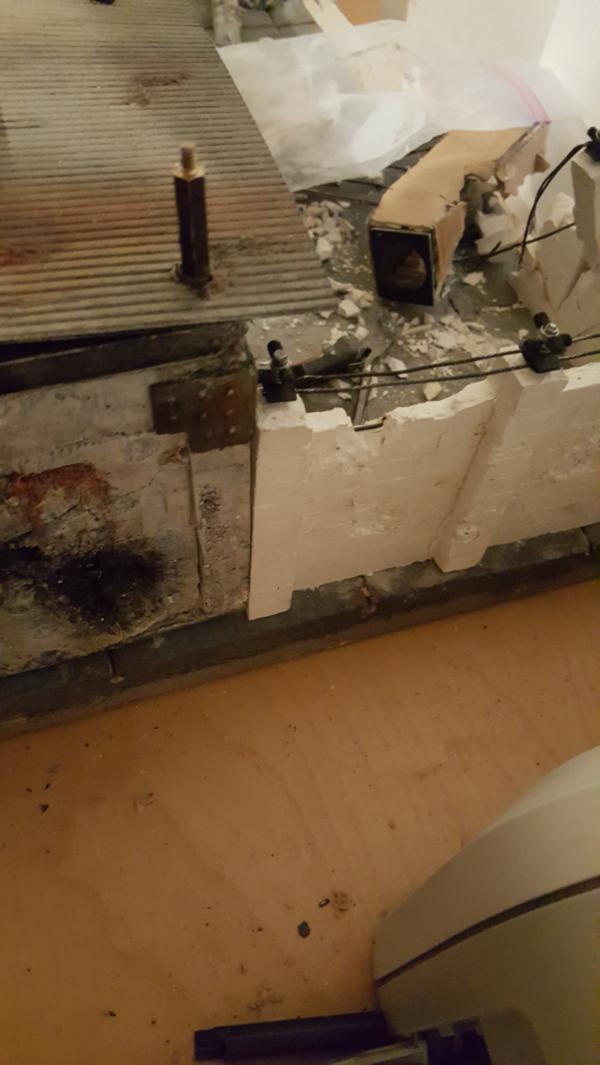
We also have some less pretty mechanics. How to actually attach this stuff!
So we have a wooden base with foamcoated foam on top. I'm attempt to attach what amounts to blocks of cast concrete in a permenent way. Glue just aint gonna cut it. So we use the threaded rods I've been inserting in all these walls to actually bolt the walls too the wood underneath. A bit overkill but hey it sure is sturdy.
Sometimes they poked out abit in front but I can patch that later.
|
|
|
|
|
|
2017/04/29 18:42:59
Subject: Re: Multi-level city terrain, marine v nid bases (4/29: cutting a wall to fix a mistake)
|
|
Dakka Veteran
|
So, all the walls are up and bolted down. Yay! Time to test putting it all together with the garage.
Looks okay on this side..
whoops whats that?

yeah we're off by almost a half inch. TBH. this was somewhat inevitable. I measured plenty but between lego dimensions being not quite 1/4th inch per dot AND actually mounting the walls to the board adding more wiggle room... it just got off.
Its okay, not a hugely tough fix just gotta get out my dremel and cut a bit off.
Basically I just am going to shift the post over a bit:
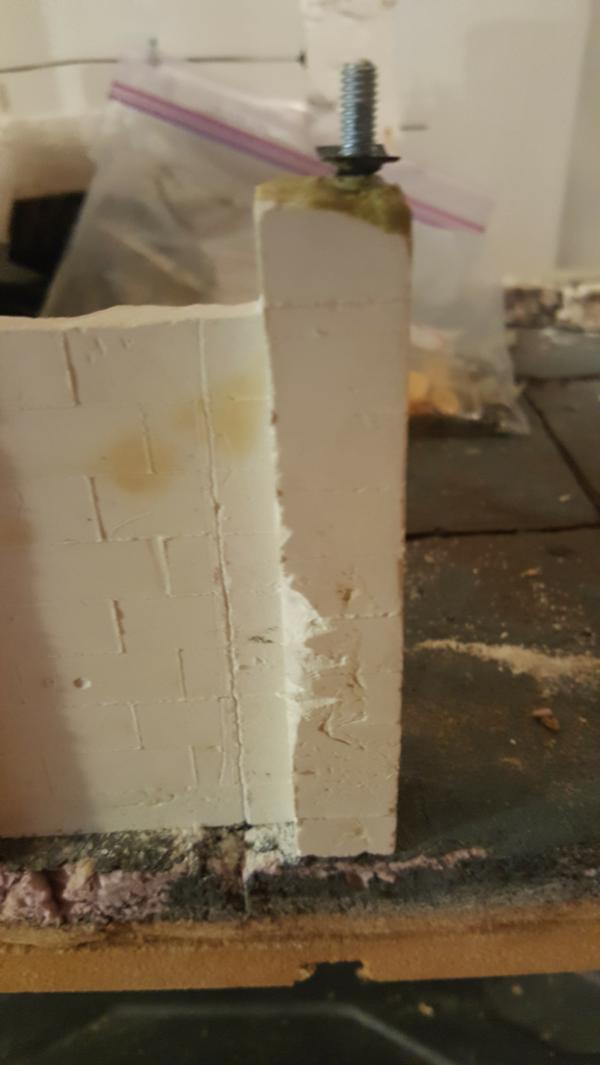
Dremel time!
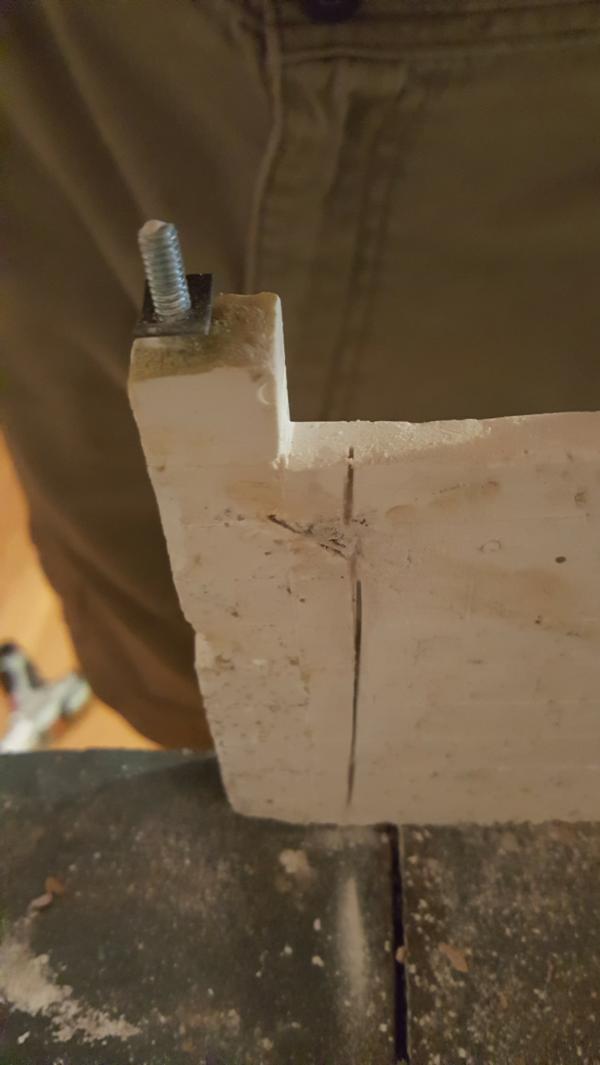
Cut off the wall bits I need, sand down the post a bit, re-add a new hole to pin the post back to the rest of the wall and we drill the hole in the tile and we're good to go.
All fixed:
|
|
This message was edited 1 time. Last update was at 2017/04/29 18:44:20
|
|
|
|
|
2017/04/30 07:05:52
Subject: Multi-level city terrain, marine v nid bases (4/29: cutting a wall to fix a mistake)
|
|

Tough Tyrant Guard
|
Walls are coming along really well... hard luck on the casting with it pouring out everywhere, can only imagine the thoughts going through your head as it went everywhere hehe.
Going to be cool seeing the wall effects with the Mawloc and Tyrant etc in there... nicely done!
|
|
|
|
|
|
2017/04/30 07:26:12
Subject: Re: Multi-level city terrain, marine v nid bases (4/29: cutting a wall to fix a mistake)
|
|
Dakka Veteran
|
Yeah, lots of swearing and moving quickly. Blu tac is my friend at quickly plugging holes. And remnants of my crappy green stuff that I'm trying to get rid of before getting actual green stuff.
Its okay, I just have to remember that you really want the consistency to be about toothpaste, something that almost stands together on its own. A little runnier is okay too if you need to pour but justtt bareeelly. It should oooze out.
The ratio is basically 1 part water to 3 parts powder (the official number is 5oz of water per 1lb of hydrostone). You dont really need to be precise you just need to keep adding powder until the proper consistency is achieved.
|
|
|
|
|
|
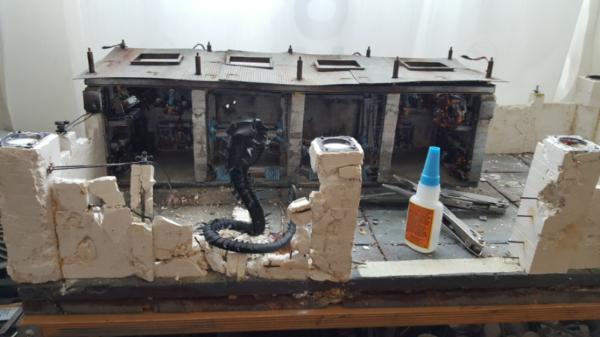
2017/05/01 00:14:43
Subject: Re: Multi-level city terrain, marine v nid bases (4/30: Bursting a mawloc out of the ground WIP 1)
|
|
Dakka Veteran
|
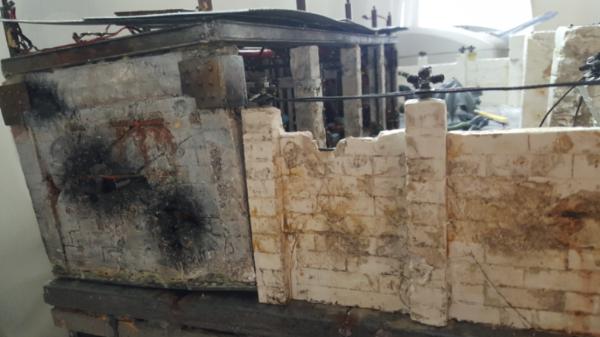
So, the right side is bolted down and I'd be done with the fencing/eletrical tops already butttt I need my hardware store to get more parts.
So its time to work on the mawloc some more!
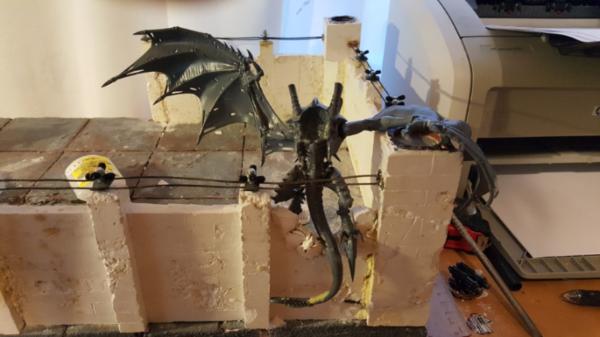
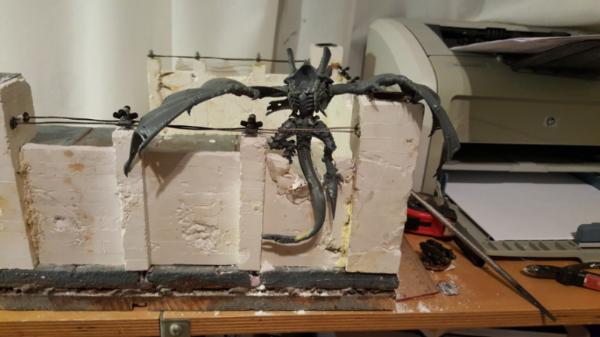
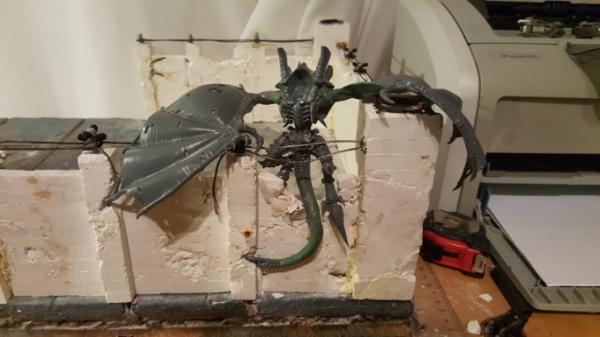
I went ahead and cast the mawloc half-destroyed tower as well, the goal is for it to be as destroyed as possible but still upright. So just barreeellly hanging on. We also have the mawloc sitting on top of the collapsed wall support, which works well because it allows the mawloc to face the tower and thus outwards. Having him face inwards seemed.. unideal from a display perspective.
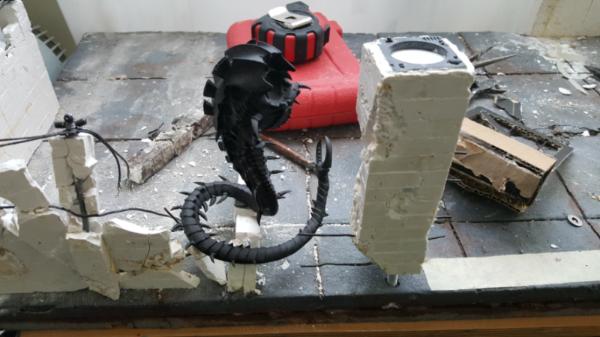
I started adding more rubble around the tower and also working on the pit the mawloc is coming out of. This bad boy needs to be pretty big and I intend for my rippers to also be swarming out int he gaps.
I started building up the wall the mawloc pushed outwards/completely destroyed, so you could see remnants of it:
Continuing to build out more:
|
|
|
|
|
|
2017/05/01 21:07:39
Subject: Re: Multi-level city terrain, marine v nid bases (4/30: Bursting a mawloc out of the ground WIP 2)
|
|
Dakka Veteran
|
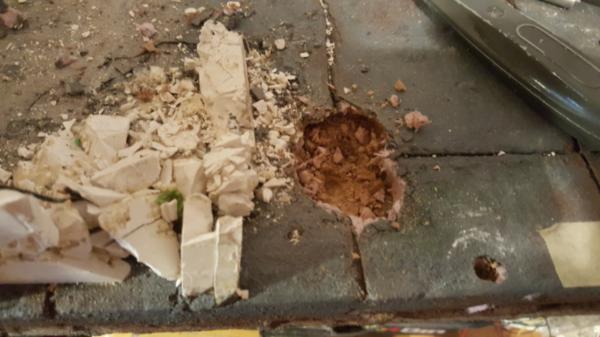
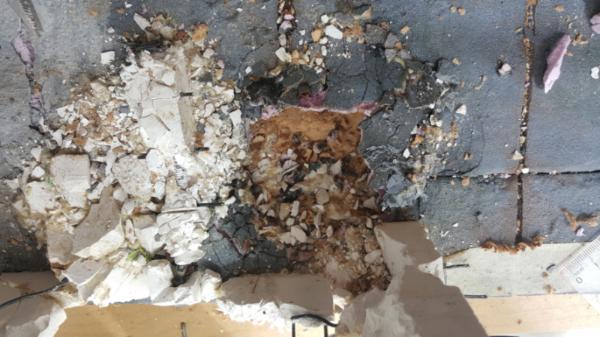
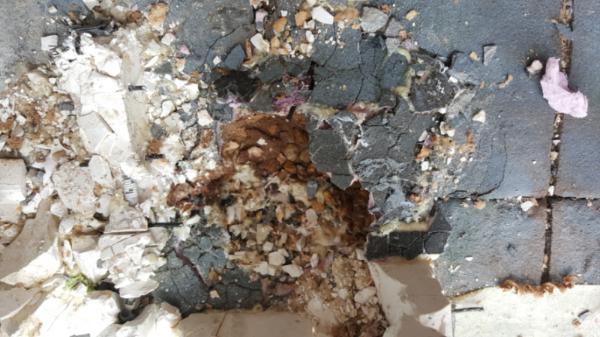
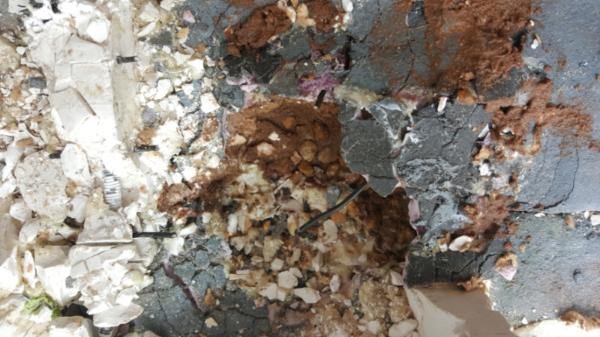
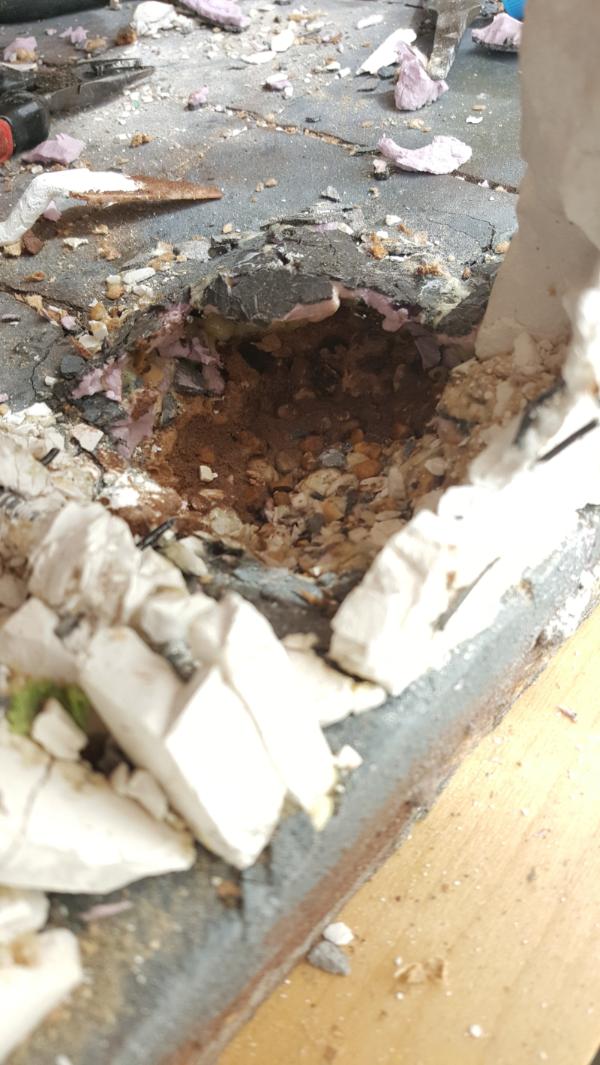
SO work continues, mostly just adding rubble and such in the hole, and trying to hollow it out without actually punching through to the other side (which i do.. once. Whoops! Sorry table underneath)
Also got.. SOME more nubbies for my electrified tops so.. just slowly finishing off the right side:
 \
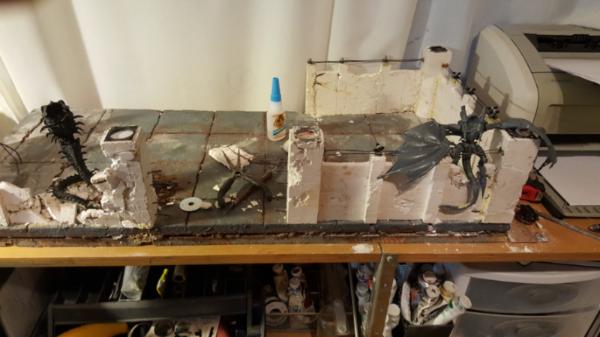
We also have our first "all together" shot, trying to make sure the placement of the mawloc doesnt impact the sighlines to the garage TOO much, so far so good!
|
|
|
|
|
|
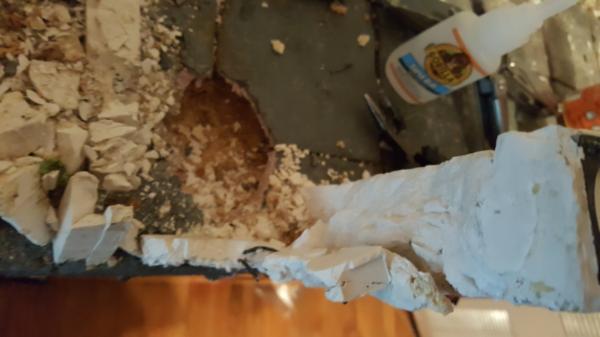
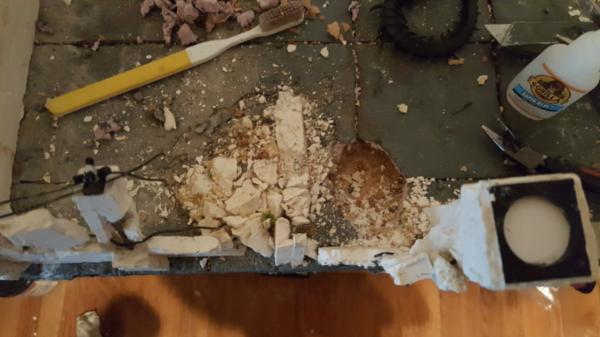
2017/05/03 18:54:32
Subject: Re: Multi-level city terrain, marine v nid bases (5/3: Mawloc bursting out of the ground build done)
|
|
Dakka Veteran
|
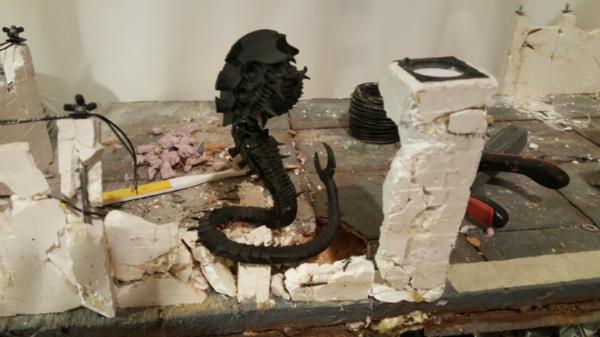
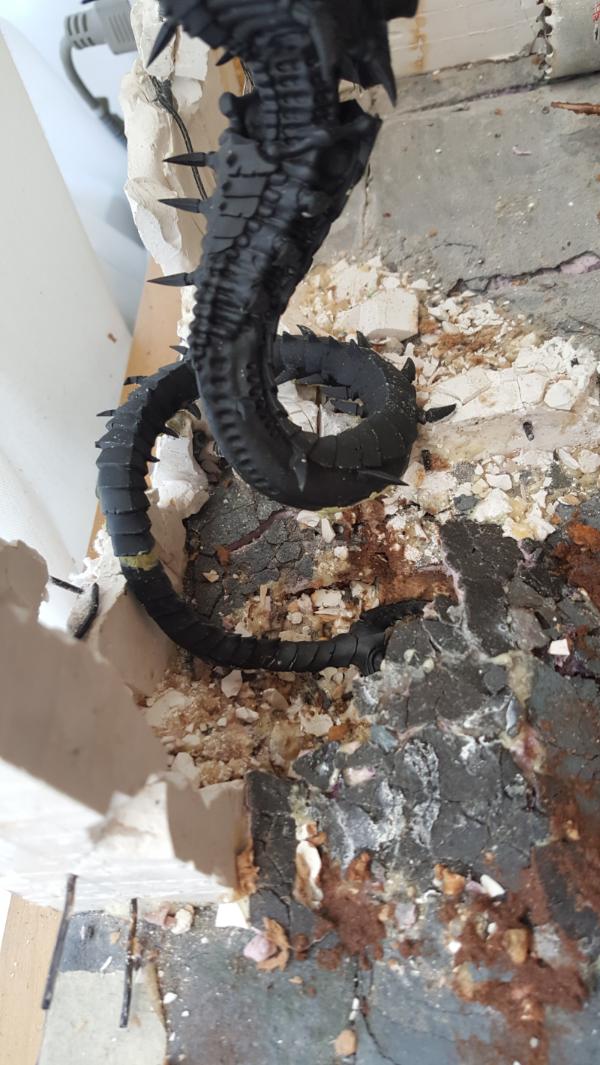
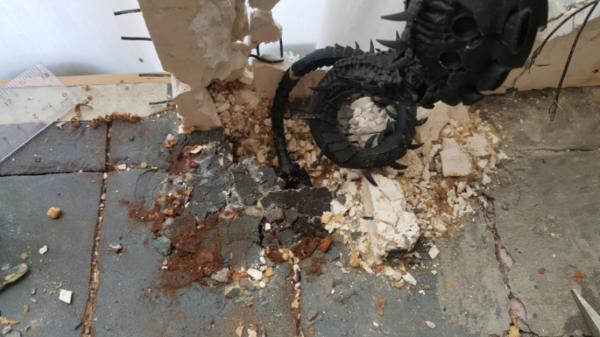
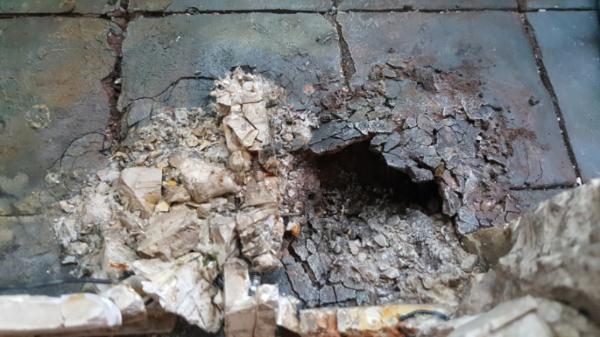
. So like with the other "nids coming from the ground" crater I wanted to build a tunnel for the mawloc to come out of. Its a good way to hide my relative lack of depth and gives a better feeling of the big guy coming out of the ground and causing lots of damage.
So lets do a little timelapse of me making it!

Now even with liberal use of gorilla glue the tunnel "roof" that I had built was.. a touch flimsy. Definitely one of those things that seemed like the first actual dropped model it might collapse it, so I decided to just shove in some wire supports as far as they'll go. Turns out that worked pretty well at stiffining it up.
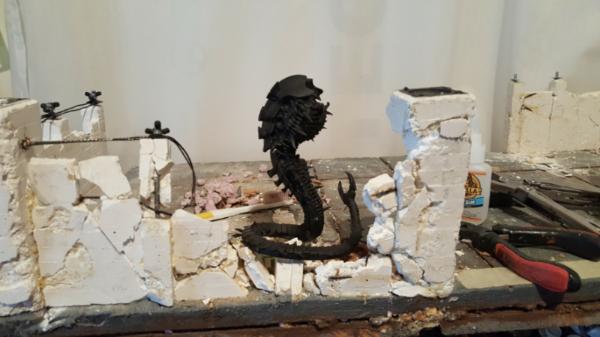
Turned out pretty deep! Im happy. There will be black/water/etc in the back there to develop the depth even further.
I also started working to bend the tail down into the hole:
|
|
This message was edited 1 time. Last update was at 2017/05/03 18:54:54
|
|
|
|
|
2017/05/04 21:11:18
Subject: Re: Multi-level city terrain, marine v nid bases (5/4: Flyrant attacks WIP 1)
|
|
Dakka Veteran
|
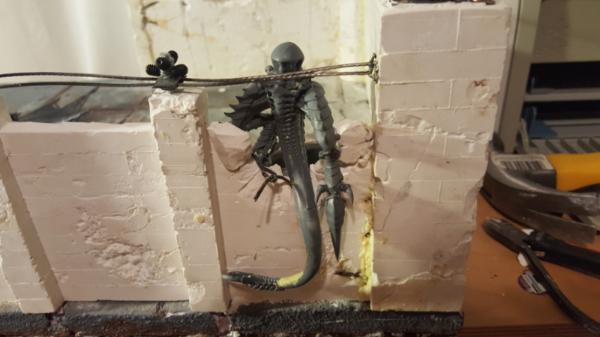
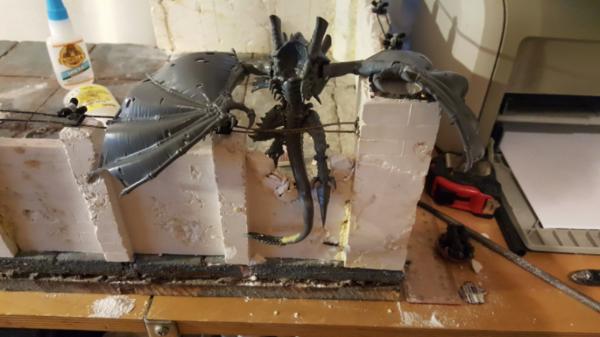
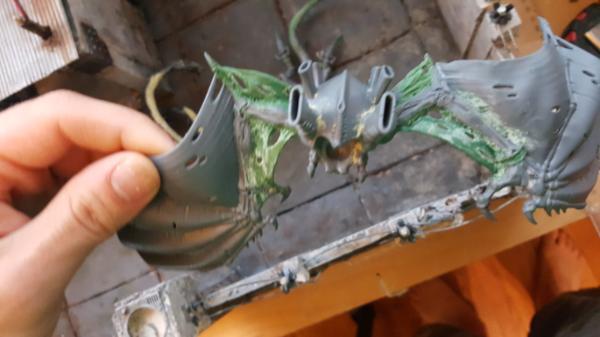
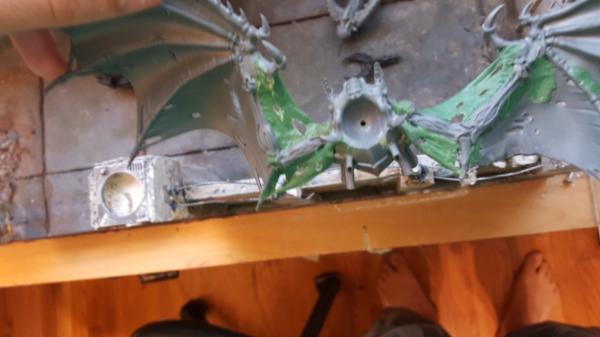
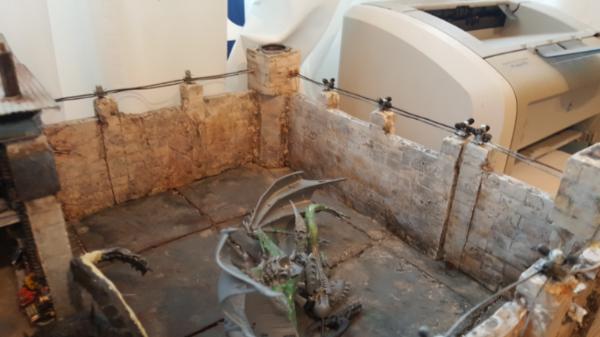
So with the Mawloc portion basically done conceptually it's time to figure out the flyrant attacking the other side and get that pose figured out before I start painting.
First upw as trying to figure out a good leg position. the wingspan on flyrants really are huge, so I need this guy to hug the edge as much as possible. Ideally that means his left wing (screen right) is wrapped aroudnt he pillar and ripping off the turret there.
I think the pose worked pretty well but I need to figure out the tail a touch better. Still, pretty good.
Next was working on the left arm. I had to cut it off to repose it, which also meant taking out some of the small wing bits. They should relatively easy to re-green stuff though.
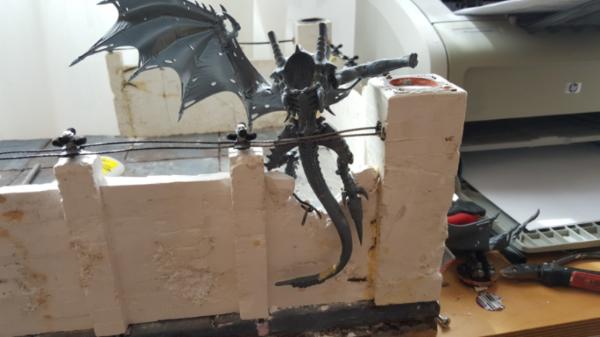
Next up was re-attaching the wing:
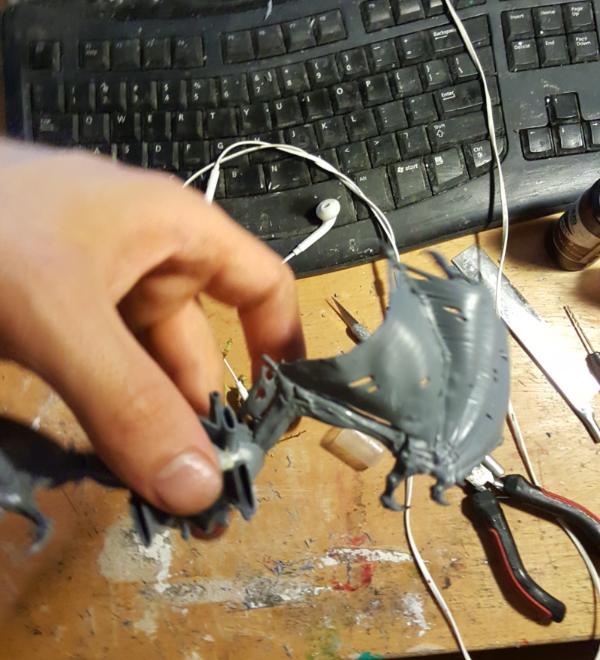
I then curled the wing a bit with heat.. carefully and hey the pose works! THe wing sticks out a touch more than i'd like but I'm hesitant to heat it more. Stuff like claws start shrinking if i am not perfect in my positioning of the soldering iron.
The right wing though is a bit wierd like that, so i might cut it off too. Blergh.
|
|
|
|
|
|
2017/05/04 21:26:33
Subject: Multi-level city terrain, marine v nid bases (5/4: Flyrant attacks WIP 1)
|
|
Ragin' Ork Dreadnought
|
It looks kind of like it's landed awkwardly and is trying to haul itself into a better position. With all the work you've done with one wing, the unmodified one looks pretty stiff and static by comparison. Sorry to advocate for more work for you.
|
|
This message was edited 1 time. Last update was at 2017/05/04 21:26:55
|
|
|
|
|
2017/05/04 21:52:33
Subject: Re: Multi-level city terrain, marine v nid bases (5/4: Flyrant attacks WIP 1)
|
|
Dakka Veteran
|
Yeah the other wing is.. going to get changed.
|
|
|
|
|
|
2017/05/05 06:01:46
Subject: Multi-level city terrain, marine v nid bases (5/4: Flyrant attacks WIP 1)
|
|
Pious Palatine
|
This is brilliant. I found the info about the casting process really fascinating , although it's probably not something i'll ever try.
The results are certainly fantastic though.
EDC
|
|
|
|
|
2017/05/05 09:04:05
Subject: Multi-level city terrain, marine v nid bases (5/4: Flyrant attacks WIP 1)
|
|
Agile Revenant Titan
|
Man those Marines are all kinds of screwed aren't they?
Looking great man
|
|
|
|
|
|
2017/05/06 00:54:44
Subject: Re: Multi-level city terrain, marine v nid bases (5/5: Flyrant attacks II, better R-wing)
|
|
Dakka Veteran
|
RE: evildrcheese. Try it you should! It's surprisingly not *that* time consuming comparatively speaking. For example, if you just wanted to cast some straightforward wall segments for use in a generalized way thats a lot easier. I onyl ran into problems cleaning the legos because I had to A: take apart the mould each time to pull out my wires to firmly attach wall segments and B: had a lot of different sized walls.
Given how strong it is (with rebar/any sort of mesh inside to protect againts cracking) its well worth it for durable terrain.
RE: ynnead yep! they totally are. The original "story" of this was to have the very screwed marines so desperate that they are calling up demons to help them, and the demon they get is Crowley. So it's marines that are... quickly becoming chaotic good paired with demons that are chaotic neutral at best. I had a really great all white/burning ashen wings scheme for my demons. Very classic fallen-esque. Now that summoning will likely go away that storyline isnt as needed but its still one to keep around.
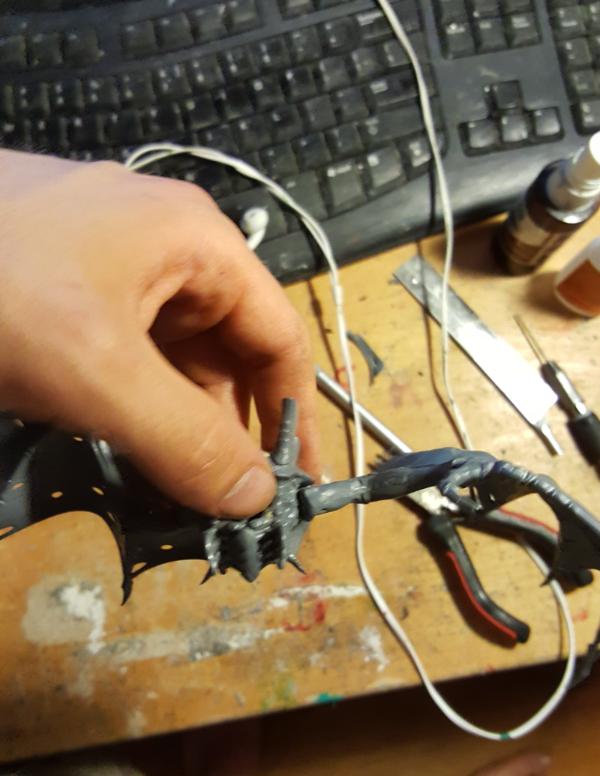
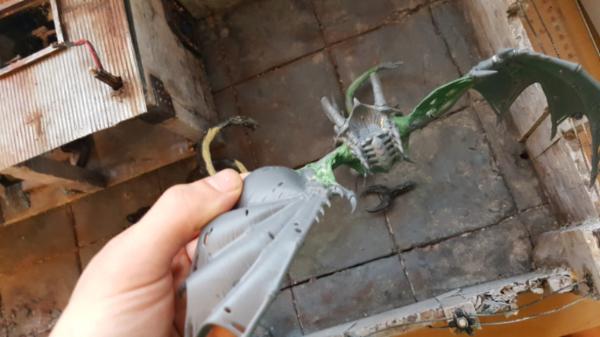
Anyhoo, time to fix that right wing.
I pretty much just cut it off and pulled it down and it worked pretty well, no need to try and heat warp it into a curve and risk the talons.
I pulled it over as far as possible so the hand is resting on that fence post. I'll probably cut at least one of the lines to make that easier to pull off.
Next up is the tail, it's not bad per say but it would be nice if it was DOING something. I figure slight bending and it will be embedded into the post, ripping it apart.
|
|
|
|
|
|
2017/05/08 20:31:32
Subject: Re: Multi-level city terrain, marine v nid bases (5/8: Flyrant attacks p3 and painting my walls p1)
|
|
Dakka Veteran
|
So now its time to tweak the tail! One thing I watned to add was have it digging into the concrete some, so its a bit more active than just hanging there. Bending it was.. difficult however. Its so thick it didnt respond to heat quickly and unfortunately I accidentally melted one of the foot claws by just being close to it! So.. i had to swap it out for the rear one. Ugh. Still, i ended up with ad ecent enough bend to make this "good enough".
With that we're in decent shape. Now I gotta start green stuffing the wing bits I cut off and also painting up my walls.
So hey look! paint! Now for this I did have more detailed accounts, including what NOT to do (ie: it takes washes VERY heavily so go even lighter than you expect). So I was feeling pretty good, fairly in control of the colring and seemed like I was closing in to the final look much faster and better.
Until I compared it to the garage and went "well.. crap"
Not only is it darker but its just fundamentally bluer and more concretey instead of white marble. So.. in other words.. I basically got to do everything about what I did before all over again. Wash the entire surface darker than it should be, only to bring it back with heavy drybrushing/white washes that tint it more concrete blue-grey.
Now I just gotta remember what every so slightly off-white mixture I used to blue this up...
|
|
|
|
|
|
2017/05/09 18:42:14
Subject: Re: Multi-level city terrain, marine v nid bases (5/8: Flyrant attacks p3 and painting my walls p1)
|
|
Dakka Veteran
|
While I moan and groan slowly washing and drybrushing my walls... lets do some greenstuff.
We're back to the real deal and boy was it good timing. The other stuff I was using was so crumbly it could never work for these wings, I needed something flexible.
Pretty basic. Im still "meh" on sculpting but I know that these will be my brown shiny orange/green look, so hopefully that hides imperfections in this.
|
|
|
|
|
|
2017/05/10 20:49:36
Subject: Re: Multi-level city terrain, marine v nid bases (5/10: left side concrete wall painting work)
|
|
Dakka Veteran
|
SO back to painting, mostly just working on the walls and getting them to line up with the garage better. Lots of wash then drybrush then wash on the bottom over and over. Its taking a whil ebut we're getting there and its getting some good richness in color as a result.
I'll do some pics of my paints in a bit, unfortunately some of them end up being home brew mixtures but you'll recognize the washes at least.

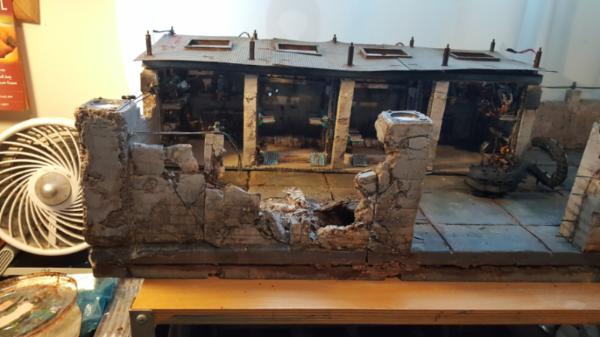
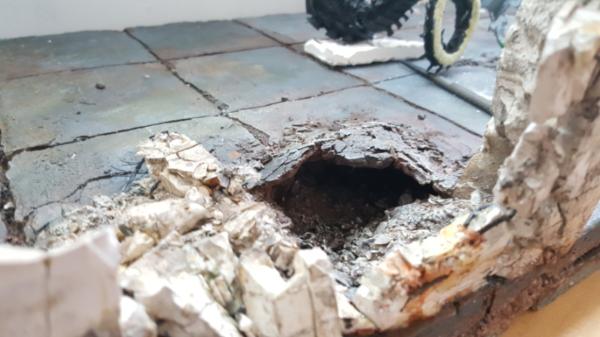
The tunnel is also coming along well:
Gets nice and dark in there:
|
|
|
|
|
|
2017/05/11 13:11:28
Subject: Multi-level city terrain, marine v nid bases (5/10: left side concrete wall painting work)
|
|
[SWAP SHOP MOD]
Robot Cat
OH-I Wanna get out of here
|
Man, that wall looks great. Would never have guessed it started life as Legos.
|
|
|
|
|
2017/05/11 23:12:55
Subject: Re: Multi-level city terrain, marine v nid bases (5/11: right side concrete wall painting work)
|
|
Dakka Veteran
|
Thanks! Lego casting is my new favorite. Despite the.. problems cleaning them.
Next up, work on the right side! man this is a lot of wall...
|
|
|
|
|
|
2017/05/12 23:43:55
Subject: Re: Multi-level city terrain, marine v nid bases (5/12: front edge cleanup)
|
|
Dakka Veteran
|
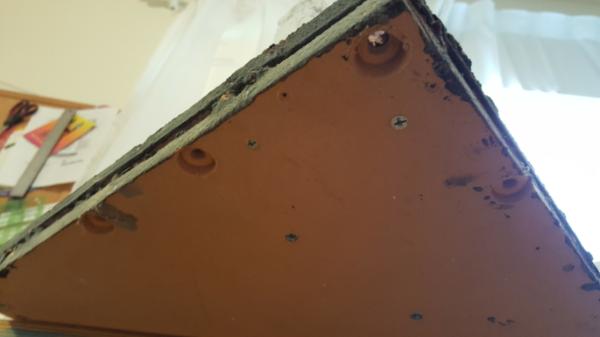
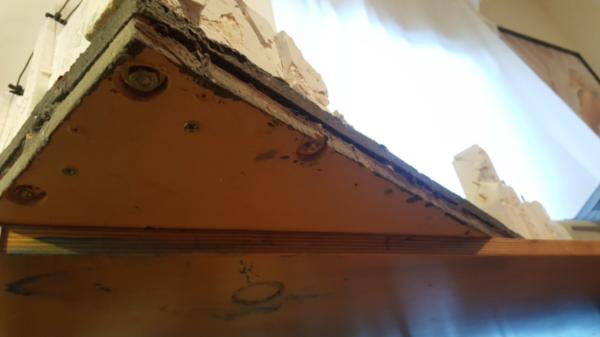
So before I really start attaching things for good I want go go ahead and tackle a relatively straightfoward cleanup step that will really help make things look better: the front edge.
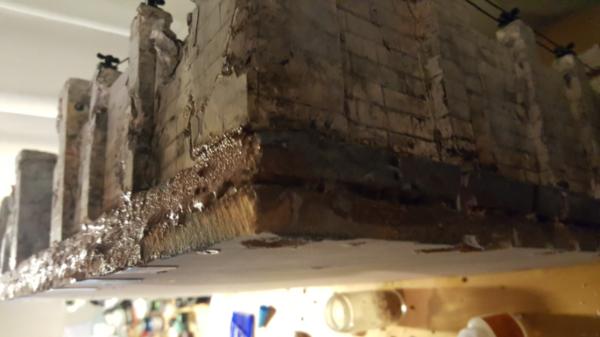
I dont have a good picture of the before but you can see it here:
or on the side here:
Basically it's that gap between the foam/foam coat andt he wood underneath. Its where cork was to show the dirt layer originally but over time/scrapes/etc its just become more of a gap. This was further exacerbated when I drilled in the holes to mount the walls a lot of the foam got punched through. So its time to fill that all in, at least for the front side.
Since the front wall is permenent, I also figured I'd go ahead and fill int he drill holes for the bolts underneath. So I quickly cutout some plastic, added lots of blobs of Gorilla glue and water.. and went to town. Then for the crack itself just.. a lot of gorilla glue, rocks, and coatings of my mud mixture (superfine sand + wood glue)

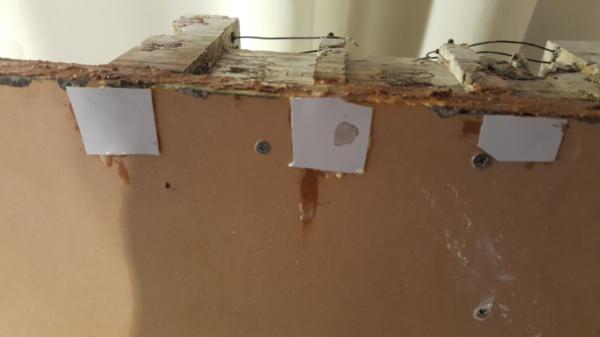
Since the Gorilla glue expands so much I had to watch out for mud bubbles but otherwise it was just a waiting game.
And now I have a much sturdier and cleaner front edge. Still needs to paint it up with drybrush/washes of browns but the texture is correct. No wood or foam showing:
|
|
|
|
|
|
2017/05/13 00:17:41
Subject: Multi-level city terrain, marine v nid bases (5/12: front edge cleanup)
|
|
Agile Revenant Titan
|
Wow that's looking phenomenal with paint on you've done a brilliant job with those.
|
|
|
|
|
|
2017/05/15 22:35:10
Subject: Re: Multi-level city terrain, marine v nid bases (5/15: adding steel connecting plates to my wall)
|
|
Dakka Veteran
|
Thanks!
One thing I realized would help was adding in the steel t-plates I did on the garage. It really helped give some contrast to the wall of concrete and made it feel more real. So I figured I'd do that here too!
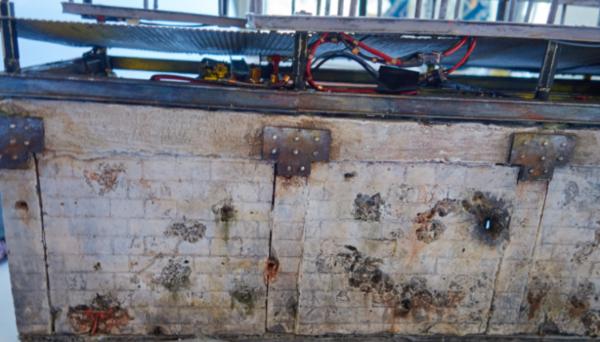
First up, making the plates. I sized them to match the ones from the garage.
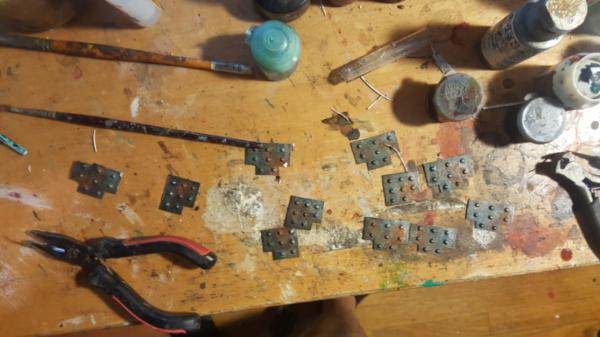
Unfortunately if you look at the garage those plates are for the bigger beams. Not the smaller joints. So when you apply the same sized plate there it just.. dunno, it was too big.

So I cut them down pretty much right to the bolt, no more excess:

That worked a lot better.
|
|
|
|
|
|
|
|
