| Author |
Message |
 |
|
|
|
|
Advert
|
Forum adverts like this one are shown to any user who is not logged in. Join us by filling out a tiny 3 field form and you will get your own, free, dakka user account which gives a good range of benefits to you:
- No adverts like this in the forums anymore.
- Times and dates in your local timezone.
- Full tracking of what you have read so you can skip to your first unread post, easily see what has changed since you last logged in, and easily see what is new at a glance.
- Email notifications for threads you want to watch closely.
- Being a part of the oldest wargaming community on the net.
If you are already a member then feel free to login now. |
|
 |
2014/05/03 19:01:19
Subject: Ramblings of a novice modeler . . . 5/19/14
|
|

Boosting Ultramarine Biker
Maryville, TN
|
***EDIT***
Had a mod move this from the P&M Forum...going to try to mirror my blog on this forum going forward . . .
So I'm putting together my first ever mini...I went with the 10 man Space Marine Tactical Squad. So far so good on the very first model, he's glued up and it went pretty damn good for a first shot. My biggest issue was getting the Boltgun and arms glued up. I ended up trying to do all 3 at once and of course got a bit of plastic cement in places it shouldn't be, but I think I can take care of that with a bit of targeted filing and smoothing. 
I think on the next model I'm going to try to start with one arm, then get the other arm to match up with it. It also through me off that when you do finally get the arms lined up and holding the Boltgun properly, the joints where the arm meets the torso are not flush, I had to glue mine with gaps to get it all to line up correctly although after gluing on the Shoulder Pads and all, the joints do seem very strong after setting up completely. I think it's a bit tricky to get the gun lined up with the butt joint where the trigger hand meets the gun, so I'd love to hear what you modeling veterans do at this stage. I'm also horribly paranoid that I should be leaving the gun and arms off and do them after I get through painting the chest and areas that will be behind the Boltgun...but the whole idea of doing this in stages stresses me out a bit. In my mind I'd like to have an assembled model to paint rather than having to worry about getting paint on glue areas, and glue on finished paint etc . . . But I'd love to hear otherwise if you feel there is a better way. So...leave the gun off and add it later...or assemble 100% and then paint? Painting around and behind the Boltgun worries me a bit though.
So basically, what is your favorite way to complete the arms and Boltgun on a Space Marine? I'd love to hear some techniques.
|
|
This message was edited 4 times. Last update was at 2014/05/19 18:56:27
|
|
|
 |
|
2014/05/03 19:40:13
Subject: Re:Help a noob! :)
|
|
Sword-Wielding Bloodletter of Khorne
|
My process for assembling/finishing a space marine with a two-handed gun and no CCW, which I am in no way asserting is the best method but it works for me:
1) take the bits off the sprue with clippers, make sure to leave some excess flash on the bit because it's better to just file that off than clip a chunk out of your mini
2) if there are any pieces I anticipate being difficult to file for mold lines while assembled, I file them
3) glue the legs to base*
4) put torso halves together, then glue torso to legs
5) glue the head on. note than when gluing on the torso and head, you have an overall pose in mind, ie how you will pose the arms later
6) glue on backpack
7) remove all mold lines
8) paint it so that you can paint the chest, especially aquilas, without a boltgun in the way
9) with the sharp end of your file, carefully scratch the paint off the parts of the torso that you will be gluing the arms onto so that it's bare plastic, this way your plastic glue can work like it's supposed to
10) paint arms
11) put a coat of paint on the rim of the base, and also a bit of paint onto the top of the base around the edges. this is so that when you base your miniature with sand, grass, etc, there won't be a glaring black line of untextured/unpainted base between the rim and textured parts
12) base your miniature
12) go over the rim with more paint to taste
13) spray seal
14) voila
Since this is your first mini, hopefully some of these tips will save you from a bunch of goofups I made.
*Many people always decorate their bases before gluing the mini on, and it is hard to get around the feet/shin armor with glue, so depending on what you're trying to do your mileage may vary.
|
“Idleness is the enemy of the soul; and therefore the brethren ought to be employed in manual labor at certain times, at others, in devout reading.”
― St. Benedict of Nursia, The Rule of Saint Benedict
 The Mendicants Polaris, Chaos Warband, Deviant Sect of Word Bearers The Mendicants Polaris, Chaos Warband, Deviant Sect of Word Bearers  |
|
|
|
|
2014/05/03 19:45:20
Subject: Re:Help a noob! :)
|
|
Huge Hierodule
United States
|
 ZultanQ wrote: ZultanQ wrote:My process for assembling/finishing a space marine with a two-handed gun and no CCW, which I am in no way asserting is the best method but it works for me: 1) take the bits off the sprue with clippers, make sure to leave some excess flash on the bit because it's better to just file that off than clip a chunk out of your mini 2) if there are any pieces I anticipate being difficult to file for mold lines while assembled, I file them 3) glue the legs to base* 4) put torso halves together, then glue torso to legs 5) glue the head on. note than when gluing on the torso and head, you have an overall pose in mind, ie how you will pose the arms later 6) glue on backpack 7) remove all mold lines 8) paint it so that you can paint the chest, especially aquilas, without a boltgun in the way 9) with the sharp end of your file, carefully scratch the paint off the parts of the torso that you will be gluing the arms onto so that it's bare plastic, this way your plastic glue can work like it's supposed to 10) paint arms 11) put a coat of paint on the rim of the base, and also a bit of paint onto the top of the base around the edges. this is so that when you base your miniature with sand, grass, etc, there won't be a glaring black line of untextured/unpainted base between the rim and textured parts 12) base your miniature 12) go over the rim with more paint to taste 13) spray seal 14) voila Since this is your first mini, hopefully some of these tips will save you from a bunch of goofups I made. *Many people always decorate their bases before gluing the mini on, and it is hard to get around the feet/shin armor with glue, so depending on what you're trying to do your mileage may vary.
This is good, but I do things slightly different. I base the model before painting as it removes the possibility of accidentally of accidentally getting glue on your painted model. Not to mention, you don't just put the basing material on the base. You also paint it. I also clean all mold lines off before assembly as they tend to be easier to get to. Oh, also, he skipped a big step: priming.
|
|
This message was edited 1 time. Last update was at 2014/05/03 19:45:56
|
|
|
|
|
2014/05/03 19:52:52
Subject: Help a noob! :)
|
|
Boosting Ultramarine Biker
Maryville, TN
|
Thanks for the reply, looking over your checklist I think I did many of them on my first mini.
I did get too close on 2 of the clips I made...not too bad though. I actually removed mouldlines and filed all the pieces prior to assembly, which is maybe why it took me so long to get my first model built. (about 3 hours glued up) Heh.
I still worry about trying to glue around a finished paint, I know I'm going to hate trying to paint around that Boltgun, and I also know that I am going to muck up my paint work trying to glue one pieces after the fact. Hmmmm....I hate decisions into the unknown.
|
|
|
|
|
2014/05/03 19:53:45
Subject: Re:Help a noob! :)
|
|
Sword-Wielding Bloodletter of Khorne
|
 Darth Bob wrote: Darth Bob wrote: ZultanQ wrote:My process for assembling/finishing a space marine with a two-handed gun and no CCW, which I am in no way asserting is the best method but it works for me:
1) take the bits off the sprue with clippers, make sure to leave some excess flash on the bit because it's better to just file that off than clip a chunk out of your mini
2) if there are any pieces I anticipate being difficult to file for mold lines while assembled, I file them
3) glue the legs to base*
4) put torso halves together, then glue torso to legs
5) glue the head on. note than when gluing on the torso and head, you have an overall pose in mind, ie how you will pose the arms later
6) glue on backpack
7) remove all mold lines
8) paint it so that you can paint the chest, especially aquilas, without a boltgun in the way
9) with the sharp end of your file, carefully scratch the paint off the parts of the torso that you will be gluing the arms onto so that it's bare plastic, this way your plastic glue can work like it's supposed to
10) paint arms
11) put a coat of paint on the rim of the base, and also a bit of paint onto the top of the base around the edges. this is so that when you base your miniature with sand, grass, etc, there won't be a glaring black line of untextured/unpainted base between the rim and textured parts
12) base your miniature
12) go over the rim with more paint to taste
13) spray seal
14) voila
Since this is your first mini, hopefully some of these tips will save you from a bunch of goofups I made.
*Many people always decorate their bases before gluing the mini on, and it is hard to get around the feet/shin armor with glue, so depending on what you're trying to do your mileage may vary.
This is good, but I do things slightly different. I base the model before painting as it removes the possibility of accidentally of accidentally getting glue on your painted model. Not to mention, you don't just put the basing material on the base. You also paint it. I also clean all mold lines off before assembly as they tend to be easier to get to.
Oh, also, he skipped a big step: priming.
These are good points, in step 8 when I said "paint it" I meant that to encompass all the various steps of painting since I was primarily just explaining assembly, but yeah, priming is very important. I personally just use GW undercoat and it works well enough for me.
And if you're going to paint your base then yeah, it's better to leave the mini off and base it first. I'm a huge fan of static grass and all the space marine bases in my army without bling are easily grassified. If you get glue/grass on the legs, it's easy enough to take it off with an old wet paintbrush.
|
“Idleness is the enemy of the soul; and therefore the brethren ought to be employed in manual labor at certain times, at others, in devout reading.”
― St. Benedict of Nursia, The Rule of Saint Benedict
The Mendicants Polaris, Chaos Warband, Deviant Sect of Word Bearers |
|
|
|
|
2014/05/04 18:01:35
Subject: Re:Help a noob! :)
|
|

Esteemed Veteran Space Marine
|
Just for my ten-pence, here's my own method of doing SMs - from assembly to painting. It's much the same as ZultanQ's method, but with differences regarding the order of gluing:
1. Remove components from sprue, taking care not to gouge bits off the parts (As ZultanQ mentions, leaving excess sprue is best for this)
2. Clean off all flash and mold-lines. Usually, I remove flash using a sharp scalpel, running it at an angle along the mold-lines and obvious flash. After this, I sand these areas smooth to ensure no visible marks are left.
Now, this is where my method diverges from ZultanQ's:
3. Using small amounts of Blu-tack, I join each component together. This allows me to see the finished product and identify any problem areas before they become a problem, as I haven't glued them in position.
4. When I'm satisfied with the pose, I then glue only minor components together. For example, on my last batch of SMs (Tac-squad) I glued the bolters to the arms whilst the pose was still in place to ensure they were orientated correctly. I also glued on any small pieces such as scopes, backpack icons, pouches/grenades, purity seals and crucially the torso halves. However, I didn't glue the legs, head, arms, pauldrons or torso (The complete section) together. This way, I can paint each piece separately, and get into all the nooks and crannies, without obstruction. Note: Gluing the pauldrons is optional - I find it's best to leave them off, but you may disagree.
5. Blu-tack the model back into the desired pose and onto a base. Adjust if necessary. Ensure the Blue-tack doesn't obscure any areas you wish to paint. If, like me, you use GW's textured paints with a wash and drybrush, your base doesn't have to be done by this point. However, if you create your own base and it needs priming, then make sure everything you want on your base is done before this point
6. Prime model in your desired colour (Grey, Black or White being the most common). This will also prime your base, so as per-last point, make sure your base is done BEFORE this point.
7. Disassemble the Blu-tacked components. If desired, Blu-tack them onto cocktail sticks so you can hold them, twist them etc. without smudging or scraping paint off.
8. Begin painting.
9. When fully painted and dried (Including your base), remove all Blu-tack and permanently glue all components into the desired pose.
10. Spray varnish your model, when dry - all done!
Now, my method is rather more involved than ZultanQ's, in the sense that it's far more effort to go to, but the upside is that it gives you plenty of opportunity to identify problems, re-adjust poses if you get a sudden flash of inspiration, ensures your primer gets into all the areas (Nothing worse than getting halfway through painting and finding an area isn't covered by priemer and the paint slides off!) and also gives you much greater flexibility when it comes down to painting fiddly areas.
|
|
|
|
|
|
2014/05/04 20:10:32
Subject: Re:Help a noob! :)
|
|
Boosting Ultramarine Biker
Maryville, TN
|
 Warpig1815 wrote:
Now, this is where my method diverges from ZultanQ's: Warpig1815 wrote:
Now, this is where my method diverges from ZultanQ's:
3. Using small amounts of Blu-tack, I join each component together. This allows me to see the finished product and identify any problem areas before they become a problem, as I haven't glued them in position.
I learned this the hard way on model #1. Did posing with Blu-Tack on the 2nd model and wow...much better!
Thanks for the reply!
|
|
|
|
|
2014/05/05 02:42:40
Subject: Help a noob! :)
|
|
Hurr! Ogryn Bone 'Ead!
|
I started painting a long time ago, and I still do things very similar to how you do them Demigod.
1. assemble space marine. legs, torso, right arm, gun, left arm, shoulders, head, backpack.
2. file off moldlines
3. add basing(optional)
4. paint.
5. add flock
If you really want to get the chest emblems, you could do the gun last, but I never really worried about it. It's not like anyone is going to see it anyway. Just try to get some paint on the parts you see.
Show some pics when you finish him!
|
|
|
|
|
2014/05/05 14:56:52
Subject: Help a noob! :)
|
|
Boosting Ultramarine Biker
Maryville, TN
|
 King Crow wrote: King Crow wrote:I started painting a long time ago, and I still do things very similar to how you do them Demigod.
1. assemble space marine. legs, torso, right arm, gun, left arm, shoulders, head, backpack.
2. file off moldlines
3. add basing(optional)
4. paint.
5. add flock
If you really want to get the chest emblems, you could do the gun last, but I never really worried about it. It's not like anyone is going to see it anyway. Just try to get some paint on the parts you see.
Show some pics when you finish him!
Yeah I've decided to build all the models in this first squad, then paint them later. I may go with a different process on later builds, like leaving off the gun etc, but for now going to go with this basic approach. It takes me a LONG time to get one model prepped and glued up (3+ hours lol), but I am in no hurry at all....I'm enjoying the learning process and each model teaches me new things for the next one. As of now I have 3 models complete, ready to undercoat....when I get all 10 models done I'm going to start the painting process. I also have a complete noob blog that is listed on the WWW links below....but for now here is what they look like:

|
|
This message was edited 1 time. Last update was at 2014/05/05 14:57:27
|
|
|
|
|
2014/05/05 19:04:19
Subject: Help a noob! :)
|
|
Hurr! Ogryn Bone 'Ead!
|
Nice work on drilling out the holes in the barrels of the guns. I never bothered with that either! Did you use a drill bit from a GW kit?
|
|
|
|
|
2014/05/06 01:51:02
Subject: Help a noob! :)
|
|
Boosting Ultramarine Biker
Maryville, TN
|
Thanks, I used the new Citadel drill with the included bits. They supply 2 each 1.0mm, 1.5mm, and 2.0mm.
I did the side ports with the 1.0mm and the main bore with 1.5mm on the bolters which does not leave much room at all. I was a bit stressed over ruining the gun when drilling it out, it has to go in perfectly straight but I like the look of the big bore.
|
|
This message was edited 3 times. Last update was at 2014/05/06 01:53:33
|
|
|
|
|
2014/05/06 06:28:47
Subject: Help a noob! :)
|
|
Hurr! Ogryn Bone 'Ead!
|
Oh it looks great, and more realistic too. Keep up the good work.
|
|
|
|
|
2014/05/06 08:39:50
Subject: Help a noob! :)
|
|
Blood-Raging Khorne Berserker
|
Never drilled holes into any of my weapons before, looks pretty good though.
Nice job too with gluing them together, had tiny bit of issue with CSM tactical squad in gluing them. Positioned and glued and when moved hand away, my guy's bolter came with me lol
|
 DarkMistro DarkMistro  
For my work & other source of 40K showing in game and models : https://www.youtube.com/user/DivisionZeroWoWAlive
Aiming to become Commissioned Painter, do please feel free to ask me about possible painting commissions and helping hands
 |
|
|
|
|
2014/05/06 13:29:03
Subject: Help a noob! :)
|
|
Boosting Ultramarine Biker
Maryville, TN
|
 DarkMistro wrote: DarkMistro wrote:Never drilled holes into any of my weapons before, looks pretty good though.
Nice job too with gluing them together, had tiny bit of issue with CSM tactical squad in gluing them. Positioned and glued and when moved hand away, my guy's bolter came with me lol
I had a bit of glue smear on my first marine as well. I tried to glue up the 2 arms and Bolter all at the same time and got some adhesive on my fingers which then got on one of the arms. I was able to file it away and I think it will paint up without issue...hopefully, but hey it was the first one!
On number 2 I posed the arms and bolter using Blu-Tack, to get the pose I liked and then I started my gluing, I'll never do another model without working on the pose first with Blu-Tack first. I did the tricky "butt joint" where the trigger hand meets the arm first, the two arms were still stuck to the torso with blu-tack which helped hold that glue joint in place while it cured. Then I glued the trigger arm to the torso and let it setup, then glued the other arm to the torso and to the boltgun where the hand supports the underside of the gun. This was a big improvement over my first attempt, the pose was easier and no glue mess!
|
|
|
|
|
2014/05/06 13:34:49
Subject: Help a noob! :)
|
|
Blood-Raging Khorne Berserker
|
May have to try that for next set of CSM tactical or Havoc squad i get myself.
Usually just see where about's they glue on and then position them before adding glue to them, after seeing where bouts they go, then I glue them together.
Think biggest worry gluing wise may encounter is going to be my next vehicle.
|
DarkMistro
For my work & other source of 40K showing in game and models : https://www.youtube.com/user/DivisionZeroWoWAlive
Aiming to become Commissioned Painter, do please feel free to ask me about possible painting commissions and helping hands
|
|
|
|
|
2014/05/06 13:43:32
Subject: Help a noob! :)
|
|
Boosting Ultramarine Biker
Maryville, TN
|
I haven't done a vehicle yet, but I plan to. I'm going to go with the Citadel "Thick" cement on the tank rather than than the "Thin" that I used on the Marines, which will leave a bit more time for the glue to cure, also going to use rubber bands to hold it together while it dries. But for now it's only troops.
|
|
This message was edited 1 time. Last update was at 2014/05/06 13:44:55
|
|
|
|
|
2014/05/06 13:45:40
Subject: Help a noob! :)
|
|
Blood-Raging Khorne Berserker
|
I've only done 3 vehicles so far, my two on Dark Eldar which is Venom and Raider. Then my newest which completed it and blog of it yesterday my Triarch Stalker .
But aye I'd recommend to you to stick with troops before tackling with vehicles lol Automatically Appended Next Post: But you do have the easier side with vehicle wise rhinos and vehicles with same build all have the same shape (part from sizes vary) so you got 4 huge panels to glue and then front 'n' back and then you got complete body done lol
only thing that needs bit extra glue time is the turrets and cannons that go along with it.
|
|
This message was edited 1 time. Last update was at 2014/05/06 13:56:42
DarkMistro
For my work & other source of 40K showing in game and models : https://www.youtube.com/user/DivisionZeroWoWAlive
Aiming to become Commissioned Painter, do please feel free to ask me about possible painting commissions and helping hands
|
|
|
|
|
2014/05/06 14:23:51
Subject: Ramblings of a novice modeler . . .
|
|
Boosting Ultramarine Biker
Maryville, TN
|
Had a mod move this from the P&M forum to the blog forum. I'm going to be posting a lot of progress over time so this seems to be the better option.
|
|
|
|
|
2014/05/06 14:31:35
Subject: Ramblings of a novice modeler . . .
|
|
Blood-Raging Khorne Berserker
|
Aha I see It is good place to have it, I know my blog one I did over three / four days of my Triarch Stalker was decent in some views got very nice response about it so you may get bright responses and things knowing it 
|
DarkMistro
For my work & other source of 40K showing in game and models : https://www.youtube.com/user/DivisionZeroWoWAlive
Aiming to become Commissioned Painter, do please feel free to ask me about possible painting commissions and helping hands
|
|
|
|
|
2014/05/06 15:39:27
Subject: Ramblings of a novice modeler . . .
|
|

Bane Lord Tartar Sauce
|
Hey, excellent work so far with your minis. The barrel hole drilling is a nice touch, but more importantly you've taken the time to scrape away the mold lines. Well done, sir!
Now, here's a piece of advice that will make your space marines go together a million times easier. Green stuff. When you're going to attach the arms, mix up a little ball of it. Now glue the arms into place, but put little balls of GS in the joints between the shoulders and torso, along with some glue. This will cause the arms to stick immediately (GS is slightly adhesive and sticky), but since the GS stays putty-like for a long time, you'll be able to reposition the arms as needed for a couple of minutes while you get your bits all into position.
One other thing I would recommend for you is to grab a little package of blue-tack from the office supply section of your local Wal-Mart or equivalent. This stuff is a modeler's dream come true, because it lets you test fit parts together in whatever configuration you want, without leaving any residue or damaging anything. It's like the post-it note of modelling.
|
|
|
|
|
|
2014/05/06 16:29:28
Subject: Ramblings of a novice modeler . . .
|
|
Boosting Ultramarine Biker
Maryville, TN
|
 bossfearless wrote: bossfearless wrote:Hey, excellent work so far with your minis. The barrel hole drilling is a nice touch, but more importantly you've taken the time to scrape away the mold lines. Well done, sir!
Now, here's a piece of advice that will make your space marines go together a million times easier. Green stuff. When you're going to attach the arms, mix up a little ball of it. Now glue the arms into place, but put little balls of GS in the joints between the shoulders and torso, along with some glue. This will cause the arms to stick immediately ( GS is slightly adhesive and sticky), but since the GS stays putty-like for a long time, you'll be able to reposition the arms as needed for a couple of minutes while you get your bits all into position.
One other thing I would recommend for you is to grab a little package of blue-tack from the office supply section of your local Wal-Mart or equivalent. This stuff is a modeler's dream come true, because it lets you test fit parts together in whatever configuration you want, without leaving any residue or damaging anything. It's like the post-it note of modelling.
Thanks for the kind comments sir. Yeah the mould lines were a long process for me, just finding them all trying to hide in the nooks and crannies, and then scraping and filing...but in the end it'll be worth it. Since I have yet to paint a single drop, I'm hoping that all my painting covers up the minute file marks left behind. I used the fine file with almost zero pressure so as to not blemish the surface too much...I think I'm doing it right.  I used the Citadel mouldline remover, then followed up with a fine file. I've never read anything about using Green Stuff the way you mentioned...very interesting will have to take a look at that. I did end up using Blu-Tack on my 2nd and 3rd models (shown here)
http://rudhammer40k.blogspot.com/2014/05/mounting-arms-and-boltguns.html
and wow...it was a game changer for me. I used a bit too much on my first go, but it still REALLY helped getting everything in place...I agree with you though...it is a modelers dream. I use it to stick the model to the table and then I use it to pose the different bits. Although my 5 year old daughter keeps stealing my Blu-Tack and my bases to mount her own toys!
Hey, thanks for the reply...love hearing from all the veterans around here....posting on these hallowed forums is a bit....daunting.
|
|
This message was edited 1 time. Last update was at 2014/05/06 16:36:28
|
|
|
|
|
2014/05/06 16:50:27
Subject: Ramblings of a novice modeler . . .
|
|
Bane Lord Tartar Sauce
|
If you want daunting, check out the link in my signature for a guide to putting LEDs into your space marine models.
|
|
|
|
|
|
2014/05/06 17:16:49
Subject: Ramblings of a novice modeler . . .
|
|
Hurr! Ogryn Bone 'Ead!
|
Nice work! I can see you've done some clean assembly and bonus for (neatly) drilling out the barrels! Now, I'm not sure how you plan on painting/base-coating whether it's by brush, spray can or airbrush - and how much detail you plan on getting on them, but may I suggest (at least for the next batch) to not assemble the whole model before painting? It will make some areas easier to reach, and can make the process go quicker in some cases. I spend a day just painting back packs, another day paint a squad's worth of blotters and arms, etc. Of course, we all have our methodology (and levels of OCD) so ultimately do what you like best. Hope to see more progress pics soon!
|
|
|
|
|
2014/05/06 17:18:02
Subject: Ramblings of a novice modeler . . .
|
|
Boosting Ultramarine Biker
Maryville, TN
|
Oh for the love of god...yeah challenging to say the least. Sounds fun though, I can really see this being nice on tanks too. Going to subscribe and come back to that at a later date, nice tutorial!
Automatically Appended Next Post:
 Kaiserbudheim wrote: Kaiserbudheim wrote:Nice work! I can see you've done some clean assembly and bonus for (neatly) drilling out the barrels! Now, I'm not sure how you plan on painting/base-coating whether it's by brush, spray can or airbrush - and how much detail you plan on getting on them, but may I suggest (at least for the next batch) to not assemble the whole model before painting? It will make some areas easier to reach, and can make the process go quicker in some cases. I spend a day just painting back packs, another day paint a squad's worth of blotters and arms, etc. Of course, we all have our methodology (and levels of OCD) so ultimately do what you like best. Hope to see more progress pics soon!
Thanks much. Hoping to get another built tonight, planning on doing the MK. VI Corvus model, and going to use the one that is slamming a magazine up into the Boltgun on this one. My game plan on painting as of now is; Mount the squad on a small board like a short yard stick, and base coat them using Chaos Black spray. Then I'm going to go through and paint up each model, individually this time around, and try to apply what I learn on each subsequent model. I did originally consider leaving off the bolter and arms to paint later, making painting the torso areas easier...which is actually why I started this post at first. After thinking about it some more, I decided to assemble 100% and paint afterwards, partly because I don't have paints or brushes yet. I figure I can try painting in stages on later models and decide which method I like better overall.
I do plan to go a bit nuts on paint, going to try to paint them to the best of my ability every time I paint a model....OCD creeping in. I don't plan on making some models table top and some better...just going for broke on all of them. Of course I may tire of that on down the line, but for now that is the plan...and of course I'm stressed on what to expect in terms of difficulty. Phase one for me though is the building process I am currently doing. Then I'm moving to paint, but I need some get some cash set aside first for the brushes...then the paint.
Going to go with edge highlighting for the most part, and some drybrushing on certain areas. To be honest almost everything I've planned has been taken from sources all over the web, and the Games Workshop manuals. I'm really digging White Dwarf for painting modeling tips, the new weekly mag is perfect for a beginner like me and I've picked all 14 issues. Right now this is my tentative paint list for my Ultramarines:
|
|
This message was edited 6 times. Last update was at 2014/05/06 19:01:57
|
|
|
|
|
2014/05/06 18:51:11
Subject: Ramblings of a novice modeler . . .
|
|
Blood-Raging Khorne Berserker
|
That is a long list of paints and other things surprised can remember to use them all lol
|
DarkMistro
For my work & other source of 40K showing in game and models : https://www.youtube.com/user/DivisionZeroWoWAlive
Aiming to become Commissioned Painter, do please feel free to ask me about possible painting commissions and helping hands
|
|
|
|
|
2014/05/08 15:05:25
Subject: Re:Ramblings of a novice modeler . . .
|
|
Boosting Ultramarine Biker
Maryville, TN
|
Mark VI Corvus Battle Plate!
I decided to build my next Marine equipped with MK VI Corvus armor, in the past I wasn't a huge fan of the "Beak" helmet but after building this model I really dig the look of it. I also used the alternate hand so he looks like he's getting ready to slam another full magazine in his Bolter.
I made a small mistake on the Purity Seal on the shoulder plate, it will interfere with the Ultramarine decal that will be placed on this shoulder guard. I'm going to have to cut it off and file it back down which shouldn't be too hard. This is the first model that may require a bit of Liquid Green Stuff to fix some errors.
One thing I noticed that I was missing in this unit are Grenades, which are standard armaments for Tactical Marines. This battle brother has both Frag and Krak grenades on hand ready to decimate foes that are closing in or behind barricades. These things are so tiny that I lost the first on on the floor, and almost lost another which I found after getting on my hands and knees using a magnifying glass. Going to head to the hobby shop today and pickup an hobby tweezers!
The elbow on this model had a small gash from getting a little "over zealous" with the clipper, this is the other spot I'll need some liquid greenstuff to fix.
And then there were four.
That's it for now, tonight I build number five which when added to the others will form my first 5 man squad. I think #5 will be wielding a Missile Launcher.
|
|
|
|
|
2014/05/19 18:55:58
Subject: Re:Ramblings of a novice modeler . . .
|
|
Boosting Ultramarine Biker
Maryville, TN
|
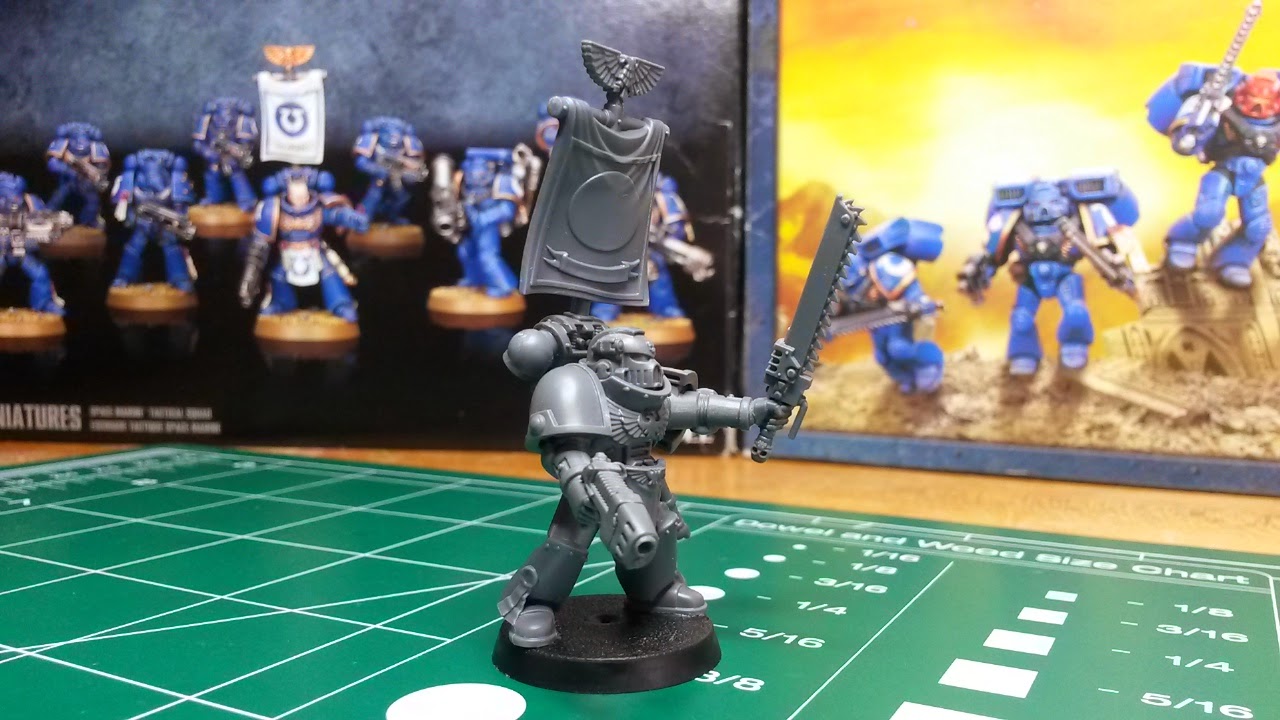
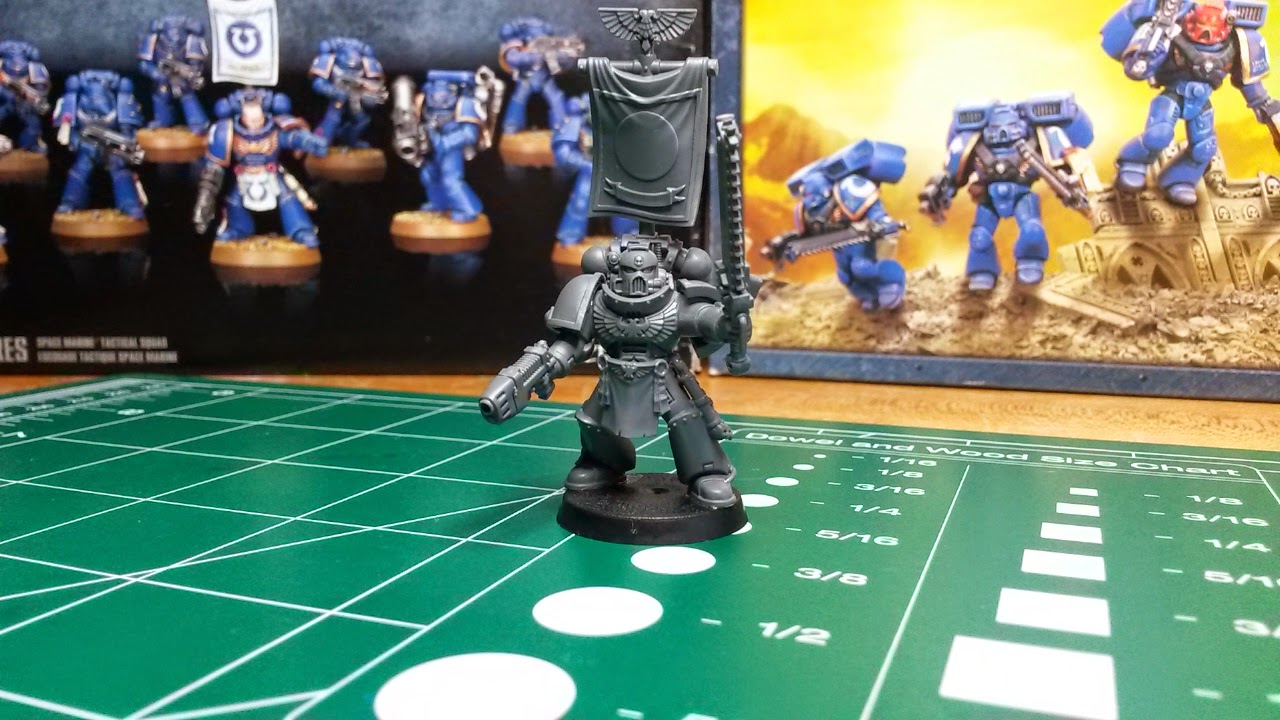
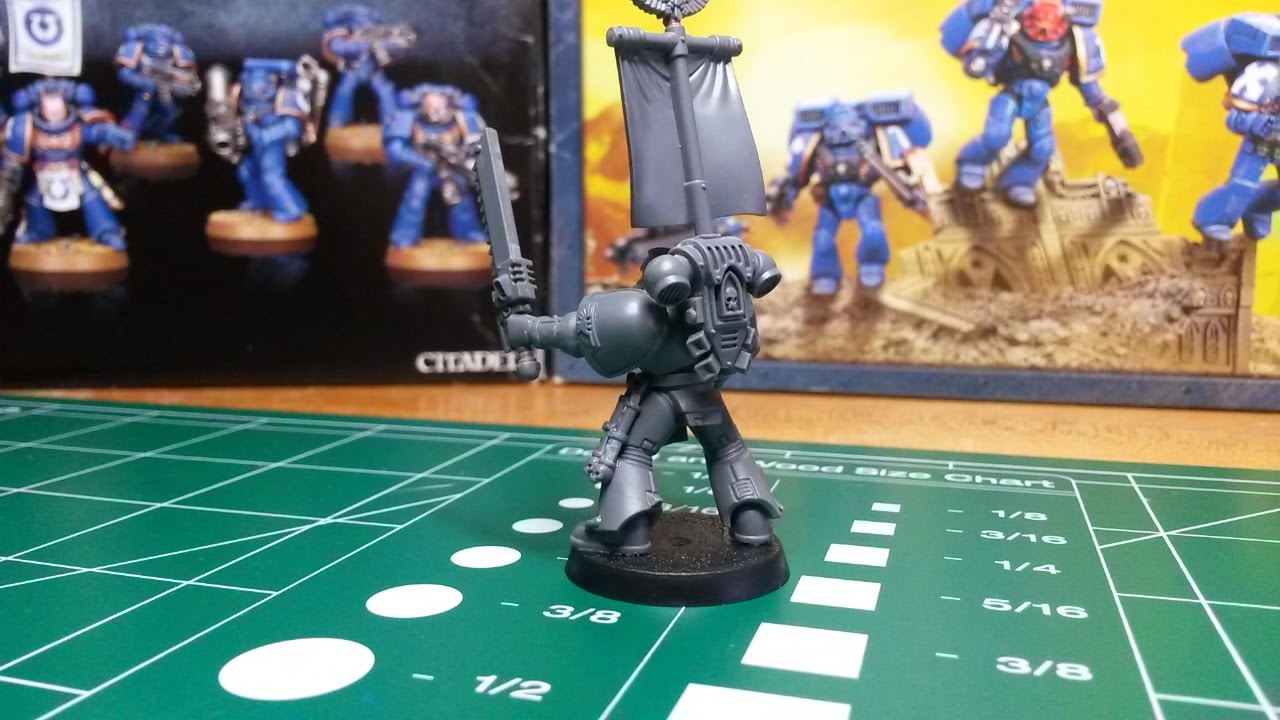
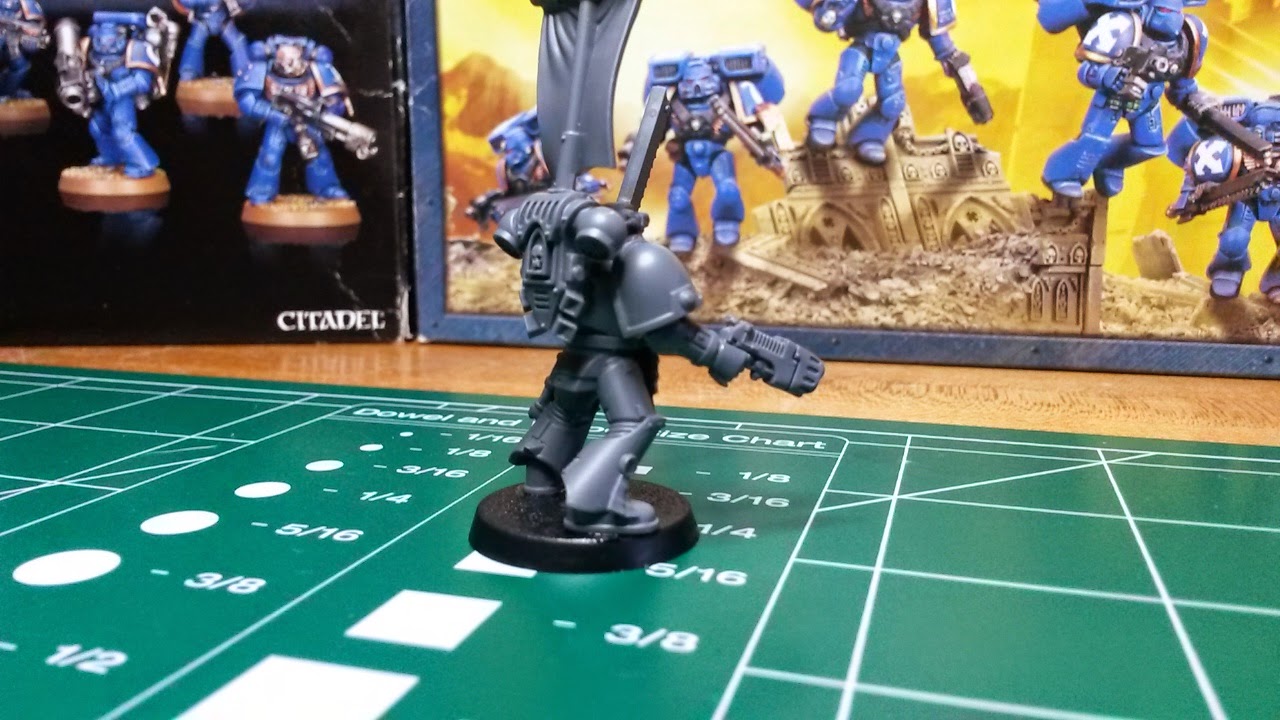
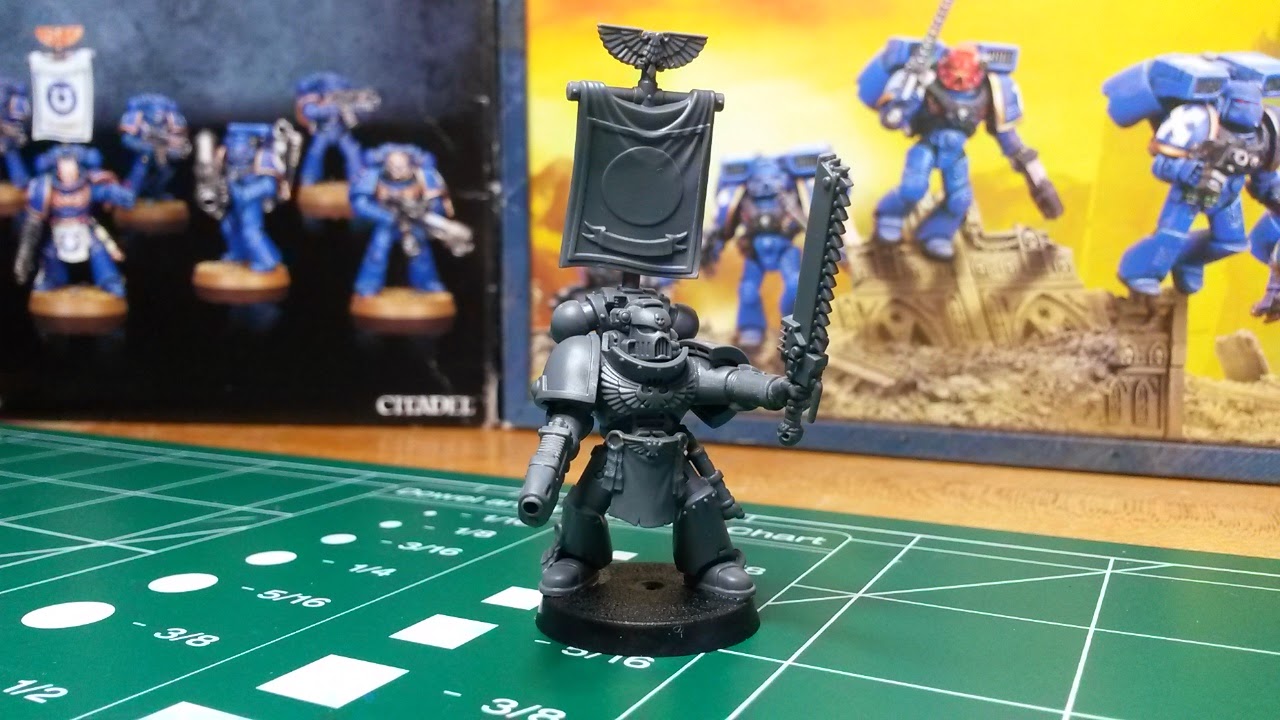
So I finally built my Sergeant, completing the first squad I've ever built. I really like the look on this model, it was fun to build and I'm glad I saved the Sarge for last, it really helped building the previous 9 Marines to get a handle on what it takes to get these things together.
I equipped my Sergeant with a Plasma Pistol and Chainsword, I really dig the look of the two weapons...not positive this is the best weapon load out, but right now it's mostly about having fun and learning to model. I also opted to mount the banner, I like banners, and it really makes him stand out amongst his battle brethren...I actually plan to mount all the Sergeant's with banners. He also wears a scroll case on his waist, Loincloth, and a backpack with a Relic insert for added effect. At any rate, love how it turned out and this will complete my first squad. I'm going to build a 5 man Assault squad next then I'm buying paints and brushes and starting that phase.
Nothing to exciting yet for you veteran builders, but a big milestone for me as a complete noob. So here he is:
|
|
This message was edited 2 times. Last update was at 2014/05/19 18:58:47
|
|
|
|
|
2014/05/19 19:01:33
Subject: Ramblings of a novice modeler . . . 5/19/14
|
|
Blood-Raging Khorne Berserker
|
That Sarge looks ready to take on anything that comes at him lol
|
DarkMistro
For my work & other source of 40K showing in game and models : https://www.youtube.com/user/DivisionZeroWoWAlive
Aiming to become Commissioned Painter, do please feel free to ask me about possible painting commissions and helping hands
|
|
|
|
|
|
|

 IMPOSSIBLE IS RELATIVE