| Author |
Message |
 |
|
|
|
|
Advert
|
Forum adverts like this one are shown to any user who is not logged in. Join us by filling out a tiny 3 field form and you will get your own, free, dakka user account which gives a good range of benefits to you:
- No adverts like this in the forums anymore.
- Times and dates in your local timezone.
- Full tracking of what you have read so you can skip to your first unread post, easily see what has changed since you last logged in, and easily see what is new at a glance.
- Email notifications for threads you want to watch closely.
- Being a part of the oldest wargaming community on the net.
If you are already a member then feel free to login now. |
|
 |
2013/09/03 20:16:58
Subject: Homemade FW-style realm of battle terrain boards/buildings (9/3 - adding LED lighting)
|
|

Executing Exarch
|
im interested in seeing the fan idea that sounds really cool...(sorry for the bad pun) but the lights on the board so far are my favorite
|
|
|
 |
|
2013/09/03 22:29:25
Subject: Re:Homemade FW-style realm of battle terrain boards/buildings (9/3 - adding LED lighting)
|
|
Dakka Veteran
|
A quick note on painting:
So I hadn't really started to think about how I planned on painting all this up yet. I'm most comfortable with just brushwork, so was planning on shying away from airbrushing (although the goal of this was to learn a lot i didnt need to add yet another unknown to this!) because it's relativly easy to hit a large area with brushwork.
My main concern was primering, and I wasnt sure if iw anted to start with just a flat latex paint or what.. because i would quickly burn through all my acrylics trying to just do a basecoat.
Then I stumbled upon this little beauty of a kickstarter:
http://www.kickstarter.com/projects/klingbeil/game-decors-paintworks-terrainpaint
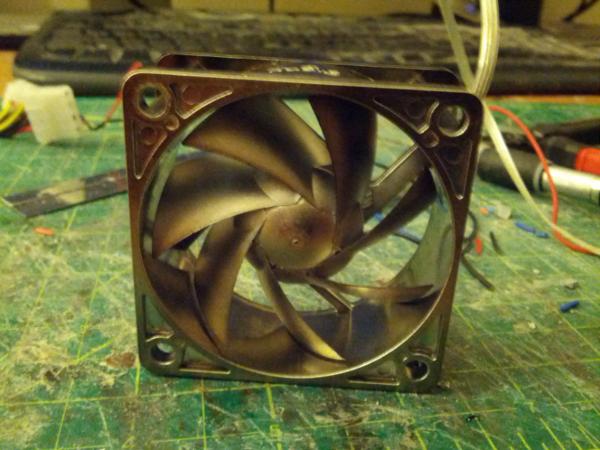
And that pretty much solves that. overall looks like a great way to get a good solid basecoat in, which is exactly the kind of problem I was having, where to get en masse cheap paint for basecoating without needing to primer first. My current color idea is to go with the "cavern stone kit" for the darker tiles and then the "fieldstone kit" for all the foundations that arnt going to be marble (aka: all of the sides/side smaller tiles that arnt the main face of the foudnation), but honestly I'll just get all 4 kits and then play around with the color schemes (would let me vary the foundation colors too, which could look pretty nice) Automatically Appended Next Post: as promised the board just lit with the leds!
We also ahve the fan i've been tinkering with:
|
|
This message was edited 1 time. Last update was at 2013/09/04 04:30:18
|
|
|
|
|
2013/09/05 22:36:26
Subject: Re:Homemade FW-style realm of battle terrain boards/buildings (9/3 - adding LED lighting)
|
|
Dakka Veteran
|
Quick update:
mostly just working now to blend the craters a bit more along the edges. So far i think
it's working well and definitely helping make them feel a bit more attached to the ground
I dont want to go too far though because I do like the concept that the crater shattered and threw
around whole plates/chunks of concrete, but in general it definitely helps, especially for the aquila. '
also the elmers spray adhesive has been invaluable here at getting everything to stick down

|
|
|
|
|
|
2013/09/09 18:33:13
Subject: Re:Homemade FW-style realm of battle terrain boards/buildings (9/3 - adding LED lighting)
|
|
Dakka Veteran
|
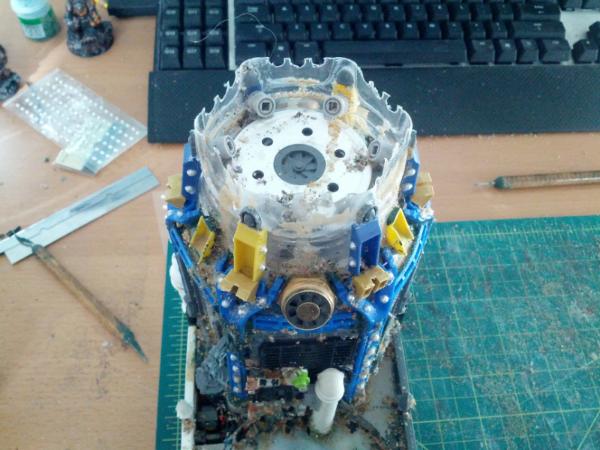
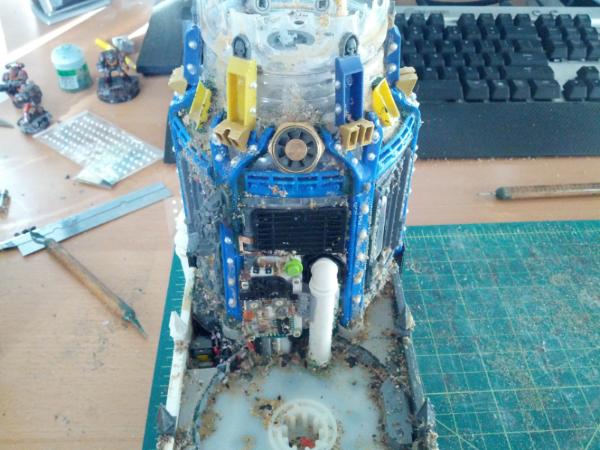
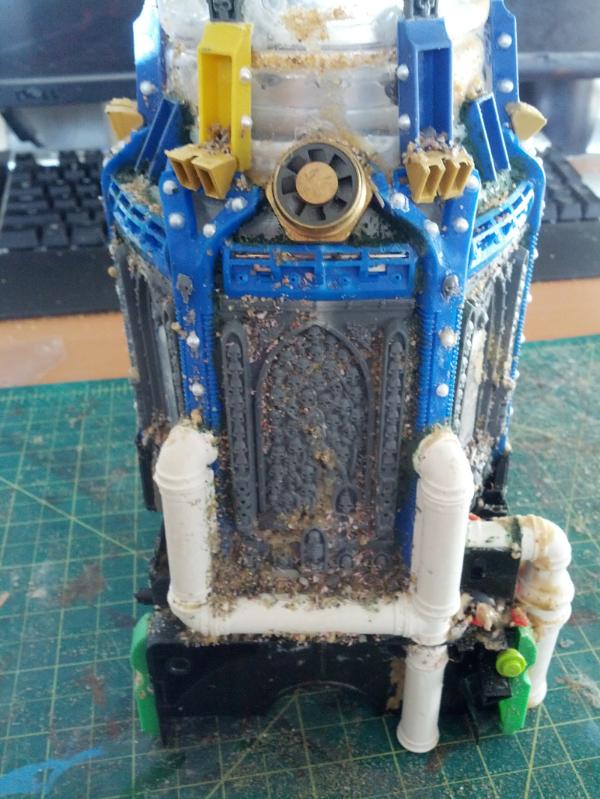
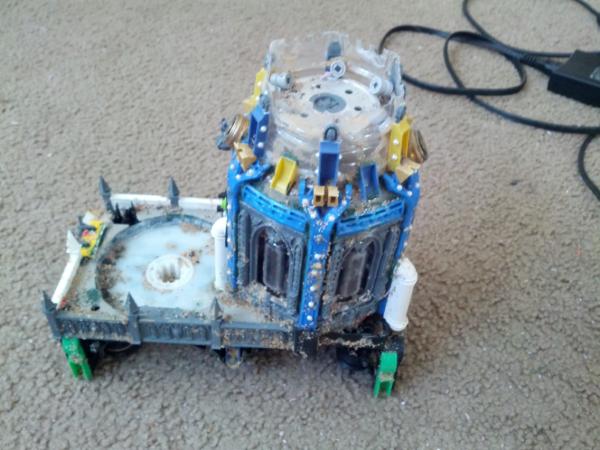
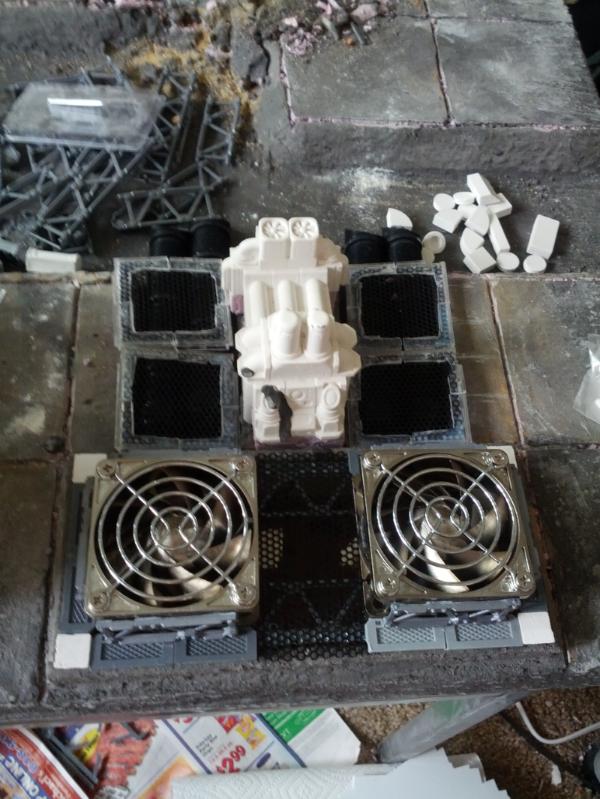
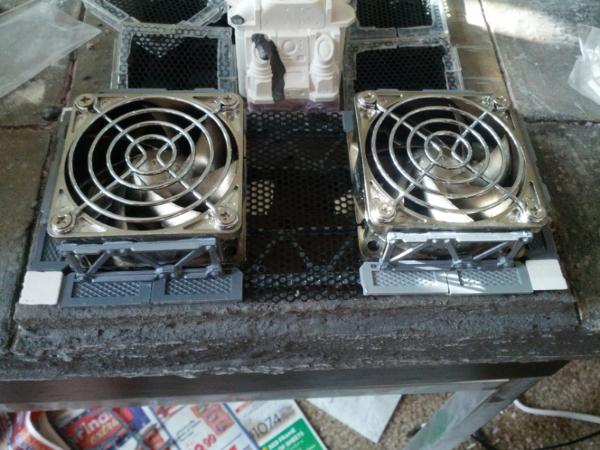
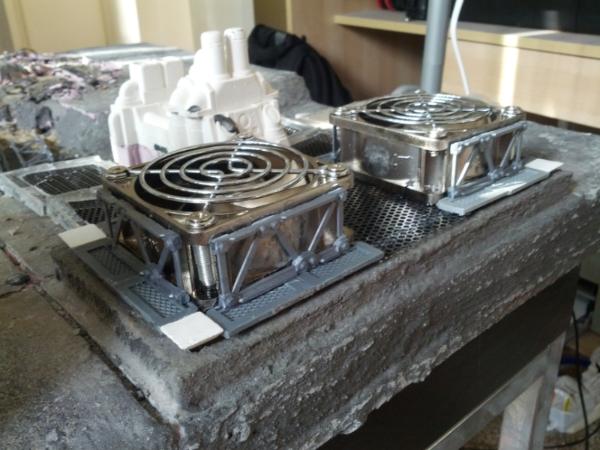
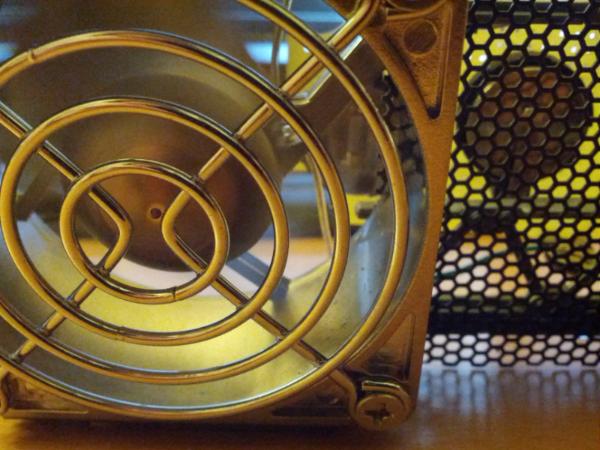
Finally have a plan for the fan section, so I took a break from smoothing out my edges to work on that
the basic form is there, still need to add some details/control panelling and figure out how im going to do the corners, but the basic idea is there.
Also the fans to work and can go nice and slwoly, ill show that circuit and do a tut for it next.
The pillars are there mostly for stability/able to work on it outside of the container.
|
|
|
|
|
|
2013/09/11 09:09:59
Subject: Homemade FW-style realm of battle terrain boards/buildings (9/3 - adding LED lighting)
|
|

Ambitious Space Wolves Initiate
|
Dear Sir,
I hope you will accept my compliments on your work. It is truly inspiring. Your dedication to your vision, your use of electronics and your realism are all things to which I find myself aspiring.
With Breathless admiration
The Guern
|
|
|
|
|
2013/09/11 16:34:05
Subject: Re:Homemade FW-style realm of battle terrain boards/buildings (9/3 - adding LED lighting)
|
|
Dakka Veteran
|
Thanks a lot! Now i just need to get it all done lol.
|
|
|
|
|
|
2013/09/17 03:39:00
Subject: Re:Homemade FW-style realm of battle terrain boards/buildings (9/16 - moving fans, detail work)
|
|
Dakka Veteran
|
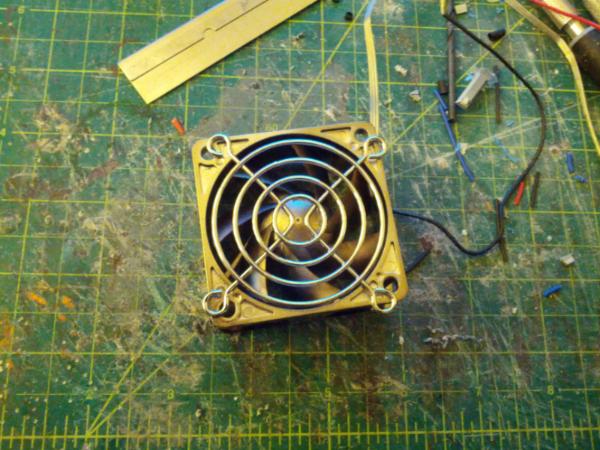
Heya guys so i got the circuit for the fans working and they very very slowly move!
Im pretty happy about it tho there is one, tiny flaw.. the 3 3volt penny batteries i got for them lasted abouuuut 10 minutes.
To be fair i had been testing with them so i probably was shorting them a lot, but it was still somewhat sad to see how fast it died.
A 9v might have more juice or something bigger/rechargable. Either way here is the basic tut of how do do your own:
The fans i got were these:
http://www.frys.com/product/5525440
They're small, look good for their size (they look like how a real fan would at that scale instead of most 60mm fans which ahve larger motors)
and go at a low rpm. More impotantly they can go suppppper slow.
Thru testing I figured out that they run perfectly fine off of 9 volts and have a resistance of something along the lines of 500 ohms at that.
Thus by getting a 500 ohm potentiometer I could, in theory, completely control how fast the fan moved (which turned out to be the case).
Furthermore I would also want a switch so I could turn the whole thing on or off at a whime. Ideally id also add some LEDs to this circuit
to make it all glow but that will have to be for revision 2.
The basic circuit diagram for this is thus:
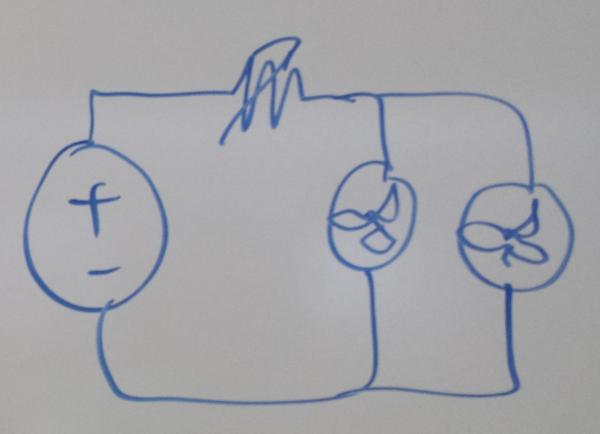
Note that this is missing a switch but you can just put it anwhere next to the potentiometer (squiggly line) or on the opposite side.
And this is our result on the board:
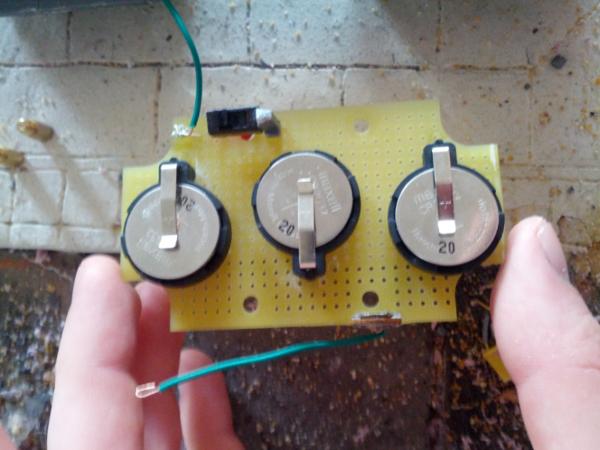

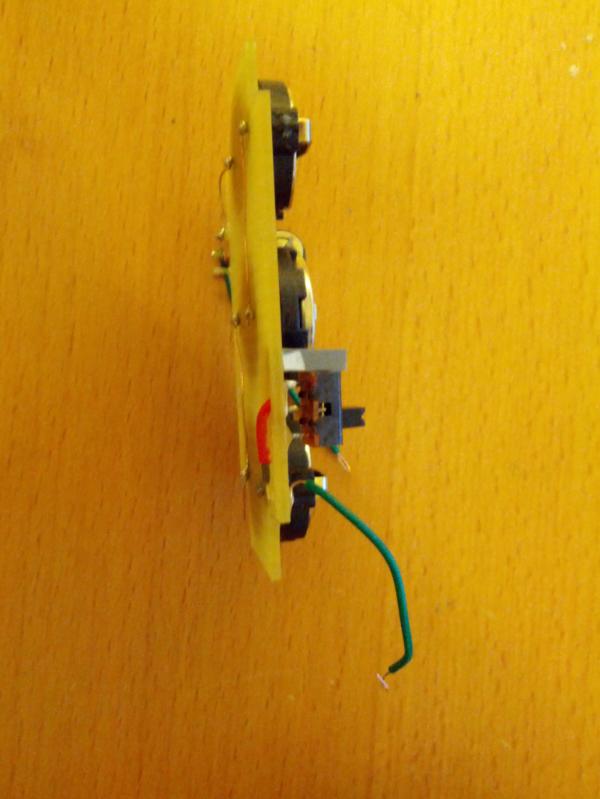
The batteries are all wired in series to stack up to 9 volts, the potentometer is on one side of the circuit (the wierd little circle thing with a minus side in the middle.
To adjust it you take a flat head, stick it in the middle and twist) and the switch on the other.
One CRITICAL thing is to test all this while you are doing it. THere is nothing worse than soldering something down and realizing that the act of doing so
just broke the ocnnection. make sure that every wire is twisted together and holds fast before soldering so that when you do it doesnt come apart from the
act of soldering. Also note that the fans do need to be in the right polarity to move, and also while testing always make sure ur POT is zeroed out so you dont
accidentally have it so high nothing moves (i did this often and kept fearing i broke the circuit)
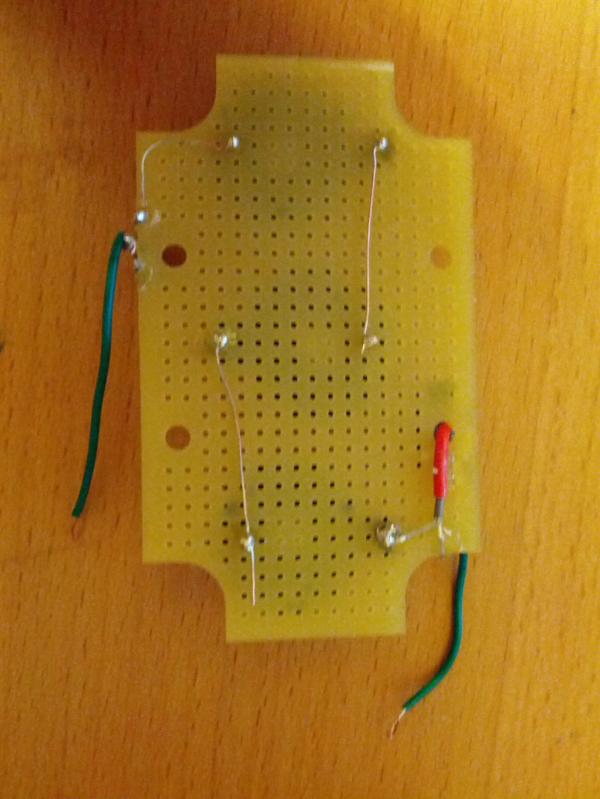
The next step is to pair up the fans
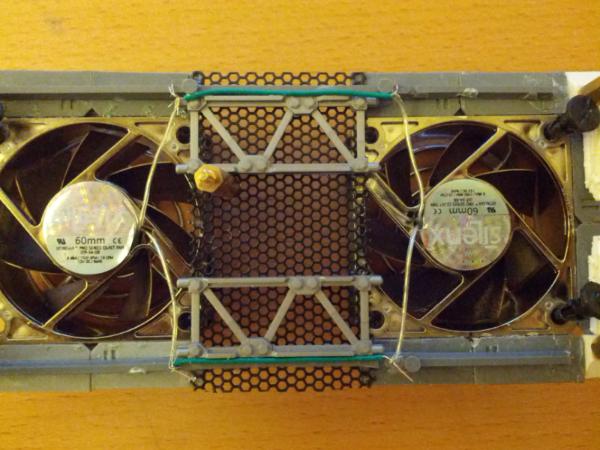
then if you hoook up the 2 ends of the board to the 2 ends of the fans and watch it spin!
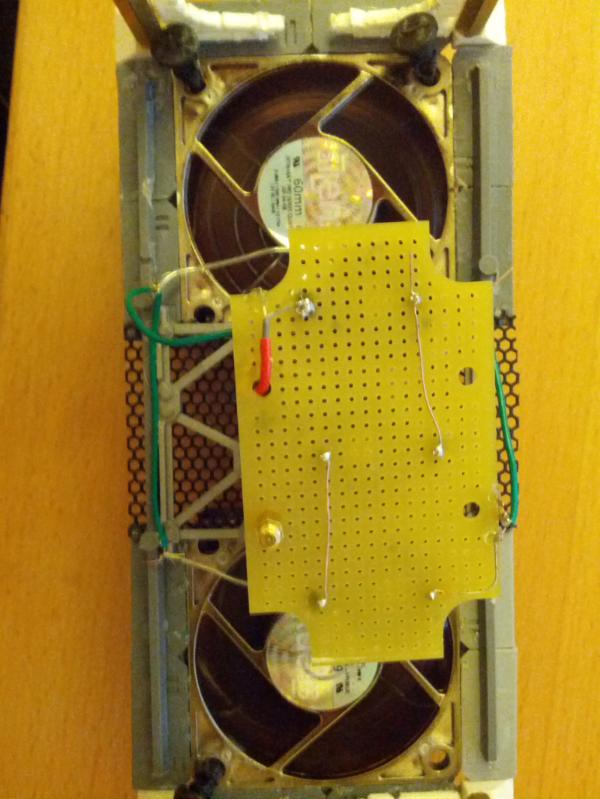
yay spinning! (this is a lot faster than I wouldnormally do but it's easier to see that it's moving on camera)
|
|
This message was edited 1 time. Last update was at 2013/09/17 03:40:06
|
|
|
|
|
2013/09/17 09:35:51
Subject: Homemade FW-style realm of battle terrain boards/buildings (9/16 - moving fans, detail work)
|
|

Regular Dakkanaut
|
Nice circuit work, but won't the batteries still be drained in no time? Wouldn't a 9V wall adapter be better?
|
|
|
|
|
|
2013/09/17 12:39:26
Subject: Homemade FW-style realm of battle terrain boards/buildings (9/16 - moving fans, detail work)
|
|
The Hive Mind
|
I definitely wouldn't use coin batteries for this - as you've noticed they drain too fast.
I'd try a 9v battery and see if that lasts for a few hours. If not, use the wall adapter (or more 9v batteries).
|
My beautiful wife wrote:Trucks = Carnifex snack, Tanks = meals.
|
|
|
|
|
2013/09/17 16:13:56
Subject: Re:Homemade FW-style realm of battle terrain boards/buildings (9/16 - moving fans, detail work)
|
|
Dakka Veteran
|
Yeah 9vs may have to be the way to go. I was hoping that the fans wouldnt really take much pwoer to keep going, and thus the coin batteries would last a bit longer. I was also originally concerned about space so I opted for the coin batteries.
Now that i realize I have more room for revision 2 (to happen later lol) will likely try 9vs instead.
I want to try an avoid a wall outlet if I can because it doesnt really work with the whole tile concept and forces the fans to always be on the edge of the board if i wanted to run them, dunno.
|
|
|
|
|
|
2013/09/19 16:42:15
Subject: Re:Homemade FW-style realm of battle terrain boards/buildings (9/19 - first page updated with pics)
|
|
Dakka Veteran
|
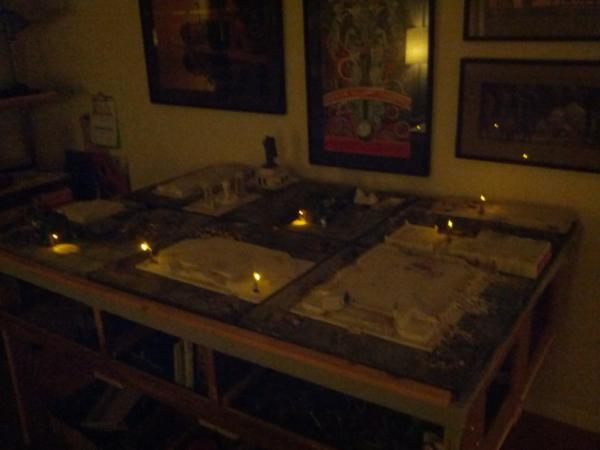
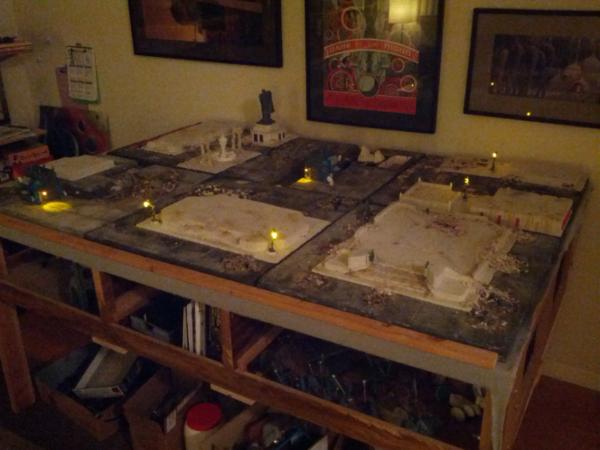
Hey guys I updated the first page to show a picture set of the latest of the board. Mos tprogress now will be a lot smaller and a bit slower, I need a bit of a break from this before I start basecoating and whatnot, and I need to start learning rust and whatnot as well.
|
|
|
|
|
|
2013/09/19 20:59:02
Subject: Re:Homemade FW-style realm of battle terrain boards/buildings (9/19 - first page updated with pics)
|
|
Longtime Dakkanaut
|
Wow. Really enjoying this thread so far. Excellent use of alternative material (Legos, fans, etc) and since I really like Hurst casts it's cool to see them as well.
Great stuff, looking forward to seeing more.
Subbed.
|
|
|
|
|
|
2013/10/01 04:14:26
Subject: Re:Homemade FW-style realm of battle terrain boards/buildings (9/19 - first page updated with pics)
|
|
Dakka Veteran
|
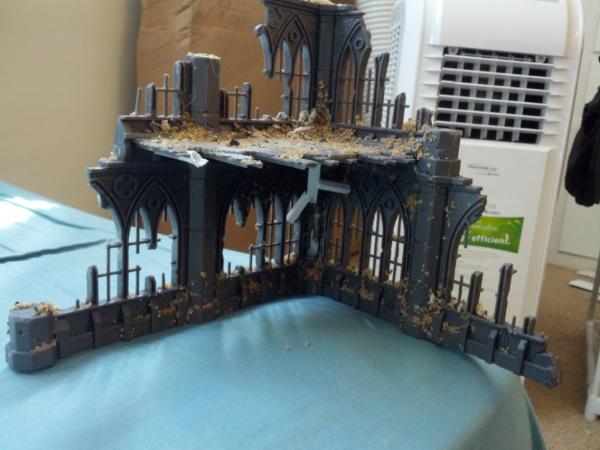
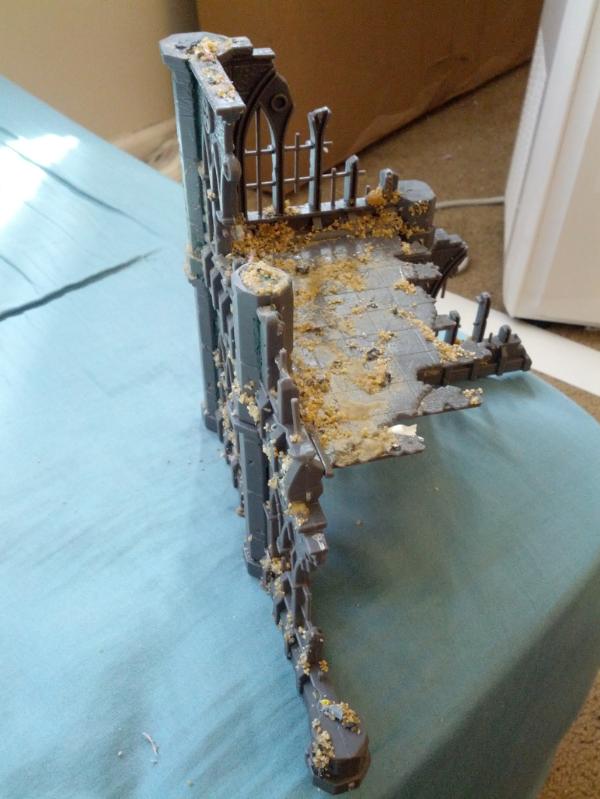
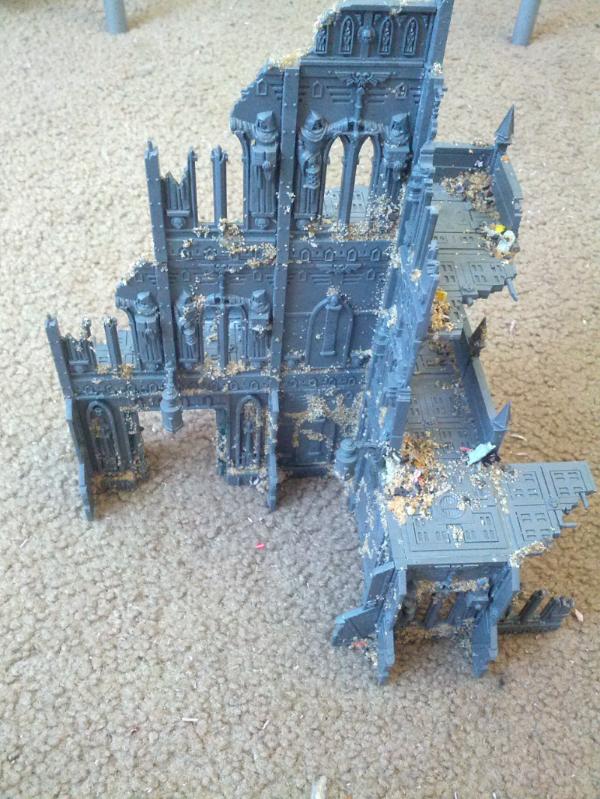
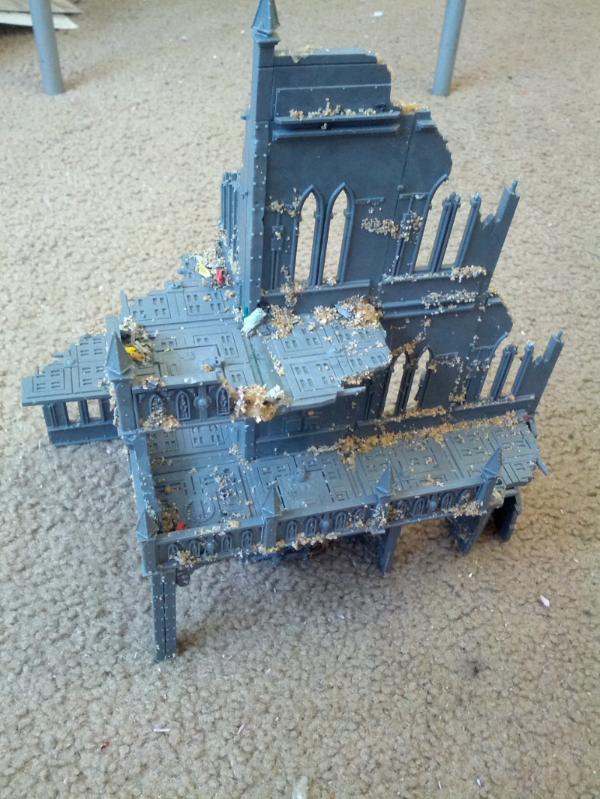
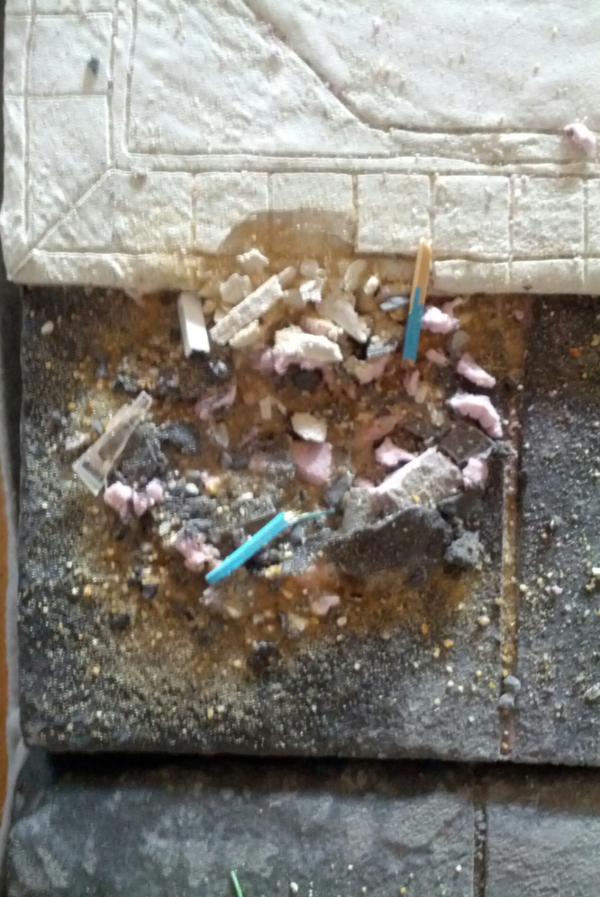
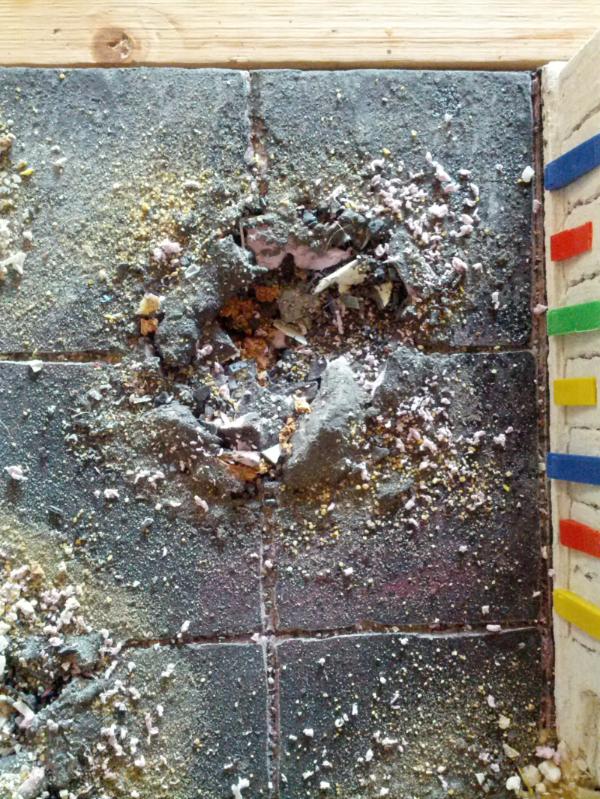
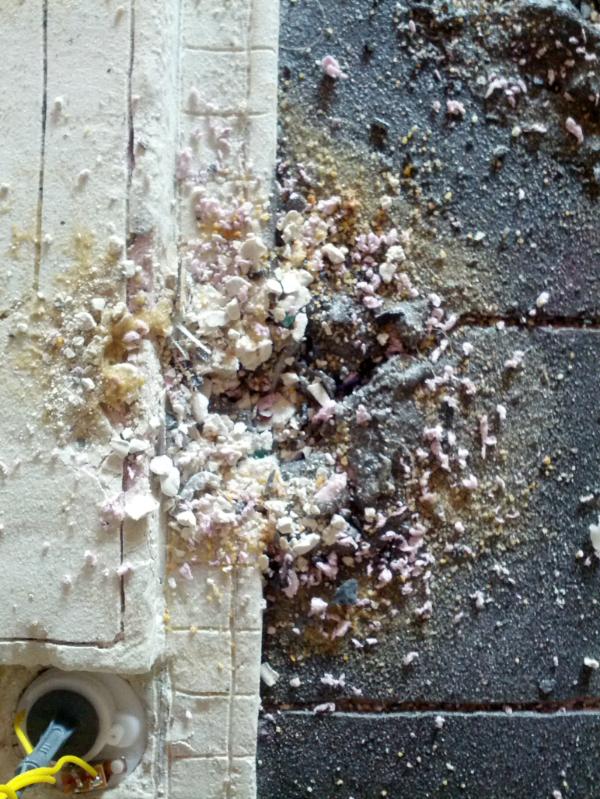
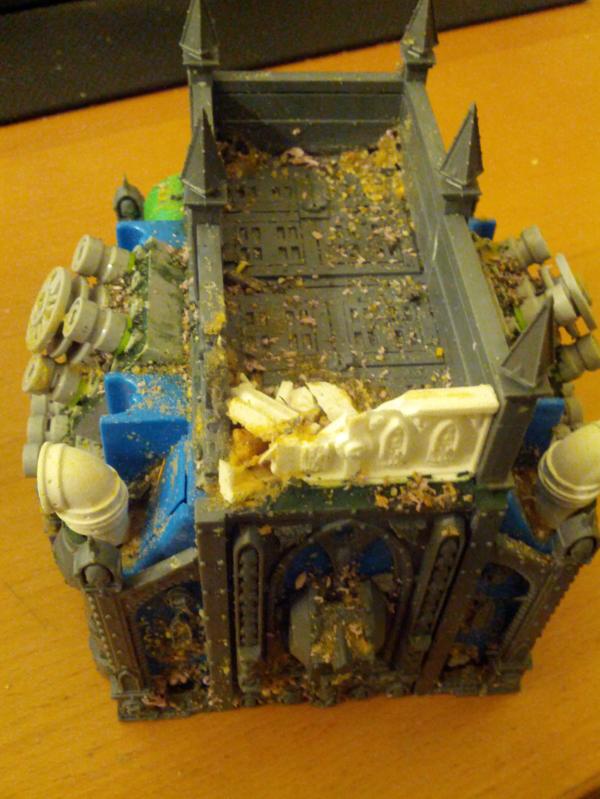
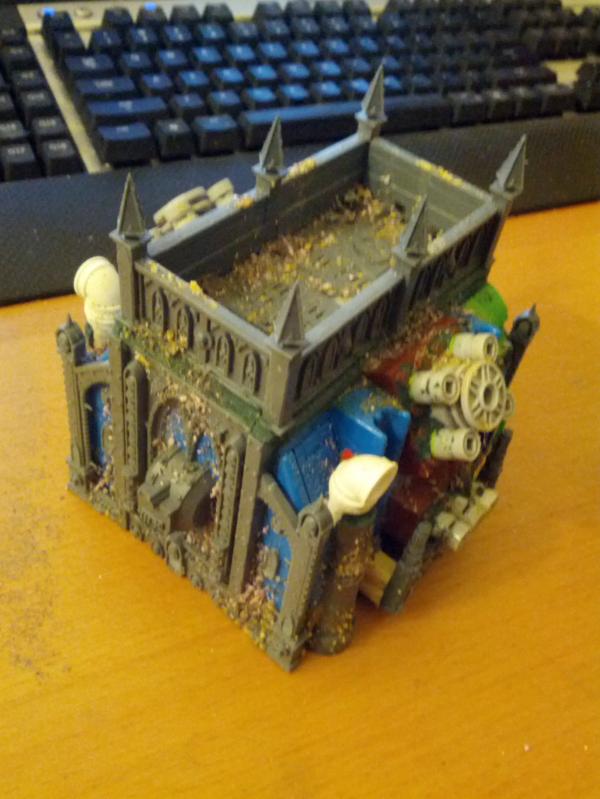
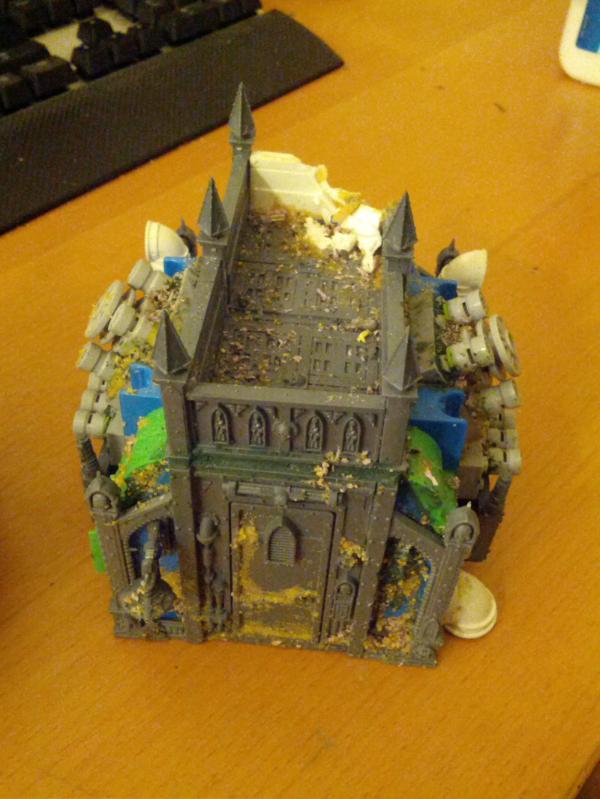
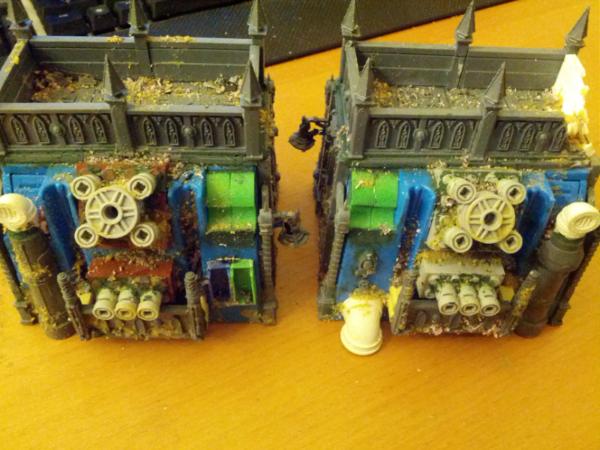
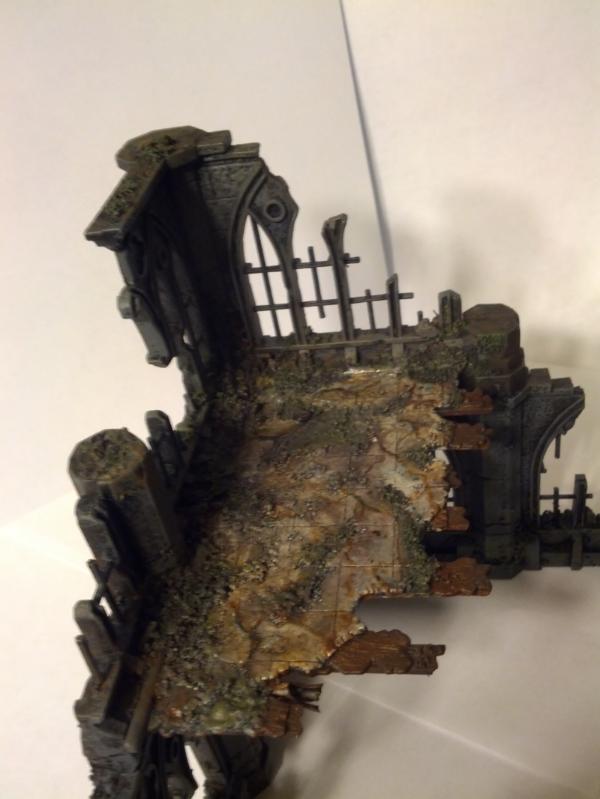
So although I am mostly focused on coding, Im still slowly going back and starting to green stuff all the various seams in my buildings/foundations.
I also went ahead and started doing the same grime treatment to the buildings as I have been the foundations.
This shoudl help add a bit of realism while also covering up any gaping holes in the buildings.
My basic plan of attack for adding the grit was to use a very watered down mixture of elmers,
pick a side, and pretty much just coat somewhat haphhazardly the elmers all over the side.
I would then shake it about and let it drip down to the crevaces, and then pretty much just throw
sand everywhere and let it stick where it wants to stick. The idea being to let all the grime pool in
places you'd expect it to pool. It's rather messy, and glue gets everywhere,
but you can use the gluey/sandy slurry that acucmulates to get bigger chunks of grit.
You'll notice the white wall segment as what I used to complete the break, this is again
one of my casted walls, and one benefit of that is that the plastic is a lot more brittle than GW plastic,
so it fractures SUPER well and in a very realistic way.
|
|
|
|
|
|
2013/10/01 11:24:38
Subject: Homemade FW-style realm of battle terrain boards/buildings (9/19 - first page updated with pics)
|
|
The Hammer of Witches
|
That looks gnarly. Its going to be grime-tastic.
|
|
|
|
|
|
2013/10/15 16:31:59
Subject: Re:Homemade FW-style realm of battle terrain boards/buildings (9/19 - first page updated with pics)
|
|
Dakka Veteran
|
|
|
|
|
|
|
2013/10/19 19:24:02
Subject: Re:Homemade FW-style realm of battle terrain boards/buildings (9/19 - first page updated with pics)
|
|
Dakka Veteran
|
|
|
|
|
|
|
2013/10/21 09:03:03
Subject: Homemade FW-style realm of battle terrain boards/buildings (9/19 - first page updated with pics)
|
|
Regular Dakkanaut
|
Looks great! Adding all that texture really helps in taking the pre-fab look away! 
|
|
|
|
|
|
2013/10/21 20:41:27
Subject: Re:Homemade FW-style realm of battle terrain boards/buildings (9/19 - first page updated with pics)
|
|
Dakka Veteran
|
Yeah it definietly helps break it up! I may have gone overboard but it's easy enought o just scrape some off.
my paintworks kickstarter finally started going so i ordered all my paints and hopefully next month i can start getting the base coat in!
now for the real challenge.. figuring out what to color my "foundations"
|
|
|
|
|
|
2014/01/31 18:01:22
Subject: Re:Homemade FW-style realm of battle terrain boards/buildings (9/19 - first page updated with pics)
|
|
Dakka Veteran
|
Hey guys! So I'm back! Mostly.
Alas I still have yet to get my kickstarter paints (damn cold weather!), but I did finally get all of my initial set of buildings cruddified/primered, and I've been slowly starting to paint buildings.
I also have done a few experiments with paint chipping methods and using that to generate a pretty convincing rust effect.
There will be pictures later tonight but it's exciting just to have something to post here again!
|
|
|
|
|
|
2014/02/01 00:24:15
Subject: Re:Homemade FW-style realm of battle terrain boards/buildings (1/31 - back! new pics to come)
|
|
Longtime Dakkanaut
|
Great to see you back mate !
Like your table a lot.
|
|
|
|
|
|
2014/02/01 06:42:20
Subject: Re:Homemade FW-style realm of battle terrain boards/buildings (1/31 - back! new pics to come)
|
|
Dakka Veteran
|
Thanks! There has been a lot of experimenting and figuring out the building scheme is handy because it does at least start determining other colors on the board.
First up is rust/paint chipping, and for that I present you guys.. this stuff!
http://www.ak-interactive.com/ecomm/?acc=Catalog&sacc=view&IDCat=658&idp=6154&idc=3
The basic idea is you put down your base "rust" underlayer. In my case just blobs of burnt umber type colors, browns, and occasional splashes of a straight up orange. Also maybe some drybrushing of leadbelcher.
Then you put down a layer of some sort of finish to protect it (in my case ardcoat), then a layer of the chipping fluid,, and then finally your "beauty" layer of whatever paint/metal color you are chipping away with.
When ur done with that layer, jsut start coating it with water and scrubbing with a toothbrush/toothpicks/etc and watch the other layer chip off. It works pretty fantastically:
There are, however, a few things Ive figured out.
First of all you really do need your beauty layer to have a HIGH contrast with the under layer. I tried like a somewhat olive camo green on top and it just.. doesnt really show up at all. One of the key problems i did is after I chipped it off I coated the whole thing in a nuln oil wash and it just really blended it all together. As a result I highly reccomend you do any sort of washes on the beauty layer BEFORE you chip, just to preserve the maximum amount of contrast. It reaallly helps. I'll have examples of sucesses and failures tomorrow when there's more light, but yeah there is definitely such a thing as too subtle.
The plus side tho is that if it's too subtle.. just put another ardcoat/chip coat/beauty layer on top and voila start over, just more complexity to your final result! no harm done (it's all pretty thin so gonna be a while before you really start losing detail).
The second KEY point to this you MUST let it all fully dry before you do this. Each layer in all this MUST be fully dry before you put on the next layer, otherwise it starts to chip early and just sorta ends up blending together.
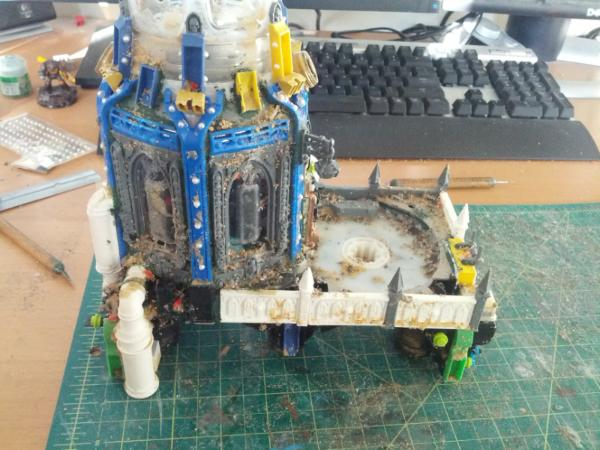
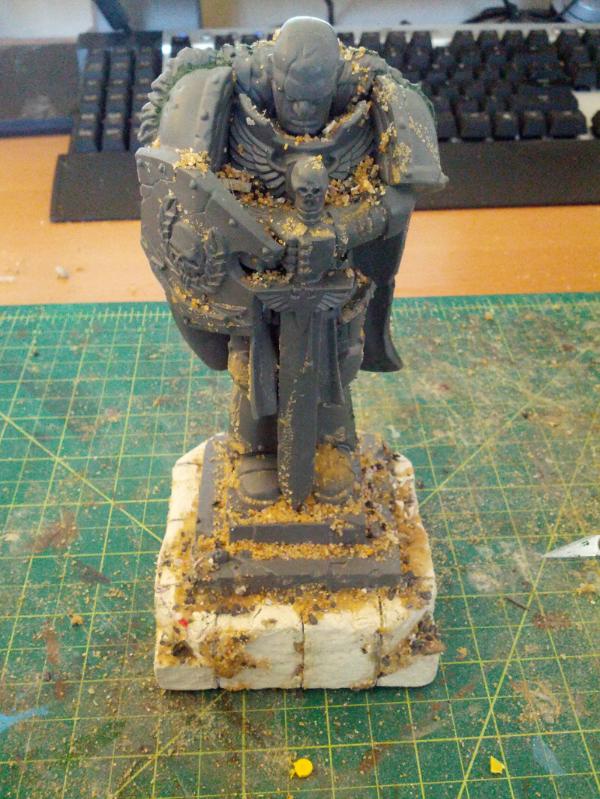
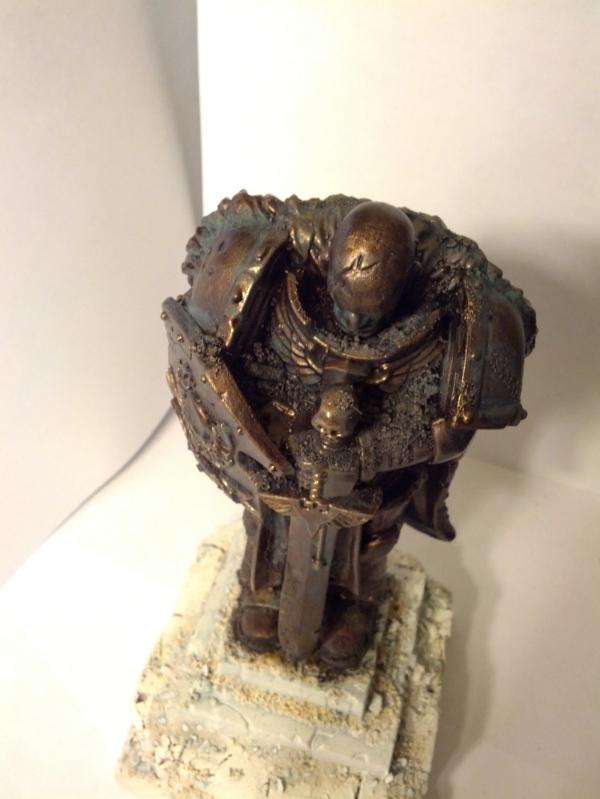
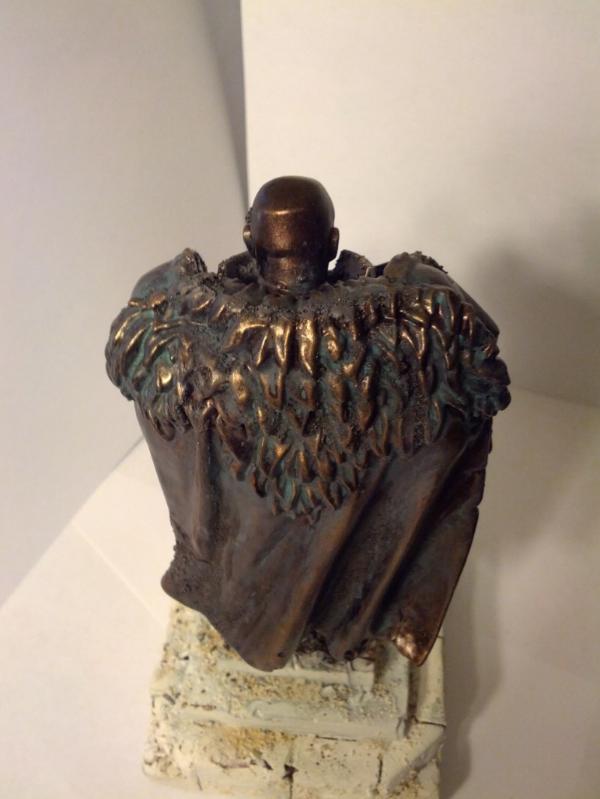
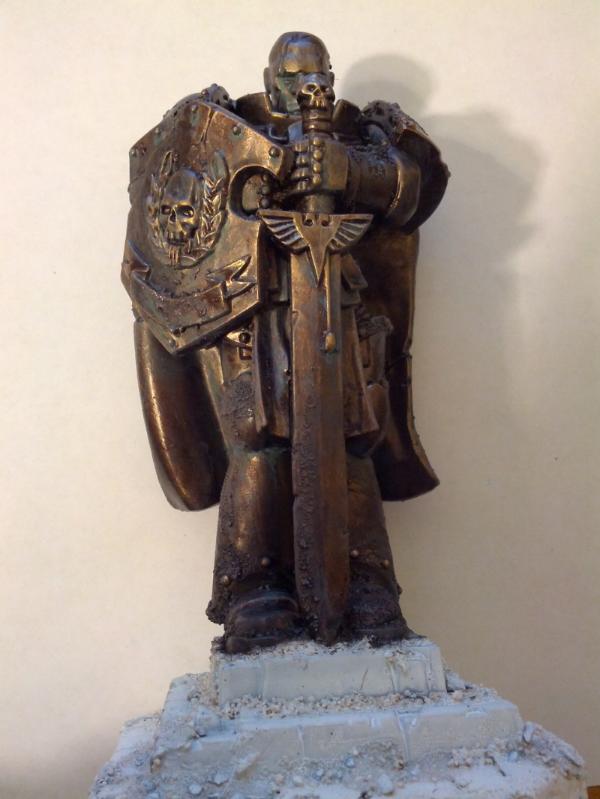
Next up is doing a old bronze look! With the recent release of nihilakh oxide old bronze is easier than ever, and I decided to test it on my statue to pretty satisfactory results I have to say.
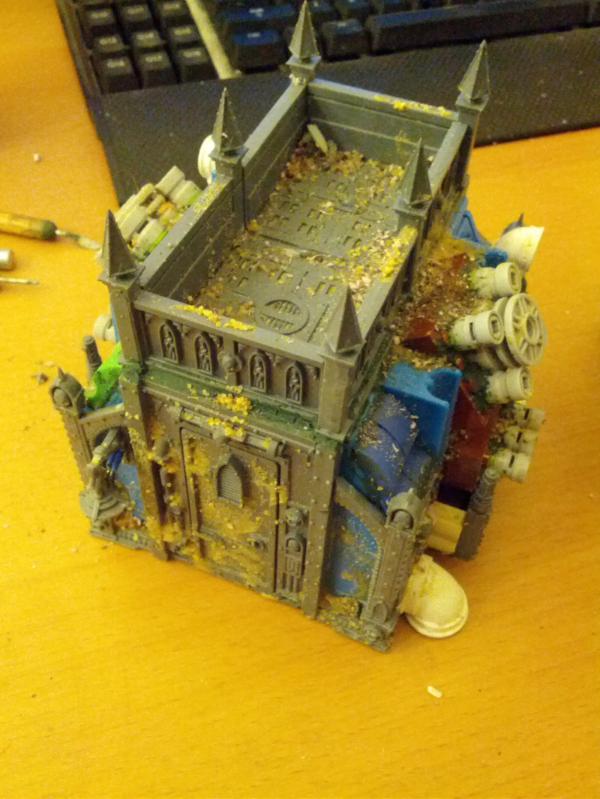
Finally comes a building. This is where, well, you just gotta do it and try it out. I generally am an "overthinker" when it comes to building colors, and as a result spend days thinking about how something is going to look before i work upt eh courage to try it. I'm just too afriad of messing it up the first time and doing another coat/potentially losing detail or something.
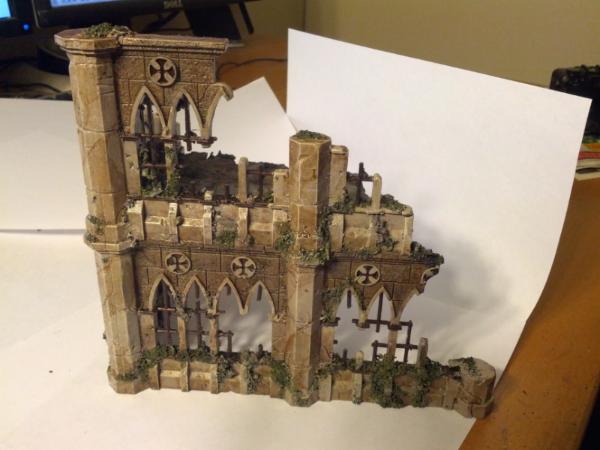
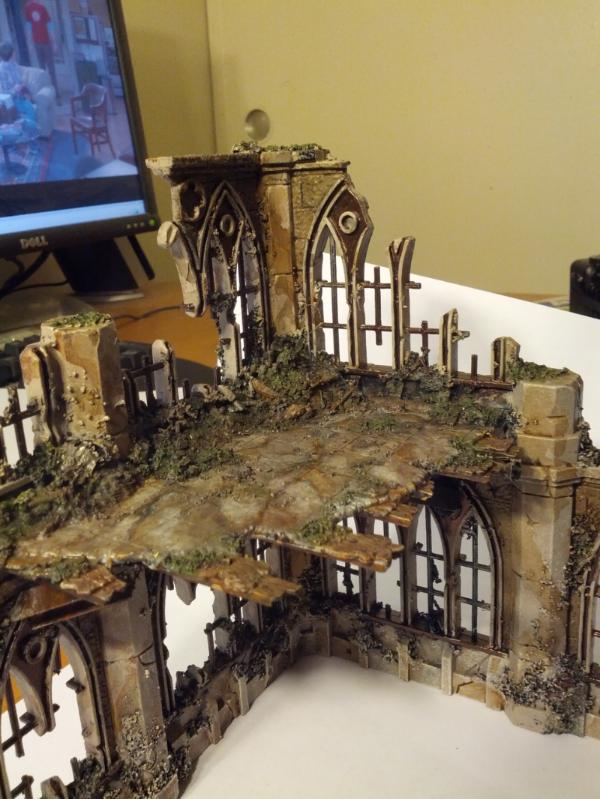
But I figured if i started with my pegasus hobbies ruins I could mess up the least expensive/least complicated ruins I had, and furthermore I figured id color it in somewhat of a "standard" way with a basecoat of stormraven fur, various patches of browns and greens, and then a drybrush of dawnstone on top. For the flooring id get a bit more compcliated and continue experimenting with marble effects.
This is the result:
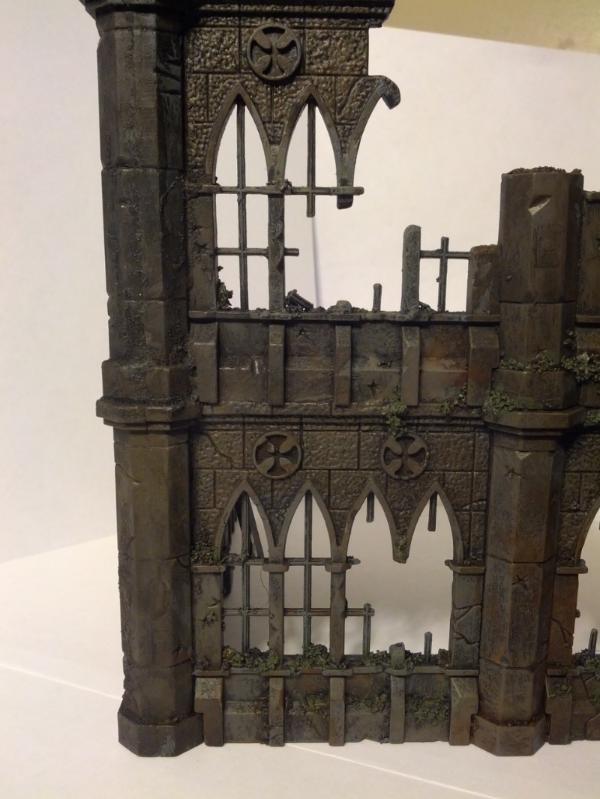
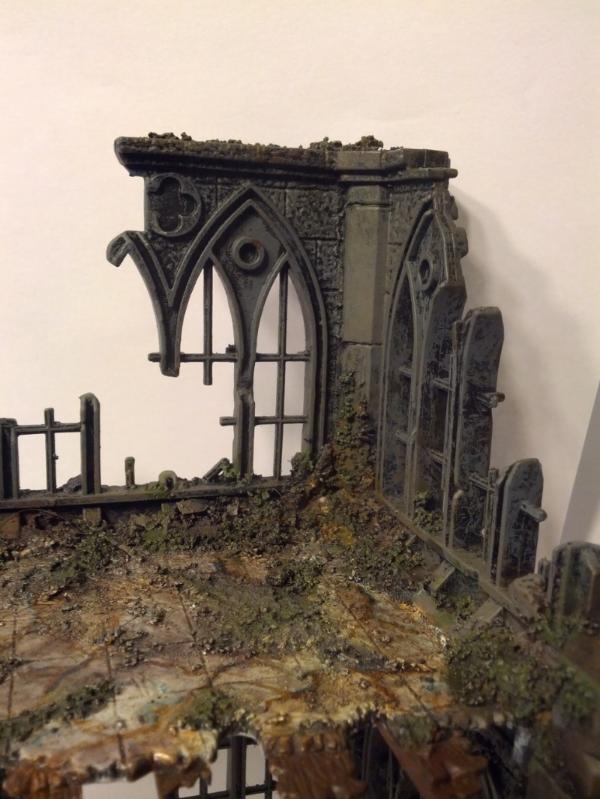

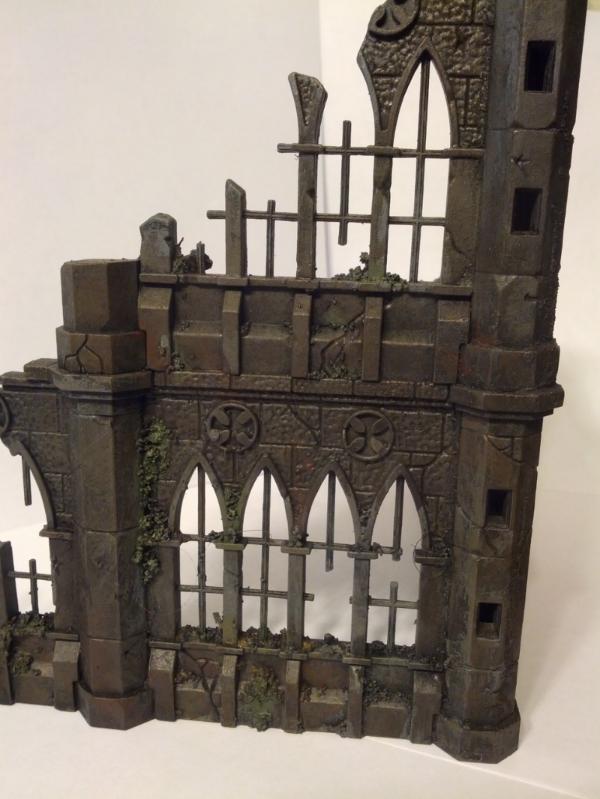
And, well, I was kinda bored. None of the detail really popped, and more dawnstone really wasnt helping either. I could have gone even whiter but i just, didnt really like the grey. It's one of those things where I knew that a majority of the board would be straight grey, with the exception fo the foundations. So the idea of grey tiles with whiter foundations and then.. grey buildings on top again just.. didnt appeal. Sure I have plans to make the mechanicum buildings wilder colors, but I wasnt thrilled with where the church was going, especially since it dictated the colors of a few other buildings as well (i want some consistency between like the cathedral/administrtion building and the colesium)
so then I found this color scheme which was al ot more exciting:
http://www.dakkadakka.com/dakkaforum/posts/list/150/547736.page
that to me works a lot better. Higher contrast, using the bronze (which I can make look aged super well), and a better template to get marble effects as well. So I went over to my GW and picked up these gems:
Baneblade brown (darker)
Rakarth Flesh (my base marble/limestone/etc color)
pallid wych flesh (highlights)
and went to town one the other half of the church.
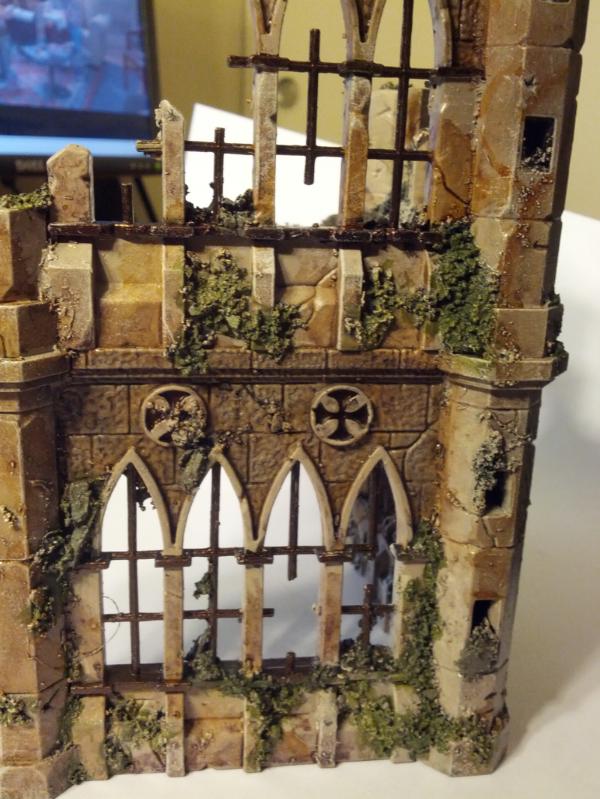
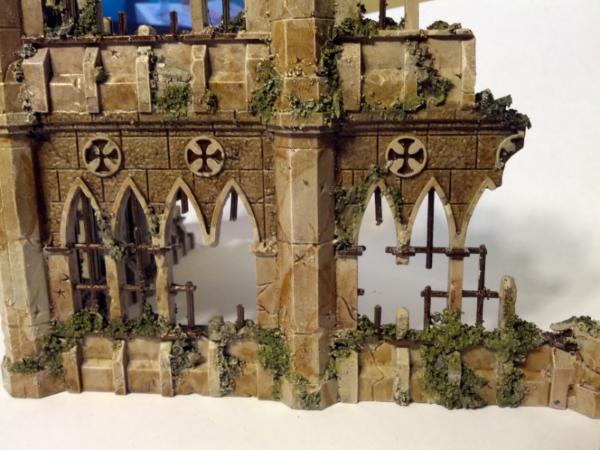
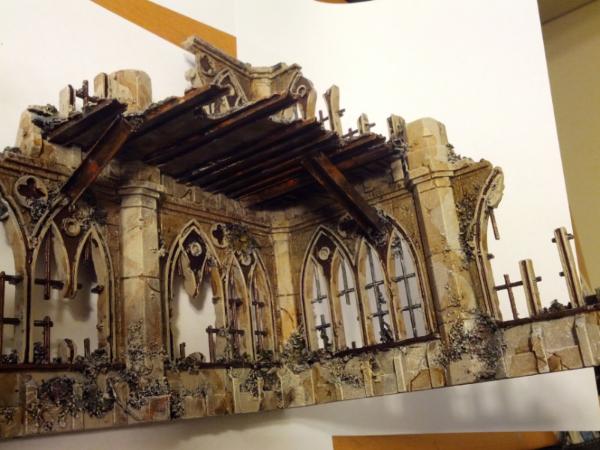
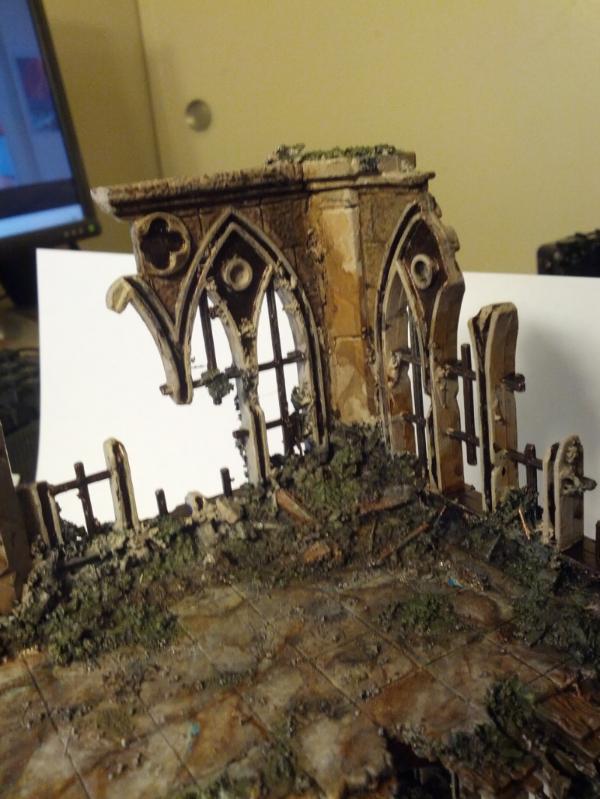
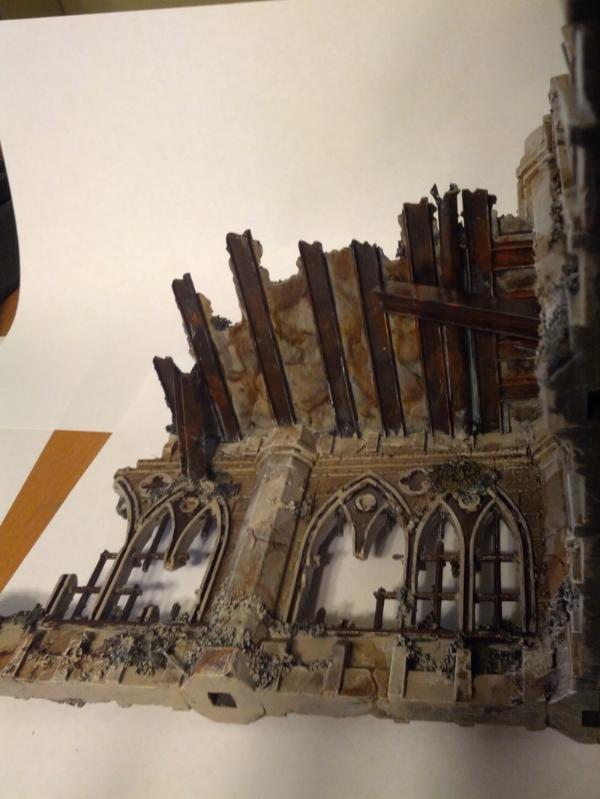
which im MUCH happier with. It pops more, I see all the details, and it looks more like limestone. It's not perfect, I still need to add the dripping effect and I am nto quite certain about the colors of the "rough" stones that are darker, they still seem a bit off (i might just need to add more variety there between the stones), and I may yet tone down some of the darkening of the pillars so they are less contrasty, but overally it's just a lot more effective to me. (I still also need to figure out just what colors the grime would be). What do you guys think?
|
|
This message was edited 1 time. Last update was at 2014/02/01 06:44:30
|
|
|
|
|
2014/02/01 10:46:34
Subject: Homemade FW-style realm of battle terrain boards/buildings (1/31 - painting buildings)
|
|
Avatar of the Bloody-Handed God
Inside your mind, corrupting the pathways
|
Love the colours on the buildings. And love the vines etc... too many people have dead metalic buildings - fantastic work.
|
|
|
|
|
|
2014/02/01 14:19:42
Subject: Homemade FW-style realm of battle terrain boards/buildings (1/31 - painting buildings)
|
|
[SWAP SHOP MOD]
Robot Cat
OH-I Wanna get out of here
|
Hot damn, thats some nice looking terrain. Would love to play on something that looks like that.
|
|
|
|
|
2014/02/01 22:51:04
Subject: Re:Homemade FW-style realm of battle terrain boards/buildings (1/31 - painting buildings)
|
|
Longtime Dakkanaut
|
As above , the pale coloured stone looks awesome , and so much more realistic if my town centre is to be believed i.e. all tan stone no grey !
|
|
|
|
|
|
2014/02/01 23:35:59
Subject: Homemade FW-style realm of battle terrain boards/buildings (1/31 - painting buildings)
|
|
Aspirant Tech-Adept
|
First rate stuff, I love the very solid buildings and the painting is great too (although I also liked the grey). My only suggestion is to add some more vegetation using clumps of static grass - quite sparingly - to give some variety. Oh and maybe some hanging wiring under the floors.
Really looks so much better than the pre-fab GW terrain kits, I can't stand how flimsy they tend to look. I'd love to redo my scenery with this sort of detail.
|
|
|
|
|
|
2014/02/02 20:19:21
Subject: Re:Homemade FW-style realm of battle terrain boards/buildings (1/31 - painting buildings)
|
|
Dakka Veteran
|
Heya thanks!
RE: vegetation, that's defintiely a great idea and in the cards, im still working out the rubble colors too but yeah definitely planning on at least adding clumps of moss in places.
As promised here is some more testing of the chipping process:
So first up we have the successful barrels:
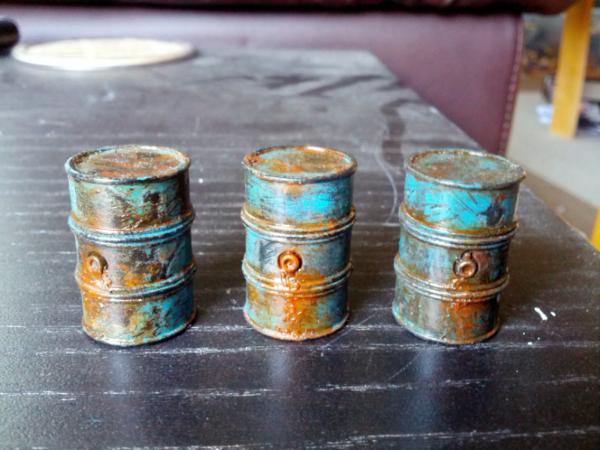
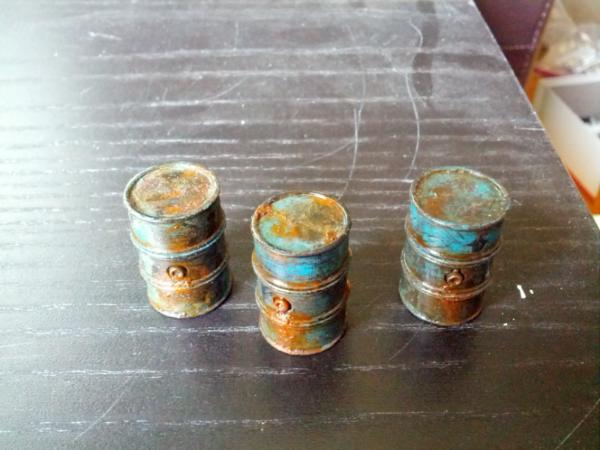
I'm pretty happy with these, and they look great. Then we get to the problem children:
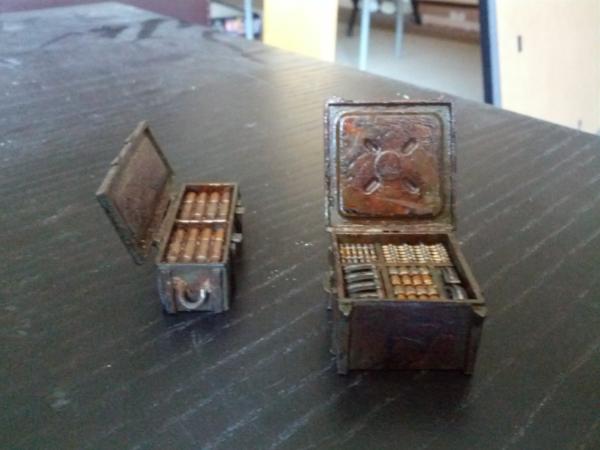
And this is why you really need a pretty saturated/bright paint color, especially if you are planning on doing washes afterwords, because otherwise it just dulls out and becomes supppper hard to tell what's going on. While I generally like the camo green, and may still try to make it work, it's super super key to just do any sort of washes BEFORE you chip so that it's still in the end over rust/undercolor. Although you can see the detail in the light, in general it's just not at all there.
|
|
|
|
|
|
2014/02/02 22:52:27
Subject: Re:Homemade FW-style realm of battle terrain boards/buildings (1/31 - painting buildings)
|
|

Lone Wolf Sentinel Pilot
|
Good to see the project back on the move!
Awesome palette, colour scheme looks great.
The crates don't look bad at all IMHO, they just, as you say, keep a low key. Higher contrast tones, like those on the barrels, do help bring the pieces out more. Both would be good additions to any piece!
|
|
|
|
|
|
2014/02/05 07:52:07
Subject: Homemade FW-style realm of battle terrain boards/buildings (1/31 - painting buildings)
|
|
Regular Dakkanaut
|
Great to see you're back on the project!
As for those crates, I think they look great! They do seem a bit low-contrast, but with the gritty, realistic-looking color scheme you're going for I don't think it hurts the model at all. (I often find that colors behave very differently depending on what kind of light you play under. Sunlight tends to bounce into recesses, lowering contrast and making colors appear washed out, while lamp-light often gives the colors a little extra pop, increasing saturation and contrast. )
|
|
|
|
|
|
2014/02/05 08:41:45
Subject: Re:Homemade FW-style realm of battle terrain boards/buildings (1/31 - painting buildings)
|
|
Member of a Lodge? I Can't Say
|
Some really inspirational ideas going on in here! Those craters are looking great and the cathedral / basilica pieces are great!
Darn you...... i want to do one now!! 
Cheers, 
|
|
|
|
|
|
2014/02/05 21:30:11
Subject: Re:Homemade FW-style realm of battle terrain boards/buildings (1/31 - painting buildings)
|
|
Dakka Veteran
|
Thanks guys!
I agree that the lighting can very much dictate how the ammo crates look, and in the right lighting they do look okay, but for my lighting at least they are a bit.. low contrast, especially compared to how the barrels turned out. So for my situation i just want to amp up their contrast a bit and try again with brighter camo colors.
|
|
|
|
|
|
|
|