| Author |
Message |
 |
|
|
|
|
Advert
|
Forum adverts like this one are shown to any user who is not logged in. Join us by filling out a tiny 3 field form and you will get your own, free, dakka user account which gives a good range of benefits to you:
- No adverts like this in the forums anymore.
- Times and dates in your local timezone.
- Full tracking of what you have read so you can skip to your first unread post, easily see what has changed since you last logged in, and easily see what is new at a glance.
- Email notifications for threads you want to watch closely.
- Being a part of the oldest wargaming community on the net.
If you are already a member then feel free to login now. |
|
 |
2018/01/21 18:31:24
Subject: Re:Syro's projects: Currently Hero Quest Furniture
|
|

Posts with Authority
Boston-area [Watertown] Massachusetts
|
No, the mummies are AMAZING, and only need to be washed with a light tan inkwash.
GREAT job on all of this. I'd be proud to face any of your armies across the table.
--B.
|
Falling down is the same as being hit by a planet — "I paint to the 20 foot rule, it saves a lot of time." -- Me
ddogwood wrote:People who feel the need to cheat at Warhammer deserve pity, not anger. I mean, how pathetic does your life have to be to make you feel like you need to cheat at your toy army soldiers game?
 |
|
|
 |
|
2018/01/21 20:21:18
Subject: Syro's projects: Currently Hero Quest Furniture
|
|

Sureshot Kroot Hunter
|
The mummies look great but the casted skeletons are brilliant! Also you blog made the front page, well done man
|
|
|
|
|
|
2018/01/21 23:21:28
Subject: Re:Syro's projects: Currently Hero Quest Furniture
|
|
Krazed Killa Kan
|
@Briancj: Thanks, it's flattering to see such a big name on Dakka visiting my blog. It would be cool if we got to battle sometime. I wish I had gotten your post before I started painting the mummies, so I wont get to try out your idea unless I make more. I painted the bandages with watered down Ushabti bone, and painted any skin showing through with Bugman's glow to give it that heavily tanned/pickled look that mummy skin has. I'm planning on using a brown wash on the bandages (I have game color umber shade and army painter strong tone) and a black wash on the face. Does this sound like a good plan? I might also add a few more bandages in places too.
@Thanks boundless! I was surprised and excited when I stumbled upon my first blog entry on the homepage. I took a screen shot of it 
Thanks for your comments on the mummies and skeletons. The skeletons were a huge pin to clean all the flash off of, but I do love how they turned out. I'm hoping the mummies still look good with the beginnings of painting them.

The mummies with some paint on them, still WIP.

Stretching racks. The second hand Hero Quest I bought off of Ebay is missing most of the small pieces like: every skull, rat, candle, and the arms to the stretching rack. While I was building a new one I made arms for the old one too. I'm planning to paint the arms on the old one brown to match better. Maybe use some oil, stain, or a wash on the new one. The stretching rack I made, you can actually turn the handles to rotate the wood pole that the ropes for stretching will be attached to.
|
|
|
|
|
|
2018/01/22 16:40:13
Subject: Syro's projects: Currently Hero Quest Furniture
|
|

Fresh-Faced New User
|
I owned Hero Quest as a child, and I would to have a fully sculpted version of the terrain alongside improved miniatures. So I applaud you for the effort, it looks really nice.
|
|
|
|
|
2018/01/22 21:30:19
Subject: Syro's projects: Currently Hero Quest Furniture
|
|

Druid Warder
|
I envy Your attention to detail - and terrain, Syro. A fully 3D tabletop, be it a boardgame or an RPG, makes wonders at immersing players, not mentioning huge possibilities of practicing world-building crafts. 
Regarding mummies - they look very nice, well, for mummies. Another recipe is to cut the closest available tabloid - they are printed on a very absorbing paper and drench strips directly in vinyl emulsion. Take an equal parts of thick PVA and hot water. Mix thoroughly and let it stand while cooling, then shake vigorously and pour into a shallow pool of goo.  Quick to soak in, perfect for paper-mache.
And all these candlesticks have given me an idea about lighting stuff up. Need to ponder further!
|
Painting progress tracker:
2017: 50 of 50 planned; 2018: 80 of 60 planned; 2019: 75 of 75 planned
Pledge 2020:
6 to sculpt, 75 to paint (2/57 done) |
|
|
|
|
2018/01/23 03:05:07
Subject: Re:Syro's projects: Currently Hero Quest Furniture
|
|
Krazed Killa Kan
|
@Shiro-chan: Thanks! I missed playing Hero Quest from when I was a child, so I recently bought a new set. I'm glad you like what I have been making. I hope to play with them soon.
@Wirecat: Thank you! I feel like I don't always pay such close attention to detail, but both being on Dakka and the "League of Extraordinary Riveters" has helped push me to make better and more detailed miniatures and terrain. I'll have to try out your paper-mache recipe, recently I've been lazy and just use a 50-50 mix of PVA glue and Water. The paper I used was scrap I peeled off of the cheap foamcore I used in the furniture project
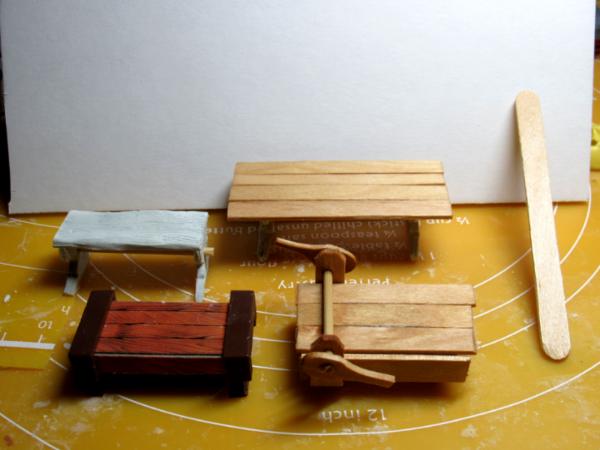
A tiny bit more progress on the furniture. I built a 3rd smaller table to accompany the other two. Both of my other tables were much bigger than the original, so i made that one. I admit it looks a little like a bench. I also used some oil on the wood top of a table and the stretching rack to try to give it a better color and make the wood grain more clear (popsicle stick is in there for comparison).

Also you may remember that larger teddy bear that I ended up not using for the last LoER terrain contest. I made him a twin that I'm turning into a necklace for my niece.
|
|
|
|
|
|
2018/01/23 23:47:16
Subject: Re:Syro's projects: Currently Hero Quest Furniture
|
|
Krazed Killa Kan
|

I made this fire yesterday and forgot to photograph it and add it to my post. I made the fire from hot glue attached to little bits of craft sticks and big tooth picks.

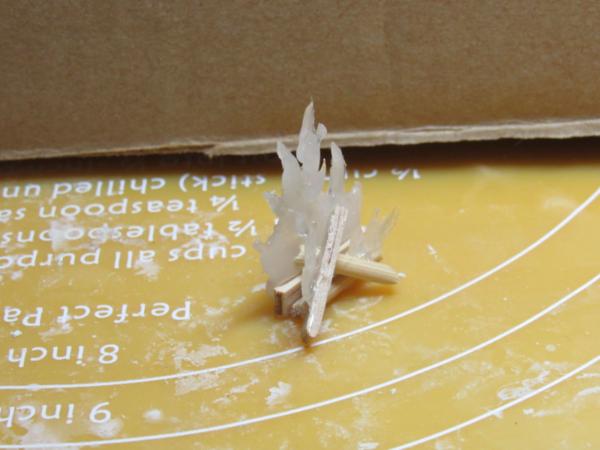
The fire from different angles.


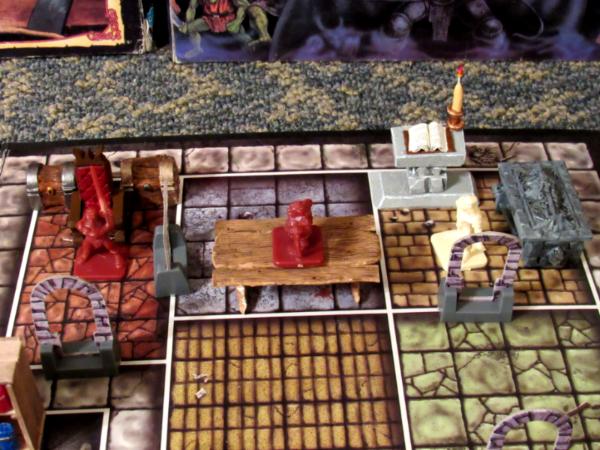
Except for paint, I consider the stretching rack now finished. You can still turn the handles to pull up the shackles more.
The beginnings of the throne carved out of high density styrofoam
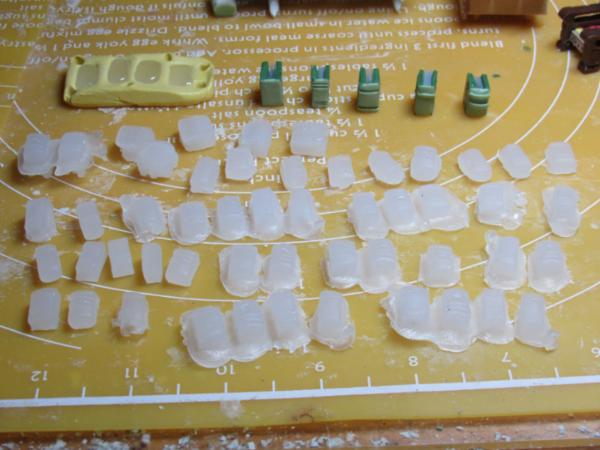
It's hard to tell in the picture, but I have been mass producing the spines of books for my book shelves. Hopefully they will look good. Automatically Appended Next Post: I decided to keep pushing. Another 2 maybe 2.5 hours of working on building bookcases and preparing books. With the deadline for this contest looming close I'm trying to get it done:
The beginnings of the first

Starting the second, making the back of the first.

This is where I stopped for the night, showing a scale shot, and basically how they will have books (still needs shelves).
|
|
This message was edited 1 time. Last update was at 2018/01/24 02:58:16
|
|
|
|
|
2018/01/24 14:30:30
Subject: Re:Syro's projects: Currently Hero Quest Furniture
|
|

Gargantuan Great Squiggoth
|
Just had a really great read through the blog, fantastic and inspiring work going on. Definitely missing Hero Quest right now. Squiggoths are looking brilliant, did similar myself. Those mummies turned out great bud, nice outside the box thinking.
For guns start with a box section and add tubes, makes it easier to mount.
For the armour plates card is good, cereal box has a nice pitted texture on the inside surface which takes paint well.
Experiment with the mixing of all the putty products. Miilliput and Greenstuff work very well together, there is also another type, used by tradesmen, more a metal putty, sets very fast, good for the impetuous artist.
Bulk out your shapes for sculpts with crushed tin foil, compact it as much as possible, it is way cheaper than using just putty.
Above all.......Have faith in your self, you are an artist bud, and you have a good head on your shoulders, you could easily manage silicone molds and resin, your scuplts are quite brilliant, really looking forward to following you.
|
|
|
|
|
|
2018/01/25 00:15:37
Subject: Re:Syro's projects: Currently Hero Quest Furniture
|
|
Krazed Killa Kan
|
Thanks for reading my blog Cam, I'm glad you enjoyed it. Also thank you for the advice. It really is amazing how different the feel is when sculpting different combinations of apoxie putties. I can't believe I haven't tried bulking out with tin foil, I spent most of my life sculpting stuff out of tin foil. I remember your squiggoth with the howdah made of bones, it was really cool!
As for project updates, I continue to plug along on my Hero Quest furniture with more work on the bookcases.
I made scrolls from strips of paper rolled up and tied with thin wire.

All the shelves are now in the bookcases. The bookcases are mostly done, except I'll be adding a small facade of wood on the left and right when all the contents are in place,

All of the contents that will be going in the bookcases. They need priming, painting, and gluing in place. Automatically Appended Next Post: 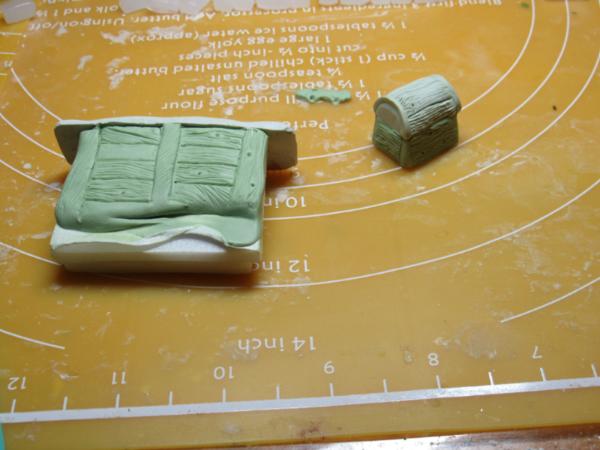
I finally got back to working on the treasure chest that I'm completely sculpting from scratch. I also started on the cupboard, I've been putting it off because it seemed like it was going to be a pain. In the back I've started trying to make a fancy iron hinge to attach where needed on the cupboard and treasure chests.
|
|
This message was edited 1 time. Last update was at 2018/01/25 11:59:36
|
|
|
|
|
2018/01/26 01:35:39
Subject: Re:Syro's projects: Currently Hero Quest Furniture
|
|
Krazed Killa Kan
|
I made the front of the cupboard today, The putty fought me more than I'm used to when making the wood grain, I think I had too much greenstuff in the mix. I'm happy with how it came out in the end. I still need to finish the back and side when it's dry, and then add the "hardware" that I've been working on sculpting.
|
|
|
|
|
|
2018/01/27 15:10:28
Subject: Re:Syro's projects: Currently Hero Quest Furniture
|
|
Krazed Killa Kan
|
Recent progress:

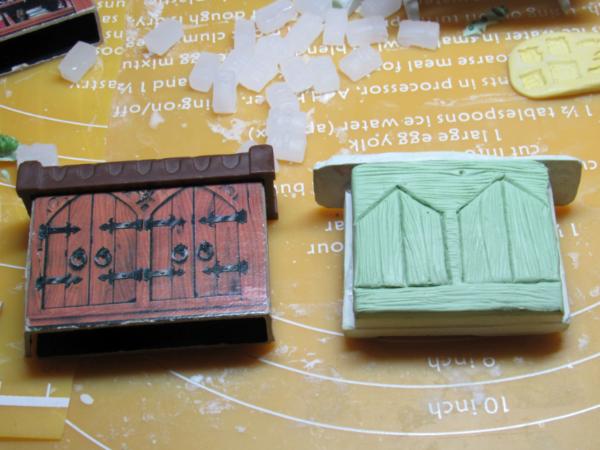
I continued the work on the cupboard. Almost done with the wood parts of it, except one side. This is the back.

Here's the front
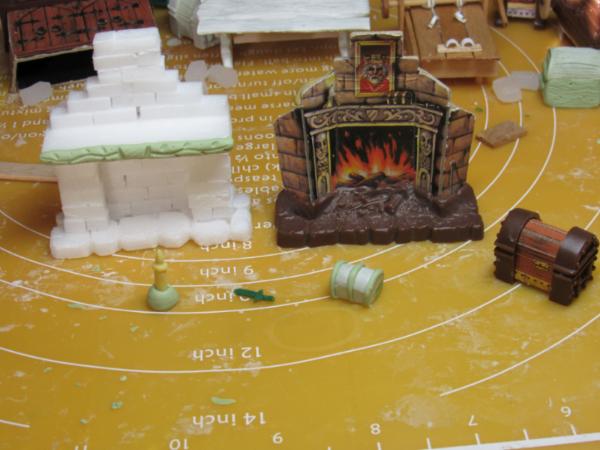
I've been making the mini pieces that sit on the mantle of the fireplace, like in the original picture. Mini-treasure chest isn't done yet.
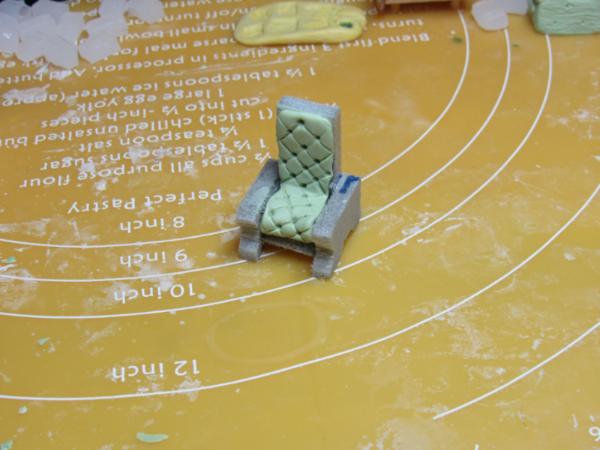
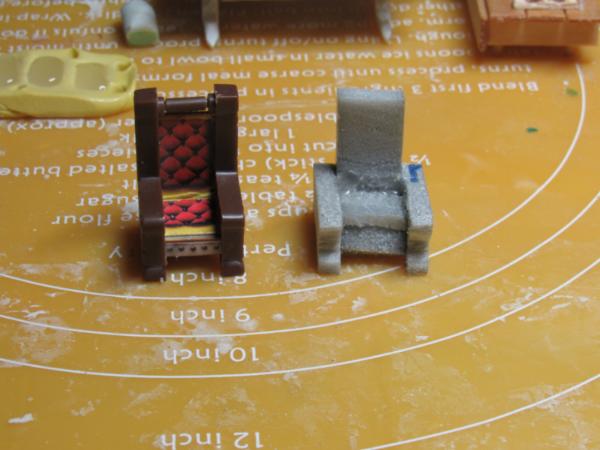
And "upholstered" the chair Automatically Appended Next Post: I spent nearly the whole day priming and painting, with a little more crafting. I only took pictures of the finished fire for the fireplace, but I've also been painting all three sorceror's tables, all three regular tables, scrolls for the book cases, a single book so far.
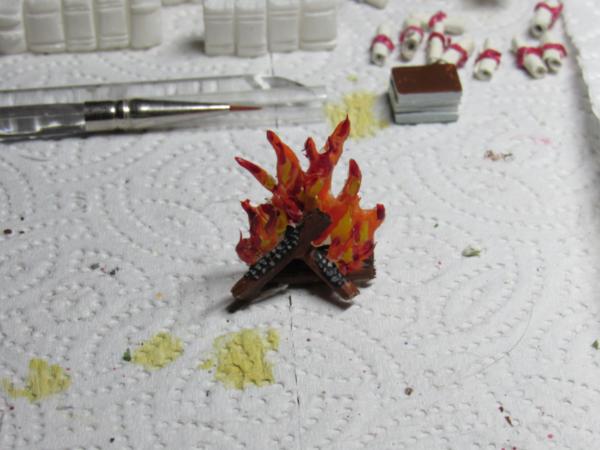
I'm extremely proud of this paint job, especially that I thought to paint on the wood charring and turning to ash.

The fire, but lit from behind to show that some light can pass through it. It would be cool if I could eventually install a flickering LED light behind the fire.
|
|
This message was edited 1 time. Last update was at 2018/01/28 03:06:49
|
|
|
|
|
2018/01/28 20:44:30
Subject: Re:Syro's projects: Currently Hero Quest Furniture
|
|
Druid Warder
|
Which putty are You mixing greenstuff with? I am lately using milliput which mixes fairly well - especially with more yellow greenstuff component than blue one. 1 part yellow to two-three parts of already mixed milliput feels about right for pressing and texturing. Probably You could try something similar with other putty kinds.
|
Painting progress tracker:
2017: 50 of 50 planned; 2018: 80 of 60 planned; 2019: 75 of 75 planned
Pledge 2020:
6 to sculpt, 75 to paint (2/57 done) |
|
|
|
|
2018/01/29 04:24:48
Subject: Re:Syro's projects: Currently Hero Quest Furniture
|
|
Krazed Killa Kan
|
Hey Wirecat, I use Apoxie sculpt mixed with greenstuff lately. Usually a very small ratio of greenstuff, I'd say probably 1 part greenstuff to 5 or 6 parts apoxie sculpt. More recently I had been sculpting fur which required a much higher mix, close to 50:50. It was a long sculpting project and I got into the habit of having a higher ratio of greenstuff. That's probably what made it harder to sculpt than usual. Strangely, it seems like if I quickly wipe a little water on it when it starts to get hard to work it softens up a ridiculous amount.
I worked all weekend on my Hero Quest furniture for the LoER terrain competition. I'm mostly done now, check out the results
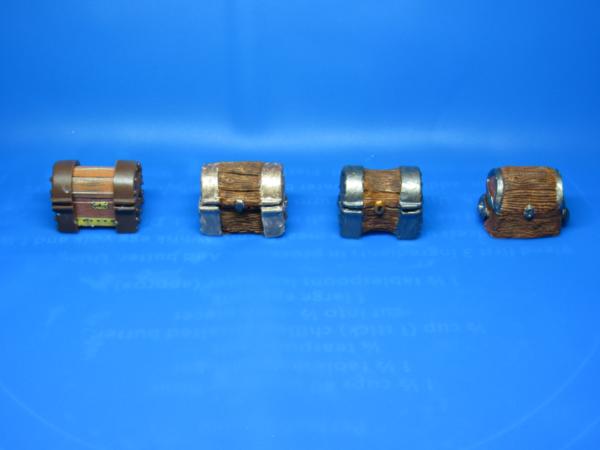
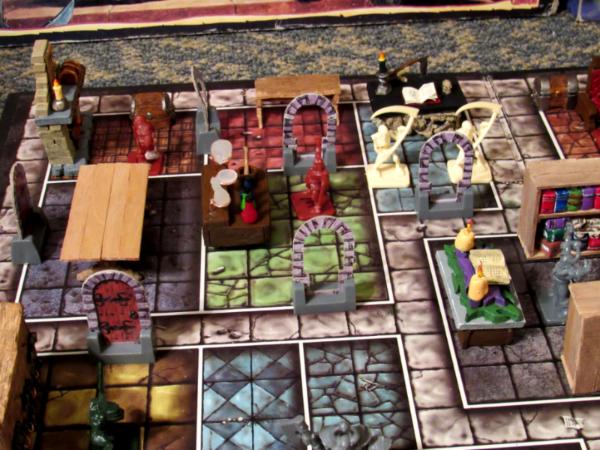
Treasure chests. From left to right: the original Hero Quest Treasure chest, the two in the middle I molded the side pieces and sculpted the wood texture, key hole, etc, and the chest furthest to the right I completely sculpted from scratch.
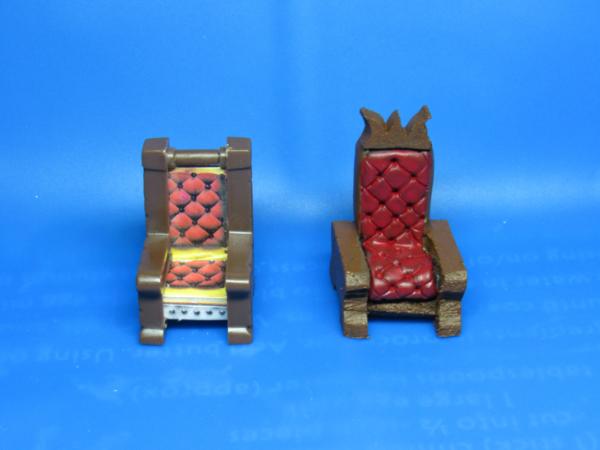
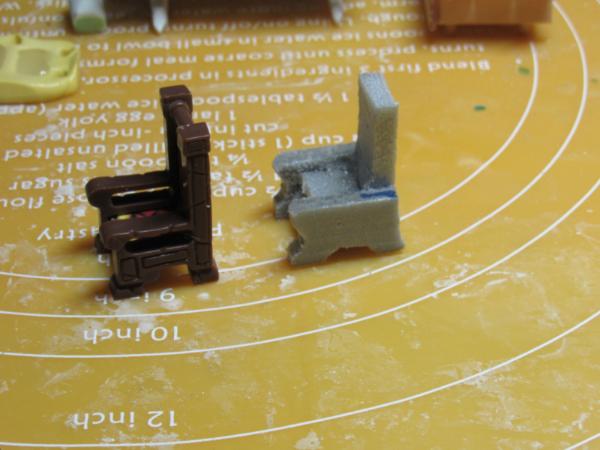
Thrones

Three different styles of trestle tables. One mostly made from craft sticks, the other two from various wood grain patterns I sculpted.

Tombs: Original on the left, the one I made from a mold on the right. I'll share side views later that show #D renditions of what was printed on the original.

Three, new, 3D versions of of the sorceror's table. The green and purple one is made to look similar to the original, the second made to look like it's a stone podium, and the last in the necromancer version. These pieces are some that I'm most proud of, but the next two I'm even more proud of.

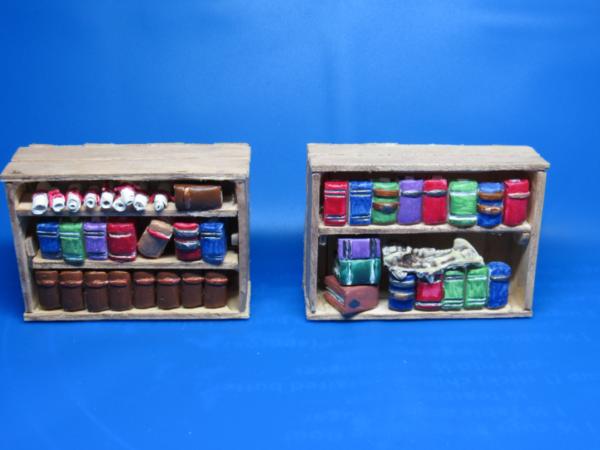
The new bookcases. I love how these turned out. Looking at the pictures I realize I forgot to do something I had planned to, but they may not need it.
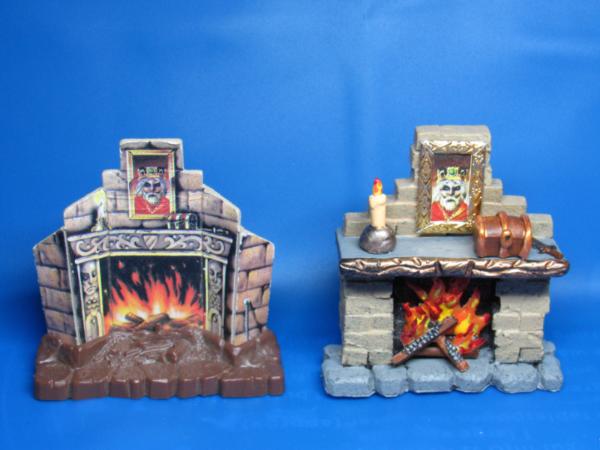
The fireplace. I can't believe how great this turned out. I didn't think there would be anything I was more proud of than the bookcases, but when I finished putting this together I was blown away. I hope all of you like it too.
|
|
|
|
|
|
2018/01/29 04:52:02
Subject: Syro's projects: Currently Hero Quest Furniture
|
|
Gargantuan Great Squiggoth
|
You have done an amazing job, excellent work, end results are nothing short of spectacular. Well done bud, good luck in the competition, but have to say win or lose, you have a fantastic set of scenery for your gaming, you can be very proud of.
|
|
|
|
|
|
2018/01/30 01:52:57
Subject: Re:Syro's projects: Currently Hero Quest Furniture
|
|
Krazed Killa Kan
|
Thanks so much Cam, your kind words and encouragement really mean a lot to me. I will be very happy with all my pieces and proud of what I made whether I win or loose the comp.
I've been working on my last two pieces of Hero Quest furniture:
I glued on all the hinges today, and made the handles. It's a shame that there isn't enough time to have cast all of my hinges in greenstuff, but the hotglue ones seem to have turned out fine. I just need to wait for the greenstuff to dry on the handles before I can paint. I'm having trouble deciding what color I want all the hardware on this to be. I haven't had any metal pieces be the original cast iron color, so probably the usual lead belcher silver, but I do like the look of that copper wire....
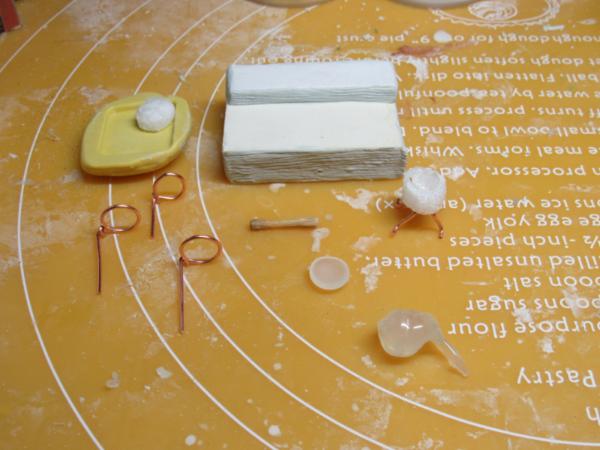
This whole time I thought I would be making a writing desk for the last piece, but with some recent research it's actually an "alchemy bench". I had forgotten after all these years, and my set didn't come with the set of scales or bottles, which gave it most of its character. It doesn't look like much now, but I'm hoping this will look good when I'm done. I'm planning on filling the area with alchemy equipment inspired by Elder Scrolls: Oblivion, rather than the letters, ink well, quill pen, etc. The copper wire rings will be acting like chemistry ring stands.
|
|
|
|
|
|
2018/01/30 04:33:23
Subject: Syro's projects: Currently Hero Quest Furniture
|
|

Painting Within the Lines
|
If I knew back when I got it that HeroQuest would be so integral to my love of heroic fantasy and RPGs, I would have taken better care of it.
|
|
|
|
|
2018/01/31 01:06:44
Subject: Re:Syro's projects: Currently Hero Quest Furniture
|
|
Krazed Killa Kan
|
@DarkSoldier: So true, it's so hard to know what will leave a long lasting impression on us and what wont. Thanks for stopping by.
I am relieved to announce that I just finished the last piece of Hero Quest furniture for my entry in the -=]_=- League of Extraordinary Riveters terrain competition #24. All 102 pictures I have taken of my progress and finished pieces can be found in my gallery in a sub-gallery called "Hero Quest Furniture".
Here's a picture of my last two finished pieces

The cupboard and the alchiment's bench
|
|
|
|
|
|
2018/01/31 06:42:23
Subject: Syro's projects: Currently Hero Quest Furniture
|
|
Gargantuan Great Squiggoth
|
Brilliant work, alchemist bench is the icing on the cake, superb.
|
|
|
|
|
|
2018/02/01 00:03:21
Subject: Re:Syro's projects: Currently Hero Quest Furniture
|
|
Krazed Killa Kan
|
Thanks Cam! I'm glad you like the alchemist bench, I changed it quite a bit from the original. I feels weird to have a little down time. It was such a push making sure I could finish in time.
|
|
|
|
|
|
2018/02/01 13:23:52
Subject: Re:Syro's projects: Currently Hero Quest Furniture
|
|
Posts with Authority
Boston-area [Watertown] Massachusetts
|
"Big Name". *snrk* Maybe 5 years ago.
The work with hot glue is amazing. I never really thought about it as a crafting medium, aside from 'nid terrain! Bravo.
The fireplace is striking, but it is the library bookshelves that captured my heart. SCROLLS! TINY LITTLE SCROLLS.
Beautiful work.
--B.
|
Falling down is the same as being hit by a planet — "I paint to the 20 foot rule, it saves a lot of time." -- Me
ddogwood wrote:People who feel the need to cheat at Warhammer deserve pity, not anger. I mean, how pathetic does your life have to be to make you feel like you need to cheat at your toy army soldiers game?
|
|
|
|
|
2018/02/01 19:35:54
Subject: Syro's projects: Currently Hero Quest Furniture
|
|
Kinebrach-Knobbling Xeno Interrogator
|
The Heroquest stuff is just brilliant - I know I've said this before on the LoER thread, but I've really enjoyed watching this develop, brings back some great memories of playing HQ as a kid. Looking forward to seeing more!
|
|
|
|
|
|
2018/02/02 21:07:50
Subject: Syro's projects: Currently Hero Quest Furniture
|
|
Sureshot Kroot Hunter
|
Well done on getting all the hero quest stuff finished man. I know you've posted a lot of pics in the Loser thread but would love to see a post of everything together in one picture, you could probably get a really good diorama or set piece with all the stuff you've managed to make
|
|
|
|
|
|
2018/02/02 22:56:07
Subject: Re:Syro's projects: Currently Hero Quest Furniture
|
|
Krazed Killa Kan
|
|
|
|
|
|
|
2018/02/03 22:23:26
Subject: Syro's projects: Currently Hero Quest Furniture
|
|
Kinebrach-Knobbling Xeno Interrogator
|
That looks as awesome on the table as I expected it would! Congrats mate.
|
|
|
|
|
|
2018/02/04 02:55:44
Subject: Re:Syro's projects: Currently Hero Quest Furniture
|
|
Krazed Killa Kan
|
Thanks Apollinaire!
I've been a little burnt out, so I haven't done much hobby stuff since the LoER comp finished. But, it's time to start planning out what I'll be working on hobby-wise in the near future (and then probably doing something completely different than I decide on).
After reading about Sedition Wars (I think in one of Camkierhi's blogs), and it's conversion opportunities, I decided to buy myself a copy back in November. I was so busy with work and the LoER comp that I only opened most of the minis today.

Most of these basic strain "zombies" will work great as plague zombies. The one with the beefy arm might look a little out of place, but maybe a zombie servitor?
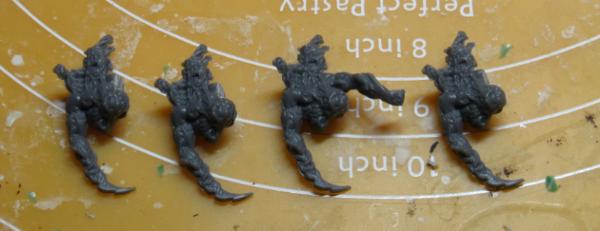
I think these guys will look great as plague bearers in the Nurgle army I've been working on.

They're a little small but these strain "quasimodo" with the cannons growing out of their back, would work well for converting into Obliterators for Chaos. (Terminator just for scale)
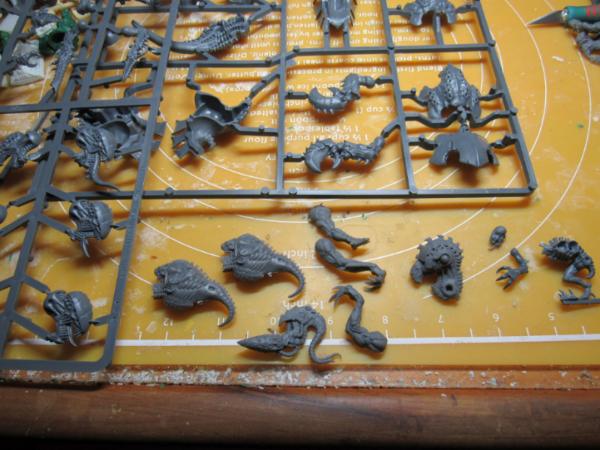
Some of the more advanced strain monsters have a real Tyranid flavor to me. I have some of their pieces with Carnafex and Genestealer bits for comparison.
I didn't take their picture, but another strain monster called the scythe witch looks like it could be converted into Calidus assassins. A bonus is I think all the high tech human soldiers in this game would make a pretty sweet high tech imperial guard force like Elysian drop troops. What do all of you think? Any suggestions?
Other projects I should be getting back to making: remake my ork warboss, my commisars, Sevlar Chem dogs Imperial guard force, Nurgle daemons, Death Wing force, homemade old style necron tomb spider.
I should be painting: Chaos space marines, chaos cultists, mutants, all of my chaos and ork vehicles ( about 25 total I think 0_o)
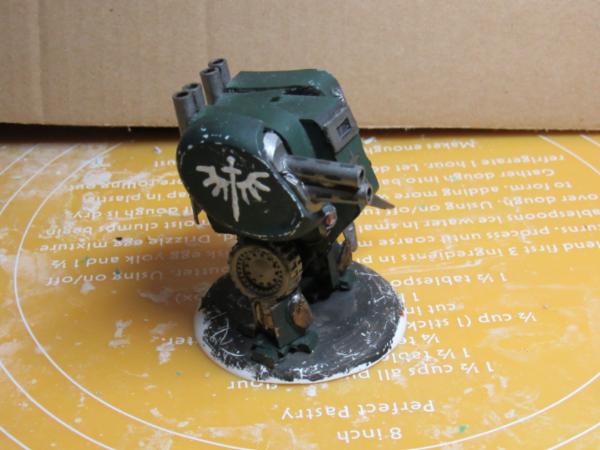
Before anything I'm going to try to put together a tutorial on my to make my simple scratch built dreadnoughts. One of my students asked me to, so he can try.

This guy
|
|
|
|
|
|
2018/02/04 05:47:51
Subject: Syro's projects: Currently Hero Quest Furniture
|
|

Tough Tyrant Guard
|
So have just finished reading this from page one as hadn't notice it before.
I really like this blog and what you have been doing in here, squiggoths are cool, nurgle daemons are suitably disgusting and...
I'm a Hero Quest fan boy... played it loads when younger and still have a mint copy of it and a "playing" copy of it currently which gets good use.
Loving the work you are doing on the furniture etc... really really cool stuff! Will keep an eye on this blog for sure!
Righto, I'm off to get my Hero Quest out and get my brother to come over for a game haha. Or maybe I teach my 7 year old?
|
|
This message was edited 1 time. Last update was at 2018/02/04 05:51:54
|
|
|
|
|
2018/02/04 09:40:03
Subject: Syro's projects: Currently Hero Quest Furniture
|
|
Gargantuan Great Squiggoth
|
Agree completely with the Sedition Wars stuff, lots of potential, and much of it requires very little conversion for Nurgle etc.
The human element could go for a Necromunda gang, IG troops and many other things.
Really like the dread has a very imperial guard feel to it, maybe a good proxy for sentinels. Obviously works well as a Marine dread also, good scale and looks the business, look forward to seeing your tut.
|
|
|
|
|
|
2018/02/04 23:44:10
Subject: Re:Syro's projects: Currently Hero Quest Furniture
|
|
Krazed Killa Kan
|
@Mad..: Thanks for going through the whole blog, and I'm glad you like it. That's really cool that you have both a mint copy and one for playing. I grew up playing my older brother's, I only bought my own about a year ago off ebay. It's missing so many little pieces, but it's nice to have my own to play whenever I want. I'm jealous that you're getting to play it so often , and I'd definitely say your daughter is old enough to start learning the game.
@Cam: Thanks Cam, it's great seeing you here. The dread is a little over sized at about 2 1/2 inches/ 7cm at the shoulder not including the base. But I like it the way it is, and it has pretty easy measurements when building (in inches unfortunately for most of the world). I've been working on the dread tut, but I'm waiting to post anything until I can do it all in one post.
|
|
|
|
|
|
2018/02/12 18:38:54
Subject: Re:Syro's projects: Currently Hero Quest Furniture
|
|
Krazed Killa Kan
|
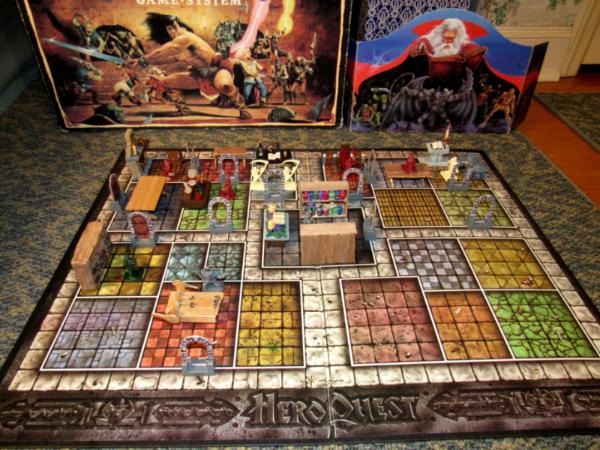
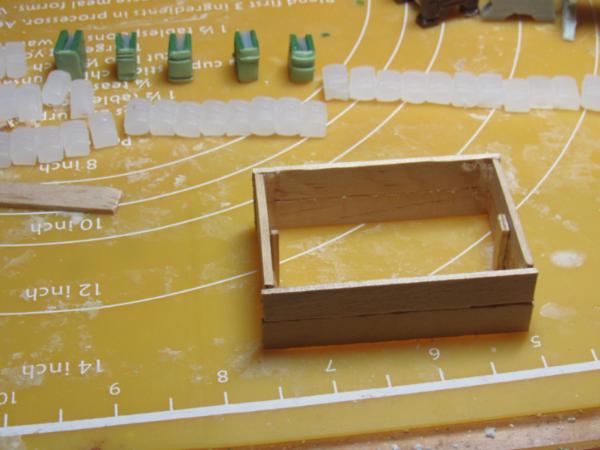
I haven't had much time or energy lately, so I haven't gotten too far on the scratch built dreadnought tutorial. Today, I decided to build a storage container out of foamcore to protect my Hero Quest furniture. It's been sitting and taking up a section of my work space because I've been afraid to store it in case I damage it.

The storage "case"
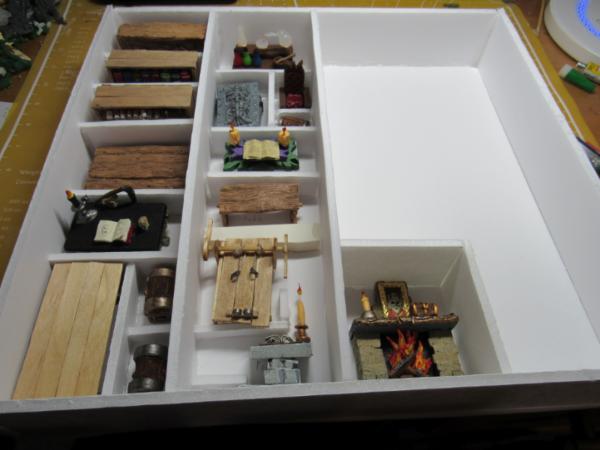
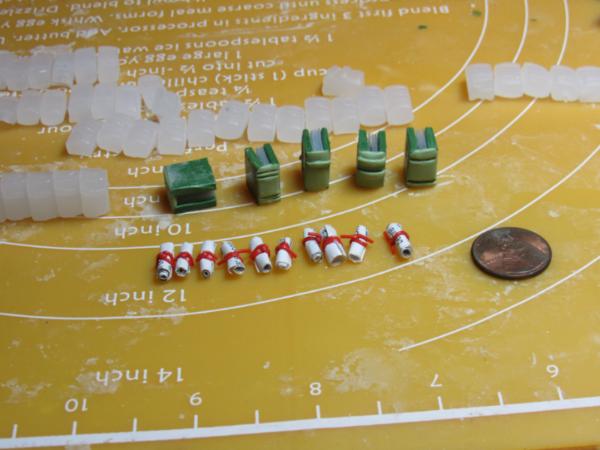
With my furniture in place. (I plan to store the tables upside down to make them much easier to get out, but have them that way for the picture).
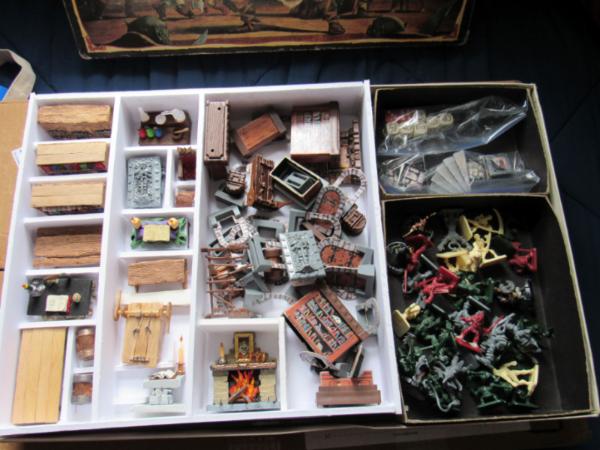
Whole contents of the game, new and old furniture side by side.
|
|
|
|
|
|
2018/02/12 18:55:52
Subject: Syro's projects: Currently Hero Quest Furniture
|
|
Gargantuan Great Squiggoth
|
Excellent.
|
|
|
|
|
|
|
|