| Author |
Message |
 |
|
|
|
|
Advert
|
Forum adverts like this one are shown to any user who is not logged in. Join us by filling out a tiny 3 field form and you will get your own, free, dakka user account which gives a good range of benefits to you:
- No adverts like this in the forums anymore.
- Times and dates in your local timezone.
- Full tracking of what you have read so you can skip to your first unread post, easily see what has changed since you last logged in, and easily see what is new at a glance.
- Email notifications for threads you want to watch closely.
- Being a part of the oldest wargaming community on the net.
If you are already a member then feel free to login now. |
|
 |
2018/12/04 23:27:11
Subject: Re:Imperial Knights: The Avengers Initiative
|
|

Ragin' Ork Dreadnought
|
Housekeeping
@CommissarKhaine: Years indeed - and now another couple of months... Still trying to make my come back apparently...
@monkeytroll: I was going to leave the mounting tubes as is. Only the Captain will have the back mounting tubes, they will be mostly covered by the mounted shield, and don't look out of place as is - do they? I guess I can always come back and add some cables later when I change my mind.
@everyone: Apologies for breaking my seventh goal *again*, its been almost three months instead of one week since my last entry. This post's excuses include: Discovering all of my liquid greenstuff (x3!) is no longer liquid, and that GW don't sell it any more? Have had to source some from elsewhere...Knocked completely off my feet by the flu. The kind where one can't even model (ie the worst kind)Another (non hobby related) personal projectSea of ThievesWork. Which should hopefully die down as of next week - fingers crossed!
Progress
So, lets see if I can remember what these pictures were about...
This should be the cleaned up Reaper Chainsword and Shield magnetised mounting points.
The obligatory "It works!" shot.
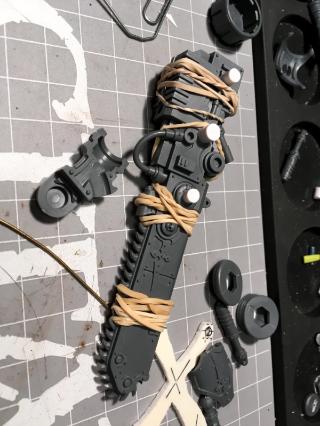
My brother reminded/informed me that the way to reduce the need to fill join gaps is to apply consistent pressure to the join. As a lazy person, I found some elastic bands to do the hard work for me.
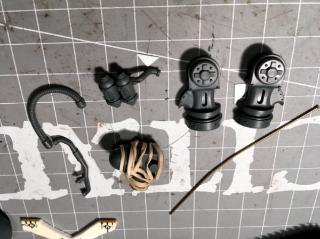
Same with the upper join of the Thunderstrike Gauntlet.
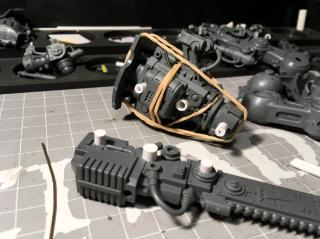
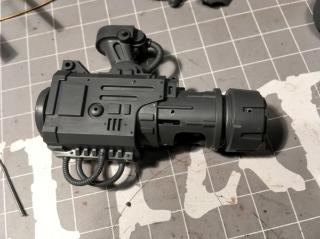
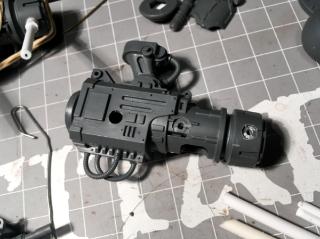
I got a bit carried away and forgot to take in progress shots here. This is the Avenger Gatling Cannon with drilled mount points for the shield. (Not glued yet, just held together for alignment.)
So I took in progress shots of the Thermal Cannon/RFBC - here I have marked out the mount point locations.
...and started drilling!
Catchya!
|
|
|
|
 |
|
2018/12/05 00:32:33
Subject: Re:Imperial Knights: The Avengers Initiative
|
|

Fixture of Dakka
|
I don't think the mounts look too out of place without the shield there, but hard to tell for sure whilst he's still in bits. I just like to ask questions  As you say, adding cables and the like at a later date isn't going to be a major job if you don't like it as is.
After a few years, a few months is nothing 
What's the alternative liquid GS you've sourced?
The plasticweld you mentioned earlier, and it's analogues, can also prevent journals from being an issue as it generally sets in seconds, so you can hold the pieces together fairly easily by hand. If you've managed to find an Oz supplier obviously.....
|
|
|
|
|
|
2019/01/01 11:34:31
Subject: Re:Imperial Knights: The Avengers Initiative
|
|
Ragin' Ork Dreadnought
|
Happy New Year all!
"Santa" was on target last year...
Iron Man is now ready to start...
Let's see if I can get off to a good start *and* maintain it this year.
@monkeytroll: Same GW liquid greenstuff, different vendor. Still haven't checked to see if it is okay yet though. Still keeping an eye out for Plasticweld.
Automatically Appended Next Post: Opening the Canis Rex box, I was most interested to see what the ramifications of the cockpit and Las-Impulsor would be. The cockpit is actually quite small, and attaches to the underside of the main armour plate - nowhere near the hip joint - so I don't expect any issues there. The Las-Impulsor on the other hand shares parts with the Thermal Cannon and Rapid-Fire Battle Cannon. Specifically it shares the rear Thermal Cannon insert and, more importantly, the Thermal Cannon face plate. This is going to require some additional thinking
Thermal Cannon
Las-Impulsor
|
|
This message was edited 1 time. Last update was at 2019/01/01 23:19:47
|
|
|
|
|
2019/01/02 03:08:45
Subject: Re:Imperial Knights: The Avengers Initiative
|
|
Ragin' Ork Dreadnought
|
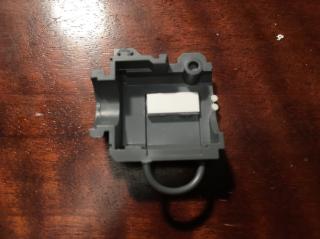
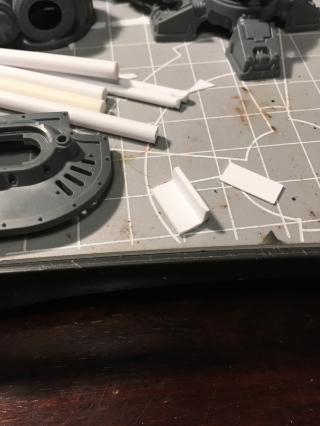
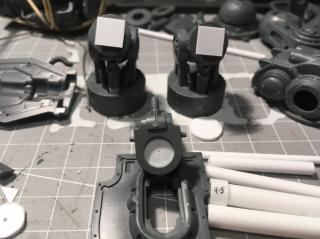
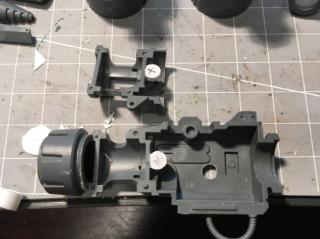
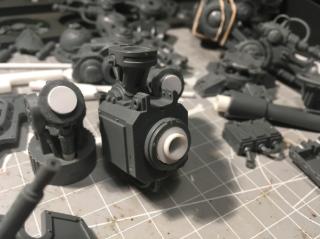
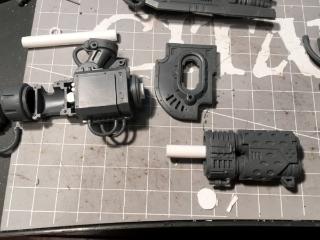
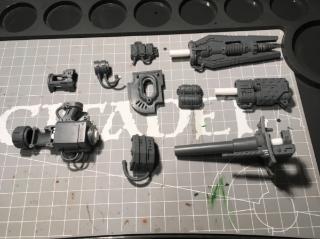
Magnetisation of the side panels for the Las-Impulsor, Thermal Cannon and Rapid-Fire Battle Cannon.
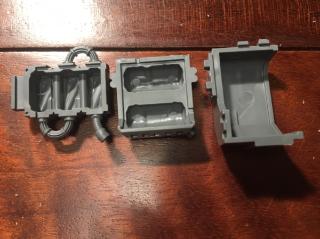
The target pieces.
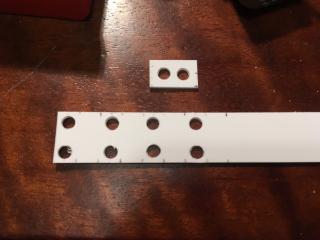
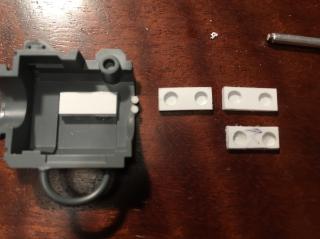
1mm thick plasticard, 12mm wide strip, marked in 5mm intervals with every second interval drilled with 3mm holes leaving 1mm to edges (ie centre at 2.5mm). (The top piece was my initial attempt which I discarded - 7mm deep with 2mm to edges.)

Scored and separated.
This is the idea for the gun pieces - a magnet sandwich made up of 12mmx5mmx0.25mm topped with the 1mm with holes for the magnets and then the 1mm solid. This is actually the pieces for the Rapid-Fire Battle Cannon, which have been trimmed by 0.5mm on the far side (ie 11.5mmx5mm).
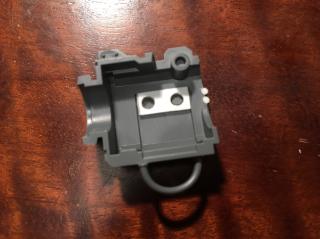
Glue a 12mmx5mmx1mm with holes on the inside of the mounting piece.
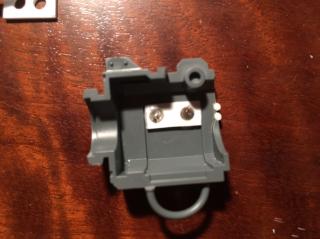
Glue in the 3mmx1mm magnets.
Top with a 12mmx5mmx1mm solid piece.
Glue a 12mmx5mmx0.25mm to a 12mmx5mmx1mm with holes for each gun side piece.
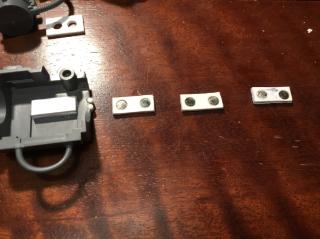
Glue in the 3mmx1mm magnets.
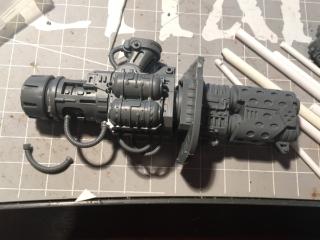
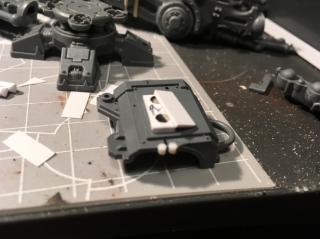
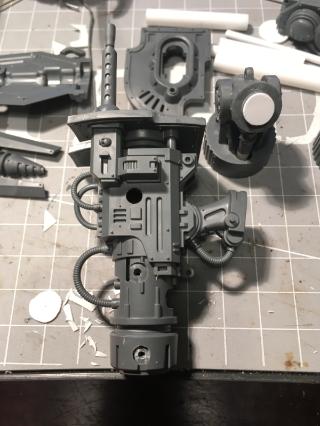
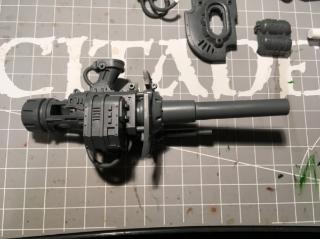
This is the Las-Impulsor. Actually a bit of mucking around to get to this point. First, I actually let the gun magnets sit on top of the housing. Then I play with the amount of plasticard topping required for the gun piece to sit on top snugly. For the Las-Impulsor, the 1mm plasticard topper was a bit thick and has been replaced with 0.5mm + 0.25mm toppers. With the snug fit achieved, I just apply the glue to the top of the topper, and push the weapon back on snugly and wait to dry. I think the Thermal Cannon required 1mm + 0.25mm toppers - I'll have to confirm when I do another one. The Rapid-Fire Battle Cannon required some extra work, which I'll cover in my next post.
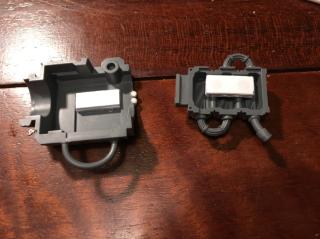
Las-Impulsor weapon side in place.
|
|
|
|
|
|
2019/01/02 13:47:12
Subject: Re:Imperial Knights: The Avengers Initiative
|
|
Fixture of Dakka
|
All looking good - and on track so far with two posts in two days 
Does the las-impulsor wire attach to anything else that needs fiddling?
|
|
|
|
|
|
2019/01/03 02:30:27
Subject: Re:Imperial Knights: The Avengers Initiative
|
|
Ragin' Ork Dreadnought
|
Trying for more, smaller, less polished updates to keep this ticking over. Image upload now tends to be the larger bottleneck.
The Las-Impulsor "wire" is also the Thermal Cannon wire, which both attach to the common insert. I'm planning to attach it to the insert. For the other end, I'm tossing up whether I need to magnetise it, un-halve it and remove the half from both side pieces, or leave as is.
As mentioned in my last post, the Rapid-Fire Battle Cannon required some extra work:
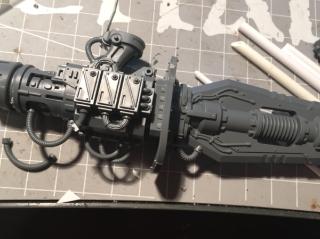
As the RFBC is deeper, and is curved near the top where the magnets need to be, I needed to construct a support mechanism. This is just 2 11.5mm x 5mm x 1mm pieces glued together.
Glued in place (on top of stock 0.25mm cover, 1mm with magnets, 1mm topper) and on the magnetised gun chassis (this makes sure the positioning is lined up). I've already tested the fit, so the missing picture is adding glue to the top and edges and placing the RFBC side piece on top.
The final results.
Catchya!
|
|
|
|
|
|
2019/01/05 05:19:22
Subject: Re:Imperial Knights: The Avengers Initiative
|
|
Ragin' Ork Dreadnought
|
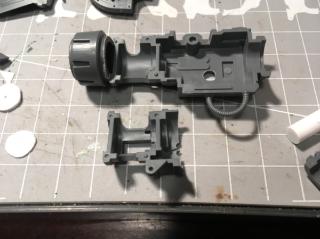
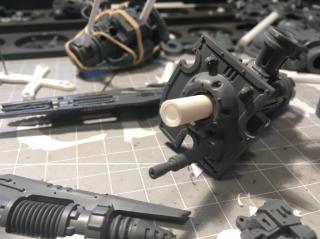
So, thinking about how to attach the gun ends to the gun body - I have three gun ends and two face plates, and not a lot of connection point within the dual use face plate. The gun ends are large, so I'm not convinced a magnet at the join point is going to be enough. However, if I can slide it along a piece of rod perhaps?
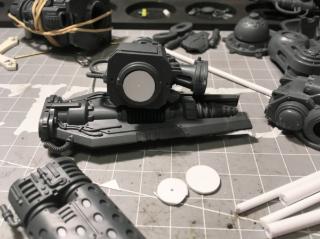
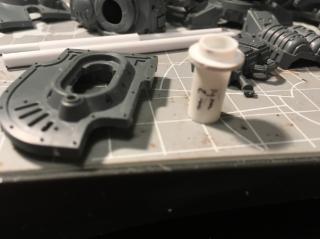
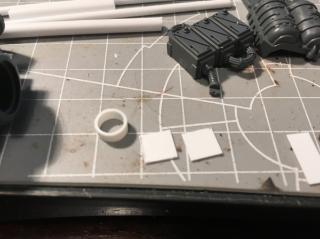
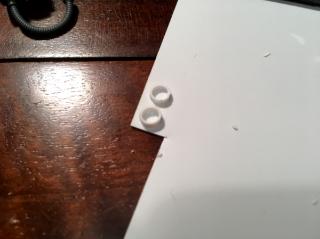
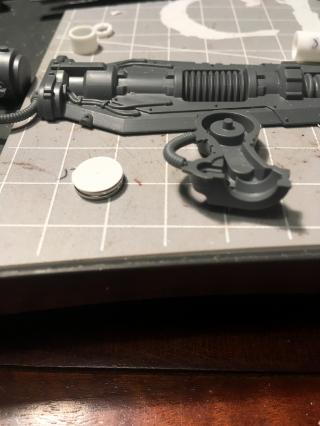
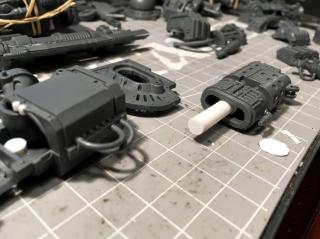
First, use my trusty compass blade device thingy (its a technical term) to cut a 1mm circular disc (11mm diameter from memory) to fit the gun body opening. You can see my two previous attempts in front to the right - one was too small, one was too big (the one on the gun body is just right!)
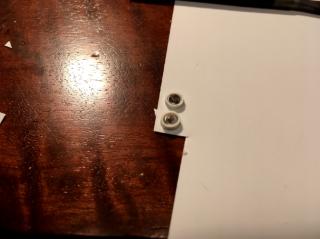
Then cut some 7mm tube, 2 pieces - 2mm and 14mm in length. The circular disc had a 5mm hole drilled through it, and using a 5mm tube through the middle, glued the 7mm tube pieces either side.
It will become clearer later that the Las-Impusor gun end needs some opening up.
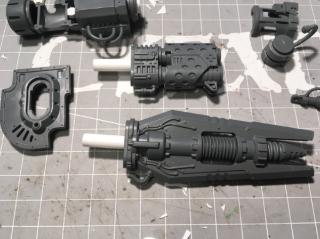
Some more 7mm tube cut to 8mm and 4.5mm lengths to fit the Thermal Cannon and Las-Impusor gun ends respectively.
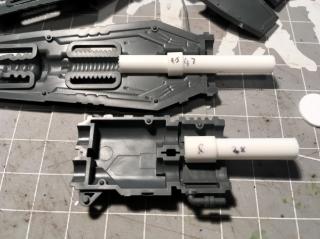
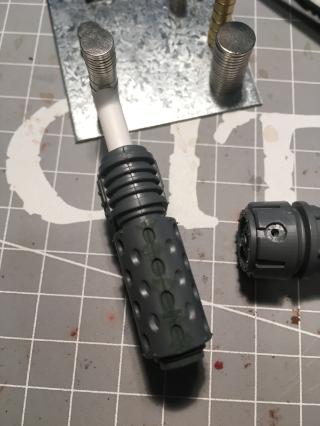
Some 5mm tube cut to 47mm and 28mm for the Las-Impulsor and Thermal Cannon respectively to form the rod that will connect the gun end to the body. This is why the Las-Impulsor gun end needed opening up.
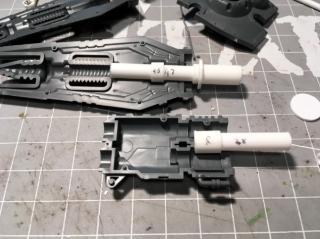
Here you can see how the Las-Impulsor will slide onto the original piece that will be inserted into the gun body.
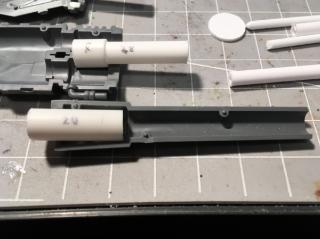
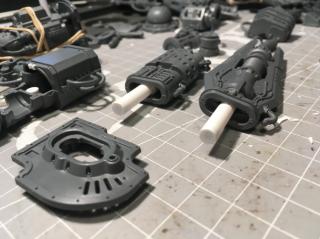
A 20mm length of 7mm tube for the Rapid-Fire Battle Cannon.
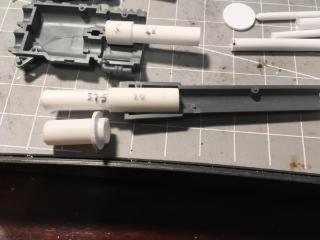
A 37.5mm length of 5mm tube for the Rapd-Fire Battle Cannon.
Catchya!
|
|
|
|
|
|
2019/01/05 09:02:50
Subject: Imperial Knights: The Avengers Initiative
|
|
Gargantuan Great Squiggoth
|
You are fairly quickly moving forward on this. For most people I would put ambitious project, but since it is you, i am not surprised. Great work bud. Inspirational as always.
|
|
|
|
|
|
2019/01/05 13:18:22
Subject: Re:Imperial Knights: The Avengers Initiative
|
|
Ragin' Ork Dreadnought
|
Hey Camkierhi! "Quickly" is an illusion - I'm currently coming up on the conclusion of two weeks off over Christmas/New Year. I'm trying to get some momentum before things inevitably slow down. I'm not as prolific as you.
Still - the aim is to have 1500pts completed (including paint!) before end of year (so I can get back to Orks).
A bit more progress.
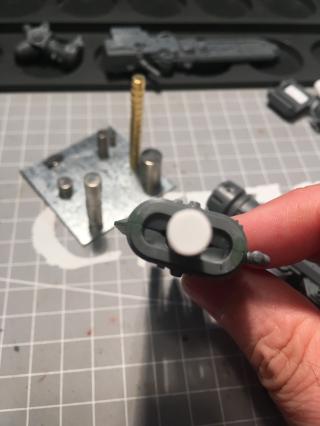
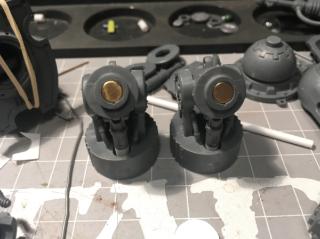
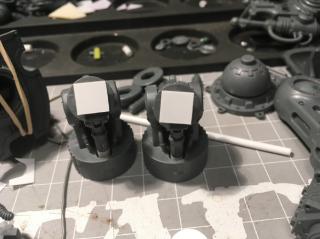
I always cover my magnets - I don't need them escaping - and they end up less prone to chipping / take paint better this way. This is 3mm of 7mm tube and some 0.5mm square toppers for a 5mm diameter x 3mm height magnet (not shown).

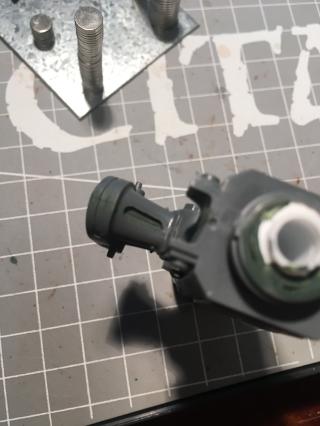
Attached to the end of the gun body insert (magnet inside).
|
|
|
|
|
|
2019/01/05 13:59:11
Subject: Re:Imperial Knights: The Avengers Initiative
|
|
Fixture of Dakka
|
Good work with the 'barrel' modularity
|
|
|
|
|
|
2019/01/05 22:55:12
Subject: Re:Imperial Knights: The Avengers Initiative
|
|
Ragin' Ork Dreadnought
|
Thanks monkeytroll!
While trying to get the fit of the gun barrels correct, the insert tube kept moving due to interacting with the side magnets. Which means I need to glue it in place. Which means I need to prep and glue all of the other gun body pieces.
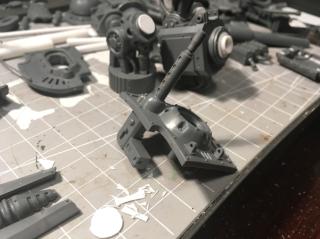
Apparently I never got back to finishing the elbow magnets. Here are 5mm diameter x 3mm deep magnets superglued into the previously drilled holes.
0.5mm thick square toppers applied.
The lower arm is ready built for magnets. That is a 9mm x 1mm disc magnet and a 9mm x 0.25mm disc plasticard topper. The magnet will actually be held in place by the groove at the top of the lower arm - hence not needing the extra structural integrity of a 0.5mm topper here.
All glued together.
Catchya!
|
|
|
|
|
|
2019/01/07 14:11:25
Subject: Re:Imperial Knights: The Avengers Initiative
|
|
Ragin' Ork Dreadnought
|
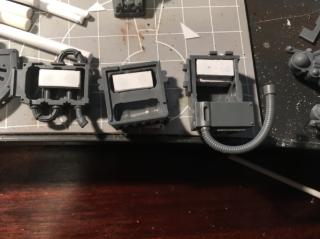
Next steps: sort out the rear insert cover.
Pieces in question to be magnetised.
1.5mm high 5mm round tube on top of 0.25mm plasticard.
With 3mm x 1.5mm magnets.
Topped with 0.25mm plasticard. (Would have been better to do these separately.)

Cleaned up.

Side sanded down ready for mounting.
In place.
Catchya!
|
|
|
|
|
|
2019/01/10 12:03:38
Subject: Re:Imperial Knights: The Avengers Initiative
|
|
Ragin' Ork Dreadnought
|
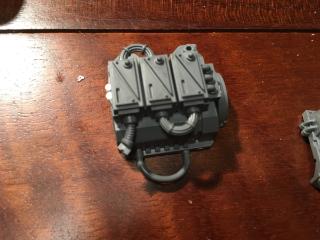
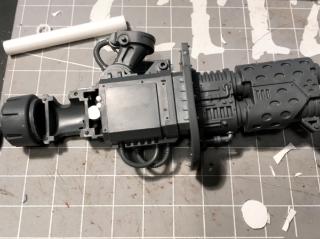
Glue the Heavy Stubber to the Rapid-Fire Battle Cannon face plate, in place to make sure it all lines up.
Removed.
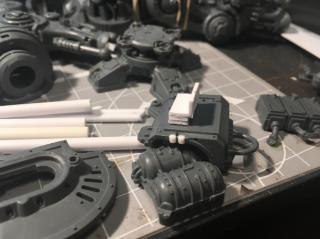
Glue the gun body and insert together.
File down the inside nub so that the central rod can go in centred.
Place the magnetised rod in place and put the faceplate back on. Somewhere along the line I magnetised these - but apparently forgot pictures! I glued a piece of 3mm tube inside with enough room for a 3mm x 1.5mm magnet, then top with 0.25mm plasticard and trim to match the 5mm outer tube.
Glue the 20mm length of 7mm tube to the 37.5mm length of 5mm tube insert.

Finally glue the Rapid-Fire Battle Cannon barrel to the face plate and magnetised inner tube. Presented here with all of the Rapid-Fire Battle Cannon magnetised bits attached.
I must take some photos of the individual pieces...
Catchya!
|
|
|
|
|
|
2019/01/11 00:42:33
Subject: Re:Imperial Knights: The Avengers Initiative
|
|
Fixture of Dakka
|
Definitely keeping up with the update schedule so far this year
|
|
|
|
|
|
2019/01/11 09:32:24
Subject: Imperial Knights: The Avengers Initiative
|
|
Gargantuan Great Squiggoth
|
I am loving following this, like having a master class series.
|
|
|
|
|
|
2019/01/12 06:20:13
Subject: Imperial Knights: The Avengers Initiative
|
|
Ragin' Ork Dreadnought
|
@monkeytroll - So far... that's the last of my holiday progress. We'll see how things proceed from here.
@Camkierhi - Glad you are enjoying it. I mostly do it for my own benefit for when I come back and do the other two. I figure people are waiting for me to go back to the posing and customisation work rather than the magnetisation - but it is all connected.
|
|
|
|
|
|
2019/01/15 23:48:48
Subject: Re:Imperial Knights: The Avengers Initiative
|
|
Ragin' Ork Dreadnought
|
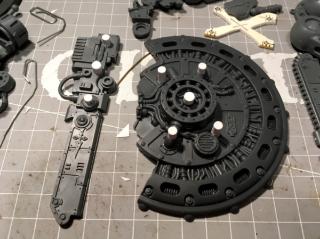
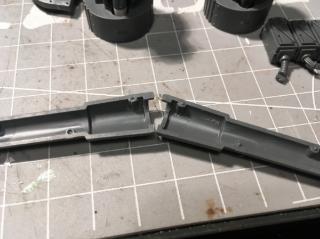
Does anyone else see the problem here?
Thunderstrike Gauntlet arm extension.
Thunderstrike Gauntlet arm flexion.
This kit is going to drive me bonkers!
|
|
|
|
|
|
2019/01/16 14:59:58
Subject: Re:Imperial Knights: The Avengers Initiative
|
|
Fixture of Dakka
|
Planning to modify the hydraulics, or completely replace with scratch-builds?
|
|
|
|
|
|
2019/01/16 22:56:06
Subject: Re:Imperial Knights: The Avengers Initiative
|
|
Ragin' Ork Dreadnought
|
I thought I was going to need the extension version for Iron Man (it matches his pose better) - but between the shoulder pad and the fact there is almost no flexibility in the wrist joint, it looks like I can get away with the "standard" position - pretty much half way between the two extremes - and not have to make any modifications at all. Not for Iron Man anyway.
If (when?) I need to use one of the extremes, well, I wasn't planning to completely scratch build the hydraulics - just modify them. I figure I can extend or reduce the inner piston easy enough, and some green stuff cable makers should take care of the cables.
The "real" issue I'm not looking forward to? Modifying the lower connection point. It should be attached to the lower arm piece, and move with it. Instead it is part of the upper arm piece and does not look designed to easily modify....
I can live with the central cog being in a static position....
|
|
|
|
|
|
2019/01/17 00:23:30
Subject: Re:Imperial Knights: The Avengers Initiative
|
|
Fixture of Dakka
|
That's why I wondered about a completely new set, if you have to rebuild the piston and lower connection point. I agree it's still easier to do just that in this case, but sometimes replacing a whole piece feels right, and leaves you with a spare piece to play with on some other project
I wouldn't have been considered the cog, it's likely to have ended up in such a similar position anyway. But I can get a lazy like that
|
|
|
|
|
|
2019/01/21 13:01:10
Subject: Re:Imperial Knights: The Avengers Initiative
|
|
Ragin' Ork Dreadnought
|
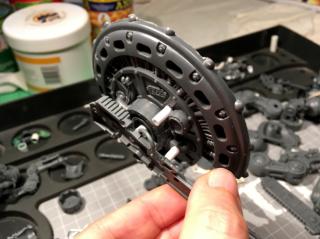
If it was Orks, or Chaos, then I would consider a rebuild. For Imperial - at least not badly damaged Imperial - I think I'd need to go a 3d print or something. I know where you are coming from - my Orks would love some Imperial Knight pieces to play with I'm sure .
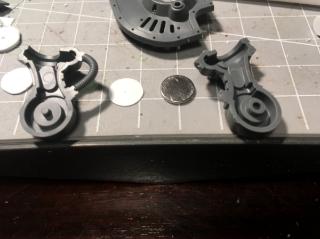
On the right, we have the top of the Rapid-fire Battle Cannon et al arm. I thought the connection point here would be the same as the top of the Thunderstrike Gauntlet arm (see below). I really should learn not to assume. Whereas the RFBC connection is made for a 9mm x 1mm disc magnet (and I'm not especially happy with the strength of the connection that gives) - the same magnet swims in the Thunderstrike Gauntlet arm. Two fit pretty good though (above left) - with a super glued 9mm x 0.25mm plasticard disc on top.
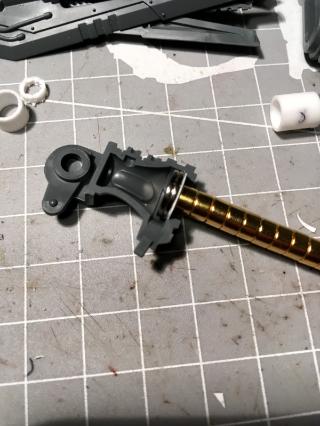
Here it is glued into one half - held only by the plastic glue. (Using a magnet handhold to pull it tight while it sets.)
Addition of a plasticard tube stopper to make sure they aren't going anywhere.
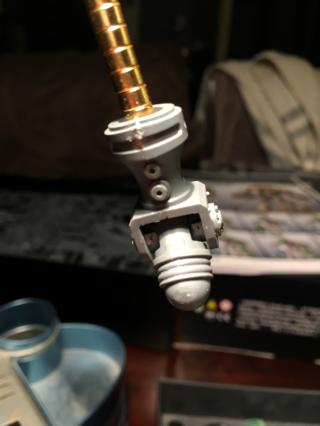
Hanging around.
I much prefer the strength of the double 9mm x 1mm disc magnets here - and although the RFBC arm doesn't have room for them, it does have room for a slighly smaller disc magnet underneath - so I think I will be going with that for the remaining RFBC arms.
Catchya!
|
|
|
|
|
|
2019/01/21 17:59:46
Subject: Imperial Knights: The Avengers Initiative
|
|
Gargantuan Great Squiggoth
|
Late in the day and probably obsolete now, but have you considered casting up parts, I have done some experimenting with iron filings in resin and then using magnets, you half the number of magnets and the strength of the joint is very good.
I am learning all sorts here and you have my collective juices flowing on a project I have on the back burner for a while. For instance love the covering of the magnets because that is always an issue. Should have thought of it before and have done it on occasion, but too lazy I guess. Makes a big difference I think.
A lot of the time I have given up on magnets, I make mechanical joints to move etc. use a fair amount of pinned joints.
|
|
|
|
|
|
2019/01/22 12:01:40
Subject: Re:Imperial Knights: The Avengers Initiative
|
|
Ragin' Ork Dreadnought
|
Late in the day, ha! I'm barely started . Seriously though, no I hadn't considered casting up parts. I dabbled earlier with my first press mould (still to actually use) and I do have some lego bricks I got over a decade ago for such a purpose. I guess I was waiting for an unmitigated disaster to push me in that direction . I had not considered, or even come across, iron filing filled resin for magnetisation - so I will add that to my ever growing list of things to ponder. I *am* *trying* to get this finished this year you know...
That's another benefit to blogging here, you never know what I might learn - thanks Camkierhi.
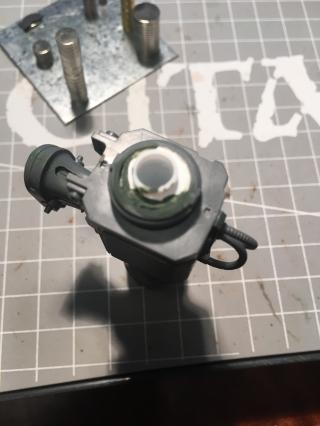
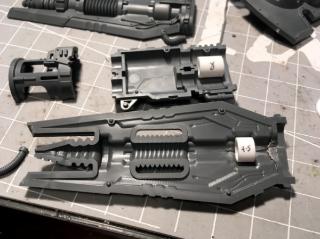
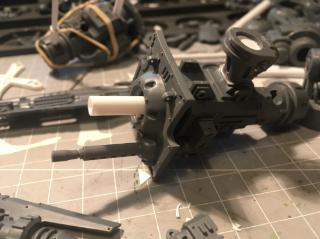
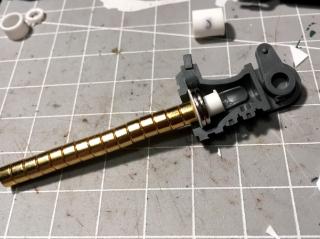
Back to the Thermal Cannon...

What is not really obvious from this picture is the 7mm tube on the end is glued in place. This was actually a careful process not easily covered in photos. The 5mm tube was inserted into the gun body, the 7mm tube added, and the face plate and Thermal Cannon end placed around it. This was repeated multiple times, each time filing a bit more from the 5mm tube end so everything fit snugly in place. Once I was happy I had the lengths correct, and the Thermal Cannon would come together correctly, only then I applied plastic glue to the end of the 5mm tube and let the action of pushing the 7mm tube onto it spread out the glue - all inside the held together Thermal Cannon end and face plate - without gluing anything else!
Once that set, then I glued the two halves of the Thermal Cannon, carefully keeping away from the very edge that connects the face plate, and also the 7mm tube end and held all together to set.
Once set it all pulls apart.
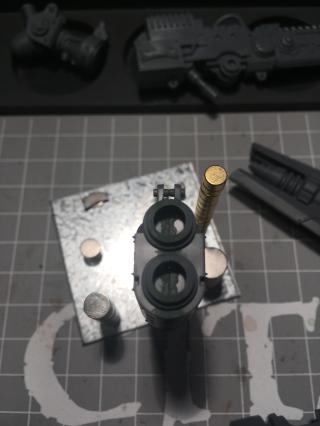
Here is a side picture looking into the Thermal Cannon end. You can better see where the 7mm tube is glued in place, connecting the 5mm tube with magnet to the Thermal Cannon end.
Catchya!
|
|
|
|
|
|
2019/01/28 12:41:41
Subject: Re:Imperial Knights: The Avengers Initiative
|
|
Ragin' Ork Dreadnought
|
Las-Impulsor end complete (along side previously completed Thermal Cannon end.)
Side view of Las-Impulsor and Thermal Cannon ends.
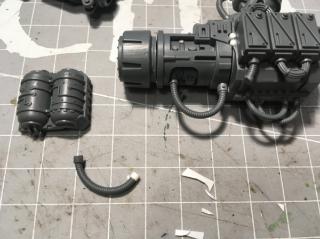
Clean up the cable connection ends, and replace the end on the actual cable.
All of the completed Rapid-Fire Battle Cannon, Thermal Cannon and Las-Impulsor magnetised bits.
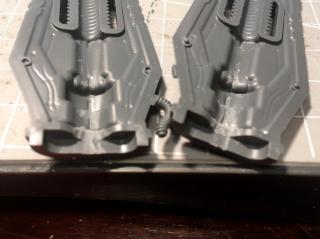
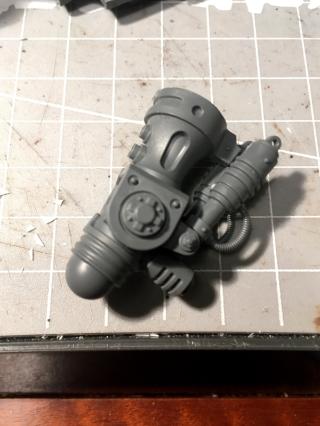
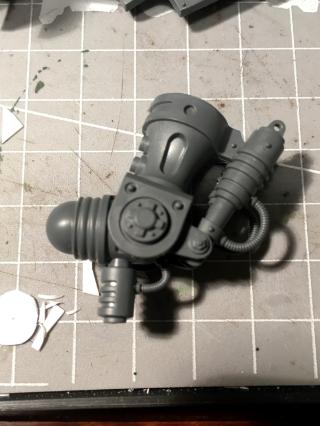
The completed Rapid-Fire Battle Cannon.
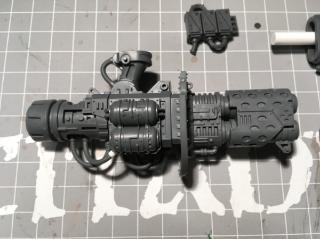
The completed Thermal Cannon.
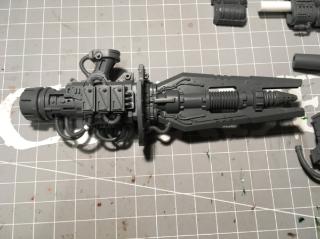
The completed Las-Impuslor.
Notes for next time around / future modifications:
More magnets in the elbow mount to shoulder.Potentially cast the Thermal Cannon/Las-Impulsor face plate and attach to the respective gun ends (removes one piece.)Drill the central holes before cutting right side in half.Work out why the Thermal Cannon side isn't sitting flush.
Catchya!
|
|
|
|
|
|
2019/02/04 13:46:19
Subject: Re:Imperial Knights: The Avengers Initiative
|
|
Ragin' Ork Dreadnought
|
|
|
|
|
|
|
2019/02/04 15:04:18
Subject: Imperial Knights: The Avengers Initiative
|
|
Gargantuan Great Squiggoth
|
Do you know about homebrew sprue putty?
Put a bit of Tamiya Thin glue in a bottle with some chopped up spru, 24 hours later you have a goo that fills gaps with plastic, sets up solid.
Great progress.
|
|
|
|
|
|
2019/02/05 09:16:43
Subject: Imperial Knights: The Avengers Initiative
|
|
Ragin' Ork Dreadnought
|
I did not know about homebrew sprue putty - sounds like something worth experimenting with. What do you use to apply it? Feels like it might destroy brushes at a rapid rate....
|
|
|
|
|
|
2019/02/05 12:59:34
Subject: Imperial Knights: The Avengers Initiative
|
|
Gargantuan Great Squiggoth
|
I use either a cocktail stick/toothpick, or I have cut the brush out of an old pot of glue and stuck it on a paintbrush handle, it is fine. Also just the brush left on the lid works well, but you can struggle if you dont have much "putty" in the jar. I had two pots of the glue, and when one got down to a bit less than half I satarted throwing spru in until you get a thick custard like consistancy, maybe even thicker. Works a treat bud.
|
|
|
|
|
|
|
|
 Imperial Knights: The Avengers Initiative
 Da Dark Angelz
 Arakasi vs Infinity