| Author |
Message |
 |
|
|
|
|
Advert
|
Forum adverts like this one are shown to any user who is not logged in. Join us by filling out a tiny 3 field form and you will get your own, free, dakka user account which gives a good range of benefits to you:
- No adverts like this in the forums anymore.
- Times and dates in your local timezone.
- Full tracking of what you have read so you can skip to your first unread post, easily see what has changed since you last logged in, and easily see what is new at a glance.
- Email notifications for threads you want to watch closely.
- Being a part of the oldest wargaming community on the net.
If you are already a member then feel free to login now. |
|
 |
2022/08/03 14:17:33
Subject: Re:Jaunty Handmaiden - A Scratch-Built Spaceship for Star Wars Legion
|
|

Stealthy Grot Snipa
|
I was absolutely loving this already, and then that painting sent me over the edge! Absolutely brilliant work, subbed and can't wait to see progress 
|
|
|
|
 |
|
2022/08/04 08:09:06
Subject: Re:Jaunty Handmaiden - A Scratch-Built Spaceship for Star Wars Legion
|
|

Huge Bone Giant
|
Thank you, glad you like it. Last month didn't go well for me in so many ways, but this week I've been able to put daily work into the Handmaiden again, so hopefully updates won't be so slow anymore. Next one should be before the end of the week.
|
Nehekhara lives! Sort of!
Why is the rum always gone? |
|
|
|
|
2022/08/06 12:21:13
Subject: Re:Jaunty Handmaiden - A Scratch-Built Spaceship for Star Wars Legion
|
|
Huge Bone Giant
|
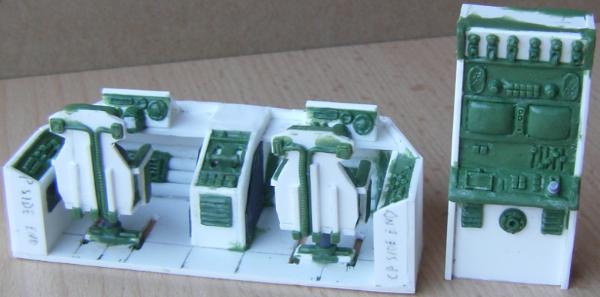
Work on the cockpit continues. But first:
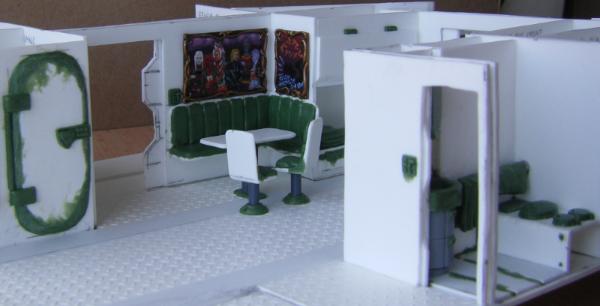
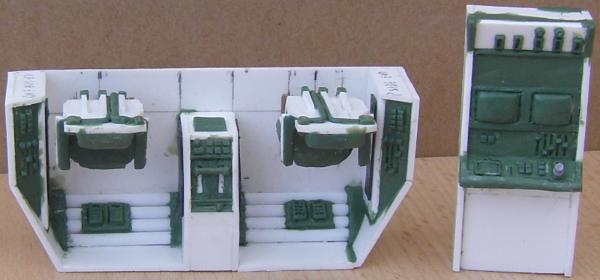
The group picture got a few touch ups after spotting a couple of rough bits in the zoomed in picture. Nothing major but an overall improvement in quality. This dry fitting picture also doubles as confirmation that I got the dimensions of the pictures right. I had the measurements from cutting the pieces of plasticard, of course, but the green stuff frames add a little extra to that. I guess that would have been a good thing to check a month ago, but hey. They still fit fine.
The interior of the ship has a lot of doors that add enough texture to the walls, but notably the walls in the bathroom and the side of the cargo hold are pretty bare. I'm not sure yet if I want to add much in the way of textured detail or leave it bare for a bit of contrast with only the eventual paintjob adding a little interest. That's something to think about. If I want to top off the walls with something, pipes or cables for instance, I have a little spare room above the pictures to make that viable.
As for the cockpit:
I had to go back to the floor insert and cut rails into it. It occurred to me that it would be good to be able to adjust the seats to accommodate people of different heights. That would have been easier to do had I thought of it before gluing the chairs on. But at least the addition of the rails made it trivial to settle on a design for the chair mounts.
I also added the central console. It has all the control elements it's going to get including the lever that makes the ship go whoosh. Okay, maybe it won't make anything go whoosh until I also install the engines. But we'll get there, too.
I'll probably add a maintenance panel or two, and maybe a vent to the sides of the console. The top is probably going to stay bare as its on the level of the windows. There's no real point in putting anything there, but maybe a few rivets or vents may be in order so it doesn't look too empty. Next step is to extend the control elements outward and add pedals and footrests below. Then some computer thingies on the sides and that should wrap up that part of the cockpit.
Also in the picture is the outside end of the wing access hatch. I think I mentioned it before, but I'm using Mantic pipes and connectors for the crawlspace in the wing. This assembly is just there for the pipes to slot in and won't have much bearing on the final shape of that part of the ship. It will get covered up by hull plating eventually and built up to look interesting.
|
Nehekhara lives! Sort of!
Why is the rum always gone? |
|
|
|
|
2022/08/11 08:31:17
Subject: Re:Jaunty Handmaiden - A Scratch-Built Spaceship for Star Wars Legion
|
|
Huge Bone Giant
|
Don't you love seeing sprue pictures of models? Here's one:
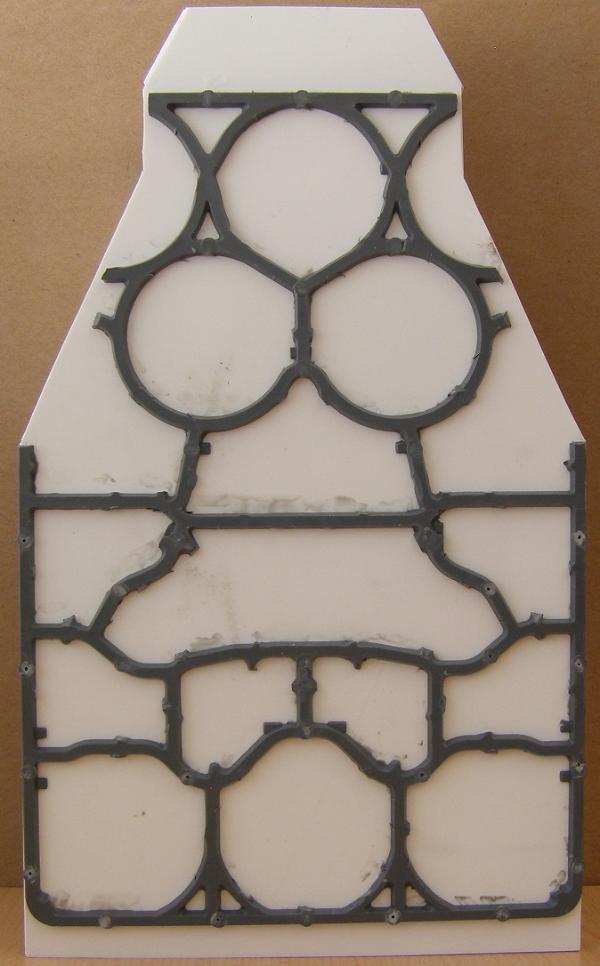
As a slight deviation from my plan to work on the cockpit, I felt the need to do some structural work on the bottom of the ship. I mentioned it earlier, but thin plasticard can lead to warping issues. That doesn't go well with switching off my brain, which is exactly what I did when I glued the floor pieces to the base plate and failed to put weight on the pieces until the glue dried. Which leads to issues with walls not fitting well anymore, the whole thing looking off and draining my motivation because I think I'm not doing a good enough job. Just things snowballing out of control. You know, the usual. So that needed fixing.
For now the purpose of the sprue is to reinforce the base plate and keep it straight. Later on, as was the plan from the beginning and will be see all around the ship, the sprue will act as a spacer between the inner and outer hull. That allows me to work on the inner and outer walls separately and gives me some space for the ship's inner workings, both seen and unseen. In the case of the base plate I picked a sprue with ample space for the landing gear. The sprue is only 2mm thick and I'll have to see if that's all I want, but I have another identical sprue that I can layer on top if I need deeper recesses for the landing gear. Either way, right now I'm thinking there won't be much ground clearance. The base model of the ship is a commercial freighter and supposed to land on nice, flat ground like a landing pad.
Side note, it's mighty nice of GW to make that sprue the exact width of my ship. Convenient!
With this out of the way I can resume work on the cockpit, I hope.
|
Nehekhara lives! Sort of!
Why is the rum always gone? |
|
|
|
|
2022/08/14 11:55:08
Subject: Re:Jaunty Handmaiden - A Scratch-Built Spaceship for Star Wars Legion
|
|

Krazed Killa Kan
|
That is convenient that it's the same width. I'm also not used to seeing the sprues so symmetrical.
|
|
|
|
|
|
2022/08/14 17:33:56
Subject: Re:Jaunty Handmaiden - A Scratch-Built Spaceship for Star Wars Legion
|
|
Huge Bone Giant
|
Yeah, it's the Cargo-8 trailer sprue, so it's all very symmetrical. It's kind of ironic. I kept sprues around for years that looked promising and instead of sorting through them I pick one from the latest box I bought. It's just a good fit.
|
Nehekhara lives! Sort of!
Why is the rum always gone? |
|
|
|
|
2022/08/14 20:26:52
Subject: Jaunty Handmaiden - A Scratch-Built Spaceship for Star Wars Legion
|
|
Utilizing Careful Highlighting
|
This is amazing! It's the kind of thing I wish I could do for my 28mm comic.
|
|
|
|
|
|
2022/08/15 17:38:28
Subject: Re:Jaunty Handmaiden - A Scratch-Built Spaceship for Star Wars Legion
|
|
Huge Bone Giant
|
Thank you kindly. 
It's never too late to learn, although you might not like the results if you're anything like me. I did a few one shot comic panels with model photos in the way back when. I never meant to expand that to a series, but it got me to thinking just how much work I'd have to put into new models and scenery to get new scenes right. These days I have more skill to put into my work, which comes at the cost of even more time. I'd never get anything done*...
Respect to you for getting a series like that running.
*On topic of getting things done, I'll be happy if the Jaunty Handmaiden gets finished this year. I've only had about a quarter of the hobby time I would have liked to put into it for two months now. But hey, it's not a race.
|
Nehekhara lives! Sort of!
Why is the rum always gone? |
|
|
|
|
2022/08/25 08:46:50
Subject: Re:Jaunty Handmaiden - A Scratch-Built Spaceship for Star Wars Legion
|
|
Huge Bone Giant
|
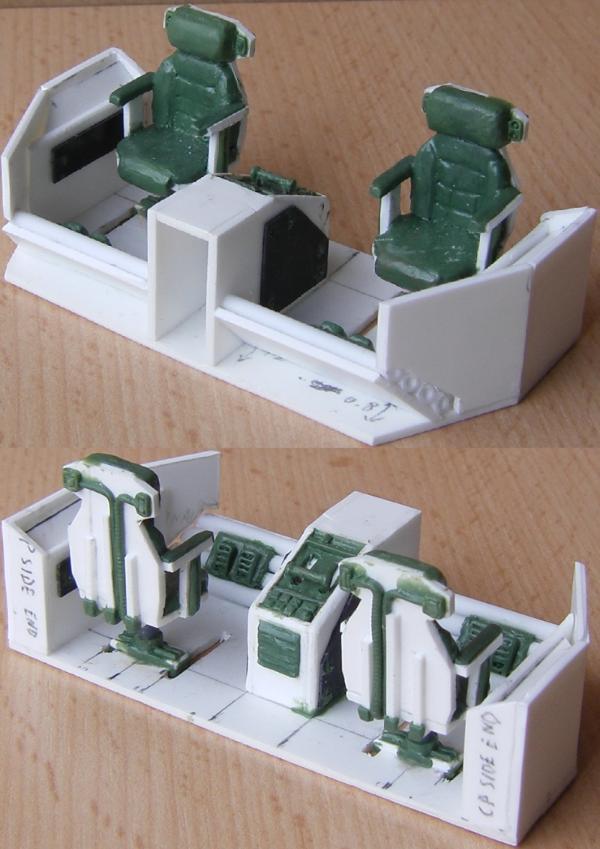
Some work on the cockpit insert:
I added a vent and maintenance panels to the central console. There's a little gap filling left and the transition to the forward console, but other than that it's finished.
I installed pipes to frame the upcoming pedals with the idea that they house cables to connect stuff. They also double as footrests. The pilot's side will get a mirrored setup.
It's a bit difficult to figure out the various heights and distances for the wheels, front and side consoles. I may have to find a sitting Legion model like a pilot of speeder bike rider to get a clearer idea of that. I'm terrible at estimating distance without visual aid.
|
Nehekhara lives! Sort of!
Why is the rum always gone? |
|
|
|
|
2022/08/25 21:34:06
Subject: Re:Jaunty Handmaiden - A Scratch-Built Spaceship for Star Wars Legion
|
|
[DCM]
Boom! Leman Russ Commander
|
What has amazed me throughout this build is the thinness and narrowness of many of the pieces of greenstuff you've created for consoles and other fine detail work. My very limited experience working greenstuff for a limited ranged of pieces (mostly tarps, packs and bedrolls) is that it gets extremely cranky the longer it gets worked and very picky/sticky the thinner it gets.
You've created some tremendously detailed pieces and even with frequent wetting and being careful not to get a lot of direct light on the material, I can only imagine the patience you've brought to the game.
Well done. Looking forward to forward motion.
|
"He fears his fate too much, or his desserts are small, who will not put it to a single touch; to win- or lose- it all."
Montrose Toast

|
|
|
|
|
2022/08/27 00:48:21
Subject: Re:Jaunty Handmaiden - A Scratch-Built Spaceship for Star Wars Legion
|
|
Krazed Killa Kan
|
Those chairs look honestly comfy, I wish I could sit in them. Very nice work again
|
|
|
|
|
|
2022/08/27 08:09:29
Subject: Re:Jaunty Handmaiden - A Scratch-Built Spaceship for Star Wars Legion
|
|
Huge Bone Giant
|
Thanks, guys!
Heh, I wouldn't have thought of my sculpting as particularly patient in this case. I usually struggle with large projects and I'm aiming for a solid, if occasionally rough finish that's going to get evened out during painting so as not to get bogged down. I'd like to finish the model before I die of old age. I suppose since I love sculpting and have been using green stuff almost daily for a decade and a half, I have a decent idea by now how to get it to do what I want. And it helps to have a good tool.
|
Nehekhara lives! Sort of!
Why is the rum always gone? |
|
|
|
|
2022/09/10 16:06:52
Subject: Re:Jaunty Handmaiden - A Scratch-Built Spaceship for Star Wars Legion
|
|
Huge Bone Giant
|
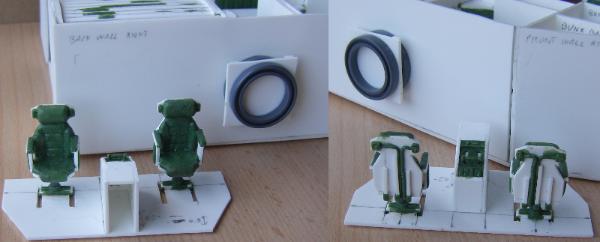
A few bits got more work:
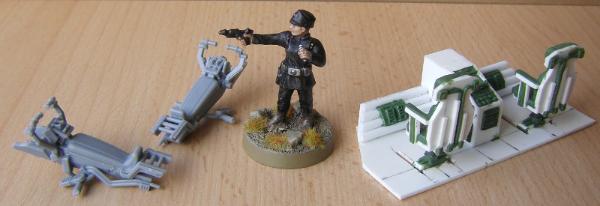
The cockpit insert got encased pedals as well as some pipes on the pilot's side to get both sides on the same level. Nothing fancy, but necessary before I can work on the consoles that would stop me from reaching those bits.
The other thing I made are the speeder bikes I talked about early on. Originally I expected to scratch-build something, but not too long afterwards I became aware that a swoop biker kit was going to be released. It would be too much to say that I waited for that, given that I'm not exactly building at the speed of light, but I did decide to hold back. No point in doing the extra work if there's a perfectly good kit available.
I converted the smaller bike into something a lot more compact so as to be able to fit them inside the cargo compartment. The conversions were really easy to do as well, only requiring a few cuts and no rebuilding. I've played around with a mock up a little:
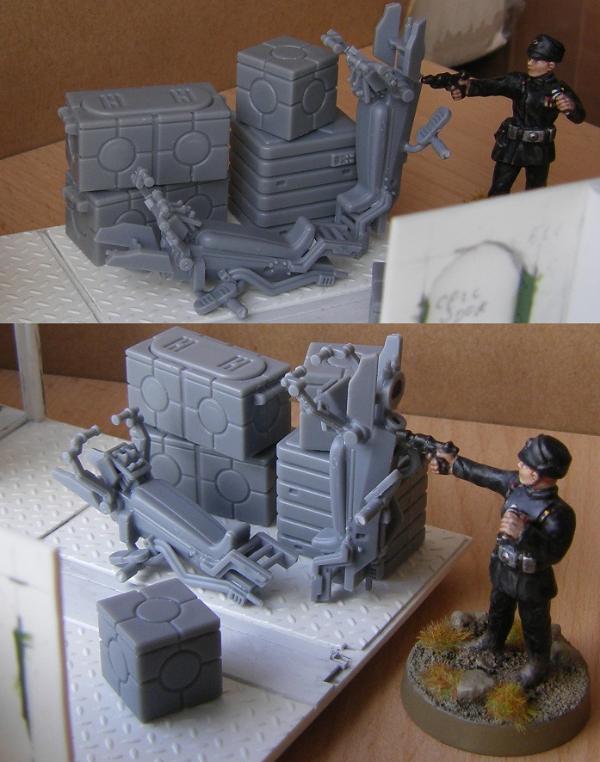
The bike on the right will sit on a wall mount I have yet to make, as simulated by the officer. There's a leftover cross like bit in the kit that looks promising for that purpose. The front end will sit right under the door rail and the back end should be a few comfortable millimeters above the floor. I'll mirror the wall mount on the other side of the cargo compartment, but I'm thinking of leaving that bike on the floor. Possibly poking out of the compartment to a yet to be determined degree, maybe with a rag and some tools added to the floor around it. Then the back of the compartment is filled with boxes.
|
Nehekhara lives! Sort of!
Why is the rum always gone? |
|
|
|
|
2022/09/12 08:16:32
Subject: Jaunty Handmaiden - A Scratch-Built Spaceship for Star Wars Legion
|
|
Druid Warder
|
Not a cargo cult but cargo cool indeed! Good progress, congratulations!
|
Painting progress tracker:
2017: 50 of 50 planned; 2018: 80 of 60 planned; 2019: 75 of 75 planned
Pledge 2020:
6 to sculpt, 75 to paint (2/57 done) |
|
|
|
|
2022/09/12 14:55:44
Subject: Jaunty Handmaiden - A Scratch-Built Spaceship for Star Wars Legion
|
|
Brigadier General
|
This is brilliant work.
I'm primarily a toybasher. The greebling is mostly done and I just have to figure out how to chop it up and reassemble it.
This sort of from-scratch work is a whole other level and really impressive. Looking forward to seeing the final result.
|
|
|
|
|
|
2022/09/13 06:47:03
Subject: Re:Jaunty Handmaiden - A Scratch-Built Spaceship for Star Wars Legion
|
|
Huge Bone Giant
|
Thanks, guys.
|
Nehekhara lives! Sort of!
Why is the rum always gone? |
|
|
|
|
2022/09/13 07:22:32
Subject: Jaunty Handmaiden - A Scratch-Built Spaceship for Star Wars Legion
|
|
Shas'la with Pulse Carbine
|
Ship is shaping up, looking forward to seeing more...
|
My hobby ADHD, mostly Necromunda, with a splash of regular 40k... |
|
|
|
|
2022/09/15 17:24:39
Subject: Re:Jaunty Handmaiden - A Scratch-Built Spaceship for Star Wars Legion
|
|
Huge Bone Giant
|
I should also take the opportunity to write myself a reminder about making the holochess game board that was suggested on the last page. I keep forgetting about that. Plus take the time to figure out where I want to place the odd power socket around the ship. And perhaps look into a techy bit or two in the bunks, like a wall mounted screen or something.
In fact I should keep an actual to do list for all those little decorative bits that I want to put into the ship now that the interior is so far advanced.
|
Nehekhara lives! Sort of!
Why is the rum always gone? |
|
|
|
|
2022/09/15 18:23:41
Subject: Re:Jaunty Handmaiden - A Scratch-Built Spaceship for Star Wars Legion
|
|
Utilizing Careful Highlighting
|
 Geifer wrote: Geifer wrote: I did a few one shot comic panels with model photos in the way back when. I never meant to expand that to a series, but it got me to thinking just how much work I'd have to put into new models and scenery to get new scenes right. These days I have more skill to put into my work, which comes at the cost of even more time. I'd never get anything done*...
Respect to you for getting a series like that running.
Thank you, Geifer.
|
|
|
|
|
|
2022/09/18 16:29:28
Subject: Re:Jaunty Handmaiden - A Scratch-Built Spaceship for Star Wars Legion
|
|
Huge Bone Giant
|
More work on the cockpit:
I got the side console framework done on both sides. I'll no doubt sculpt buttons and stuff before long, but I think I may have to at least make a start on the forward consoles to see where they meet the sides.
The construction is not particularly neat as I'm at the point where the chairs get in the way of getting the parts in the right position. Slanted surfaces are a pain to begin with, but that only makes it worse. For the most part it's not a big deal as it leaves a few gaps in places that get filled with green stuff anyway, but I won't get around doing some cosmetic work that wouldn't have been strictly necessary if I could just reach in there properly.
Before I put the forward consoles in, I'll sculpt some end pieces for the pipes to give them a more elegant appearance.
I stopped work on the wall mount for the first speeder bike when I realized that the plastic bit I was talking about earlier would make a good base for the steering wheel. So I think I'm going to use it for that, but that leaves me to figure out a suitable wall mount.
|
Nehekhara lives! Sort of!
Why is the rum always gone? |
|
|
|
|
2022/09/22 11:41:48
Subject: Re:Jaunty Handmaiden - A Scratch-Built Spaceship for Star Wars Legion
|
|
Huge Bone Giant
|
Progress with a little bigger visual impact:
While sculpting all the little controls and details on the cockpit insert takes time and plenty of sculpting sessions, I figured I could make a start on the starboard wall computer and get some more progress out of those sculpting sessions.

It needs a lot more buttons and dials, and the blank lower part is reserved for the access port for astromechs. The computer on the other side, when I get around to it, will be suspended from the wall with the lower part removed to make way for the escape hatch I have planned for the floor behind the pilot's seat. Since part of that wall is still missing, it will be handy to have the full sized computer as a template.
About that wall, I wasn't sure what to do with the top fifth of the cockpit wall, but I think I'll have another row of windows. Probably angled to allow a better view of what's going on above (and to the front of) the ship. That will take a bit of brain work to figure out, since I'm still not good at exotic angles.
|
Nehekhara lives! Sort of!
Why is the rum always gone? |
|
|
|
|
2022/10/06 16:15:33
Subject: Re:Jaunty Handmaiden - A Scratch-Built Spaceship for Star Wars Legion
|
|
Huge Bone Giant
|
More cockpit progress, now with a novelty top down view to conceal how little work I got done:
So, real life has been getting in the way of things again (hurray!), but at least I got a fair bit of sculpting in on the computer consoles. For the forward insert that means the side consoles are now as finished as they can be without also installing the front consoles. Those will start as a simple flat piece of plasticard that I'll build on, since they have to allow room for the crew's legs under them. Currently the plan is for a central dashboard with the wheel and some instruments and some buttons and dials and stuff between it and the center console. Then a monitor or two in the corner between the dashboard and the side console. The consoles I have already take up a decent amount of space and have a fair few controls, so there isn't much room or much need for a lot more of it on the forward console.
The computer in the back is making good, albeit slow progress. There's a lot of stuff to add and since I only had a rough start in the last update, also a fair bit of polish to straighten things and get crisp edges. With more yet to come. The lower half is mostly getting the astromech port and some ventilation, I reckon. I want a number key pad in the empty area above as well, just to have that covered. And I mustn't forget to sculpt a loudspeaker above each monitor for that sweet 2-bit sound to go with all the black and white line action on those screens. Or maybe I'll have green screens. We had one of those when I was a kid. Nostalgia!
|
Nehekhara lives! Sort of!
Why is the rum always gone? |
|
|
|
|
2022/10/09 22:33:35
Subject: Jaunty Handmaiden - A Scratch-Built Spaceship for Star Wars Legion
|
|
Utilizing Careful Highlighting
|
I remain in awe of your skills, Geifer.
|
|
|
|
|
|
2022/10/10 01:36:40
Subject: Jaunty Handmaiden - A Scratch-Built Spaceship for Star Wars Legion
|
|
Dusty Skeleton
Houston, TX
|
This is amazing! Love your work and I'll continue to follow this thread.
|
You can't spell Slaughter without Laughter! 
|
|
|
|
|
2022/10/10 06:25:22
Subject: Jaunty Handmaiden - A Scratch-Built Spaceship for Star Wars Legion
|
|
Shas'la with Pulse Carbine
|
Great work on the cockpit!
|
My hobby ADHD, mostly Necromunda, with a splash of regular 40k... |
|
|
|
|
2022/10/10 14:41:45
Subject: Re:Jaunty Handmaiden - A Scratch-Built Spaceship for Star Wars Legion
|
|
Huge Bone Giant
|
Thanks, guys!
|
Nehekhara lives! Sort of!
Why is the rum always gone? |
|
|
|
|
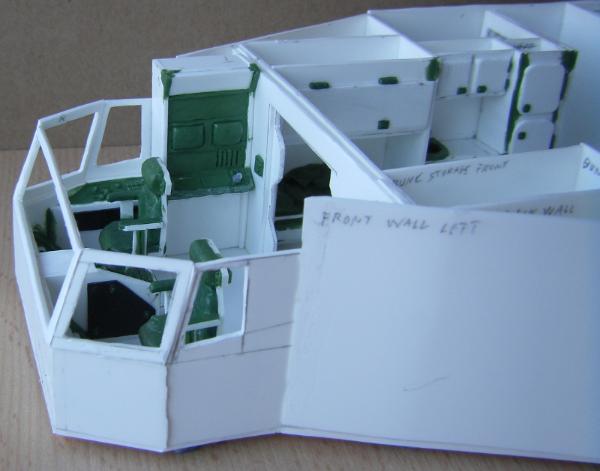
2022/10/15 13:51:41
Subject: Re:Jaunty Handmaiden - A Scratch-Built Spaceship for Star Wars Legion
|
|
Huge Bone Giant
|
Progress:
I'm slowly building the framework for the front consoles. Not much progress so far as much of my time went into sculpting on the starboard computer.
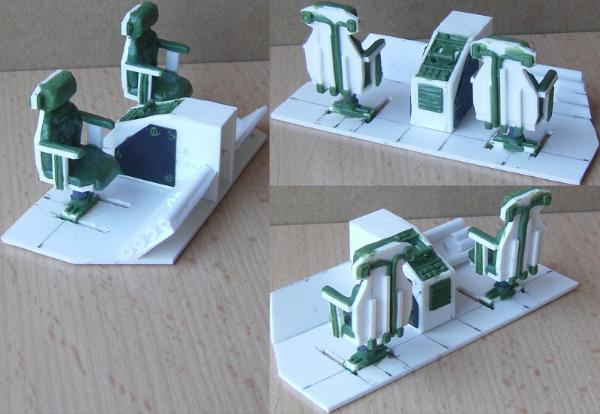
I didn't want to decide on the exact location of the astromech port without an astromech for comparison, so I converted a spare R2 to a standing pose. The conversion was pleasantly simply with only two cuts on each ambulatory strut and a tiny bit of gap filling required. Let's have a marketing shot of the cockpit with everything I got so far and the little visitor added for flavor:
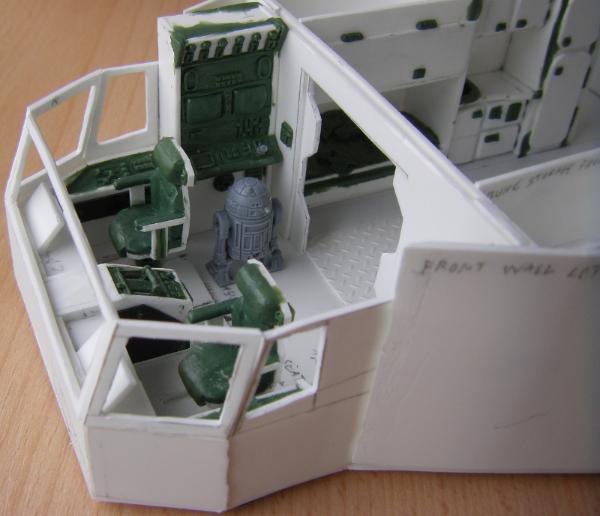
That's just for show as the space behind the seats is meant to stay empty to allow model placement.
I didn't convert the model just for fun, though. R3-Q7 will be a permanent addition to the airlock:
Granted, right now it's just a trashcan in the corner of an empty room. I plan on building a recharging station for him into that corner. Nothing too fancy as the astromech is the focus of that part, but I'm thinking a low wall or rail extending outward from the wall, some plugs or ports or techy bits, and maybe a diagnostic screen above him. The outer airlock door is supposed to be centered, which leaves room to put a locker next to the recharging station for space suits, tools and other assorted bits you might want to grab before you go breathe some space air.
There's a good chance that R3 is going to be the next piece that sees some paint. It's probably best to do that separately.
|
Nehekhara lives! Sort of!
Why is the rum always gone? |
|
|
|
|
2022/10/15 22:48:28
Subject: Jaunty Handmaiden - A Scratch-Built Spaceship for Star Wars Legion
|
|
Utilizing Careful Highlighting
|
More work to a fascinating project. I am still in awe. Also, your little astromech is a nice touch.
|
|
|
|
|
|
2022/10/16 16:18:39
Subject: Re:Jaunty Handmaiden - A Scratch-Built Spaceship for Star Wars Legion
|
|
Huge Bone Giant
|
Thank you.
|
Nehekhara lives! Sort of!
Why is the rum always gone? |
|
|
|
|
2022/11/01 13:12:53
Subject: Re:Jaunty Handmaiden - A Scratch-Built Spaceship for Star Wars Legion
|
|
Huge Bone Giant
|
Small update today with the distinction of finishing another part:
That's the starboard computer done, except for fitting and gap filling. I'm happy with the ratio of techy bits and empty space. I should probably follow up with its port counterpart, which I plan to give some different elements. I want the pilot and co-pilot controls mirrored for obvious reasons, but the random computer stuff in the back should not overtly duplicate functions.
As for the aforementioned controls, the instruments on the dashboard are done. So are the mounts for the wheels. I'd like to assemble the wheels next but it's fiddly work and my hands haven't been steady enough recently to get it done yet. Even if that keeps going for a while I can still fill the remaining console space with the elements I talked about in a previous update. Either way, the forward cockpit insert is nearing completion.
|
Nehekhara lives! Sort of!
Why is the rum always gone? |
|
|
|
|
|
|

