| Author |
Message |
 |
|
|
|
|
Advert
|
Forum adverts like this one are shown to any user who is not logged in. Join us by filling out a tiny 3 field form and you will get your own, free, dakka user account which gives a good range of benefits to you:
- No adverts like this in the forums anymore.
- Times and dates in your local timezone.
- Full tracking of what you have read so you can skip to your first unread post, easily see what has changed since you last logged in, and easily see what is new at a glance.
- Email notifications for threads you want to watch closely.
- Being a part of the oldest wargaming community on the net.
If you are already a member then feel free to login now. |
|
 |
2017/10/09 21:33:11
Subject: Re: Multi-level city terrain, marine v nid bases (10/6: Modelling lightning p2)
|
|

Dakka Veteran
|
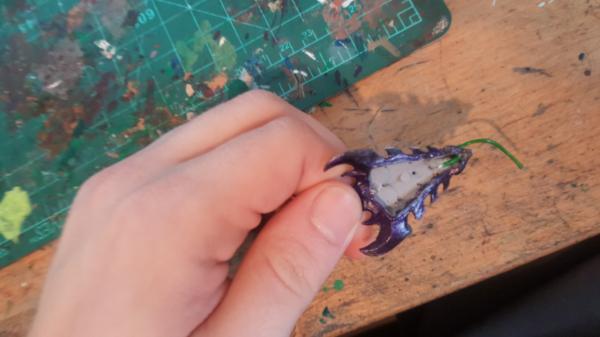
Thanks! We have more work on the lightning model.
One of the things I realized is that the wire itself is pretty.. stiff. Originally I bought the "brightest" version of the cool neon el wire I'm using in order to get maximum effect. I figure I can just strip the acrylic protective coating around the wire/phosphor and bend it into place.

but even then it's still very stuff, so the only way to get it into the tubes was to make it a half tube and press the wire into it. If I angle it right you wont really see the "seams" in the tube from the main direction youd be looking at it:
And with that the model is now basically ready to go! Next up is modelling up my display cart real quick and the back to work on the shiel before I head off to home where I can get this stuff 3d printed up!
|
|
This message was edited 1 time. Last update was at 2017/10/09 21:34:39
|
|
|
 |
|
2017/10/11 21:09:51
Subject: Re: Multi-level city terrain, marine v nid bases (10/6: Modelling a cart p2)
|
|
Dakka Veteran
|
|
|
|
|
|
|
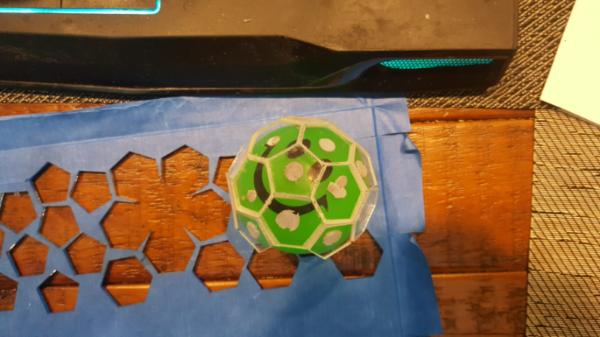
2017/10/13 21:13:13
Subject: Re: Multi-level city terrain, marine v nid bases (10/13: 3d prints, shield work)
|
|
Dakka Veteran
|
Alright, time to finally start putting this all together. We're at the maker space and ready to work!
First up I finally have a much, much better application of the foil:
so now it's time to start testing on the hexagons directly. I need to figure out what the best method is to apply it (brush, q-tip, etc) and then thats all ready to go.
Next up is the first 3d print of the lightning!
Very exciting! also very thing.. verrryy thin. Worryingly thin. So I decided to go back into the 3d model and try to bulk up areas but, more importantly, just make it even easier to insert the wire in. Hopefully its enough...
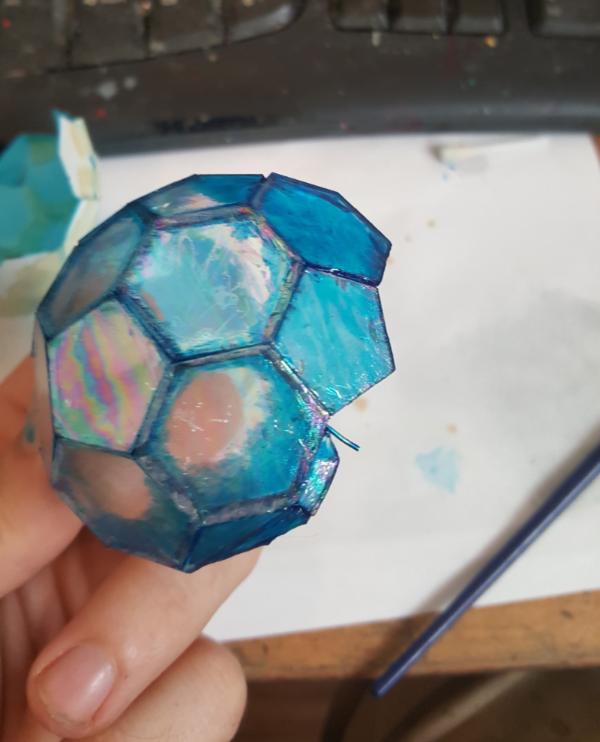
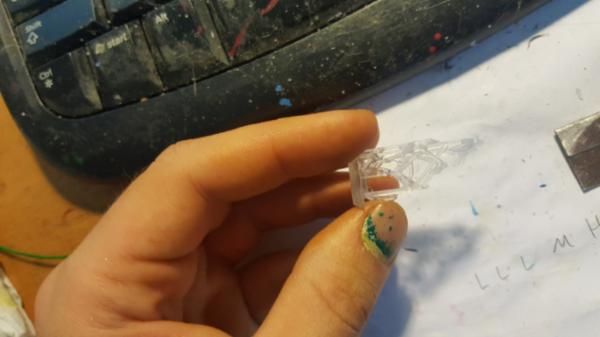
Finally we have a completed shield!
I had to switch to a ball to get it to go around but otherwise it's in good shape! Now I just need to wait and let the glue set fo rthe shield. One trick to this glue is that the longer it goes the better it sets (it needs 24 hours to be at 80% strength, weeks for full) so I figure give it a couple days before I pull it off.
|
|
|
|
|
|
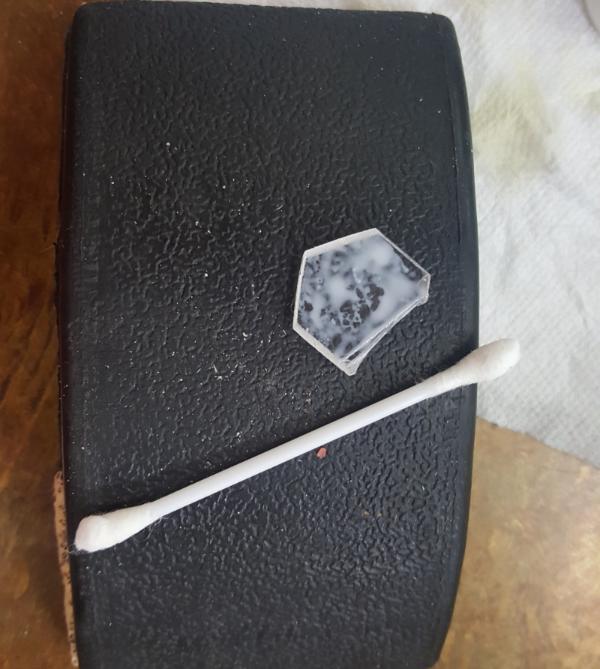
2017/10/16 18:54:33
Subject: Re: Multi-level city terrain, marine v nid bases (10/13: finally a clean foil transfer)
|
|
Dakka Veteran
|
Okay so more work on figuring out how to apply the foil. I know I need a lot of fluid but HOW you apply it also matters. First I tried Q-tip
As you can see I couldnt really ever get it to stop pooling.
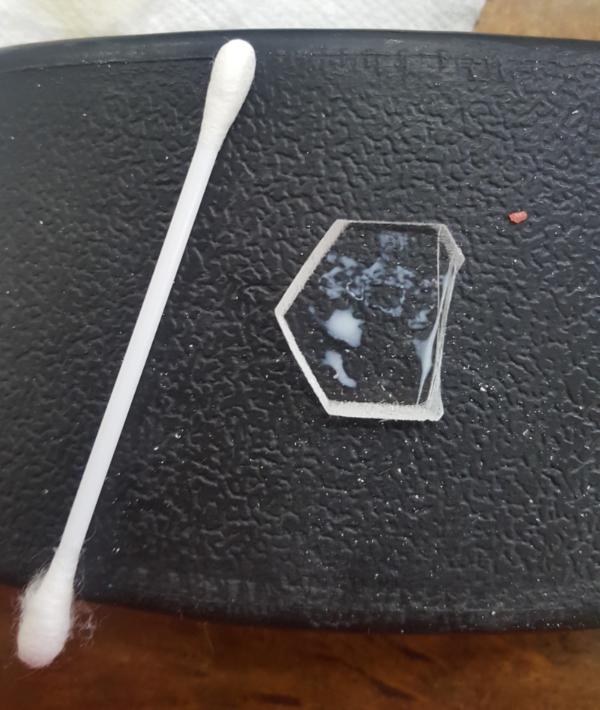
Next I tried a spongy thing, with the idea that maybe with small enough holes it will stop pooling but that didnt really work. You'd get like one pass of sponge and further touching of the sponge to the fluid would then immediatly drain it and not be good.

Finally I tried a slightly angled flat brush (pictured above behind the sponge). Just a ton of fluid, basically flatly applied. I can use the tip of the angle to add "drops" of fluid to any areas that need it.
Much better:
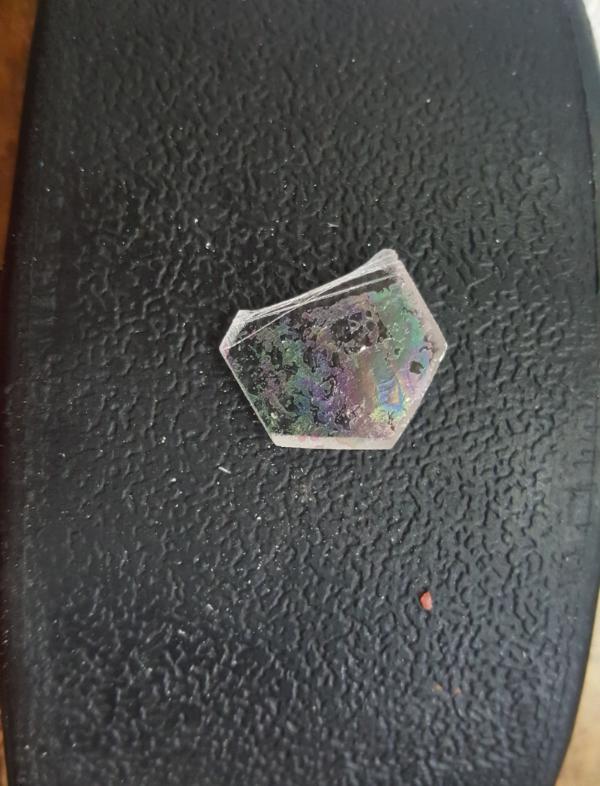
and with that we finally have a clean transfer!
FINALLY.
|
|
|
|
|
|
2017/10/17 22:43:07
Subject: Re: Multi-level city terrain, marine v nid bases (10/17: shield work)
|
|
Dakka Veteran
|
So, its been a few days, time to take the shield off its stand and check it out! First step was cleaning the thing:
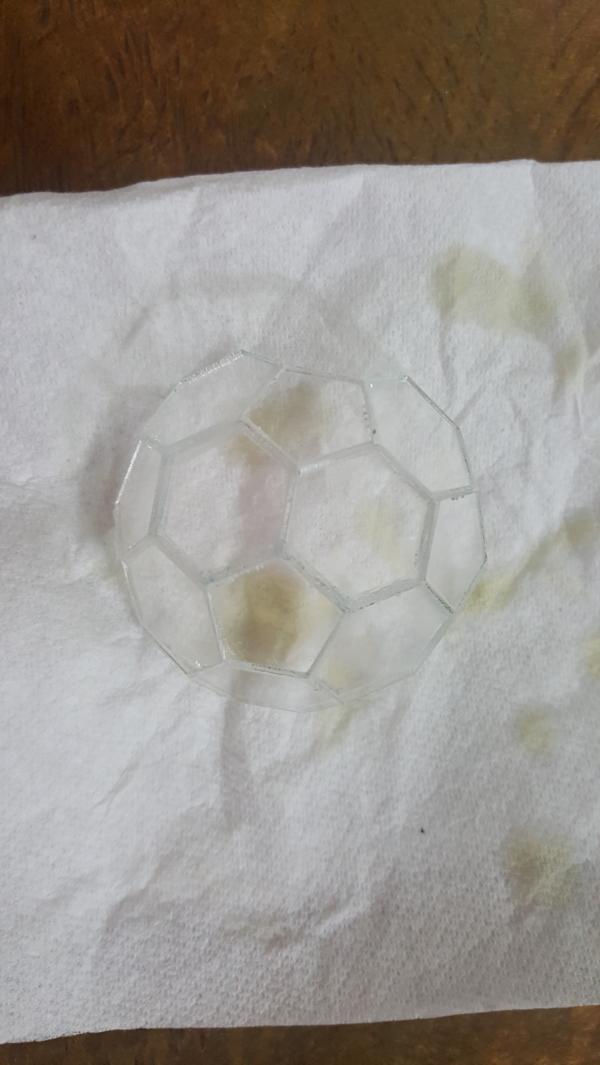
Not actually an easy process. Any sort of stain, even from water, will be captured when I put on the glue for the foil. So I need it to be as clean as can be for it to remain maximally transparent. Alcohol doesnt really clean off reside though, so finally I settled on Goo Gone spray.
Its VERY good at residue (like the residue from tape/blu tac/etc) but itself can leave a bit behind. So after using Goo Gone I typically use any sort of windex equivelent to get all remaining residue off and have a clean surface. All while holding it on the edges so that my fingerprints dont leave a mark.
... This technique will come in very very handy later ( le sigh)
Anyhoo the shield looks great, so now to start figuring out how blue to make it and spray the blue on there!
|
|
|
|
|
|
2017/10/19 10:23:07
Subject: Multi-level city terrain, marine v nid bases (10/17: shield work)
|
|
Longtime Dakkanaut
|
Wow. That looks obnoxious 
Also looks like it's paying off and the lightning looks legit.
|
|
|
|
|
|
2017/10/20 18:30:25
Subject: Re: Multi-level city terrain, marine v nid bases (10/20: workspace improvements P1)
|
|
Dakka Veteran
|
It does, in the end, but there are bumps in the way.
Anyhoo, back to the plot...
So we've hit the end of my trip home to madly work on all my projects. I did a 3d test of the lightning which seems like it might work, so I kicked off a clear resin version to use. I was hoping to more than one in case some breaks but,.. in the end only 1 could be managed. No pressure!
I made good progress on the shield, completing the shell shape and cleaning it all of goo.
Finally there was the matter of the cart. Time was short so I wouldnt end up getting the time to do any welding BUT i did at least learn a bit about how welding works, which was the goal of the cart to begin with. So its something that I can flesh out with a class later to learn a new skill. What I could do, however, was cut all the pieces for the cart.
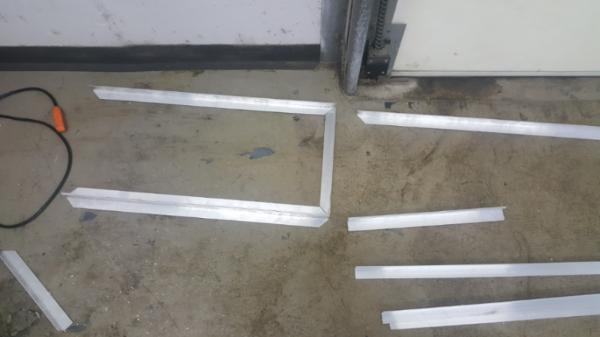
Making sure you get the cut right on the right bevel of the corner bracket.. lotta mental gymnastics.
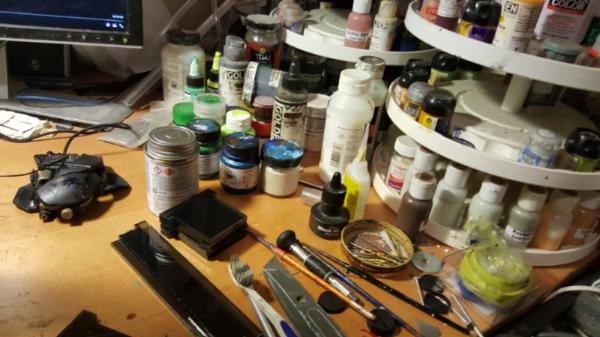
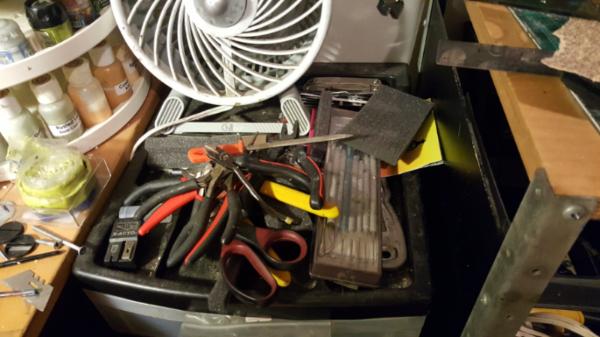
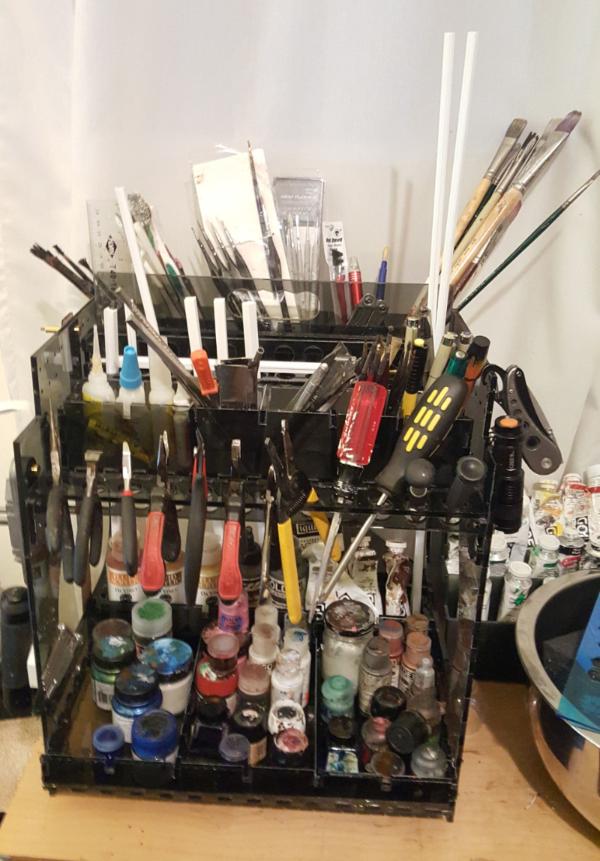
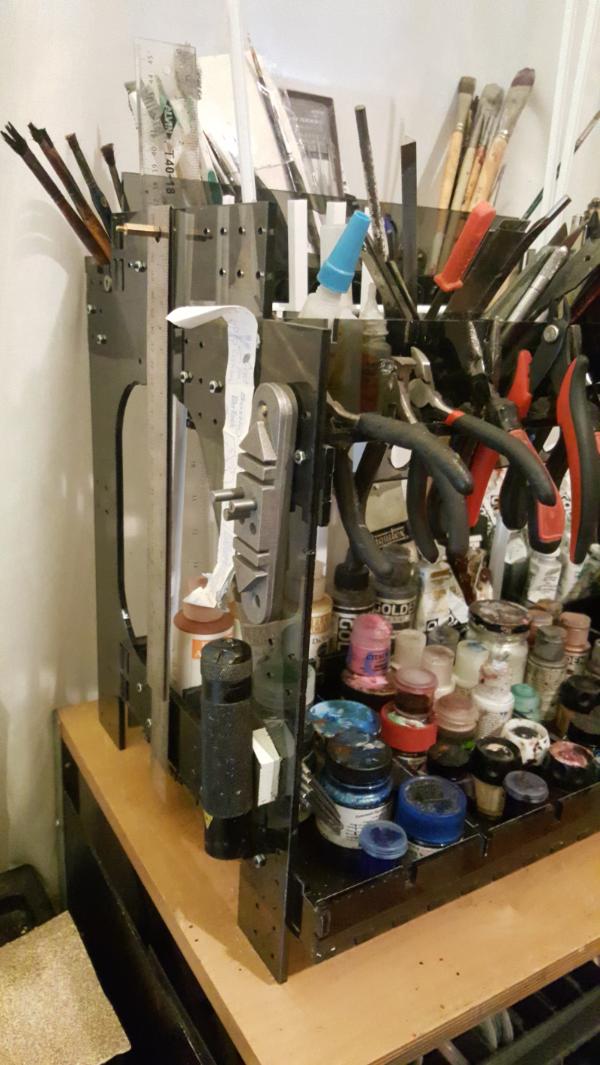
Anyhoo another things that happened was I re-discovered an old project. I cant recall if i wrote about it here but basically there was this video about custom made vertical shelves that Adam Savage (Mythbusters) made that was cool and I thought it would be an interesting kickstarter idea. The kickstarter bit fizzled a bit, i had too much to do at the time (and still do have a lot) BUT i did get a first pass at a design done. The basic premise was to use acrylic sheets and have a modular design with lots of holes pre-drilled, so you make some basic set of shelve designs for various hobby types (painting, tools, soldering, etc) and mix and match what you want. Ideall you can "stack" each shelf on top of each other for maximum modularity.
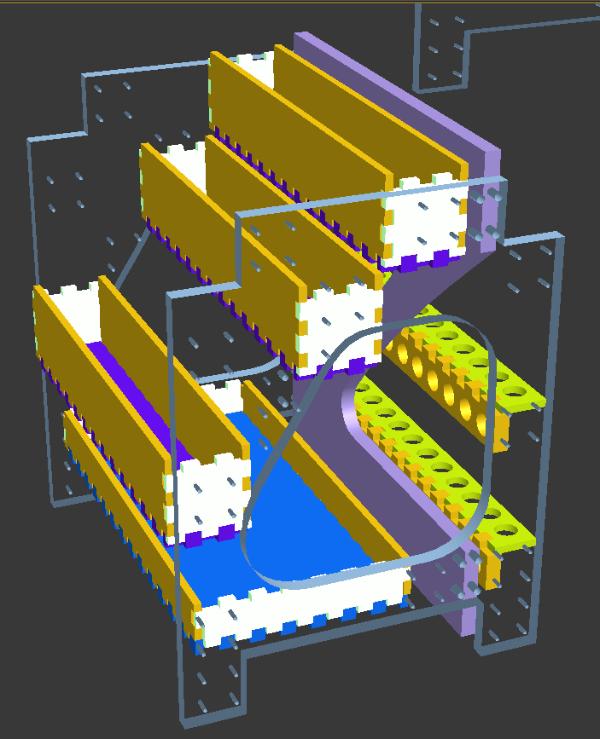
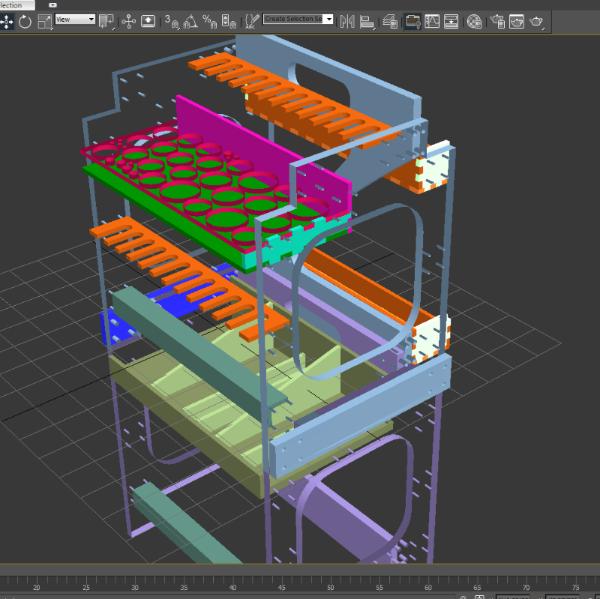
I never got to test the stacking idea BUT i did get to lasercut a prototype:
Now since I had flown down originally.. no way of bringing that back and shipping wasnt something I was interested in, too busy for other things to worry about trying to ship a build thing very carefully. BUT since this time I drove down.. I can drive it back! Sure the kickstarter part is on a backburner but MAN do i need to re-organize my space.
I have random collections of paint "groups" everywhere (liek my "blue" effect or my "dark metal" effect)
Unahpyp piles of tools:
and difficult to reach acrylic tubes:
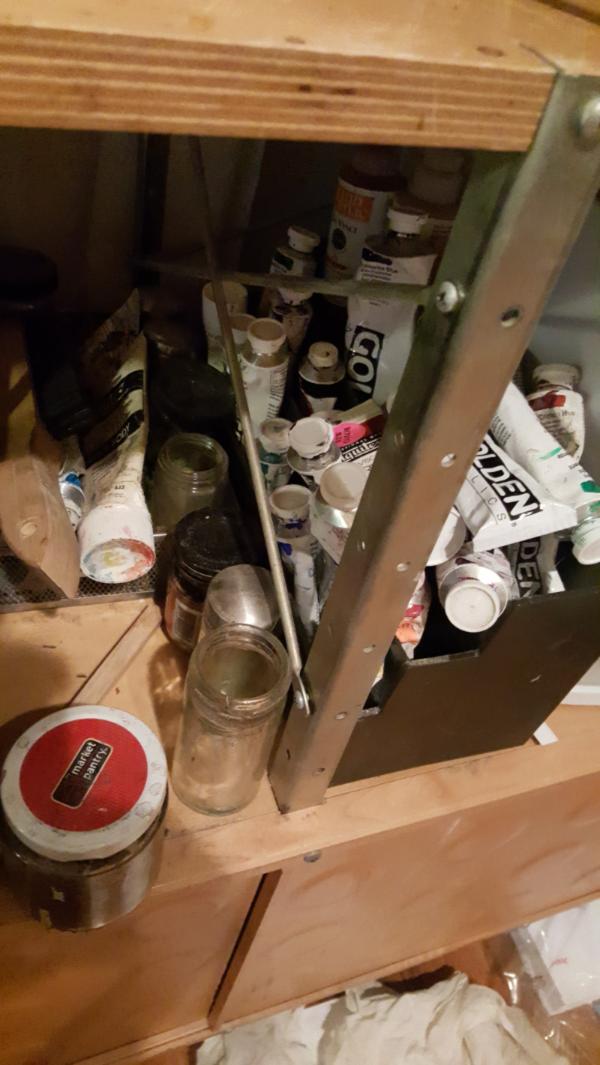
and this is the more organized its been in a while...
|
|
|
|
|
|
2017/10/24 20:37:45
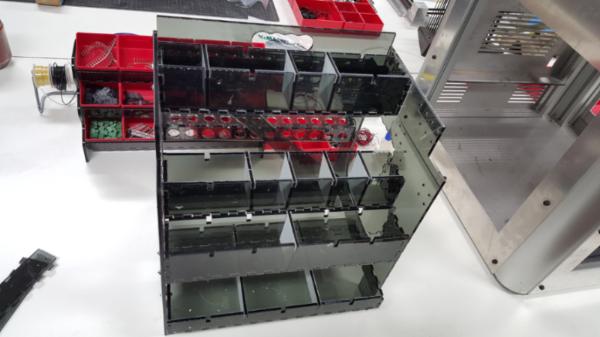
Subject: Re: Multi-level city terrain, marine v nid bases (10/24: modular acrylic shelves result)
|
|
Dakka Veteran
|
Sorry about the delay. Socal open was a thing.
Anyways, here is the result from my organization. Honestly I'm surprised at how WELL it works, adding on pegs/magnets to the side really opened up the possibilities I hadnt thought of. I may have to revisit the kickstarter thing at a later date if more people want these things.
|
|
|
|
|
|
2017/10/26 17:24:07
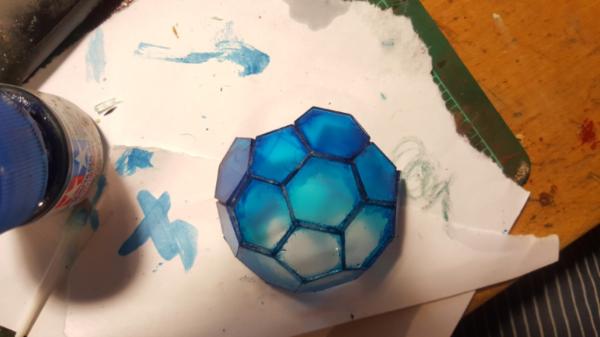
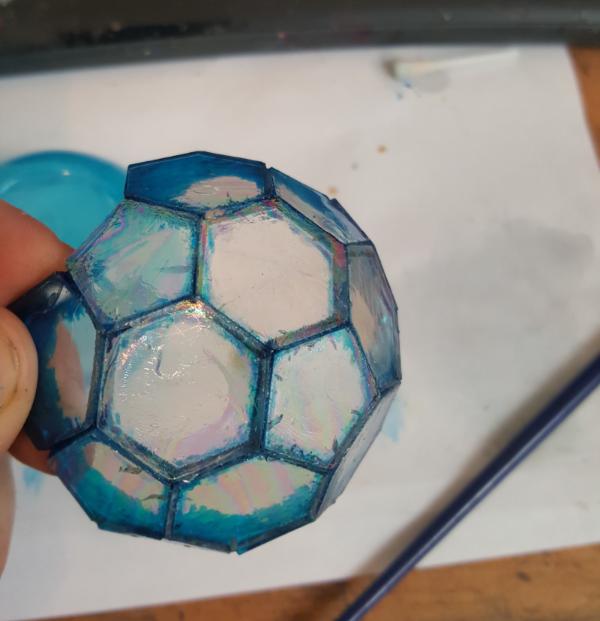
Subject: Re: Multi-level city terrain, marine v nid bases (10/26: making an oily blue shield)
|
|
Dakka Veteran
|
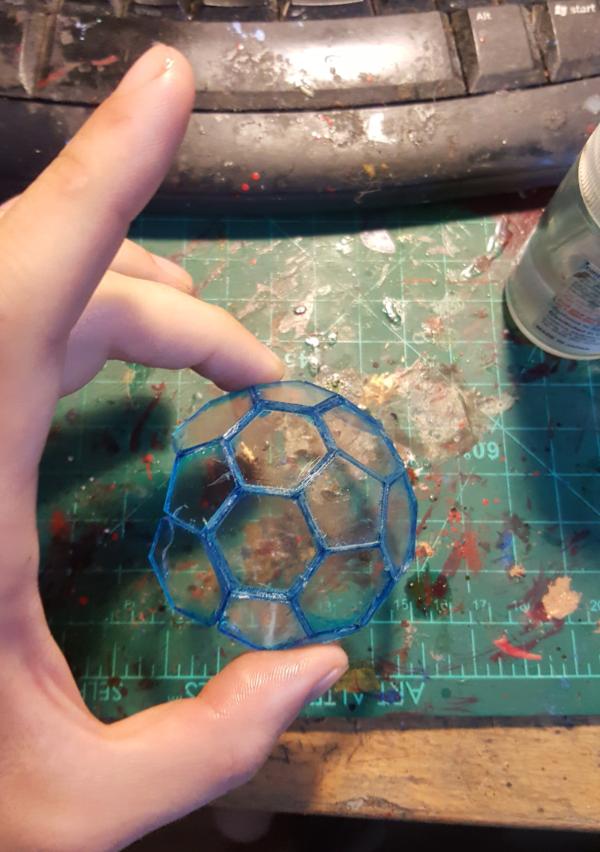
Thus begins our tale of woe (well, it ends happy, but man it took a while to get there): the final coloring of the shield.
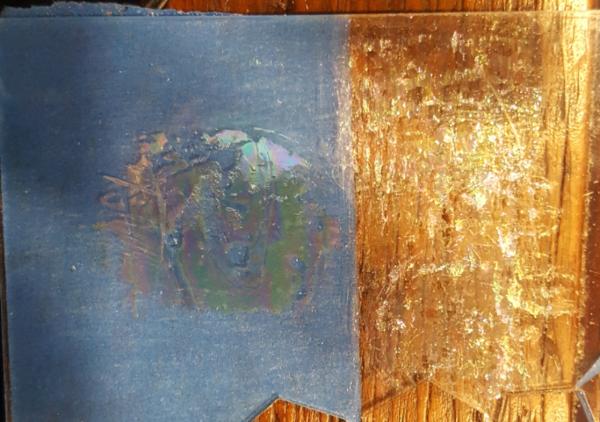
First up was primering. Just to be extra careful I decided to primer something else first, to start testing out my methods for this. A fatal flaw though I would determine later is that I primered in what Im guessing was an ever so slightly warm and humid day? Either way the primer went.. spottier, clumpy.
Which you can see in the closeup:

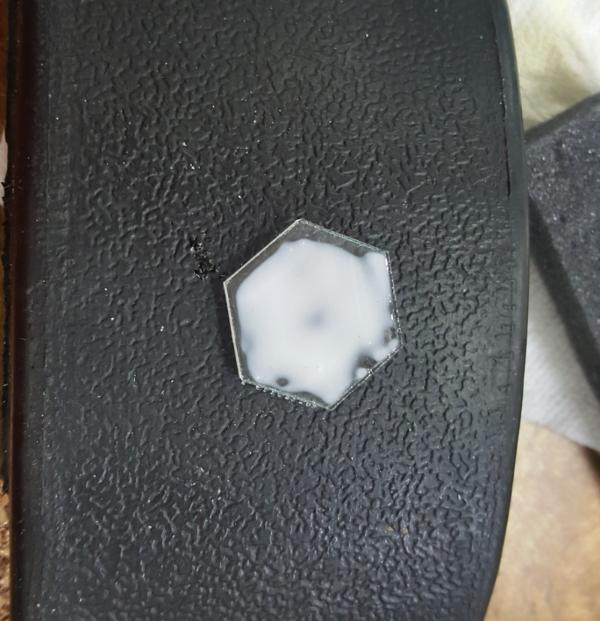
So when I primered the shield it, too, was clumpier. Not.. too bad, but it wasnt a happy start. Still I had to press on, so next was putting on the foil.
Things were going.. okay.. until I stuck oin the foil backwards. So the way it works is that there are 2 sides. one "foil" side and one thats the plastic sheet holding it onto something. If you put it foil down on the tacky glue everything is fine. But if you put it down PLASTIC side well... it doesnt come off. So it RUINS the tacky glue layer and blisters it, so you basically have to clean off and redo the whole square. Thank goodness for goo gone..
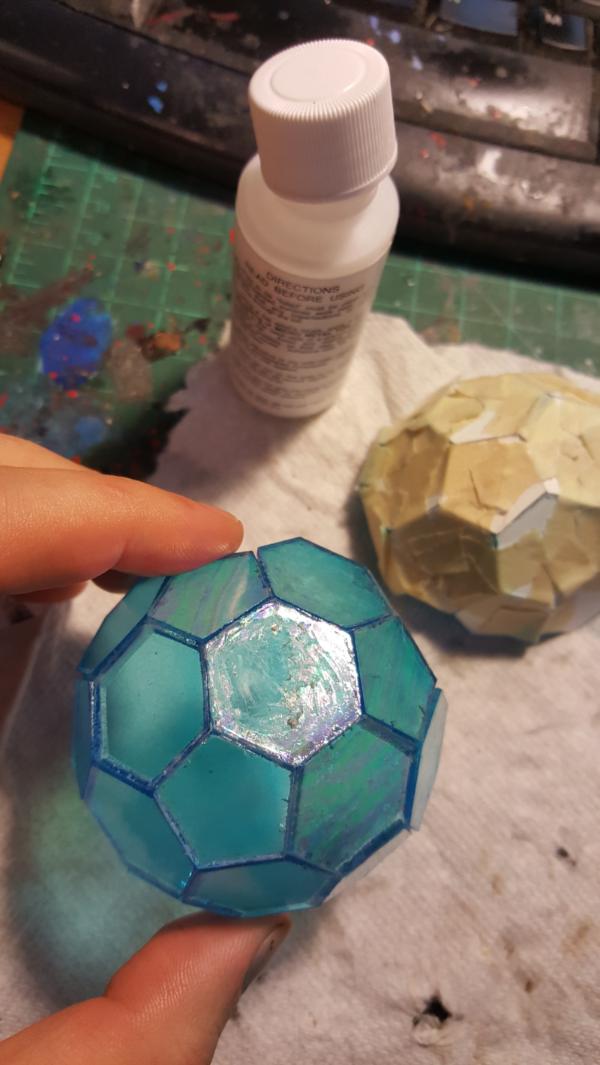
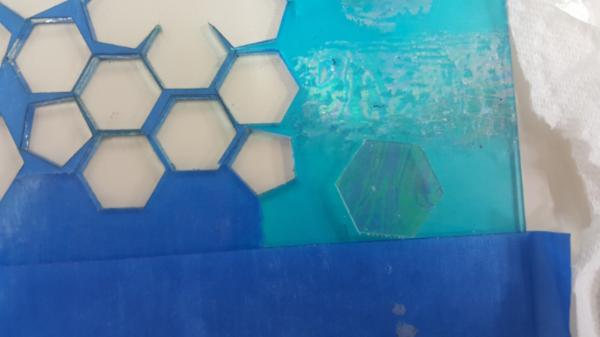
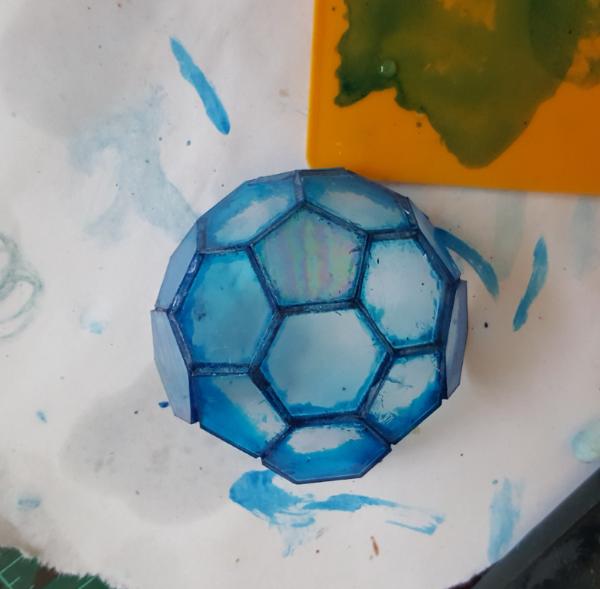
So I got most of the panels done, even after re-doing one, and it.. was way too blue. Just.. too blue. You couldnt really see past the panels. Also the edges/corners of every hexagon were stubbornly still clear so ideally id very carefully stick some very runny blue in there to color it. But I couldnt do that now I had all the panels done..
I decided to try and rub some of the blue off, to clear out the middle so to speak. So I flipped it over and started scraping it off with a q-tip and more goo-gone. It took some effort but it worked. Then.. I flipped it back over. The constant rubbing on the center hexagon (which I had foiled) caused it to "crack" slightly with a craquelure effect. It was no longer shiny and pretty. To fix that I tried adding a gloss coat to everything. But that ALSO caused the same effect due to (im guessing) refraction effects due to varying thickenss in the gloss coat.
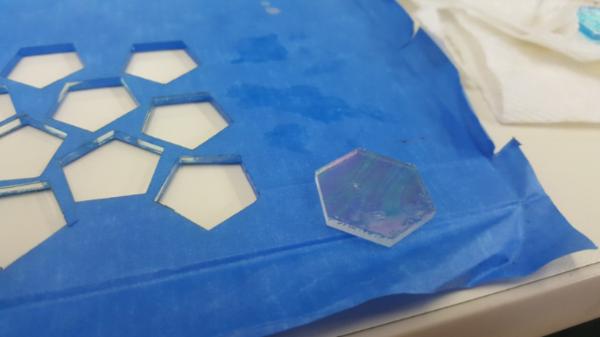
At this point I had a few blistered panels, and a faded effect in the middle. So.. i decided to just start over, all over. Full redo. Sigh. This was basically an ENTIRE day to redo so it sucked but.. it was the right decision. Too many compromises had been made and it was time to reset and do it better the second time. So first I used alcohol to break the gloss coat, and then goo gone to break the foil/foil glue. Finally cleaning off the blue in the back.
The process of cleaning off the blue revealed the look I want much more. Dark blue edges and blue at the edges of the shield but clear in the middle. Still, I couldnt just stop because there was a lot of mistakes in there, but it was nice to see what I needed to do.
Finally, back to square one (mostly):
|
|
This message was edited 1 time. Last update was at 2017/10/26 17:26:41
|
|
|
|
|
2017/10/27 21:03:59
Subject: Re: Multi-level city terrain, marine v nid bases (10/27: making an oily blue shield v2)
|
|
Dakka Veteran
|
|
|
|
|
|
|
2017/10/30 21:02:49
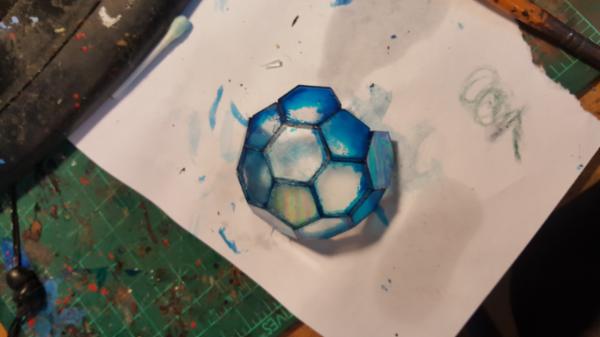
Subject: Re: Multi-level city terrain, marine v nid bases (10/30: making an oily blue shield p3)
|
|
Dakka Veteran
|
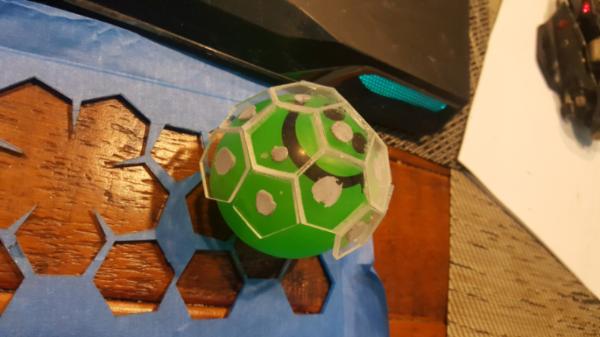
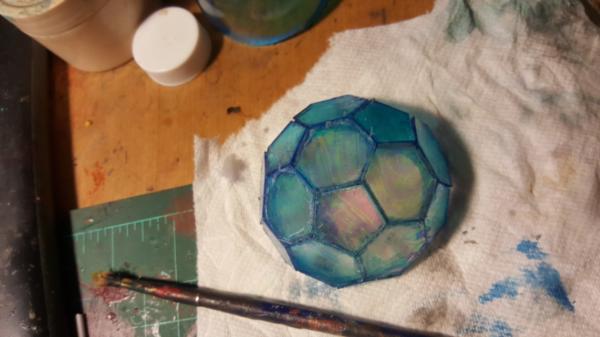
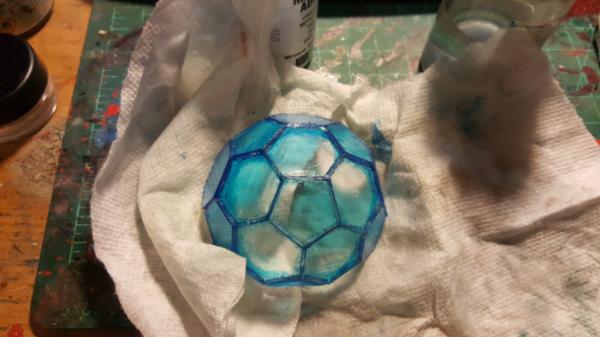
Just more work on the shield! The key lesson here was to leave one square near the middle free, so I could always use it to hold tightly if i need to scrape or adjust the blue. Also holding the shield well helps when angling it to fit on the foil sheet well.
Sadly there are still some "scratches" in the foil from when I used the back of a brush to rub some of the areas not sticking away but.. not much i can do about that. No way i'm doing this a third time..
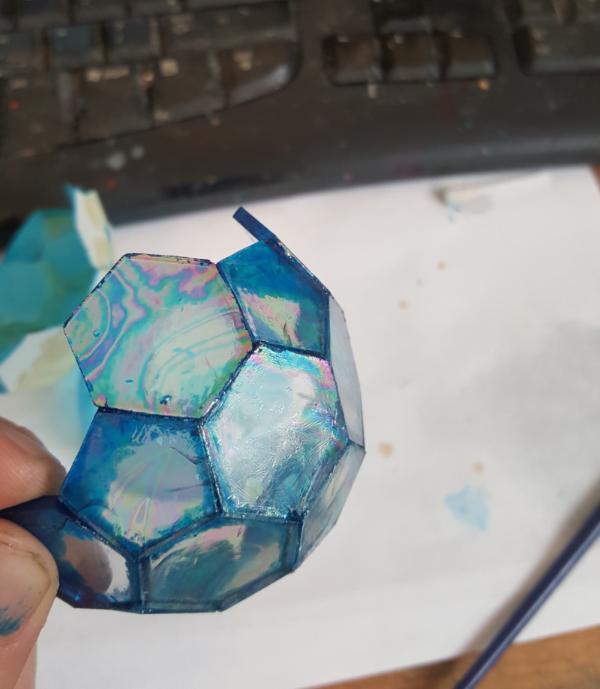
I also added a couple of bits on the bottom so the shield touched the ground. It sucks that you can see the edges there but, tbh, you cant tell when its on there, you just see that the shield goes all the way down.
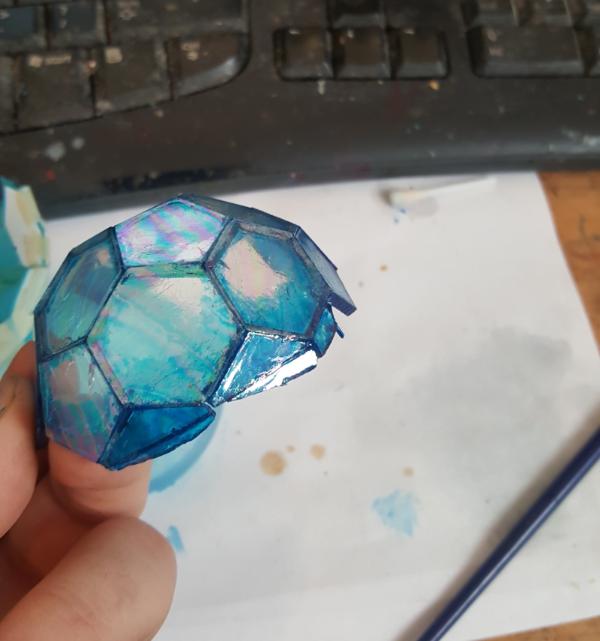
In v2 I also went ahead and drilled in holes for pins because, well, i realized there was no easy way to glue this down and it needed to be ON there since its the primary way i carry the model (IE: on edge of the shield)

|
|
|
|
|
|
2017/10/31 18:37:41
Subject: Re: Multi-level city terrain, marine v nid bases (10/30: EL wire 3d printed lightning bolts attempt 1)
|
|
Dakka Veteran
|
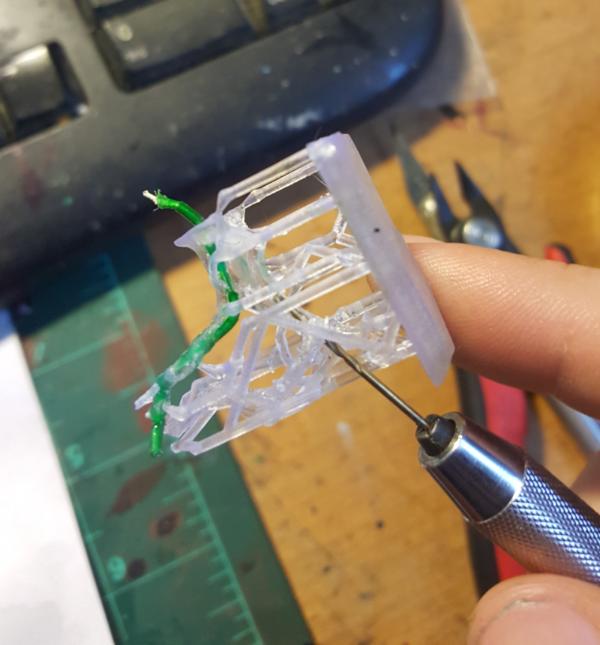
Now, finally, is woe. Sigh.
Okay, so, first step. The original EL wire I got was 2.3mm "super bright" wire from coolneon. Now, the trick is that my tubes are.. only 1.2 mm. HOWEVER, while the EL wire is thick the CORE of the wire is not, its more like 1mm. So I figured I would strip the wire and just thread the core into my 3d printed lightning bolts.
2 Problems:
1: stripping it is REALLY HARD. Basically you have to strip it WITHOUT breaking the core phosphor layer. And unlike normal wire sheathing it is.. really really on there. So even when I did strip it there were definitely cracks and breaks in hte phosphor, which were then compounded when i tried to bend it tightly.
2. the 1mm thick core wire doesnt bend well, at all. It's crazy stiff and basically impossible to bend in tight spaces like my lightning bolts.
So, that figured out, I went to the angel wire version from cool-neon, which is only 1.2mm WITH the sheathing. It owuld mean I have to change colors but since its like a $1 per foot I just bought one of each color to test what I liked.
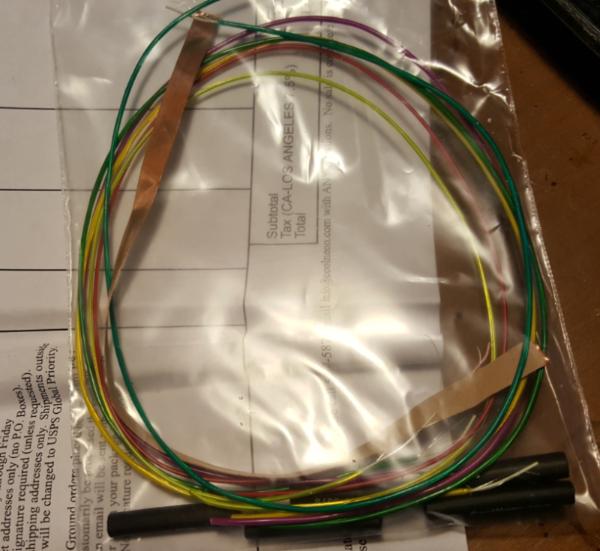
Its much more bendy and still bright enough, so that was happy. Next step was actually fitting it into the model:
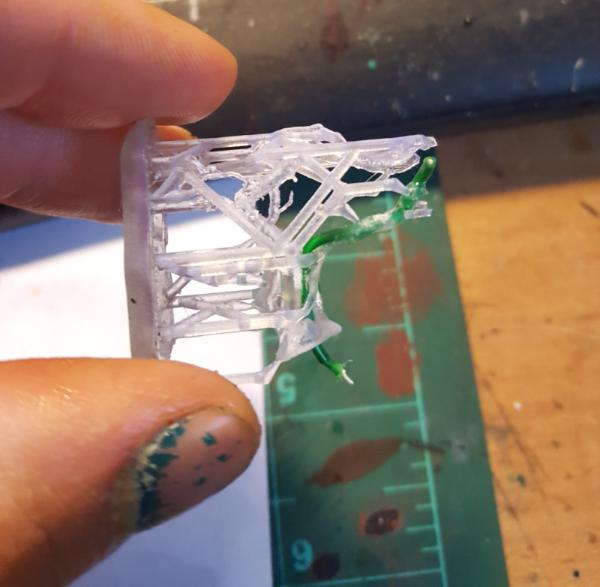
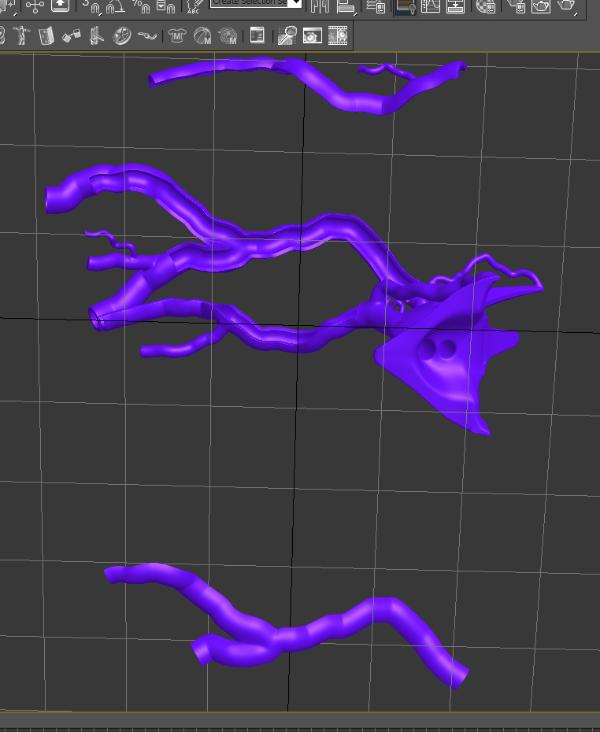
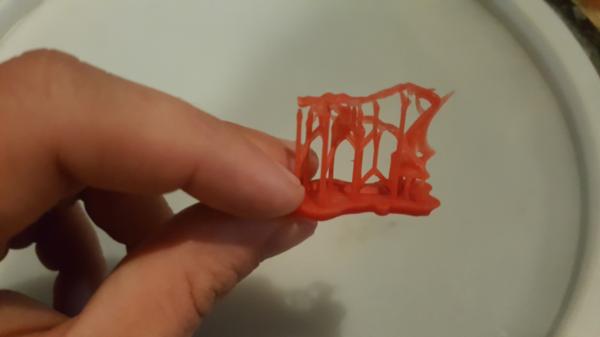
Now here is where we run into the woe. So, 3d printing. In order to get the clear resin the way to print it is the "clear liquid" method, where you have a pool of liquid that is hardened at points. So you are pulling the model out of the liquid (I cant remember the official name of this type of printing but yeah) layer by layer.
The downside is that the liquid doesnt QUITE harden fast enough for 1.2mm tubes, it tends to collapse on one of the axis. So if you are pulling up, for example, you want your tubes to be aligned vertically so when it sags down a bit it doesnt collapse the tube. However, since my tubes were going along all 3 axis... no matter what I do one of the tubes was going to be collapsed.
We oriented the model, therefore, so that the tubes within the horn would be the onest o collapse on the basis that I could just drill them out again. This worked for the first hidden tube but the second... more or less just cracked in multiple places. Turns out that the resin is SUPER brittle from drilling and yeah, just.. broke everywhere. Fitting the tubes around the wire worked relatively well but I just could not get the second wire in there.
SO yeah, everything pretty much broke:
|
|
|
|
|
|
2017/11/03 18:40:19
Subject: Re: Multi-level city terrain, marine v nid bases (11/3: EL wire lightning bolts finished)
|
|
Dakka Veteran
|
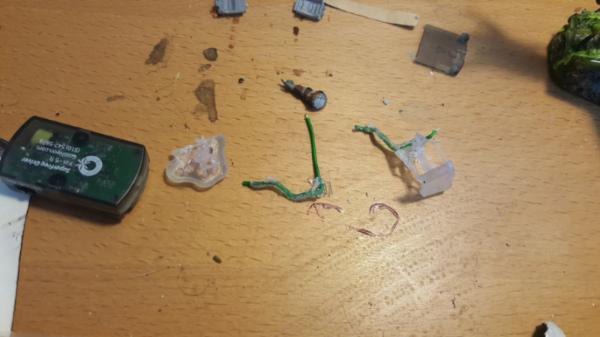
So, after the failure of the 3d model the new plan was this:
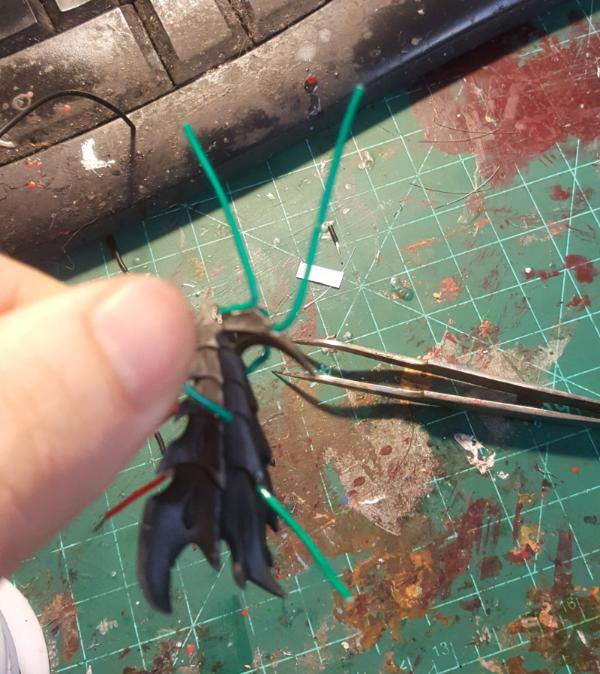
Take the existing horn headpiece i had and carefully drill out the horn to just directly put in the wire. THen bend the wire into lightning bolt shapes and, later on (after Socal) add some 3d printed tubes directly to the wire as needed. Basically the way I approached this at first was to fit the wire around the 3d model. Which failed.
Approach 2 is to fit the model around the wire. so once I have a shape of wire nailed down and glued down to the shield I could go back later and model up new tubes/detailing to wrap around it. Until then I would have squiggly EL wire that lit up which looked decently close. In theory anyways.
But first.. an interlude about EL wire. EL wire is actually 2 wires. The first is a "core" with a phosphor coating (which is what lights up) and then there are teeeeennny tiiiiineeey "angel" wires which wrap around the core. The whole thing is then wrapped in the sheath. Unlike normal wire EL wire is lit with Alternating Current. In this instance the circuit (i'm told) doesnt really need to change from DC in terms of voltage in parallel rules and so forth. What IS important, however, is that there is a MINIMUM length any given segment of EL wire needs to be in. If you dont match that minimum length your wire risks "burning out". The rated minimum length for my EL wire power source is 1 inch.
In reality its more like 1.25 inches.
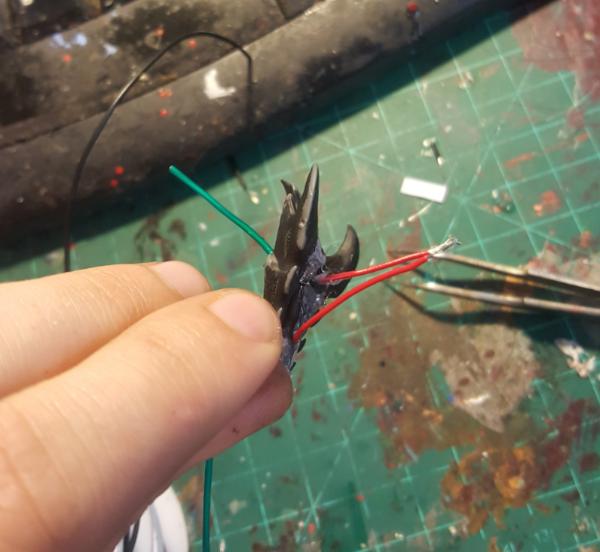
So, I drilled out my holes into the horn and..a ctually did a pretty good job.
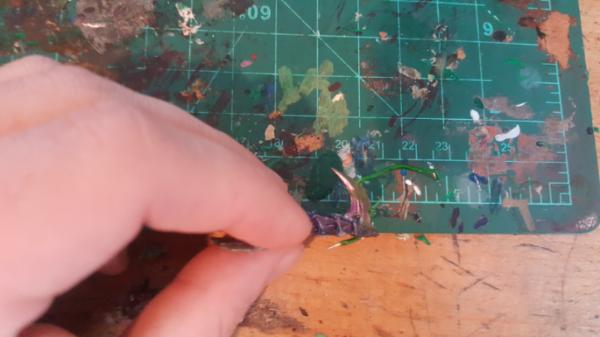
But they were relatively delicate so I went ahead and glued down the wire into the holes to really secure it. I also figured as I add wires down I shoudl test the whole thing to make sure its working nice and happy. So I tested the pair that I had already done, they were at the length (at the time) of 1 inch.. all going okay.. oh wait, what was that?
Yeah.. the wire burned out. Too short. Of course at the time I didnt know what burn out was, it just sorta faded out. But further attempts at lighting it and it just would look all "crackly" and be at 10% brightness that it normally is. So not only had I lost wire but basically the entire headpiece as well since it was glued down and the wire would be difficult to get out even normally (very tight fit).
So.. commence screaming. Sigh. Well, time to ebay another neurothrope head and do this all over again!
A few days later and we can re-start with a new color of green wire! this time i made SURE each length was up to par. Downside is it made stuffing it all into the head much, mcuh more difficult, and I have a shrot somewhere that I have to tap to get one of the wires to light up buuttt.. it works.
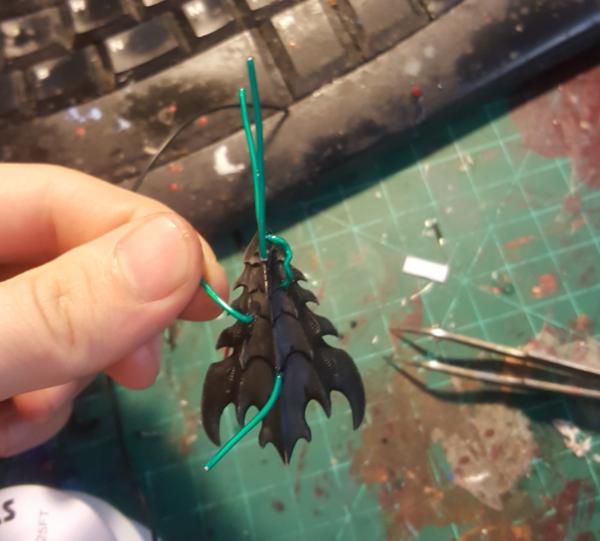
After the bending:
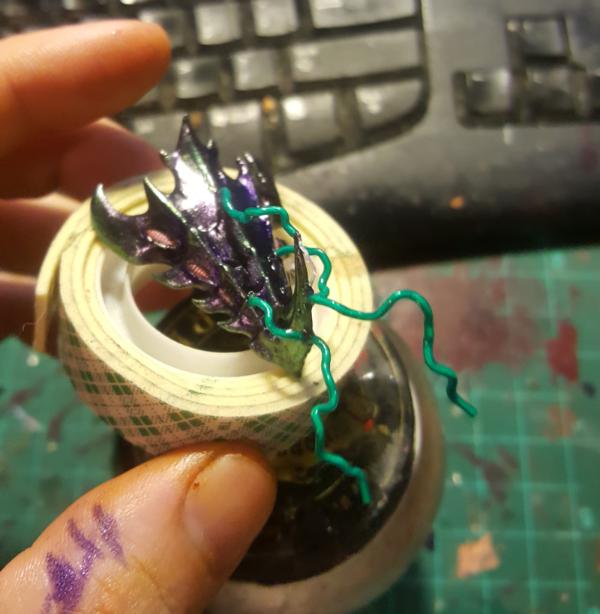
I have to say just bending the wire crisply doesnt look too bad, i may just leave it like this for the final lightning look.
|
|
|
|
|
|
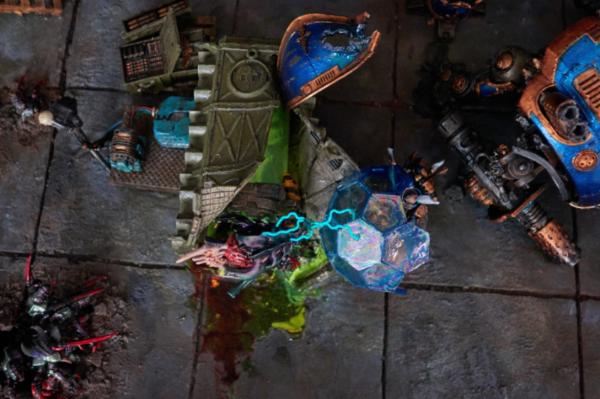
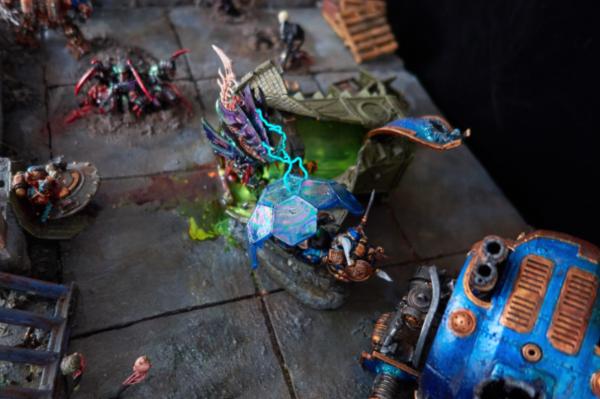
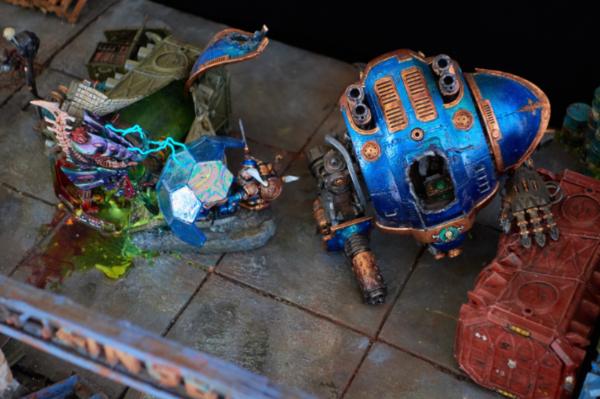
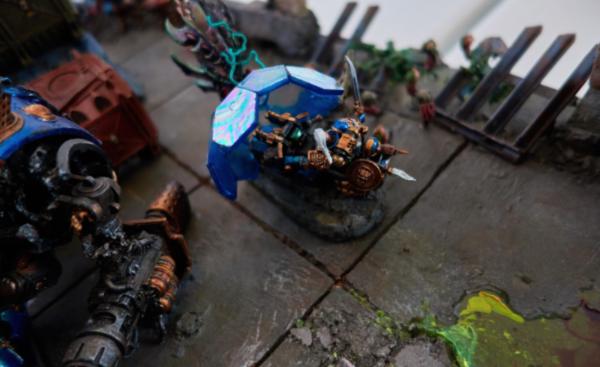
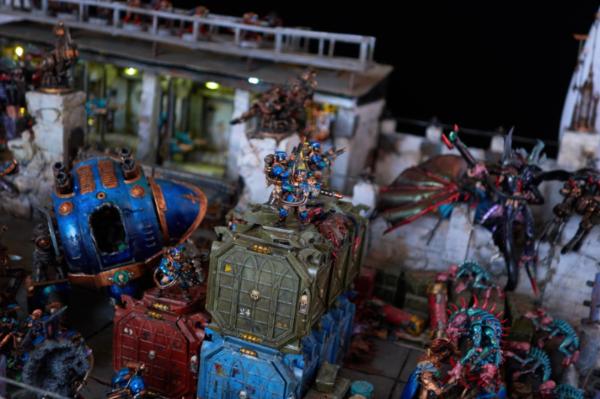
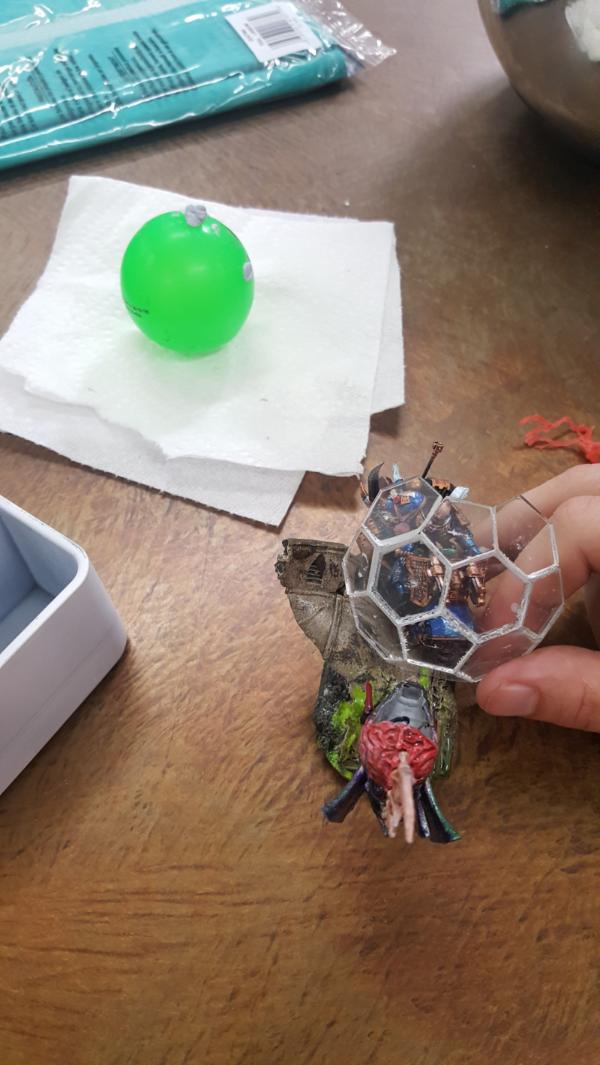
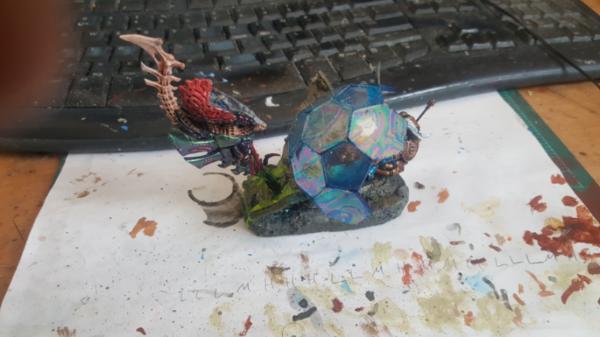
2017/11/17 21:08:13
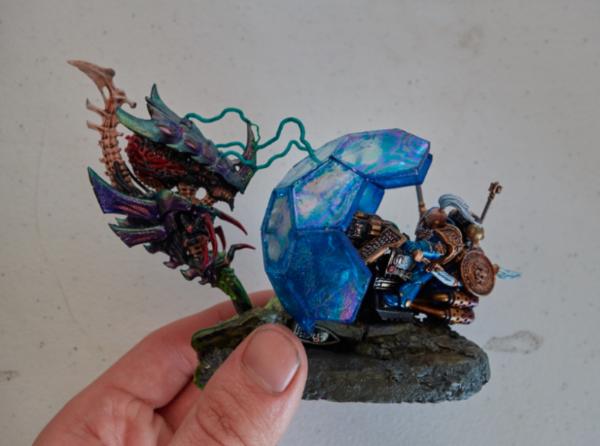
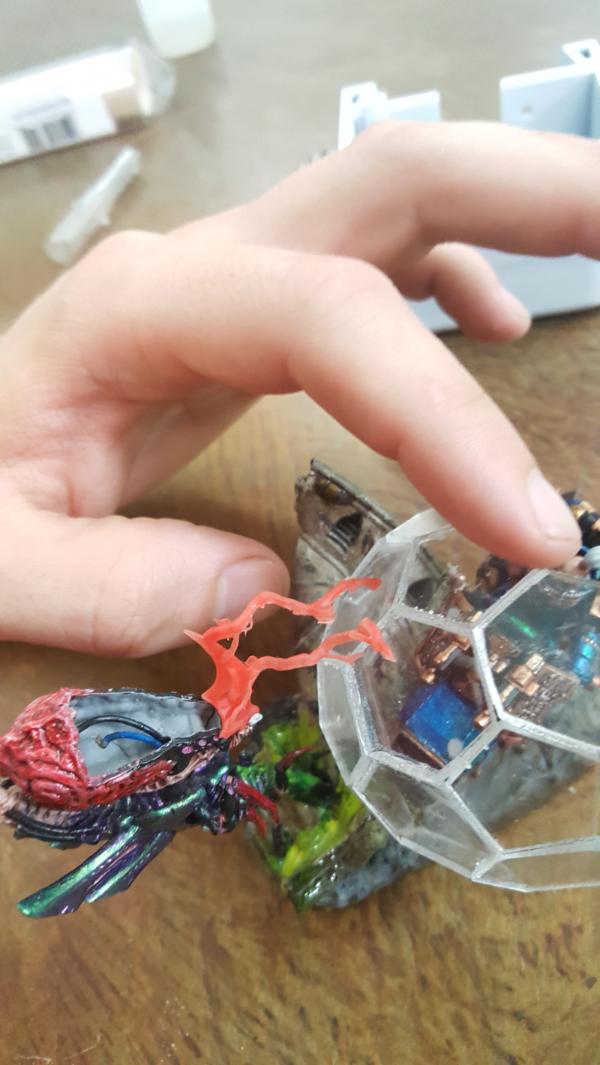
Subject: Re: Multi-level city terrain, marine v nid bases (11/17: EL lightning bolts vs shield pics!)
|
|
Dakka Veteran
|
|
|
This message was edited 1 time. Last update was at 2017/11/21 19:31:06
|
|
|
|
|
2017/11/17 21:47:00
Subject: Multi-level city terrain, marine v nid bases (11/17: EL lightning bolts vs shield pics!)
|
|
Lone Wolf Sentinel Pilot
|
Awesome warp blast/forcefield effects
|
 10000+ 10000+
 10000+ 10000+
 8500+ 8500+
 3000+ 3000+
 8000+ 8000+
 3500+ IK Plus 1x Warhound, Reaver, Warlord Titans 3500+ IK Plus 1x Warhound, Reaver, Warlord Titans
DakkaSwap Successful Transactions: cormadepanda, pretre x3, LibertineIX, Lbcwanabe, privateer4hire, Cruentus (swap), Scatwick2 (swap), boneheadracer (swap), quickfuze (swap), Captain Brown (swap) x2, luftsb, Forgottonson, WillvonDoom, bocatt (swap)
*I'm on Bartertown as Dynas |
|
|
|
|
2017/11/19 00:05:03
Subject: Re: Multi-level city terrain, marine v nid bases (11/17: EL lightning bolts vs shield pics!)
|
|
Dakka Veteran
|
Thanks! I'm happy with how it turned out. Ill have more pics soon I just had to tweak the brightness a bit.
|
|
|
|
|
|
2017/11/19 01:04:08
Subject: Multi-level city terrain, marine v nid bases (11/17: EL lightning bolts vs shield pics!)
|
|
Stealthy Warhound Titan Princeps
|
That is a truly impressive level of persistence to get the effect you wanted!
|
|
|
|
|
2017/11/19 06:34:58
Subject: Re: Multi-level city terrain, marine v nid bases (11/17: EL lightning bolts vs shield pics!)
|
|
Dakka Veteran
|
Thanks! Yeah when I get an concept for these things I really want to get at least one example out of it. Otherwise I cant purge out that "what if feeling" and its.. really irritating having that feeling stick around for months/years at a time.
I still have a dream of my own 3d printed tron bikes (with EL wire of course) in 28mm sizing to use as whatever bikers I could need. Thats going on 3 years now?
Originally I was going to do this shield effect for a knight, with the explosion/fireball hitting the void shield equivelent they have. But as I've refined what I wanted it made more sense to do it here since it could be more of that star that way (and I already did my flamethrower effect which quenched the need to do any more fire related stuff)
|
|
This message was edited 2 times. Last update was at 2017/11/19 06:36:05
|
|
|
|
|
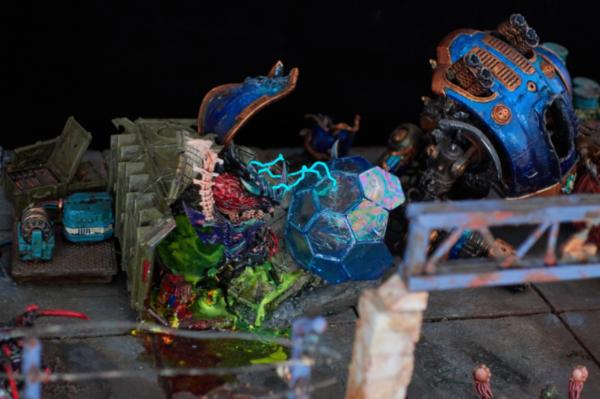
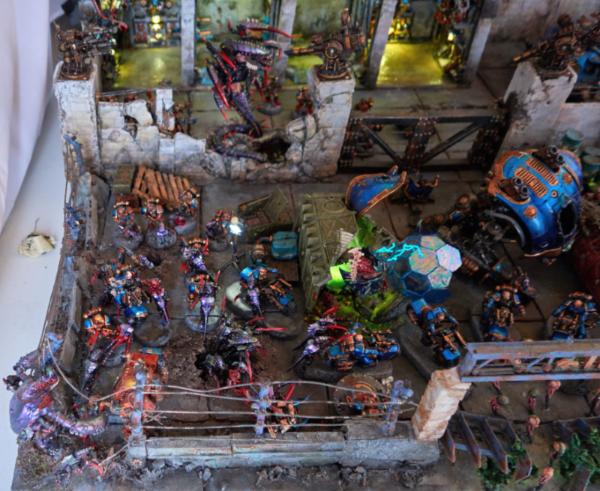
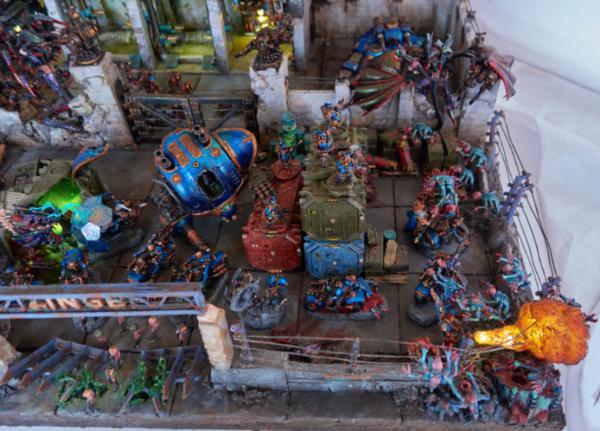
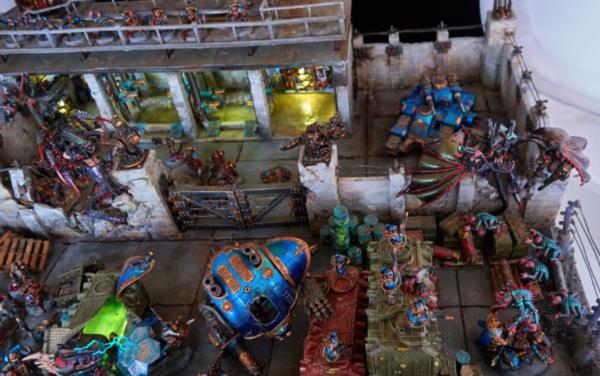
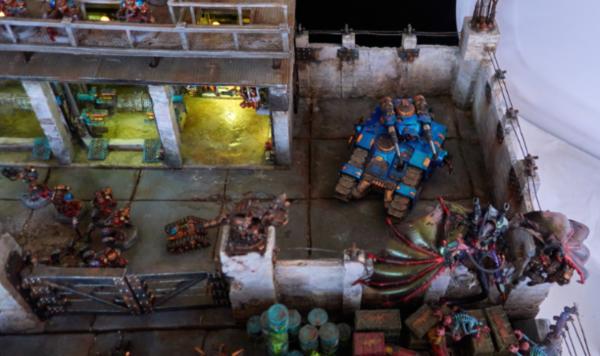
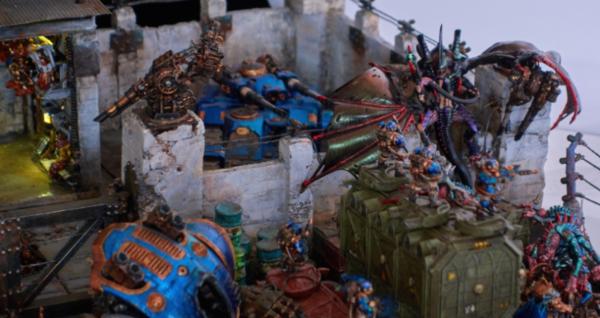
2017/11/21 19:34:03
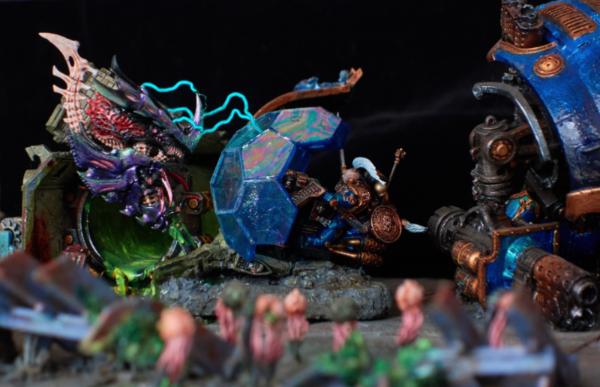
Subject: Re: Multi-level city terrain, marine v nid bases (11/21: Final Diorama Pics)
|
|
Dakka Veteran
|
|
|
|
|
|
|
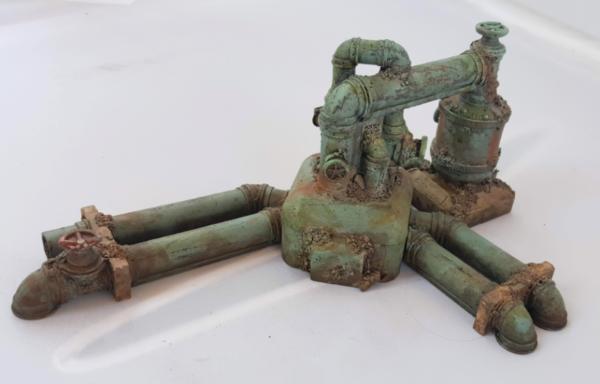
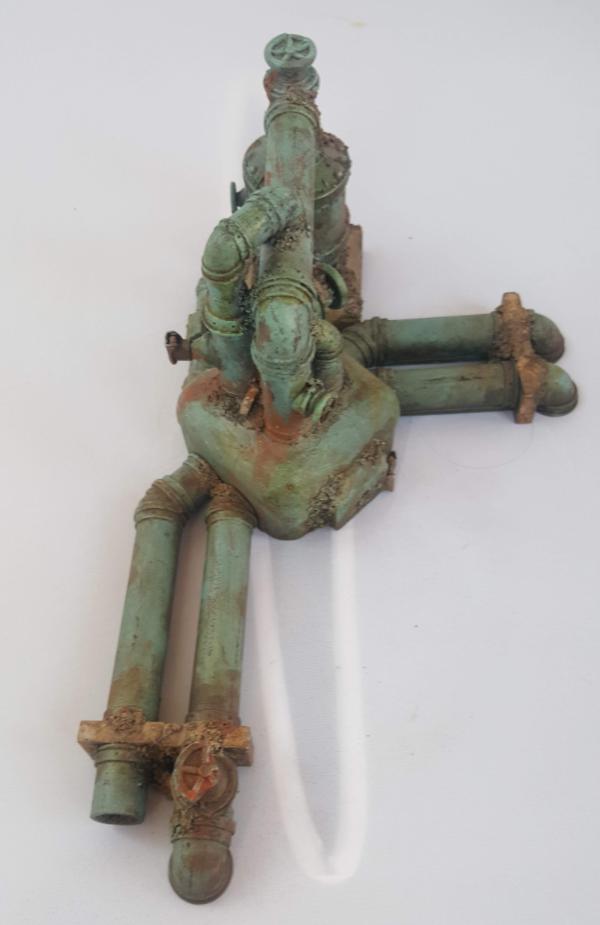
2018/08/04 22:01:26
Subject: Re: Multi-level city terrain, marine v nid bases (8/4: selling some terrain to get more terrain!)
|
|
Dakka Veteran
|
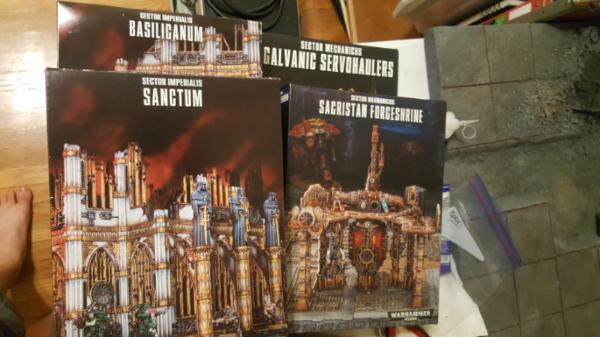
Hello! I'm back, well, eventually I am anyways. I'm back mostly because the new sector imperialis ruins are AMAZING and i want ALL OF THEM.
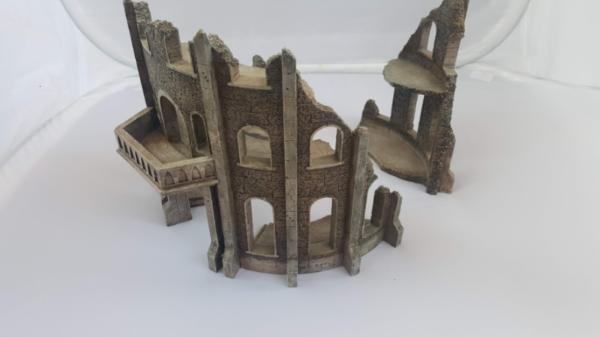
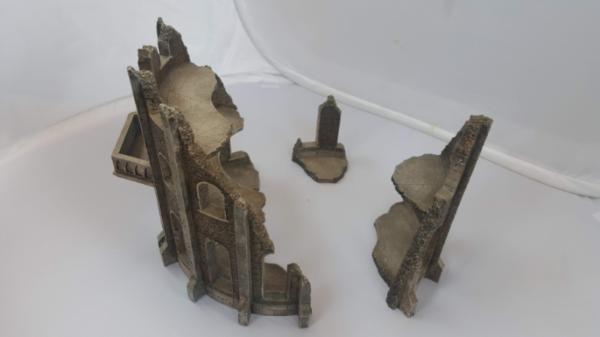
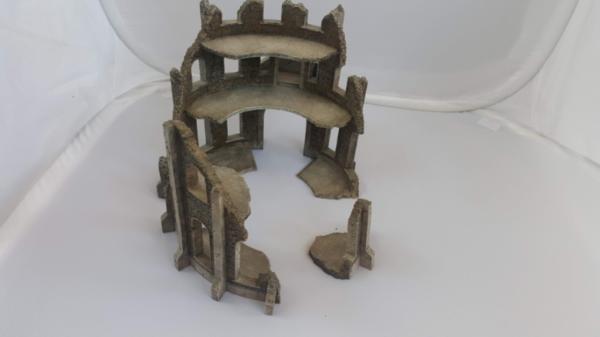
Sadly, im out of room, so! it's time to sell some things first. Im starting here because, well, you guys have actually seen this whole journey through so if there is any you want you get first crack at it. Here is the first batch of what I want to get rid of. More to follow once I.. get slightly better pictures of them than what I have. PM me if interested/offers.
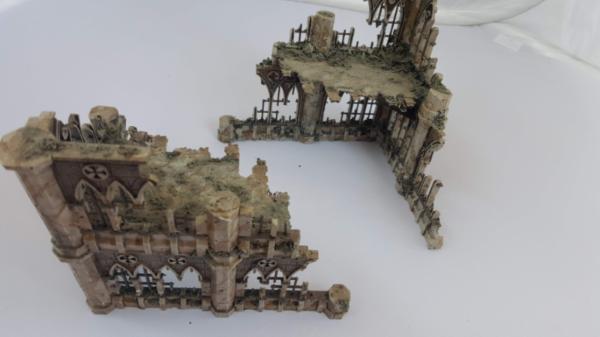
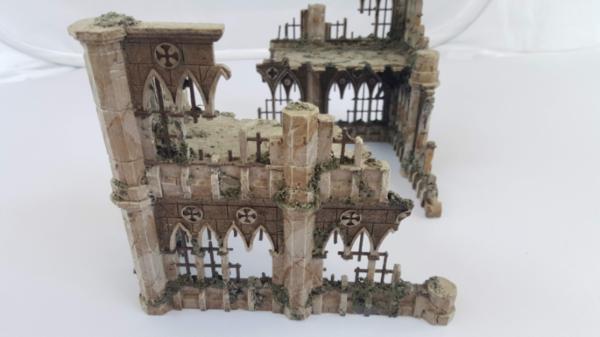
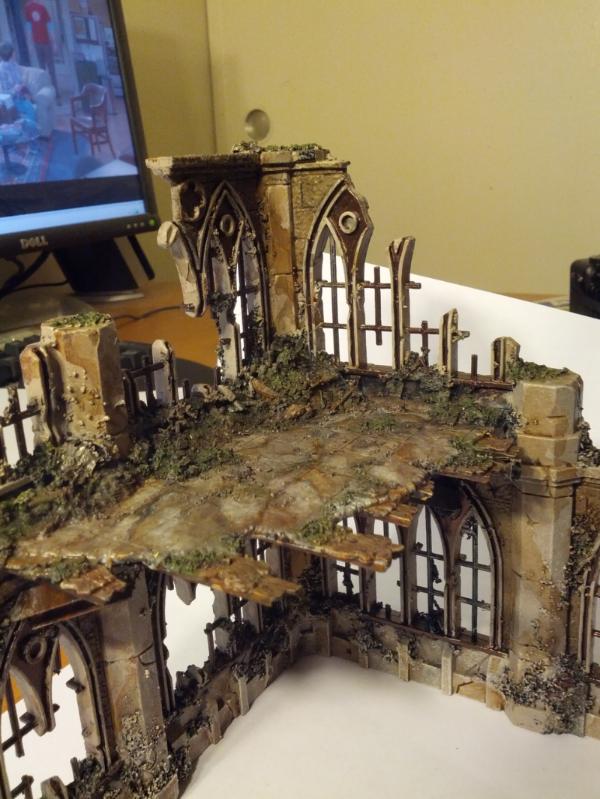
These are from an existing kit but are a very heavy resin and feel stone-like. They're also have a footprint of about a foot so.. just too much room for me really given that I already HAVE lots of big things but would make a good centerpiece that wont shift around.
|
|
This message was edited 1 time. Last update was at 2018/08/04 22:03:57
|
|
|
|
|
2018/08/05 20:00:45
Subject: Multi-level city terrain, marine v nid bases (8/4: selling some terrain to get more terrain!)
|
|

[MOD]
Making Stuff
|
Doesn't hurt to have a few different 'big' pieces so that you're not always using the same ones 
|
|
|
|
|
|
2018/08/06 00:22:33
Subject: Re: Multi-level city terrain, marine v nid bases (8/4: selling some terrain to get more terrain!)
|
|
Dakka Veteran
|
I mean.. yes but I want NEW big pieces. City big pieces with statues.
More importantly though is the fact that the colesium, while an excellent terrain piece, doesnt really have attachment points for my bridge network system. That is one of the key pieces of modularity that make my terrain flexible for both 40k and kill team/dnd/etc. Thus I kind of want EVERY building to at least have a few attachment points so I can really go to town with bridges between them.
|
|
|
|
|
|
2018/08/10 04:08:21
Subject: Re: Multi-level city terrain, marine v nid bases (8/9: selling some terrain to get more terrain p2!)
|
|
Dakka Veteran
|
|
|
|
|
|
|
2018/08/10 11:52:18
Subject: Multi-level city terrain, marine v nid bases (8/9: selling some terrain to get more terrain p2!)
|
|
[SWAP SHOP MOD]
Robot Cat
OH-I Wanna get out of here
|
If i wasn't out of hobby funds I'd totally be looking at picking up some of these.
|
|
|
|
|
2018/08/10 22:32:25
Subject: Re: Multi-level city terrain, marine v nid bases (8/9: selling some terrain to get more terrain p2!)
|
|
Dakka Veteran
|
Noooooo there is always more room for hobby funds!
|
|
|
|
|
|
2018/08/25 15:24:17
Subject: Multi-level city terrain, marine v nid bases (8/9: selling some terrain to get more terrain p2!)
|
|

Painlord Titan Princeps of Slaanesh
|
So... I clicked on this thread at 4.27 a.m. because I'm currently making three small terrain pieces (out of cork and rocks, mostly) and thought maybe I might get some tips and tricks.
I'm leaving this comment nearly seven hours later, disappointed that a standard 6x4 board is too small to build a St. Paul's sized cathedral on.
This thread is magnificent. Game raised.
|
|
|
|
|
|
2018/08/30 06:52:56
Subject: Re: Multi-level city terrain, marine v nid bases (8/9: selling some terrain to get more terrain p2!)
|
|
Dakka Veteran
|
Thanks! It's been a long journey with many breaks buutt this thread definitely helps keep the motivation up to keep trying new things.
The good news is that there will be new posts soonish! All the items sold and I bought myself some galvanic cranes and knight docks and imperalis terrain.
So we'll get this party started again with new fun times. When in doubt, add more bits to my terrain board? I also want to actually finish painting the 2x2 tiles too...
|
|
|
|
|
|
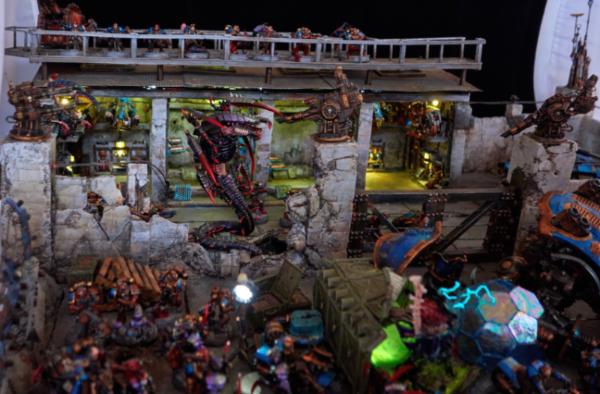
2018/10/30 00:32:11
Subject: Re: Multi-level city terrain, marine v nid bases (10/29: lets make new things! )
|
|
Dakka Veteran
|
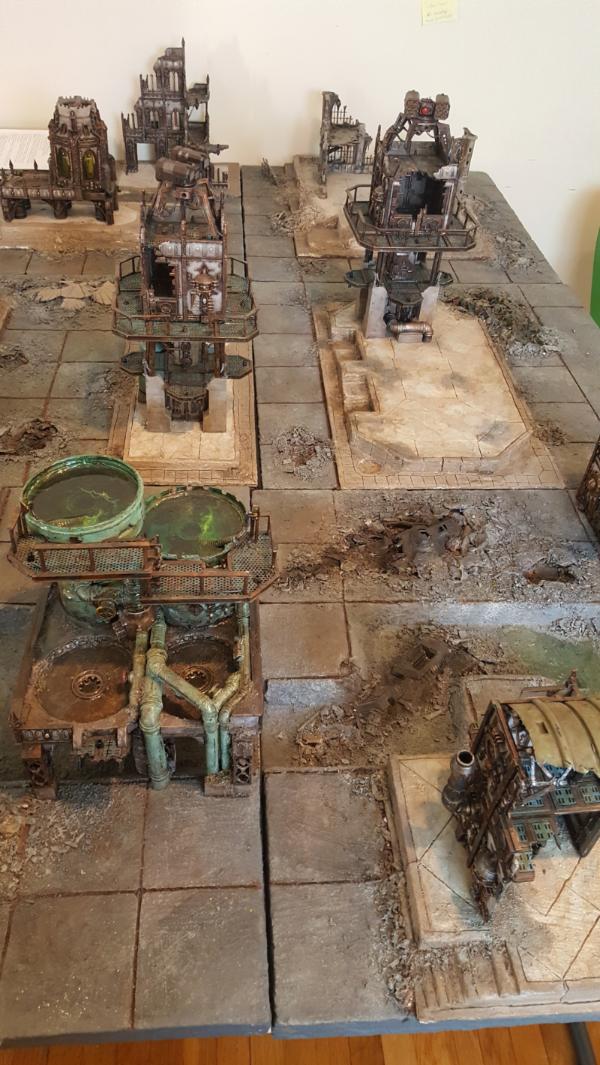
Hello again! So stuff sold! basically nearly everything "spare" that I was either okay to get rid of or had no use for is now gone. Look at how much room i have!
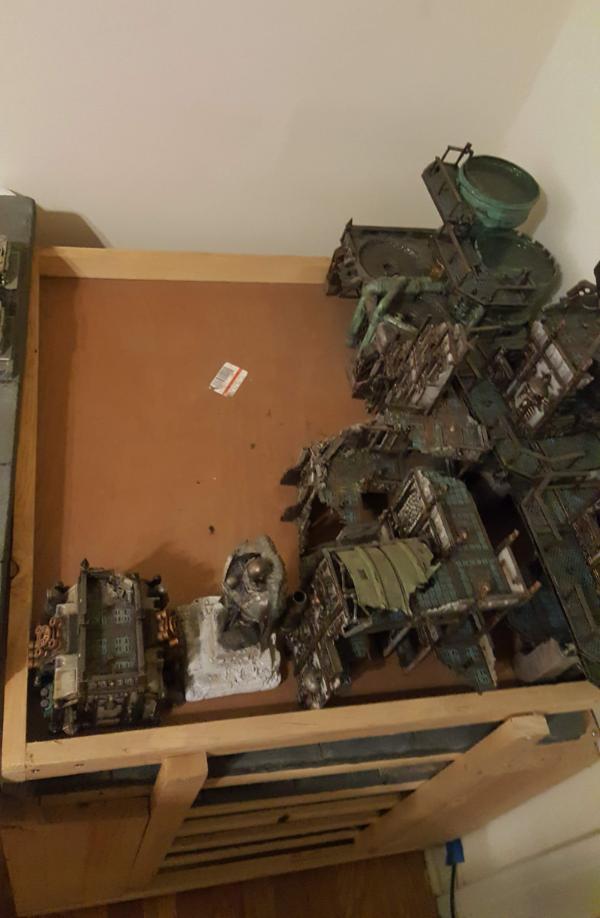
and the reason for all this room.. NEW STUFF! I really really love all the new terrain bits GW has made and wanted to paint it up with all the statutes to really bring together everything on the city tile.
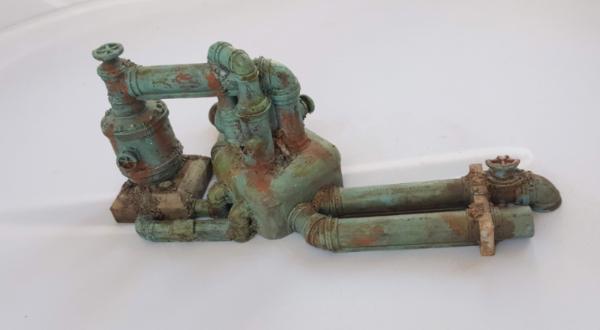
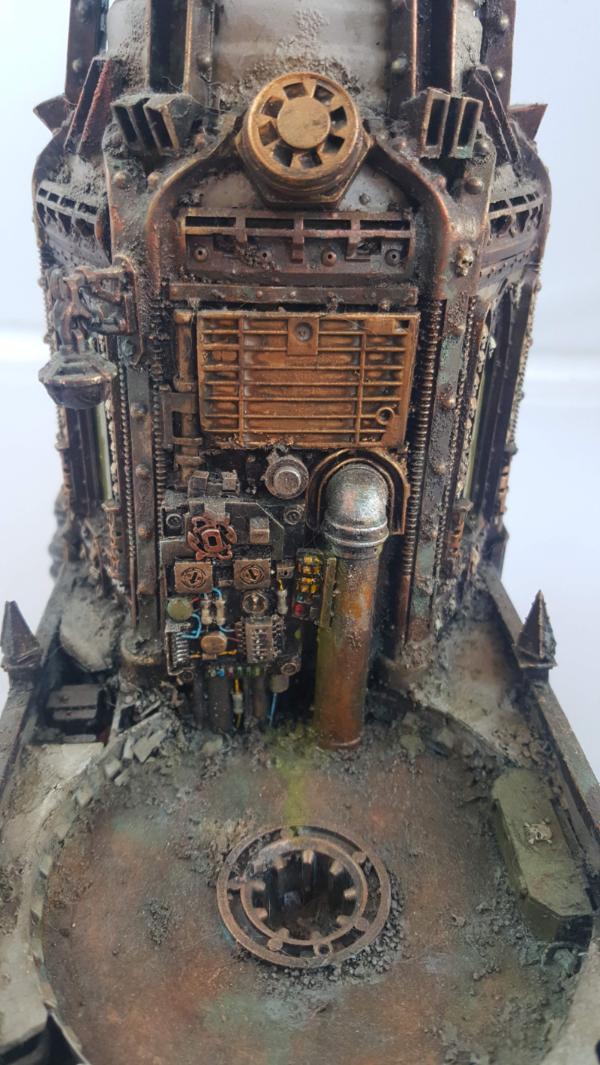
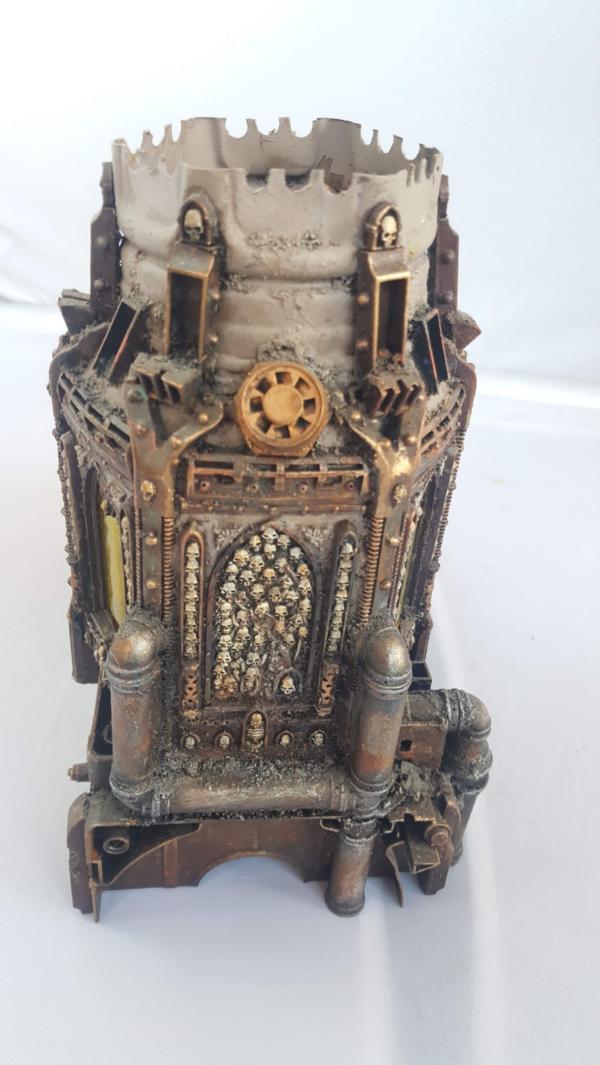
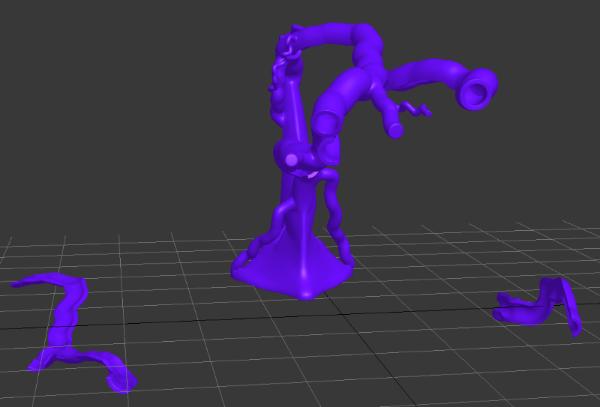
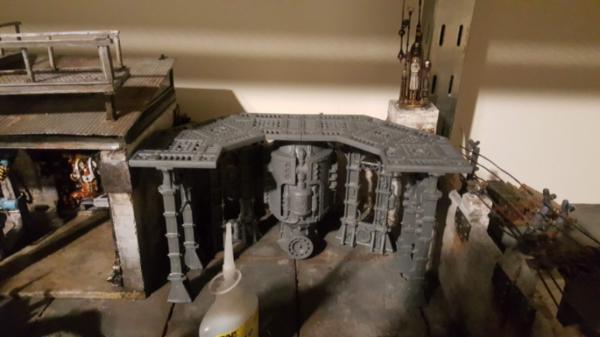
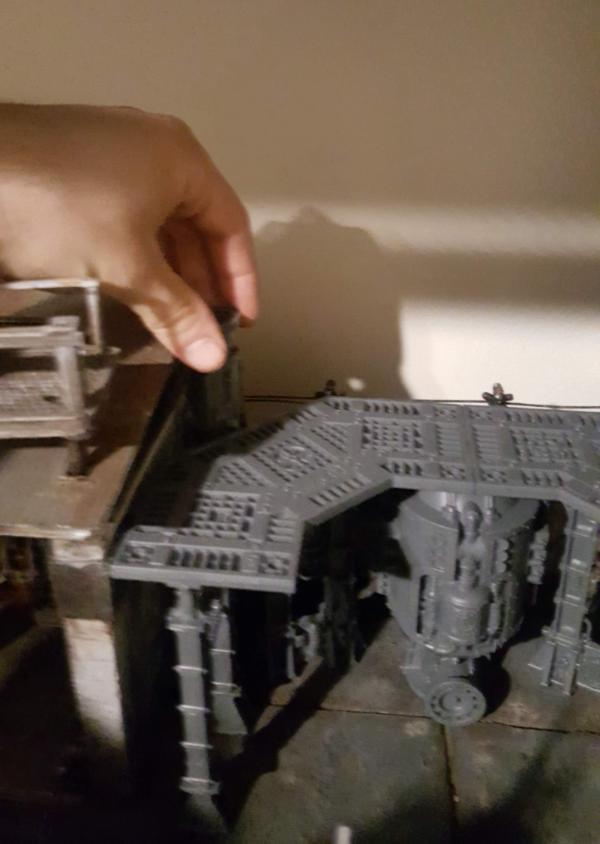
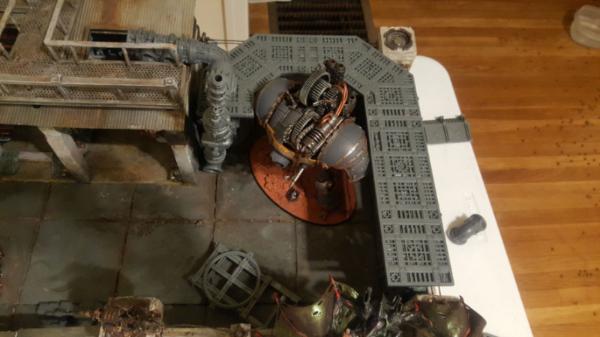
Also that forgeshrine (with an added awesome GIANT CRANE?!?!?!) is a perfect fit for.... el garage. This is the current state of it:
It's a good state, no argument there, but there is that.. big blank space where the sicaran is. It bugs me. Originally I wanted to make some kind of barracks there buuut I couldnt really think of a design that was reasonably time-efficient and would look decent from this angle. The alternate idea was some kind of giant knight area which would service the knight now fallen on the ground but that would also have taken a ton of work. Enter the new forgeshrine which looks to be a perfect fit and great way to fill out that area (and give me new base types to boot for more variety on my scions/scouts)
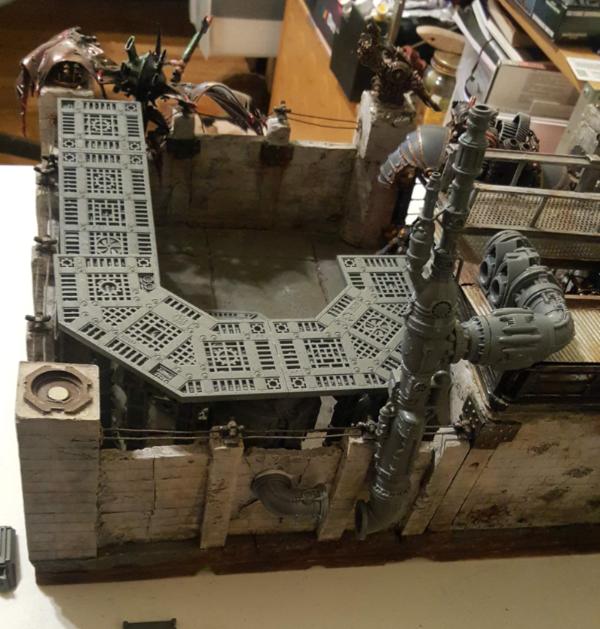
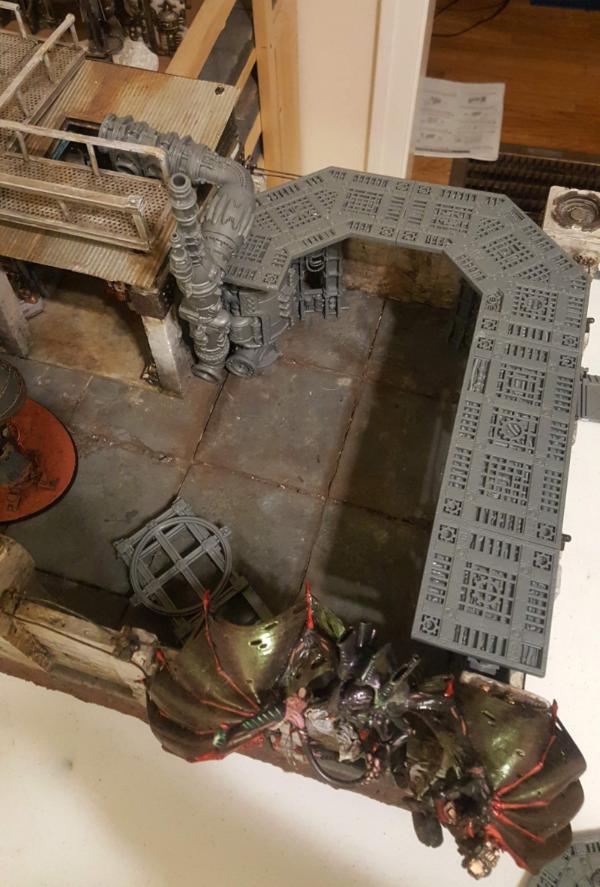
The other thing that bugs me about the garage is, well, its really hard to see inside. I took this setup to Socal last year and one thing I noticed was that people had a hard time really getting a sense of the garage interior when it was all setup and put together. There is so much detail there hidden away by the roof/walkway that it might be worth revisting to see if, now that I have something else to connect the walkway to, i cant clean up that area and make it a bit more open. It would also be nice to finally add my gargoyles, heavy bolters, and searchlights to the walkway so it looks like the bloody battlefield mess everything else is.
|
|
This message was edited 3 times. Last update was at 2018/10/30 00:36:02
|
|
|
|
|
2018/10/30 21:44:16
Subject: Re: Multi-level city terrain, marine v nid bases (10/30: placing a forgeshrine)
|
|
Dakka Veteran
|
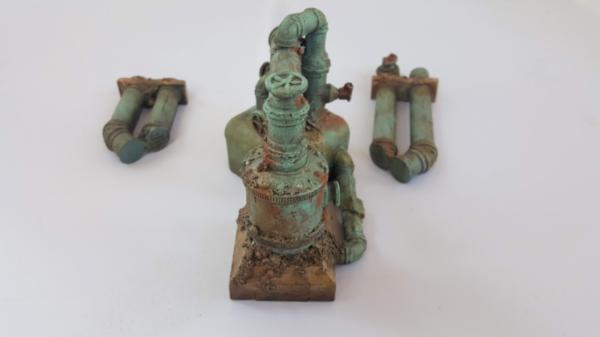
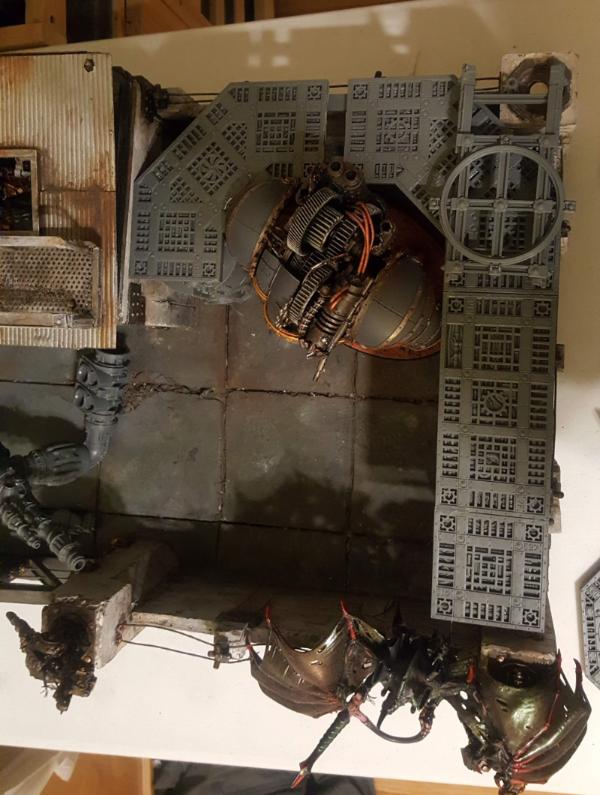
So, now im trying to figure out placement. The good news is that the forgeshrine fits very well in my little nook!
The bad news is twofold:
1. it sticks out relatively far from the wall when the exhaust pipe is in the back, this is bad because i wanted this thing to be RIGHT up against the wall so I can maximize total walkway distance on the side. My plan is to combine the forgeshrine with the giant crane on rails to explain just how knights get repaired and also show how supplies are moved around the base. So I want to maximize the distance there.
Furthermore sticking it center in the middle is.. kinda boring. I dont need this to match the original layout THAT closely.
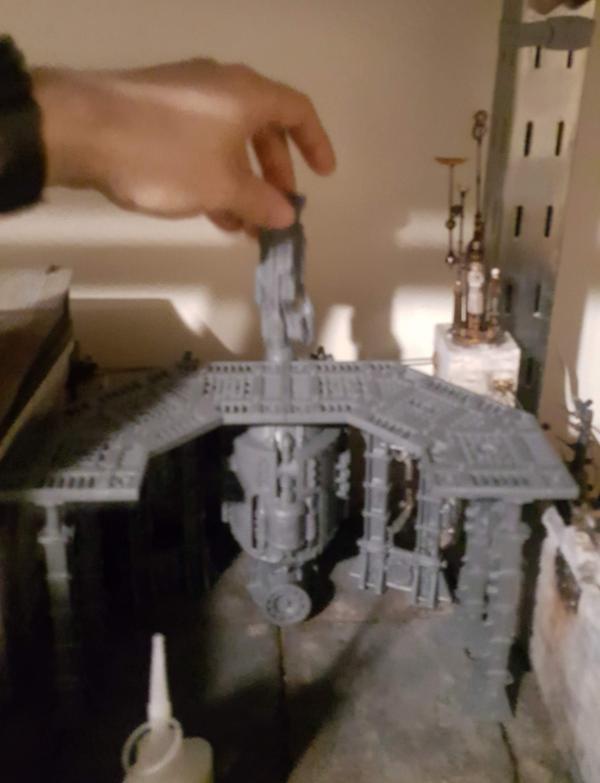
2. I tried moving it to the corner but that blocked the door and also looks wierd:
You can see the issue here, there is a big gap near the wall even with just the cylinder which means im losing out on distance for the side walkway:
So yeah, not sure yet there what to do.
One other thing, I've switched glues around a bit for this project. Normally I just use like superglue and move on (zap a gap, gorilla, etc) but one thing i've noticed with the buildings/other large plastic structures gluesd that way is that, while sturdy in compression, they can easily crack under tension (like if you pick up the building wrong) or if you suddenly "drop" the building or otherwise "shock" it somehow. So i wanted to experiment with some other glues. I already used this brand for my acrylics (weld-on) but after watching an adam savage video I bought a couple more of their types (each # is a different consistency/plastic type):
https://www.eplastics.com/Plastic/plexiglass_glue/ips3-4oz?gclid=EAIaIQobChMIotT7x46v3gIVhPhkCh1-fAkcEAQYBSABEgINB_D_BwE
I went with #3 and #16, which handle the same plastics but 3 is super liquid and 16 is "thicker" and theoretically stronger.
Both have their pros and cons
pros:
1. THEY WORK ON STYRENE (the white plastic card i always use) . super glue does NOT and was the primary reason why my walkways have wire through them, because i just could NOT glue it well.
2. they do seem to weld the plastics together strongly once set (they set fast after a minute or so, and then more strongly as time goes on)
cons:
they are fiddly as hell. the #3 is so liquid it can squirt everywhere and is similar to my acrylic experience. It just takes real skill and luck to get it all to work.
#16 almost instantly gets cloudy/a film over it when it interacts with air, so the tube clogs CONSTANTLY and is a real pain to glue something down (since once you unclog it comes squirting out from the pressure)
|
|
This message was edited 1 time. Last update was at 2018/10/30 21:52:06
|
|
|
|
|
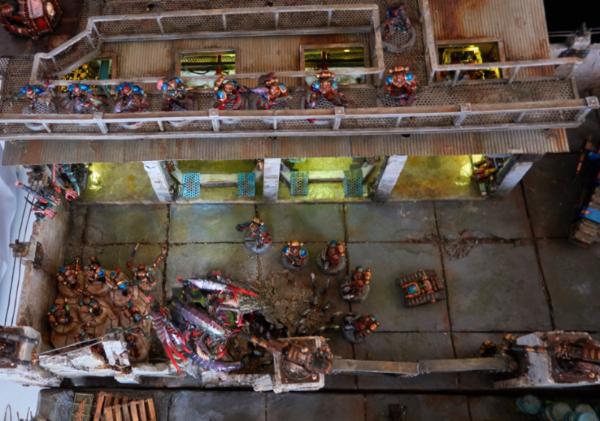
2018/10/31 22:28:00
Subject: Re:Imperium vs Nids Diorama II: The Final Pieces (10/31: placing a forgeshrine again)
|
|
Dakka Veteran
|
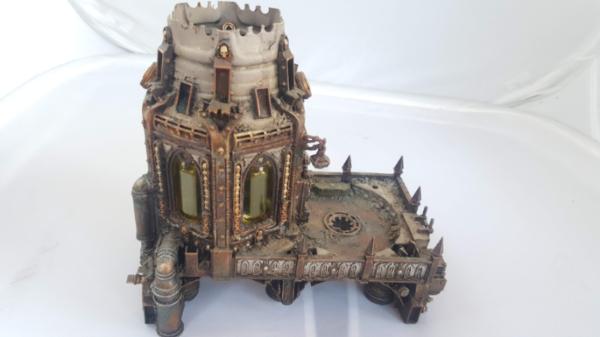
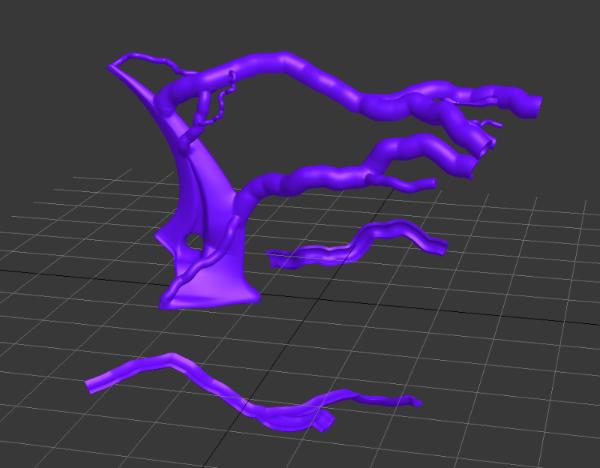
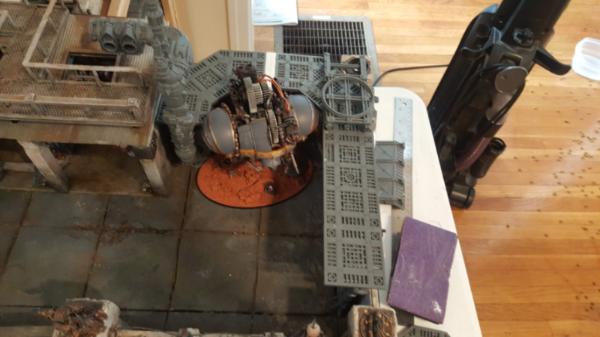
So when I left off I was still trying to figure out how to place the forgeshrine to maximize my space.... and im still doing that.
The problem was twofold, the pipe setup in the back and also the fact that the cylindrical forge part has a larger diameter than the platforms which cramps how much total length i get for them.
I could potentially live with the second problem, but not the first. I started to consider more exotic locations like so:
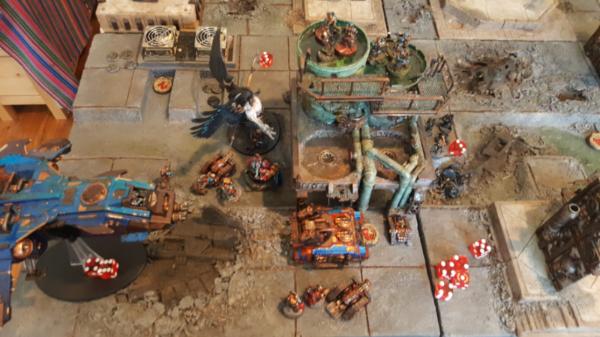
but that would have been a TON of work (you just KNOW i would have to drill through the wall to get an actual pipe in there..) and is a definite breakage risk when im carrying/moving this to events by being "off" the tile. I ended up with something of a epiphany and decided instead to move the forge to the side. I had to cut off some legs I had already glued to do it buttttt it looks a LOT better.
Furthermore having the pipes there lets me use both sides, since there is a control panel on the other side which is traditionally hidden in the "standard" arrangment. I would need to re-do some of my walkways but it would look great and could connect everything together. There was just one more problem...
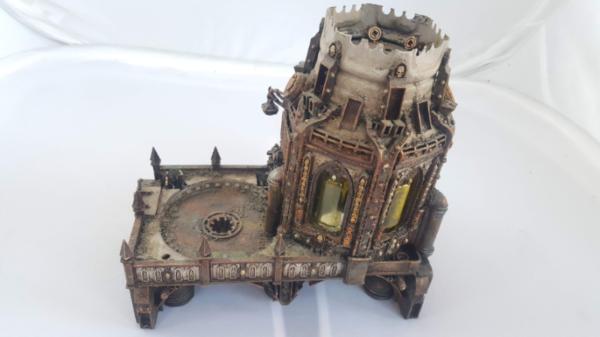
A knight doesnt actually fit well in that gap! i borrowed a knight from a friend to test and.. yeah.. doesnt really fit. I already had the thought of potentially having a rising platform so this setup could handle "bigger" knights (like the new plastic beefcake castellan) and adjust itself but even then the width was just nooooot nearly enough for even this guy. Sigh. So now to widen the thing.
not perfect, but much better, especially when I rise stuff up.
All together now:
|
|
This message was edited 2 times. Last update was at 2018/10/31 22:30:56
|
|
|
|
|
|
|