| Author |
Message |
 |
|
|
|
|
Advert
|
Forum adverts like this one are shown to any user who is not logged in. Join us by filling out a tiny 3 field form and you will get your own, free, dakka user account which gives a good range of benefits to you:
- No adverts like this in the forums anymore.
- Times and dates in your local timezone.
- Full tracking of what you have read so you can skip to your first unread post, easily see what has changed since you last logged in, and easily see what is new at a glance.
- Email notifications for threads you want to watch closely.
- Being a part of the oldest wargaming community on the net.
If you are already a member then feel free to login now. |
|
 |
2021/10/17 09:21:42
Subject: Re:Mac's P&M Shenanigans-- 10/3: detailing scratch-built Battle Sanctum (LoER)
|
|

Longtime Dakkanaut
|
Love what you have done with the scraps, but hope all the permits were in order to put that stuff on the castle 
|
|
|
 |
|
2021/10/25 05:14:32
Subject: Re:Mac's P&M Shenanigans-- 10/3: detailing scratch-built Battle Sanctum (LoER)
|
|

Preacher of the Emperor
|
Wooo... thanks for all the comments and support, y'all. I finally got the thing done! I held off until DJJazzyJeff posted the voting thread, but now I can drop a few details on the final steps.
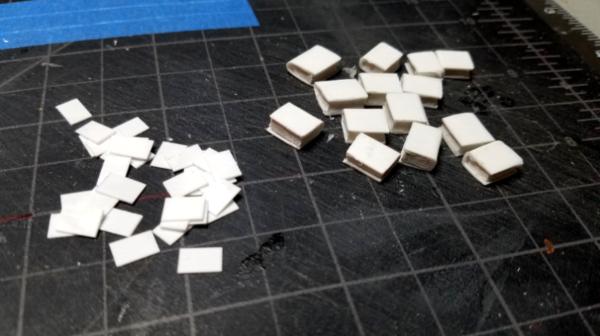
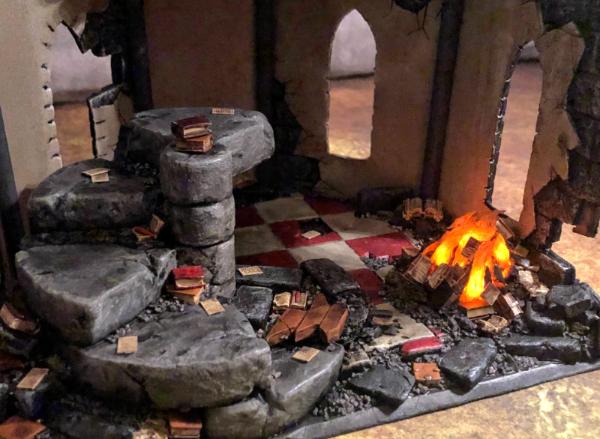
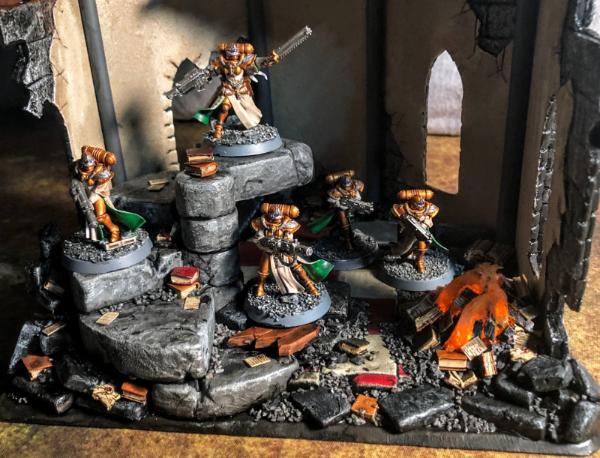
The concept from early on was a book-burning. LoER's theme "By the Book" sent me digging through the bits box for some old metal books from here and there, and I knew I'd need some more to supplement them. When the Ecclesiarchy rounds up heretical texts for the pyre, they don't stop with just a few. I made my extras out of foamed PVC textured with the edge of a file and sandwiched into a trough of styrene card. Once the glue dried, I sliced them apart with a blade and cleaned them up with sandpaper. The scrap styrene got cut into squares to represent the scattered pages that survived the purge.

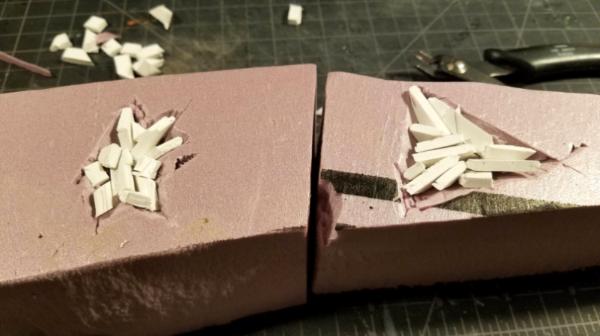
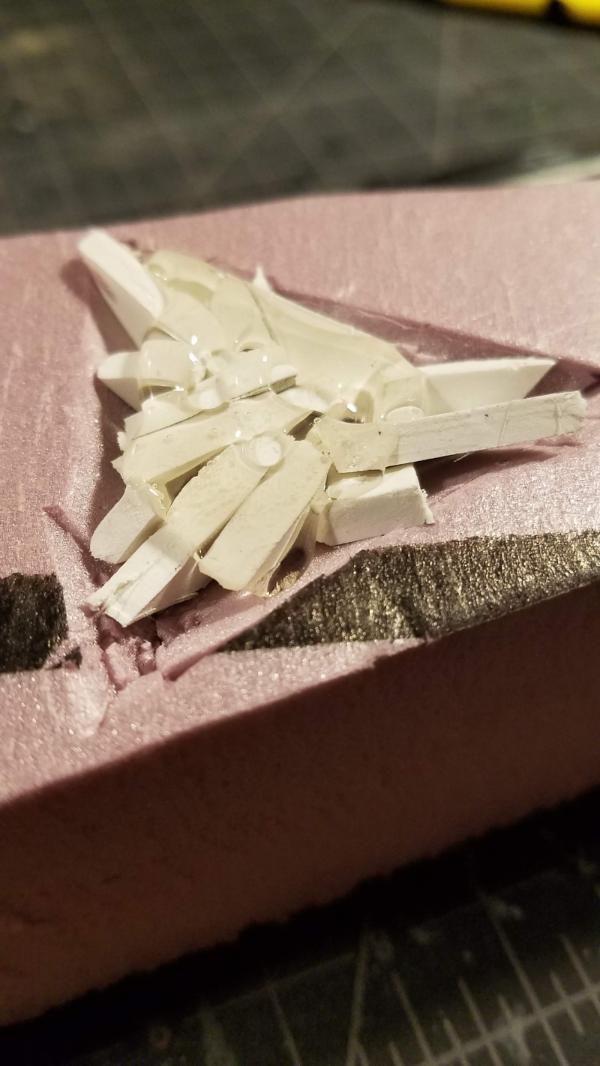
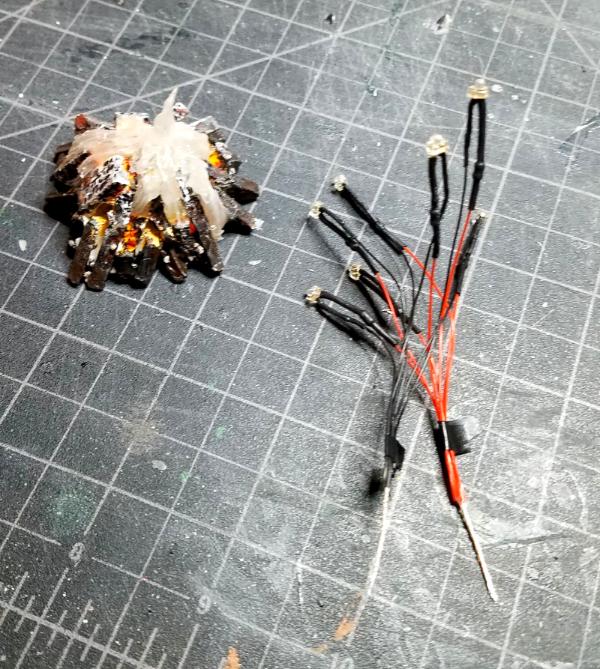
With plenty of books in store, I got busy on the bonfire. I had a bunch of flickering amber micro LEDs from Evan Designs, and I imagined that if I built the bonfire out of trimmings from the floors of the Sanctum and locked them together with hot glue, I'd be able to drill holes from the LEDs from the bottom. The hot glue proved to be a little soft and hard to work with, but it all worked out. I cut some inverted bonfire shapes in some scrap foam, arranged the strips upside down in the pits, and slathered on the hot glue. I painted the bonfire first, then ran more hot glue over the top that I used tweezers to work into flame shapes. I tinted the flames with yellow and orange pigment so they'd look somewhat like fire under full light, and got busy on the wiring. The micro LEDs were perfect for the space I was working with, wired up easily through the base of the Sanctum, and even got a switch hidden in the rubble.
|
|
|
|
|
|
2021/10/25 05:22:51
Subject: Re:Mac's P&M Shenanigans-- 10/3: detailing scratch-built Battle Sanctum (LoER)
|
|
Ultramarine Land Raider Pilot on Cruise Control
|
Wow. That's impressive work. Great job!
|
|
This message was edited 1 time. Last update was at 2021/10/25 05:23:09
|
|
|
|
|
2021/10/26 05:02:12
Subject: Re:Mac's P&M Shenanigans-- 10/3: detailing scratch-built Battle Sanctum (LoER)
|
|
Preacher of the Emperor
|
Thanks! I had a really good time with this build, the foam cutter got a good workout, and the challenges of the scratch built books and the bonfire lighting and wiring turned out as well as I'd hoped. Here's a bit more detail on the final phases of construction and paint.
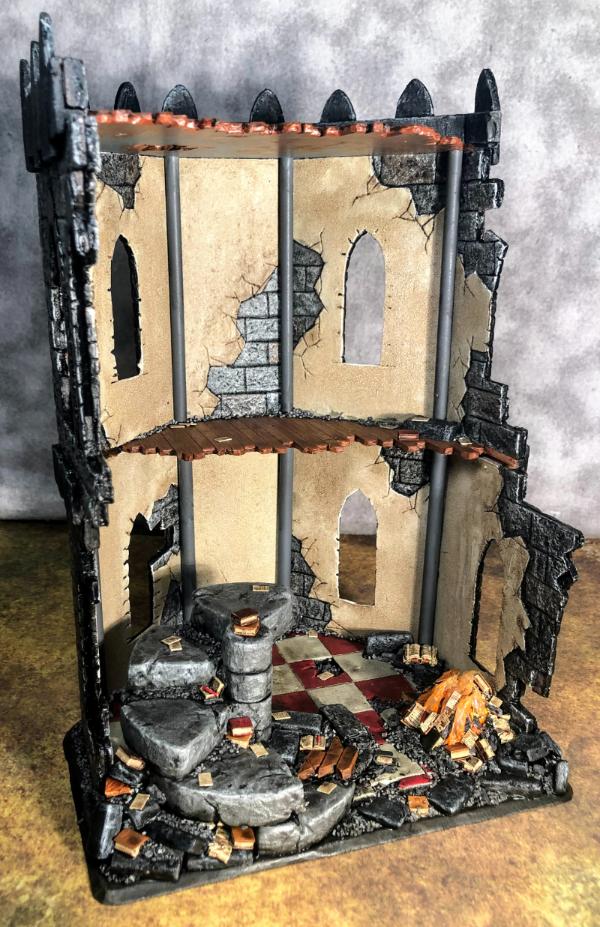
In summary, this is an Adapta Sororitas Battle Sanctum designed to match the official GW model in scale and dimension. I built it mainly out of XPS foam, supplemented by Styrene card, foamed PVC, and a bit of cork and ballast to dress it up. The bonfire is made of scrap PVC, hot glue, and a half-dozen flickering amber micro LEDs running on a coin cell hidden in the base.
This is probably my favorite photo of the finished product. I found it difficult to light the interior enough to make the details pop while still letting the bonfire stand out against the shadows, but somehow I managed it here.
This one shows the upper floors of foamed PVC (which I won't do again... too hard to carve and texture) and the ground floor of XPS (much easier to work with). I pretty happy with the red and white paint scheme, which I think adds some visual interest without being garish. The switch for the LEDs is the section of broken floorboards on the bottom step of the stair.

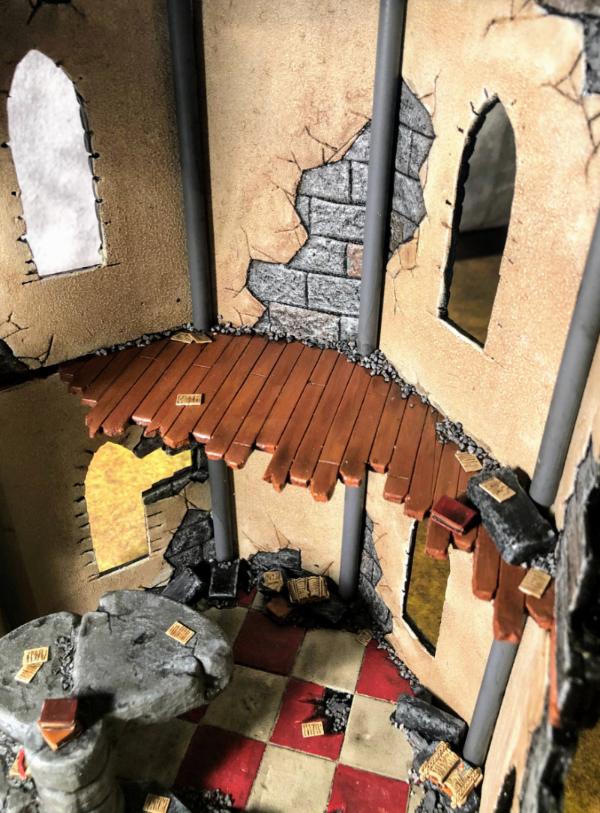
Here's the silliest part: the balcony you can't get to. The wall was too narrow for the template I'd built for the windows, but I didn't feel up to carving it freehand. I considered mounting a closed door on the inner and outer surfaces, or maybe adding a statue, banner, or brazier on the outside, but ultimately left it as it was. Maybe someday I'll do something with it. It does make a nice place to park extra Miracle Dice during a game.

This is the best photo of the stone texture and paint... I was frankly surprised at how well it came out. The texture was all done with a steel ruler and sculpting tools, followed by rolling it all with balls of aluminum foil. I laid down a base of black acrylic paint mixed with ModPodge (tip o' the cap to Black Magic Craft), then gray acrylic, drybrushed with titanium (all cheap art store acrylics), and then washed with Nuln Oil thinned with flow aid straight from the bottle. I wouldn't have managed the effect if I hadn't painted the wall panels flat on the table before assembly... gravity did the trick. Another quaint point... the supports for the balcony and the pieces for the rampart are all off-cuts I'd saved from earlier in the project.

This is my best photo of the interior walls, which again came out much better than expected. The stone texture is etched into the same layer as the plaster, with the cracks added with a dental tool. I was wary of the interior being too dark, so I rolled on titanium acrylic with a 2" foam roller (which really aided the texture). I thinned Agrax Earthshade with flow aid for the wash. The crimbling plaster was random, and the fact that this seems to be one big gap on either side of the support post was a happy accident.
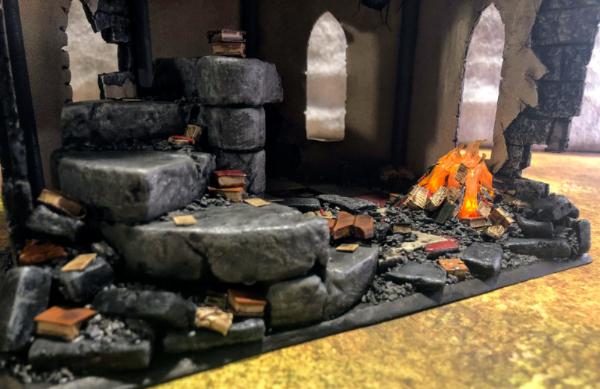
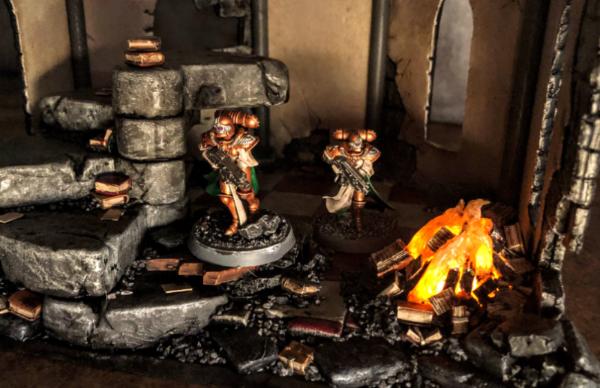
This is the best one of the bonfire. Other details are a little muddled, but in such low light it actually throws a glow on the wall behind it.

Here's one with better lighting from the front. The fire is washed out, but the illusion is aided by the yellow and orange inks I added to the clear glue flames.
I think the effort of making all those extra books and pages helped to sell the book-burning theme. Everywhere there is hidden heresy.
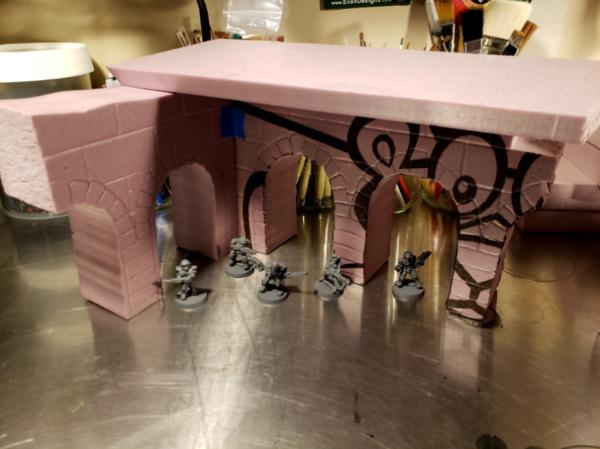
I popped a squad of Celestians in for scale. I learned with my cliff/shelf from an earlier LoER themed entry to give ample room for 32mm bases, especially when they're strewn with rubble.
I had some fun messing with lighting conditions, and this was my favorite of the photos staged with models. Obviously these two veteran Battle Sisters are leaving no corner of this ruin untouched in their efforts to root out any who waver in their commitment to the God-Emperor of mankind. While heretical texts burn on the pyre, the Adepta Sororitas scan the shadows for the impure and blasphemous.
Thanks for checking it out!
|
|
|
|
|
|
2021/11/01 11:32:45
Subject: Re:Mac's P&M Shenanigans-- 10/25: LoER entry complete (scratch built Battle Sanctum, LED bonfire)
|
|
Longtime Dakkanaut
|
Love the action shots with the Sisters inside their Sanctum  Great build, the light effect is gorgeous!
|
|
|
|
|
2021/11/03 12:42:19
Subject: Mac's P&M Shenanigans-- 10/25: LoER entry complete (scratch built Battle Sanctum, LED bonfire)
|
|
Preacher of the Emperor
|
Thanks viterbi! I'm imagining a whole series of lighted works as I gain confidence.
|
|
|
|
|
|
2022/01/08 21:38:17
Subject: Re:Mac's P&M Shenanigans-- 10/25: LoER entry complete (scratch built Battle Sanctum, LED bonfire)
|
|
Preacher of the Emperor
|
Time for a long overdue update...
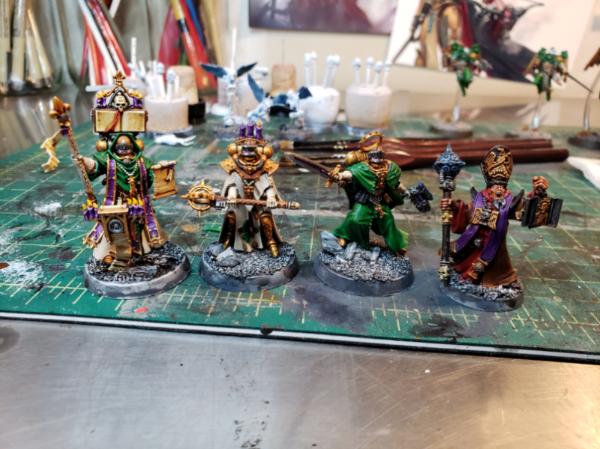
First, four Sororitas and Ministorum characters have made it all the way through assembly and paint. Left to right: Dialogus, Dogmata, Palatine (converted from the Canoness model), and the classic metal Missionary. I'm all-around pleased with the scheme, the level of detail I managed for the time and effort I put in, and, to be honest, the Missionary's pupils. I did those with a blue .01 Micron pen.
I have been managing to get in a game here and there... here's a recent set-up that played really well with 9th ed. terrain rules.
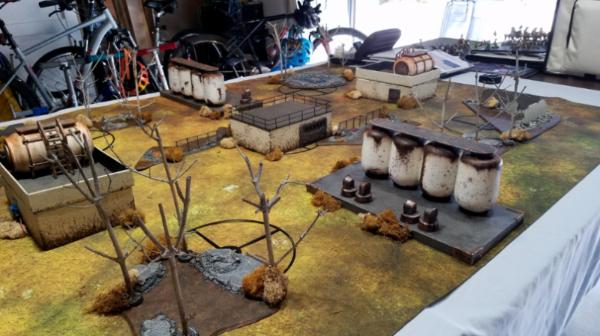
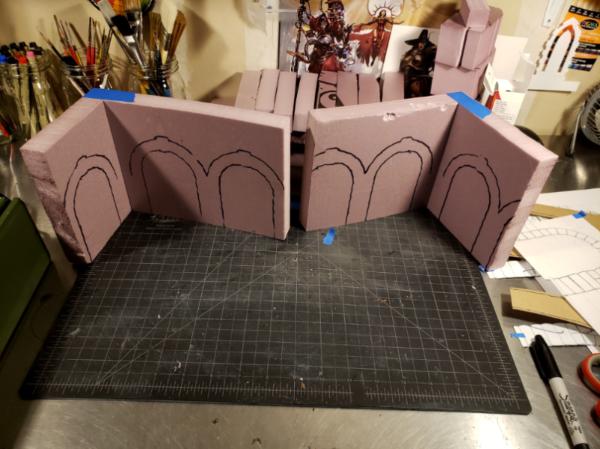
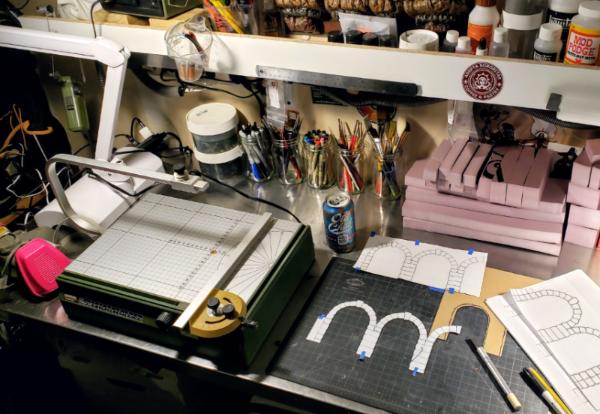
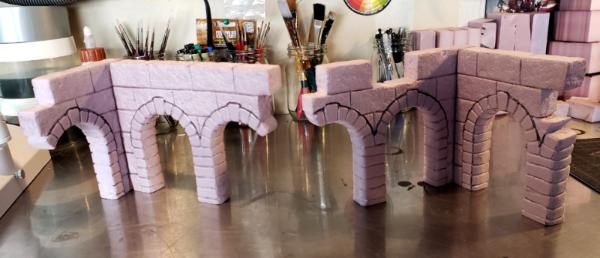
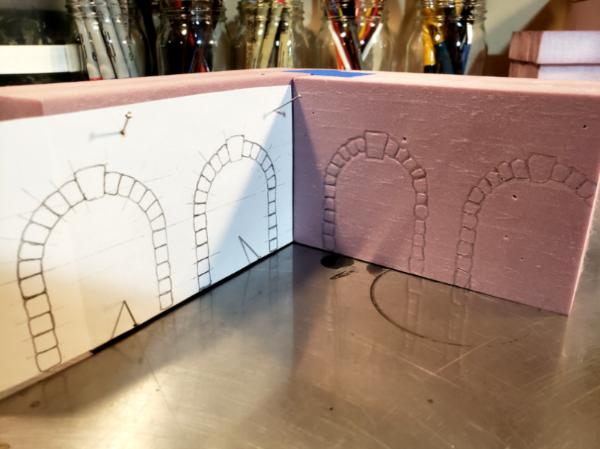
Finally, I'm off on a new terrain building project. This one is ambitious in scale and will serve as my entry into the newly re-imagined League of Extraordinary Riviters Hobby Challenge (#36: Crossings). I had a Romanesque arch template from Shifting Lands that I'd never used, and our regular gaming host had a neoprene mat, but no terrain for it. I decided to try to crank out a table's worth of terrain in one go. I cut lots of 1" and 2" XPS foam into 3" and 5" heights, and sketched two different arch designs with the help of the templates.


Tonight I'll attach the paper templates (I made a dozen copies of each) to the foam and start cutting out the arches. The template will guide me in scoring the stonework for the arches, and I'll use a straightedge to score more widely spaced lines for the stone of the wall.
|
|
|
|
|
|
2022/01/09 12:47:44
Subject: Mac's P&M Shenanigans-- 1/7: Dialogus, Dogmata, Palatine, Missionary... and Romanesque arches!
|
|

Mad Gyrocopter Pilot
|
Really cool blog, the sisters and your terrain look great together!
|
|
|
|
|
|
2022/01/11 04:54:00
Subject: Mac's P&M Shenanigans-- 1/7: Dialogus, Dogmata, Palatine, Missionary... and Romanesque arches!
|
|
Preacher of the Emperor
|
 Olthannon wrote: Olthannon wrote:Really cool blog, the sisters and your terrain look great together!
Thanks! I'm leaning more in the direction of a setting-neutral style that will work for 40k and AoS.
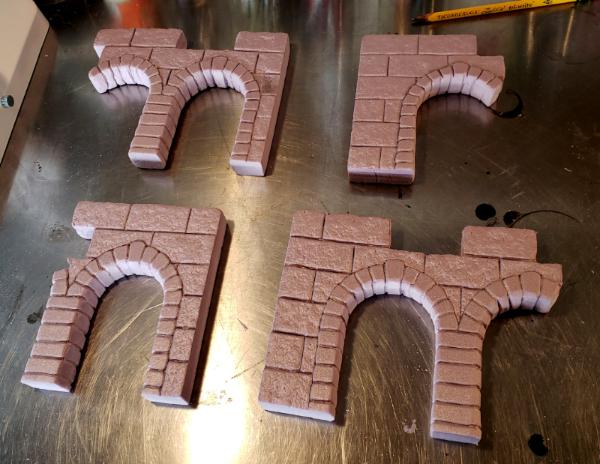
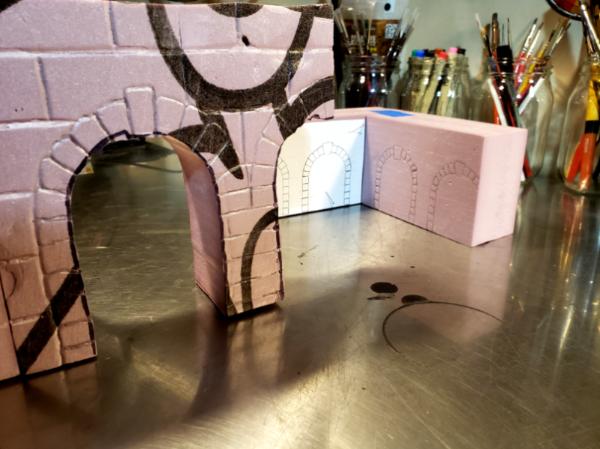
Here's the latest update. I copied all the templates and mounted about half of them. Once I started etching, I couldn't help myself and got the first set on the Proxxon to cut out the arches, then etched the stone blocks surrounding the arches (conveniently 1" x 2", making it easy to move quickly with a 1" steel ruler). It needs some trimming, and I haven't cut the top cap yet, but I'm happy with the way it's going.
|
|
|
|
|
|
2022/01/12 10:45:12
Subject: Mac's P&M Shenanigans-- 1/7: Dialogus, Dogmata, Palatine, Missionary... and Romanesque arches!
|
|

Regular Dakkanaut
|
Your finished ruined tower/Battle Sanctum looks amazing MacPhail! The books are a really nice touch and the LED power fire is a awesome. I imagine it really adds to the atmosphere when playing on it.
Looks like you've made a good start on your next terrain project. I look forward to seeing it progress. Happy New Year, hope 2022 is a good one for you 
|
|
|
|
|
|
2022/01/13 00:00:54
Subject: Mac's P&M Shenanigans-- 1/7: Dialogus, Dogmata, Palatine, Missionary... and Romanesque arches!
|
|

Fixture of Dakka
|
Very nice knife work MacPhail.
Cheers,
CB
|
|
|
|
|
|
2022/01/23 08:00:48
Subject: Re:Mac's P&M Shenanigans-- 1/7: Dialogus, Dogmata, Palatine, Missionary... and Romanesque arches!
|
|
Longtime Dakkanaut
|
Sisters characters look great (even if I think the dogmata is the one dud in the whole line-up, although your paintjob is ace). Missionary eyes work well, he looks quite mad, as a good missionary should 
Excited to see the terrain project develop!
|
|
|
|
|
2022/02/02 17:45:55
Subject: Re:Mac's P&M Shenanigans-- 1/7: Dialogus, Dogmata, Palatine, Missionary... and Romanesque arches!
|
|
Preacher of the Emperor
|
|
|
|
|
|
|
2022/02/14 04:50:31
Subject: Re:Mac's P&M Shenanigans-- 2/13: Ruined Romanesque arches with initial paint.
|
|
Preacher of the Emperor
|
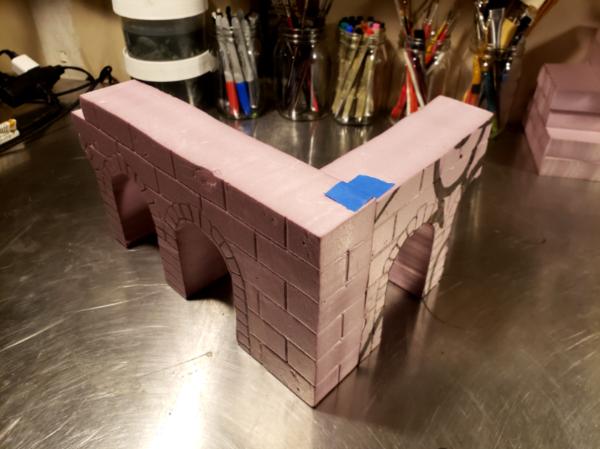
A quick progress update. I got the first set of foam "ells" mostly done (except for assembly), with two coats of 'black magic' (ModPodge + black acrylic paint) and a messy gray drybrush. I'm not going to do much more in terms of paint, but will hand them off toe a friend whose a pro with an airbrush.

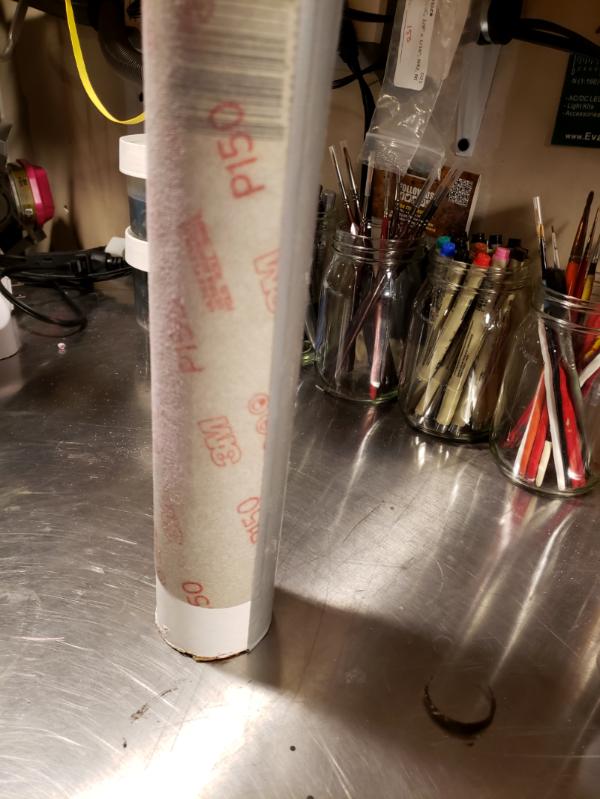
My improvised sanding block (made of a shipping tube and 150-grit sandpaper) was the MVP of the session.
I was pleased enough with the way I cut this inside corner to fit that I need to take a photo before paint. I'm definitely getting better with the hot cutter.
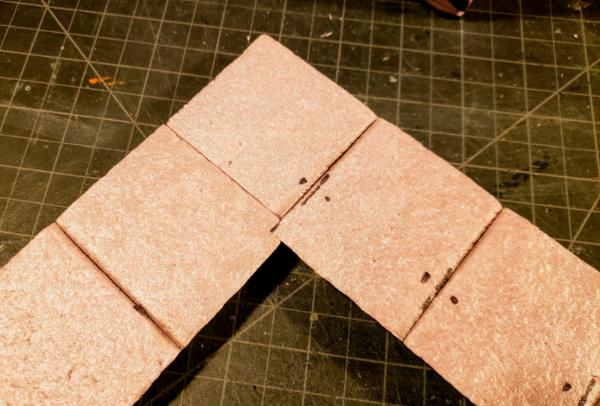
I still have three more pairs of piece imagined, designed and pre-cut, but very from from done. I'm going to try to push one more set through before the end of the month.
|
|
|
|
|
|
2022/02/15 18:13:52
Subject: Mac's P&M Shenanigans-- 2/13: Ruined Romanesque arches with initial paint
|
|
Ancient Venerable Dreadnought
|
Nice arches MacPhail, the cutter seems to be earning its keep. The paint on them came out well too
|
Goberts Gubbins - P&M Blog, started with Oldhammer, often Blackstone Fortress and Void Panther Marines, with side projects along the way |
|
|
|
|
2022/02/16 16:27:00
Subject: Mac's P&M Shenanigans-- 2/13: Ruined Romanesque arches with initial paint
|
|
Fixture of Dakka
|
Wow, they look great now.
Cheers,
CB
|
|
|
|
|
|
2022/03/01 04:17:41
Subject: Re:Mac's P&M Shenanigans-- 2/13: Ruined Romanesque arches with initial paint
|
|
Preacher of the Emperor
|
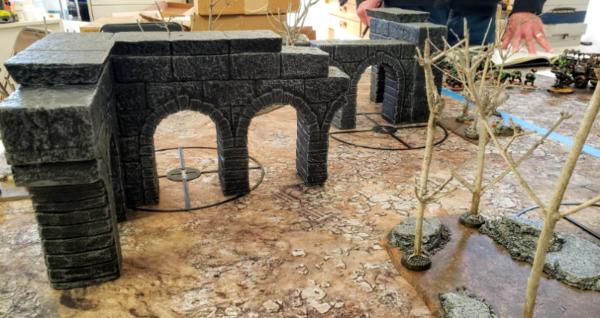
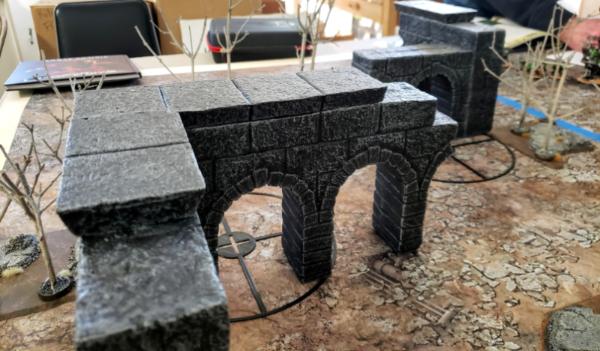
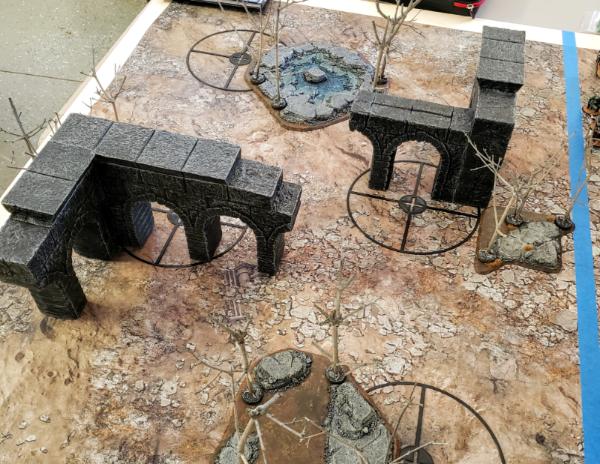
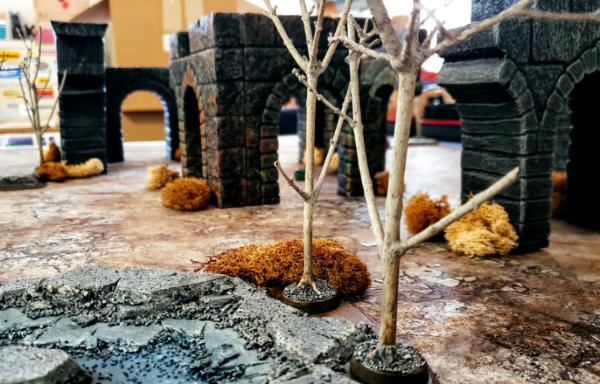
So I managed to get a few photos of the new arches in a recent game... that's also the mat that they'll eventually be painted to match, once I get the rest of the set done. I need to keep chipping away and picking up the pace. I have spring break in a couple of weeks and I hope to bust out the whole lot. Here's the first set, along with some of my older forest terrain and some 3D printed objective markers from a German Etsy seller.
|
|
|
|
|
|
2022/03/25 05:05:09
Subject: Re:Mac's P&M Shenanigans-- 2/28: LoER Hobby Challenge entry: ruined arches
|
|
Preacher of the Emperor
|
Update time! I just had a 9-day Spring Break, with plenty of hobby time. So many things happening all at once.
First, an update on the ruined arches. I got the second set of Ls done, one inch thick instead of two, and without the 'scalable' top cap, so they went faster. I tried out some green and orange paint sponged on to the bottom halves to create lichen and break up the monochromatic monotony. I'm pretty pleased with the outcome:
More pics of construction in spoliers:
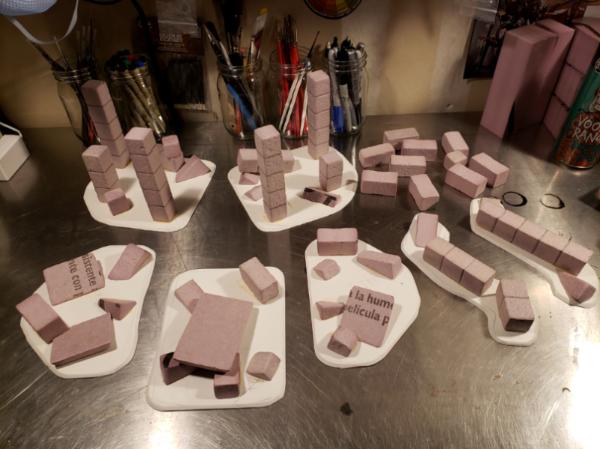
I also cranked out a bunch of supporting terrain to complete the set. If the MVP of building the ruined arches was the old cardboard shipping tube with sandpaper taped to it, the MVP of this expansion was an old oatmeal can full of driveway gravel. My tools are cutting edge!
Clockwise from top left: two "forests", some scatter terrain, two "barricades", and three "craters", all headed for paint to match the arches.
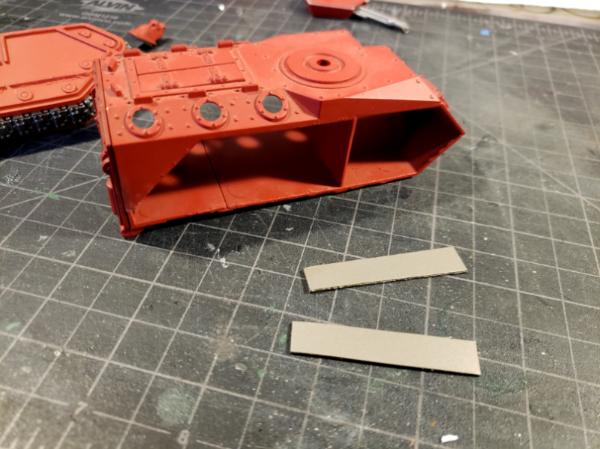
I made some headway on an old Chimera restoration. The lasgun array was in terrible shape, so I'm replacing them with strips of styrene card sprayed with Leadbelcher. This thing will probably get some Shapeways heavy flamers on the hull and turret before I finish paint and do some weathering.
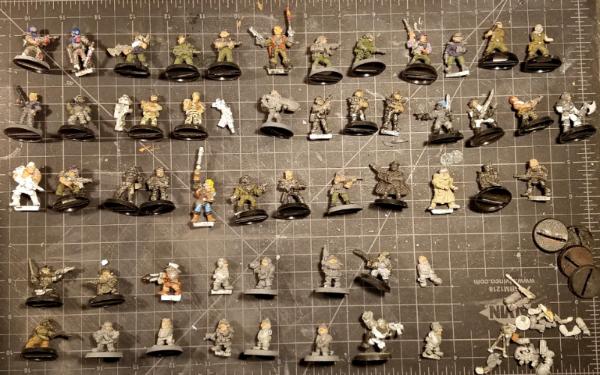
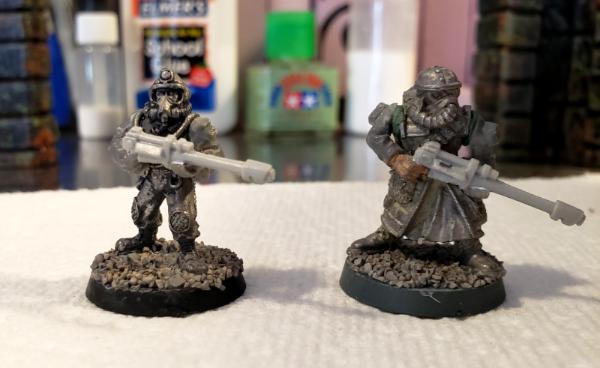
Remember my surprise recovery of a giant box of old Rogue Trader and Second Ed. metal and plastic minis from a friend's garage? I finally got moving on a few of them, picking my favorites for a stand-in Imperial Guard squad. Also I'm getting ready to push on soon with my counts-as-Harker and counts-as-Stracken, who will lead my 2e rabble as Catachans (see why I need flamers for the Chimera?). The bottom pic is two of my favorite old metal minis and the classic IG sprue arms and lasguns I needed to get them back in the game.
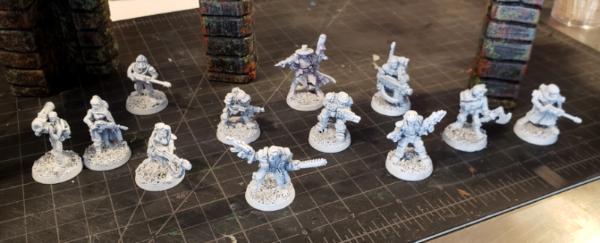

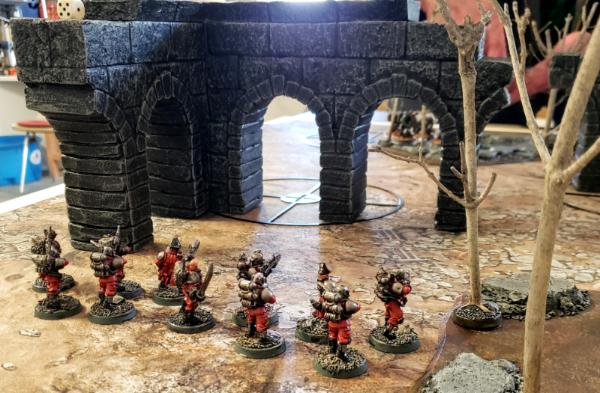
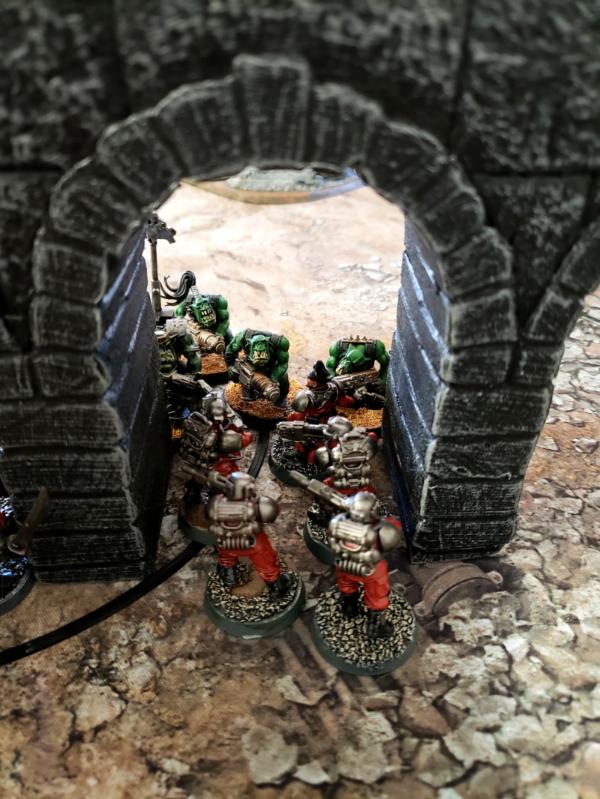
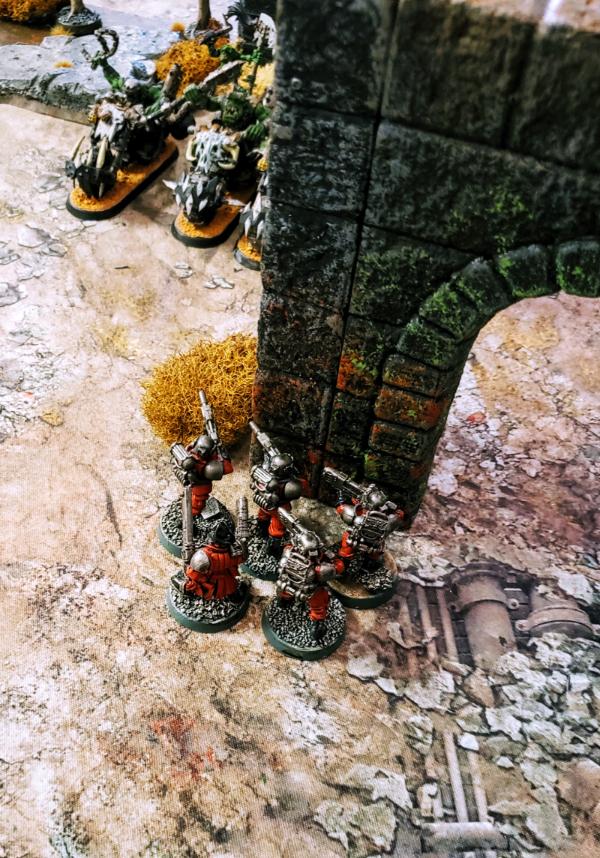
Finally, a couple of pics from a recent Crusade game. My Inquisitorial Task Force faced off against Denghar's Waaagh among the ruins of an ancient temple complex. Here a squad of Inquisitorial Stormtroopers lies in wait for a group of Ork Warbikes:
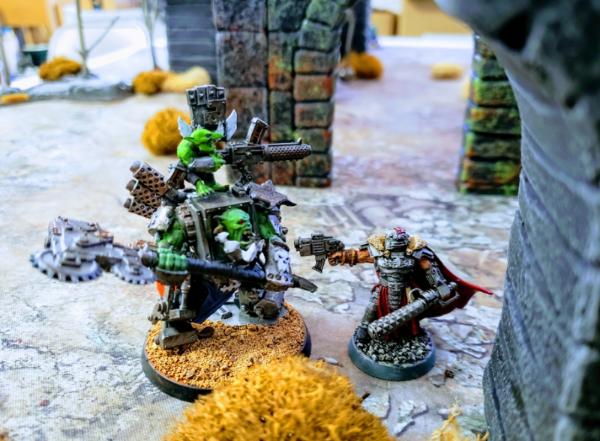
And here Inquisitor Grimhame of the Ordo Xenos stands toe-to-toe with Denghar himself. He was struck down by the Warboss, but it allowed the Captain of his Stromtroopers make a run for it with critical battlefield data.
|
|
|
|
|
|
2022/03/26 22:54:41
Subject: Re:Mac's P&M Shenanigans-- 4/24, Spring Break progress, lots of productivity!
|
|
[DCM]
Boom! Leman Russ Commander
|
Good pics all- very interesting work. 
It's amazing how many of your resurrected/rescued figures I've got; what a great reminder of the beginning of this aspect of the hobby for me.
The lichen/moss effect is very striking- showing up very well in your gaming pics at the end. Those blotches of color really make the stonework pop.
Rock on!
|
"He fears his fate too much, or his desserts are small, who will not put it to a single touch; to win- or lose- it all."
Montrose Toast

|
|
|
|
|
2022/03/27 17:28:51
Subject: Mac's P&M Shenanigans-- 4/24, Spring Break progress, lots of productivity!
|
|

Ancient Venerable Dreadnought
|
The arches look great in action! The green and red help portray a good bit of age. The metal guard are an exciting prospect, can’t wait to see those
|
Goberts Gubbins - P&M Blog, started with Oldhammer, often Blackstone Fortress and Void Panther Marines, with side projects along the way |
|
|
|
|
2022/03/29 08:45:28
Subject: Re:Mac's P&M Shenanigans-- 4/24, Spring Break progress, lots of productivity!
|
|
Longtime Dakkanaut
|
Cool pics from the game, looks like a great duel. Excited to see those old metal minis come along over time!
|
|
|
|
|
2022/04/02 07:42:51
Subject: Re:Mac's P&M Shenanigans-- 4/24, Spring Break progress, lots of productivity!
|
|
Preacher of the Emperor
|
Many thanks!
Meer_Cat, I'm really enjoying this deep bitz dive. I'm both intimidated and pumped to paint them. And I'm totally inspired by your twist tree!
Viterbi, I might take a swing at the 'Inquisitor', but that Squat Trike is calling.
gobert, it was a pleasant surprise how well that worked out. I went with an even heavier hand on the final set, which I have yet to photograph.
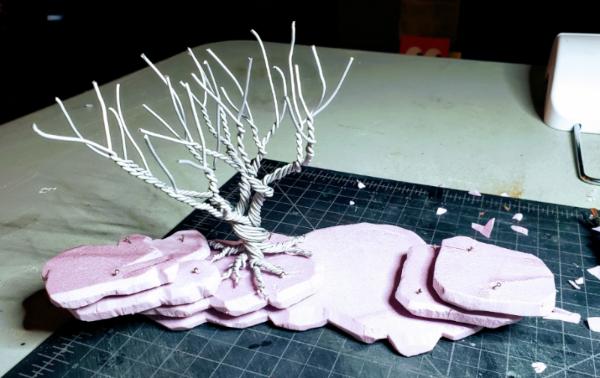
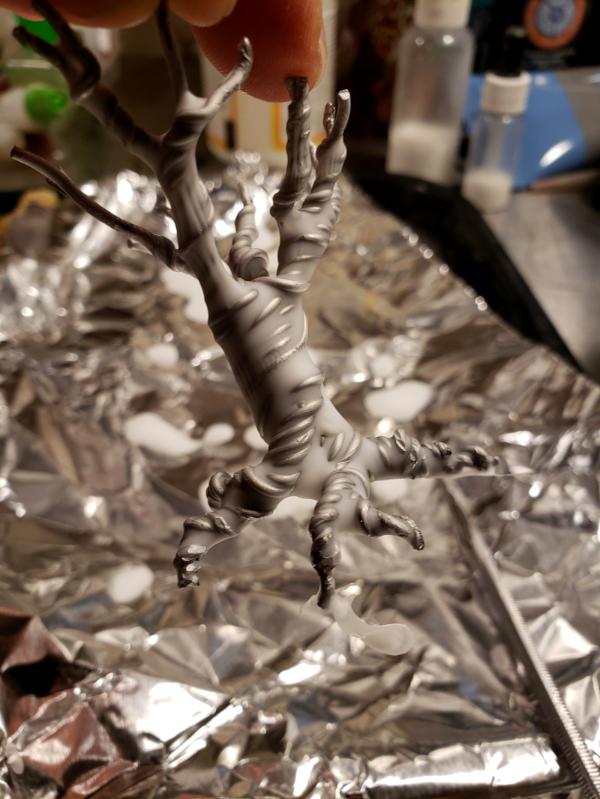
So the ruins are pretty much done, and I can move on to some new terrain projects for the current LoER theme, which is biomes. I got some good feedback on how crisp my recent terrain seemed, and I want to go more organic for this next build. I'm going to try to pull off two "forest" area terrain pieces out of armature wire on pink XPS bases. Solid tip o' the hat to Mel the Terrain Tutor for the twist trees tutorial.
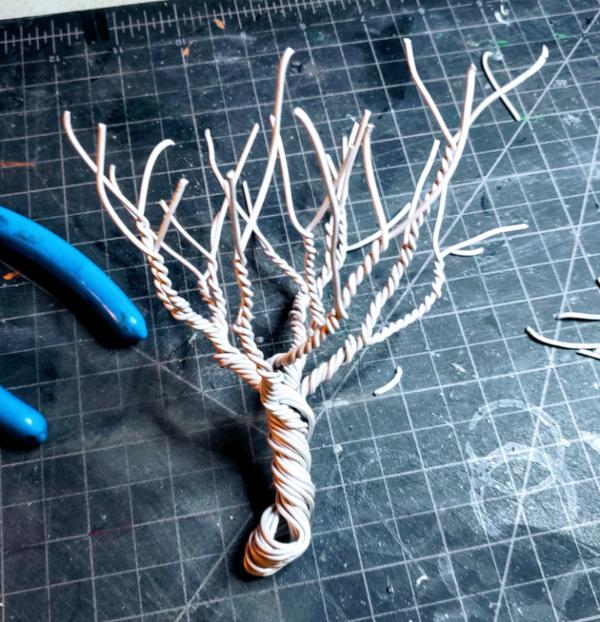

I guess the next step is to go for some texture on both the tree and the base.
|
|
This message was edited 1 time. Last update was at 2022/04/02 07:43:52
|
|
|
|
|
2022/04/02 10:43:11
Subject: Re:Mac's P&M Shenanigans-- 4/24, Spring Break progress, lots of productivity!
|
|
[DCM]
Boom! Leman Russ Commander
|
That is the look I wanted for my tree, only more gooderer!
I'll have to give Mel's tutorial a look and get some proper wire instead of using the odds and ends from my bits box. I love the character this build is showing already.
Don't get me wrong- I like my build and think it will work well in the space I have in mind for it on the terrain board; this, though, looks really good!
|
"He fears his fate too much, or his desserts are small, who will not put it to a single touch; to win- or lose- it all."
Montrose Toast
|
|
|
|
|
2022/04/02 13:32:25
Subject: Mac's P&M Shenanigans-- 4/24, Spring Break progress, lots of productivity!
|
|
Grisly Ghost Ark Driver
|
Fantastic looking tree, it looks really natural! The twisted wire is a brilliant way of making sure each branch looks like it can support the branches coming off it.
|
|
|
|
|
|
2022/04/03 11:40:11
Subject: Re:Mac's P&M Shenanigans-- 4/24, Spring Break progress, lots of productivity!
|
|
Krazed Killa Kan
|
Wow Mac, I really like the look of that tree armature Looking forward to the LotR terrain.
|
|
|
|
|
|
2022/04/05 11:56:50
Subject: Re:Mac's P&M Shenanigans-- 4/24, Spring Break progress, lots of productivity!
|
|
Preacher of the Emperor
|
Meer_Cat, if you switch up your wire in the future, I think I'd go with a lighter gauge than what I've got. It was hard on the hands to twist, even with two pairs of pliers, and left a lot of relief in the 'bark' that needed to be filled in with hot glue or PVA to not look like wire. Counter to my norm I've thrown out the packaging, but if I had to guess I'd say I used something like 10 or 12 gauge, and would have preferred 18 or 20. Maybe a mix of both next time?
Gwyn, Syro, many thanks! All credit to Mel the Terrain Tutor... I've had mixed success following his builds, but this one came good pretty much as advertised. Certainly the material delivered. The only innovation I brought was the hot glue / PVA coating.
Here's an update:
Waiting for the PVA to dry on the smaller tree.
The trees have been primed and glued in place, and the roots have been extended with Green Stuff. Next steps are some cork rocks and ballast between the roots.
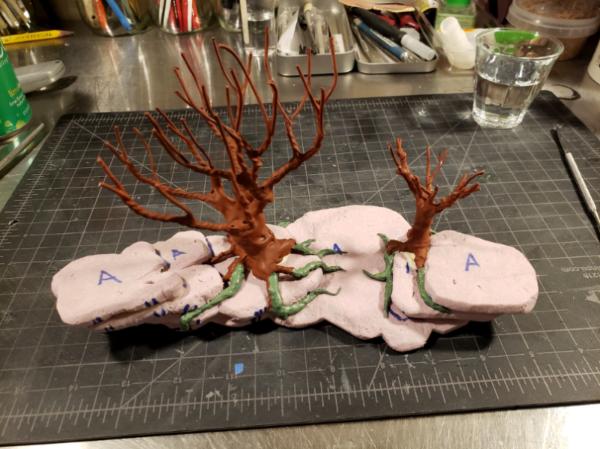
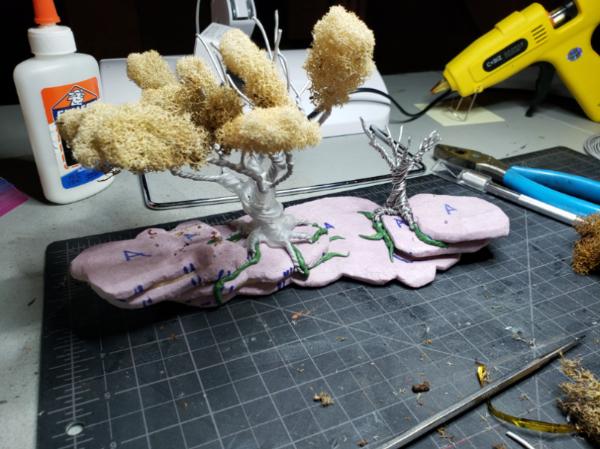
I've also been messing with clumps of lichen and trying to decide how to do the branches.
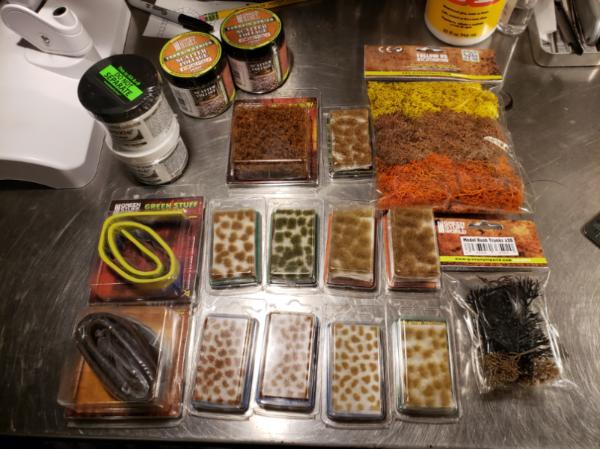
Finally, I got a big order from Green Stuff World, part restock of successful things (like the grass tufts) and part experiment with some new items (like the shrubs and organic litter). The Apoxie Sculpt is another trial item.
|
|
|
|
|
|
2022/04/06 22:15:40
Subject: Mac's P&M Shenanigans-- 4/5, armature wire twist trees, green stuff roots, XPS rocks
|
|
Longtime Dakkanaut
|
Great work on that terrain.
|
|
|
|
|
2022/04/07 00:18:11
Subject: Re:Mac's P&M Shenanigans-- 4/5, armature wire twist trees, green stuff roots, XPS rocks
|
|
[DCM]
Boom! Leman Russ Commander
|
Really shaping up nicely!
I tried mixing gauges of wire (of what I had lying about) but definitely want to purpose buy some lighter gauge- you're right, even with pliers it was a bit rough on the hands. I've got 100 feet of 'stove wire' which seems about 16 gauge, I'll look for some lighter stuff.
Never occurred to me to use PVA (white, Elmer's?) glue to smooth the trunk and heavier branches; I rolled greenstuff out as thin as I could, cut it into thin strips, wound those around the wire and then smoothed them out with my fingers. I like the glue idea much better and will try that next time.
I'm also planning on using 'clumps' of lichen to form the foliage. I had a buddy though who used a paper crimper (it scallops the edges of pictures for mounting in a scrap book) to make a bunch of leaf-like confetti which he then glued on individually. He was quite mad, of course. 
The Grove of the 100 Poets is looking great!
|
"He fears his fate too much, or his desserts are small, who will not put it to a single touch; to win- or lose- it all."
Montrose Toast
|
|
|
|
|
2022/04/09 13:22:15
Subject: Mac's P&M Shenanigans-- 4/5, armature wire twist trees, green stuff roots, XPS rocks
|
|
Grisly Ghost Ark Driver
|
The lichen looks great as the foliage, I could almost believe that's an actual tree even before any paint is on it.
|
|
|
|
|
|
2022/04/25 06:13:35
Subject: Re:Mac's P&M Shenanigans-- 4/5, armature wire twist trees, green stuff roots, XPS rocks
|
|
Preacher of the Emperor
|
Gwyn, I'm sold. I may experiment with coloring it or adding leaves in the future, but I'm happy with the effect for now.
Meer_Cat, please tell me about the Grove of 100 Poets... Google let me down.
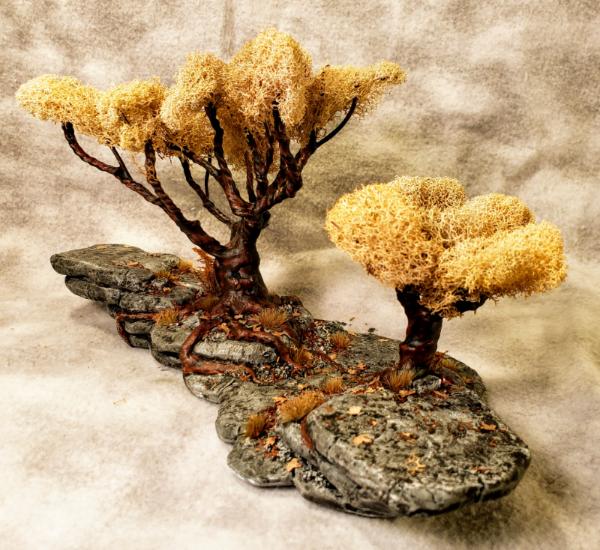
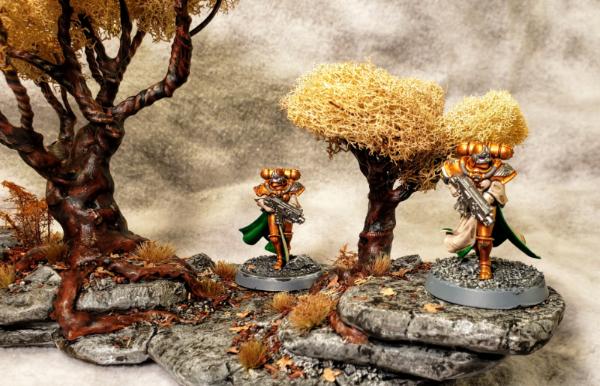
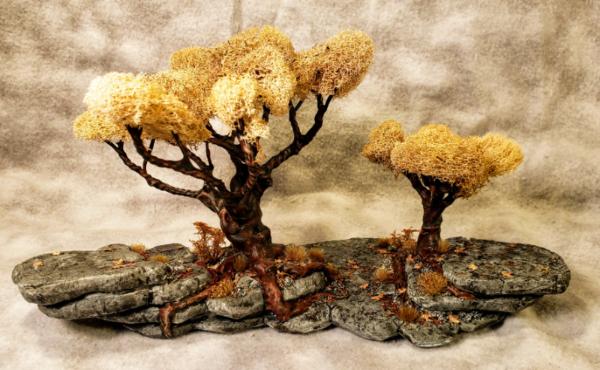
bbb, thanks so much! Here's the finished product...
I'm quite content with the outcome, and it's a good fit for this cycle's theme ("Biomes") in the LoER Hobby Challenge. Revisions for next time: I'll mix wire gauges as discussed above, I'll scale up about 25% to more easily fit models, and I'll try to pick up my efficiency. Ultimately I'd like to knock out 3 more of these, but taller and wider and faster.
More images: The next LoER Hobby Challenge Theme Poll is up as well: LINK
|
|
|
|
|
|
|
|


 Finished Forge World Elysian Army
  Finished Tau Sept Cadre
  Alaitoc Eldar Warhost
  Finished Order of Our Martyred Lady - Sisters of Battle
  Finished Necromundian Imperial Guard Regiment