| Author |
Message |
 |
|
|
|
|
Advert
|
Forum adverts like this one are shown to any user who is not logged in. Join us by filling out a tiny 3 field form and you will get your own, free, dakka user account which gives a good range of benefits to you:
- No adverts like this in the forums anymore.
- Times and dates in your local timezone.
- Full tracking of what you have read so you can skip to your first unread post, easily see what has changed since you last logged in, and easily see what is new at a glance.
- Email notifications for threads you want to watch closely.
- Being a part of the oldest wargaming community on the net.
If you are already a member then feel free to login now. |
|
 |
2015/08/19 15:43:58
Subject: My First Warhound Titan... And Legio Astorum Mechanicum Knight Army (WIP) [Updated Pics]
|
|

Fresh-Faced New User
|
So I got back in to the hobby at the end of last year after an 18 year hiatus and painted the DA component of the Dark Vengeance box which I was given by a mate. Since then I painted a few more DW, a Dreadnought and Azrael and then after seeing a couple of other friends Titans (specifically one friends two Reaver Maniples) at an Apoc game, I saw a Warhound on a trading site and decided I needed it. Alcohol may have been involved.
Now seeing as up until this point the biggest thing I had built and painted was a Dreadnought this was going to be an eye opener...
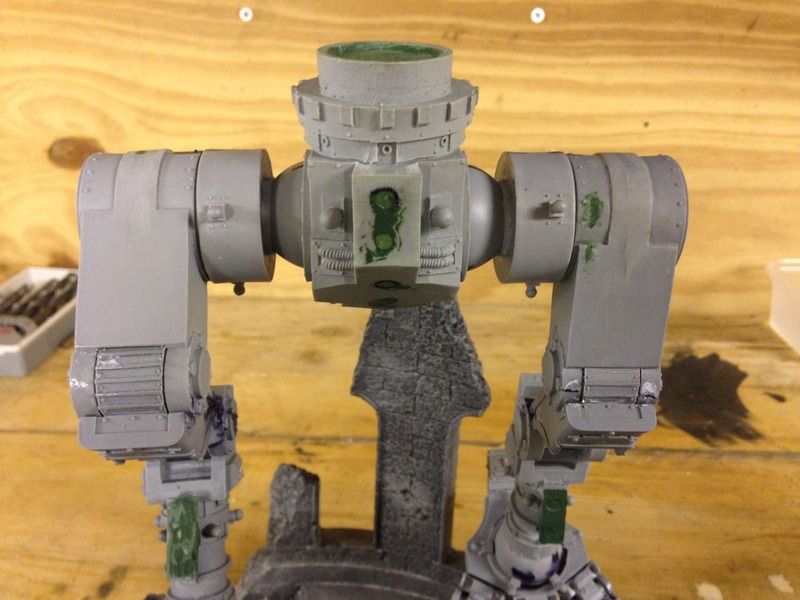
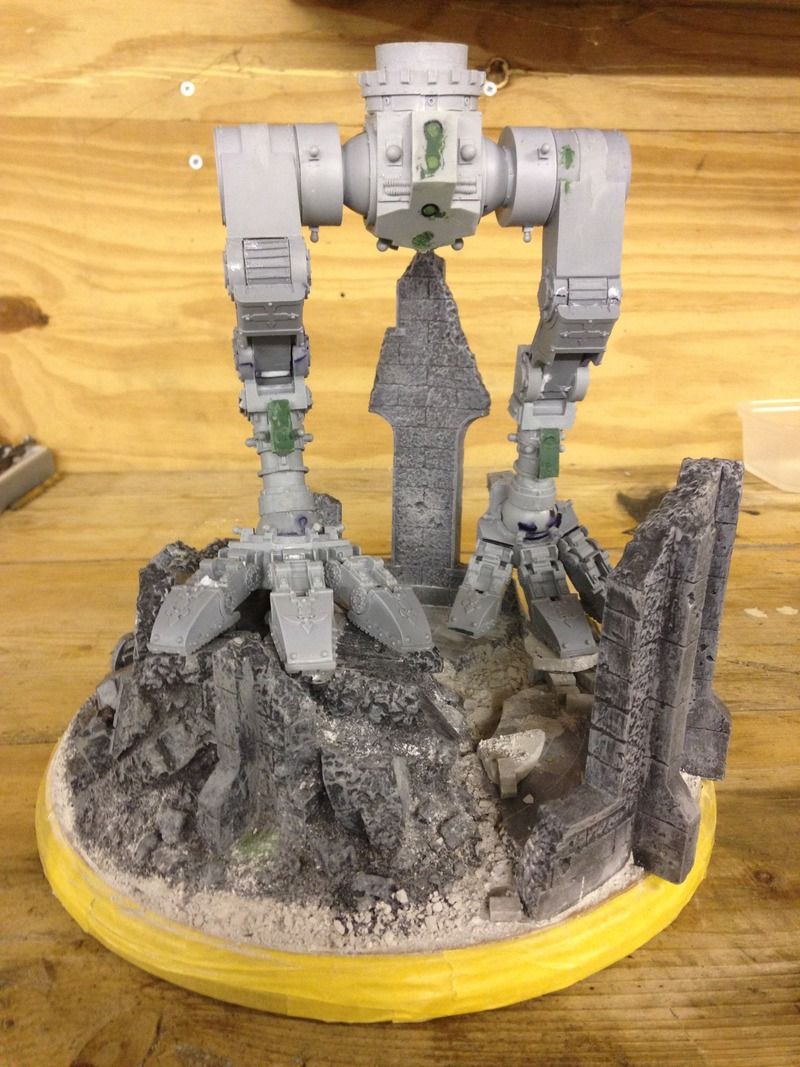
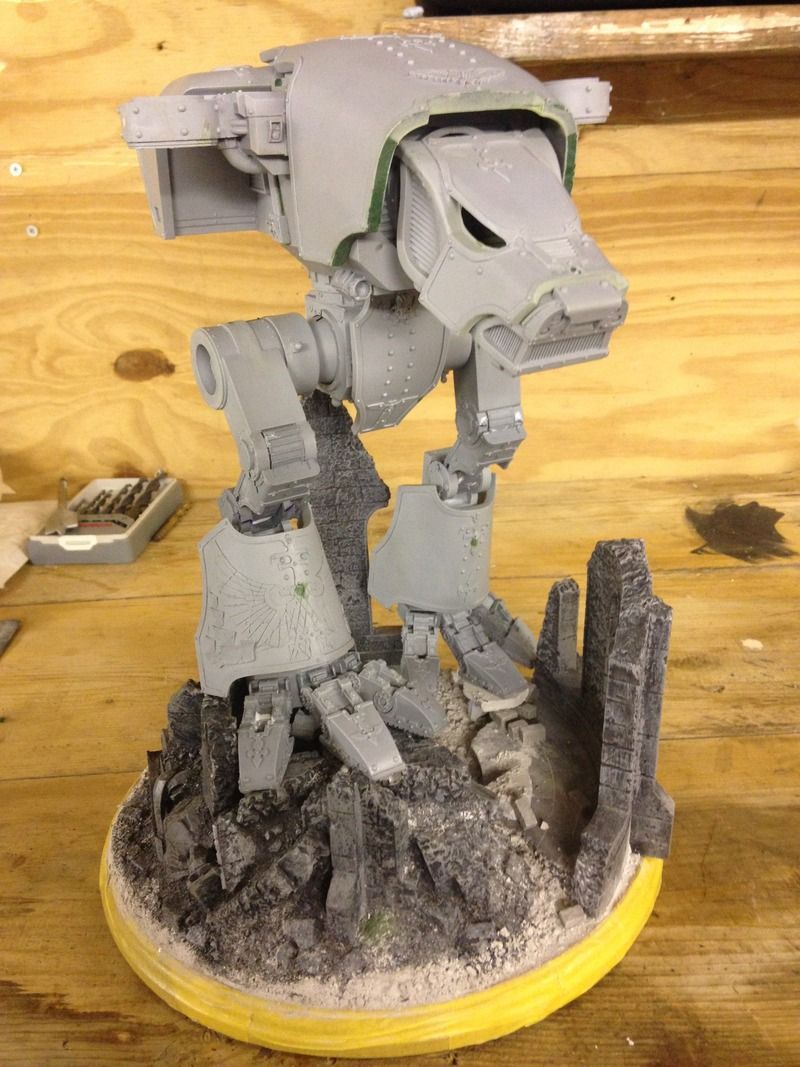
I took a few photos up to where I am up to now, which is the base is built, the Legs are built and I have painted most of the interior. Its now time to build the body and start painting the exterior.
The colour scheme (exterior) will be Legio Astorum / Warp Runners as the fluff kinda fits with working alongside DA the best (Thanks to info from this forum).
The interior colour scheme is a homage to WW2 RAF Bomber command, so I have painted the interior in cockpit green, and the crew uniforms are RAF Blue. There will also be an external nod to No. 8 (Pathfinder force) Group who did reconnaissance and target marking ahead of the bomber groups, so viii markings and No.8 Group Motto on Shin guards etc.
Anyway a few photos of progress and I'll add more as I get painting more. Please feel free to comment or give advice.
As it arrived - the previous owner had removed the largest of the resin gates.
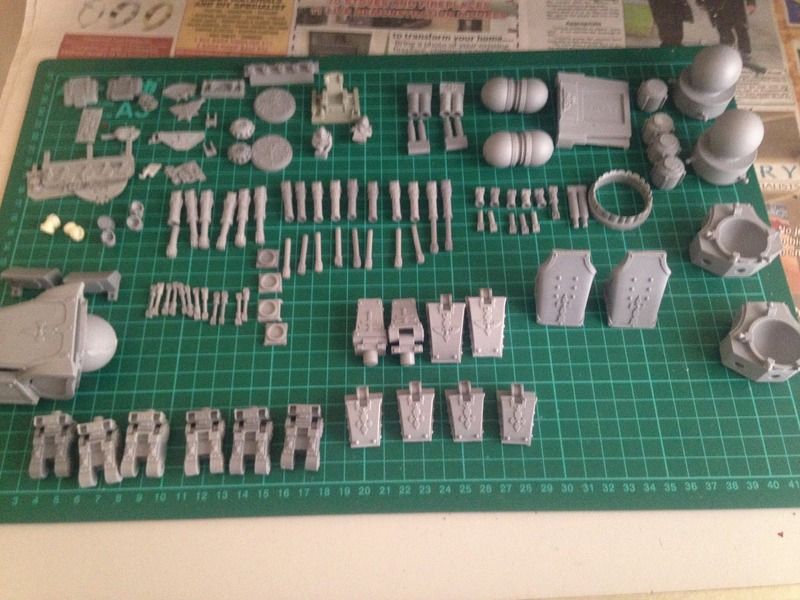
The number of parts particularly the pistons was somewhat daunting and I wondered if I had bitten off more than I could chew...
I wont post loads of pics of the build as I'm sure most of you have seen them before.
First Part was sourcing a Base - I found an online company that does Wooden bases for trophies mail order for about £10 shipped. Perfect. I tried both an 8" and 10" and though the 8" would be better for gaming the 10" was more suited for the crazy plans I had for the base / posing of the Warhound.
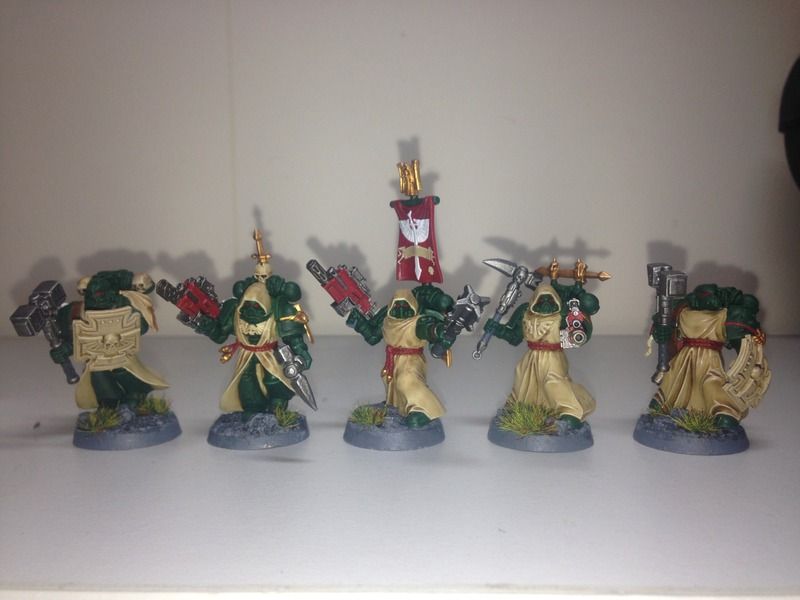
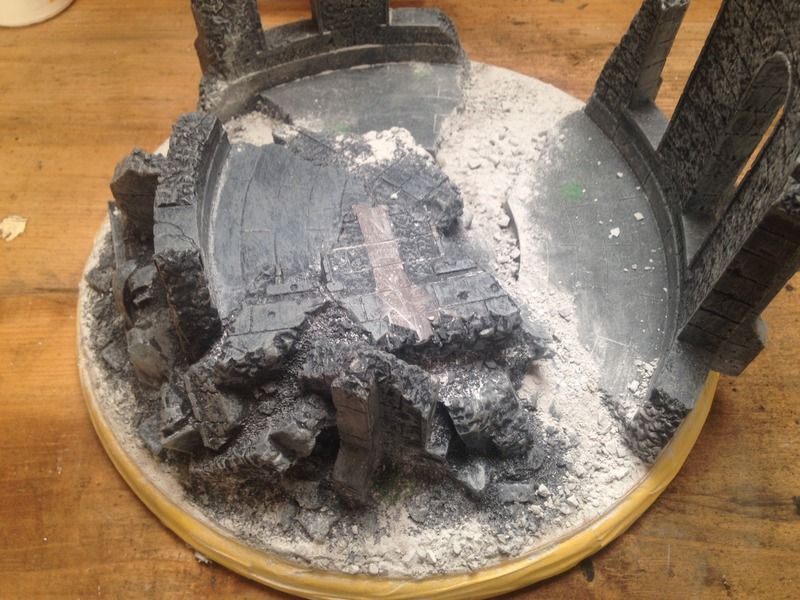
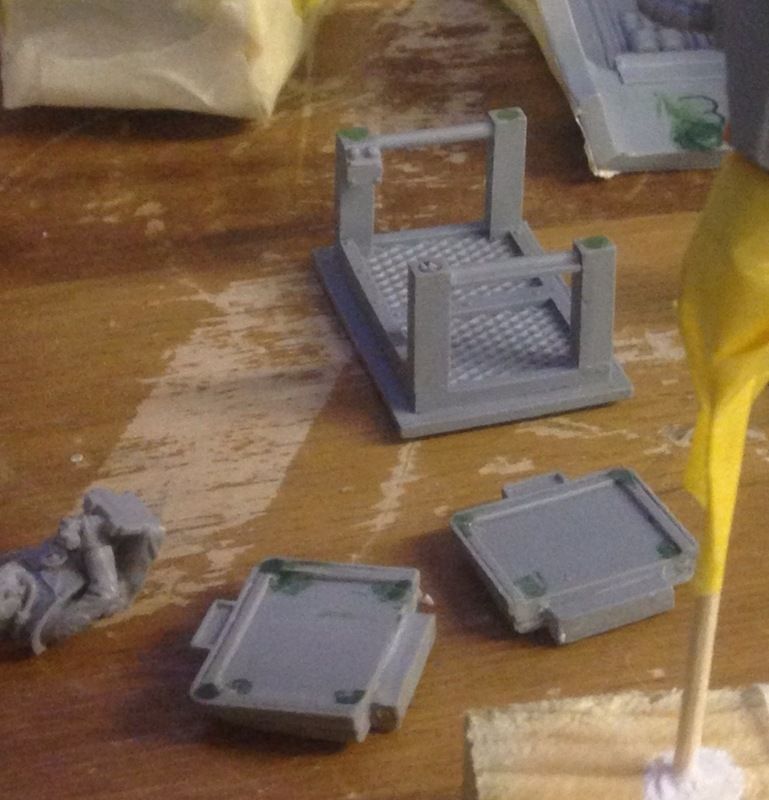
For the Base I wanted to continue the them I had for the bases for my DA Army of city ruins:
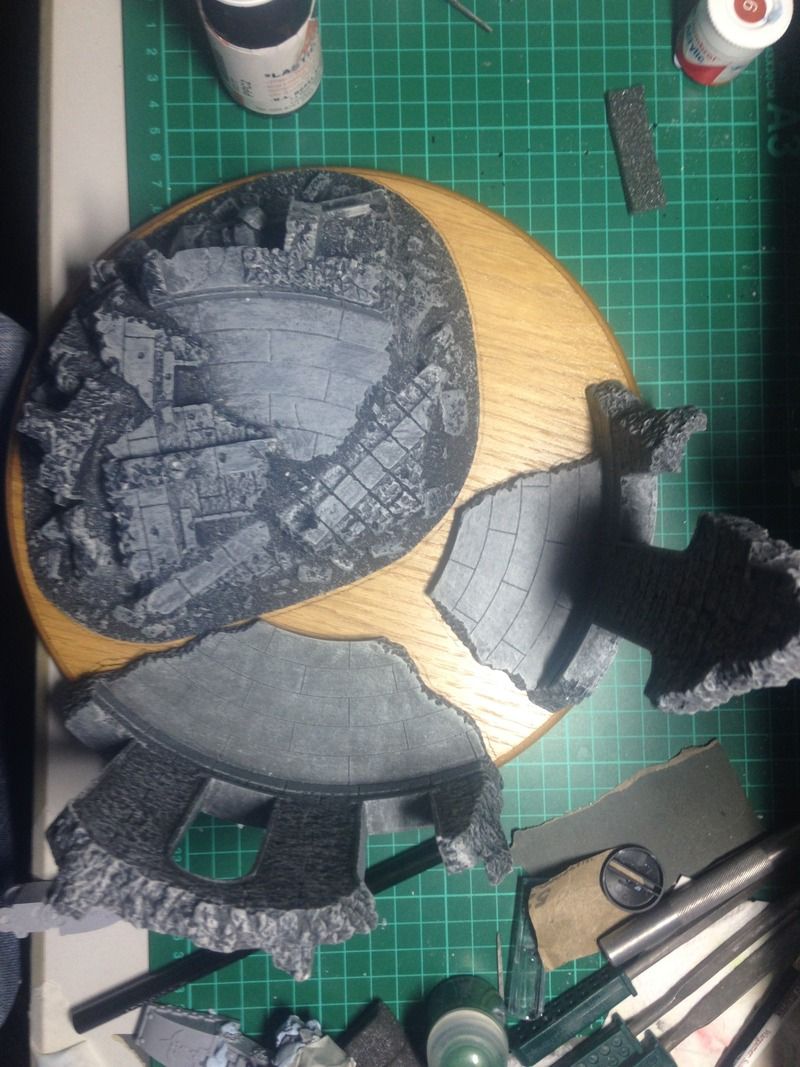
At this point I probably should have stopped and made life easy for myself, but the crazy visions of a Warhound walking through ruins won out and I ordered several Flames of War Battlefield in a box terrain pieces...
After much test fitting, wailing and gnashing of teeth I came of with an arrangement that kind of fitted the base Photo prior to giving up and trimming).
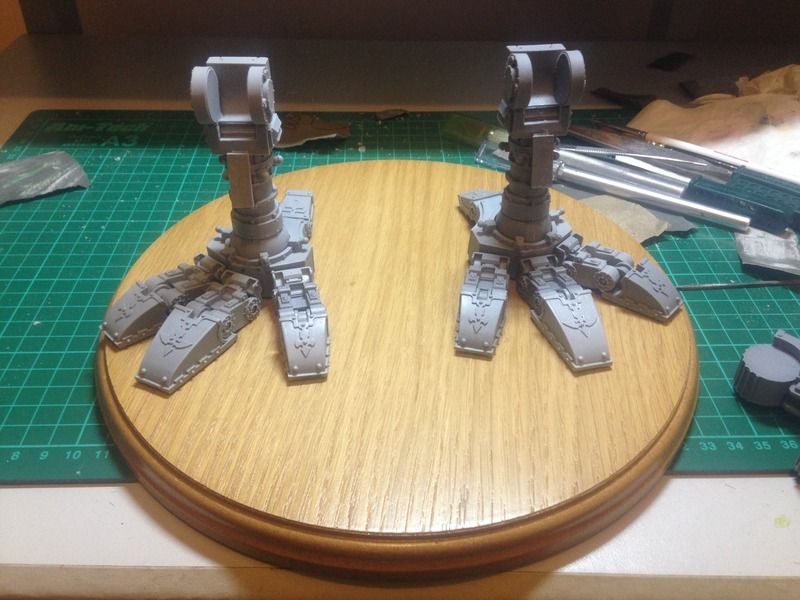
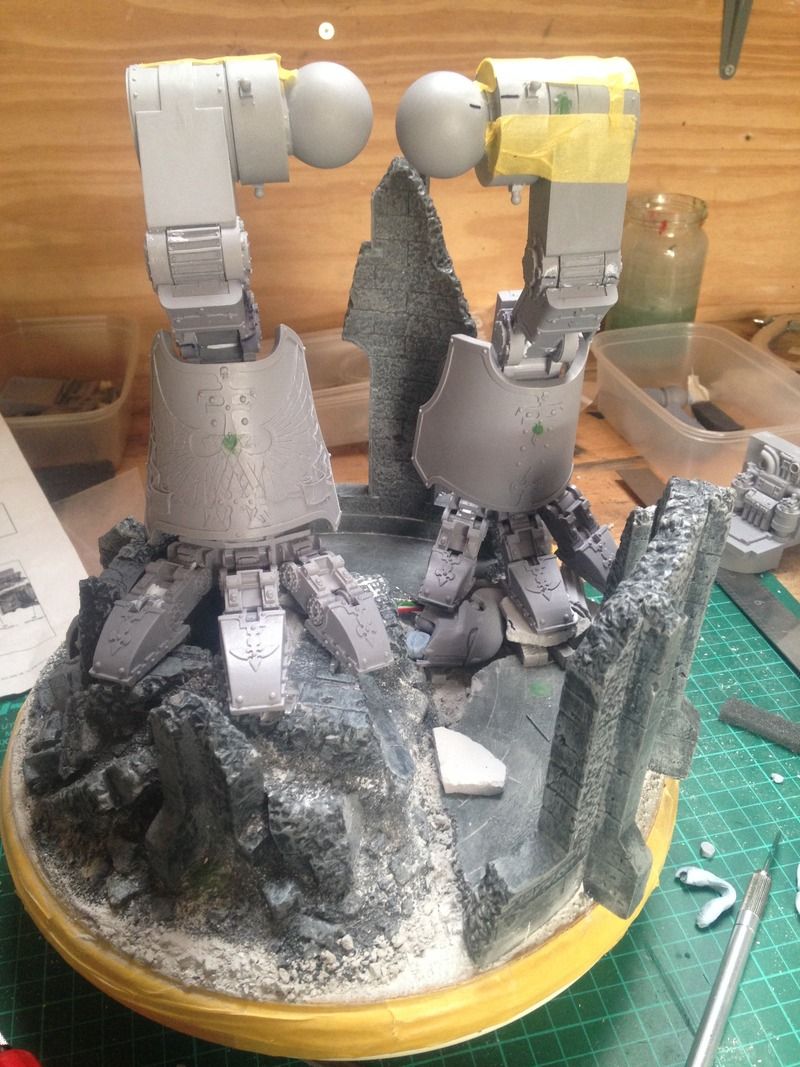
Then the fun (read really annoying) bit came: working out how the feet / legs would fit together on this unholy monstrosity I had created...
Much masking tape, blutac and swearing was involved but finally.
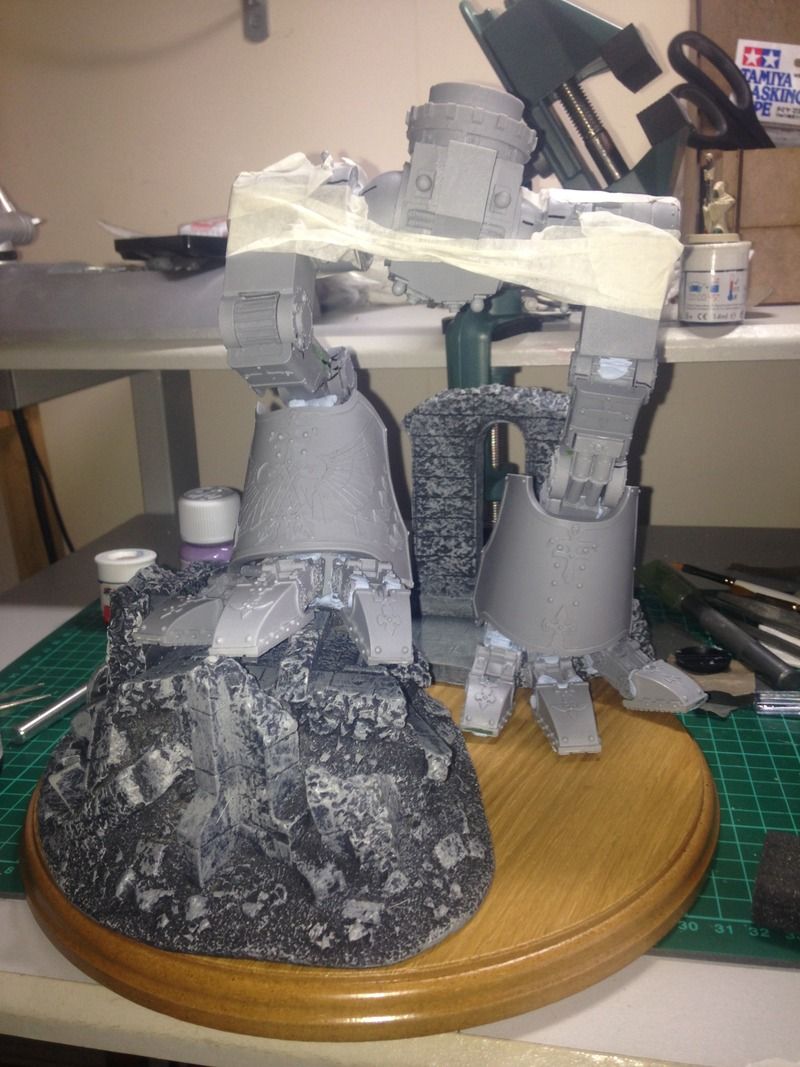
This was only the rough draft to test if the concept would work.
Deciding 'what the hell' i mounted the terrain pieces to the base. Using JB Weld two part Epoxy and screws. It wasn't going to go anywhere on my watch:
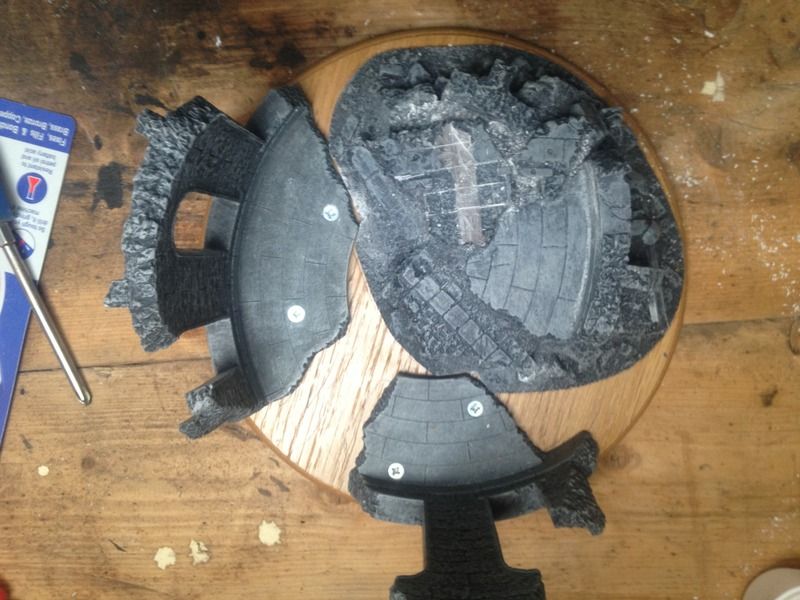
I then retested the feet positions and trimmed the terrain as necessary:
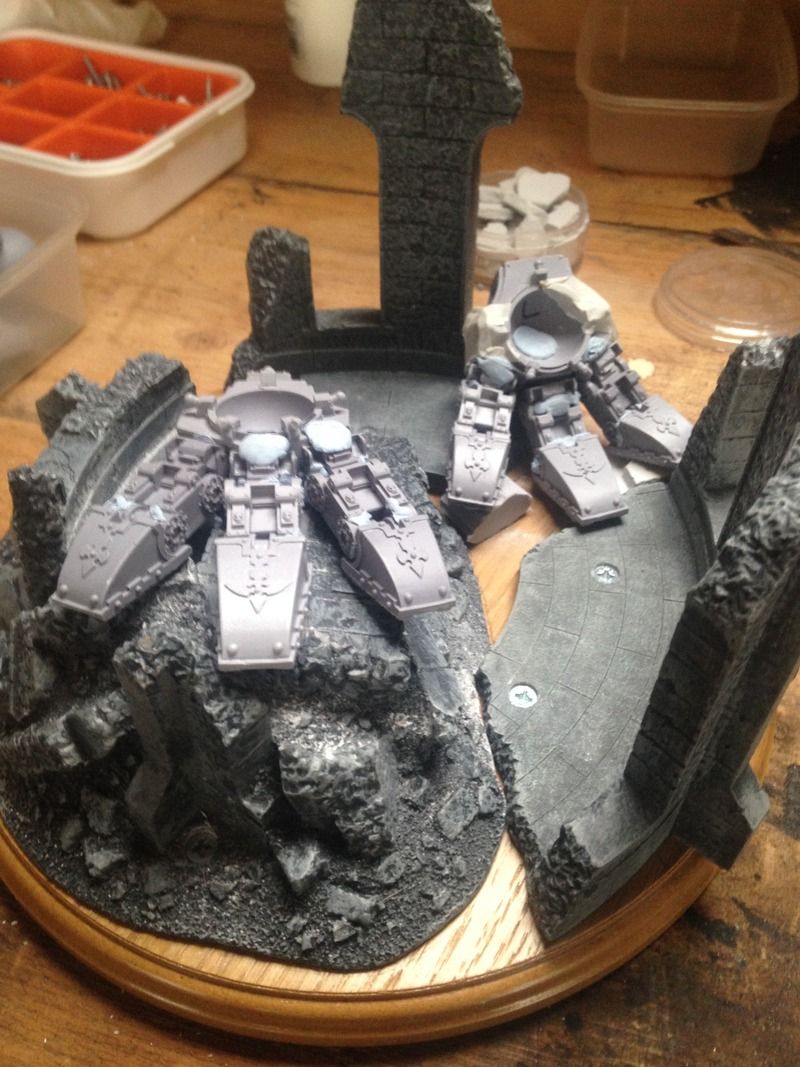
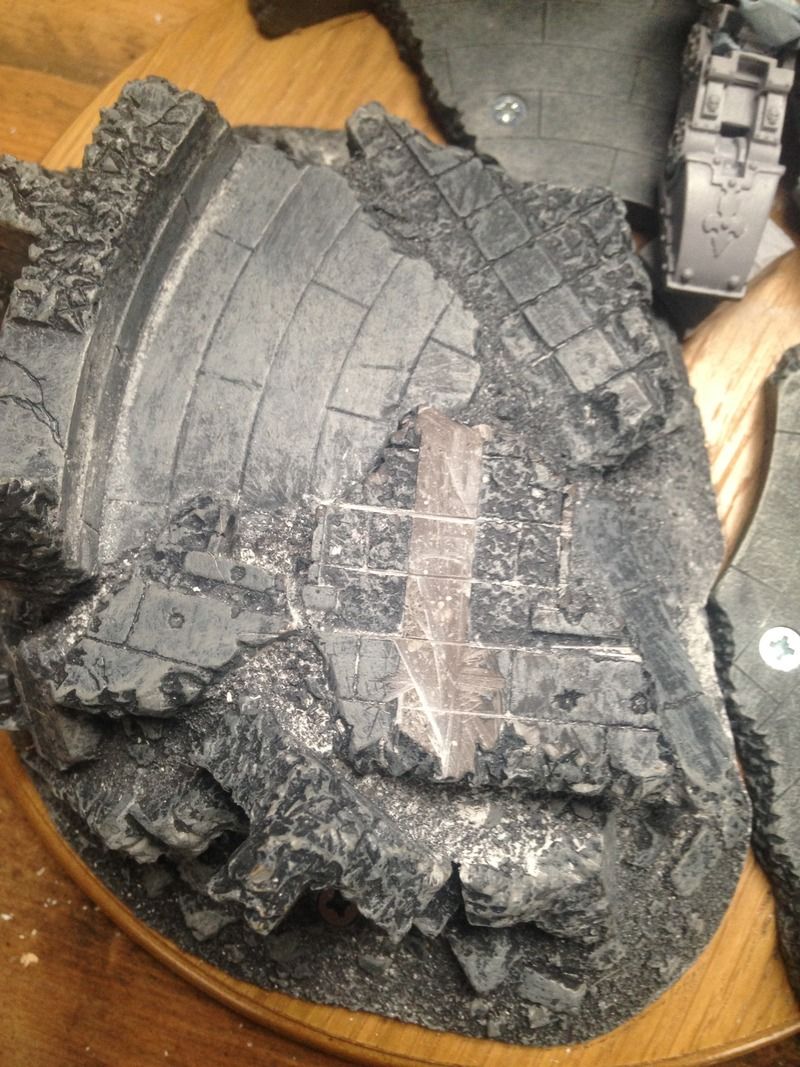
I then added some texture to the base prior to building up the rubble etc to support the left foot.
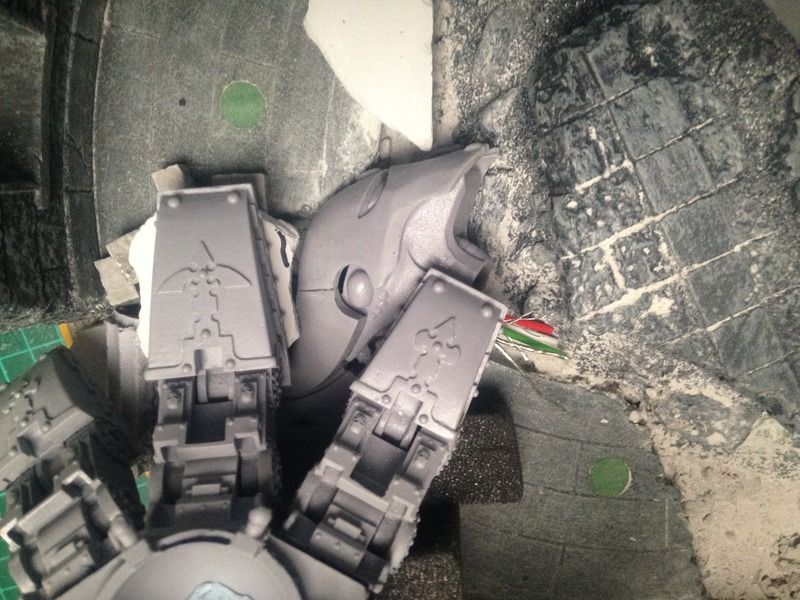
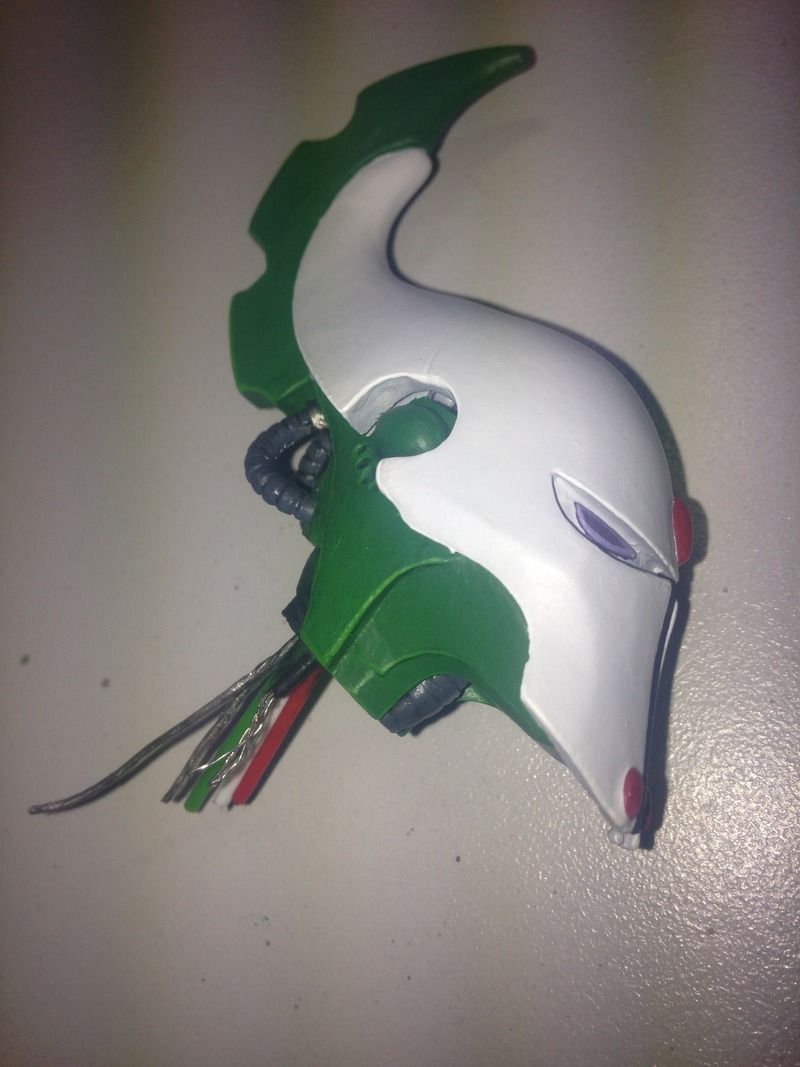
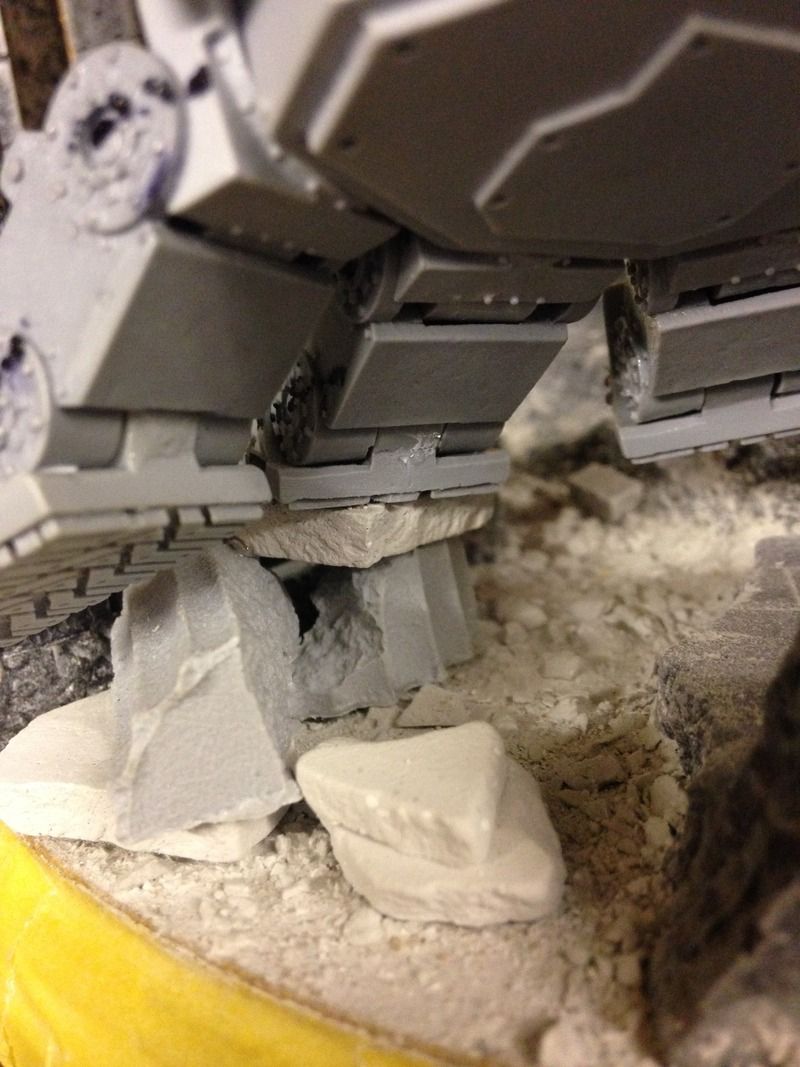
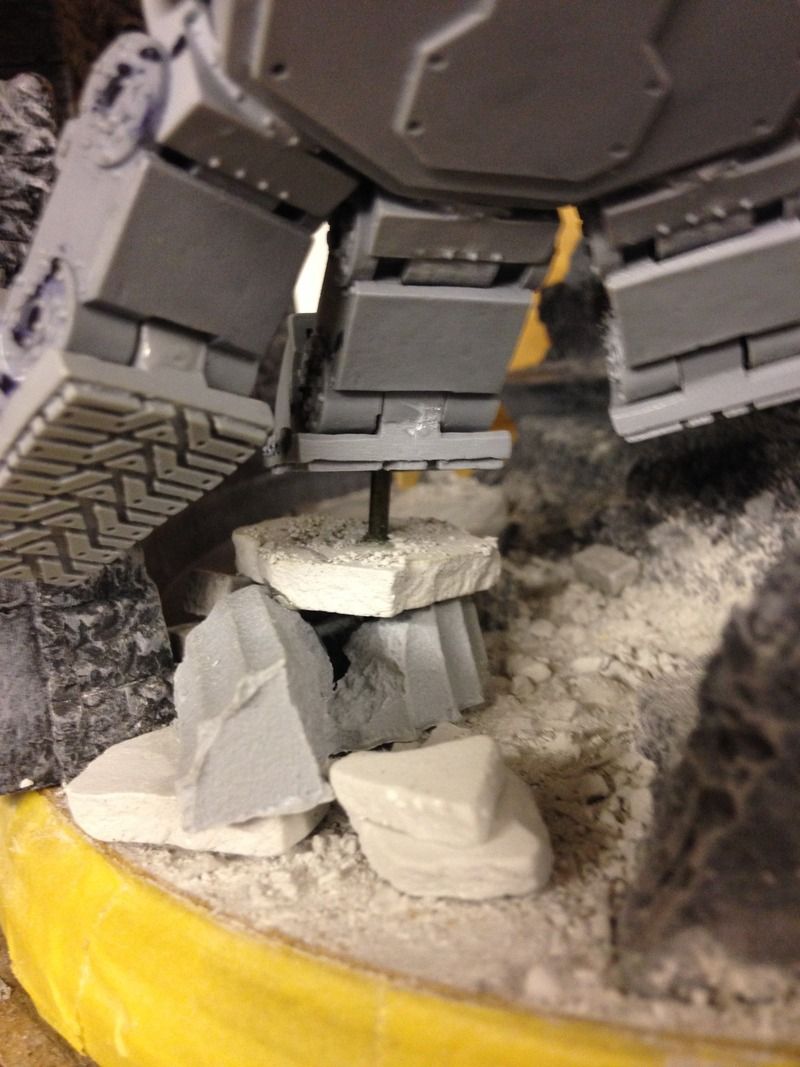
The left foot need to be raised and I wanted it to be crushing an Eldar titan Head I acquired of a friend (whose Revenant decimated some DW) so I built up the rubble to support it.
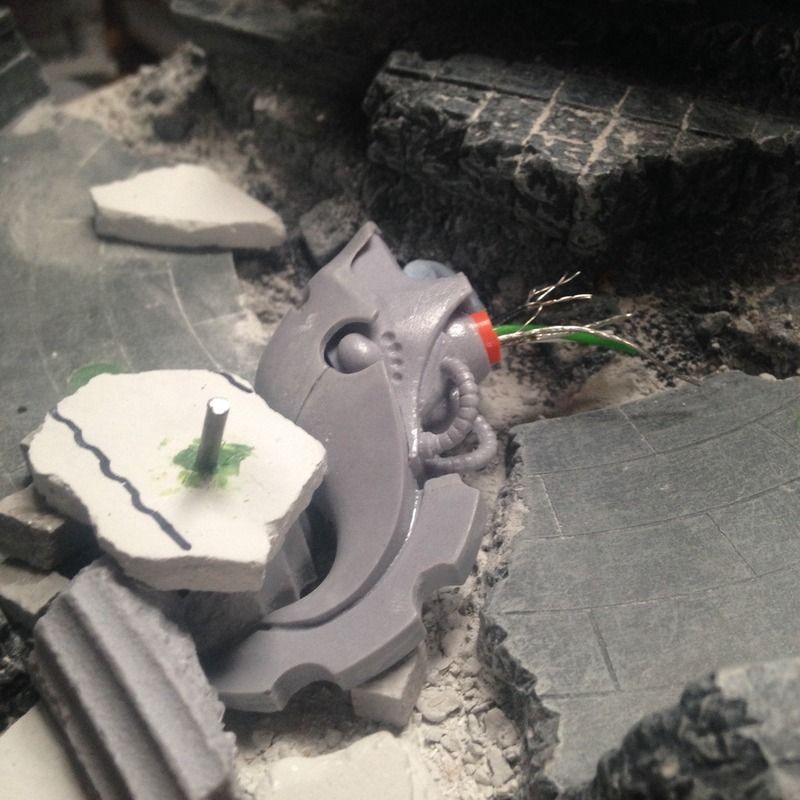
You can also see the locating pin I put in to mate with the toe to position the Warhounds foot, and the wires from the decapitated Eldar titan head.
I I deliberately did not glue the Eldar Titan head down and it does not actually support any weight so it can be painted and slipped in to place once the base etc is complete.

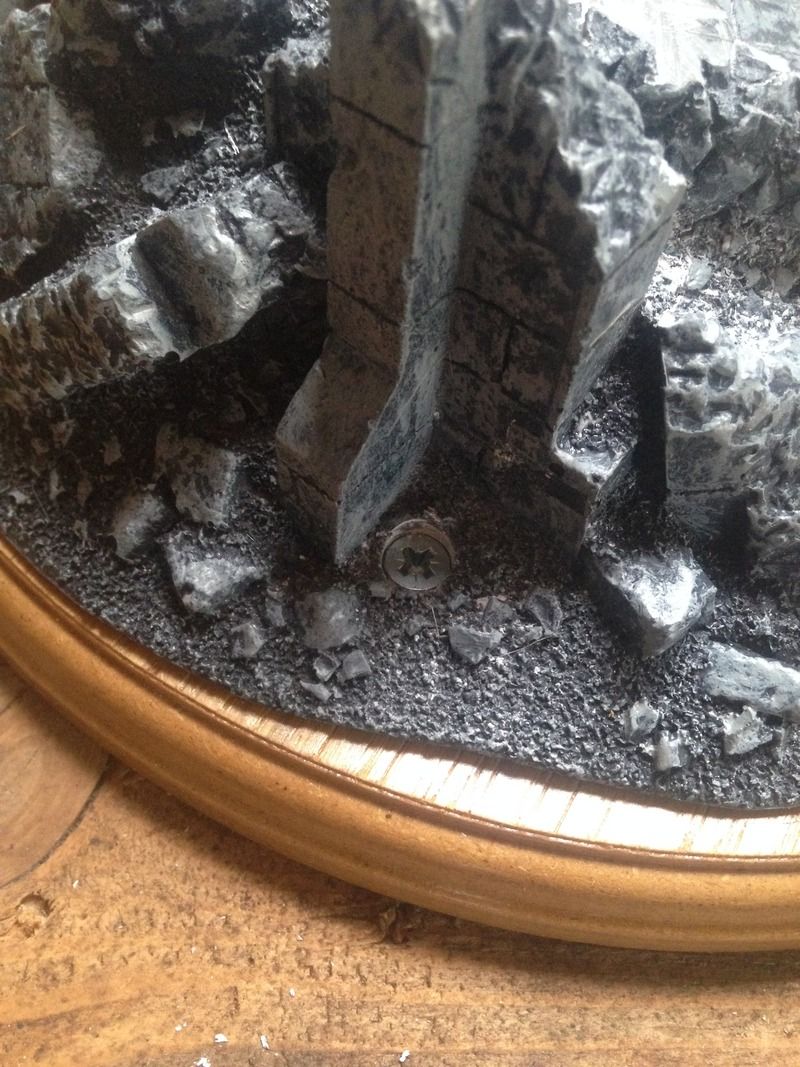
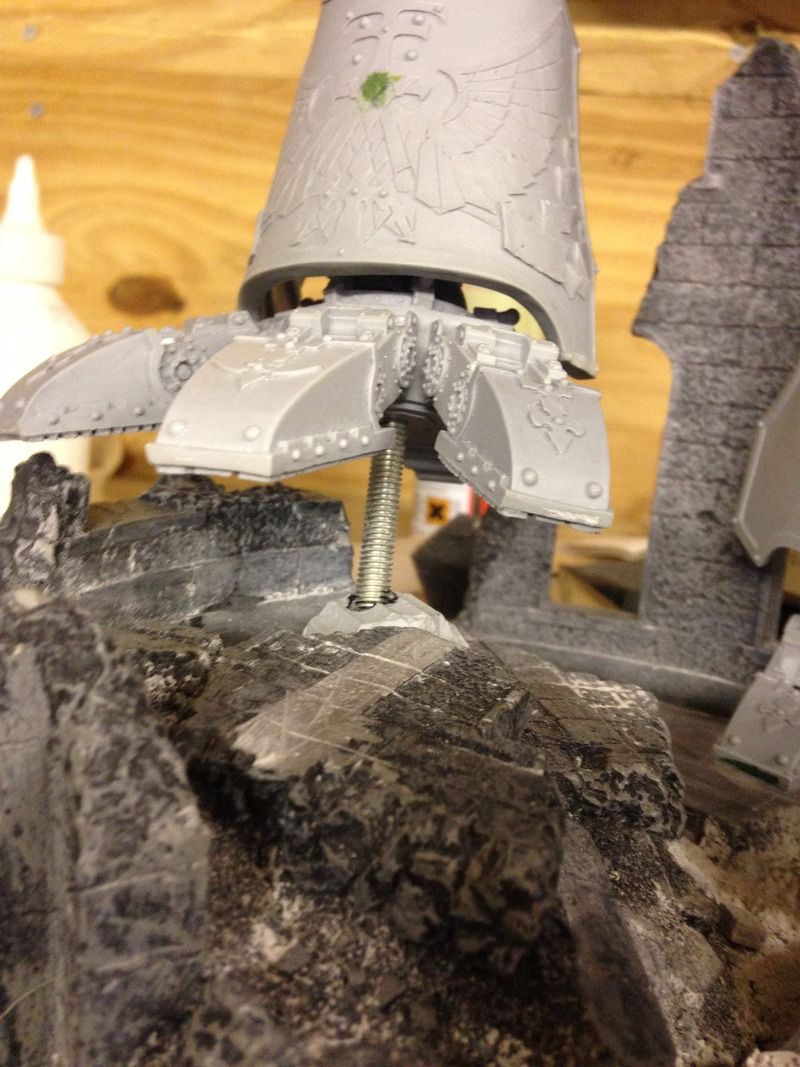
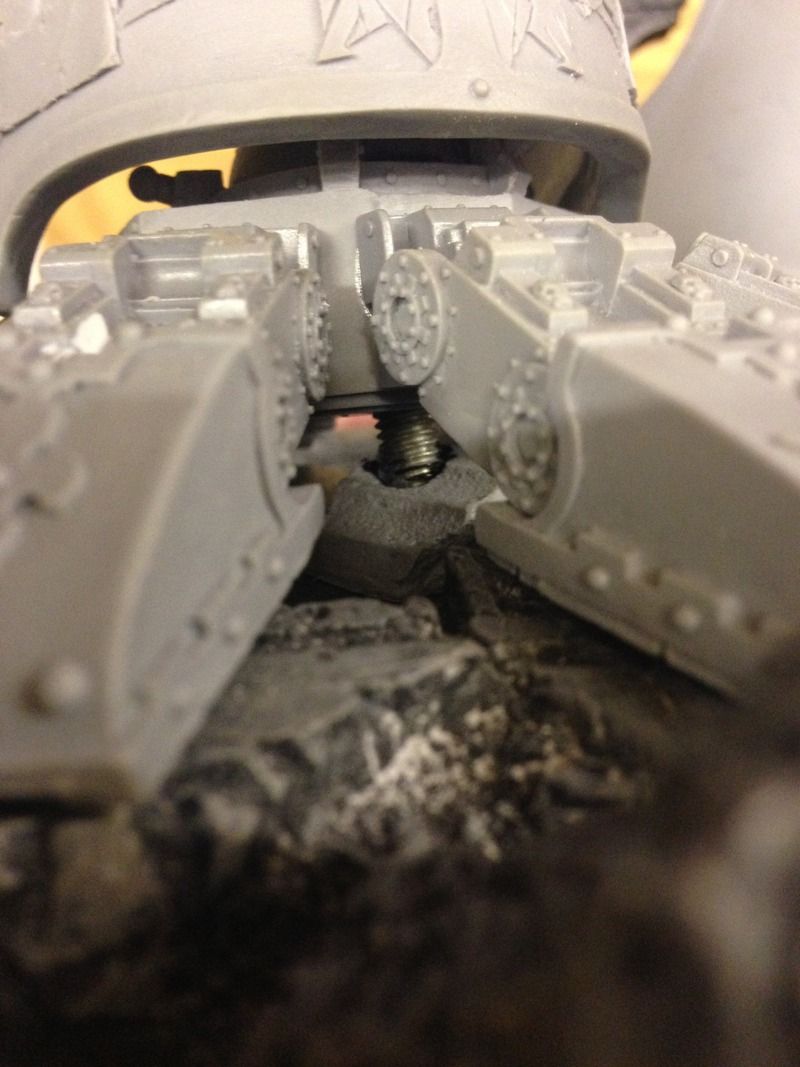
Anyway enough of crushing Xeno scum under foot; next job was to ensure the Warhound was secure on the base but allow it to be removable for transport etc. To this end I drilled a 6.5mm dia hole from the base of the lower leg and then through the right foot in to the terrain at an angle aligned with the lower leg. I then Epoxy'd a length of 6mm rod (actually a 6mm bolt with head removed).
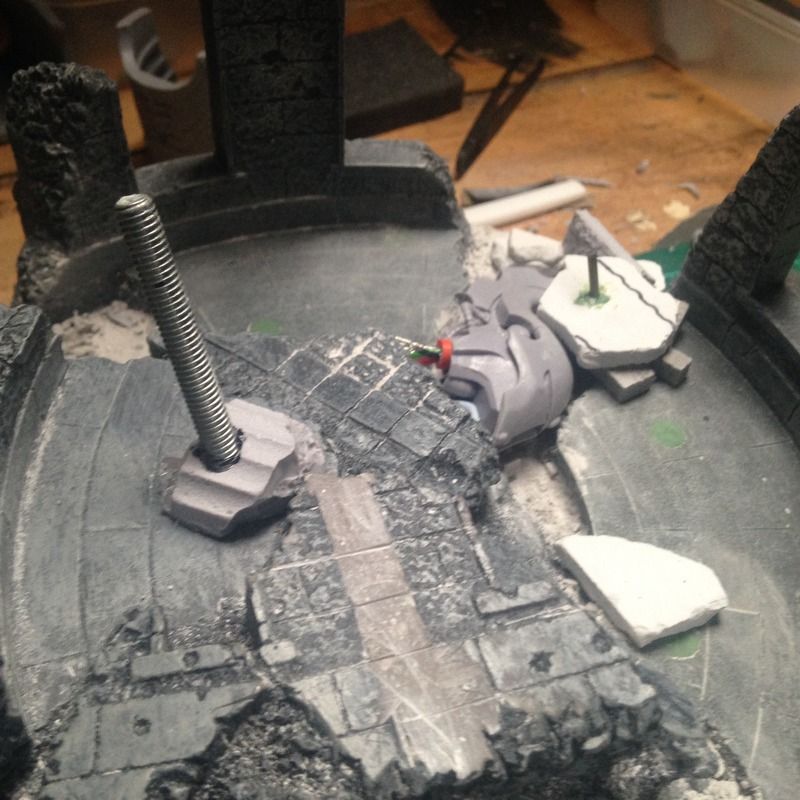
I covered the join with a piece of rubble so the bolt is barely visible under the foot.
The legs are now self standing (actually there were without the pin / bolt).
I have missed out a stage slightly which is the part where I decided to magnetise it and got a bit carried away...<
I have learnt a lot about magnetising. Some good some bad:
1) check, double check, triple check and then quadruple check the polarity of the magnets and which way they need to face and then mark the faces.
2) once you have done the above, glue them in the correct way around.
3) plastic tweezers make everything easier.
4) if you are trying to stick two magnets in holes adjacent to each other and they keep trying to stick to each other then and even bigger magnet on the other side of the piece will over come this and hold it in place.
5) when doing the above if you haven't done 1) then the magnet you are attempting to hold in place becomes a small superglue covered projectile.
6) superglue activator is a godsend.
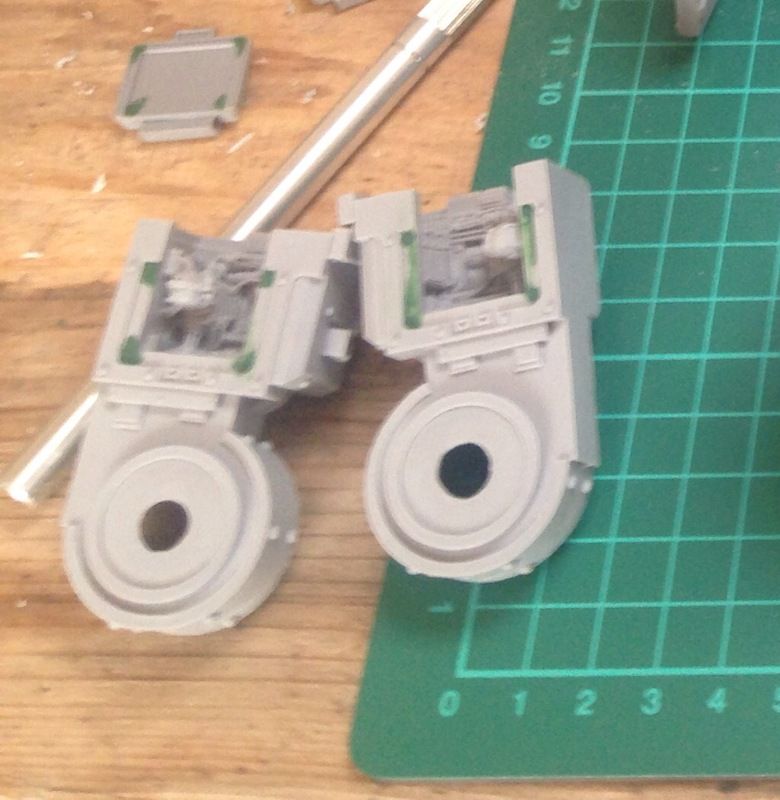
7) it's easy to get carried away magnetising bits...

Yes I magnetised the servitor hatches...
I then got distracted by painting the Eldar Titan Head, I used a colour scheme similar to but not completely mimicking my arch nemesis' titans (I say Nemisis but it was one Apoc game where he killed some of my DW).
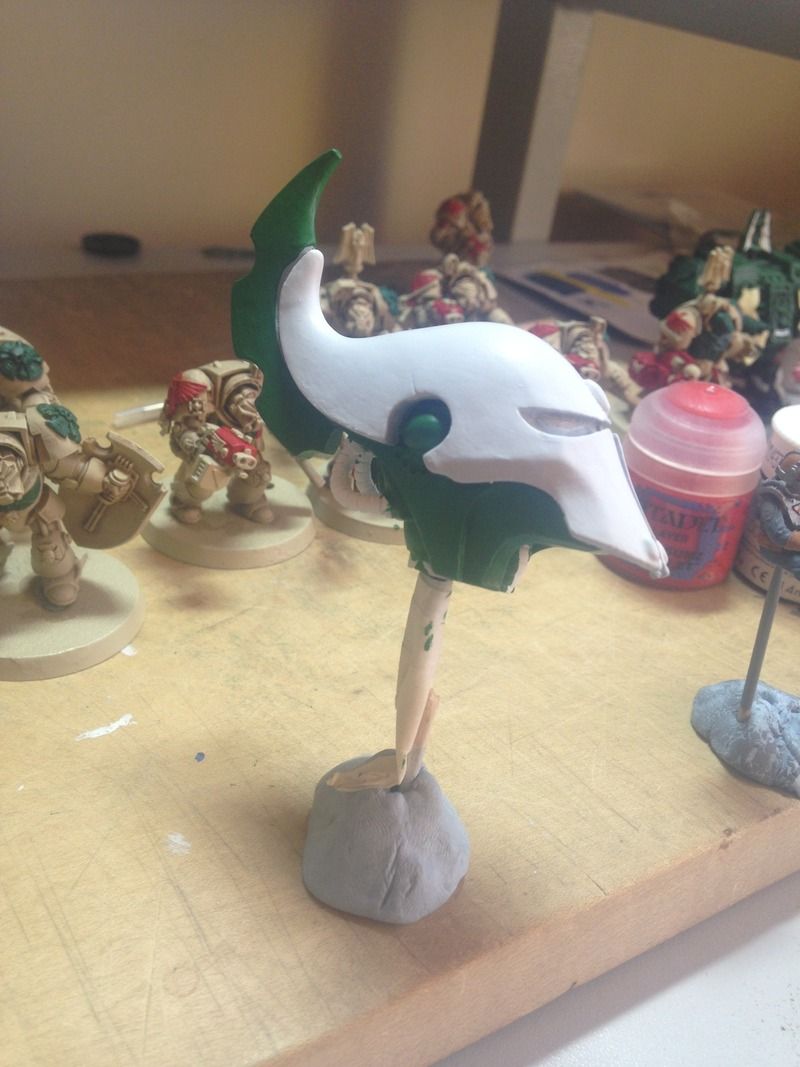
There is something satisfying about a Eldar head on a spike...
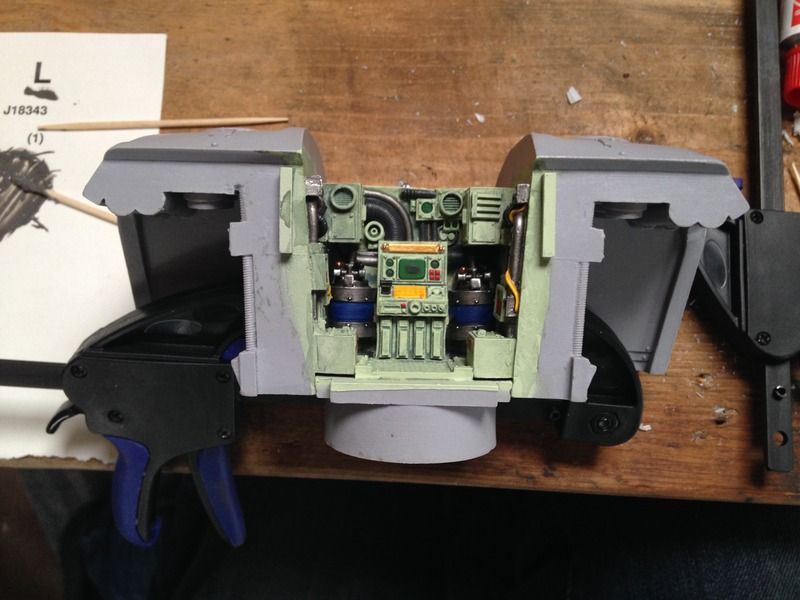
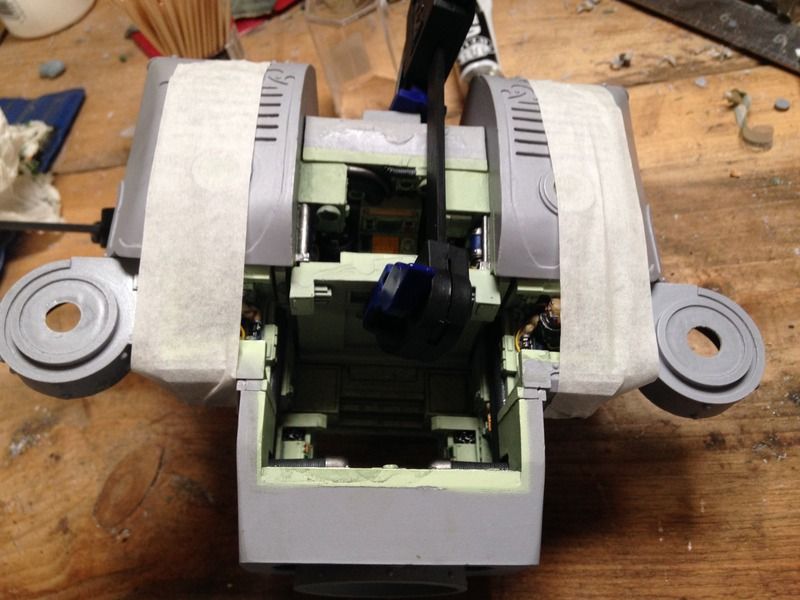
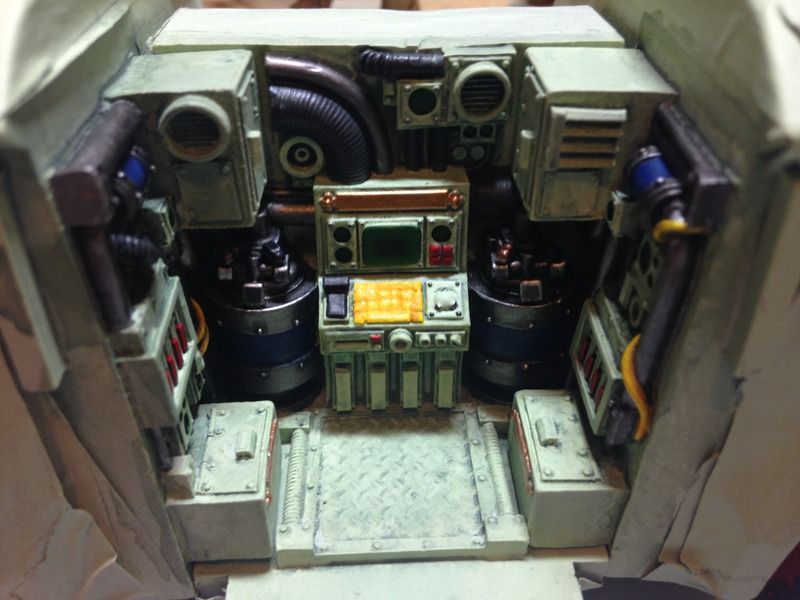
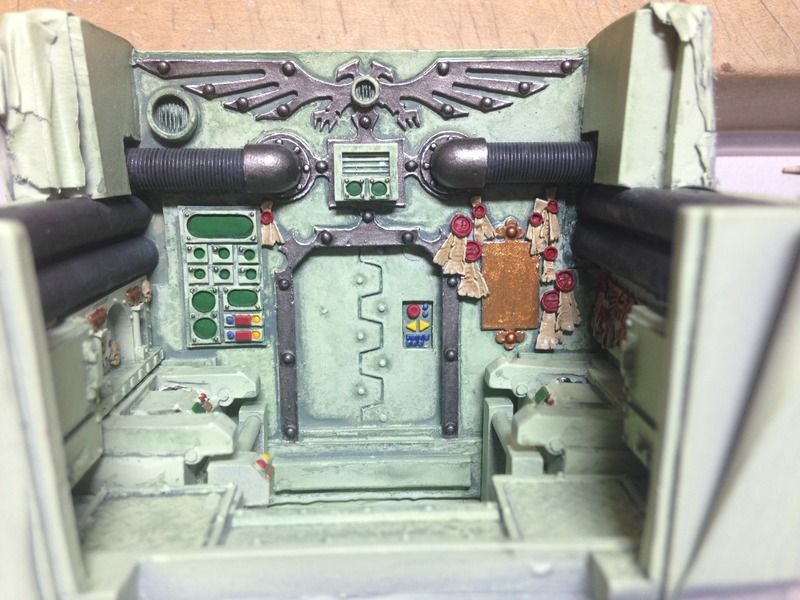
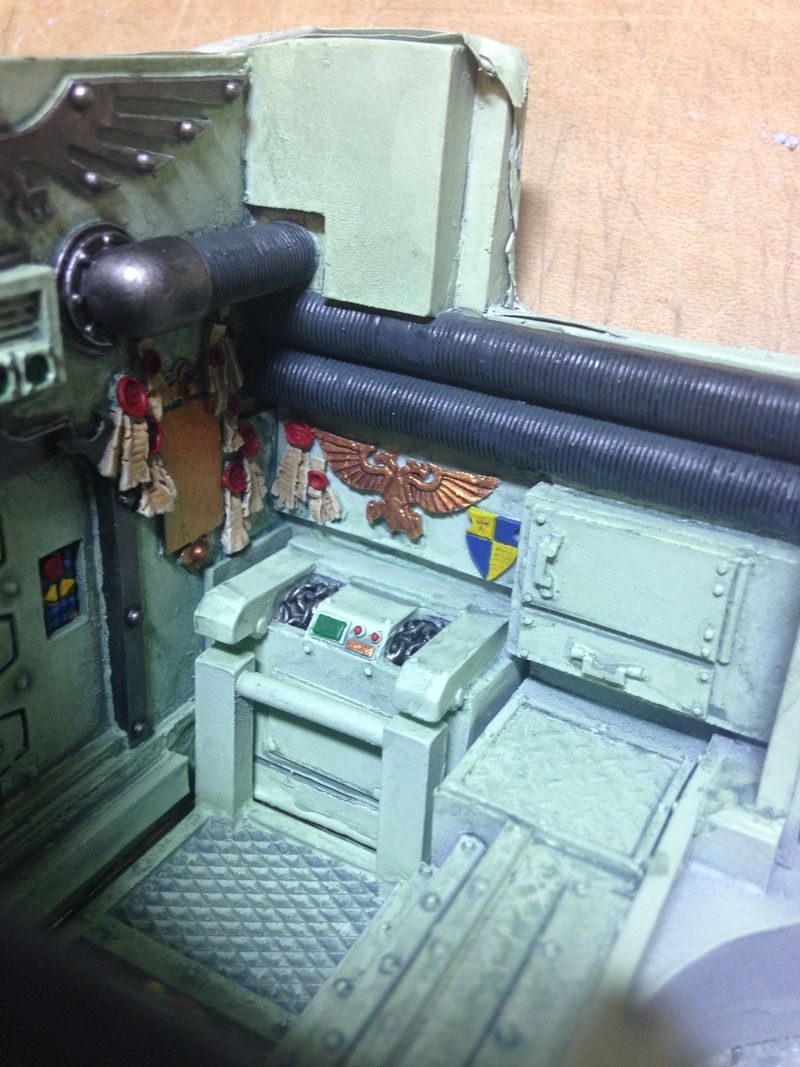
Having got this far I turned my attention to the body, I decided I would hate myself forever if I didn't do a reasonable job of the interior so I decided to paint it prior to assembly. Everything was test fitted first then masked and primed with car primer before receiving a coat of Humbrol 90 spray and then washed with thinned down Humbrol 78 paint to give it that classic Airfix model / WW2 bomber airframe look.
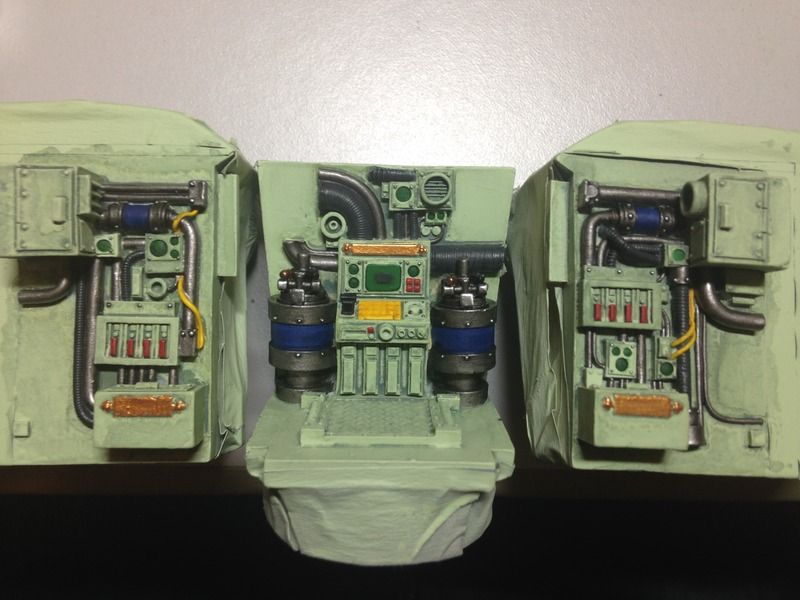
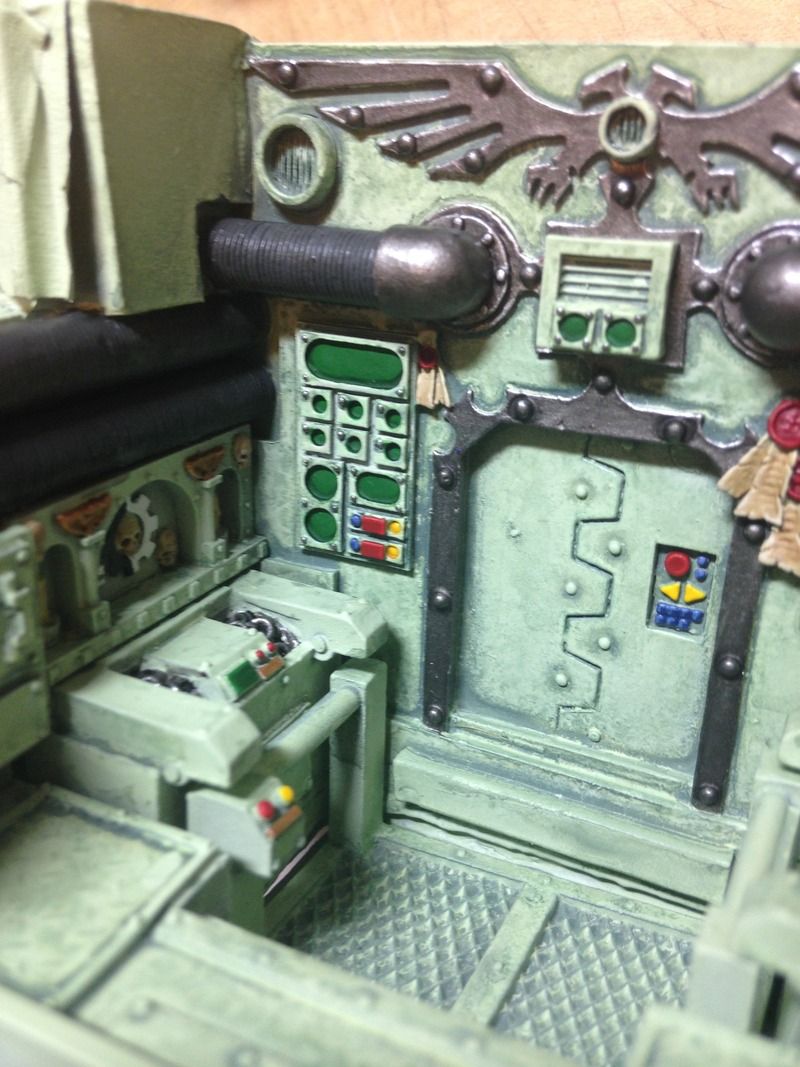
I then painted the interior. I have spent far too long on it really but them I'm still learning how to paint again (excuses excuses). I'll post a couple more photos on the interior when I take some in the next post but this is the general scheme:
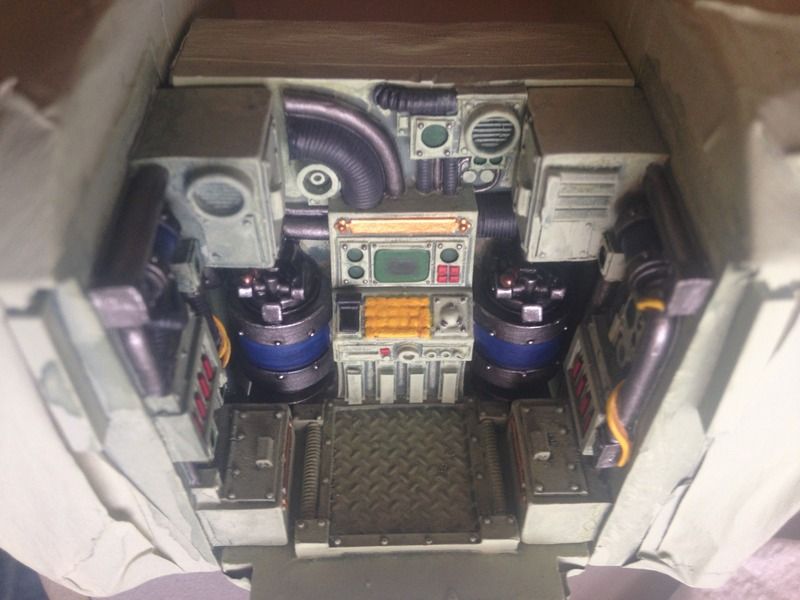
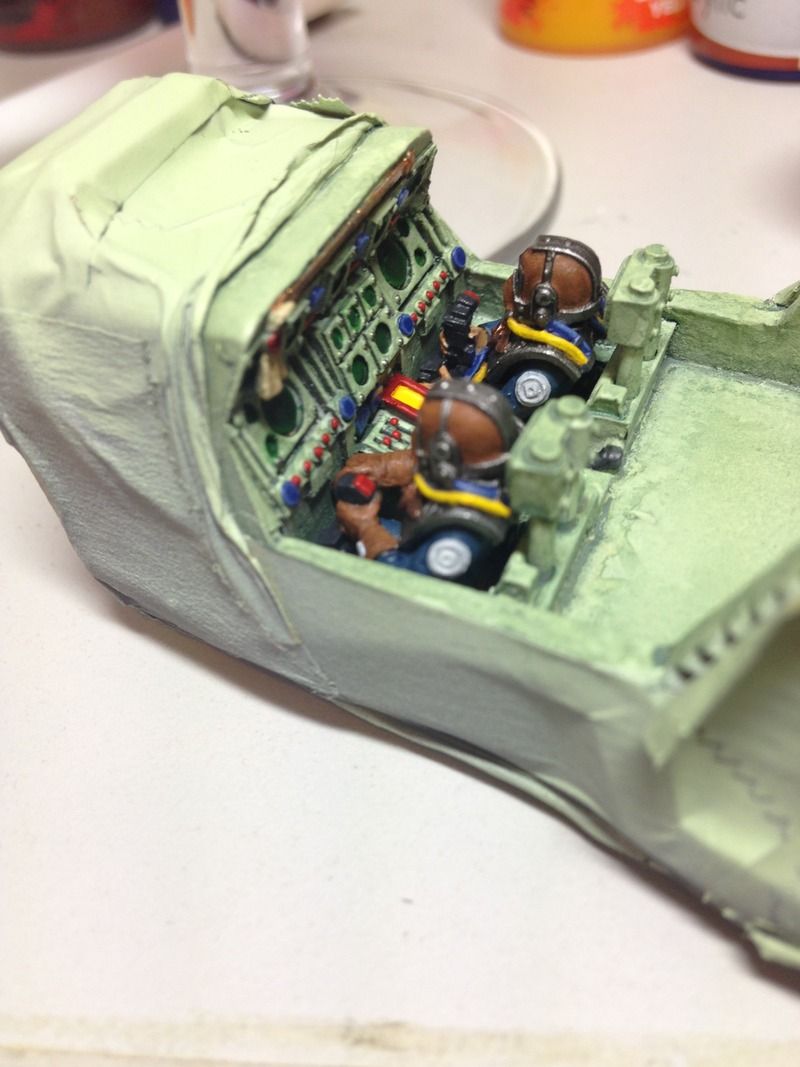
I tried to keep the colours of the controls fairly uniform and primary as I didn't want it to end up looking garish.
Anyway this is where I am up to currently so comments on progress so far and advice for the future appreciated. I'll try and remember to take some more photos as the painting of the exterior starts.
Cheers for reading if you got this far.
|
|
This message was edited 4 times. Last update was at 2017/03/25 00:22:36
|
|
|
 |
|
2015/08/19 18:07:07
Subject: My First Warhound Titan... (WIP)
|
|
Death-Dealing Devastator
|
Love this so far, base looks fantastic!
|
"We are the Red Sorcerers of Prospero, damned in the eyes of our fellows, and this is to be how our story ends, in betrayal and bloodshed. No...you may find it nobler to suffer your fate, but I will take arms against it." |
|
|
|
|
2015/08/19 20:34:19
Subject: Re:My First Warhound Titan... (WIP)
|
|
Fresh-Faced New User
|
|
|
|
|
|
2015/08/19 20:41:23
Subject: My First Warhound Titan... (WIP)
|
|

Ultramarine Master with Gauntlets of Macragge
What's left of Cadia
|
I applaud your dedication in painting the interior, I wouldn't have the patience to do so. Keep up the good work
|
TheEyeOfNight- I swear, this thread is 70% smack talk, 20% RP organization, and 10% butt jokes
TheEyeOfNight- "Ordo Xenos reports that the Necrons have attained democracy, kamikaze tendencies, and nuclear fission. It's all tits up, sir."
Space Marine flyers are shaped for the greatest possible air resistance so that the air may never defeat the SPACE MARINES!
Sternguard though, those guys are all about kicking ass. They'd chew bubble gum as well, but bubble gum is heretical. Only tau chew gum
|
|
|
|
|
2015/08/20 13:36:28
Subject: My First Warhound Titan... (WIP)
|
|
Regular Dakkanaut
Dublin
|
Any chance you can tell us which store does those lovely wooden bases?
|
40k Armies :   
Fantasy Armies:
DA:90SG+M-B--I+Pw40k99#--D++++A++/wWD232R++T(M)DM+
"We of the bloody thumb, salute you" - RiTides, Grandmaster of the Restic Knights |
|
|
|
|
2015/08/20 16:55:15
Subject: My First Warhound Titan... (WIP)
|
|
Fresh-Faced New User
|
http://www.allwoodsdirect.co.uk was the source if the bases. The top surface is a real wood vaneer on a stained MDF type material base. So the top which I completely obscured looked really nice. The price and speed of delivery was good. Just be aware that the edge is not vaneered.
|
|
|
|
|
2015/08/21 17:15:40
Subject: My First Warhound Titan... (WIP)
|
|
Lord of the Fleet
|
Some very nice work going there, especially the WWII bomber-style interior colours, might have to pinch that idea for my own 'Hound.
Is there a possiblity you could elaborate more on how you are securing the Titan to the base? From what I can make out the feet are permamently attached to the base and the legs slot over the bolts, or is it something different?
Thanks
|
|
|
|
|
2015/08/23 08:40:36
Subject: My First Warhound Titan... (WIP)
|
|
Ruthless Interrogator
|
Second the above. Always wanted a wee warhound.
|
 EAT - SLEEP - FARM - REPEAT EAT - SLEEP - FARM - REPEAT |
|
|
|
|
2015/08/23 21:05:56
Subject: My First Warhound Titan... (WIP)
|
|
Tough Traitorous Guardsman
London, England
|
fanbloodytastic!
|
|
|
|
|
|
2015/08/24 09:51:07
Subject: Re:My First Warhound Titan... (WIP)
|
|
Fresh-Faced New User
|
Regarding mounting of the Tian to the base.
I have assemble the feet and legs so they are free standing without requiring support to stand up. However to ensure that the titan stays put I have added support.
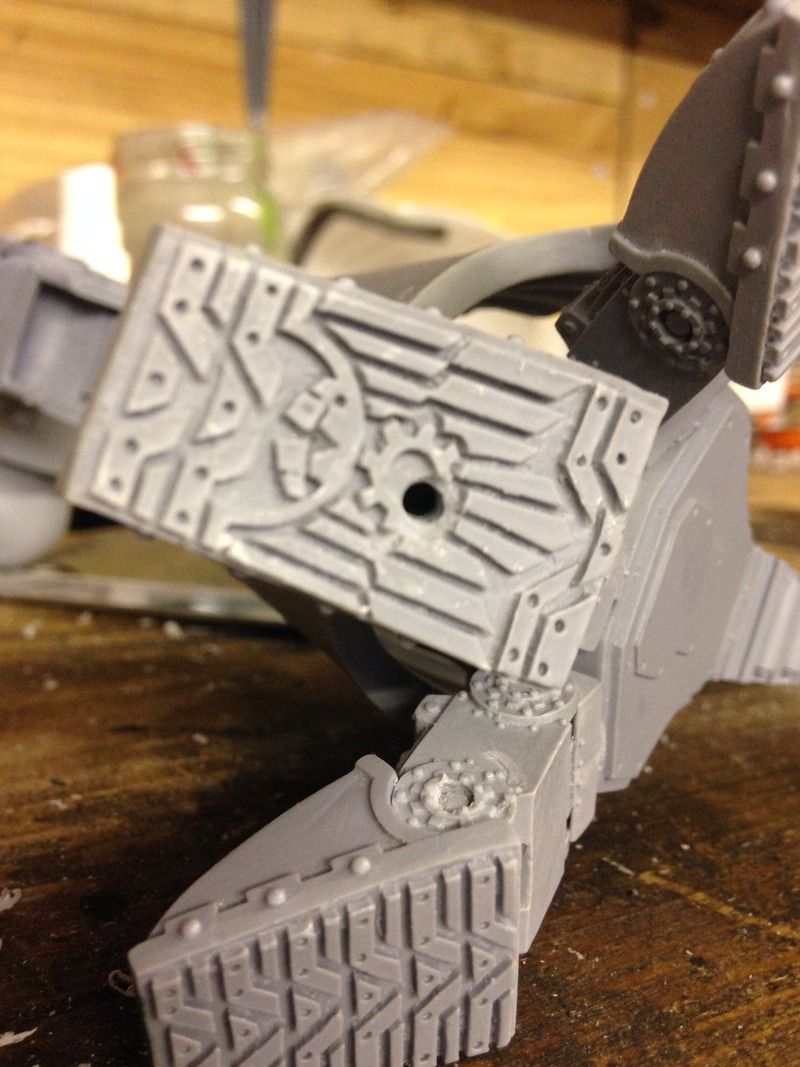
The right foot / leg -
I drilled a 6.5mm hole up from the base of the leg along its length. I then extrapolated this angle and drilled a hole through the foot from the inside of the foot joint through in to the base. The bolt is epoxy'd in to the base and the foot glued to the leg and the entire assembly slides on to the bolt. The bolt should be long enough to support the weight of the titan and as it is inclined prevent rotation.
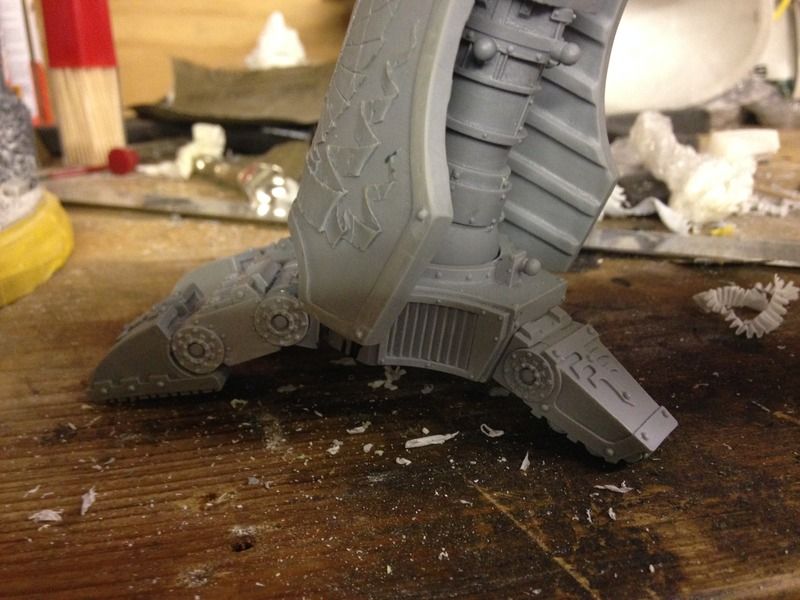
The left leg / foot -
This is in a stepping motion and again glued in a self standing position, albeit a bit wobbly when balanced on rubble / eldar titan head. Less to support it and more to locate it in the correct position is a simple pin through he rubble and in to the middle toe. Again slightly inclined to prevent rotation it is enough the the leg self stands. However the majority of the weight bearing is designed to be through the right leg assembly as above.
Hope this makes sense / is helpful.
[Edited for typo's as my keyboard apparently isn't really working today]
|
|
This message was edited 4 times. Last update was at 2015/08/24 09:57:07
|
|
|
|
|
2015/08/25 13:04:29
Subject: Re:My First Warhound Titan... (WIP)
|
|
Fresh-Faced New User
|
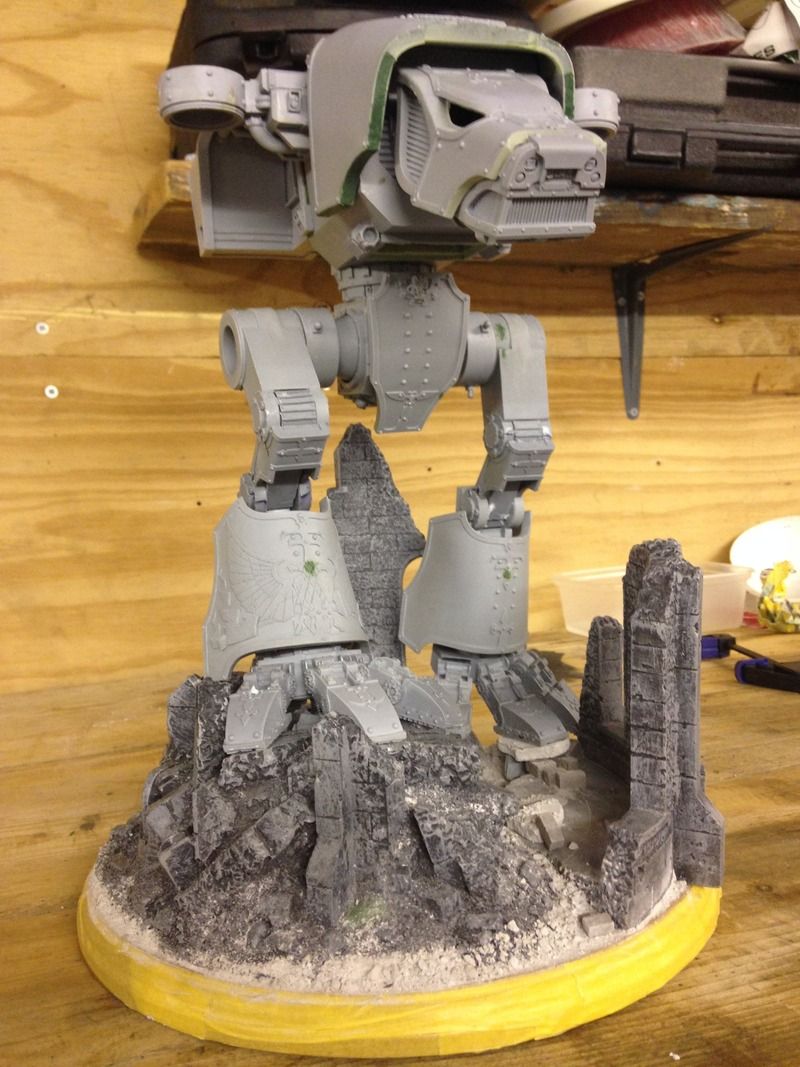
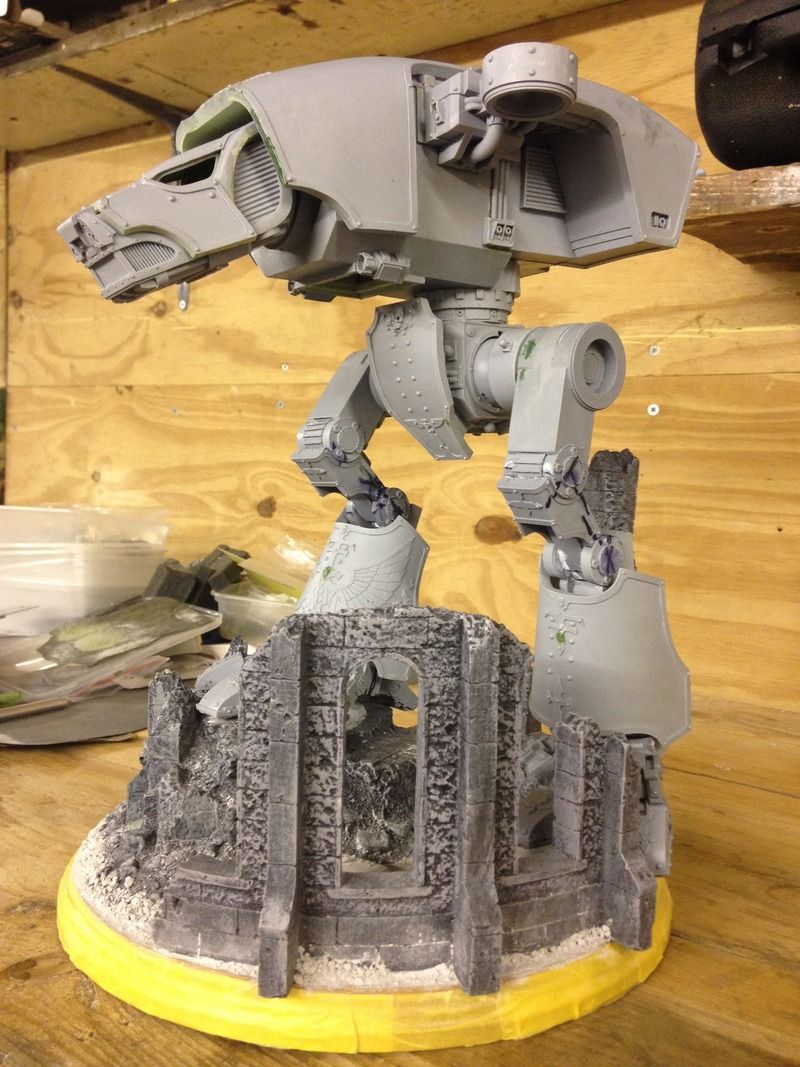
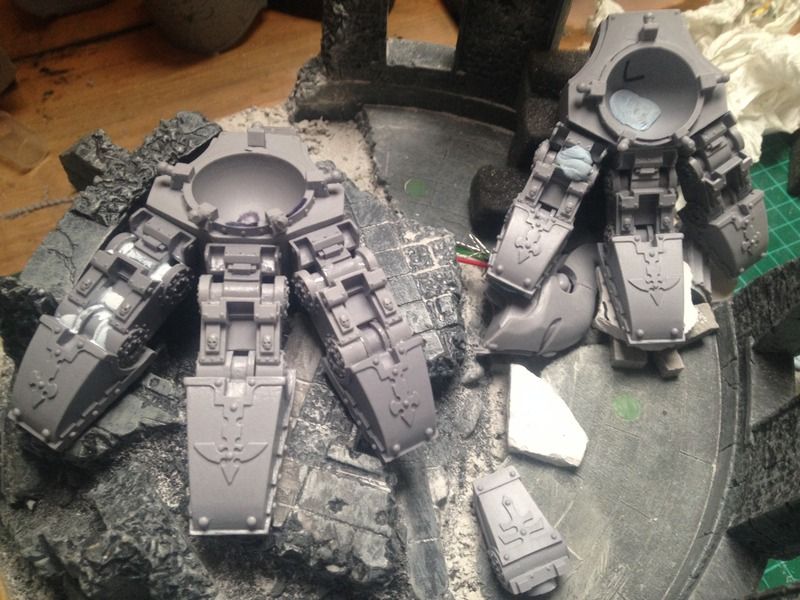
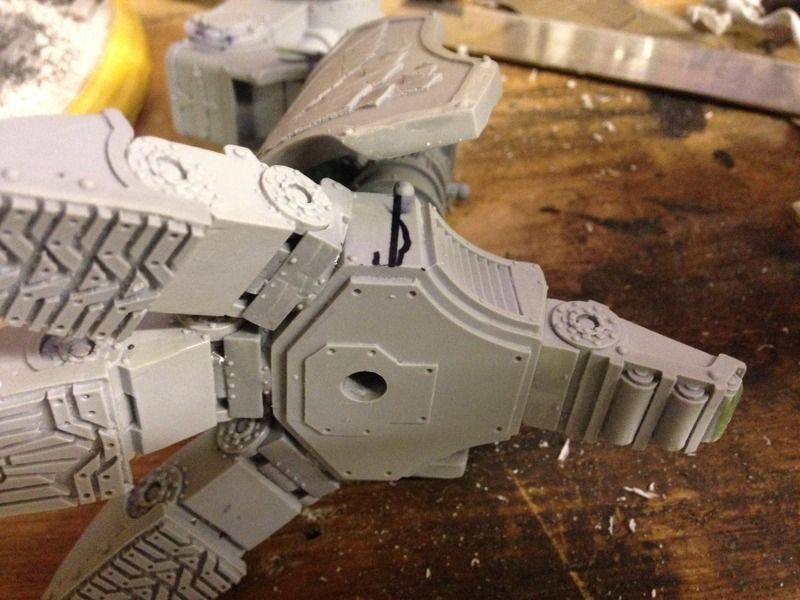
Finally bit the bullet and assembled the body.
Advice from a mate with four Warhounds was not to attempt it without clamps. He was right. I used some 100mm soft jaw clamps, however a 150mm plus one to pull the front and rear of the body together would have been ideal.
I used JB Weld epoxy for the main body sections with superglue on the weapon arms to hold them as they were challenging to hold with tape while the epoxy set.
|
|
|
|
|
2015/08/26 17:07:16
Subject: My First Warhound Titan... (WIP)
|
|

Confessor Of Sins
|
Nice work!
|
 Cratfworld Alaitoc (Gallery) Cratfworld Alaitoc (Gallery)
 Order of the Red Mantle (Gallery) Order of the Red Mantle (Gallery)
Grand (little) Army of Chaos, now painting! (Blog) |
|
|
|
|
2015/08/27 00:45:02
Subject: My First Warhound Titan... (WIP)
|
|

Arch Magos w/ 4 Meg of RAM
|
This is epic - great great work so far. Totally following this
|
|
|
|
|
|
2015/08/27 13:41:33
Subject: My First Warhound Titan... (WIP)
|
|
[SWAP SHOP MOD]
Robot Cat
OH-I Wanna get out of here
|
Always fun to see good titan builds.
|
|
|
|
|
2015/08/27 17:31:42
Subject: My First Warhound Titan... (WIP)
|
|

Ancient Space Wolves Venerable Dreadnought
I... actually don't know. Help?
|
I'll be keeping this in my personal folder...
|
|
|
|
|
|
2015/08/27 23:49:22
Subject: My First Warhound Titan... (WIP)
|
|
Boosting Ultramarine Biker
|
I love this!
I dont think I'd have the time/rescorces to do this!
cannot wait to see it done
|
|
|
|
|
|
2015/08/28 01:40:42
Subject: My First Warhound Titan... (WIP)
|
|

Incorporating Wet-Blending
|
A mate of mine bought one of these and I got super jealous. Turns out he wants me to build and paint it.
ohboyohboyohboyohboyohboy
|
|
|
|
|
2015/08/28 20:15:26
Subject: Re:My First Warhound Titan... (WIP)
|
|
Fresh-Faced New User
|
|
|
|
|
|
2015/08/29 11:35:00
Subject: My First Warhound Titan... (WIP)
|
|
Esteemed Veteran Space Marine
Sheppey, England
|
Great blog, great pics. The Warhound's my favourite class of Titan and it's great to see this one coming together so nicely. I'll be following this with great interest!
|
|
|
|
|
|
2015/08/30 14:23:03
Subject: Re:My First Warhound Titan... (WIP)
|
|

Warning From Magnus? Not Listening!
|
Thanks.....
I had ALMOST gotten over my yearning for a Titan...... 
Still, really nice so far, can't wait to see it painted!
Ember 
|
|
|
|
|
|
2015/08/30 18:06:47
Subject: My First Warhound Titan... (WIP)
|
|
Gimlet-Eyed Inquisitorial Acolyte
|
Looking good so far, can't wait to see it all together!
|
 3000pts 30 wins 2 draws 12 loses 3000pts 30 wins 2 draws 12 loses
 5000pts 13 wins 1 draws 9 losses 5000pts 13 wins 1 draws 9 losses
WoC "where the points don't matter" 6 wins 0 draws 4 losses
Things my Giant has pocketed for later in AoS: 1 zombie, 2 spirit hosts, 1 banshee, 1 zombie dragon, assorted phoenix guard
X-wing: Scum and Villainy |
|
|
|
|
2015/08/30 19:33:32
Subject: My First Warhound Titan... (WIP)
|
|
Servoarm Flailing Magos
|
Love seeing these go together. You are doing fantastic so far!
|
http://www.teun135miniaturewargaming.blogspot.com/ https://www.instagram.com/teun135/
Foxphoenix135: Successful Trades: 21
With: romulus571, hisdudeness, Old Man Ultramarine, JHall, carldooley, Kav122, chriachris, gmpoto, Jhall, Nurglitch, steamdragon, DispatchDave, Gavin Thorne, Shenra, RustyKnight, rodt777, DeathReaper, LittleCizur, fett14622, syypher, Maxstreel |
|
|
|
|
2015/08/31 04:16:06
Subject: My First Warhound Titan... (WIP)
|
|
Ultramarine Master with Gauntlets of Macragge
What's left of Cadia
|
Looking great so far. Can't wait to see the end result
|
TheEyeOfNight- I swear, this thread is 70% smack talk, 20% RP organization, and 10% butt jokes
TheEyeOfNight- "Ordo Xenos reports that the Necrons have attained democracy, kamikaze tendencies, and nuclear fission. It's all tits up, sir."
Space Marine flyers are shaped for the greatest possible air resistance so that the air may never defeat the SPACE MARINES!
Sternguard though, those guys are all about kicking ass. They'd chew bubble gum as well, but bubble gum is heretical. Only tau chew gum
|
|
|
|
|
2015/08/31 21:06:58
Subject: My First Warhound Titan... (WIP)
|
|
Implacable Skitarii
|
All great by now, keep it up!
Very effective and nice looking base as well. I might suggest adding a darker layer on the eldar head, around the foot; y'know, make it look like a big shadow.
Also, i'd be curious to see the magnetised servitor covers, if it wouldn't bother you too much when the titan is complete.
Keep 'em coming mate
|
|
|
|
|
|
2015/09/01 05:43:43
Subject: My First Warhound Titan... (WIP)
|
|
Pious Palatine
|
Looking good.
Makes me think that one day I could do such a project justice.
Thanks for sharing.
D
|
|
|
|
|
2015/09/01 19:16:00
Subject: My First Warhound Titan... (WIP)
|
|
Fresh-Faced New User
|
Thanks all for the kind words! It's very much a learning experience as I haven't modelled or painted since about 1995 and I only painted my first dark angels again about 8months ago!
Weather has been a bit too damp to do any more spraying so that is on hold currently. Hopefully later this week I'll start getting some see colours on the legs as they are primed.
The elder head I will probably tone down with some weathering powders which I want to learn to use.
I'll photo the servitor hatches when it's dry enough to go to the garage, but essentially I just put a couple of stacked 2x1mm magnets in each corner of the recess where the hatch closes and one in each corner of the hatch and green stuffed over them so you can't see them much. Don't need a lot to hold them down. I also put magnets in each end of the hinge and in the hinge mount on the body shell so I could have them open. Got a bit carried away....
|
|
|
|
|
2015/09/02 06:00:28
Subject: My First Warhound Titan... (WIP)
|
|
Pious Palatine
|
Ah yes, I believe the term is 'neodymium fever' when you got mad with magnets.
Don't worry we've all been there.
D
|
|
|
|
|
2015/09/02 18:57:51
Subject: Re:My First Warhound Titan... (WIP)
|
|
Fresh-Faced New User
|
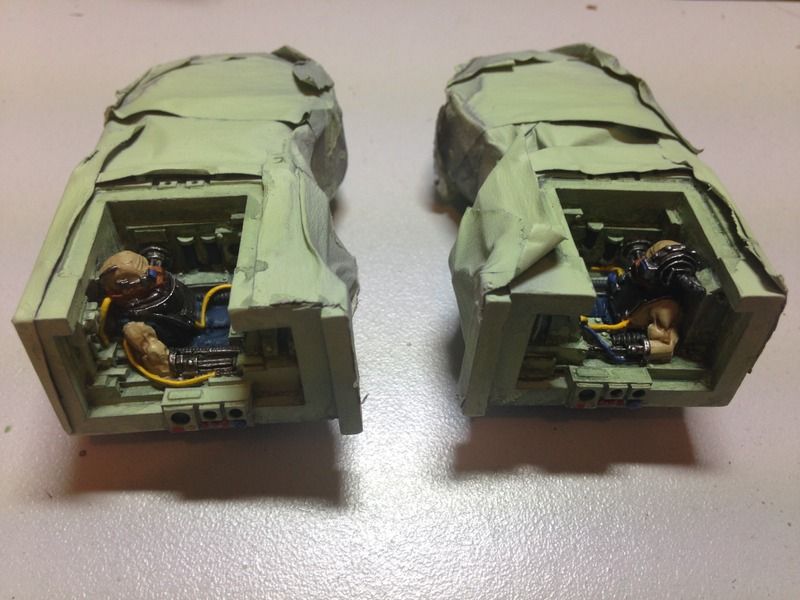
Heres a couple of close ups of the magnetised servitors hatches. They are cropped down so low res unfortunately but they are aprayed now so it's hard to see the magnets now.
|
|
|
|
|
2015/09/06 20:15:03
Subject: Re:My First Warhound Titan... (WIP)
|
|
Fresh-Faced New User
|
So I've finally started painting the exterior, albeit only the legs so far...
Base coat of grey car primer, I have a line with a thick washer hanging from the roof at prime spraying height which I can hang the legs on using the waist magnet.

I then masked of the majority of the legs with masking tape and cling film and gave the toes and upper leg armour with a coat of Macragge Blue:
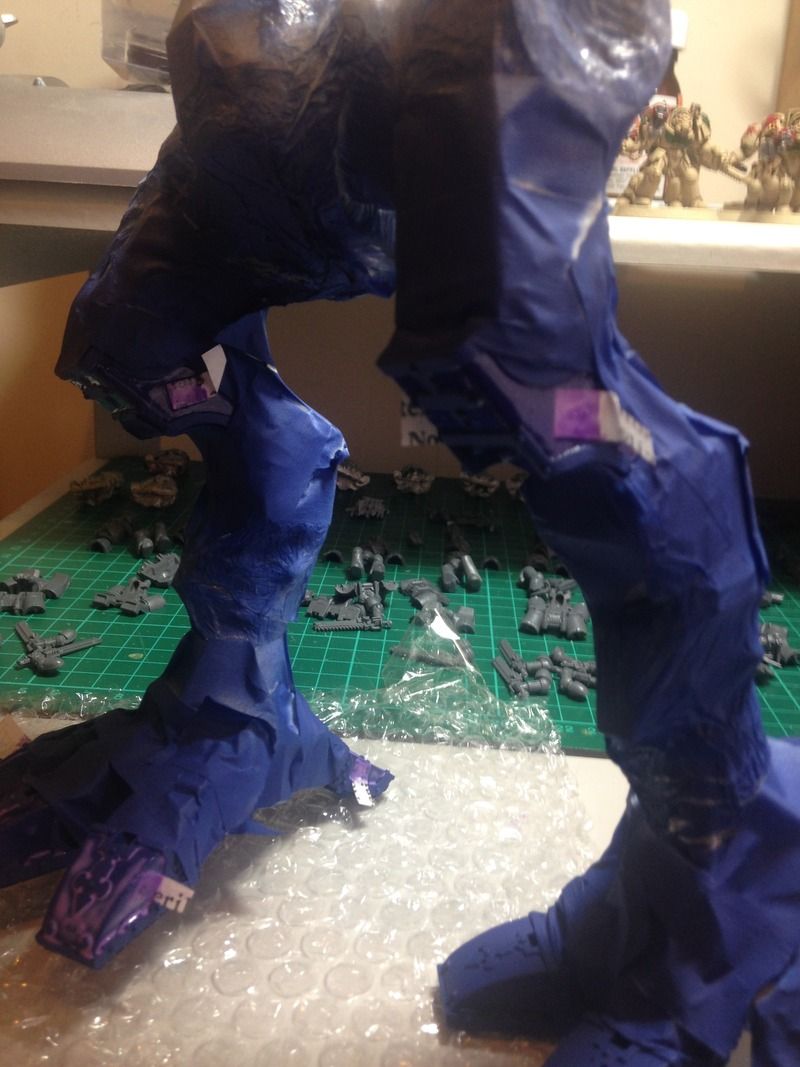
I then masked the blue bits with Maskol, adding small paper pull tabs to allow easy removal.
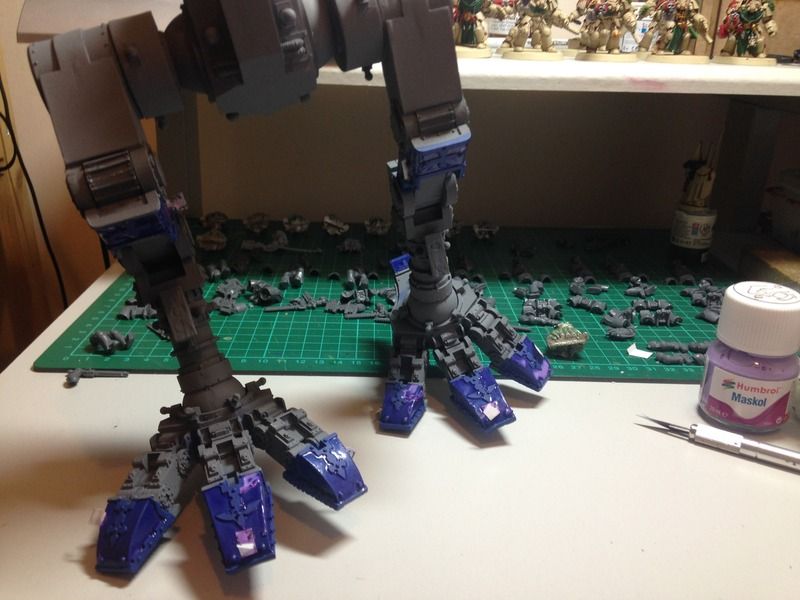
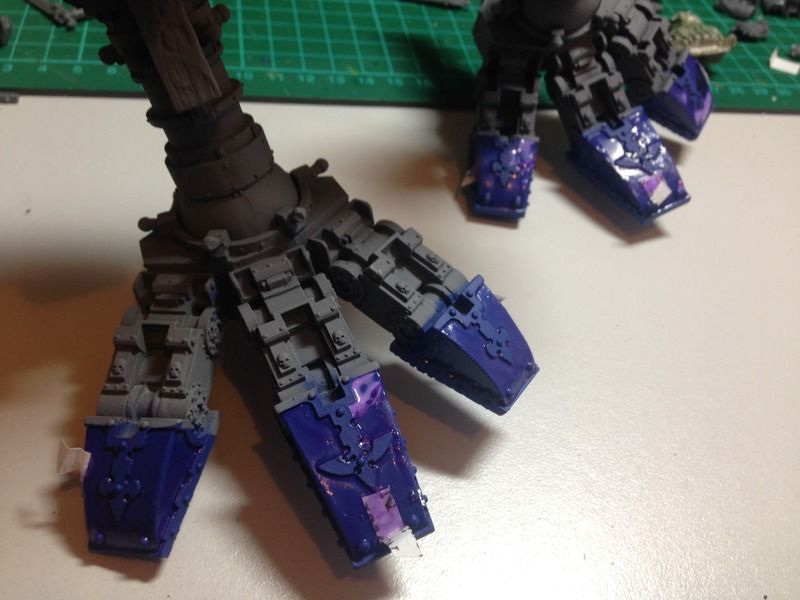
I've just put a base coat of Army painter Matt black over the whole of the rest of the legs, to be followed tomorrow with a coat of Army Painter Leadbealcher. I decided to go for a black under coat to a) darken up the Leadbealcher and b) add shade to any nooks and crannies.
Hopefully the Maskol will do its job!
|
|
|
|
|
2015/09/06 21:15:44
Subject: My First Warhound Titan... (WIP)
|
|
Ancient Space Wolves Venerable Dreadnought
I... actually don't know. Help?
|
Hmm, is maskol any good? I've been thinking about trying it....
|
|
|
|
|
|
|
|
 ~2800 points
  Full Chapter + Kabuki Guilliman

 3700 Points + Kabuki Vulkan
 XIIIth Legion 8500 Points + ForgeWorld Guilliman