| Author |
Message |
 |
|
|
|
|
Advert
|
Forum adverts like this one are shown to any user who is not logged in. Join us by filling out a tiny 3 field form and you will get your own, free, dakka user account which gives a good range of benefits to you:
- No adverts like this in the forums anymore.
- Times and dates in your local timezone.
- Full tracking of what you have read so you can skip to your first unread post, easily see what has changed since you last logged in, and easily see what is new at a glance.
- Email notifications for threads you want to watch closely.
- Being a part of the oldest wargaming community on the net.
If you are already a member then feel free to login now. |
|
 |
2016/10/20 22:02:15
Subject: nou's P&M blog; now Triumvirate of Conversions
|
|

Wicked Warp Spider
|
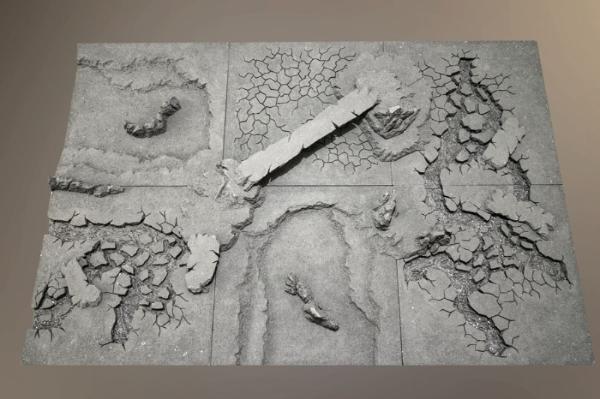
As I start this blog halfway through the process of making this terrain, here are some pics of current state of the project:
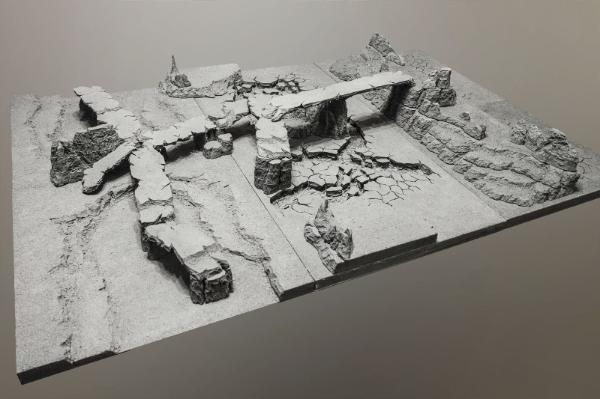
This set currently consists of six 2'x2' base boards (in fact they are a bit smaller due to the size of XPS boards available here in Poland), a couple of hills, walls/ridges, small bridges, one large bridge and a couple of columns of different heights to support the bridge (they double duty as LOS blockers). It is only rougly basecoated now, as I have initially thought this will be enough elements to cover all my needs, but wanted to playtest it before painting, and after a dozen of test games it proved to be enough for interesting and varied 4'x4' games, but a bit restricted for 6'x4' setups. So I have postponed painting it until I had time to make some additional pieces - which I had no time to make for almost a year now, but I finally do. And this is what this blog will be all about.
To have enough pieces for non-repetetive 6'x4' setups, I plan to make two additional base boards - one additional lava river board with interconnectivity on two sides (as now I have three boards with a single interconnecting side each, so a maximum of 2'x4' net of "trenches" or dangerous terrain river) and one flat board, as having only a single one limits possible hill placement/bridge placement combinations. Apart from that, I plan to make one large, modular hill (the size of almost two base boards) divided into four sections, so it will be possible to use it in 6 different configurations (half of it will be smaller anough to be placed on top to make two level hill), some smaller multi-level hills, two medium bridges and a couple of collumns/ridges. Many of those new elements will be taller than existing ones (or enable stacking of more levels), as the main problem with this set is not enough tall terrain pieces to block LOS for MCs and GMCs. Each level is 3cm tall, so I need at least 4 levels to completely block LOS for things like Trygon.
So that's about it for now. Hopefully I'll post some progress pics after the weekend. Cheers!
|
|
This message was edited 3 times. Last update was at 2018/06/06 21:21:00
|
|
|
 |
|
2016/10/21 05:52:20
Subject: nou's Lava Terrain P&M blog
|
|

Pious Palatine
|
These boards looks really cool. Have you got any pics of the prior stages/steps?
EDC
|
|
|
|
|
2016/10/21 08:58:22
Subject: nou's Lava Terrain P&M blog
|
|

Screamin' Stormboy
|
Looking good
|
 Tactical_Spam wrote: Tactical_Spam wrote:The racial make up of the Imperium is 100% Australians. Its the reason the Imperium has survived for so long.
|
|
|
|
|
2016/10/21 12:58:02
Subject: nou's Lava Terrain P&M blog
|
|
Wicked Warp Spider
|
 evildrcheese wrote: evildrcheese wrote:These boards looks really cool. Have you got any pics of the prior stages/steps?
EDC
Thanks!
Unfortunately no, I don't have any, but I will make more detailed WIP photos of those boards and elements I make now to expand this set. And I'll use exactly same process and techniques, so you'll see how those were made.
|
|
This message was edited 1 time. Last update was at 2016/10/21 13:53:47
|
|
|
|
|
2016/10/21 13:04:57
Subject: nou's Lava Terrain P&M blog
|
|

Norn Queen
|
Damn they look good dude.
|
Dman137 wrote:
goobs is all you guys will ever be
By 1-irt: Still as long as Hissy keeps showing up this is one of the most entertaining threads ever.
"Feelin' goods, good enough". |
|
|
|
|
2016/10/21 16:15:18
Subject: Re:nou's Lava Terrain P&M blog
|
|
Regular Dakkanaut
|
Looks Great !!
Jeśli się da to chciałbym zobaczyć w tym wątku dużo WIPów z pracy nad tym terenem. Zapowiada się naprawdę super. Będziesz do tego dorabiać jeszcze jakieś dodatkowe "kafelki" czy tylko te o których pisałeś ? 
|
|
|
|
|
|
2016/10/21 20:04:27
Subject: Re:nou's Lava Terrain P&M blog
|
|
Wicked Warp Spider
|
 ROTTEN_FACTORY wrote: ROTTEN_FACTORY wrote:Looks Great !!
Jeśli się da to chciałbym zobaczyć w tym wątku dużo WIPów z pracy nad tym terenem. Zapowiada się naprawdę super. Będziesz do tego dorabiać jeszcze jakieś dodatkowe "kafelki" czy tylko te o których pisałeś ?
Dzięki! Skromne dokonania w porównaniu do Twoich rzeźb Przy okazji spytam - jakich konkretnie mas poza green stuffem używasz i możesz z czystym sumieniem polecić (do wygodnego kupienia you nas)?
Switching back to english - yes, in fact I do intend to make a couple more boards to go somewhat beyond the theme. Initially it started as a solely 40K terrain, but with recent release of Genestealer Cults and an old Escher Gang getting dusty in my drawer I plan to get back to Necromunda. And while this board definately won't fit the Underhive aesthetics, I think it might do justice to the Ash Wastes - I'll need just a couple (probably three) more boards with some sort of modular, multi-level "high rise" features that blend nicely with this board. But I still can't settle on their look&feel - especially because I plan to buy some Ad Mech minis to represent my Nomads/Journeymen and I don't want a shantytown/scrapyard looks and nothing too "factorylike" either.
|
|
|
|
|
2016/10/22 15:11:25
Subject: Re:nou's Lava Terrain P&M blog
|
|
Wicked Warp Spider
|
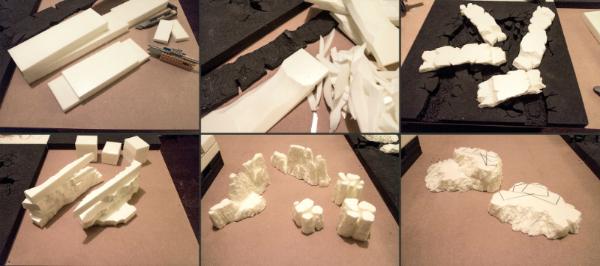
Ok, first batch of WIP photos. I arranged them in tableaus to keep this thread a bit more manageable.
Before I'll go into details about this part of work, a quick info about the table that this whole terrain is intended for. I do not have a room for permanent gaming table, so I had to work out some foldable solution. My table is made from three 2'x4' MDF boards (10mm thick), supported by three OSB beams (the whole thing is then placed on work supports). They are hold in place by a system of steel pins and holes - no screws needed for assembly, so it is easier to assemble/disassemble than IKEA furniture But because of this solution I have no frame to hold the terrain boards in place. Instead, each square board and the table itself is magnetized, so the boards do not move while playing - it is sturdy enough, that after almost a whole year of frequent use there were no accidental board shifts. You can see the magnets and table sections in the middle column of the first pic above.
Now to the actual terrain. I have decided to make a large hill first - it has four sections that are interchangeable/stackable, as shown on the pictures, which I think are quite self-explanatory, but you can see this will be a major terrain feature for my table. It is large enough so I can put any of already existing scatter pieces on top of a single section. The current final state is still only a rough cutout, without any sculpting of slopes/edges done, so it looks rather "squary". I use the cheapest soldering iron I could find (shown on the second pic) and not a "proper" styrofoam cutter. It has some advantages and disadvantages to it - it does not have a heat setting, so you it takes some time to practice to keep it at appropriate temperature by switching it on and off constantly (and avoid it getting red hot), but it allows freehand sculpting, wich makes resulting terrain more rock-like than "wiggling" technique often used with hot wire cutters.
The last thing that deserves some explanation is my high-tech, precision horizontal cutting tool  It is just a rig for olfa cutter blade, with the top gray bit showing me where the tip of the blade is when cutting. I wanted my hill to have some stepped areas, but I also wanted them to be carved from a single piece of foam for added durability. Previously I made such steps by cutting them off completely, thinning them with a band saw and gluing them back in appropriate places on a HDF board, but this time I'm making "boarderless" terrain pieces so that was not a valid option - my soldering iron makes about 4mm, irregular gap while cutting, so gluing such pieces directly wouldn't be possible. I often make such "single purpose" tools using LEGO bricks - I think they are perfectly suited for such use (even for things like jigs for wood milling), as they are indefinitely recyclable and you can build literally hundreds of specialised tools using just a small shoe box of them (and there is no problem of storing such tools afer use ).
You can also see a layout for new lava river section. It is just a rough drawing ATM, the actual cracks pattern will most likely end up looking completely different, depending on the "flow" of final edge sculpting). I'll get back to it after finishing sculpting of the hill edges.
|
|
|
|
|
2016/10/22 15:53:22
Subject: nou's Lava Terrain P&M blog
|
|
Regular Dakkanaut
|
Promising start, there looking really good.
|
|
|
|
|
2016/10/26 17:56:56
Subject: Re:nou's Lava Terrain P&M blog
|
|
Regular Dakkanaut
|
You asked me about clay - For sculpting big models i recomend SuperSculpey, for smaller parts FIMO SOFT , but both need to be heated. FIMO is easy to find, SuperSculpey You have here:
http://www.sklep.planetart.pl/m/238/masy-plastyczne-masy-polimerowe-premo-sculpey-super-sculpey
Great idea with this knife. It's great that You solve problems in such good ways .
Keep going !!
|
|
|
|
|
|
2016/11/01 01:15:27
Subject: Re:nou's Lava Terrain P&M blog
|
|
Wicked Warp Spider
|
@Rotten_factory: Thanks for the info!
This time a rather small update.
Hill slopes are now completely sculpted and as you can see the whole thing is much less squary and the rock texture is quite detailed. One note about the sculpting technique while using soldering iron - there are two possible "modes":
- heat cutting: temperature that barely let you move the iron through leaves a nice, smooth trace and a foamy surface
- melt sculpting: depending on how hot the iron really is and how you handle the iron, you can also melt the foam from a small distance, letting you carve without physical contact or turn the foam into solid styrene (especially usefull for hardening edges). This also let you controll thickness of any lines cut in foam - colder iron will leave a thin line, red hot iron will melt 3x-4x wider. It takes some time to get used to this technique and controll different outcomes on the fly.
One important thing - unlike hot wire cutters, melt sculpting using soldering iron generates a lot of toxic fumes, so do it with filtering mask or in a very well ventilated area (and a fan pointed from behind helps a lot with keeping fumes away).
And here you have two stages of new lava river board - a rough cut and detailed sculpt (and the final layout - small parts will be cut to different heights before gluing them to the board).
If you look closely, rock detail of the river undercut and hill slopes differ - this is intentional. Because I'm making a modular board with a lot of scatter pieces, I won't be able to put a lot of small detail onto the boards, because I want as much freedom of placement as I can. So I'm varying structures everywhere I can (while keeping them consistent enough to not look out of place), so the final look of this set when properly painted won't be dull and repetetive. This also makes for the clear distinction of below and above "0" level features.
|
|
|
|
|
2016/11/16 13:12:55
Subject: Re:nou's Lava Terrain P&M blog
|
|
Regular Dakkanaut
|
Very nice update. Lot of useful information. What will be the next step?
Nice job
|
|
|
|
|
|
2016/11/17 19:04:31
Subject: Re:nou's Lava Terrain P&M blog
|
|

Nasty Nob
|
Nice looking terrain. Looking forward to the finished product. Thanks for sharing! 
|
|
|
|
|
|
2016/11/19 01:48:20
Subject: Re:nou's Lava Terrain P&M blog
|
|
Wicked Warp Spider
|
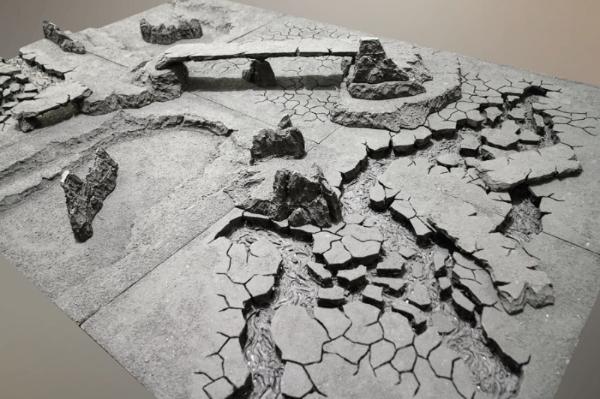
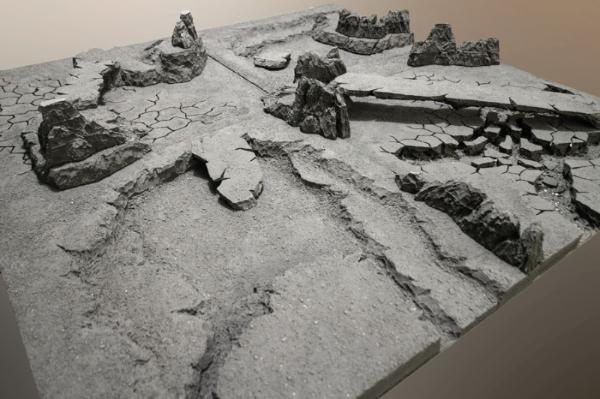
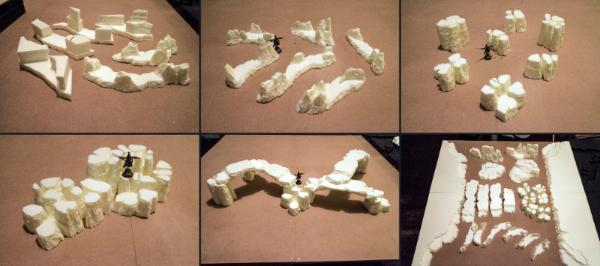
Finally, I have some time to post the progress I have made since last update. While starting this thread I didn't realise how much "overhead" time it takes to publish anything resembling a proper " WIP progress blog"... So this time a rather bulk update.
After sculpting large hill and new river tile, the next step was to shape all remaining scatter terrain pieces. Because I don't have any other projects utilizing XPS boards, I try to use all leftover pieces for somethng useful, so I don't have to store them. Because of that, shapes and dimensions of scatter terrain shown above are not exactly planned up front... This was especially true with those two small hills (botom right) - they are made from what was left after cutting out "The Large Hill" sections - those rectangular markings you can see on them are there for visual aid while sculpting, so I can be sure that I'll have enough room for at least 40mm bases (so those wobbly Zoanthropes could be safely placed) when bridges are placed on those hills.
Top row photos illustrate bridge making process - again, I wanted those made from single piece of foam, so horizontal knife was in use again. Then I had to pre-carve undercuts of those bridges - I haven't made this step previously while making my existing large bridge piece, and melt-sculpting it from a solid block of foam was a chore: melt scultping hardens the foam and small cutting edge of my soldering iron means, that I have to use a lot of "drawcuts" while modeling larger curvatures or details (a "drawcut" is a technique utilising a U-shape of iron tip and movement "along", not "across" the iron axis, to shave a thin strip of foam from a sharp edge or make a wide but shallow stroke). Each subsequent "drawcut" produces harder strains of solidified polistyrene and becomes more difficult to sculpt further. So this time, to avoid such buildup, I shaped them first using a small olfa knife. You can see finished bridges on the last top-row picture.
Left and middle bottom row pictures show first and last step of making LOS blocking pieces, which double-up as bridge supports. Larger ones are made from leftover pieces from cuting lava river board and are four layers high, so they completely obscure Trygon, and combined with large hill and bridge can go 10" above "absolute bottom" level. I'll skip those three other columns for now, as they started as simple supports for bridges, but then evolved to something completely different... But one other thing I want to focus on here: if you magnify those pictures, you can see that my process of "stacking all leftovers without pre-planning and then go-with-the-flow meltsculpting" has one serious drawback - I use styrofoam glue (with some spots of hot gun glue for immediate support) to join layers of foam. But styrofoam glue does not melt as easily as the foam itself (in fact it just softens and rehardens). I'm not making a photorealistic, true-to-nature diorama, so I don't mind those horizontal lines, but even then I have to use small round chisel to remove most excessive buildups of styrofoam glue after sculpting (it can even be made entirely smooth, but requires too much time to be convenient). If you want a smooth slope, then you can still use this iron technique, but plan ahead and change the order of things - work "top to bottom", sculpting top layer first and just then glue it to the next raw piece of foam, leaving safe, glueless margin and then extend sculpts onto the new layer. Or glue only a "solid core", which you are 100% sure you won't have to sculpt.
As I wrote earlier, this whole terrain set is meant for both 40K scale games and Ash Wastes Necromunda/Kill Team skirmishes. But those have qute different requirements from "ideal terrain setup". This set has proven great for 40K, but my Kill Team test games had shown, that except for rivers/trenches, almost all other pieces are LOS blockers and not cover-providers. So this tableau shows a couple of different ways to make my terrain more "skirmish-friendly". (a model used for scale reference is a 4th ed metal Harlequin troupe master - it is around 1/2 higher than Esher ganger or Eldar Guardian and still get obscured a lot by even smaller rocks or half-level columns).
But first to elaborate a bit on those columns/bridge supports. Initially I planned for only three of them and utilise those small, two-layer hills as acces points for bridges, but this 40mm of flat space reqirement makes them too large to have lots of them on the table... So after brief play with different setups of new and old terrain pieces, I came up with the idea of making more columns, this time in form of "step ladders". All my columns (at that moment) have been cut out from quite cubical blocks of foam (so that two bridge ends could be placed on a single column to make longer setups), and looked a bit weird when placed on my very irregular terrain and I wasn't to happy about it. And just then, when I have finished those new "ladder columns" and grouped all those pieces together, came the final idea - to make them into a modular "column hill" (bottom left arrangement). I sculpted them some more to give them this "thin columns" look, made two additional mid-sized pieces and carved them into a bit more irregular shapes, so when grouped together, they can now form a single, highly irregular stepped hill.
Next are those elongated rock clusters shown in first two pictures. I tried to use smaller pieces when I first made my terrain, but half-level pieces proved unimportant in 40K and were just cumbersome to use/provided very minimal cover in most cases. So now I have came up with those - they are between 0,5-2,5 levels high and are double-purpose. In 40K they can work as "forrest" type of terrain, i.e. non- LOS blocking cover terrain that you can shoot through. But in Necromunda/Kill Team, they give enough real cover, so they can be utilised in True- LOS manner and provide good enough cover even against shoters located on higher levels. Same principle of "area terrain in 40K and True- LOS terrain in Necromunda/Kill Team" can be utilised for my rivers/trenches, so all those elements combined should provide terrain cluttered enough for proper Necromunda usage.
Middle lower photo shows an example of "catwalk" setup that is possible with new pieces only. When used with all available terrain I now have I can made a linked chain of catwalks over a good part of entire 6'x4' board.
Finally, a group shot of all new scatter pieces that I made. As you can see they can populate 4'x4' board well enough, so combined with river-boards and my old pieces they should definately be enough for my needs of non-industrial terrain.
Next step is to give all those XPS sculpts some texture. I have made this already, but I just run out of time for this post... So till next time! (hopefully later this weekend)
|
|
|
|
|
2016/12/16 18:57:50
Subject: Re:nou's Lava Terrain P&M blog
|
|
Wicked Warp Spider
|
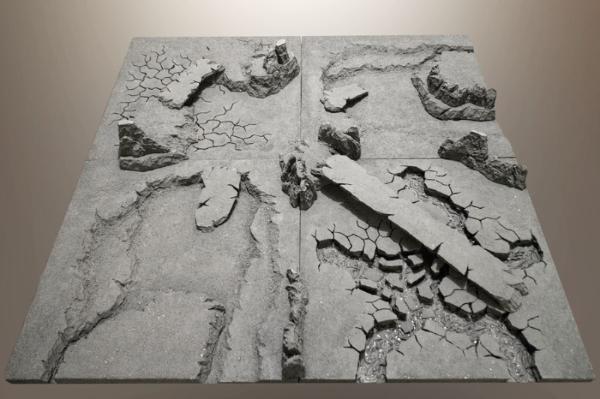
Ok, that was a long break... Terrain itself is now finished (still primed only) and a couple of games played on it already. It is a very refreshing thing NOT to have to use all available pieces But it is much harder to actually settle on something, as I'm eager to test every major design - all at once
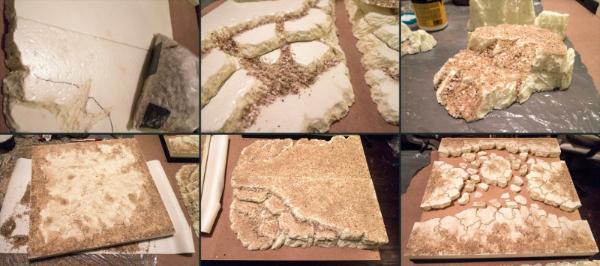
Now back to blogging... Next step after cutting and sculpting is texturing. I'm using a standard PVC glue + sand technique, but nevertheless I have a bit to write here.
When trying to make such "open" terrain set as mine, you cannot realy go into tiny details and patterns, because everything should be placeable anywhere. So, in order to not to end up with a flat and dull painted styrofoam, I went down a slightly different path on making interesting enough texure. It boils down to a basic concept of noise frequency. Even using few different grades of sand, it eventually gets boring given large enough area. Moreso, sand an any other medium is only "positive height". So, my first step was to smack a bag full of gravel all over my flat terrain pieces to make irregular dents in the foam. This creates negative, medium frequency noise on the surface. Next step is to apply glue and sand on any natural detail spots. I use three different types of media: very fine sand, which has almost no texture at all, but mixed with glue creates a very durable and hard surface; river sand with grain size varying from .5mm up to 4mm; and finally a small gravel, about 3-5mm in size. Fine sand plus glue mixture is great for two things - hardening the foam to create concrete like flat surface if you use thin layer of glue, or to build up very low frequency noise with it if you use a lot of glue, throw a lot of sand in and tap to create variance. This second option breaks the flat feeling of stock foam and makes a nice foundation for adding further variance with thicker sand (or a mixture of both for added irregularities).
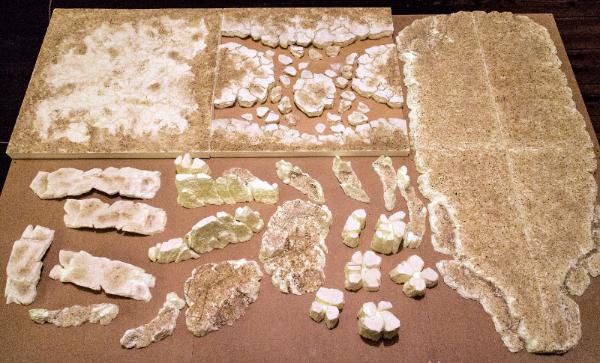
Probably every square inch of flat areas of my terrain has been covered in glue and different mixtures at least twice. The result shown in unpainted pictures is after only one overall layer.
Last picture shows one of layouts I have already played on. This was an asymetric attacker-defender scenarios at 1500 pts. The terrain proved itself in every way intended - large bugs got enough cover/ LOS blocking, catwalks and large mountain provided true 3D feeling and finally Trygon can be completely obscured - in fact it could be placed directly under the highest bridge (which was on a typical Flyer base level).
|
|
|
|
|
2016/12/17 21:13:38
Subject: nou's Lava Terrain P&M blog
|
|
Growlin' Guntrukk Driver with Killacannon
|
Amazing, good tip on the gravel for indents.
|
|
|
|
|
|
2016/12/17 21:40:53
Subject: nou's Lava Terrain P&M blog
|
|

Shroomin Brain Boy
|
brilliant work...
i´ve been dreaming about a lava board for years...got me an airbrush recently and this makes painting more do-able...but please explain that lego knife conversion...maybe even a tutorial on how to build it? it looks really clever!!! i need to copy that^^
|
|
|
|
|
|
2016/12/17 21:51:02
Subject: nou's Lava Terrain P&M blog
|
|
Gargantuan Gargant
|
Amazing looking terrain board. I look forward to seeing how it progresses.
|
|
|
|
|
|
2016/12/17 22:39:56
Subject: nou's Lava Terrain P&M blog
|
|
Longtime Dakkanaut
|
Absolutely amazing work. A real beauty of a playing surface. It really is along the lines of what I am looking for. Thanks for linking me in.
|
See My Crazy Army plan here: http://www.dakkadakka.com/dakkaforum/posts/list/0/521618.page#5517409
2000 Point Armies
[40k] Orks - Kaptin Grimskragas Razorfangs; Tyranids - Hive Fleet Acidica; Astra Militarum - Murdochs 5th Armoured Detachment; Necron - Reclamation Legion of Tomb World Fordris; Inquisition - Ordos Hereticus Witchfinder Tasetus and Coven; Iron Hands - Taskforce of the Garrsak Clan Company; Alpha Legion - XII Ambush Cell, Loyalists of the Twin Primarchs; Aeldari - Guiding Light of Yarn Le'ath;
[Warhammer] Empire - Obsidian Knightly Order; Bretonnian - Vain Quest for the Grail, 11th Crusade of Araby; Dwarf - Throng of Kark Veng; Ogre Kingdoms - Wondrous Caravan of the Traveller and his Maneaters; Tomb Kings - Bronze Host of Ka-Sabar; Chaos Dwarf - Protectors of Hashuts Holy Places; High Elf - Dragonriders of Caledor; |
|
|
|
|
2016/12/18 21:16:19
Subject: nou's Lava Terrain P&M blog
|
|
Wicked Warp Spider
|
Thank you all for such kind words
I probably won't update this thread further for at least a month, but will probably post some photos of fully painted terrain when it's ready.
|
|
|
|
|
2017/12/10 17:53:32
Subject: Re:nou's (mostly) Terrain P&M blog; now Sector Mechanicus for Necromunda
|
|
Wicked Warp Spider
|
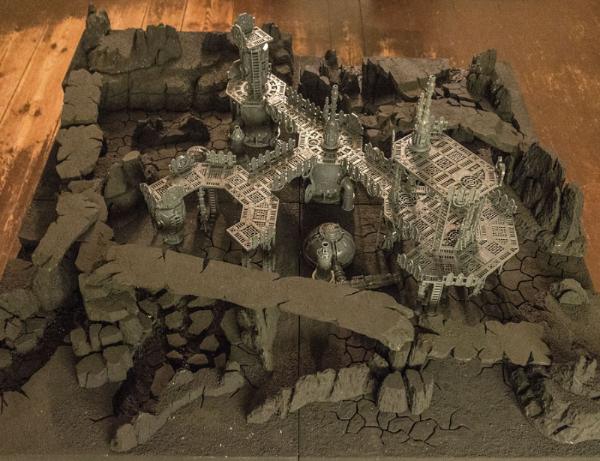
Ok, that was a seriously long break this time... Terrain is still unpainted as first SW:A happened and then summer season which is a lot less of a hobby time for me. But now I'm back with some new work.
First some photos of my Sector Mechanicus lot and example assembly. This is quite dense setup, as I had space for only two tiles at my bench, but it is only a bit more dense that my usual playing field (I use a lot of my rock terrain pieces for populating 4'x4' table).
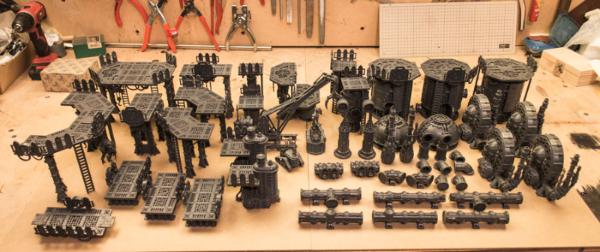
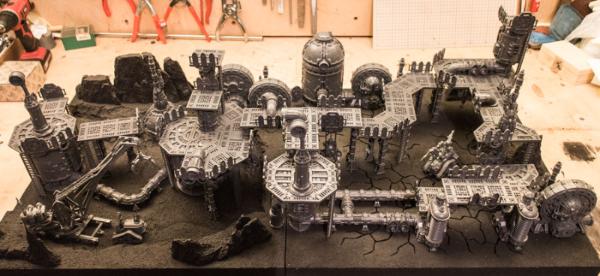
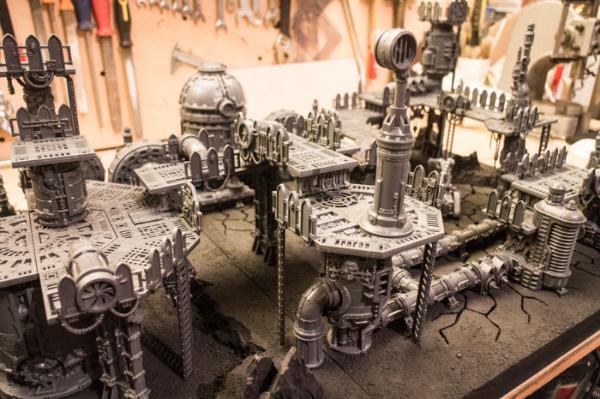
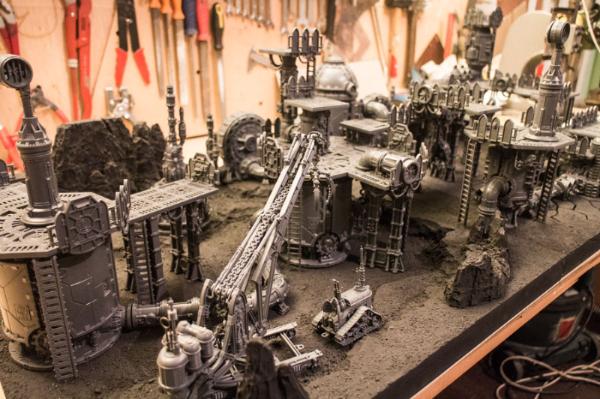
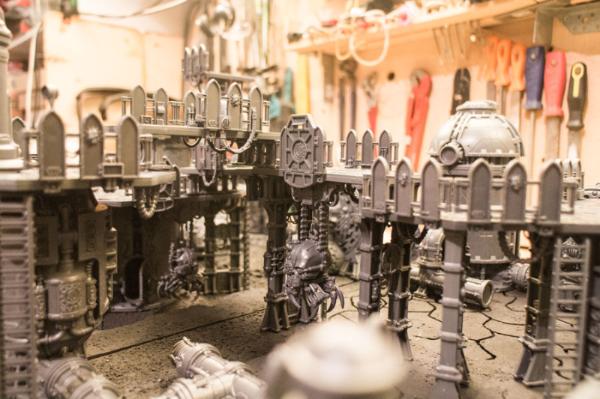
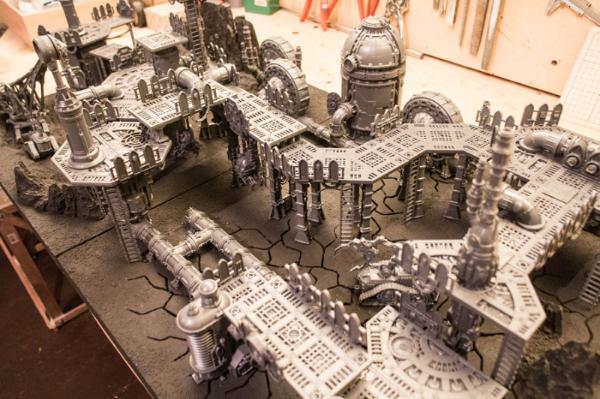
All those pieces on the first, unarranged picture, are permanently glued into subassemblies (except for ladders and platforms on large tanks and small boilers - those are detachable and interchangeable and I intend to keep them this way). As you may see, I cut some of supports at the top part and made small supports for straight walkways. This way I have plenty of cover on a single level as it is never same height all across and has small height variations along platforms. I also made couple of "half height" (2.5") supports from pipes and small Alchomite Stack features and lowered Plasma Regulators to match, so now I can achieve mid-levels. I plan to weight some pieces with smaller footprint so they are stable mid-game, but otherwise I'm happy with how modular this terrain set is at this moment.
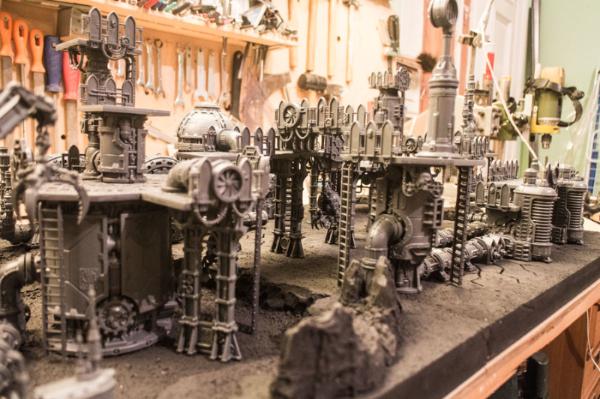
Just as a comparison, my early setup from two SW:A boxes with only 5" levels looked much more "sterile":
|
|
This message was edited 1 time. Last update was at 2017/12/10 17:56:03
|
|
|
|
|
2018/01/09 00:31:15
Subject: Re:nou's P&M blog; now some Eldar conversions
|
|
Wicked Warp Spider
|
"And now for something completely different", some Eldar conversions.
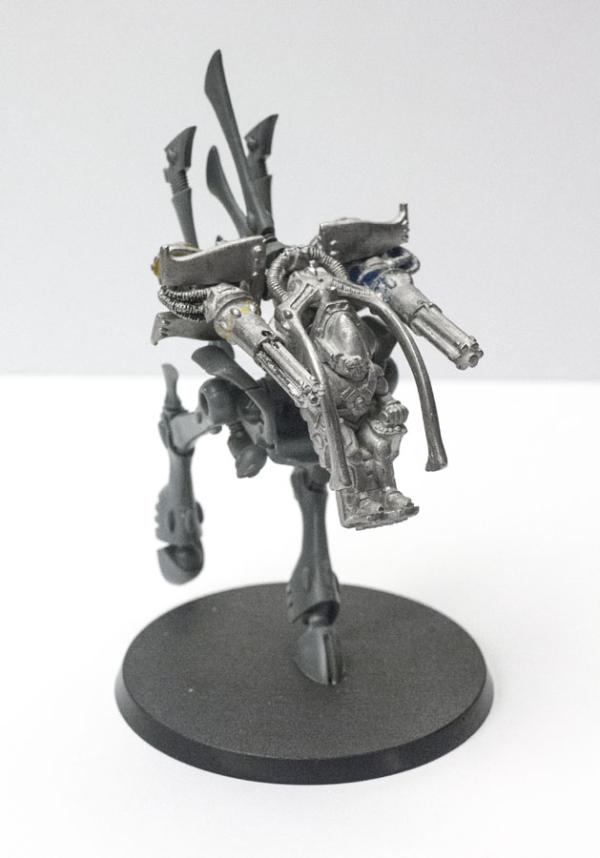
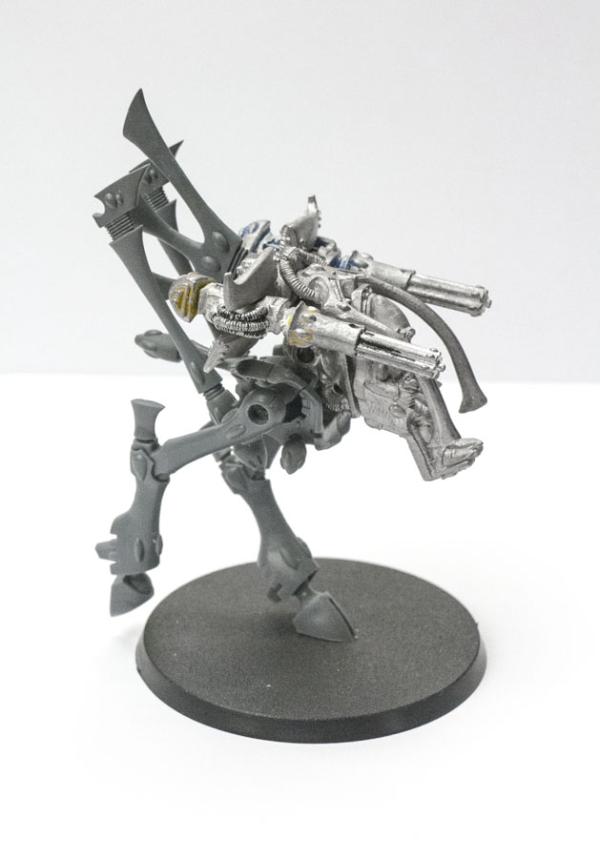
Starting with "updating" some of the oldest model I owned, 2nd ed era War Walker (second iteration, with updated pilot). While weapons, weapon mounts and raider of the original model still fit into current Eldar line quilte well (mostly because half of "current" line is nearly as old, but still  ), legs look like made from playschool clay and by someone pretty recently "graduated" from said playschool So, when I found out that my Wasp Walker came with entire lower asembly doubled decision was instant - vintage or not, old walker had to undergo a modernisation, and this is the result:
|
|
|
|
|
2018/01/09 01:35:59
Subject: Re:nou's P&M blog; now some Eldar conversions
|
|
[DCM]
Boom! Leman Russ Commander
|
|
"He fears his fate too much, or his desserts are small, who will not put it to a single touch; to win- or lose- it all."
Montrose Toast

|
|
|
|
|
2018/01/09 11:34:04
Subject: Re:nou's P&M blog; now some Eldar conversions
|
|
Wicked Warp Spider
|
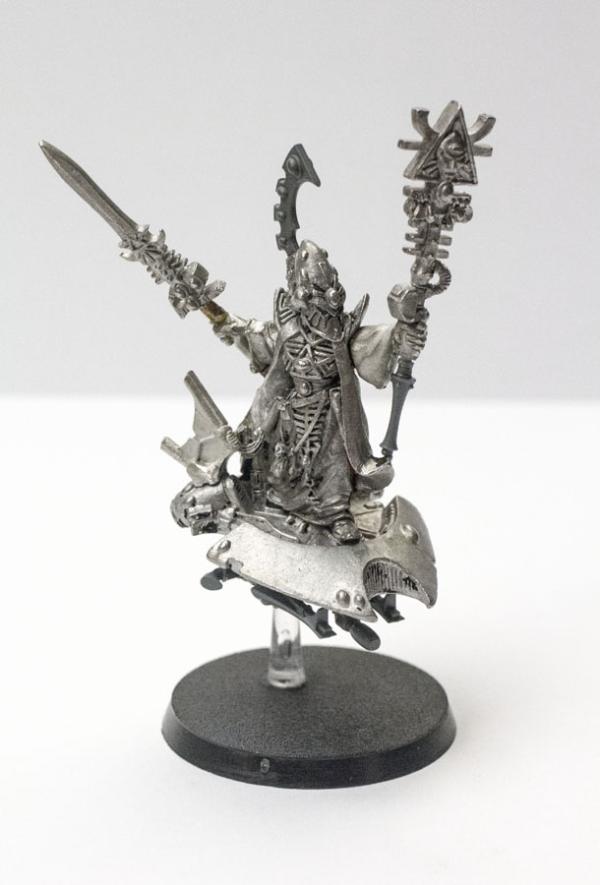
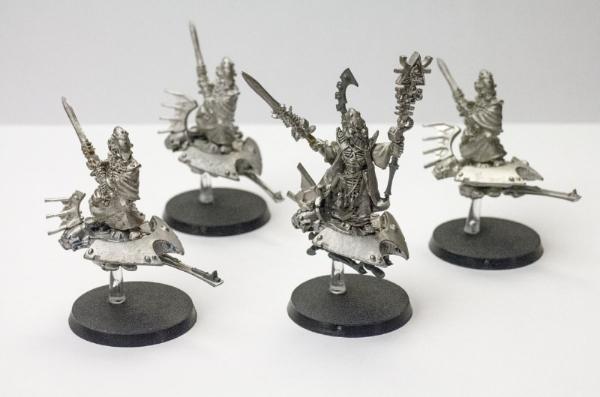
You give me too much credit here , it is nowhere near as detailed as some other boards out there. But I am indeed quite a patient person - sculpting all those ridges took somwhere around a week worth of full time job... Nevertheless, glad you like it! Thanks! Automatically Appended Next Post: Next up is another "Oldhammer" conversion. This time involving a model, that underwent the highest number of "plastic surgeries" from all models I own - my 2nd ed, original lead Eldrad, bought in '95. Back then it was the only farseer available in Poland (we hadn't had Rouge Trader here at all). So after just a few games, while being half painted, he lost both his hands and got meltagun and sword loadout. But not long after that 3rd ed happened and he had to drop melta and pick up a humble pistol; he also got his helmet fin replaced by a ponytail - as was fashionable back then At the same time I bought a lot of cloned warlocks to join him. Then I quit 40K for 15 years and when I came back, foot sloging farseer just didn't cut it anymore. He needed another revamp and he finally settled as a Skyrunner with a spear accompanied by skyrunner warlocks retinue. He also got his ghosthelm fin back (first iteration was scratchbuilt from plasticard, but then, in a nearly canibalistic manner, he regained a proper Eldrad fin from his newborn, younger self ).
|
|
This message was edited 1 time. Last update was at 2018/01/09 11:54:41
|
|
|
|
|
2018/01/09 21:49:16
Subject: nou's P&M blog; now some Eldar conversions
|
|
Walking Dead Wraithlord
|
Cool boarders. I like the use of BFG fins to add detail.
|
|
|
|
|
2018/01/09 22:36:57
Subject: nou's P&M blog; now some Eldar conversions
|
|
Crushing Black Templar Crusader Pilot
|
Love the terrain, it looks like a real place if you know what I mean.
Nice conversions on the pointy ears too
|
  
Relapse wrote:
Baron, don't forget to talk about the SEALs and Marines you habitually beat up on 2 and 3 at a time, as you PM'd me about.
|
|
|
|
|
2018/01/09 23:44:07
Subject: nou's P&M blog; now some Eldar conversions
|
|
Wicked Warp Spider
|
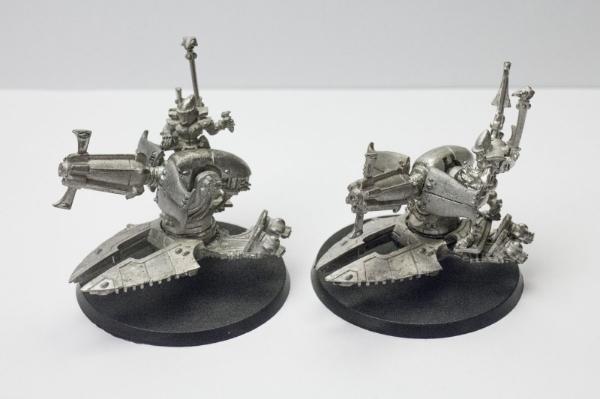
Thanks! I knew I wanted to do such boarders to recycle old standing psykers, but simply bashing a platform and a mini seemed... formally unconnected. Using those fins came after couple of failed tries with diferent "armour panel" options and they were "like a glove" fit. Saddly I had only those four sets to work with. I would rather have four different or at least three of the same variety for warlocks...
Next thing to show is rather simple, but is connected to those boarders: I really dislike two things about new plastic Support platforms - the shape of the guard and a bare minimum detail level, on both Support platforms and Guardian heavy weapon platforms. Old metal ones are IMHO a lot nicer overall. But they lacked the "real artillery with a real gunner" feel to them. Using guardian platforms as boards for psykers left me with a lot of spare weapon mounts, so in turn solved my dillema:
 Automatically Appended Next Post:
  IGtR= wrote: IGtR= wrote:Love the terrain, it looks like a real place if you know what I mean.
Nice conversions on the pointy ears too
Thanks! I hope it'll look even more convincing after I'll finally find time to paint it properly one day. It's been two years now since first part of this board was made and it is still primed only. I either don't have time to do this or prefer to play on it when I do have time. It is my primary play surface and reverting to improvised or flat table just takes too much "feel" away...
|
|
This message was edited 1 time. Last update was at 2018/01/09 23:50:08
|
|
|
|
|
2018/01/11 15:16:29
Subject: Re:nou's P&M blog; now some Eldar conversions
|
|
Wicked Warp Spider
|
Before moving to some more recent, plastic stuff let me take you all onto the journey to some pretty ancient history. I started my 40K adventure in 1995, just after 2nd ed Eldar Codex showed up. It was a time of contrasts in Poland - we just recently regained independence from communist regime (USSR troops left our country just two years earlier) and we had both recession and huge prosperity at the same time (different regions, different stories back then - I was fortunate to live in Warsaw which bloomed right after '89). First wargaming and MTG clubs and stores started opening, but supply was very, very poor and prices, compared to average income were huge. I was in a first year of high school back then, so had even less money to spend on this fresh, exciting hobby. I "fell in love" with D-Cannon as soon as I got my hands on the codex, but it was totally unobtainable. I was young, I had no real experience with proper scratchbuilding, but I had enthusiasm and sculpting clay for kids was readily available, so I made these two "beauties":
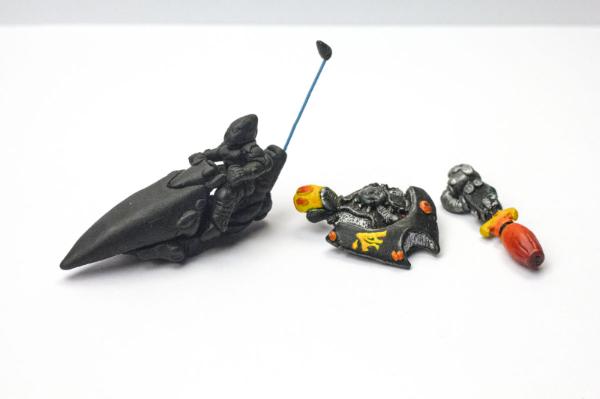
Platform was my first ever clay sculpt (sadly it didn't survived all those years intact), bike came second. Plastic Jetbikes were already available, so there was no way of getting my hands on a favourable, earlier design. I was pretty content with those, so tried something bigger next:
All of the above were made without ever seeing any one of them "in person" - they were made solely based on a catalogue pages from the back of the codex, so each one is slightly bigger and have some skewed proportions. I know, they are fugly, but I was 15 back then and was entirely self-taught. But strangely enough, this Dreadnaught caught attention at my gaming club and some people asked, if I can sculpt something for them. Sadly, I don't have any pictures of sold items, as those were times, when geting even a USSR made camera was beyond my reach, but in the next couple of months I made second Eldar Dreadnaught (in this dynamic pose from codex illustration), two Space Marine Dreadnaughts, a Screamer Killer and one Space Wolfes Terminator character, I don't remember his name - he was in a codex, but no mini was available, only one converted picture came up in some WD and our Space Wolves player asked me to make him for him (I got my Eldrad in exchange for this one). I was especially proud of Screamer Killer and this Space Wolf character. Those sculupts funded more than a half of my 2nd ed collection. The only thing I have to show from that "pinnacle period" of my abilities back then is this Harlequin bike canopy for plastic Jetbikes:
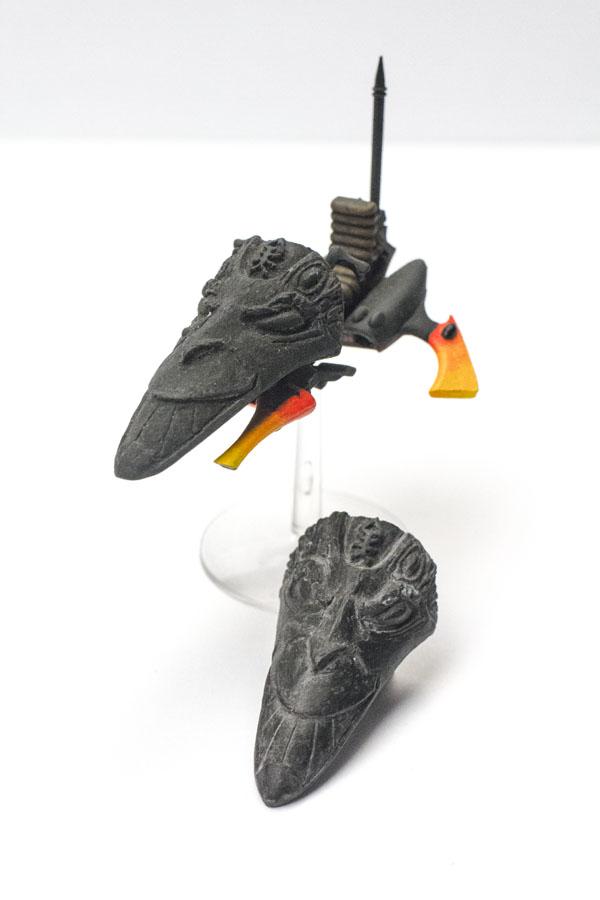
Lower one is the original sculpt and the mounted one is a negative pressed clay copy. Silicone molds, resins, green stuff etc were still hard to get and expensive and I never got to switch to those. This era ended for me with the advent of 3rd ed, when Harlequins and Exodites I worked on back then were no longer part of the game and I quit 40K altogether for next 15 years soon after. I sometimes wonder where I would be now (from a hobby perspective) if have never quit miniature sculpting... but all those early experiences didn't went to waste, just gradually evolved into my current profession as a graphic designer and now I'm slowly regaining my "minature-fu". One of my new year resolutions is getting properly aquainted with green stuff and go beyond kitbashing once again.
Edit: I just saw, that this is my 600th post on dakka. Perfect little celebration
|
|
This message was edited 1 time. Last update was at 2018/01/11 15:17:52
|
|
|
|
|
2018/01/12 17:01:23
Subject: Re:nou's P&M blog; now some Eldar conversions
|
|
Wicked Warp Spider
|
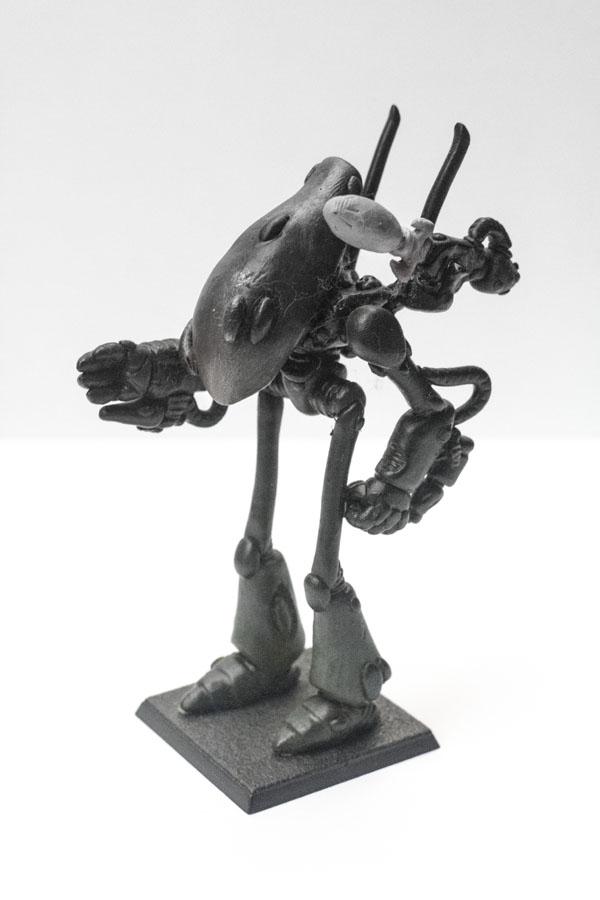
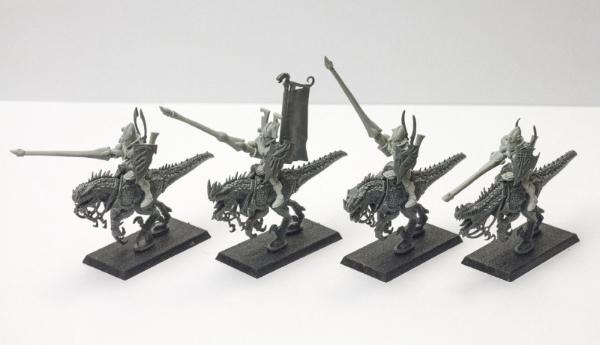
Now moving to modern stuff, bridged with just a little bit more of 2nd ed backstory. I mentioned working on Exodites near the end of 2nd ed. I always loved space-elfs-on-dinosaurs idea and when a nice Cold One conversion was featured in one of the WDs, I started working on mine. The result were those two. As you can see I was in the middle of painting when 3rd happened "overnight" and there was no point in finishing them anymore (at least not for tabletop purposes).
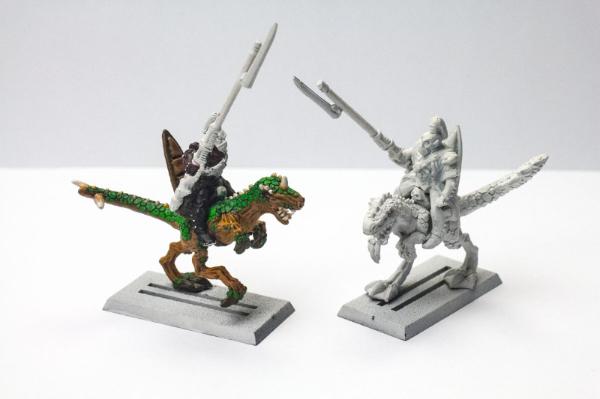
When I came back to this hobby and finished updating and filling up my Craftworlds army, I returned to Exodites. It is still a "classic" Cold Ones with Eldar riders approach (I don't really dig this Sylvaneth Wood Elves in Space concept), but side by side comparison shows exactly how much better GW miniatures become over my years of absence...
|
|
|
|
|
2018/01/12 22:25:22
Subject: nou's P&M blog; now some Eldar conversions
|
|
Walking Dead Wraithlord
|
I love 'em. I have a small pile of stripped metal Cold Ones I used as Exodites in 2nd just waiting for inspiration and time to be redone.
|
|
|
|
|
|
|