| Author |
Message |
 |
|
|
|
|
Advert
|
Forum adverts like this one are shown to any user who is not logged in. Join us by filling out a tiny 3 field form and you will get your own, free, dakka user account which gives a good range of benefits to you:
- No adverts like this in the forums anymore.
- Times and dates in your local timezone.
- Full tracking of what you have read so you can skip to your first unread post, easily see what has changed since you last logged in, and easily see what is new at a glance.
- Email notifications for threads you want to watch closely.
- Being a part of the oldest wargaming community on the net.
If you are already a member then feel free to login now. |
|
 |
2017/06/29 06:10:08
Subject: Could someone explain why the red was painted like this
|
|

Locked in the Tower of Amareo
|
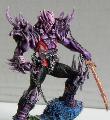
Searching for various ways to paint blood angels I came into this one that uses airbrush that uses steps I would never have dreamed up with. Could somebody explain what's going in?
http://www.themightybrush.com/how-to-paint-blood-angels-part-i/
Okay so first base coated with darkish red brown. So far so good.
Then looks like it's airbrushed with dark blue with only some recesses left as brown? Oookay?
Then white to where I suppose lightest parts are supposed to be?
Then optional steps where blue and white are strenghtened.
Then came step that blew me out. Yellow? Woot? Why yellow? I presume that above steps are what do shading/highlighting so idea is to keep the yellow coat light(least it becomes flat yellow).
Only after this comes the actual red.
So basically is the blue/white at first doing the shading so that as long as you don't paint yellow&red too strongly that provides shading? And why yellow before red?
|
2024 painted/bought: 109/109 |
|
|
 |
|
2017/06/29 07:05:09
Subject: Could someone explain why the red was painted like this
|
|

Dakka Veteran
|
The yellow makes the overlaying red much brighter and more vibrant
As for why it was painted like this? Christ knows. A base, wash, drybrush would achieve just as good a result.
|
|
This message was edited 1 time. Last update was at 2017/06/29 07:06:23
|
|
|
|
|
2017/06/29 07:48:27
Subject: Could someone explain why the red was painted like this
|
|

Three Color Minimum
|
The technique is called preshading. It's been in use among classical artists since the Italian renaissance. The idea is that you create a more natural shadow color if you first base coat with it's compliment (color opposite it on the color wheel). This is because when you mix two opposite colors you always get a very natural brown. By applying the compliment and then applying a very thin layer of your actual color over it, the shadows and highlights will appear very natural. I routinely preshade red with green, but I haven't seen it done with blue before. The principle of shading a warm color with a cool one is the same, however.
With regards to the yellow, it's because red looks less pink over yellow than it does over white (because red+white=pink). The result then, is a natural red highlight.
It's advanced color theory in action. The guy knows what he's doing.
|
“I do not know anything about Art with a capital A. What I do know about is my art. Because it concerns me. I do not speak for others. So I do not speak for things which profess to speak for others. My art, however, speaks for me. It lights my way.”
— Mark Z. Danielewski
|
|
|
|
|
2017/06/29 07:53:13
Subject: Could someone explain why the red was painted like this
|
|

Dakka Veteran
|
I know you're being flippant, but I don't think a simple base, wash, brybrush would produce anything like the same result.
What the guy is doing is preshading the miniature, so most of the shading and highlighting is done before the actual colour is applied. It's a nice technique if you have an airbrush, and quite commonly used, I believe. He's taking it a touch further with the use of blue in the shadows and yellow in the highlights to tint the red a bit. Acrylic paints are quite thin (assuming you Thin Your Paints enough) so you tend to see through the coats to what is underneath, so the final red has dark purpleish shadows and bright, orange-tinted highlights.
It's an interesting way of doing red, actually. I would try it out, if I had an airbrush.
Edit - yeah, what Nodri said. 
|
|
This message was edited 1 time. Last update was at 2017/06/29 07:55:20
|
|
|
|
|
2017/06/29 08:20:50
Subject: Could someone explain why the red was painted like this
|
|

Grizzled Space Wolves Great Wolf
|
It's probably easier to work backwards...
Final spray - red... duh, you want red.
2nd from final spray - yellow... makes the red more vibrant.
3rd from final spray - white highlight.... makes the yellow pop more on the raised surfaces which in turn makes the red pop more.
4th from final spray - blue... when red is sprayed over blue it gives it a more natural dark brownish purplish tone, because blue is in the crevices you end up with more depth to your final red. The odd thing here is that it kind of clashes with the yellow, I think the yellow was sprayed a bit too heavily which has made the blue turn brown. IMO the yellow should have been sprayed lighter and/or focused more on the raised areas.
5th from final spray - Vallejo red brown... I think this step isn't entirely necessary because it'll mostly be covered by the blue/white, but what it means is your transitions will be a bit more natural and if you happen to miss a spot with your blue or white coats it isn't the end of the world, because it'll still come in a more natural reddish tone.
That painting method isn't far off how I paint my Space Hulk Blood Angels, but I forego the yellow and stopped doing the red brown basecoat because I found it didn't make a huge amount of difference. But I do apply a black ink afterwards, maybe if I had of used yellow before my red it would have given enough contrast to not do the black ink at the end.
|
|
This message was edited 1 time. Last update was at 2017/06/29 08:24:49
|
|
|
|
|
2017/06/29 08:33:49
Subject: Could someone explain why the red was painted like this
|
|
Locked in the Tower of Amareo
|
Thanks for the explanations! Maybe I try this with my HH blood angels. Problem being figuring out colours that would be more or less appropriate. I can't seem to find easy place to order vallejo model air without ordering 40£+ at once and don't currently really need anything else and the ~5 bottles don't(luckily) cost quite that much
Interesting technique.
|
2024 painted/bought: 109/109 |
|
|
|
|
2017/06/29 09:13:39
Subject: Could someone explain why the red was painted like this
|
|
Dakka Veteran
|
AllSeeingSkink wrote:
That painting method isn't far off how I paint my Space Hulk Blood Angels, but I forego the yellow and stopped doing the red brown basecoat because I found it didn't make a huge amount of difference. But I do apply a black ink afterwards, maybe if I had of used yellow before my red it would have given enough contrast to not do the black ink at the end.
If you click through to parts two and three of the guide, he does use a black ink wash, among other things, a bit later in the process. Looking through the rest of the blog, the guy has a really exceptionally nice looking Blood Angels army.
|
|
|
|
|
2017/06/29 18:18:03
Subject: Could someone explain why the red was painted like this
|
|
Dakka Veteran
|
 feltmonkey wrote: feltmonkey wrote:I know you're being flippant, but I don't think a simple base, wash, brybrush would produce anything like the same result.
Im not trying to be flippant, actually. Sorry if it came off that way.
I understand the colour theory behind it, but I honestly don't see it showing through in the result enough to justify all the hassle.
|
|
|
|
|
|
2017/06/29 18:45:32
Subject: Could someone explain why the red was painted like this
|
|

Chaos Space Marine dedicated to Slaanesh
italy
|
The guy could as well have painted a fresco on that BA only to have it sprayed with red in step 5. He does know colour theory but clearly does not know how/when to use the proper techniques.
EDIT: he still paints 100% better than me. SO, yeah. Probably he got too much free time.
|
|
This message was edited 1 time. Last update was at 2017/06/29 18:46:17
|
|
|
|
|
2017/06/30 02:41:52
Subject: Could someone explain why the red was painted like this
|
|
Grizzled Space Wolves Great Wolf
|
 Neferhet wrote: Neferhet wrote:The guy could as well have painted a fresco on that BA only to have it sprayed with red in step 5. He does know colour theory but clearly does not know how/when to use the proper techniques.
What do you suggest the proper technique would be then? Neferhet wrote:EDIT: he still paints 100% better than me. SO, yeah. Probably he got too much free time.
Spraying those multiple colours doesn't actually take all that much time. Because of the way you're layering the sprays you can be a bit more haphazard about it and it won't adversely affect the results, in fact it can sometimes enhance the effect and make it look a bit more natural.
|
|
This message was edited 2 times. Last update was at 2017/06/30 02:43:42
|
|
|
|
|
2017/06/30 07:35:10
Subject: Could someone explain why the red was painted like this
|
|
Longtime Dakkanaut
|
The preshade / precolour with yellow and blue is a 'temperature contrast' trick.
In general, warm light sources such as sunlight tend to be yellowish, which cast a blue-looking shadow.
Red (especially airbrushed) though a strong tint is not particularly opaque, so preshades can show through very well.
It's a good enough technique.
|
|
|
|
|
|
2017/06/30 08:59:18
Subject: Could someone explain why the red was painted like this
|
|
Dakka Veteran
|
winterdyne wrote:The preshade / precolour with yellow and blue is a 'temperature contrast' trick.
In general, warm light sources such as sunlight tend to be yellowish, which cast a blue-looking shadow.
Red (especially airbrushed) though a strong tint is not particularly opaque, so preshades can show through very well.
It's a good enough technique.
And this can be replicated with a red base, purple wash, red drybrush, orange drybrush for an easier but comparable effect.
|
|
|
|
|
|
2017/06/30 09:12:44
Subject: Could someone explain why the red was painted like this
|
|
Chaos Space Marine dedicated to Slaanesh
italy
|
AllSeeingSkink wrote: Neferhet wrote:The guy could as well have painted a fresco on that BA only to have it sprayed with red in step 5. He does know colour theory but clearly does not know how/when to use the proper techniques.
What do you suggest the proper technique would be then?
Neferhet wrote:EDIT: he still paints 100% better than me. SO, yeah. Probably he got too much free time.
Spraying those multiple colours doesn't actually take all that much time. Because of the way you're layering the sprays you can be a bit more haphazard about it and it won't adversely affect the results, in fact it can sometimes enhance the effect and make it look a bit more natural.
Base dark Brown /Red, spray Red. Wash. The second and third part of the tut are excellent. Also, hisà tachnique is proper too. Just takes some more time and more spraying for the sake of it
|
|
This message was edited 2 times. Last update was at 2017/06/30 09:15:34
|
|
|
|
|
2017/06/30 10:41:20
Subject: Could someone explain why the red was painted like this
|
|
Grizzled Space Wolves Great Wolf
|
PossumCraft wrote:winterdyne wrote:The preshade / precolour with yellow and blue is a 'temperature contrast' trick. In general, warm light sources such as sunlight tend to be yellowish, which cast a blue-looking shadow. Red (especially airbrushed) though a strong tint is not particularly opaque, so preshades can show through very well. It's a good enough technique.
And this can be replicated with a red base, purple wash, red drybrush, orange drybrush for an easier but comparable effect.
It might be comparable, but absolutely not "easier" for a person who owns an airbrush. Automatically Appended Next Post: Neferhet wrote:Base dark Brown /Red, spray Red. Wash. The second and third part of the tut are excellent. Also, hisà tachnique is proper too.
Red sprayed over dark brown will look relatively dull on the raised areas and relatively too bright in the crevices. The point of preshading is to add a softer depth to the model than is achieved by a wash and the point of the yellow is that red is a weak colour so going over a yellow base will be more vibrant and require less coats. Just takes some more time and more spraying for the sake of it
Don't knock it until you've tried it. Preshading is a very quick technique that can be difficult to master but is not time consuming. It'll take me several hours to paint one of my Space Hulk Terminators, of which only about 2 minutes is preshading it. I probably spend about 10 minutes spraying each of them and it'd cut it down to maybe 7 to 8 minutes if I eliminated the preshading steps. Indeed one time when I tried working upwards to a red Blood Angel from a dark primer it took me waaaay longer than preshading because you need a lot of coats of red before you get a nice vibrant colour. Absolutely do not recommend that, preshading is way easier
|
|
This message was edited 2 times. Last update was at 2017/06/30 10:48:57
|
|
|
|
|
2017/06/30 11:04:54
Subject: Could someone explain why the red was painted like this
|
|
Longtime Dakkanaut
|
Also, generally not as smooth as a filtered airbrush colour, nor as fast if working in a batch.
Possumcraft, I've held off you a little bit in some other threads you've commented in, but you're consistently giving poor advice. If you think you have a better way, show proof, don't tell.
|
|
|
|
|
|
2017/06/30 11:18:00
Subject: Could someone explain why the red was painted like this
|
|
Locked in the Tower of Amareo
|
Well the article got me curious enough that I'll be giving it a shot especially as I found shop that sells vallejo model air(needed several of those colours or equilavents so might just as well get exact shade anyway. At least then if it's voefully different it's 100% because of my skill level and not at all because used shade is different! Easier to figure out how badly I'm doing it  )
First attempt or two is obviously going to be slower because it's first and because first I obviously won't be doing several at once and airbrushing I think is slower if doing just 1 model(cleaning up takes more time relatively than if you can paint many with same "cleaning" so to speak)
|
2024 painted/bought: 109/109 |
|
|
|
|
2017/06/30 11:25:01
Subject: Could someone explain why the red was painted like this
|
|
Longtime Dakkanaut
|
The trick with this technique is EVEN coats. You'll be working with quite thin paint, so don't have too much paint flow (don't pull back too far on the trigger) and keep your distance right.
Paint hitting the model should look just between satin and glossy, not wet (too much flow), or runny (usually too much flow and too close).
Have fun!
|
|
|
|
|
|
2017/06/30 11:32:22
Subject: Could someone explain why the red was painted like this
|
|
Locked in the Tower of Amareo
|
Thanks for the tip! That wasn't mentioned in the article so good you mentioned before I tried it and wondered where the hell this airbrush rookie went wrong AGAIN
|
2024 painted/bought: 109/109 |
|
|
|
|
2017/06/30 11:48:11
Subject: Could someone explain why the red was painted like this
|
|
Longtime Dakkanaut
|
Sure, there are three common things that can go wrong really, beyond the usual clogs, tip dry etc.
Paint going on too dry - this will look powdery and considerably lighter than you might expect. It will rub off easily and change colour significanlty darker when varnished. Usually a result of too high pressure, and /or too much distance.
Paint going on too wet - this will cause runs and 'spidering' as your paint hits the surface and then gets blown about by the airflow. Not fun.
Spatter when starting airflow. Press the trigger down and then pull back. Don't pull back then press - that lets a blob of paint build up in the nozzle which will then get launched at your model when the airflow hits it. Practice by aiming away from the model. :-)
|
|
|
|
|
|
2017/06/30 11:59:48
Subject: Could someone explain why the red was painted like this
|
|
Locked in the Tower of Amareo
|
First one hasn't been issue so far. Second one I'm constantly struggling with. Maybe my thinning ratio is too bad. Third one not straight up but similar issue when I stop by simply releasing airflow before stopping paintflow which results in splatter next time I press trigger down. That I solved basically by aiming elsewhere when I press trigger next time!
While I'm at it could you tell what is causing this particular issue that often plagues me. Basically paint stops coming out UNLESS I do pumping effect with the trigger while pressing it down at which point there comes small amount and then stops.
Biggest worry is always I have done permanent damage but good thing is after clean up it usually works. Seems to happen with GW paints more than vallejo so I PRESUME it's simply too little thinned paint? Especially since after removing paint and doing it again usually solves(though simply adding more thinner doesn't seem to solve it which I presume is because too thick paint is too much lodged in so I need to wash all out before trying again)
|
2024 painted/bought: 109/109 |
|
|
|
|
2017/06/30 12:52:29
Subject: Could someone explain why the red was painted like this
|
|
Beast of Nurgle
u.k
|
tneva82 wrote:First one hasn't been issue so far. Second one I'm constantly struggling with. Maybe my thinning ratio is too bad. Third one not straight up but similar issue when I stop by simply releasing airflow before stopping paintflow which results in splatter next time I press trigger down. That I solved basically by aiming elsewhere when I press trigger next time!
While I'm at it could you tell what is causing this particular issue that often plagues me. Basically paint stops coming out UNLESS I do pumping effect with the trigger while pressing it down at which point there comes small amount and then stops.
Biggest worry is always I have done permanent damage but good thing is after clean up it usually works. Seems to happen with GW paints more than vallejo so I PRESUME it's simply too little thinned paint? Especially since after removing paint and doing it again usually solves(though simply adding more thinner doesn't seem to solve it which I presume is because too thick paint is too much lodged in so I need to wash all out before trying again)
One trick I learned from next level painting on youtube, is to have an old toothbrush nearby with some airbrush cleaner on it and every couple of minutes, scrub the tip of your airbrush seems to at the very least reduce clogging. Sometimes though if it is going really well I get a bit over confident and do not do this then end up getting a splatter.
|
|
|
|
|
2017/06/30 13:45:47
Subject: Could someone explain why the red was painted like this
|
|
Longtime Dakkanaut
|
What you're describing (paint stopping unless you 'pump' the nozzle when it clears for a bit) is tip dry. Basically dry paint has built up around your nozzle and on the tip of the needle. Not a lot to counteract this other than drying retardant / flow improver, and lowering the pressure a little bit. Every so often you'll need to wipe the tip clean.
Don't do this without pulling the needle back - bending the needle is easy to do and will result in more problems! I use a cotton bud and airbrush cleaner for the same thing - effectively I'm forcing cleaner/thinner in through the nozzle to loosen the clog. Quick spray off-model to make sure it's coming through clear again and away I go. I do find that some paints do this worse than others, in particular red-browns with heavy pigment. Sometimes it's a case of finding a brand (of that particular colour) that behaves more like what you want.
With the runs, you should practice be able to spray neat water, or neat thinner and not have it run. The thinner the paint, the less flow and pressure you need.
|
|
|
|
|
|
2017/06/30 14:47:41
Subject: Could someone explain why the red was painted like this
|
|
Beast of Nurgle
u.k
|
winterdyne wrote:What you're describing (paint stopping unless you 'pump' the nozzle when it clears for a bit) is tip dry. Basically dry paint has built up around your nozzle and on the tip of the needle. Not a lot to counteract this other than drying retardant / flow improver, and lowering the pressure a little bit. Every so often you'll need to wipe the tip clean.
Don't do this without pulling the needle back - bending the needle is easy to do and will result in more problems! I use a cotton bud and airbrush cleaner for the same thing - effectively I'm forcing cleaner/thinner in through the nozzle to loosen the clog. Quick spray off-model to make sure it's coming through clear again and away I go. I do find that some paints do this worse than others, in particular red-browns with heavy pigment. Sometimes it's a case of finding a brand (of that particular colour) that behaves more like what you want.
With the runs, you should practice be able to spray neat water, or neat thinner and not have it run. The thinner the paint, the less flow and pressure you need.
i hope that the poster of this thread will not mind me semi hijacking and asking winterdyne a question. What tips would you suggest for me when taking on step 4 of this ... http://elementgames.co.uk/painting-tutorials/264-1-day-daemons-how-to-paint-plague-drones I made a bit of a mess last time, I tried to fix it and then had to paint strip and re-prime. Even things that might seem obvious to you might help me, also would you say step 10 was airbrushed? Thanks and sorry to the original poster .
|
|
|
|
|
2017/06/30 16:04:52
Subject: Could someone explain why the red was painted like this
|
|
Longtime Dakkanaut
|
Low pressure, thin paint, very low flow, quite close distance. Build the colour up gradually. As I said, you don't want runs, you want the colour to go on looking just slightly glossy and quite transparent.
For step 10, possibly - again, what you do by glazing can be done by doing an airbrush filter if you're not too concerned about overspray (not an issue in the situation pictured). This said, could be quicker/more convenient with a 1/4" filbert and just glazing it on.
|
|
|
|
|
|
2017/06/30 19:46:32
Subject: Could someone explain why the red was painted like this
|
|
Dakka Veteran
|
winterdyne wrote:
Possumcraft, I've held off you a little bit in some other threads you've commented in, but you're consistently giving poor advice. If you think you have a better way, show proof, don't tell.
?
Not really sure I'm even consistently *giving* any advice.
Don't have any spare marines to paint right now, but below are some old ones done red, drybrushing on the SM and layering on the AdMech.
Red base, black wash, red drybrush, orange drybrush.
Shown not told.
|
|
|
|
|
|
2017/06/30 22:47:24
Subject: Could someone explain why the red was painted like this
|
|
Longtime Dakkanaut
|
Yeah... not the same look at all, especially on large flat areas.
These are preshade and filter jobs, post washed and edged pretty much as per the tutorial in the OP.
|
|
|
|
|
|
2017/07/01 02:57:15
Subject: Could someone explain why the red was painted like this
|
|
Dakka Veteran
|
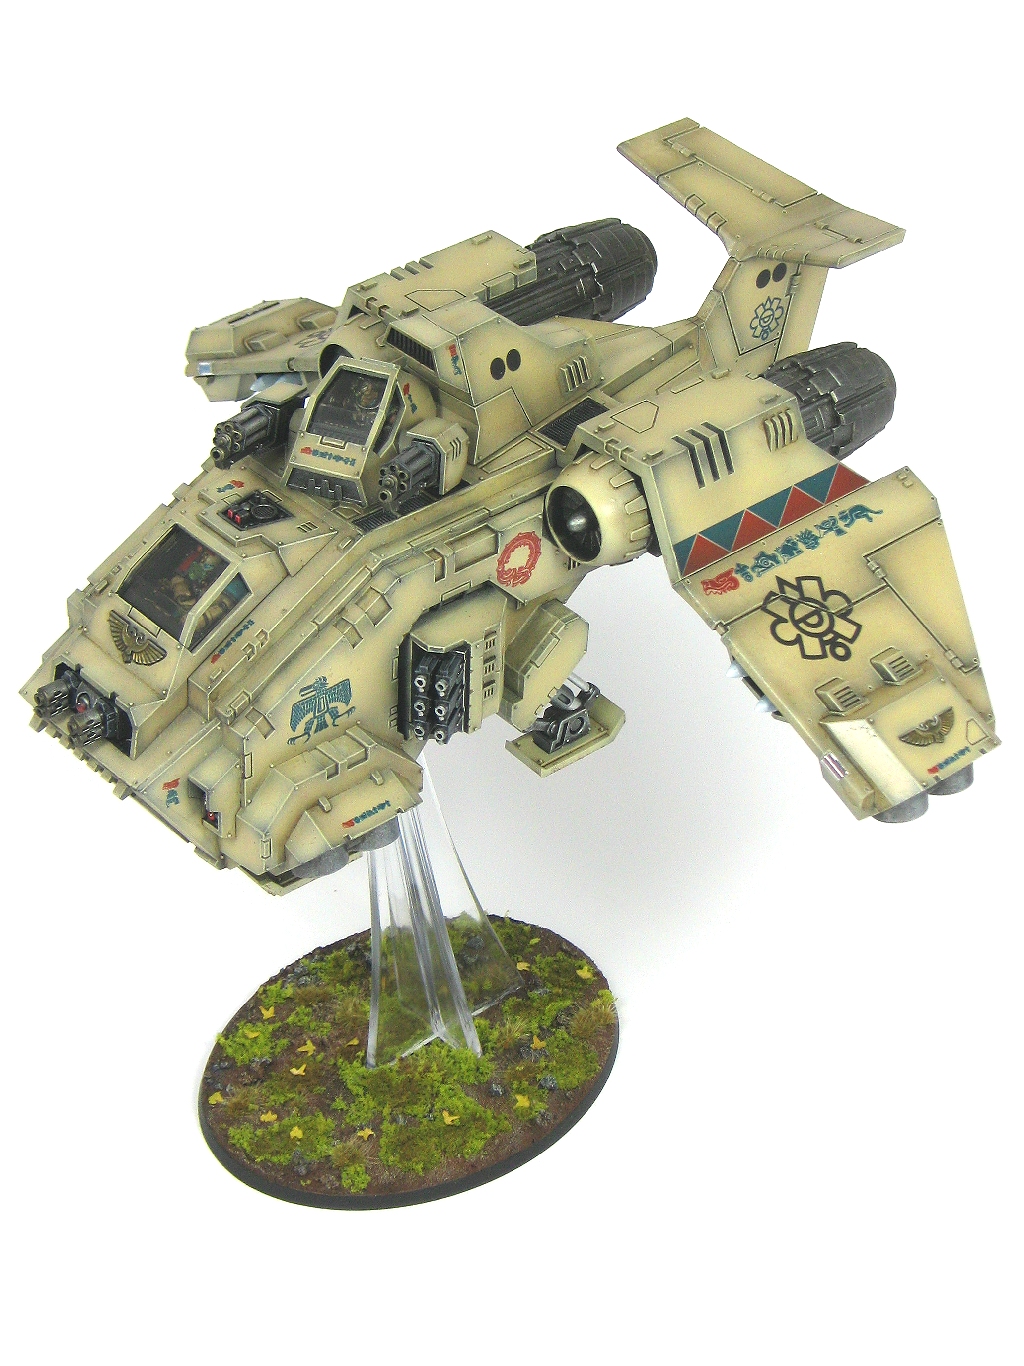
Yeah, but see that looks fantastic, and you can see where all the work has gone into it.
With the BA in the OP, it doesnt show up.
The reds I've linked are old things from my HDD, not painted to achieve the same effect, btw, just all I have on hand.
I'm not against using an airbrush to paint, but the OP question was about why so many colours and layers on the BA he linked.
I just personally don't feel the result shows the layers used, not anything like that flyer above.
|
|
|
|
|
|
2017/07/01 13:32:39
Subject: Could someone explain why the red was painted like this
|
|
Chaos Space Marine dedicated to Slaanesh
italy
|
AllSeeingSkink wrote:
Automatically Appended Next Post:
Neferhet wrote:Base dark Brown /Red, spray Red. Wash. The second and third part of the tut are excellent. Also, hisà tachnique is proper too.
Red sprayed over dark brown will look relatively dull on the raised areas and relatively too bright in the crevices. The point of preshading is to add a softer depth to the model than is achieved by a wash and the point of the yellow is that red is a weak colour so going over a yellow base will be more vibrant and require less coats.
Just takes some more time and more spraying for the sake of it
Don't knock it until you've tried it. Preshading is a very quick technique that can be difficult to master but is not time consuming. It'll take me several hours to paint one of my Space Hulk Terminators, of which only about 2 minutes is preshading it. I probably spend about 10 minutes spraying each of them and it'd cut it down to maybe 7 to 8 minutes if I eliminated the preshading steps.
Indeed one time when I tried working upwards to a red Blood Angel from a dark primer it took me waaaay longer than preshading because you need a lot of coats of red before you get a nice vibrant colour. Absolutely do not recommend that, preshading is way easier
That is indeed a sensible advice. my concerns are two: i don't own (and not going to buy) an airbrush, so maybe to e it will take more time? and maybe the whole preshading technique is better on large areas than on small models?
|
|
|
|
|
2017/07/01 14:48:24
Subject: Could someone explain why the red was painted like this
|
|
Beast of Nurgle
u.k
|
im not sure if all the work on the blood angel shows through in the final result,but it does look really good. As does the flyer and the things that possumcraft painted, not sure how that flyer doesnt fall over. is the base weighted?
p.s what type of filbert would you suggest in terms of what kinds of fibres or hairs?
|
|
|
|
|
2017/07/01 17:59:07
Subject: Could someone explain why the red was painted like this
|
|
Rampaging Furioso Blood Angel Dreadnought
|
You could ask him... he's LutherMax on B&C.
Honestly I don't think all of that preshading makes that much of a difference here in this particular case, but I'll say that ALL of LutherMax's minis look fantastic; his entire Blood Angel's army looks amazing.
|
|
|
|
|
|
|
|
