| Author |
Message |
 |
|
|
|
|
Advert
|
Forum adverts like this one are shown to any user who is not logged in. Join us by filling out a tiny 3 field form and you will get your own, free, dakka user account which gives a good range of benefits to you:
- No adverts like this in the forums anymore.
- Times and dates in your local timezone.
- Full tracking of what you have read so you can skip to your first unread post, easily see what has changed since you last logged in, and easily see what is new at a glance.
- Email notifications for threads you want to watch closely.
- Being a part of the oldest wargaming community on the net.
If you are already a member then feel free to login now. |
|
 |
2017/08/01 01:40:44
Subject: Terrain - Easy-peasey Hedges
|
|

[MOD]
Making Stuff
|
From the Comm Guild blog:
 - by Iain Wilson - by Iain Wilson
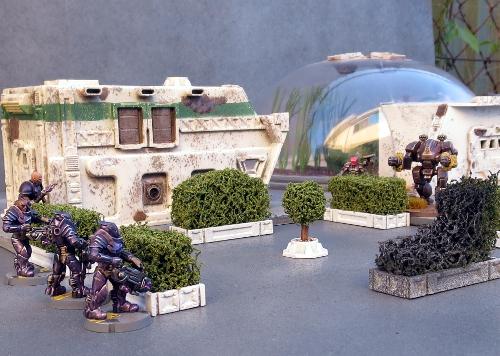
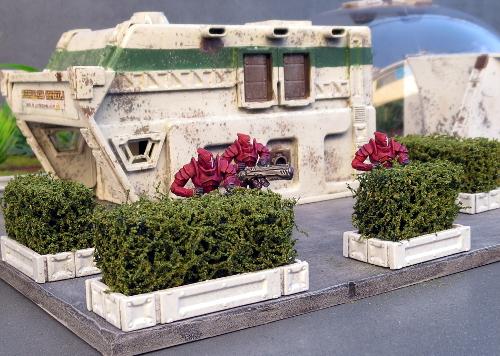
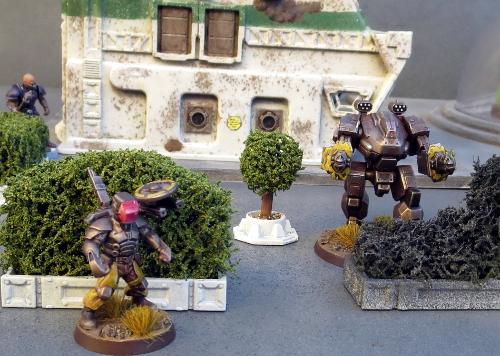
Stands of forest or jungle trees are staples of most of our gaming collections. Sometimes, though, you want your greenery to suit a more civilised warzone, and for that, you just can't go past the humble hedge. So this week, we're looking at a quick and easy way to churn out some shrubby scatter terrain.
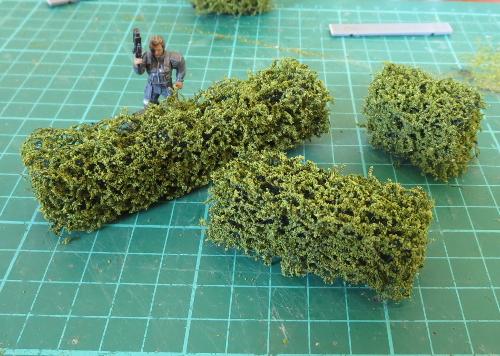
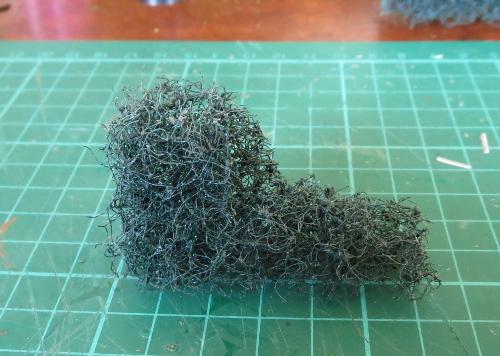
We start with a thick kitchen scourer. For a standard green hedge, you would ideally want a dark green or black scourer, although you could easily use other colours to make alien hedges. The scourer I'm using here is about 20mm thick, and has a really coarse texture. You could use thinner scourers by gluing a couple together, but that may wind up with a visible seam line.

Cut the scourer into strips using a sharp knife or a fine saw. The width of the strips is up to you, depending on how tall you want to make your hedges.

Next, paint the strips of scourer with some PVA glue. Work the glue into the weave of the scourer a little, but try to not leave any big lumps of glue right on the surface, as that may make the outside of your hedge a little blobby.
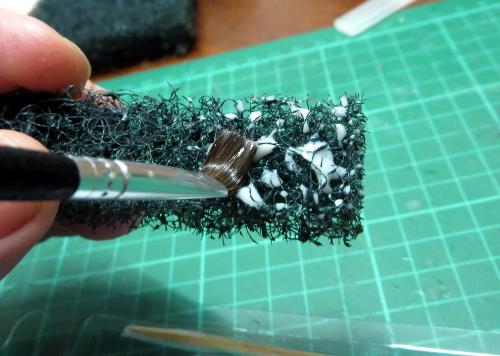
Finally, scatter flock over the glue. You'll get the best results here with a fine grade flock, which you should be able to find in most gaming stores' modeling supply sections or anywhere that sells model trains. Don't use the chunkier, dyed-sawdust stuff - it will just wind up looking like dyed sawdust stuck to a sponge.
Let the glue dry, and you could easily use your hedges as is to stick onto terrain pieces or scatter around a table. For a slightly more urban look, you can add some boxwork to them using strips of plasticard or the support struts from the Maelstrom's Edge terrain sprue. For the below, I've used a strip of 5mm masonite as a base, which will help to give the hedge section a little more weight.
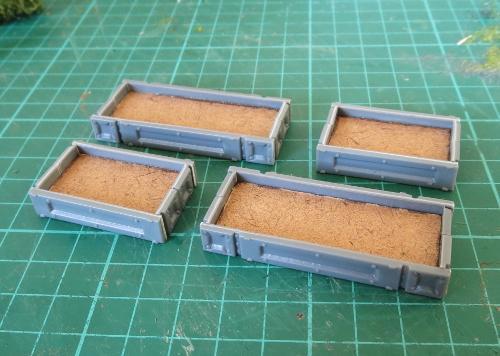
Paint the boxwork up however suits your terrain collection, and then glue the hedges in place with some superglue or PVA glue.
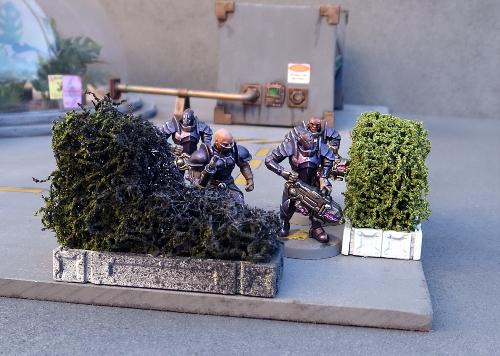
You can mix things up a little by making sections in different heights, to create some lower cover and some full line-of-sight-blocking barriers. Battle damage can be added by cutting or tearing away pieces of the scourer before adding the flock.
To create a burnt effect, I left the flock a bit patchy around the damaged part of the hedge, and once the glue was dry gave it a quick spray with some flat black, followed by a light dusting of flat grey.
If you want to get really carried away, you can also shape the scourer using a knife or some sturdy scissors and create some topiary features.
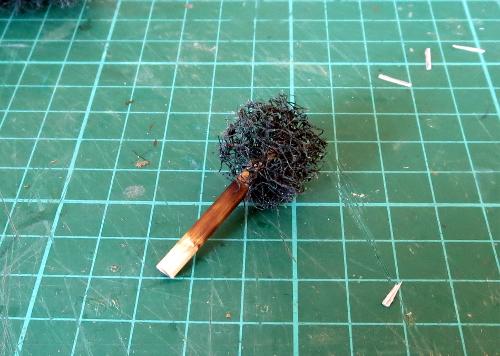
The trunk of this ball topiary was made from a short piece of a wooden skewer, dyed with a little brown ink and then glued into the scourer ball with superglue.
If this all has your green thumb itching, grab yourself some scourers and hedge away! As always, feel free to share your creations on the Comm Guild Facebook page - first one to post a miniature garden maze for their gaming table wins a cookie! (Or possibly just the adulation of the masses and fleeting fame...)
You can find the full range of Maelstrom's Edge models, including the ever-useful terrain sprue, in the Maelstrom's Edge webstore here, and a collection of modeling articles, tutorials and walkthroughs of a wide range of different building and miniature projects in the article roundup here.
|
|
|
|
 |
|
2017/08/01 09:17:48
Subject: Re:Terrain - Easy-peasey Hedges
|
|

Elite Tyranid Warrior
|
 Thank you!
|
|
|
|
|
|
2017/08/01 09:41:35
Subject: Re:Terrain - Easy-peasey Hedges
|
|

Experienced Maneater
|
Awesome, definetely have some use for this.
|
|
|
|
|
|
2017/08/01 11:02:41
Subject: Re:Terrain - Easy-peasey Hedges
|
|

Mekboy Hammerin' Somethin'
|
Wow this looks so easy! I especially like the damaged and burnt hedge sections.
Thanks for the tips.
|
|
|
|
|
2017/08/01 18:48:39
Subject: Terrain - Easy-peasey Hedges
|
|
Beast of Nurgle
u.k
|
Ive seen this done with horse hair, but those look quite uncared for but here they look like somebody gives a gak about them and cares for them ha ha.
|
|
|
|
|
2017/08/01 19:15:40
Subject: Terrain - Easy-peasey Hedges
|
|
Using Inks and Washes
|
Another really helpful tutorial, thanks! I'll have to try some of these.
|
|
|
|
|
2017/08/02 18:03:08
Subject: Re:Terrain - Easy-peasey Hedges
|
|
Yu Jing Martial Arts Ninja
|
Brilliant, and precisely what I was looking for - thanks dude
|
|
|
|
|
2017/08/03 09:42:05
Subject: Terrain - Easy-peasey Hedges
|
|
Basecoated Black
|
Fantastic and simple, will be making some hedges now.
|
|
|
|
|
|
2017/08/04 01:52:55
Subject: Terrain - Easy-peasey Hedges
|
|

Inquisitorial Keeper of the Xenobanks
|
These are awesome.
Winter time Saturday evening whiskey and soda project -
can't wait!
|
. |
|
|
|
|
2017/08/07 00:31:04
Subject: Terrain - Easy-peasey Hedges
|
|
Stealthy Warhound Titan Princeps
|
I really should do this for topiary trees.
|
|
|
|
|
2017/08/09 20:45:29
Subject: Terrain - Easy-peasey Hedges
|
|

Adolescent Youth on Ultramar
Rome
|
Amazing man very inspire
|
|
|
|
|
|
2017/08/10 07:21:03
Subject: Terrain - Easy-peasey Hedges
|
|
Three Color Minimum
In the casting shack.
|
I'm going to have to steal this. Something like this would look great on a ministorum world.
|
|
This message was edited 1 time. Last update was at 2017/08/10 07:21:11
“I am free, no matter what rules surround me. If I find them tolerable, I tolerate them; if I find them too obnoxious, I break them. I am free because I know that I alone am morally responsible for everything I do.” ― Robert A. Heinlein
"Yar har fiddle-dee-dee, being a pirate is alright with me!
I'll do what I want 'cause a pirate is free, I am a pirate!" |
|
|
|
|
2017/08/10 10:51:12
Subject: Re:Terrain - Easy-peasey Hedges
|
|
Virus Filled Maggot
|
Thank you for posting this.
I can't wait to go scourer shopping and start making some hedges!
|
|
|
|
|
2017/08/11 00:28:11
Subject: Terrain - Easy-peasey Hedges
|
|
Three Color Minimum
In the casting shack.
|
I might try doing it with brown flock to represent dead hedges.
|
“I am free, no matter what rules surround me. If I find them tolerable, I tolerate them; if I find them too obnoxious, I break them. I am free because I know that I alone am morally responsible for everything I do.” ― Robert A. Heinlein
"Yar har fiddle-dee-dee, being a pirate is alright with me!
I'll do what I want 'cause a pirate is free, I am a pirate!" |
|
|
|
|
2017/08/11 10:23:40
Subject: Re:Terrain - Easy-peasey Hedges
|
|

Veteran Wolf Guard Squad Leader
|
Really good results -it never would have crossed my mind to try this. Thanks
|
I let the dogs out |
|
|
|
|
2017/08/11 13:57:59
Subject: Terrain - Easy-peasey Hedges
|
|
Krazed Killa Kan
|
Have an Exalted!
|
|
|
|
|
2017/08/11 15:04:37
Subject: Terrain - Easy-peasey Hedges
|
|
Highlord with a Blackstone Fortress
Adrift within the vortex of my imagination.
|
This is not a tip, it's a gaming lifehack.
Inspiratonal.
|
n'oublie jamais - It appears I now have to highlight this again.
It is by tea alone I set my mind in motion. By the juice of the brew my thoughts aquire speed, my mind becomes strained, the strain becomes a warning. It is by tea alone I set my mind in motion. |
|
|
|
|
2017/08/13 00:43:28
Subject: Terrain - Easy-peasey Hedges
|
|
Regular Dakkanaut
|
Thank you for sharing this, it's quite helpful.
|
|
|
|
|
2017/08/13 16:47:40
Subject: Terrain - Easy-peasey Hedges
|
|
Nurgle Chosen Marine on a Palanquin
|
An even quicker way to make similar hedges is to use a baggie of flock and Rustoleum Rusty Metal Primer. Fill baggie about 1/3 full of flock. Spray hedge with Rusty Metal Primer (reddish brown) and while its still wet, throw it into the bag and shake the bag. Take the hedge out of the bag and repeat the process as needed.
T
|
|
|
|
|
|
|


 &
& 
 6.000 Pt Ultramarines
