| Author |
Message |
 |
|
|
|
|
Advert
|
Forum adverts like this one are shown to any user who is not logged in. Join us by filling out a tiny 3 field form and you will get your own, free, dakka user account which gives a good range of benefits to you:
- No adverts like this in the forums anymore.
- Times and dates in your local timezone.
- Full tracking of what you have read so you can skip to your first unread post, easily see what has changed since you last logged in, and easily see what is new at a glance.
- Email notifications for threads you want to watch closely.
- Being a part of the oldest wargaming community on the net.
If you are already a member then feel free to login now. |
|
 |
2017/08/01 11:57:09
Subject: Warhound Scout Titan Level 2 Table Top Paint job
|
|

Been Around the Block
|
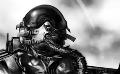
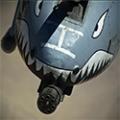
Just some stuff i have been working on over the last 2 weeks, Tell me what ya Think
|
Like what you see, looking for a commission, msg me
Facebook: www.facebook.com/Stormhammerpainting
Website: jisturrock.wix.com/stormhammerpainting
Email: mueskulls@gmail.com |
|
|
 |
|
2017/08/01 12:10:48
Subject: Warhound Scout Titan Level 2 Table Top Paint job
|
|
Powerful Phoenix Lord
|
Your work is better on the larger things, more crisp. This is nothing spectacular, but a very solid, crisp tabletop paintjob. The metallics still feel a bit heavy. Nice work.
|
|
|
|
|
2017/08/01 12:26:05
Subject: Warhound Scout Titan Level 2 Table Top Paint job
|
|
Douglas Bader
|
 Muggami wrote: Muggami wrote:Just some stuff i have been working on over the last 2 weeks, Tell me what ya Think
Honestly? Not impressive for a commission service. The paint job is very basic, especially on the interior, with minimal shading/weathering/etc to justify paying for a commission project. And, worse, you've left casting flaws untouched, which is a pretty serious failure if you're trying to show off your professional skills. It's not worth paying lots of money for, and who is going to take a cheap $10 paint job on a $500 titan?
|
|
This message was edited 1 time. Last update was at 2017/08/01 12:26:36
There is no such thing as a hobby without politics. "Leave politics at the door" is itself a political statement, an endorsement of the status quo and an attempt to silence dissenting voices. |
|
|
|
|
2017/08/01 14:35:47
Subject: Warhound Scout Titan Level 2 Table Top Paint job
|
|
Moustache-twirling Princeps
|
Peregrine nailed it. No offense, but I think you need to take a lot of time off from commissions and work on your basics. Watch some APJ, BuyPainted, and GW painting videos. Read up on the subject a bit more and probably invest in better tools (good brushes mean less messy brushwork, better airbrush means less sputters and more control etc).
Also... where are the Void Shield generators?
|
|
|
|
|
|
2017/08/01 15:03:19
Subject: Warhound Scout Titan Level 2 Table Top Paint job
|
|

Been Around the Block
|
Nice model for sure, and I like the glow effects in the cockpit. really solid clean work. Commissions are always hard to judge because it's down to whoever is paying for it, how much time they want you to put in basically, if your client is happy then it's a success. Don't take any criticism too harshly on here it's all constructive and aimed at helping you.
|
|
|
|
|
2017/08/01 15:21:21
Subject: Warhound Scout Titan Level 2 Table Top Paint job
|
|
Longtime Dakkanaut
|
Well, if I remember rightly it took me about a week to build a warhound, being unfamiliar with the kit at the time, including fixing up some flaws, starting from a decent cast.
Let's not go into the time it took to get that decent starting point beyond saying it was many weeks of back and forth. I'd certainly have rejected that head piece from the look of it - that's a nasty mould slip, and it'd take a long time and a fair amount of skill to fix properly.
I hope you properly pinned and cored it. Warhounds sag horribly if you don't. I'd especially be wary of the legs splayed like that. Specifically, that pose is putting a lot of torque on the middle leg pieces which are only about 1/4" x 1/2" (12mm x 6mm) at their weakest point. In warm conditions they'll twist and the model will topple nose down, lifting the outer toes on the feet, possibly breaking the inner ones. I speak from painful experience, having been working on one in a conservatory in temps of around 35C. You can alleviate this by basing it and securely fastening the feet, but you'll still get the forward tilt and twist of the middle legs if they've not got good strong pins right the way through. I put two lengths of 3mm steel rod in (mine was entirely supported by that one leg, though). Still twisted a bit. Horrid. Would probably have been better to use 4 or 5 lengths of 1.2mm brass rod.
To those unfamiliar with the Warhound, the torso and weapons together weigh around 1.5kg. It's a lot of weight on two quite thin strips of resin. The Chaos Warhound on show at Warhammer World has exactly this kind of sag going on, so it's not a specific dig I'm making here - just pointing out a horrid flaw in the kit design itself.
So, that leaves about a week for the paintjob... not nearly enough time for me.
I've seen neater work done in the same time, but to temper some expectations you're never going to get a high end finish in that time, in fact I think realistically you're not going to get much more than is shown.
More attention should really have been paid to masking to avoid some pretty ugly overspray in places. I suppose a few external details (lenses on weapons etc) and neatening up, little things to draw interest away from the generally flat colour gradients.
Have a look at some of Mathieu Fontaine and Tommy Soule's work. Following the logs you get a good idea of staging and what you should be aiming for things to look like at each stage. You can then figure out what time is needed for something you're happy with.
With commission work the budget is what determines what time gets to be spent at the end of the day, but as a commission painter you also need to be able to tell your client when a timescale or budget they're proposing is likely to lead to lower standard of finish.
|
|
|
|
|
|
2017/08/01 23:26:52
Subject: Warhound Scout Titan Level 2 Table Top Paint job
|
|
Been Around the Block
|
 sonny2dap wrote: sonny2dap wrote:Nice model for sure, and I like the glow effects in the cockpit. really solid clean work. Commissions are always hard to judge because it's down to whoever is paying for it, how much time they want you to put in basically, if your client is happy then it's a success. Don't take any criticism too harshly on here it's all constructive and aimed at helping you.
I 100% understand and appreciate your complement good sir, and good criticisms are always welcome, when they are helpful
|
Like what you see, looking for a commission, msg me
Facebook: www.facebook.com/Stormhammerpainting
Website: jisturrock.wix.com/stormhammerpainting
Email: mueskulls@gmail.com |
|
|
|
|
2017/08/01 23:43:53
Subject: Warhound Scout Titan Level 2 Table Top Paint job
|
|
Moustache-twirling Princeps
|
Muggami wrote: sonny2dap wrote:Nice model for sure, and I like the glow effects in the cockpit. really solid clean work. Commissions are always hard to judge because it's down to whoever is paying for it, how much time they want you to put in basically, if your client is happy then it's a success. Don't take any criticism too harshly on here it's all constructive and aimed at helping you.
I 100% understand and appreciate your complement good sir, and good criticisms are always welcome, when they are helpful
Everyone has been trying to help. Winterdyne and I, among others, have given you lots of constructive criticism. You just got to actually listen and apply it. From what I see, you haven't.
|
|
This message was edited 1 time. Last update was at 2017/08/01 23:44:24
|
|
|
|
|
2017/08/01 23:45:23
Subject: Warhound Scout Titan Level 2 Table Top Paint job
|
|
Last Remaining Whole C'Tan
|
winterdyne wrote:Well, if I remember rightly it took me about a week to build a warhound, being unfamiliar with the kit at the time, including fixing up some flaws, starting from a decent cast.
Let's not go into the time it took to get that decent starting point beyond saying it was many weeks of back and forth. I'd certainly have rejected that head piece from the look of it - that's a nasty mould slip, and it'd take a long time and a fair amount of skill to fix properly.
I hope you properly pinned and cored it. Warhounds sag horribly if you don't. I'd especially be wary of the legs splayed like that. Specifically, that pose is putting a lot of torque on the middle leg pieces which are only about 1/4" x 1/2" (12mm x 6mm) at their weakest point. In warm conditions they'll twist and the model will topple nose down, lifting the outer toes on the feet, possibly breaking the inner ones. I speak from painful experience, having been working on one in a conservatory in temps of around 35C. You can alleviate this by basing it and securely fastening the feet, but you'll still get the forward tilt and twist of the middle legs if they've not got good strong pins right the way through. I put two lengths of 3mm steel rod in (mine was entirely supported by that one leg, though). Still twisted a bit. Horrid. Would probably have been better to use 4 or 5 lengths of 1.2mm brass rod.
To those unfamiliar with the Warhound, the torso and weapons together weigh around 1.5kg. It's a lot of weight on two quite thin strips of resin. The Chaos Warhound on show at Warhammer World has exactly this kind of sag going on, so it's not a specific dig I'm making here - just pointing out a horrid flaw in the kit design itself.
I have 2 warhounds I have not yet built, and I'm really glad to have read this.
I get pinned, but what is "cored", though?
|
 lord_blackfang wrote: lord_blackfang wrote:Respect to the guy who subscribed just to post a massive ASCII dong in the chat and immediately get banned.
 Flinty wrote: Flinty wrote:The benefit of slate is that its.actually a.rock with rock like properties. The downside is that it's a rock
|
|
|
|
|
2017/08/02 03:28:12
Subject: Warhound Scout Titan Level 2 Table Top Paint job
|
|

Veteran Wolf Guard Squad Leader
|
 Ouze wrote: Ouze wrote:winterdyne wrote:Well, if I remember rightly it took me about a week to build a warhound, being unfamiliar with the kit at the time, including fixing up some flaws, starting from a decent cast.
Let's not go into the time it took to get that decent starting point beyond saying it was many weeks of back and forth. I'd certainly have rejected that head piece from the look of it - that's a nasty mould slip, and it'd take a long time and a fair amount of skill to fix properly.
I hope you properly pinned and cored it. Warhounds sag horribly if you don't. I'd especially be wary of the legs splayed like that. Specifically, that pose is putting a lot of torque on the middle leg pieces which are only about 1/4" x 1/2" (12mm x 6mm) at their weakest point. In warm conditions they'll twist and the model will topple nose down, lifting the outer toes on the feet, possibly breaking the inner ones. I speak from painful experience, having been working on one in a conservatory in temps of around 35C. You can alleviate this by basing it and securely fastening the feet, but you'll still get the forward tilt and twist of the middle legs if they've not got good strong pins right the way through. I put two lengths of 3mm steel rod in (mine was entirely supported by that one leg, though). Still twisted a bit. Horrid. Would probably have been better to use 4 or 5 lengths of 1.2mm brass rod.
To those unfamiliar with the Warhound, the torso and weapons together weigh around 1.5kg. It's a lot of weight on two quite thin strips of resin. The Chaos Warhound on show at Warhammer World has exactly this kind of sag going on, so it's not a specific dig I'm making here - just pointing out a horrid flaw in the kit design itself.
I have 2 warhounds I have not yet built, and I'm really glad to have read this.
I get pinned, but what is "cored", though?
I assume it refers to hollowing out what parts you can so as to reduce weight of larger pieces of resin.
|
|
|
|
|
|
2017/08/02 07:28:54
Subject: Warhound Scout Titan Level 2 Table Top Paint job
|
|
Longtime Dakkanaut
|
No, pinning is just at a joint. Coring is running the rod right through the part, end to end, to provide a rigid core. Usually only really needed where there is significant load such as the middle leg sections I mentioned. It's difficult to do, you need a long drill bit and a steady hand or drill press.
|
|
|
|
|
|
2017/08/02 11:03:55
Subject: Warhound Scout Titan Level 2 Table Top Paint job
|
|
Been Around the Block
|
Winterdyne we actually magnetized the guy, the client wanted the ability to store him in a smaller container and have multiple options for weapons
|
Like what you see, looking for a commission, msg me
Facebook: www.facebook.com/Stormhammerpainting
Website: jisturrock.wix.com/stormhammerpainting
Email: mueskulls@gmail.com |
|
|
|
|
2017/08/02 11:49:18
Subject: Warhound Scout Titan Level 2 Table Top Paint job
|
|
Moustache-twirling Princeps
|
winterdyne wrote:No, pinning is just at a joint. Coring is running the rod right through the part, end to end, to provide a rigid core. Usually only really needed where there is significant load such as the middle leg sections I mentioned. It's difficult to do, you need a long drill bit and a steady hand or drill press.
This is a very good idea. I will be doing that myself on my personal Warhound for sure. What rod did you find gives best strength-to-weight ratio?
|
|
|
|
|
|
2017/08/02 12:06:33
Subject: Warhound Scout Titan Level 2 Table Top Paint job
|
|
Longtime Dakkanaut
|
I was unimpressed with the 3mm steel. I think 4 staggered lengths of 1.5mm-2mm brass would have been better. Easier to cut too. Other options might be extruded square or rectangular section tubing. Much more boring out to do, then you'd flood with epoxy before inserting the reinforcement, but it'd be pretty damn rigid.
As for the OP, just noticed this titan is also missing knee pistons (gap for them visible in 5th shot, above shin plate). Pretty shoddy assembly work on top of pisspoor cleanup. You need to step it up, man, missing pieces out on a £400 kit is not cool.
|
|
|
|
|
|
2017/08/02 12:13:28
Subject: Warhound Scout Titan Level 2 Table Top Paint job
|
|
Moustache-twirling Princeps
|
winterdyne wrote:I was unimpressed with the 3mm steel. I think 4 staggered lengths of 1.5mm-2mm brass would have been better. Easier to cut too. Other options might be extruded square or rectangular section tubing. Much more boring out to do, then you'd flood with epoxy before inserting the reinforcement, but it'd be pretty damn rigid.
As for the OP, just noticed this titan is also missing knee pistons (gap for them visible in 5th shot, above shin plate). Pretty shoddy assembly work on top of pisspoor cleanup. You need to step it up, man, missing pieces out on a £400 kit is not cool.
Moments like this I am glad I have a dremel. Should make the coring process a lot easier. I have done one Warhound prior, but that was years ago and didn't do more than basic pinning (and ball magnets for the arms). I think I am going to try this out whenever I get to my Lucius Warhound. I wouldn't want anything happening to that precious, OOP gem of a model.  Thanks for the help, winterdyne!
|
|
|
|
|
|
2017/08/02 12:24:16
Subject: Warhound Scout Titan Level 2 Table Top Paint job
|
|
Longtime Dakkanaut
|
I ended up using a full on power drill held in a bench vice as the dremel was just too shaky and I don't have a drill press.
Depending on how slow your dremel goes you should be ok - slow and steady is the name of the game when drilling really deep. You need to be bang on with your alignment too, you don't want to drill off-centre and end up out the side of the part.
The necessity for all this is pretty dependent on the pose though - you'll see when you dry fit where the weak spots are.
|
|
|
|
|
|
2017/08/02 12:34:41
Subject: Warhound Scout Titan Level 2 Table Top Paint job
|
|
Moustache-twirling Princeps
|
winterdyne wrote:I ended up using a full on power drill held in a bench vice as the dremel was just too shaky and I don't have a drill press.
Depending on how slow your dremel goes you should be ok - slow and steady is the name of the game when drilling really deep. You need to be bang on with your alignment too, you don't want to drill off-centre and end up out the side of the part.
The necessity for all this is pretty dependent on the pose though - you'll see when you dry fit where the weak spots are.
Yea, I have one that dials down really nice and slow. It has been very useful. I haven't settled on a pose, honestly. The basic "striding forward into war" one is likely the most stable versus the more dynamic stuff and while I would love my big giant Titan to be a bit more showcase-y and dynamic, I think stability will rule the day. Wouldn't want it toppling!
|
|
|
|
|
|
2017/08/02 12:47:31
Subject: Warhound Scout Titan Level 2 Table Top Paint job
|
|
Librarian with Freaky Familiar
|
To the other guy yeah from what i understand the warhound is a bit of a bitch when it comes to the titan family. Im building my first titan, a reaver, and he is really easy, because of how his center of mass is situated, it requires very little effort to keep him together, solid as a rock with really powerful magnets for torso
The war hound though, wew lads, the stories i have heard, also have heard their toe/leg assembly is a bitch. Which for the reaver i could not get the toe pistons in to save my life. Automatically Appended Next Post:  em_en_oh_pee wrote: em_en_oh_pee wrote:winterdyne wrote:I ended up using a full on power drill held in a bench vice as the dremel was just too shaky and I don't have a drill press.
Depending on how slow your dremel goes you should be ok - slow and steady is the name of the game when drilling really deep. You need to be bang on with your alignment too, you don't want to drill off-centre and end up out the side of the part.
The necessity for all this is pretty dependent on the pose though - you'll see when you dry fit where the weak spots are.
Yea, I have one that dials down really nice and slow. It has been very useful. I haven't settled on a pose, honestly. The basic "striding forward into war" one is likely the most stable versus the more dynamic stuff and while I would love my big giant Titan to be a bit more showcase-y and dynamic, I think stability will rule the day. Wouldn't want it toppling!
I would also suggest if your are going to drill into your model with one of those bits that makes a big hole, drill your pilot hole all the way first then start with the other bit, i ended up cracking a ball socket in half to my reavers arm that thankfully gorilla glue saved.
|
|
This message was edited 1 time. Last update was at 2017/08/02 12:49:04
To many unpainted models to count. |
|
|
|
|
2017/08/02 12:50:45
Subject: Warhound Scout Titan Level 2 Table Top Paint job
|
|
Speed Drybrushing
|
Void Shield Projectors missing
Neck cables missing
Groin shield put on the ass
Metal carapace grill missing
Weapon lenses not painted
The rest is a basic tabletop paintjob, not bad, something to build from.
|
Not a GW apologist |
|
|
|
|
2017/08/02 13:05:40
Subject: Warhound Scout Titan Level 2 Table Top Paint job
|
|
Longtime Dakkanaut
|
 Backspacehacker wrote: Backspacehacker wrote:
...
I would also suggest if your are going to drill into your model with one of those bits that makes a big hole, drill your pilot hole all the way first then start with the other bit, i ended up cracking a ball socket in half to my reavers arm that thankfully gorilla glue saved.
For very deep holes (more than 2cm / 1"), unless you're 'hands off' with a drill press you'll almost certainly break a bit (leaving it wedged very inconveniently in the model) trying this. Slow and steady, big bit, keep it lubed (water works), and keep the swarf out. But for sure, start with a pilot hole (you always should anyway).
|
|
This message was edited 1 time. Last update was at 2017/08/02 13:06:38
|
|
|
|
|
2017/08/02 13:17:16
Subject: Warhound Scout Titan Level 2 Table Top Paint job
|
|
Librarian with Freaky Familiar
|
winterdyne wrote: Backspacehacker wrote:
...
I would also suggest if your are going to drill into your model with one of those bits that makes a big hole, drill your pilot hole all the way first then start with the other bit, i ended up cracking a ball socket in half to my reavers arm that thankfully gorilla glue saved.
For very deep holes (more than 2cm / 1"), unless you're 'hands off' with a drill press you'll almost certainly break a bit (leaving it wedged very inconveniently in the model) trying this. Slow and steady, big bit, keep it lubed (water works), and keep the swarf out. But for sure, start with a pilot hole (you always should anyway).
True facts, turned white as a ghost when i broke my titan, thank god for gorilla glue hah.
|
To many unpainted models to count. |
|
|
|
|
2017/08/02 13:33:58
Subject: Warhound Scout Titan Level 2 Table Top Paint job
|
|
Moustache-twirling Princeps
|
Backspacehacker wrote:To the other guy yeah from what i understand the warhound is a bit of a bitch when it comes to the titan family. Im building my first titan, a reaver, and he is really easy, because of how his center of mass is situated, it requires very little effort to keep him together, solid as a rock with really powerful magnets for torso
The war hound though, wew lads, the stories i have heard, also have heard their toe/leg assembly is a bitch. Which for the reaver i could not get the toe pistons in to save my life.
Automatically Appended Next Post:
em_en_oh_pee wrote:winterdyne wrote:I ended up using a full on power drill held in a bench vice as the dremel was just too shaky and I don't have a drill press.
Depending on how slow your dremel goes you should be ok - slow and steady is the name of the game when drilling really deep. You need to be bang on with your alignment too, you don't want to drill off-centre and end up out the side of the part.
The necessity for all this is pretty dependent on the pose though - you'll see when you dry fit where the weak spots are.
Yea, I have one that dials down really nice and slow. It has been very useful. I haven't settled on a pose, honestly. The basic "striding forward into war" one is likely the most stable versus the more dynamic stuff and while I would love my big giant Titan to be a bit more showcase-y and dynamic, I think stability will rule the day. Wouldn't want it toppling!
I would also suggest if your are going to drill into your model with one of those bits that makes a big hole, drill your pilot hole all the way first then start with the other bit, i ended up cracking a ball socket in half to my reavers arm that thankfully gorilla glue saved.
Ooof. That must have been a hell of a thing. I use my Dremel super slow and steady and haven't had any issues. I also wear away area with a small bit by working in a circular movement as opposed to just pushing it in there ( lol sex joke and/or phrasing?). I am going to be VERY careful with my Warhound though. No doubt I will be sweating bullets while I do it. Nothing makes you jumpier than being a sneeze away from ruining a VERY expensive model.
|
|
|
|
|
|
2017/08/02 14:03:48
Subject: Warhound Scout Titan Level 2 Table Top Paint job
|
|
Longtime Dakkanaut
|
Fear is the mind-killer. :-) Do, or do not, there is no try. And so on.
Also, whatever you break, you can (generally) fix. :-)
|
|
|
|
|
|
2017/08/02 14:23:53
Subject: Warhound Scout Titan Level 2 Table Top Paint job
|
|
Been Around the Block
|
tell you what guys, the stuff on the warhound construction was really good to read, titan construction isn't something I ever really looked into, and I presumed there was a lot of pinning involved, but the actual boring out of pieces and inserting rods to act as load bearing members etc. reminds me of larger model aircraft construction that actually require the use of wing spars etc.
|
|
|
|
|
2017/08/02 14:36:57
Subject: Warhound Scout Titan Level 2 Table Top Paint job
|
|
Librarian with Freaky Familiar
|
Imo the best way to learn how to build a titan, is just start building it. You learn so much as you go along. I would say find a "cheap" titan off eBay and just have at it. It's a totally differ beast then normal modeling so much more fun though.
|
To many unpainted models to count. |
|
|
|
|
2017/08/02 14:42:17
Subject: Warhound Scout Titan Level 2 Table Top Paint job
|
|

Been Around the Block
Ireland
|
Got to admit I am not a fan of how that came out. But I am not sure what level the OPs client paid for it.
|
Stepping Between Games - www.steppingbetweengames.com |
|
|
|
|
2017/08/02 14:58:38
Subject: Warhound Scout Titan Level 2 Table Top Paint job
|
|
Longtime Dakkanaut
|
sonny2dap wrote:tell you what guys, the stuff on the warhound construction was really good to read, titan construction isn't something I ever really looked into, and I presumed there was a lot of pinning involved, but the actual boring out of pieces and inserting rods to act as load bearing members etc. reminds me of larger model aircraft construction that actually require the use of wing spars etc.
Exactly where I learned the trick - large resin aircraft fuselage and wings.
|
|
|
|
|
|
2017/08/03 11:41:36
Subject: Warhound Scout Titan Level 2 Table Top Paint job
|
|
Been Around the Block
|
 Thousandeyes wrote: Thousandeyes wrote:Got to admit I am not a fan of how that came out. But I am not sure what level the OPs client paid for it.
Its a Table Top Plus model or a level 2 of 3 levels
|
Like what you see, looking for a commission, msg me
Facebook: www.facebook.com/Stormhammerpainting
Website: jisturrock.wix.com/stormhammerpainting
Email: mueskulls@gmail.com |
|
|
|
|
2017/08/04 21:43:42
Subject: Re:Warhound Scout Titan Level 2 Table Top Paint job
|
|
Last Remaining Whole C'Tan
|
One of those levels should have at least included a drybrushed highlight on the Aquila on the carapace, man.
This must have taken an enormous amount of effort to build but then it got really lazy in some obvious spots. I'm saying "lazy" because you did a decent airbrush highlight on the crew.
Are you familiar with preshading? It wouldn't add a lot of time to your paintjob, but I've found it makes a big difference on my finished models.
|
|
This message was edited 1 time. Last update was at 2017/08/04 21:53:09
lord_blackfang wrote:Respect to the guy who subscribed just to post a massive ASCII dong in the chat and immediately get banned.
Flinty wrote:The benefit of slate is that its.actually a.rock with rock like properties. The downside is that it's a rock
|
|
|
|
|
2017/08/05 02:49:35
Subject: Re:Warhound Scout Titan Level 2 Table Top Paint job
|
|
Nurgle Predator Driver with an Infestation
|
Listen man. Winter dyne has tried to help you so much, recommendations, everything. I put a warhound together. Took like 2 weeks or so. Painting couldn't even tell you how long that took. Here's the thing. Winterdyne, and some of these folks on here are pros. I'm all about improving. But be realistic. Here's my Titan. It's cored, weapons, All 4 are magnetized and the upper body is magnetized to the legs. But honestly, I can't compete with the work these guys put out. We gotta know where we belong. Enjoy the game bro.
I removed my pictures. Didn't realize posting pictures to someone else's thread was improper. My bad. But I still wouldn't try and sell it
|
|
This message was edited 2 times. Last update was at 2017/08/05 03:17:57
|
|
|
|
|
|
|

