Forum adverts like this one are shown to any user who is not logged in. Join us by filling out a tiny 3 field form and you will get your own, free, dakka user account which gives a good range of benefits to you:
No adverts like this in the forums anymore.
Times and dates in your local timezone.
Full tracking of what you have read so you can skip to your first unread post, easily see what has changed since you last logged in, and easily see what is new at a glance.
Email notifications for threads you want to watch closely.
Being a part of the oldest wargaming community on the net.
If you are already a member then feel free to login now.
2018/02/07 22:27:45
Subject: The -=]_=- Terrain Comp Thread -=]_=- LoER Terrain Contest #24 "Pimpin' Aint Easy " Public Voting
Greetings all, and welcome to the League of Extraordinary Riveters terrain competition #24 "Pimpin' Aint Easy" public voting thread!
The Brief:
"Pimpin' Aint Easy"
Ok, so you all have a favorite game board or bit of printed card scenery that has inspired you to build it in the glorious, rivet-covered Third Dimension at one point or another, am i right? (if not, start going through your card scenery and board games to getting inspired!)
This is similar in spirit to the "Pimp my Boardgame" contest that runs over on Boardgamegeek.com, which was inspired by the popular culture oddity "Pimp My Ride".
Your task is to model something that is printed on (or is inspired by) a board game board, or piece of card scenery (think 1995 Necromunda or other similar scenery that has 2D art that is meant to look like 3D texture or terrain). This could be as simple as 2 or 3 Settlers of Catan tiles, or a small room from Warhammer Quest or Descent, to as complex and involved as a tile from Deathwatch: Overkill, or even a full board game board. (Check out dsteingass'project blog for examples of what I'm talking about)
Alternatively, instead of 3D-ifying a piece of 2D game art (I'll be honest, that's really what I want to see the most), you could create some sort of terrain feature that shows off something that has been 'blinged' or 'pimped'. This could be a wrecked buggy that has been embellished with decorations (think Mad Max), an open market stall that has been covered with colorful bangles and exotic wares to attract the most potential customers, or an underhive night-club with garish neon signs and flashing lights.
Your work can be in any scale, for any system/purpose. All terrain is equal in the eyes of the League (...except of course for the specific purpose of judging competitions...)
We had many participants, but not all could make it to the finish line. In the end we have four finalists to chose from....
WIP's for many of the entries can be seen in the contest thread HERE.
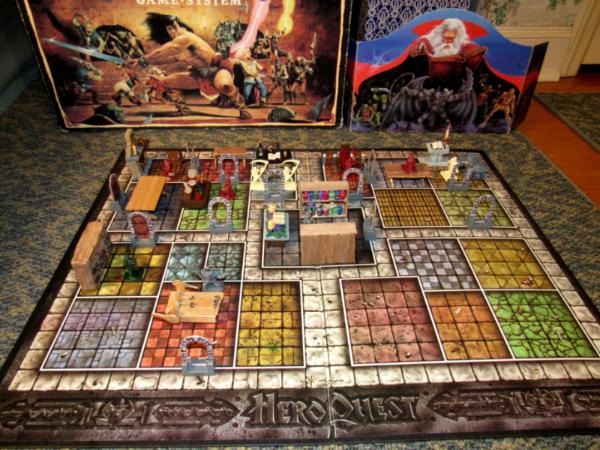
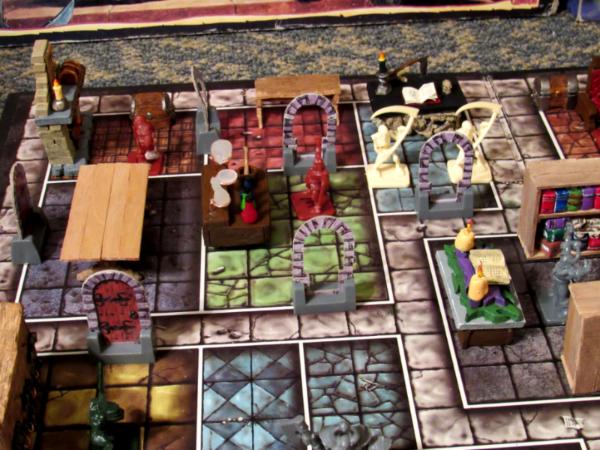
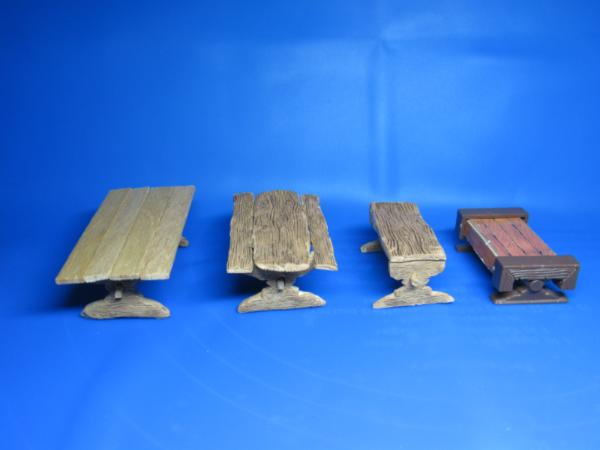
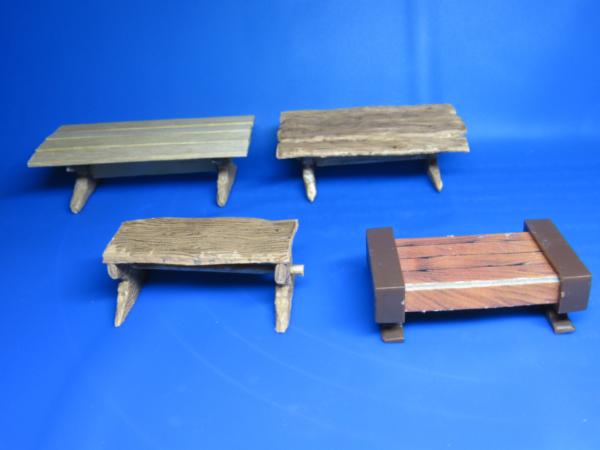
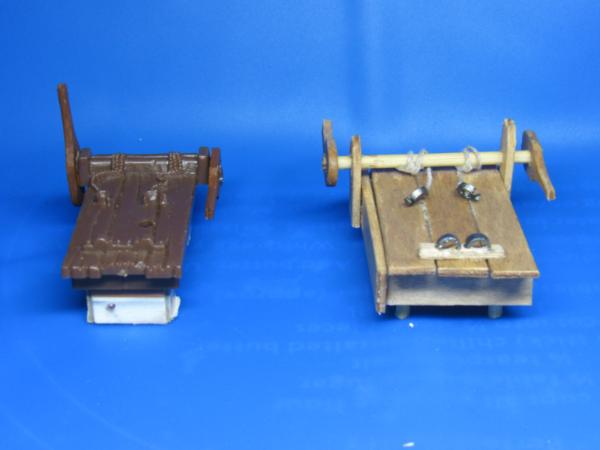
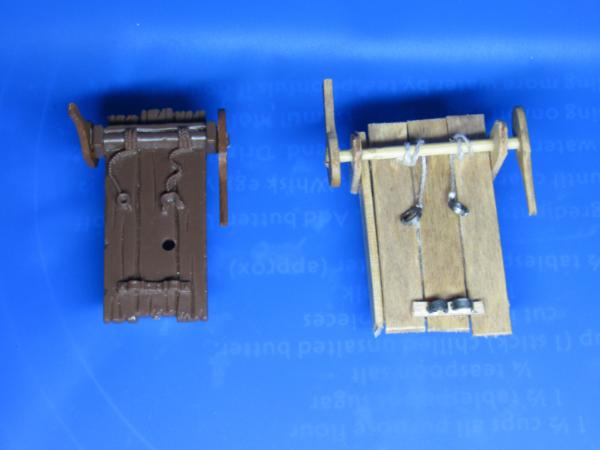
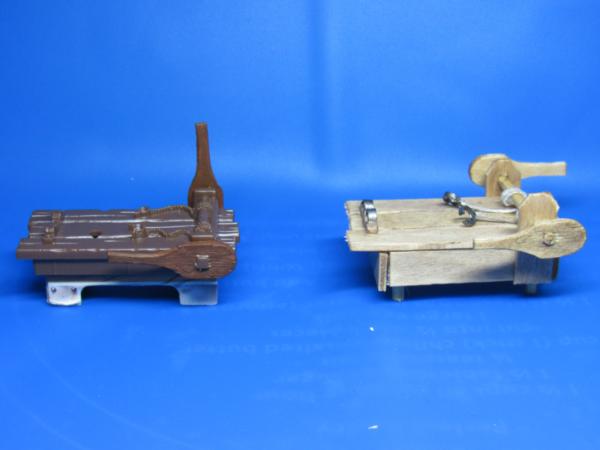
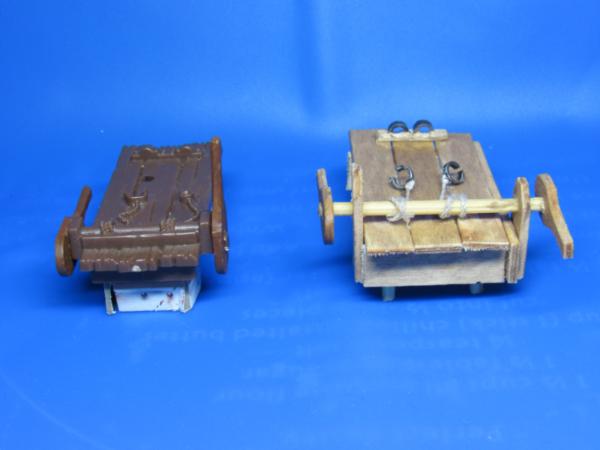
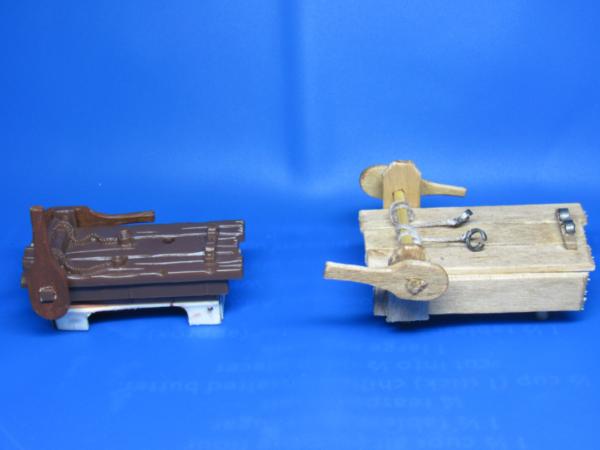
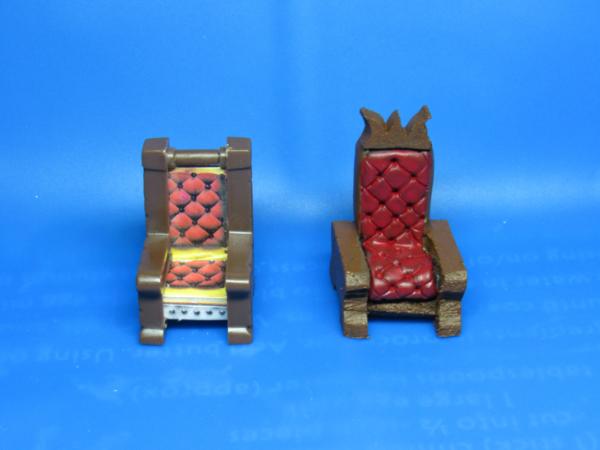
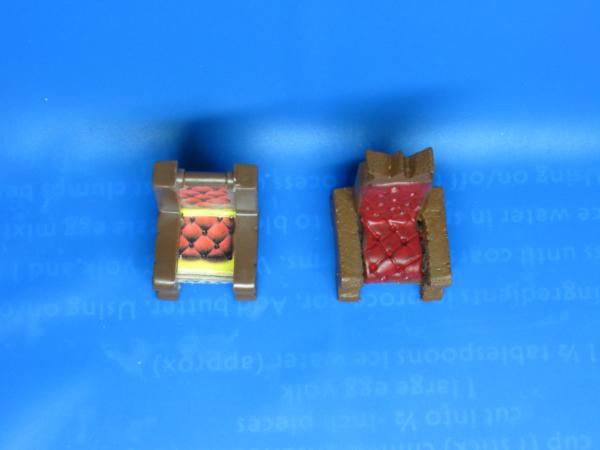
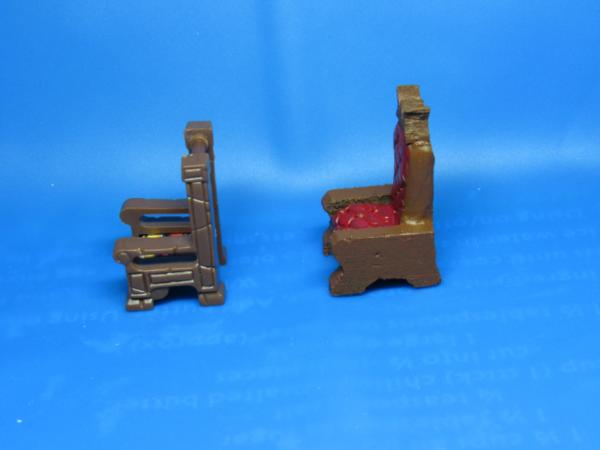
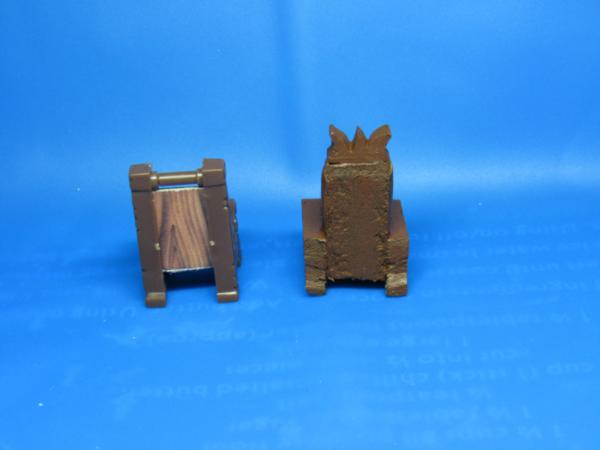
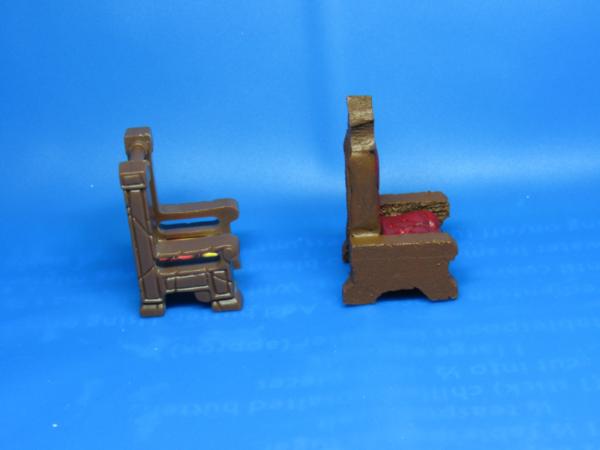
Syro_ with "Hero Quest Furniture"
Here is my contest entry, sorry for the volume of pictures. Most of my pictures are side-by-side comparison shots with the original piece of Hero Quest furniture on the left and my piece on the right (except the tables). These are also all in their own gallery called Hero Quest Furniture.
Spoiler:
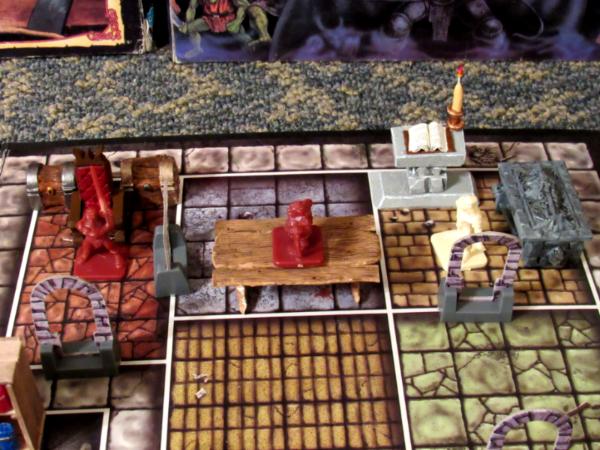
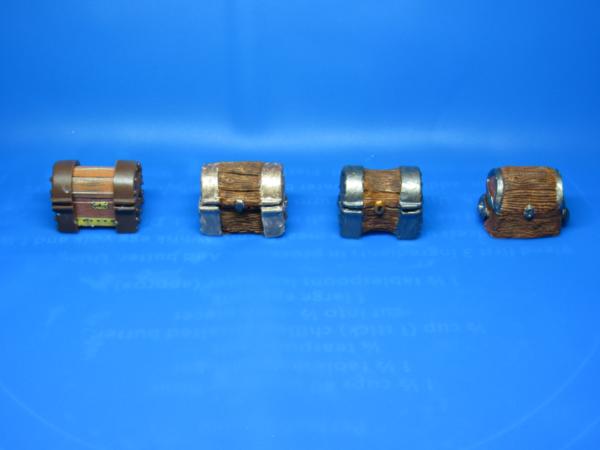
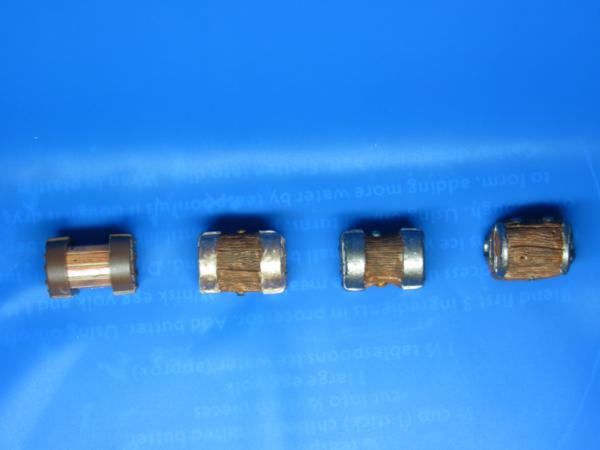
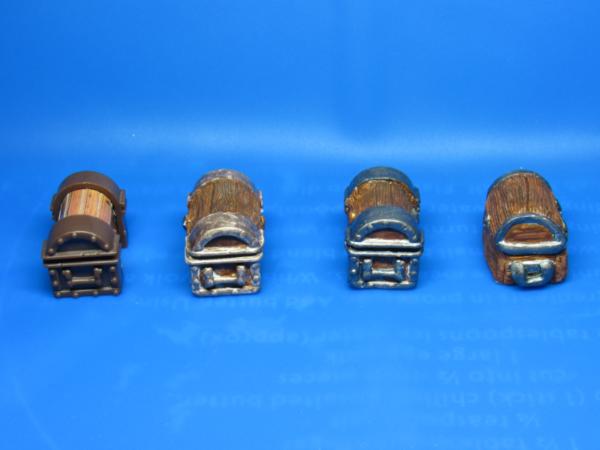
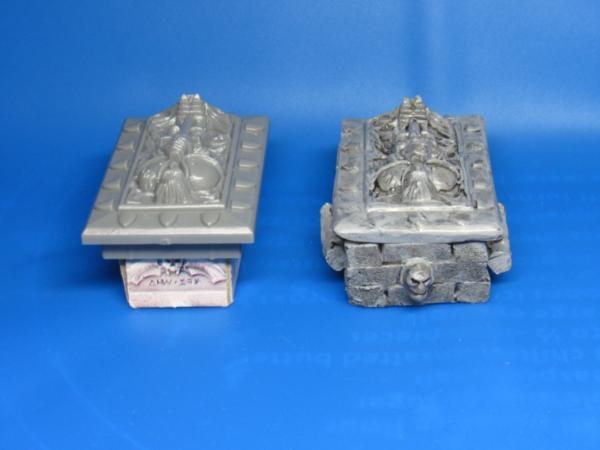
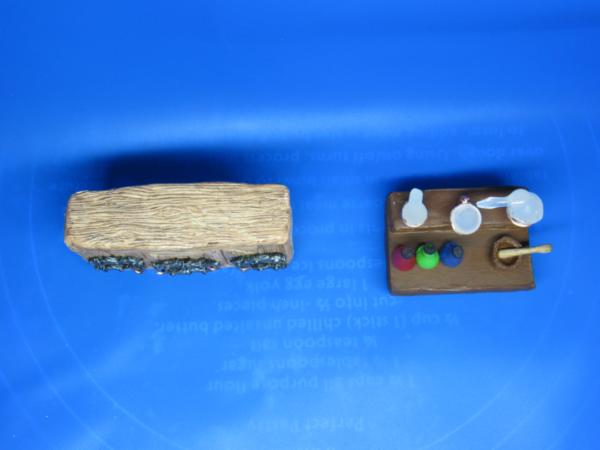
Treasure chests: (The one on the far right is sculpted from scratch)
I made a mold of the plastic side pieces of the original hero quest treasure chest. I cast 4 of them and glued two pair on blocks of styrofoam. I then filled in the wood area with apoxie putty and sculpted a wood grain pattern into it. I forget the name of the sculpting tool I use and I couldn't find it in my Amazon purchase history, but it's those little paintbrush size and shape silicone pointed sculpting tools. Later I created the keyhole locks and hinges with greenstuff. I used the tip of a mechanical pencil to make the keyhole. The furthest right treasure chest is completely sculpted, starting with a stryrofoam base, I created the wood grain pattern, then sculpted the iron banding on top. Then ending with the hardware like on the other two.
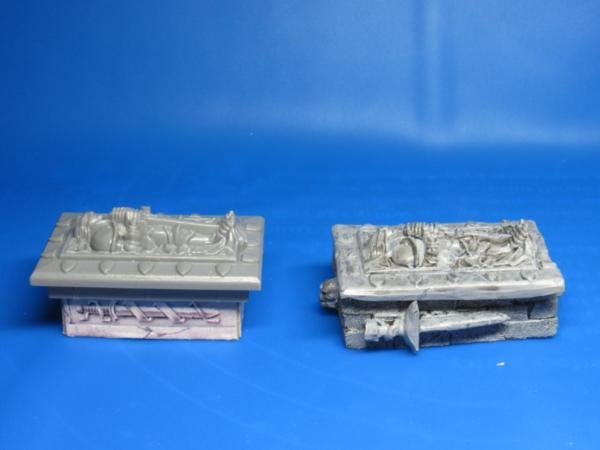
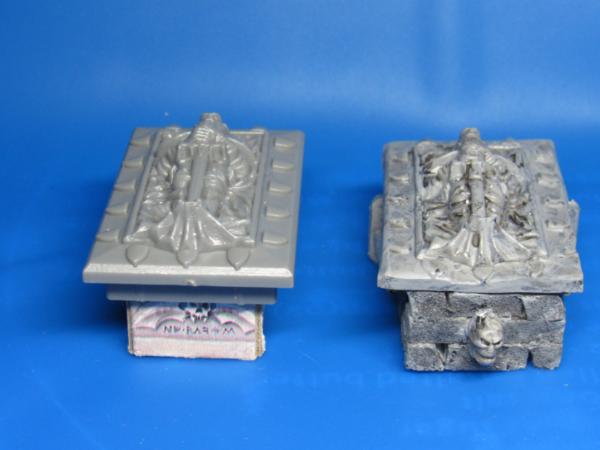
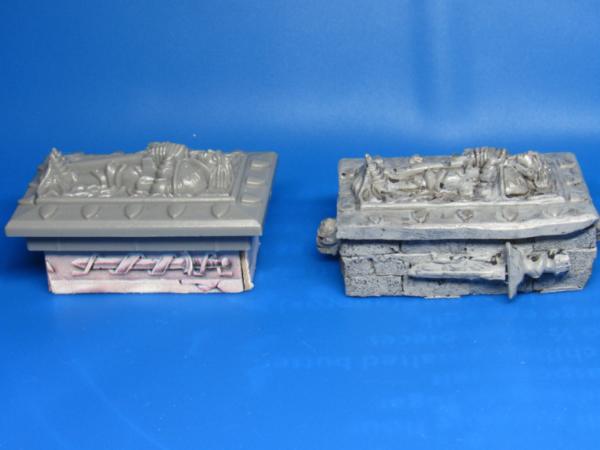
Tomb: (Top section made with mold)
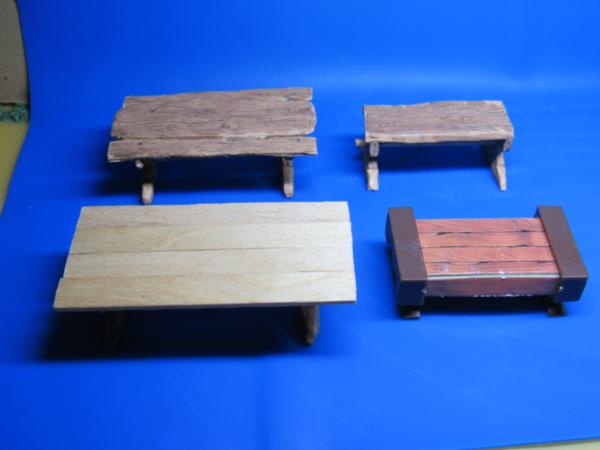
Tables:
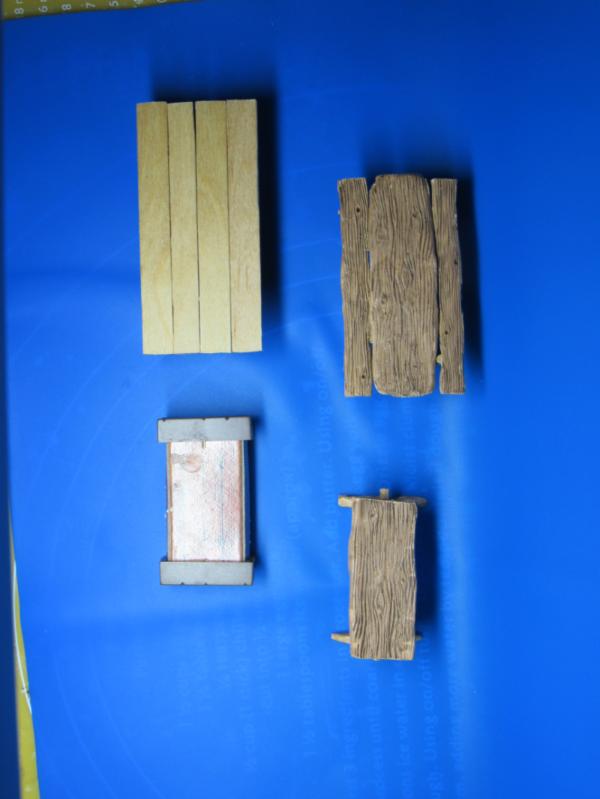
I decided Trestle tables were the mostly likely table that Hero Quest was going for. I sculpted an hour glass shaped piece out of apoxie sculpt with the wood grain pattern, when dry, I flipped it over and repeated a wood grain pattern on the other side. I then made a mold to cast enough pieces for my table "legs". Trestle tables have a horizontal brace piece, so I carved a tongue piece in craft sticks and drilled openings to slide them through on the legs. One table top is cut down and oiled craft sticks, the second is a collection of different wood grain sculpts I made earlier in the contest, the last tiny one is a cut down version with shortened legs and just one central wood grain piece.
Stretching rack:
The stretching rack is 100% scratch built. There is a rectangle of foamcore in the middle, I built the craft stick planking on top. I drilled holes in the posts and handles, then carved them to shape with a hobby knife. The pole that rotates to tighten the rope and the legs are made from bamboo skewers. The shackles are styrene tube. You can actually rotate the lever arms to change high how the shackles are on the rack.
Throne:
The throne is made from high density grey foam for building insulation. Cut and glued into the basic shape, with the details then carved into it. I then applied a layer of apoxie putty to sculpt in the details of the chair cushions.
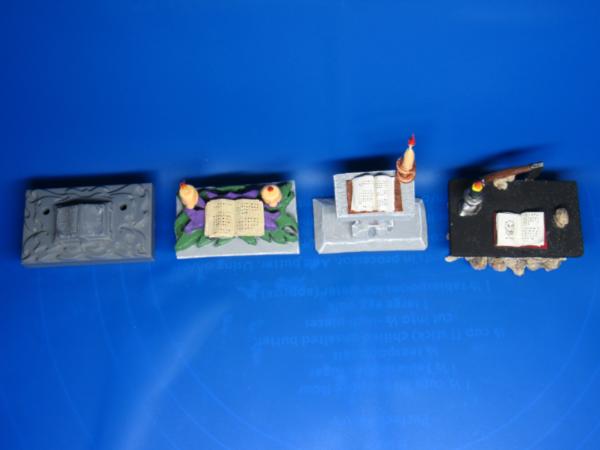
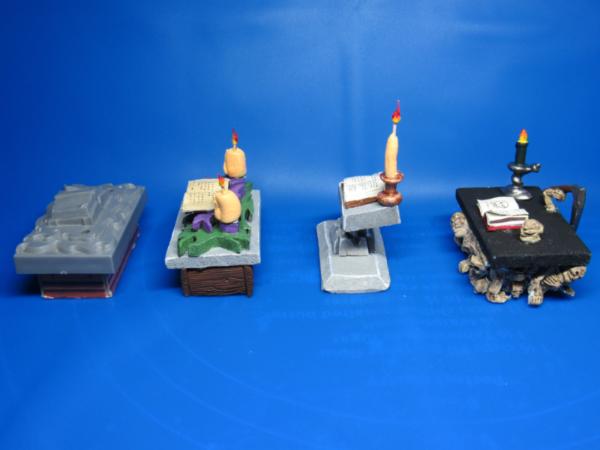
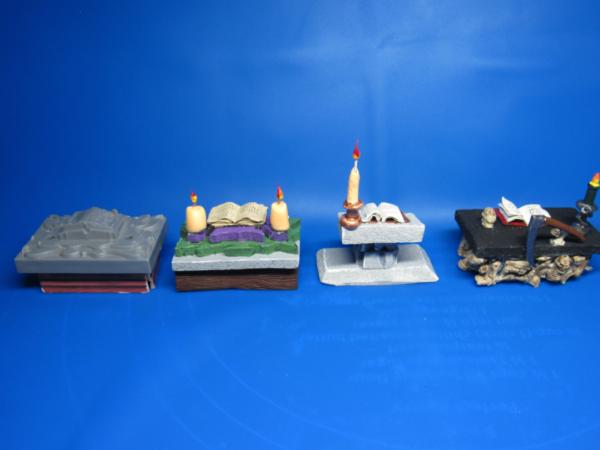
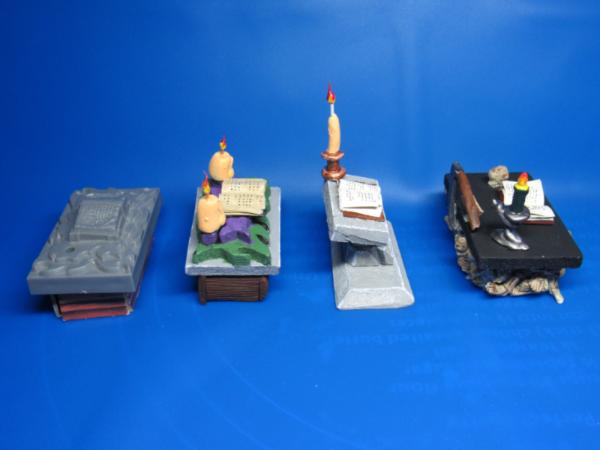
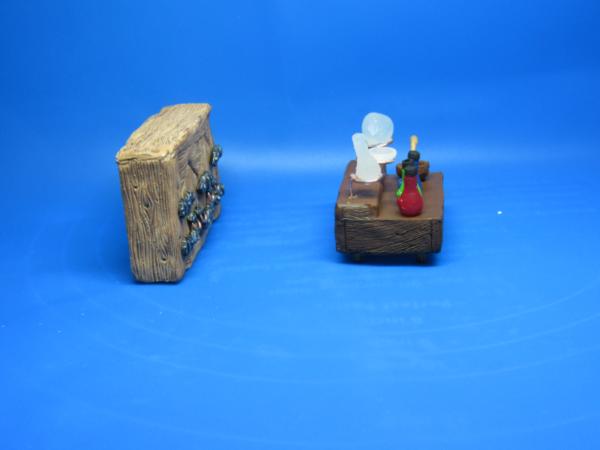
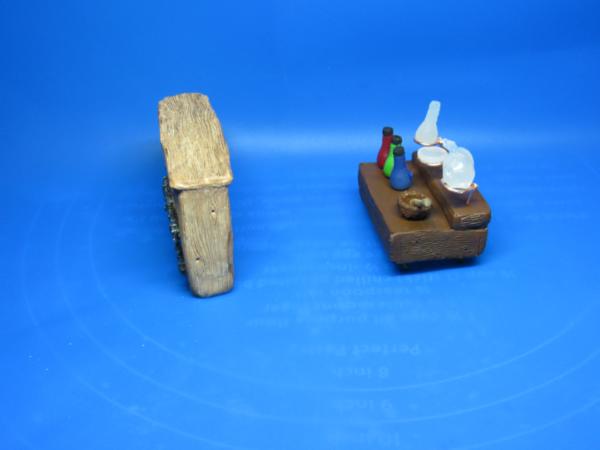
Sorceror's tables:
I made three going in different directions. I made one similar to the original, I painted it purple, green, and grey. I started by cutting a strange pattern into foamcore to match the original. I added it to a rectangle of foamcore for the main part. I made candles from wire wrapped in apoxie sculpt. I then use hot glue to make the candle flames and wax dripping down the side. I built this upon wood grain sections of apoxie putty. I learned that scoring the apoxie putty then snapping it gives a similar end grain texture to wood rather than perfectly smooth if I cut all the way. The second podium was planned with a stone theme. I had a mold of that trapezoid shaped base from a different project, I cut more of the grey foam into rock edges. Then finished it one of my books and another sculpted candle. I tried highlighting all the edges during painting to see if it would pop more than my usual paint jobs. The last sorceror's table, starts with a foamcore base. I then broke up 6 skeletons that I cast to use as the decorations on the side and top. I sculpted a few extra femurs to slip in as well. As mentioned above the candle is from a playset. I painted the skeletons with ushani bone and followed with a brown wash. I used a micron pen for the writing on all three books and the skull symbol.
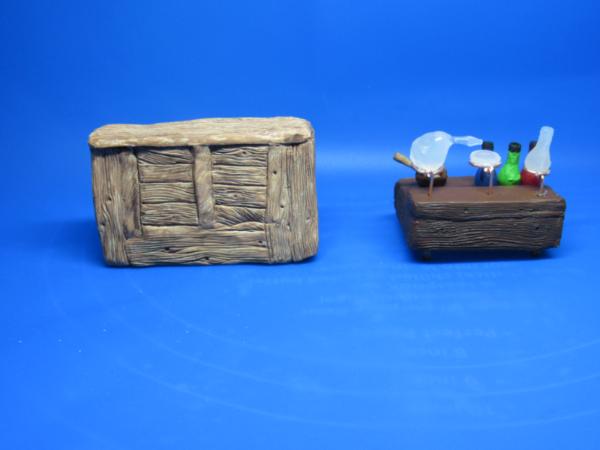
Cupboard and Alchemist bench:
The cupboard is completely scratch built. I started with a double layer of foamcore glued to a wood grain panel I made (still partially visible in some WIP shots). One side at a time, I sculpted in the wood grain and details. I sculpted a hinge out of greenstuff which I then made a mold of. I cast all the hinges. The handles are copper wire bent into loops, stick on with green stuff made to look like more hardware.
I changed the alchemist's bench quite a bit from the original as I felt the original looked more like a writing desk, especially since I don't have the original bottles and scales that came with it. I took inspiration from video games, especially Elder Scrolls Oblivion. I tried to recreate the alchemy equipment used in the game. The front right has a mortar and pestle. I made what's basically chemistry ring stands out of copper wire in the back. The center evaporating dish is just a glob of hot glue, the "glass" vessel in the right is also created freehand with hot glue. I started with a flat-ish hemi-sphere of dried hot glue which I then turned over and applied glue to the flat side to make it more round. I also applied hot glue while holding it upside down to let gravity pull out the spout section which I cut down to size. I sculpted a bottle master from greenstuff, made a mold and used hot glue in the mold to make the bottles more see through. I painted the potions red, green and, blue also as a homage to fantasy video games for health, stamina, and mana potions.
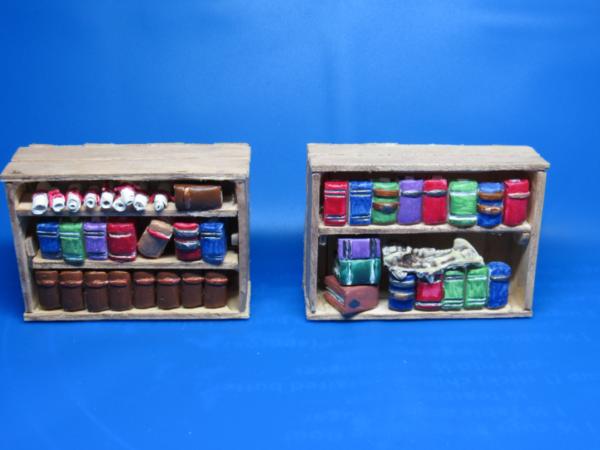
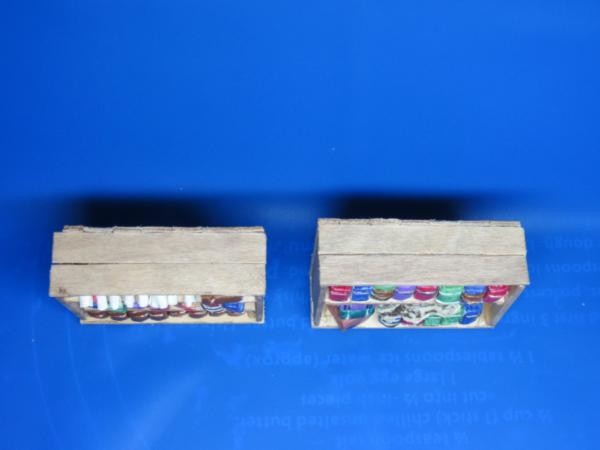
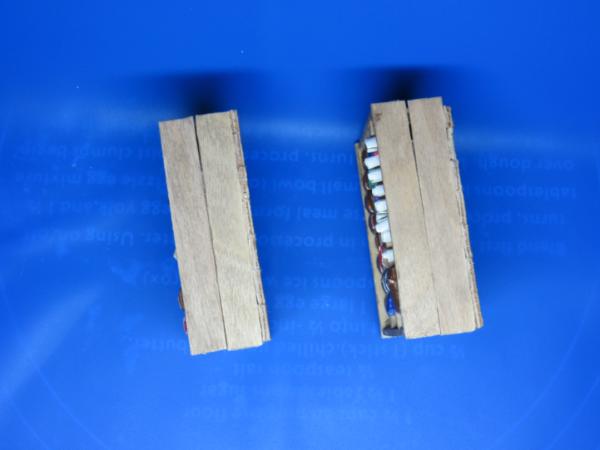
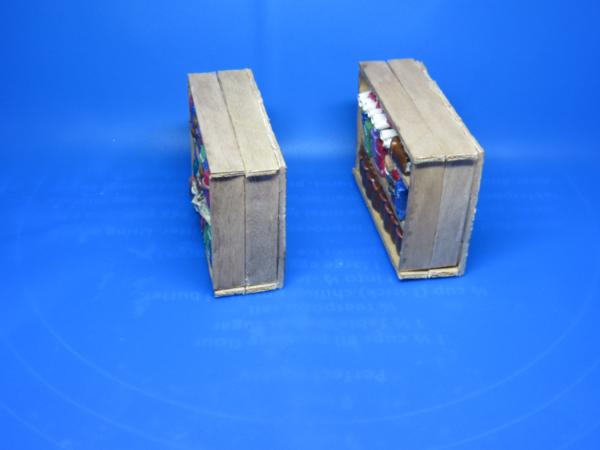
Bookcases:
I made the bookcases entirely from craft sticks except for what's in them. I made 5 books out of strips of plastic and green stuff, the spines are made of greenstuff as well. I made a push mold of the spine half of the books, and mass produced them with hotglue in the molds because of time constraints. I glued these collections of spines into solid sections that would fit on the bookcases. After priming them, I painted them a variety of colors. I made the scrolls by rolling up tiny sections of paper and tying them with fine wire. The skull is the top half of a dragon head, I had a mold of from a different project. The stacked on their side books where you can see all the pages, are the originals I made before molding them. I used a brown wash directly on the craft stick wood to give it that worn slightly grey look.
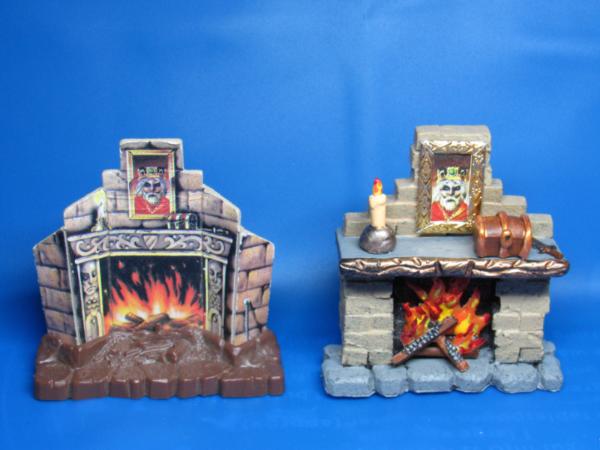
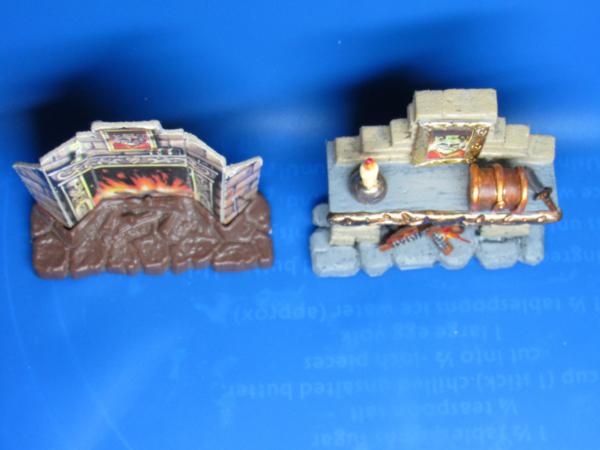
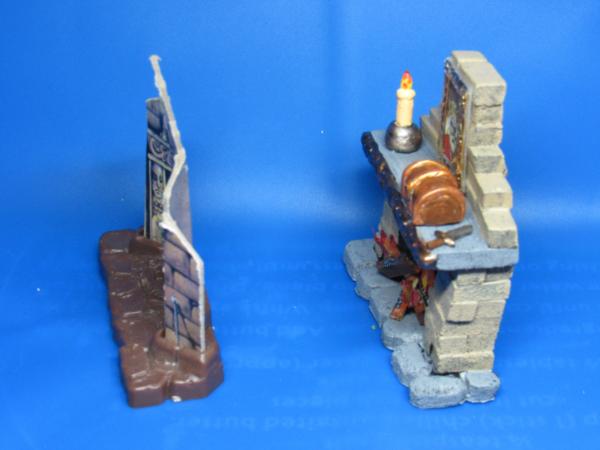
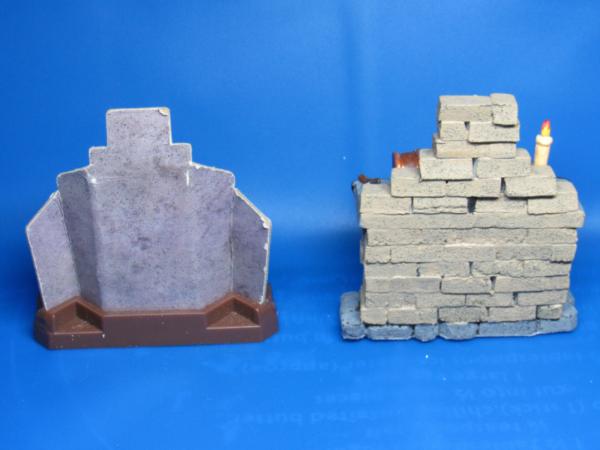
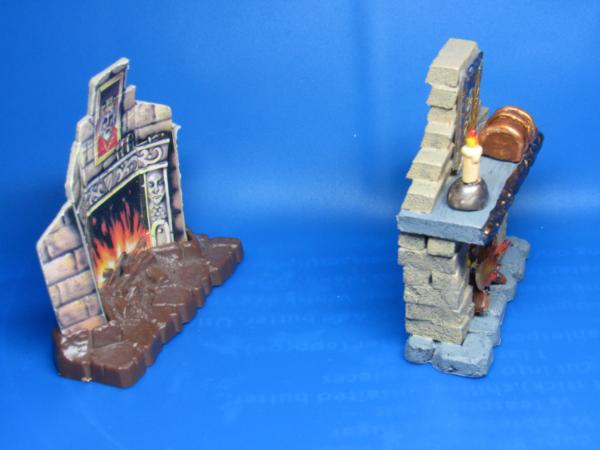
Fireplace:
The base stones and brickwork are all foamcore glued with PVA. The fire itself is made from small pieces of craft stick and skewer. I squirted hotglue on my silicone sheet and dragged out pieces with the tip of the gluegun to make the flames. I glued several fire sections together to make the fire more 3D. I didn't prime it so light could still partially pass through after painting the flames. I am most proud of painting the char and ash on the wood where the flames are. The mini treasure chest on the mantle is completely sculpted, the candle is from the playset, but candle holder is apoxie putty. The dagger is a sword from that same playset (I think it's called mythical heroes in case you're interested). I cut off the hand of the model holding it, scraped of the hand's features,a nd cut down the sword to make the dagger. For the painting, I found a photo online and printed it. The frame is made from the fancy hang loop on Dollar Tree Chinese fans. After repairing fans, I kept the broken hang loops knowing I could use them for something.
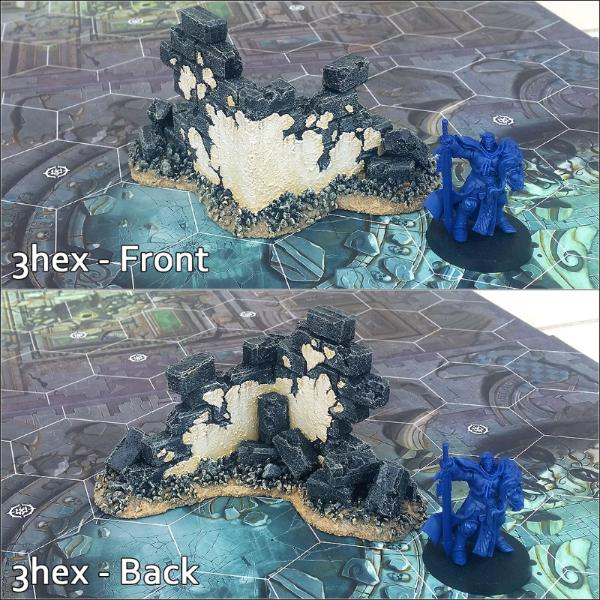
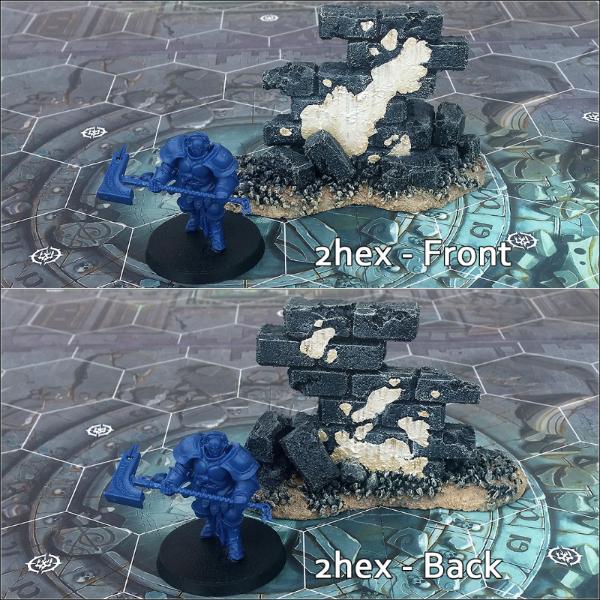
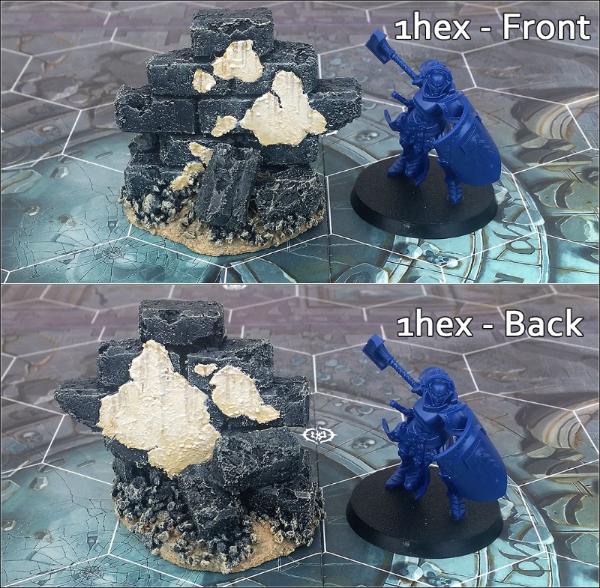
Z-Ray with "Shadespire Impassible Terrain Hexes"
Spoiler:
3hex Piece
2hex Piece
1hex Piece
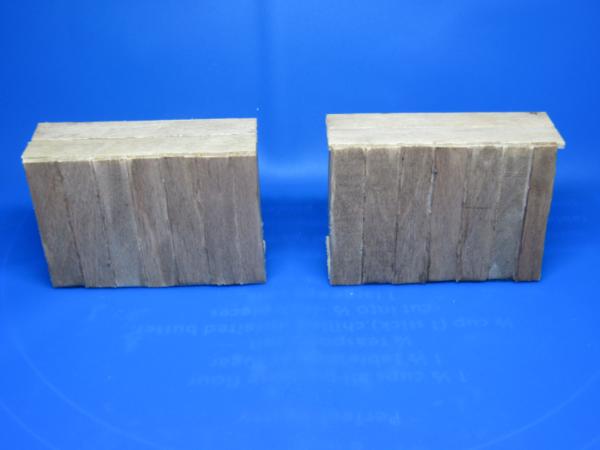
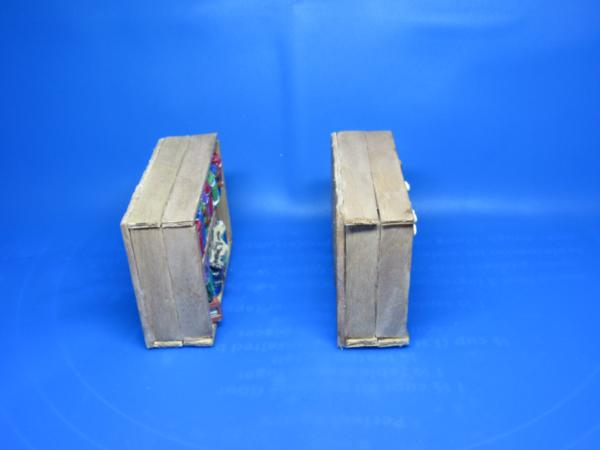
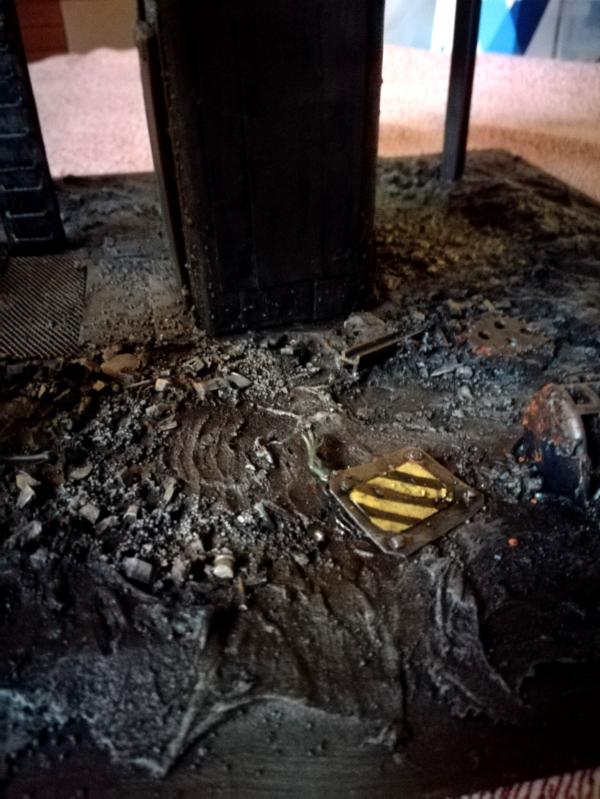
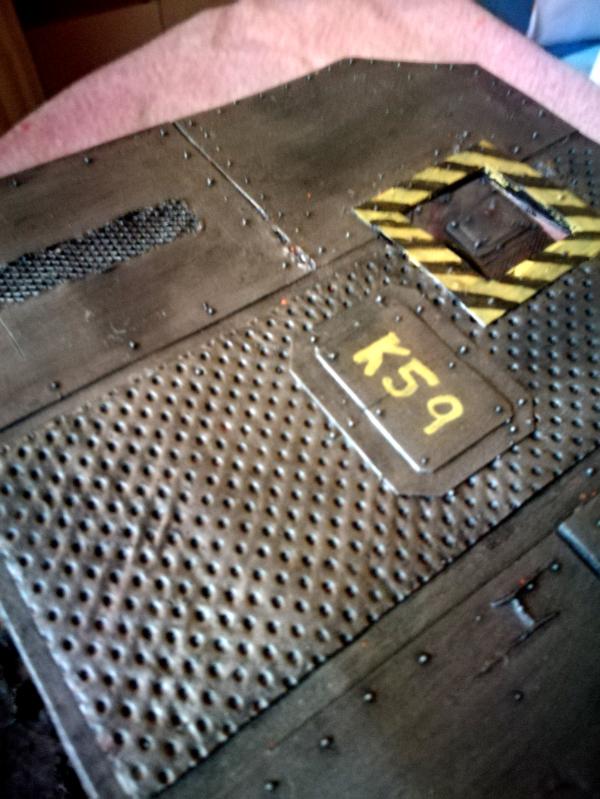
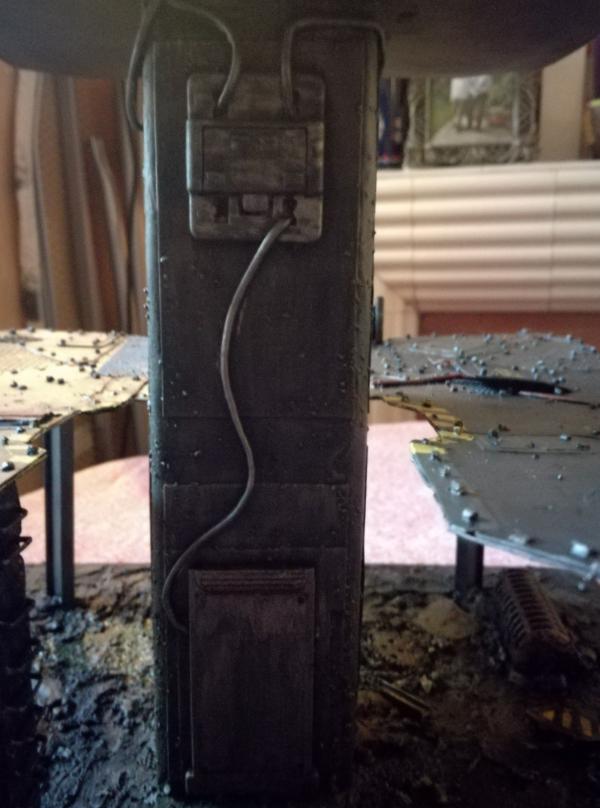
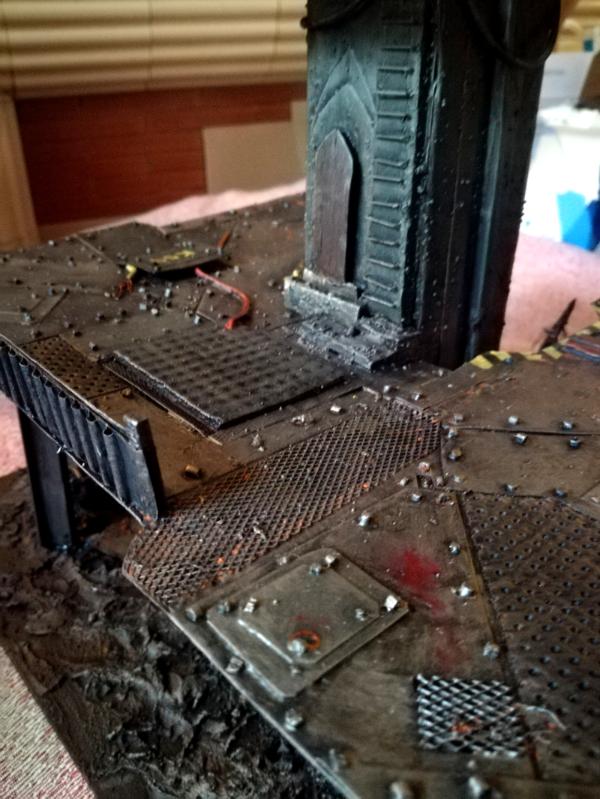
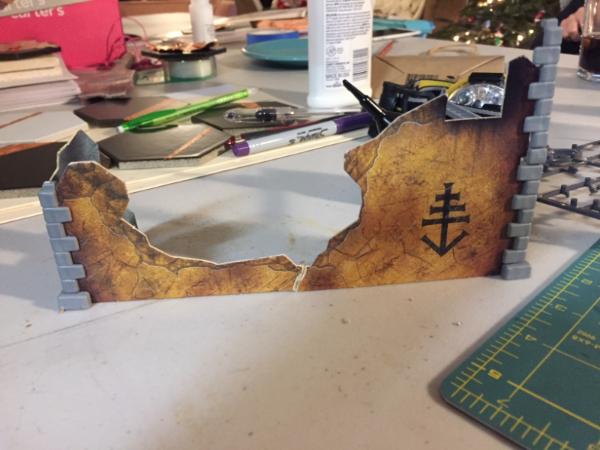
Apollionaire with "Necromunda (1995) Card - Terrain Tower"
Spoiler:
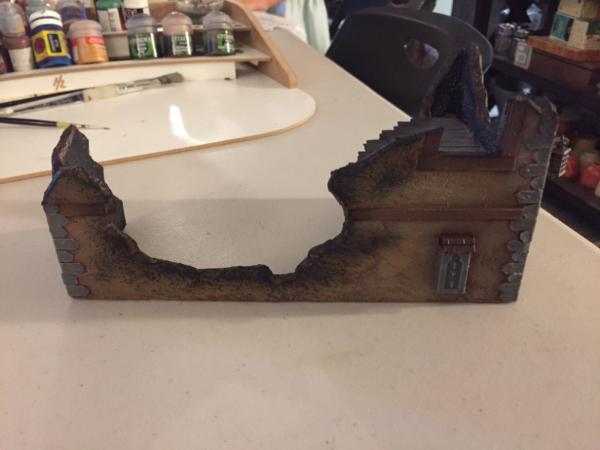
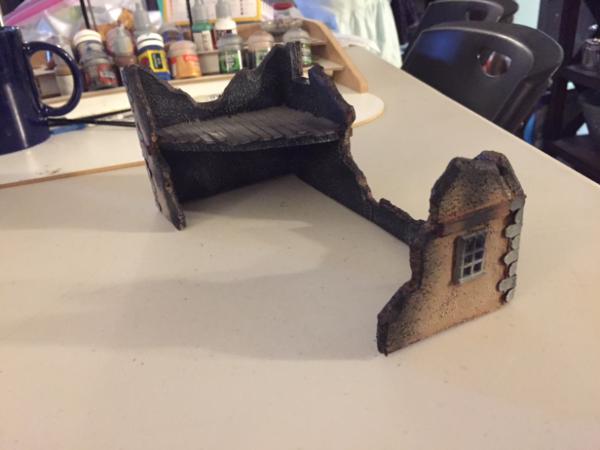
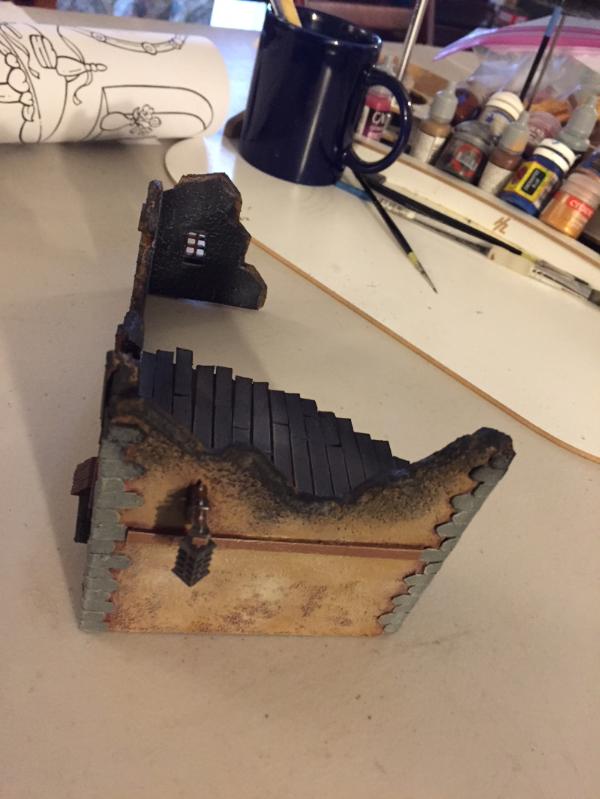
Ozymandias with "Mordheim Card Terrain - Ruined Building"
I wanted to recreate one of the old Mordheim cardboard buildings. This one was falling apart after years of being used both in Mordheim and more recently for Malifaux. Recreating it in foamcore seemed the best solution as it gives it some strength and thickness that is more realistic. I also had some extra pieces from other bits of terrain that I could use to pimp it up even more. Now just need to make another dozen or so to finish the board!
Spoiler:
Everyone pick a favorite? Great, get voting! You have 1 week.
This message was edited 4 times. Last update was at 2018/02/08 06:46:52
Couldn't have 4 more different approaches and results to one theme. All shine in their own ways; be that volume of work, technical skill, effort (pushing yourselves), or practical use.
Well done all.
Tough decisions ahead for you, Fango.
Mastodon: @DrH@warhammer.social
The army- ~2295 points (built).
* -=]_,=-eague Spruemeister General. * A (sprue) Hut tutorial * Dsteingass - Dr. H..You are a role model for Internet Morality! // inmygravenimage - Dr H is a model to us all Theophony - Sprue for the spruemeister, plastic for his plastic throne! // Shasolenzabi - Toilets, more complex than folks take time to think about!
2018/02/11 19:31:18
Subject: The -=]_=- Terrain Comp Thread -=]_=- LoER Terrain Contest #24 "Pimpin' Aint Easy " Public Voting


 // inmygravenimage - Dr H is a model to us all


