Switch Theme:

Converting Kharadron Arkanauts into Squats  [RSS] Share on facebook Share on Twitter Submit to Reddit
»
Author Message
Advert


Forum adverts like this one are shown to any user who is not logged in. Join us by filling out a tiny 3 field form and you will get your own, free, dakka user account which gives a good range of benefits to you:
  • No adverts like this in the forums anymore.
  • Times and dates in your local timezone.
  • Full tracking of what you have read so you can skip to your first unread post, easily see what has changed since you last logged in, and easily see what is new at a glance.
  • Email notifications for threads you want to watch closely.
  • Being a part of the oldest wargaming community on the net.
If you are already a member then feel free to login now.


Made in gb
Enginseer with a Wrench


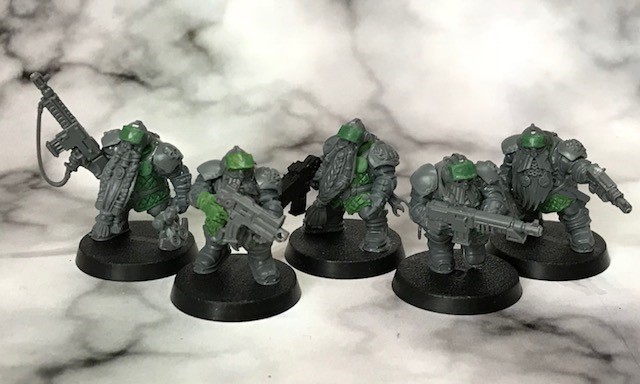
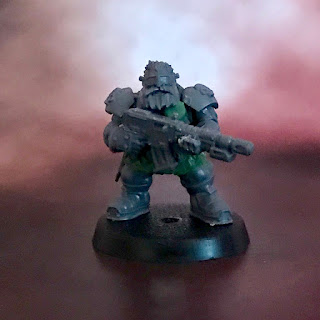
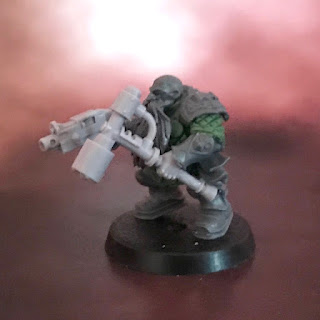
This is a tutorial to convert the Kharadron Arkanuts into Rogue-Trader inspired squats like this:


The full tutorial can be found on Death of a Rubricist here.


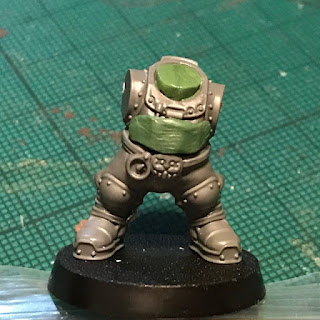
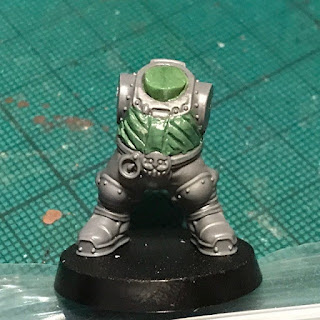
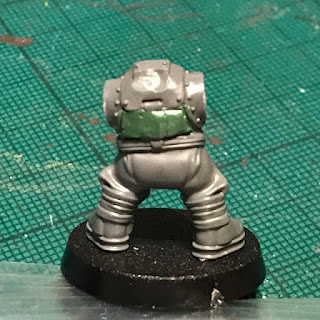
I_ Mix up your putty and apply it over the torso, aiming to fill the space between the collar and belt as shown. You don't need a huge amount.

+ Note that I've filled the neck area; that's because I'm using a flat-bottomed head from the Hammerer/Longbeard kit. Depending on which heads you're using, you may or may not need to do this. +


II_ Use the smooth end of the sculpting tool to spread out the putt evenly over the area, working into the crevices. Leave a fine gap at the edges. If you've added a little too much putty, simply smooth it so that it overflow the area, then use the sharp edge of the sculpting tool to trim it away neatly.


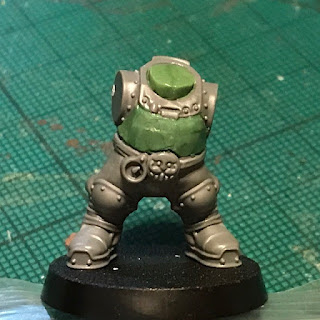
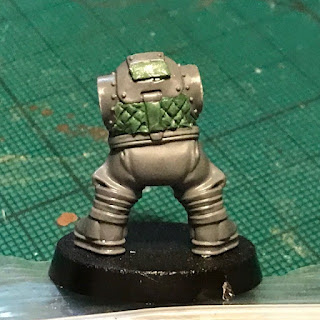
III_ Use the smooth end of the tool to gently push the surface of the putty towards the middle. This will create a raised hump, which you then gently flatten to create the impression of a strap. Note that the arkanaut bodies vary – some have two straps. You can sculpt them how you wish, but there are buckles on the collars that provide handy guidance on the placement of the straps, and help you to ensure a uniform thickness.


IV_ Use the blade of the sculpting tool to draw diagonal lines. Keep them as evenly-spaced as you can, and avoid the strap.


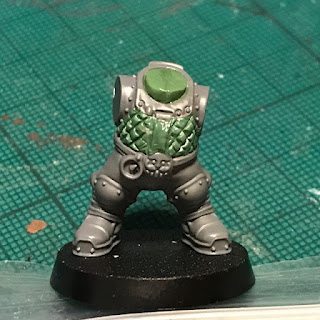
V_ Work back the other way, making diagonal lines running in the opposite direction to create the quilted effect.


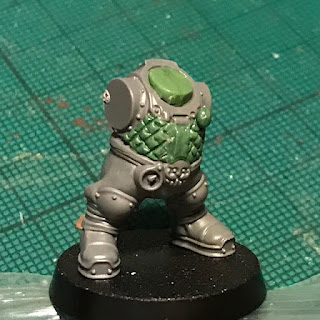
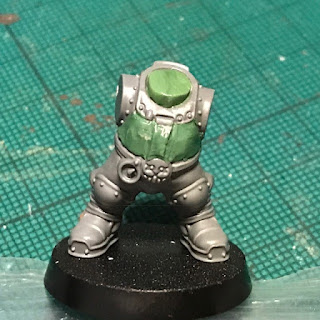
VI_ Roll a tiny ball of putty and place it on the upper left chest.


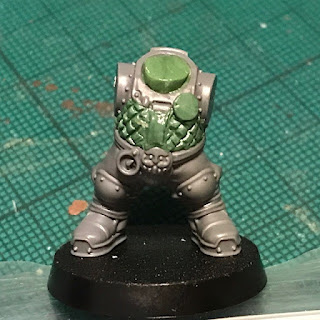
VII_ Use small circular motions of the smooth end of the tool to gently flatten out the ball into a circle. This will be the regimental/thronghold badge.


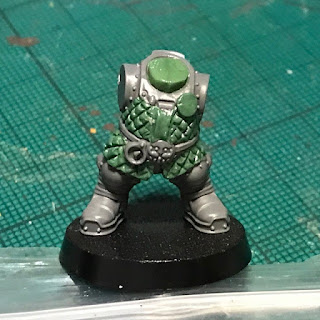
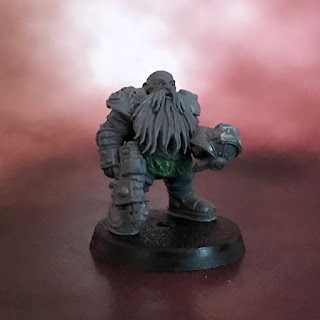
VIII_ Use the craft knife to trim away the little bobble at the back of the neck (the part where the backpack is intended to attach). Next, lay a small amount of putty between the belt and collar at the back, just like in step I.


IX_ Repeat the quilting process (steps II–V above) on the back, then add a small ball of putty where you trimmed away the backpack attachment. Smooth it out into a rough rectangle, then use the flat edge of the tool to refine and sharpen the edges.


X_ Returning to the front, wrap a small amount of putty around the upper legs, just below the belt. Smooth this into a flat tunic. As you can see, I didn't add enough putty initially, so it doesn't wrap all the way round (you can see the unsculpted end on the left of the picture). It's better to work gradually and add a little more at a time; as it's easier to add and smooth in small amounts than trim away excess neatly.


XI_ Once you have laid in the basic shape, repeat the quilting to pattern the bottom of the tunic all the way round the body. Because there's no break between the front and back, you can work round in one go. Try to match the spacing of the squares you're creating to the size of the existing quilting on the front and back.


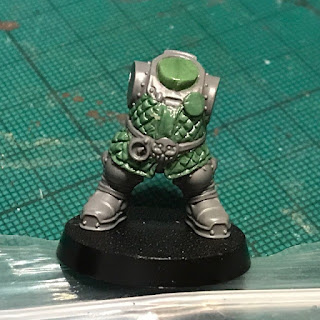
XII_ Gently run the blade of the sculpting tool round the edges of the tunic bottom to create a border. Use the smooth end of the tool to gently erase any overlapping marks to finish.

+Death of a Rubricist+
My miniature painting blog.
 
   
Made in us
Primered White


Orlando, FL

This is so cool! They look really great, especially with those autoguns you picked. Very inspiring conversion. Makes me want to make some squats myself.


Made in in
[MOD]
Otiose in a Niche


Hyderabad, India

This is really cool! Maybe not necessary for most players but very very cool.


Made in us
Martial Arts Fiday


Nashville, TN

Love it!

"Holy Sh*&, you've opened my eyes and changed my mind about this topic, thanks Dakka OT!"

-Nobody Ever

Proverbs 18:2

"CHEESE!" is the battlecry of the ill-prepared.

 warboss wrote:

GW didn't mean to hit your wallet and I know they love you, baby. I'm sure they won't do it again so it's ok to purchase and make up.


Albatross wrote:I think SlaveToDorkness just became my new hero.

EmilCrane wrote:Finecast is the new Matt Ward.

Don't mess with the Blade and Bolter! 
   
Made in us
Ultramarine Chaplain with Hate to Spare


Those are fantastic!

And They Shall Not Fit Through Doors!!!

Tyranid Army Progress -- With Classic Warriors!:
https://www.dakkadakka.com/dakkaforum/posts/list/0/743240.page#9671598 
   
Made in gb
Enginseer with a Wrench


Thanks all. Since the original batch, I've made some more. Same principles; but I've thrown in some bits and bobs from other GW dwarf ranges.


...and drafted some rules:

+Death of a Rubricist+
My miniature painting blog.
 
   
Made in gb
Raging-on-the-Inside Blood Angel Sergeant


Luton, England

Looking these, great work

Also a nice looking datasheet, how did you make it. Form fillable or just paint program?

40,000pts
8,000pts
3,000pts
3,000pts
6,000pts
2,000pts
1,000pts
:deathwatch: 3,000pts
:Imperial Knights: 2,000pts
:Custodes: 4,000pts 
   
Made in us
Humming Great Unclean One of Nurgle


In My Lab

 WisdomLS wrote:
Also a nice looking datasheet, how did you make it. Form fillable or just paint program?


I too desire knowledge.

And I'll echo the gent above who said "Looks good," since damn, they do!

Clocks for the clockmaker! Cogs for the cog throne! 
   
Made in us
Screaming Shining Spear


USA

WoW

I am soooooo envious.

You did a nice job on the Datasheets as well. The stats look spot on.

I hope you have HearthGuard in the Elites that can be attached to a Troop unit.

I hope you will have HearthGuard that can utilized Exo-Armor

Think of all the sweet weapons in the WarGear lists that the Ad Mech would love to have.

My Favorite would be Tanglefoot Grenades.

Keep Going mate....keep em coming!!!

 koooaei wrote:
We are rolling so many dice to have less time to realise that there is not much else to the game other than rolling so many dice.
 
   
Made in gb
Enginseer with a Wrench


WisdomLS wrote:Looking these, great work
Also a nice looking datasheet, how did you make it. Form fillable or just paint program?


Ta; and glad you like the datasheet. I worked it up in a desktop publishing program (InDesign). I did a conversion for Horus Heresy to 8th, so just reused the template I'd made.

admironheart wrote:WoW
I am soooooo envious.
You did a nice job on the Datasheets as well. The stats look spot on.
I hope you have HearthGuard in the Elites that can be attached to a Troop unit.
I hope you will have HearthGuard that can utilized Exo-Armor
Think of all the sweet weapons in the WarGear lists that the Ad Mech would love to have.
My Favorite would be Tanglefoot Grenades.
Keep Going mate....keep em coming!!!


Ha, some great ideas there!

+Death of a Rubricist+
My miniature painting blog.
 
   
Made in be
Sneaky Striking Scorpion


Wonderful work.

FTL


Forum Index » Painting & Modeling Tutorials
Go to: