Forum adverts like this one are shown to any user who is not logged in. Join us by filling out a tiny 3 field form and you will get your own, free, dakka user account which gives a good range of benefits to you:
No adverts like this in the forums anymore.
Times and dates in your local timezone.
Full tracking of what you have read so you can skip to your first unread post, easily see what has changed since you last logged in, and easily see what is new at a glance.
Email notifications for threads you want to watch closely.
Being a part of the oldest wargaming community on the net.
If you are already a member then feel free to login now.
So, I've recently decided to actually get into Warhammer, after several years of having no money to do such a thing, and now I do. I'm gonna get straight into the problem, I'm getting three of the Start Collecting sets, (for me, my brother, and my sister. I'm not insane.) and I don't know what paints to get or how to go about selecting the necessary colors. The citadel paints app recommends like six different paints for just the color white, which isn't very helpful. If it helps I only have a paint budget of about $80 total for all three armies (with about $10 wiggle room either way.) I know what the armies are supposed to look like, I just don't know where to start.
I'm getting the Space Marine Set (to begin with, will probably expand later) but instead of Space Marine blue I want to do my own ice/winter/whatever color scheme. Closest approximation, that I can quickly find,would be the T'au.
My brother is getting the Necron starter. Basically exactly the same except all the green bits are electric blue, and the leader is Skeletor.
And my sister is getting the Deamons of Slaanesh, (unless that's like, the worst idea ever) and they will remain basically the same as they are.
I added some pictures for reference, but I'm new and I don't exactly know how they work.
Warhammer TV on youtube should be your first stop, they do painting tutorials that're really good for beginners.
I dunno about the painting app telling you to use 6 different colours for white but if you find a scheme you like you can typically make it work with a base, a layer, and a wash or highlight.
For a very wintery looking marine I think this version of white armour with the blue shading would be best so start here:
Necrons are pretty simple as they're just metal skeletons, your brother can follow this but swap the greens for blue:
Demonettes will be less uniform anyway because they're daemones, so that makes them easier to paint one's cloths this colour then the next that colour, etc. But here's a good video for their skin:
Fafnir wrote: Oh, I certainly vote with my dollar, but the problem is that that is not enough. The problem with the 'vote with your dollar' response is that it doesn't take into account why we're not buying the product. I want to enjoy 40k enough to buy back in. It was my introduction to traditional games, and there was a time when I enjoyed it very much. I want to buy 40k, but Gamesworkshop is doing their very best to push me away, and simply not buying their product won't tell them that.
Drey wrote: So, I've recently decided to actually get into Warhammer, after several years of having no money to do such a thing, and now I do. I'm gonna get straight into the problem, I'm getting three of the Start Collecting sets, (for me, my brother, and my sister. I'm not insane.) and I don't know what paints to get or how to go about selecting the necessary colors. The citadel paints app recommends like six different paints for just the color white, which isn't very helpful. If it helps I only have a paint budget of about $80 total for all three armies (with about $10 wiggle room either way.) I know what the armies are supposed to look like, I just don't know where to start.
I've not got that app installed myself but chances are that it's giving a recipe for painting white, such as a base colour, a wash to shade it, and colours to highlight it up. It depends on how much effort you want to put into painting. Generally in miniatures painting you don't just use a flat colour - it's the shading and highlighting that makes it 'pop', especially when you're looking at it on a table from a few feet away. So for example you might paint a white area with very pale grey, with a mid-grey in the nooks and crevices, and then a pure white highlight along the edges. Though having said that, doing the whole area in a flat colour will still look better than bare grey plastic. If you're happy to start out that way, there's nothing wrong with just buying one 'white' and painting the whole area with that, but I'd suggest having a look at some painting tutorials to see how people tend to do it.
So, if you're just painting the areas in a flat colour, you can just pick the paints that look closest to the colour you want. That's fairly easy. If you want to shade and highlight you'll want darker and lighter shades of your main paint. Washes are useful for shading, since they're thinner than paints and they naturally pool in the recesses. Even if you don't bother with highlights, a wash is an easy way of giving the miniature some depth.
One big question is - do you have hobby tools, glue and brushes already, or do they have to come out of the budget too? Generally you'll need a set of small side-cutters, a hobby knife, glue (polystyrene cement for plastic models usually), a spray primer (cheap auto primer works wonders!), paints, brushes and something to decorate the models' bases (like sand, static grass or textured paint). Note that even though GW will sell all of that stuff, theirs is hilariously overpriced at times and you can save a lot of money buying similar tools from a hobby/hardware store. Even if your budget can be used entirely for paint, I'd also recommend looking at non-GW brands for paint. It's easy to get into the GW paints because they sell them alongside the models and give suggested paints to use, but they're expensive and you get less in the pot than other brands. If you have a limited budget it will stretch a lot further if you look at brands like Vallejo and The Army Painter. In fact regardless I'd recommend getting a few of the Army Painter washes if you can, they're excellent.
Drey wrote: I'm getting the Space Marine Set (to begin with, will probably expand later) but instead of Space Marine blue I want to do my own ice/winter/whatever color scheme. Closest approximation, that I can quickly find,would be the T'au.
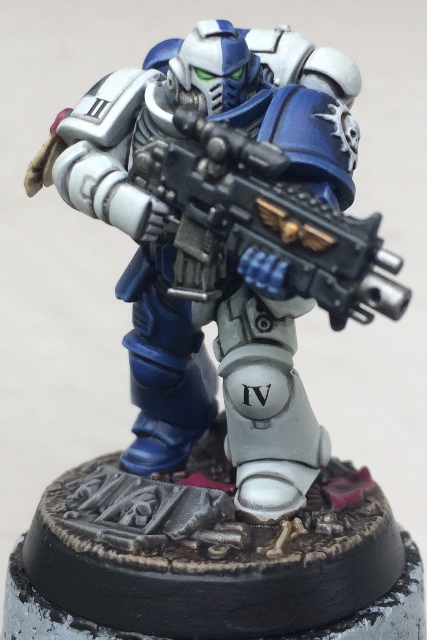
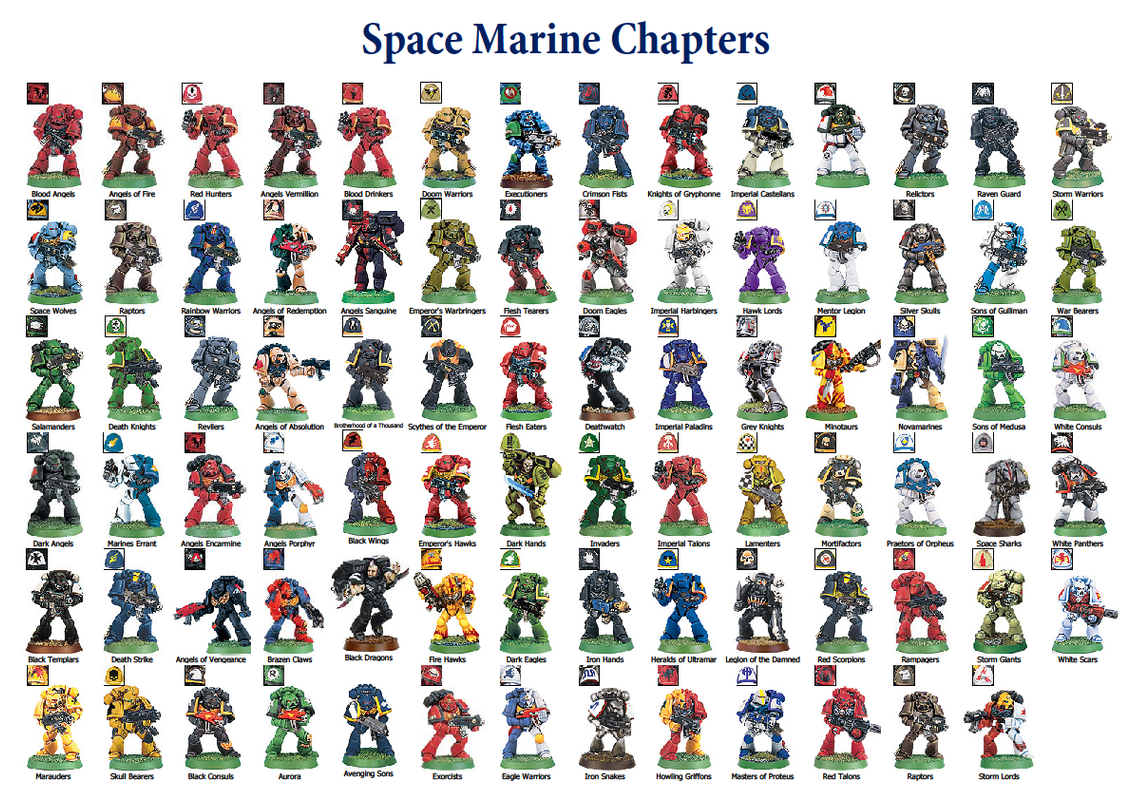
You'll soon find that one of the great things about 40k is that there's no set colour scheme for any army. They're all set up in the lore with sub-groups which have their own different tactics, colours and heraldry, with easy scope for players to invent their own. So your space marines for example are divided up into 'Chapters' which are independent armies with their own traditions, customs and heraldry. The blue ones with the upside down omega logo that you see on the box art and the GW site are the Ultramarines, they're the poster boys for the space marines. But there's loads of others to pick from - like the White Scars that Rybrook mentioned - and it's also absolutely fine (or even encouraged) to invent your own.
Drey wrote: My brother is getting the Necron starter. Basically exactly the same except all the green bits are electric blue, and the leader is Skeletor.
And my sister is getting the Deamons of Slaanesh, (unless that's like, the worst idea ever) and they will remain basically the same as they are.
I added some pictures for reference, but I'm new and I don't exactly know how they work.
Any other help would greatly appreciated.
Cool choices. Ultimately you should always buy the models you like the look of best, so if those are the ones they like then go for it. People will come along to tell you to buy whatever has strong rules at the moment, but by the time you've built, painted and learned to use them in the game, the rules will probably have had a balance tweak and whatever was strong when you bought them might not be strong any more.
As far as paint goes if you take some care and thin your paints properly you can use cheaper acrylic paints found at a normal craft store for around 1-2$ per bottle. This way you can get started with a bunch of good colors and buy the nicer quality miniature paints a few at a time /what your budget allows.
Instead of buying 4 or 5 slightly different shades of the same colour, you could go the old fashioned route and mix paints. It's less reliable that you'll get exactly the same colours each time (say if you paint 5 Marines one day, and another 5 a week later and mix up the paints each time, they're likely to be slightly different each time.) I'm fairly used to it now, and rarely have an issue with it, but can see how it could bug some people.
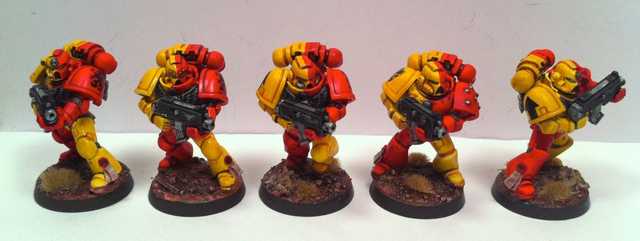
Easiest way is adding a little white to a colour to make it lighter and a little black to make it darker. Using white as the main colour makes it a little trickier, but it's still doable. If you're going for an ice theme, maybe putting blue into the white mix instead of black would work better? You could also just use a flat white base, shade it with a wash and then do a white highlight to bring raised areas back up. I did this recently for wing details on some Blood Angels models and it looks pretty nice.
Bellerophon wrote: So, if you're just painting the areas in a flat colour, you can just pick the paints that look closest to the colour you want. That's fairly easy. If you want to shade and highlight you'll want darker and lighter shades of your main paint. Washes are useful for shading, since they're thinner than paints and they naturally pool in the recesses. Even if you don't bother with highlights, a wash is an easy way of giving the miniature some depth.
Alright, sorry it took so long to get back to this, been shopping all day.
Anyway, so how would I go about using and buying washes? Like, if a model has more then one color do I need a separate wash for each color, or if the two colors are close enough in color will one wash work for the whole model? For example, on my marines they'll have white as a base color and then a light blue as the secondary/trim color and the daemonettes would obviously have at least two separate colors.
Second question, how would I get an electric blue that "glows" like the original green does on the Necrons? Back to the app, it says that its emerald green, but it looks more lime/neon green to me
Normally you want a wash that's a darker colour than your main colour that you're washing - so for example if you're painting green you ideally want a green wash (e.g. GW Biel-Tan green, Army Painter Green Tone). However you can often get away with a black (GW Nuln oil, Army Painter Dark Tone) or dark brown (GW Agrax Earthshade, Army Painter Strong Tone) wash for a lot of things, they have a shading effect but tend to make things look 'dirtier' than using a darker tone of the same colour. A lot of people like to use a black/dark brown 'dip' technique where they literally get a big pot of a wash, dip the model in it, shake off the excess and let it dry - simple and effective - so there's no way you can avoid applying one wash colour to the whole model if you do it that way! One wash over the whole model can get quick results and really improve a model over not shading at all.
For white, I'd tend to want to use a mid-grey which you don't often get in washes (I think Vallejo do one?), so I'd normally either thin down some grey paint and experiment using that as a wash or just carefully paint the mid-grey into the recesses. Normally when I do white I'm sat there with a size 0 brush carefully outlining the armour in grey. It takes some time but looks great.
Which green bit on the Necrons are you referring to? The rods in the guns are actually clear green plastic and aren't painted at all. If you mean things like the overlord's scythe and orb, that's not achieved with a particular paint but with clever painting - it's a carefully blended/highlighted transition from a darker green to a bright green highlight, which gives it a glowing effect. It's time consuming, with a fine brush and a steady hand, but it looks great when you pull it off. Similar to my last paragraph really - a lot of the good looking techniques take a lot of practice and patience to do, so when you're starting I'd not recommend trying them unless you're really in it for the painting. If you're just trying to get painted models on the table I assume you don't want to do anything that will make it take a frustratingly long time.
One way you can apply a highlight fairly quickly - though less accurately - is drybrushing. That's where you get the paint on your brush, wipe nearly all of it off and then drag it over the raised areas. It leaves the paint on the raised areas and doesn't go into the recesses, so the effect is somewhat the opposite of a wash. So for your space marines, if you wanted the Aquila on the chest to be in electric blue and make it sort of glow, you might paint it a reasonably darker blue, then drybrush a light blue over the top. It won't perhaps be an ideal effect but it's better than nothing and it's quick. Or if you want to go all in on intense painting there's plenty of help here and elsewhere on the web with all the advanced techniques.
Normally you want a wash that's a darker colour than your main colour that you're washing - so for example if you're painting green you ideally want a green wash (e.g. GW Biel-Tan green, Army Painter Green Tone). However you can often get away with a black (GW Nuln oil, Army Painter Dark Tone) or dark brown (GW Agrax Earthshade, Army Painter Strong Tone) wash for a lot of things, they have a shading effect but tend to make things look 'dirtier' than using a darker tone of the same colour. A lot of people like to use a black/dark brown 'dip' technique where they literally get a big pot of a wash, dip the model in it, shake off the excess and let it dry - simple and effective - so there's no way you can avoid applying one wash colour to the whole model if you do it that way! One wash over the whole model can get quick results and really improve a model over not shading at all.
For white, I'd tend to want to use a mid-grey which you don't often get in washes (I think Vallejo do one?), so I'd normally either thin down some grey paint and experiment using that as a wash or just carefully paint the mid-grey into the recesses. Normally when I do white I'm sat there with a size 0 brush carefully outlining the armour in grey. It takes some time but looks great.
Which green bit on the Necrons are you referring to? The rods in the guns are actually clear green plastic and aren't painted at all. If you mean things like the overlord's scythe and orb, that's not achieved with a particular paint but with clever painting - it's a carefully blended/highlighted transition from a darker green to a bright green highlight, which gives it a glowing effect. It's time consuming, with a fine brush and a steady hand, but it looks great when you pull it off. Similar to my last paragraph really - a lot of the good looking techniques take a lot of practice and patience to do, so when you're starting I'd not recommend trying them unless you're really in it for the painting. If you're just trying to get painted models on the table I assume you don't want to do anything that will make it take a frustratingly long time.
Huh, the app had me under the impression that they were painted rods. Regardless, I think I have what I need to start gathering supplies. Thanks for the help.
Just as important as the paints, good brushes! A cheap multipack will not help you out in the long run.
For starting out, you can just get a couple of the GW ones. As for paints/colours -
Deep metal
Lighter Metal
Gold
Nuln Oil
Medium Blue/Brown/Green/Red/Yellow
Black
White
Agrax Earthshade
If you have spare cash you can look into more specific colours (purple, pink etc). Those base ones above will let you paint anything, just a little mixing required. Before you know it you will have pretty much a full collection of the GW paints and will be looking at others.
Zap Brannigan -
"In the game of chess you can never let your adversary see your pieces."
"If we hit that bullseye, the rest of the dominoes should fall like a house of cards. Checkmate."
"Rock breaks scissors. But paper covers rock, and scissors cut paper! Kiff: we have a conundrum...... Search them for paper... and bring me a rock."
You may also want a "flesh" colour, if your marines have any exposed heads.
You can make a "wash" from pretty much any paint by mixing 1 part paint, 3 parts medium, and 4 parts water.
Medium is the wet part of paint that suspends the coloured pigments. You can buy medium just by itself. I think GW sells it as Lahmian Medium in the little pots, but you can buy it much cheaper in other ways.
For example, you could make 8 drops of Nuln Oil by taking a drop of any black acrylic paint, 3 drops of medium, and 4 drops of water and mixing it all together.
You could then create a wash of your base colour, and add drops of your black wash to that until it is sufficiently darkened. I'd start with a 2 drops black to 8 drops "base wash" to see how it looks and add more to desired darkness. That's a quick way to shade models quickly and cheaply, creating very natural shadow effects from a limited pallete.
If you prime the Daemons in white, and paint the flesh with 3 or 4 layers of wash, even if you choose purple-blue for the wash, the skin tones will look great, and it is super easy to do. You can be quite "sloppy" and then paint the crab-parts in darker, more solid colours.
This message was edited 1 time. Last update was at 2018/06/24 22:37:21
Welcome to the hobby ! I second what Garrior said, you can even reduce the number but it may be difficult with 3 different armies. The key is to plan ahead your color scheme, you can see a lot of pictures on this site or others (http://bolterandchainsword.com for example - hope I'm not breaking any rule), in the wip/logs/painting and modelling sections for inspiration.
WHTV videos and the citadel app are great ressources.
As far as the washes go, there are two routes. 1st one is to wash the whole model or area of on colour, then you'll want to apply a wash of the same colour. 2nd one is to wash only the recesses, it's a bit longer but "cleaner" and you can use only Nuln oil (black wash) or Agrax Earthsahe (brown wash) in the beginning.
greatbigtree wrote: You may also want a "flesh" colour, if your marines have any exposed heads.
You can make a "wash" from pretty much any paint by mixing 1 part paint, 3 parts medium, and 4 parts water.
Medium is the wet part of paint that suspends the coloured pigments. You can buy medium just by itself. I think GW sells it as Lahmian Medium in the little pots, but you can buy it much cheaper in other ways.
For example, you could make 8 drops of Nuln Oil by taking a drop of any black acrylic paint, 3 drops of medium, and 4 drops of water and mixing it all together.
You could then create a wash of your base colour, and add drops of your black wash to that until it is sufficiently darkened. I'd start with a 2 drops black to 8 drops "base wash" to see how it looks and add more to desired darkness. That's a quick way to shade models quickly and cheaply, creating very natural shadow effects from a limited pallete.
If you prime the Daemons in white, and paint the flesh with 3 or 4 layers of wash, even if you choose purple-blue for the wash, the skin tones will look great, and it is super easy to do. You can be quite "sloppy" and then paint the crab-parts in darker, more solid colours.
I was literally just about to ask if shade and wash are basically the same thing. Like if one bottle says wash and another says shade. This about clears it up, though. Also, what happened to my notifications? I didn't even know people were posting on this.
Garrlor wrote: Just as important as the paints, good brushes! A cheap multipack will not help you out in the long run.
For starting out, you can just get a couple of the GW ones. As for paints/colours -
Deep metal
Lighter Metal
Gold
Nuln Oil
Medium Blue/Brown/Green/Red/Yellow
Black
White
Agrax Earthshade
If you have spare cash you can look into more specific colours (purple, pink etc). Those base ones above will let you paint anything, just a little mixing required. Before you know it you will have pretty much a full collection of the GW paints and will be looking at others.
Should've paid more attention before I posted. Anyway, what's the difference between deep and light metals? Is it like, cobalt blue vs silver, for example? Also, would these work? I think these basically cover it, not sure about the brushes they're only like $20. Don't know why the second one is a download instead of just the picture. Sorry about that.
There's a setting in your user preferences that will "subscribe" you to any post you've posted in. You can check your "subscribed" posts by clicking on the thread tools. I don't know about other notifications, but that's what I do.
Starting out? For sure! I've always bought GW brushes, because I bought GW product at a GW store. I can say I found a BEAUTIFUL "Army Painter" Insane Detail brush that I can actually use to dot eyeballs.
"Deep Metal" like Boltgun metal will have a darker, more solid tone. Something like Mithril Silver (not sure what it is now) is almost white in colour, and is best used as a highlight on a deeper metal.
I have 6 brushes that I work with, plus scrap brushes to put glue on bases, mix custom colours, and things like that.
Drybrushes - Drybrushing is hard on brushes. Some brushes are better built to handle it though. They're also good for slopping on big splashes of base colours on vehicles and the like. With the daemons, you could load up a medium drybrush with flesh-wash and go to town on several models. If you get pools, turn the model and brush upside down and touch the brush tip to the pool. It will suck the pool back into the brush like an inkwell.
Large Drybrush 1: For light colours - If you drybrush with a dark colour, it basically stains the brush and you get colour transfer. Truthfully, this is only used for white. Used for vehicle-type models.
Large Drybrush 2: For dark colours - Mostly Red. I am / was a Red Marine player. Used for vehicle-type models, and also to drybrush grey onto my Death Company / Legion of the Damned.
Small Drybrush: For everything else. I don't drybrush much for small details. I mostly just basecoat and wash these days, but every now and again I'll have a model I want to put a bit more effort into.
Regular Brushes - Used for normal paints and washes / shades / inks.
Standard Brush - Normal, everyday brush. Good for getting main colour onto non-details. Learn to use the shape of the model, ridges and changing textures to keep from slopping everywhere.
Detail Brush - Smaller, detail oriented brush. Don't fall into the trap of using a detail brush for everything, it will take forever. Use it for details, like straps, buckles, buttons, that sort of thing.
Insane Detail Brush - Very fine details. It doesn't hold much paint. Pretty much enough to paint an eyeball, if you aren't overloading it. Great for dotting eyes, or finely placed "pin washing" into tiny crevices, like the braids on hair / beards. Dotting gemstones, if you're into that sort of thing.
Those brushes you are looking at will cause you more harm than do you good for the price. They look like the sort of synthetic bristles which hold paint poorly, and tend to flick paint around while you are trying to do things. I have a few brushes like that, and they are exclusively used to mix colours and make sure my paints are thinned to the right consistency. Most people use brushes made with Sable, which is a natural hair which is amazing for painting with. There are various grades of sable, I won't bore you with the details right now!
Starting off, you dont need lots and lots of brushes. 1 or 2 will work fine for your initial forays into the hobby, and I really would reccomend an Army Painter brush, or Games Workshop ones. They will give you the right level of control and paint flow to learn the ropes and to help improve your skills.
These 3 will let you paint anything, and will take up $21 of your $80 budget. There are "base" brushes, "wash" brushes etc, but all you really need are some normal pointed brushes and you can paint away. Do you have things like cutters and plastic glue/super glue for the mini's you are buying? If not, that is another chunk of your budget gone right there. I am going to operate on the assumption that you have hobby knives etc, and look at some paints for you.
These paints come to around $60 and should in theory allow you to paint anything with some mixing and colour theory (More blue to the green to make it darker, yellow to make it brighter for example).
I havent covered off spray undercoats, which are a whole new ballgame for you. However, they are the best method for undercoating your mini's and will allow you to paint away quickly and easily. Maybe the guys stateside can offer up some cheap alternatives to the Games Workshop ones, perhaps look into getting grey as a primer for all the armies you are looking at, will make it easier to paint over as a starter colour. White is also not a bad colour to start with, as I find it more forgiving for the new painter.
This is all done using Games Workshops paints, brushes etc. There are other brands out there, such as Vallejo and Army Painter which may provide better value for money to start with. You can also look into INSTAR paints (UK based) who do good value paints which have great reviews.
I hope that is of some help to you!
This message was edited 2 times. Last update was at 2018/06/30 08:50:43
Zap Brannigan -
"In the game of chess you can never let your adversary see your pieces."
"If we hit that bullseye, the rest of the dominoes should fall like a house of cards. Checkmate."
"Rock breaks scissors. But paper covers rock, and scissors cut paper! Kiff: we have a conundrum...... Search them for paper... and bring me a rock."
These 3 will let you paint anything, and will take up $21 of your $80 budget. There are "base" brushes, "wash" brushes etc, but all you really need are some normal pointed brushes and you can paint away. Do you have things like cutters and plastic glue/super glue for the mini's you are buying? If not, that is another chunk of your budget gone right there. I am going to operate on the assumption that you have hobby knives etc, and look at some paints for you.
Alright, thanks for that.
Side note, how much glue would I need? Like, would an 8 oz package be enough, or should I get more?
You'll mostly to entirely have polystyrene models (the grey semi-flexible plastic in the start collecting sets), so something like this testors model master bottle will do at least one start collecting box worth, probably more. CA/superglue/crazy glue will also work on plastic (just less user freindly--plastic cement grabs quicker, but also has some adjustment time after it grabs) and is the only thing that'll work on stuff like resin or metal, but you should only need like, a .5oz to a 1oz bottle--I tend to physically lose them or have them go off due to bad sealing before they run out. I also beleive the start collecting boxes don't have anything but polystyrene in them, so CA could be more of a "later on" thing. Finally, PVA (aka "elmers", white glue, that paste you're not supposed to eat as a kid) is used but only for sticking sand, "flock" (crumbled foam) or other materials to the model's base, but again, regular sized bottle will last a looong time.
Its first suggested use is for repairing figurines. The stuff is awesome, super durable, and easy to work with. Give the surfaces you're working with a quick "huff" of breath, as moisture activates cyanoacrylate (the key ingredient in super glues) and then a tiny dab of glue. Half a drop, at most. Seriously, I squeeze a half drop to the tip and then touch that to the part to be joined.
You squeeze the blue, crinkley looking side pieces to get the glue to come out. Super easy to control and if you let go of the sides it will suck the glue back in. Seals tight, and I've never had a bottle go "hard" before it was used up, and I'm not a super frequent modeler.
Takes about 5 to 10 seconds to set, but it's great stuff and if you have any habit of dropping models on the floor, you're be grateful you used it. The rubber additive gives it just a tiny bit of flex, where normal super glue is brittle.
You can use it on plastic, metal, resin... pretty much anything except wood / fibres.
This message was edited 1 time. Last update was at 2018/07/03 20:56:35
Welcome. Did you finalize a chapter or paint scheme yet?
If so please listen to some helpful tips and feel free to hit me up for advice via pm anytime.
You're going to want to follow some basics that seem like tedium, however will benefit you greatly.
1. Wash your plastic with warm soapy water before use.
2. Use an old toothbrush to scour your models.
3. Trim and clean the plastic of mold lines.
4. Under coat black always. It honestly gets the best looking results.
5. Once you purchase your paint.. find two more contrasting colors that likewise contrast with each other. For helerdry, and to make them pop. Such as if you're using yellow, grey red and white blue would contrast well. Don't forget to also pick your company colours. As there's 10 per chapter.
6. Look up the howling griffans, nova marines and other chapters with unique color schemes. I highly recommend the howling griffans.
7. For the love of all that is sacred, water down you paints, with water or a thinning agent. Milk... Consistency of milk. Layer layer layer..
8. Practice spraying before you undercoat.. clear your nozzles.
9. Get some green stuff to fill holes it also comes in liquid form.
10. Don't be afraid of the cost of you models.. as in if you screw up... You can always buy more later on... Don't rush it.
11. Your first models won't look amazing but that's okay.. you just started.
12. Matte coat your finished minis with Testors dull coat.
13. Post some pictures for us.
14. Burn and purge for the emperor.
On a side note... But some grey Knights hemets.. or the models to offset the regular helmets you have. Trust me it looks amazing.
Don't be afraid to kit bash.. when kit bashing multiple kits work better than just 2.. subtle is better than extravagant. Don't be obvious.
Regarding Primer, the colour you choose is a style choice, not a better / best option.
I found red primer for my Blood Angels / Red Marines, and that made for much faster painting as I washed the entire models in Reikland Fleshshade as my first step. I could paint a tactical marine in 10 minutes to a decent tabletop standard. I primed the bolters black (separately) so that a quick hit of drybrushed grey and then boltgun metal / nuln oil wash on the metal bits and boom! Crank out a 10-man squad in 2 hours, plus basing.
Thin paints over white primer creates natural, no-effort highlights. Faster production and in my opinion, more beginner friendly. My style, vs someone else's style. Style is entirely subjective.
Also, I prefer the look of gloss sealer in some cases. I find it makes the colours pop brighter, especially with marines. Again, a style choice, but I like brighter models, then "grungy" models. It's all about your preferred style. If you try gloss first, you can always put a dull (Matte) sealer over top to dull it down. I find gloss sealers tend to have a "thicker coat" then matte, so protect your paint jobs better if you're a gamer-first type hobbyist that has a habit of tossing your models back in the box a little less carefully than you should.
greatbigtree wrote: Regarding Primer, the colour you choose is a style choice, not a better / best option.
I found red primer for my Blood Angels / Red Marines, and that made for much faster painting as I washed the entire models in Reikland Fleshshade as my first step. I could paint a tactical marine in 10 minutes to a decent tabletop standard. I primed the bolters black (separately) so that a quick hit of drybrushed grey and then boltgun metal / nuln oil wash on the metal bits and boom! Crank out a 10-man squad in 2 hours, plus basing.
Thin paints over white primer creates natural, no-effort highlights. Faster production and in my opinion, more beginner friendly. My style, vs someone else's style. Style is entirely subjective.
Also, I prefer the look of gloss sealer in some cases. I find it makes the colours pop brighter, especially with marines. Again, a style choice, but I like brighter models, then "grungy" models. It's all about your preferred style. If you try gloss first, you can always put a dull (Matte) sealer over top to dull it down. I find gloss sealers tend to have a "thicker coat" then matte, so protect your paint jobs better if you're a gamer-first type hobbyist that has a habit of tossing your models back in the box a little less carefully than you should.
Well you can use whatever primer you want.. but honestly black adds a certain luster to the paint that I've found isn't present when using the same color you want for your base.
You also get the added benefit of shading, by using less paint in areas you want dark. Such as panel lines.
And I'm a firm believer in not using gloss.. no offense. Meant.
This message was edited 1 time. Last update was at 2018/07/04 14:59:05
I find I like shading with washes, rather than relying on the primer. Again, different styles.
I find Black to be a pain in the ass to work on top of. The primer counteracts the effort of getting highlights on the raised edges when you're using thin paint.
This message was edited 1 time. Last update was at 2018/07/04 15:08:22
All things being equal, and to each their own, a white primer with a very thin grey wash over the whole thing, followed by a pinwash of Nuln oil would accomplish the same thing in 2 applications of paint, neither requiring much effort.
I'm talking things like yellows. You could put down 8 layers of yellow over black (exaggerating) to get a solid top yellow on the very edges, then wash over it to darken the recesses, or you could start with white, put down 1 or two layers of yellow to get a crisp highlight on the upper edge and then apply a wash to darken the recesses.
I'm not saying I'm a master painter like the WHTV guys, but I doubt that our friend that's just starting is, either. I find working over white is just easier.
Some colors of paint are more transparent than others - green, yellow, red, orange tend to require more layers to become opaque over a black coat, while purples and blues tend to need more layers over white than black.
Thankfully, these days finding a primer in almost any color is possible and you can even prime and base coat in one go for many colors. You're not restricted to black/white/grey!
I really wish this thread would notify me that people are posting. So far, I've only found out because I've had another question, or I was just lurking in general.
Welcome. Did you finalize a chapter or paint scheme yet?
1. Wash your plastic with warm soapy water before use.
9. Get some green stuff to fill holes it also comes in liquid form.
11. Your first models won't look amazing but that's okay.. you just started.
13. Post some pictures for us.
14. Burn and purge for the emperor.
Don't be afraid to kit bash.. when kit bashing multiple kits work better than just 2.. subtle is better than extravagant. Don't be obvious.
I have not finalized a Chapter as it technically isn't a Chapter, but the White Scars/Howling Griffins( or the Novas, the text seems to be a bit screwy on my tablet) seem to be the closest match. (Now I'm writing it down, you may mean what Chapter I'm creating for them, but I'm gonna continue as if its supposed to be the base.)
1. If it's anything like that storm trooper helmet bust I did, that's probably definitely something I need to remember. (It was a lot like that Bible that visited my church recently that has to be stored in a bucket because of all the oil it produces.)
9. What even is green stuff? From what I've gathered through not specifically looking for it is that it's basically modelling clay.
11. While not technically true, that's not inaccurate. (I've base coated some Spartan armor (poorly) for some Mega Books minis, which I think are the same size? There abouts.)
13. Most definitely. I never ask and leave someone hanging.
14. I'm working on the final draft of the plan now!
I grew up with legos, I may not be good at it, but by the Emporer, I'll try.
This message was edited 1 time. Last update was at 2018/07/07 07:12:36
Drey wrote: I really wish this thread would notify me that people are posting. So far, I've only found out because I've had another question, or I was just lurking in general.
Welcome. Did you finalize a chapter or paint scheme yet?
1. Wash your plastic with warm soapy water before use.
9. Get some green stuff to fill holes it also comes in liquid form.
11. Your first models won't look amazing but that's okay.. you just started.
13. Post some pictures for us.
14. Burn and purge for the emperor.
Don't be afraid to kit bash.. when kit bashing multiple kits work better than just 2.. subtle is better than extravagant. Don't be obvious.
I have not finalized a Chapter as it technically isn't a Chapter, but the White Scars/Howling Griffins( or the Novas, the text seems to be a bit screwy on my tablet) seem to be the closest match. (Now I'm writing it down, you may mean what Chapter I'm creating for them, but I'm gonna continue as if its supposed to be the base.)
1. If it's anything like that storm trooper helmet bust I did, that's probably definitely something I need to remember. (It was a lot like that Bible that visited my church recently that has to be stored in a bucket because of all the oil it produces.)
9. What even is green stuff? From what I've gathered through not specifically looking for it is that it's basically modelling clay.
11. While not technically true, that's not inaccurate. (I've base coated some Spartan armor (poorly) for some Mega Books minis, which I think are the same size? There abouts.)
13. Most definitely. I never ask and leave someone hanging.
14. I'm working on the final draft of the plan now!
I grew up with legos, I may not be good at it, but by the Emporer, I'll try.
Alrighty. So as far as chapters go.. each spacearine comes from a chapter such as the Ultramarines, or the Nova marines, blood Angels etc..
Each chapter is broken down into 10 companies of space marines, signified by usually shoulders pad trim. White, gold, red, green, blue and so on depending on the company.
If you look up the history of your chapter usually breaks down the lore and significant companies achievements. Now you can of course make your own.
Or even make a renogade chapter like the soul drinkers who still serve the emperor but are excumincated.
So here's some Lore on the Nova marines as I feel they probably suit your style ideas that you already laid out..
Worth remembering that your Space Marines could be from a Chapter of your own devising. You can then make up whatever backstory you like for them, which can be particularly good in gameplay terms for letting you choose whichever Chapter Tactics you like. You'll not be able to take any other Chapter's special characters, but of those you've mentioned I think only the White Scars have any anyway.
In painting and modelling terms it means you've a lot more choice as to how your army looks. They might not follow the official Codex rules for unit or company markings, or if they do, they might do it a little different. Their heraldry might be similar enough to established chapters that you can use the models designed for those armies without having to paint them alike. Since you mentioned an Arctic theme, maybe some Space Wolf kits could provide furs for your more veteran or elite soldiers? Or maybe the knightly aspect of Space Marines appeals and you want your Terminators to use parts from the Dark Angels Deathwing kits? Maybe both? When you're making your own history for them, the sky is the limit!


 The stuff is awesome, super durable, and easy to work with. Give the surfaces you're working with a quick "huff" of breath, as moisture activates cyanoacrylate (the key ingredient in super glues) and then a tiny dab of glue. Half a drop, at most. Seriously, I squeeze a half drop to the tip and then touch that to the part to be joined.