Army composition
All forces must have the same number of knights unless specified as part of a mission
Some models are not as large as a knight, but will count as a knight for force composition when taken in specific multiples (this will be shown on their profile) but are regarded as seperate models at all other times
Most models are considered to be 'Metallic', but some forces do not use machines and they have vulnerabilities/benefits as a result - these models will be specified in their profile as 'organic'
Setting up the table
Use a 6x4 table
When using a long board edge during deployment, the middle 48" is the 'deployment edge' - when using the short sides, the entire edge is your 'deployment edge'.
Deploying armies
For each 24" between your deployment edge and the opposite edge of the board you have 12" of 'deployment distance' to share among the models you control.
The deployment distance for each model is measured between its deployment edge and the closest point on its base.
A model may not be deployed within 12" of an enemy model.
All players roll off to determine the deployment order (highest to lowest), taking the order from highest to lowest - where players share a result they then roll off to determine which gets priority in the deployment order
Players then take turns to deploy one model at a time going through the player deployment order repeatedly until all players models are deployed
Choosing edges with Three players?
Two players use the long board edges but take the deployment edge as the 48" furthest away from the short edge being used by the third player. roll off to decide who takes the short edge
Which knights go first?
When multiple players have models performing the same action, all players with a model performing the same action roll off to determine which player goes first, second, etc - with the winner going first
Which knight to use first?
When a player has more than one model performing the same action, they must start with the knight they control which is closest to an enemy model but may choose freely after that
When to turn your knight?
for any 'attack' actions the model is turned to face a primary target at the start of the action step
for all other actions the model may rotate freely about its center axis and is turned to face a primary target at the end of that action step
Facing a target
A model is considered to be facing a target when its center line passes through any point on that models base
Primary target?
when performing an attack action, a primary target must have at least one weapon directed at it
Determining facings?
All models have a center line and a dividning line.
The center line is determined by imagining a line passing through the middle of the models base, evenly dividing it between left and right and extending indefinitely out of the front and rear of the model
The dividing line is determined by imagining a line stretching through the two main weapon hardpoints, evenly dividing the base between front and rear and is the same width as the base is from front to back along the centre line
A model who's base is wholly in front of the dividing line it is in the front arc
A model who's base is at least partially touching the dividing line is in the side arc
A model who's base is completely to the rear of the dividing line is in the rear arc

Above: visual guide to determining the center and dividing lines
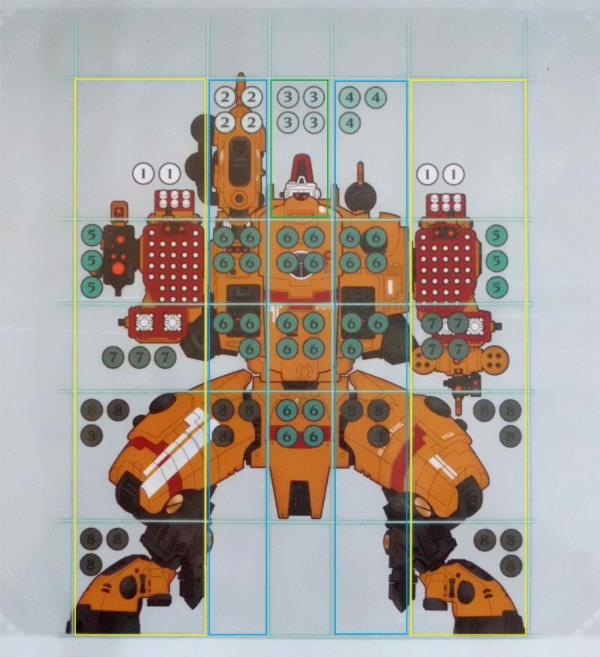
Weapon Arcs
The location of a weapon on a targeting grid determines their firing arc - taking the front targeting grid..
The location at the top of the center column may fire in any direction around the model. (marked in green in images below)
The locations to the immediate left and right side of the central column may fire at models in the front arc which are at least partially on their side of the center line. (marked in blue in images below)
The locations on the outer edges of the grid may fire at models in the front or side arcs which are at least partially on their side of the center line. (marked in yellow in images below)
Locations which are in the central column but are not at the top, may only fire at targets whos bases are at least touching the central line.

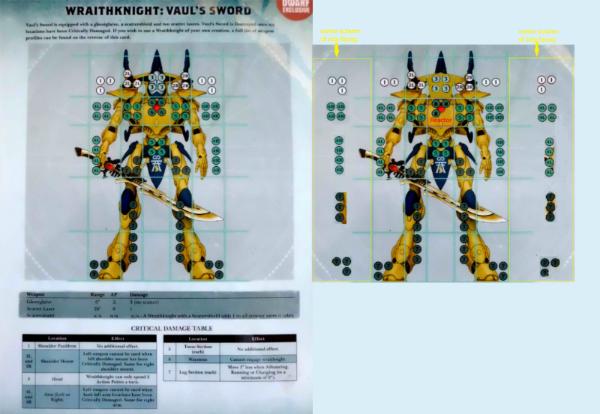
above: the eldar wraithknight here is about to attempt some shooting attacks but cannot shoot at 'knight 1' in its rear arc
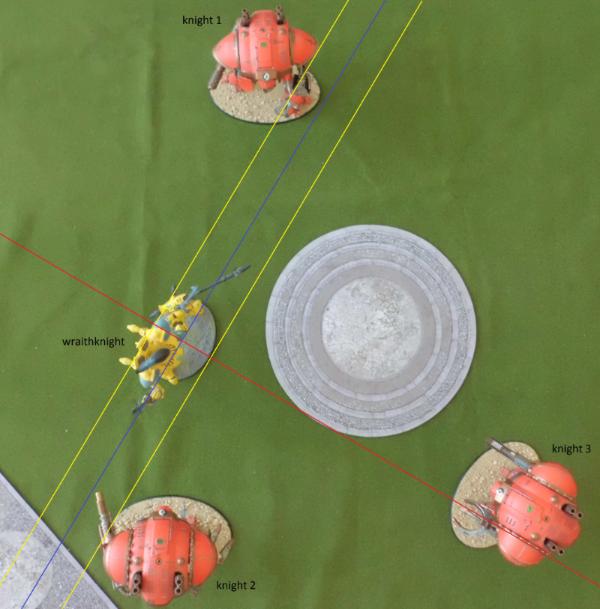
above: after turning to face its primary target, (knight 3) the wraithknight has now turned so that 'knight 1' can also be targeted - knight 1 can only be targeted by the left side main weapon, knight 2 may be targeted by the right side main weapon or shoulder weapon and knight 3 can have any of the weapons leveled at it
Rear facing targeting grid
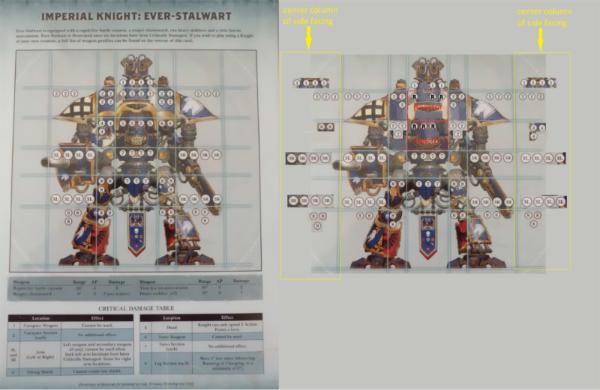
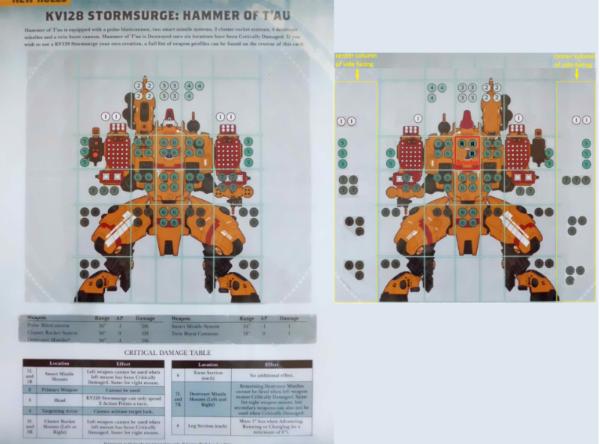
For the existing
GW knight profiles, prepare a second targeting grid for each knight to represent the rear and side facings by making a copy of the existing targeting grid with the following alterations
Imperial: locations 4, 6 and the locations directly above them now have an armour value of 3 and are now counted as 'carapace' for the purposes of critical damage; Reduce the armour values of locations 8 and 1 by one; location 5 and the location directly above it are now 'reactor' locations with an armour value of 3.
Tau: locations 1, 5, 7 and 8 have armour values reduced by 1; the location below number 3 is now a 'reactor' location with an armour value of 3
Eldar: the head location becomes a 'carapace' location; the location below becomes a 'reactor' location with an armour value of 3
Side facing targeting grids
Take the front and rear targeting grids and place them side by side; front grid to the left for a left side grid, front grid to the right for a right side grid.
When forming a side grid, the central columns of the front and rear grids are now the boundaries of your side facing targeting grid - any shots which scatter onto or past these locations are considered to have missed.
When both sheets are in the required position, a new column is formed from the partial locations on the side of both targeting grids - these become the central column of the side facing targeting grids.
The locations on this new column and their armour values are taken by tracing horizontally across from the selected location to the first targeting location on the front targeting grid with an armour value and taking the location type and armour value from it. they are also considered to be 'paired' with those locations
'Paired Locations'
Some locations are 'paired' with other locations on the other targeting grids - when both front and rear targeting sheets are placed back to back, some front targeting grid locations are 'paired' with the location to the direct reverse of them on the rear sheet For the existing
GW targeting sheets...
Eldar: the top row (excluding the head location), the bottom three rows and both edge columns
Imperial: the top row, the bottom three rows and both edge columns
Tau: the top row, the bottom two rows and both edge columns
When one of these paired locations is critically damaged the remaining paired locations are marked as critically damaged, but do not count toward the number needed to destroy the model
'Grouped locations'
Some locations are 'grouped'; these locations require that 'BOTH' locations are critically damaged before extra effects occur - these now require 'TWO' locations to be critically damaged before extra effects occur.
'Paired grouped locations'
Grouped locations may also be 'paired' - these paired locations can all count toward the 'TWO' locations required for critical damage effects.
When two locations are critically damaged, all remaining 'paired grouped locations' are marked as critically damaged, but do not count toward the number needed to destroy the model
Reactor Location
The reactor location always has an armour value of 3 - the critical damage effect from a reactor location is that knight is immediately destroyed
Destroying a model
When six locations are critically damaged on a single model it is considered to be destroyed and the model is left in place, the burning chassis becoming impassable terrain - when a model is destroyed by a reactor location receiving critical damage the model is removed from the board
Organic models
Organic models receive D3 damage from weapons which usually have 0 damage
Organic models have no ion shields to rotate but may use the 'rotate ion sheilds' action to restore a single point of damage to a location which was previously damaged, up to its starting value only; but is forfeit if the model has no damage to restore and may not be used to negate critical damage to a location
In a turn when an organic models 'head' location suffers damage, that model then suffers -1 action points during the next turn only
Winning/Drawing/Losing the game
Getting routed - when all of a players models are destroyed they have lost
Honourable victory - when there are only models from a single player remaining on the table at the end of a turn that player is the winner
Last model standing - when there is a single surviving model left on the table at the end of any turn the owning player is declared the winner
Draw - when only two opposing models remain, and both cause the opponent to be destroyed during the same action phase (any 'attack') of the current turn, then both owning players have drawn the engagement
Ending a game early
Sometimes you run out of time and a game needs to finish before victory conditions have been met - to work out a winner all players count up the number of critically damaged locations they caused and subtract the number of critical damage locations their whole force has lost (do not count locations which are marked as damaged because they are paired to a critically damaged location)
Players compare those final values and the player with the winning order taken from highest to lowest
Missions
IK:R the game is an engagement, but players may have agreed to a 'mission' to consider as part of the victory conditions
When playing with missions it is possible for a player to lose the engagement but complete their mission; this can override the result of the engagement where the mission specifies
A mission may have detrimental effects throughout the game
Missions can be used for following a narrative or to generate points for a campaign, but can also be used to mix it up a bit when playing against a regular opponent or just interacting with some new terrain you may have aquired.