| Author |
Message |
 |
|
|
|
|
Advert
|
Forum adverts like this one are shown to any user who is not logged in. Join us by filling out a tiny 3 field form and you will get your own, free, dakka user account which gives a good range of benefits to you:
- No adverts like this in the forums anymore.
- Times and dates in your local timezone.
- Full tracking of what you have read so you can skip to your first unread post, easily see what has changed since you last logged in, and easily see what is new at a glance.
- Email notifications for threads you want to watch closely.
- Being a part of the oldest wargaming community on the net.
If you are already a member then feel free to login now. |
|
 |
2019/04/07 21:36:58
Subject: Returning hobbyist needs assistance.
|
|

Been Around the Block
|
(Update: Added images of work so far down below. ROAST ME.)
Back after many years break and I have 3 issues.
How do I get under the arms and guns that cross in front? X-acto knife amputations  ?
Is my brush too big? I am using a 2 but it feels massive and the brush head smudges over say from pants to boot easily. Is 2 too big for me or do I just need to get my painting legs back. What size brush for edge highlighting?
Finally I feel my paints are too thick. I got a set of Vallejo Game color since all my Citadel paint dried up solid. Never used Vallejo before. It seems to either blob on and leave unsightly brush lines or I thin it out with water and it comes out like a wash.
Any advice is welcome. Thanks for your time.
|
|
This message was edited 2 times. Last update was at 2019/04/10 10:28:37
|
|
|
 |
|
2019/04/07 22:02:37
Subject: Returning hobbyist needs assistance.
|
|

Courageous Space Marine Captain
|
First off welcome back! Hopefully we can solve some of these issues for you so you dont skip out again
So first off, for getting under arms and legs I assume you mean for the likes of Space Marine chests with the aquilas that have bolters and arms in the way. For these you can either try sub-assemblies, where you paint the body and weapons/whatever seperately and then glue afterwards. However, in many cases you, where the weapon is airtight to the chest anyway, it doesnt really matter as they cannot be seen from any angle. Personally, I dont try to sub-assemble, if I cant be reached with a paintbrush it can't be seen.
Brush size entirely depends on what you are painting. If you've got a lot of tanks then its probably fine but for infantry I would recommend no bigger than a size 1. If you get more comfortable maybe try upping to a size 2 but for now, 1 for blocking in colour and maybe a 0 for fine details. For edge highlighting a 0 shpuld be fine but a 00 is also fine.
Okay so for thickness, you're clearly familiar with thinning so that's a good start. Many people will recommend a certain number of water drops but take it with a pinch of salt as different water has different properties. For example, I'm currently in scotland where the tap water is slightly harder and more mineral-rich than that of my hometown in Northern Ireland, so the way itth thins paint is slightly different. In general though, try a rough 2-1 ratio of paint to water and adjust as needed. If you have spare dropper bottles you can use these to gauge your amounts.
You can also try thinners, such as GW's Lahmian medium, for one example, but other brands also offer them.
If you're struggling with consistancy, try search on the Warhammer TV youtube channel. Duncan Rhodes is especially good as he shows you exactly the consistancy he uses on the demo model for whatever scheme it may be, which if you're also doing that scheme, is doubly helpful
|
I'm celebrating 8 years on Dakka Dakka!
I started an Instagram! Follow me at Deadshot Miniatures!
DR:90+S++G+++M+B+IPw40k08#-D+++A+++/cwd363R+++T(Ot)DM+
Check out my Deathwatch story, Aftermath in the fiction section!

Credit to Castiel for banner. Thanks Cas!
|
|
|
|
|
2019/04/07 23:34:03
Subject: Returning hobbyist needs assistance.
|
|
Been Around the Block
|
A 1 size brush is helping me alot. That and I think I need reading glasses now. I am going to try a method I watched on YT.
White primer -
dark Black wash -
Dry brush main color -
Quick dry brush one shade lighter -
Repeat for secondary color parts only -
Metallics -
face and skin layer -
shade darker or brighter skin dry brushed -
face highlights -
detail work / retouch -
brown wash on metallics and detail -
highlights -
eyes -
question life choices -
repeat on next model.
|
|
|
|
|
2019/04/08 02:17:58
Subject: Returning hobbyist needs assistance.
|
|
Thane of Dol Guldur
|
just gotta get some hours in friend. it will come. vallejo paints are pretty decent. keep thinning them. if theyre too washlike then add a little more paint. soon getting your ratios right will just become muscle memory.
a 2 should be fine as an all rounder. you should be able to layer and blend with that size. for final highlights you might want a smaller brush. i use 3/0 or 4/0
|
  Heresy World Eaters/Emperors Children Heresy World Eaters/Emperors Children 
Instagram: nagrakali_love_songs |
|
|
|
|
2019/04/08 03:53:26
Subject: Returning hobbyist needs assistance.
|
|

Junior Officer with Laspistol
|
1: I often find that with rifle-bearing models, I leave off the gun (in the case of marines) or I paint the arm/rifle piece (Guardsmen) separately and glue it on after I paint the mini.
2: I’m not familiar with brush sizes, but I use a GW “standard” brush, detail brush, and an Army Painter insane detail brush for 95% of my painting. I also have a couple of larger brushes for vehicles and whole-model drybrushing.
3: You might consider buying some medium. I’ve restored almost solid paint to useable with about 8 drops of medium and 8 drops of water. I use flip-top paints for the most part, and use the upper lip for thinning the paint. I dip my brush in water, and stir the paint till it runs. Need more water? Dip the brush in water and stir again. I pretty much dunk my brush every two or three paint loads to keep things flowing smoothly.
|
|
|
|
|
2019/04/08 05:24:19
Subject: Re:Returning hobbyist needs assistance.
|
|

Longtime Dakkanaut
|
1: sub assemblys, only way. paint the arms seperatly from the body and glue them on later.
2: sounds as it is yes. you do need 3-4 different sizes of brushes for your basic infantry.
3: if im not mistaken, vallejo uses drip bottles ye? if so then get a wet pallet. pour some on and add water with a brush until it is at the consistensy you like.
with drop bottles there is no way to thin the paint down in the bottle so it will allways come out as thick goo.
|
darkswordminiatures.com
gamersgrass.com
Collects: Wild West Exodus, SW Armada/Legion. Adeptus Titanicus, Dust1947. |
|
|
|
|
2019/04/08 17:19:19
Subject: Returning hobbyist needs assistance.
|
|
Been Around the Block
|
TYSM fo the input everyone.
I am using smaller brushes and flat brushes now.
I went online and watched and rewatched tip videos as a refresher.
Got a wet pallet (OMG This is amazing)
Am working on a Chaos kill team RN. When I feel it's finished or really close I'll post for some critique and link it here as well.
|
|
|
|
|
2019/04/08 18:06:29
Subject: Re:Returning hobbyist needs assistance.
|
|
Ancient Venerable Black Templar Dreadnought
|
Welcome back to the hobby of plastic crack! 
If you are building Space Marines, keeping the arms off is a good way to do things since the shoulder pads hide most of the join.
Remember to remove a little bit of paint at any join or you will have to depend on the paint adhesion (using crazy glue) and you will get no "weld" if using the solvent based glues that melt the two pieces together.
Failing that, it depends on your preferred method of painting starting with priming: I do black and work my way up, so if you miss detail hidden behind the bolter it is in "shadow" and cannot be "seen" anyway.
A good "cheater" method is a form of "Zenithal highlighting": Spray from beneath a dark colour: black (under arms, crotch, under backpack, any overhanging areas), burnt brown etc, Spray sides and top only with a "mid-tone" or your primary colour (Spraying slightly downward but with a little more coverage, then only from the top dust the model with a very light version of the primary colour or even white if you are careful.
I find this gets really good coverage and seems to blend reasonably well and comes all together with those "watery paints" in a wash.
With all the coloured rattle-cans or going into the airbrush it speeds up painting for me drastically with good results.
I find once you get past 40 years or so, the warranty goes on your eyes.
I use combinations of 2 swivel arm lights, jeweler's visor or 3X cheater glasses if in mixed company.
Some of the newer painting stands have little bars to steady your brush on.
I just make sure I have my brush hand's pinkie or other fingers touching the stand/model.
I find also I get that slight tremor when I drink coffee so it is something to look out for.
Yes, wet pallets are awesome for not having to fuss in topping up your paint as it dries on the pallet.
Look into a bit of acrylic "dry retarder" that most artist paints put out.
If you want to try your hand at mixing then these are mandatory unless you made note of your recipe for next time.
NOTE: to help save your paints in the future, get "matt medium" for acrylics, some of the thickest paints come back to life after a few drops of this stuff.
It is the actual "glue" of the paint you are adding so unlike adding water it may not stick very well or thin out too much.
Make sure you mix the heck out of even the dropper bottles, you may be seeing only the medium and all the pigment is a big blob in the bottom of the bottle.
I bought a TON of these nail polish stainless ball bearings to drop into my paints (give a good strong shake and it all mixes), I was using bits of cut sprue in there before which seemed to work fine.
Some folks have hooked up a pump clamp onto jig-saws to mix paints which is a fast way of doing things, if not scary (good tight lid right??)..
I use matt medium and a few drops of flow-aid and distilled water in a bottle to use to wet my brush prior to applying a wash or layer, it seems to get everything to lay down a bit better.
Brushes. Acrylic does well with synthetic or natural. I look for brushes that keep a good point and spring back to a point when touching the end.
I thought all brushes were the same until I got the Windsor and Newton #7 brushes... I have been ruined forever now, they have a good reservoir and hold a point terribly well.
Just clean them well, do not leave them resting in the water dish, get the fancy pink soap, it is great for forming the tips as well.
No twisting the brush when drawing it along paper to remove paint or to dry.
The tiny end brushes help much for painting eyes (paint eye colour you want, then dab in corners white, that is my preferred method).
If I paint say a longer line, I find but long hair brushes seem to work very well (called liners or script).
For edge highlighting, depending on the angle of access, running the side of the brush along the "sharp" edge or even rounded works well and does not require a great deal of accuracy.
Have you been looking at "shaders"?
They are finely mixed acrylic paint/pigment with a ton of flow-aid in it so it wicks into the recesses and avoids the raised areas.
I find you need to "block paint" everything as neatly as you can and only shade as the last step (with maybe some touch-up edge highlighting).
Some put on a hard clear-coat first before shading so cleanup is easy if things get blobby.
Your REALLY have to look at these, it is literally painting expert in a bottle... I cursed mightily when I started using these on how good the results were with little effort (almost as much as starting airbrush).
#1 rule for shading: Get every last one of those darn mold lines prior to prime or paint or you will be seeing them shockingly clear with the gosh-darn shading.
You have been warned (you can hope prior paint or clear-coat filled them in enough).
Best I could put all in one, I really have to get some FAQ together on stuff.
My main "skill" is model assembly and painting is something I am "forced" to get good at if I want all that assembly work to mean something.
Holy heck wall of text!!
Sorry all.
|
|
This message was edited 2 times. Last update was at 2019/04/08 18:12:21
A revolution is an idea which has found its bayonets.
Napoleon Bonaparte |
|
|
|
|
2019/04/09 07:31:34
Subject: Re:Returning hobbyist needs assistance.
|
|
Been Around the Block
|
This is where I am so far first attempt at table top quality after not painting for 5+ years.
BTW 6+ layers in some places....
|
|
|
|
|
2019/04/09 13:44:25
Subject: Re:Returning hobbyist needs assistance.
|
|
Ancient Venerable Black Templar Dreadnought
|
Nice! This is good to see!
The good:
Accuracy with the brush is pretty darn good.
Consistency in a "theme" will pay dividends as a group of models.
I was looking for mold lines, you removed those well which is half the battle.
The paint went on very smooth, I usually see people starting out with the paint too thick.
Suggestions for improvement:
Try a much darker shade first and build up like a dark red coat, then target the larger raised areas with a md-red and then highlight sharp edges with an orange or a bright red whatever looks best to you..
I noticed some of the brighter red paint was pooling in the recesses creating a "reverse highlight" so you may want to stay away from the cracks and crevices when putting on the base colour. You may want to add the matt-medium as pointed out for a little less flow.
You did the exact same thing I did when I started off with Black Legion: metallics edges look uneven. This is the fault of the paint application, not your technique. Metallics are VERY transparent for many brands, first paint the metal area with a similar non-metallic paint THEN the metallic over it. It will look much more clear and distinct. I was getting quite upset as a new painter way back when until we figured that one out. Try also to use different water and brushes with metallics vs non. I had a few models look like they were out at a rave coated in glitter. Metallic contamination is no joke.
Once you apply shade, it will blend everything better and fill the crevasses I think that is the #1 item that will make all that work come together.
Well done!
When I started, I did 10-man squads at a time. First squad was ok, I learned and did a lot on the 2nd squad. When I finished my 3rd squad I was looking at the first thinking they needed some serious touch-up. That is the path that leads to madness.... 
|
A revolution is an idea which has found its bayonets.
Napoleon Bonaparte |
|
|
|
|
2019/04/10 10:15:26
Subject: Re:Returning hobbyist needs assistance.
|
|
Been Around the Block
|
All right so when I did this I was trying to get a fade up to a bright red with orange just behind it to give a glow effect and it was just too much effort for how it looks. I have to go back in and do touch ups to fix it from looking as messy. My colors bleed over a lot. Taking bright pictures really close helps me see where I am messy and what I need to fix.
Now for you viewing displeasure - 
|
|
|
|
|
2019/04/11 17:27:40
Subject: Returning hobbyist needs assistance.
|
|
Junior Officer with Laspistol
|
It looks like you’re starting dark, and layering paint up to highlights. Without being hyper-critical, that’s a more difficult process than starting light and darkening down.
For example, if you put too much light paint on, you’ll get muddy transitions between colours. The rear of the Marine, for example, has the brown from the fur bled over onto the cloak.
My suggestion would be a change of process. Start with a white primer, paint the “base coat” as your mid-tone colour and then wash over that with a darker wash.
By washing last, you keep dark shadows between the brighter main colours. This helps to keep the definition of your details, and avoids the “colour smear” that your models currently have.
For now, I would suggest avoiding adding gore or glow effects. They’re trickier effects that may be contributing to the colour smear that’s going on. The weapons on the Marine, for example, look confused. At this stage of your painting, cleaner, better defined colours would be what I’d suggest practicing.
Keep at it, we all start somewhere! 
|
|
|
|
|
2019/04/11 20:26:37
Subject: Re:Returning hobbyist needs assistance.
|
|
Ancient Venerable Black Templar Dreadnought
|
Starting with a very clean block painting is a good way to go.
it looks like you are so close to pulling this together.
There is this pooling / blending / interaction going on.
It looks like the paint is way wet/thin so we are seeing the darker layers showing through on the raised areas which is the opposite effect you want.
Did you block-paint / undercoat really dark like black?
The orange may be a bit too much of a jump in highlight, it gives an impression of rust.
I have some cultists, I could try a step by step of my own and see how it goes?
I will look and see where I was at with the shotgun and sword guy.
Warning: I am one of those people who start from black primer and build up.
You should listen to greatbigtree if you are working from white.
I made the decision to always start from black because I found I made way too much of a mess of anything I wanted to keep a light colour.
I am seeing a great deal of my old painting in yours.
Shall I have a go?
Would it be of some assistance?
<edit> Those particular chaos space marines have a rather insane amount of detail, they are not an easy task you have set out for yourself. Cool looking all the same.
|
|
This message was edited 1 time. Last update was at 2019/04/11 20:29:59
A revolution is an idea which has found its bayonets.
Napoleon Bonaparte |
|
|
|
|
2019/04/11 20:57:57
Subject: Returning hobbyist needs assistance.
|
|
Junior Officer with Laspistol
|
Ooooh! I think we could have a tutorial challenge. I'll try a step-by-step from white primer, you go from dark primer!
The closest I think I'll have available would be a guardsman and maybe a loyalist marine... but it should work ok.
Have-at-you, Talizvar!
|
|
|
|
|
2019/04/11 23:14:35
Subject: Returning hobbyist needs assistance.
|
|
Been Around the Block
|
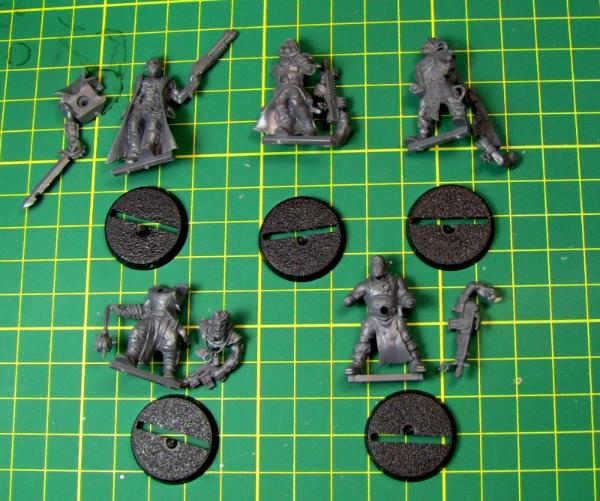
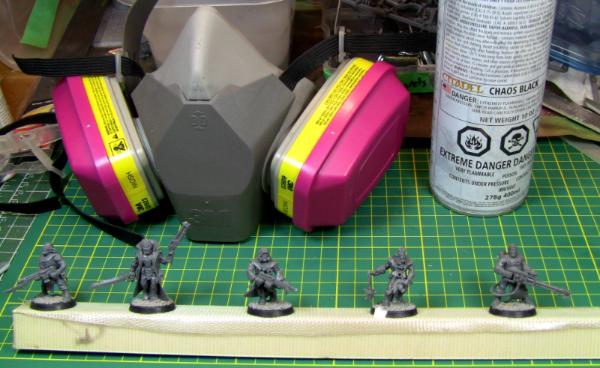
Ok I have the rest of my Chaos from my Dark Vengeance set to paint. I will just try and do plain Jane style, color in the lines, and then just hit it with a wash - then highlights after.
They are primed white and I gave them a quick black wash to see the detail lines better. Didn't thin my wash so they are grey toned but I can still make out the detail lines.
Will keep posting updates as I go. This time rather than paint them in a big batch of 16 at the same time I'll just do a few.
|
|
|
|
|
2019/04/11 23:25:53
Subject: Returning hobbyist needs assistance.
|
|
Ancient Venerable Black Templar Dreadnought
|
Gosh-darn!
Hehe, just found my Dark Vengeance stuff, furious assembly underway right now.
So it begins:
 Automatically Appended Next Post:
 I am idiot, bottom right hand guy is flamer/heavy stubber guy.
Flamer guy he is very shortly. Automatically Appended Next Post: They are alive!
Some mold line removal and drilled out gun barrels where applicable and the flamer guy is properly kitted out.
|
|
This message was edited 2 times. Last update was at 2019/04/12 00:05:21
A revolution is an idea which has found its bayonets.
Napoleon Bonaparte |
|
|
|
|
2019/04/12 00:06:29
Subject: Returning hobbyist needs assistance.
|
|
Junior Officer with Laspistol
|
Haha! I'm winning already! My guy is assembled and primed... but I forgot my phone at work.
@ Kirk: Would it be fair to say you're painting in the style of Crimson Slaughter Marines?
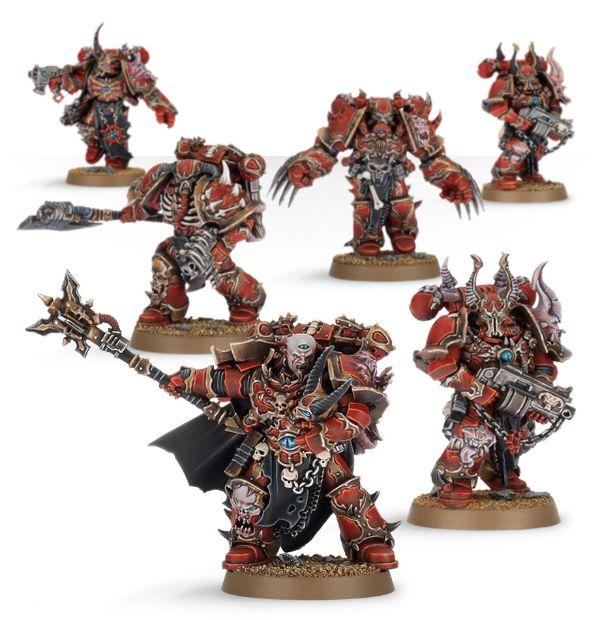
Or is your goal something different?
|
|
|
|
|
2019/04/12 00:30:29
Subject: Re:Returning hobbyist needs assistance.
|
|
Ancient Venerable Black Templar Dreadnought
|
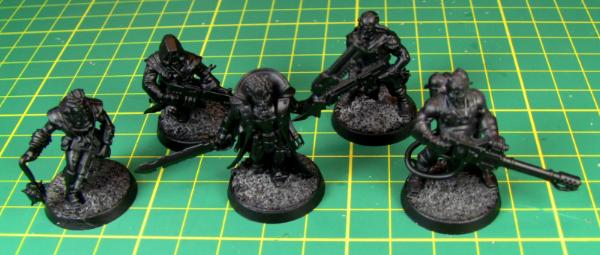
Added gravel to bases and wait a bit and prime BLACK. 
i figured I was behind one way or another so this is why my "speed build" is happening.
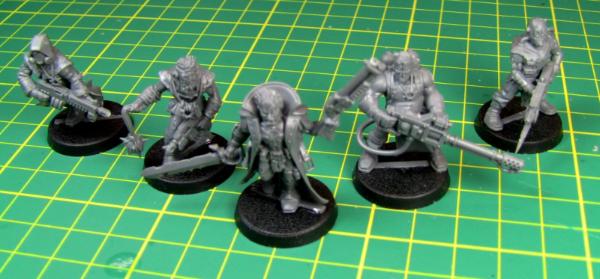
BTW I will also mention that these cultists are based very much on the "Blood Pact", the main feature is the toothy masks they wear (Our shotgun friend in particular).
https://warhammer40k.fandom.com/wiki/Blood_Pact
https://segmentumobscurus.fandom.com/wiki/Blood_Pact
Automatically Appended Next Post:
Double sided tape on a stick and line up the guys (I have no weights in the bases so they would fly otherwise).
Shake the rattle can for at least a solid minute (depending on how long the thing sat... I may need 5 minutes...)
I am spraying in garage, a bit wet so some risk: ideal is a dry day and anything between 5 to 30 degrees C (Yes I am in Canada and we mix the heck out of metric and imperial)..
Turn upside down and clear spray, then aim at models and spray at about a foot away.
Feel free to do a quick shot and let it dry for a few minutes.
I start spraying underneath first and work my way from sides to top.
 Automatically Appended Next Post: Automatically Appended Next Post: Okay, needs some dry time.
I got my fan on it and expect at any point some complaints of smell coming from the garage... I have no idea. 
Does not need to be a perfect coat, I am saving that for the "proper" paint.
Figured I might as well show this stuff while you wait for me to get my act together.
Then the smack-talk and criticisms can fly!
But none aimed at the new guy... 
I am trying to teach and demonstrate so a few good kicks are deserved this way. 
 Automatically Appended Next Post: Automatically Appended Next Post: "Pro-tip": Do not let your wet palette dry out completely with the paint sheet still in it.
It was a delicate thing to get that sponge to lift off without tearing.
|
|
This message was edited 7 times. Last update was at 2019/04/12 01:52:50
A revolution is an idea which has found its bayonets.
Napoleon Bonaparte |
|
|
|
|
2019/04/12 02:15:49
Subject: Returning hobbyist needs assistance.
|
|
Been Around the Block
|
MINI Paint Battle!!!! LOL
I saw a paint style on CoolMiniOrNot that made it look like the chaos cultists were glowing orange/red like lava. I am sure the effect was done with an air brush and I tried to do it with a brush like the overconfident youtube watching drone I am rather than try to get my core painting skills acclimated.
I am just going for basic style for these next ones. Try to focus on core skill. Brush control. Try to make it good but simple.
|
|
This message was edited 1 time. Last update was at 2019/04/12 02:19:22
|
|
|
|
|
2019/04/12 02:53:53
Subject: Re:Returning hobbyist needs assistance.
|
|
Ancient Venerable Black Templar Dreadnought
|
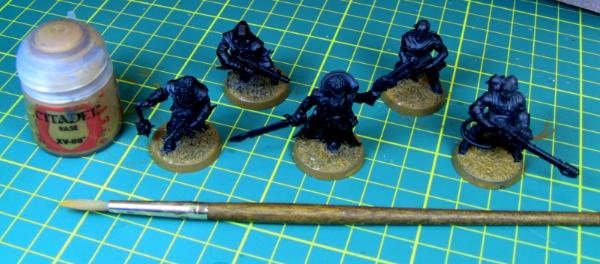
Okay, tradition for me but I do a quick coat of the base.
A high pigment paint since it is such an uneven surface.
Big brush you do not care about too much and water the paint down a fair bit and smear it in.
Use the paint thicker on the side edge.
It will take a beating with drops of paint and stuff but it is the "canvas" that frames the miniature.
It is terribly easy to clean up later.
Unless you detach the miniature from the base it can be dangerous trying to paint underneath near your pretty finished product.
I use the airbrush now to do the base (not in this case), less wear and tear on brushes and less paint used.
This is when a "plan" is important of what you want your army colours to be.
In this case, start from darkest to lightest colours or touch-up will be horrible.
I have a method I use for all my armies so if they are used like a "soup" they all look coherent.
Bases are all this colour, I tend to paint where I can the guns a red on the stocks and metallics pretty much everywhere else.
Melee weapons where possible a hazard stripe of yellow and black but power weapons a light blue.
Flamers and meltas tend to get a bronze / copper look at the nozzle (the heat bluing/purple is a new favorite).
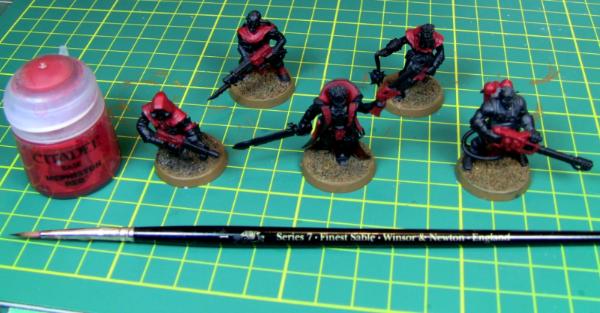
Anyway, Red will be the main army thing, the coat guy I imagine as a corrupted commissar (or the coat was taken from one) and will be black.
Anyway, clean, neat painting and washes at the end is the plan.
<edit>
Hey! Youtube is packed with well meaning people trying to help as well. 
General glows can be easier with airbrush but really good ones require masking and lots of layers, some sanding between them in some cases (the really scary good ones)... not something I attempt with any confidence. Automatically Appended Next Post: Okay, calling it a night.
I may go back and put red on later but this is most of it for now:
I am thinking a Zandri Dust (very light tan) for general clothes.
I like the darker brown boots and "leather" pouches so they may go well together.
I may start putting on a dark grey on all the metallic surfaces, it will make the miniatures a bit easier to look at as well.
I might go over the shotgun stalk to a more wood colour and finish... this will be the leader after all and will need some style.
|
|
This message was edited 2 times. Last update was at 2019/04/12 03:53:30
A revolution is an idea which has found its bayonets.
Napoleon Bonaparte |
|
|
|
|
2019/04/12 10:03:43
Subject: Re:Returning hobbyist needs assistance.
|
|
Been Around the Block
|
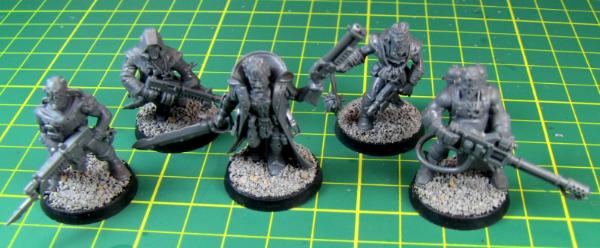
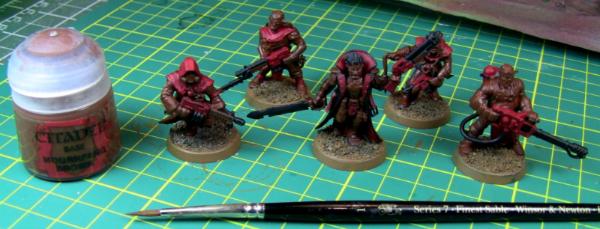
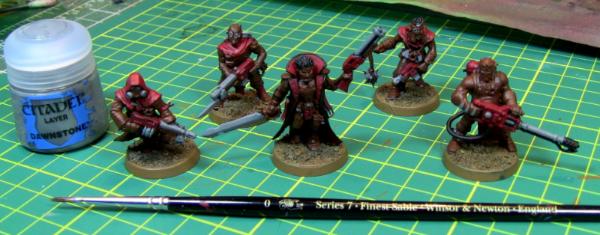
Here is where I am RN with this new batch. I painted more than I said I would...
Also I found one of my old models so you can see this is about as good as I was. Sucked at painting eyes.
I love that picture with the W&N brush right in front XD
|
|
|
|
|
2019/04/12 11:24:47
Subject: Returning hobbyist needs assistance.
|
|
Junior Officer with Laspistol
|
Damnit, now I'm way behind. Will have to catch up over the weekend.
|
|
|
|
|
2019/04/12 13:20:00
Subject: Re:Returning hobbyist needs assistance.
|
|
Ancient Venerable Black Templar Dreadnought
|
For your new batch of guys, they look much better with the elements of the model clearer.
Watch the "chrome" on the weapons, it is like black or white as a shade book-end: very hard to try to highlight sharp edges to glint since it does not get much brighter than that. You will have to be careful with your washes.
I either start the gun at black or paint a dark grey non-metallic first, for older rusty guns: targetting recesses with a dark rusty metallic or blazing orange works.
Water down a bit of "leadbelcher" is a favorite and then highlight upper areas with a more shiny metallic..
Ensign_Kirk wrote:Also I found one of my old models so you can see this is about as good as I was. Sucked at painting eyes.
Hey! The edge highlights and shading is pretty good on Creed.
Few people are any good at painting the eyes since you have to target some 1/2mm area.
I "plan" to fill the eye with a red/black/blue depends on how possessed these guys can be, then dab white in the corners of the eye.
I have done the all white and then the dot but that has zero forgiveness (cross-eyed is a common result). I love that picture with the W&N brush right in front XD
Yeah, I am too proud of the set I got, got them on sale and very afraid when I will need new ones.
I thought pretty much any brush will do and these things spoil me.
I used to spend more time forming a point on other brushes, I rarely have to on these.
The original intent (but I am questioning this now) was to show paint and brush used for that step (size/type whatever).
There may be a delay, I will have to go out tonight but I plan to update on Saturday...<ahem> I am giving "opportunity" for GBT to catch up.
Automatically Appended Next Post: BTW, I keep finding myself in a terrible hurry to pump out guys for armies I rarely do a "good job" on them: display vs table-top standard.
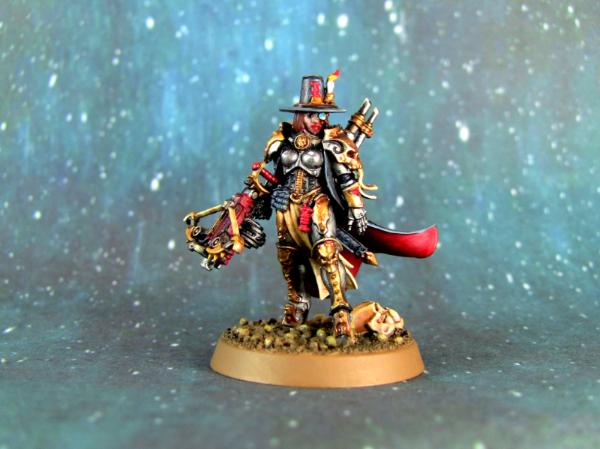
See below, this was one I spent a few weeks off and on, I was tired of claiming to be pretty good and nothing to show for it.
The base got the insane too thick gravel and Greyfax looks like she got implants for her lips but I use her for killing my friend's Orks: it is lost on them.
If you feel a need, this model is incredible, I would recommend it to anyone.
The scar across her eye was a real challenge on how to approach it: tiny in the extreme and a "busy" face as it stood.
Next I will need to work on a miniature for a couple months.
When I talk to people who paint obscenely well, it turns out their showpiece models can have up to some 100 hours into them.
Patience of monks I tell you.
|
|
This message was edited 1 time. Last update was at 2019/04/12 13:39:10
A revolution is an idea which has found its bayonets.
Napoleon Bonaparte |
|
|
|
|
2019/04/12 17:14:42
Subject: Returning hobbyist needs assistance.
|
|
Junior Officer with Laspistol
|
I appreciate the catchup time. I’m still conceptualizing and other big words about the model.
I’m going easy and just painting one model. I’m going to go for a Crimson Slaughter inspired scheme, but might try a lava glow thing too... but that would probably look funny with the Khaki’s giving off a lava glow. I’m not sure. CS takes red to an orange highlight, which isn’t my usual process.
I’ll be ‘sperimentin’ with this guy.
|
|
|
|
|
2019/04/12 18:02:09
Subject: Re:Returning hobbyist needs assistance.
|
|
Been Around the Block
|
Insomnia and red bull have progressed things to this point.
Any suggestions on what to do next? I think I am just exhausted and can't think of what to do next
|
|
|
|
|
2019/04/12 19:30:59
Subject: Returning hobbyist needs assistance.
|
|
Junior Officer with Laspistol
|
I like it! Cleaner definition for sure. Going to sound weird, but the pants on the last picture, on the right, are wonderfully grimy but details are still well defined.
Good times!
|
|
|
|
|
2019/04/12 20:24:15
Subject: Re:Returning hobbyist needs assistance.
|
|
Ancient Venerable Black Templar Dreadnought
|
Your painting accuracy is really good.
The paint seems... chalky for lack of a better word.
What specifically is the paint you are using and any idea how old?
I think you said Vallejo?
Please make sure if they are newer paints they are not meant for airbrush.
I had recently discovered that their old paint worked equally well for hairy brush but the new formulations are really bad for brushing on: they are airbrush only.
Something that occurred to me.
|
A revolution is an idea which has found its bayonets.
Napoleon Bonaparte |
|
|
|
|
2019/04/12 22:23:34
Subject: Returning hobbyist needs assistance.
|
|
Been Around the Block
|
It is all Vallejo game color except for a rose gold metallic that I put on over dark metallic silver. This folk art rose gold gives a nice rusted pitted look to the metallic that I like for this.
The very last thing I did to the skin was apply an ink of white red and light brown. Not a lot of paint. Put all of them in the belly of the brush before i mixed with a ton of water. I inked the skin with that. Then I took just plain white and dry brushed some of the areas painted brown. I am going to apply a wash and dry brushing white helps give more depth. That is probably why they look a bit chalky. LUL
Automatically Appended Next Post:
I am also going to use Pledge Revive It floor gloss to make a wash for basing and to see if it is good for the miniature.
I heard that it is great for a final coat. When mixed and applied properly it will only add pigment to pitted areas and places capillary action would take place. Also bonus it adds a clear protective layer which is good because I plan to play with these as well. I will try it out on some bases tonight.
|
|
This message was edited 2 times. Last update was at 2019/04/12 22:59:00
|
|
|
|
|
2019/04/13 20:06:29
Subject: Re:Returning hobbyist needs assistance.
|
|
Ancient Venerable Black Templar Dreadnought
|
Okay, next colour, I thought on it and this brown seems a good base for a brass/gold and for throwing on flesh on there as well as leather in general.
Think I will put on some dark grey for the steel parts while waiting for the stuff to dry.
 Automatically Appended Next Post:
Next:
Thinking leather stuff next.
|
|
This message was edited 2 times. Last update was at 2019/04/13 20:48:12
A revolution is an idea which has found its bayonets.
Napoleon Bonaparte |
|
|
|
|
2019/04/13 21:27:19
Subject: Returning hobbyist needs assistance.
|
|
Junior Officer with Laspistol
|
Hi Guys, I decided to do a separate thread so as not to interrupt your work.
In a blatant act of self-promotion...
https://www.dakkadakka.com/dakkaforum/posts/list/774151.page
If you'd like to check it out.
|
|
|
|
|
|
|