Forum adverts like this one are shown to any user who is not logged in. Join us by filling out a tiny 3 field form and you will get your own, free, dakka user account which gives a good range of benefits to you:
No adverts like this in the forums anymore.
Times and dates in your local timezone.
Full tracking of what you have read so you can skip to your first unread post, easily see what has changed since you last logged in, and easily see what is new at a glance.
Email notifications for threads you want to watch closely.
Being a part of the oldest wargaming community on the net.
If you are already a member then feel free to login now.
2020/05/14 17:45:09
Subject: New Guy Journey - Test Necron Bases; Squad mostly done
Ok ... I checked with the hosts/mods about my existing modeling thread and they said to go ahead and open a new one vs moving the other. Figured everyone else is doing it so why not.
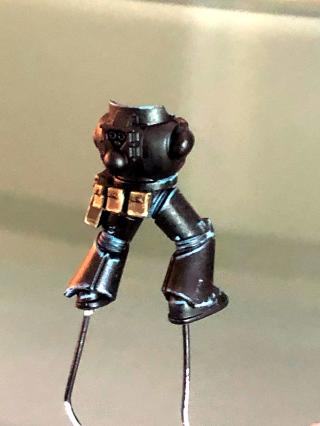
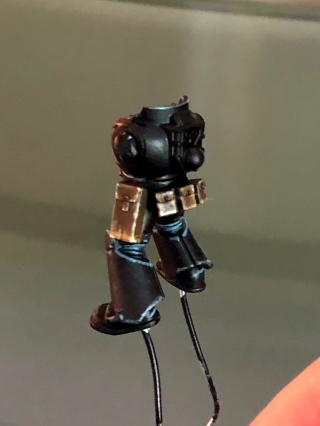
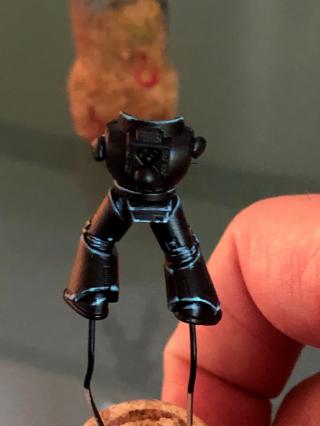
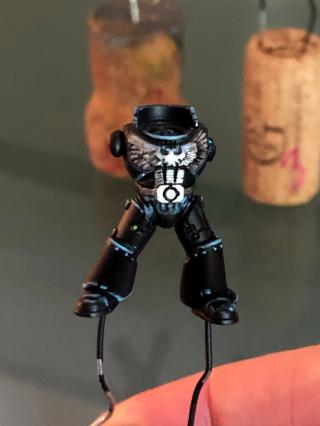
I am learning how to paint. Day 1. Picked this up, as the virus was about to lock down everything and everyone. I am intellectually curious. Try to learn new things. Travel 80% of the time so I will not always have this much time free to paint. Lastly, somewhat limited use of hands. Nothing serious. Just day to day ... sometimes all on board and other days ... control issues.
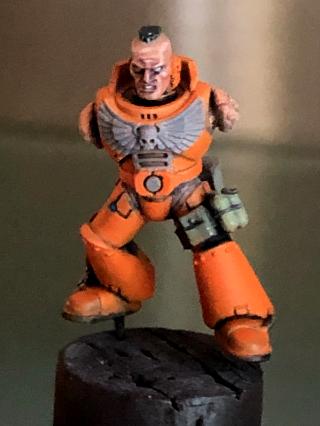
Initially, I wanted an orange army. Did a test. While I liked the model/look, the time it would require to finish an entire group of orange marines ... potentially ... something I do not have long-term. End up settling on black.
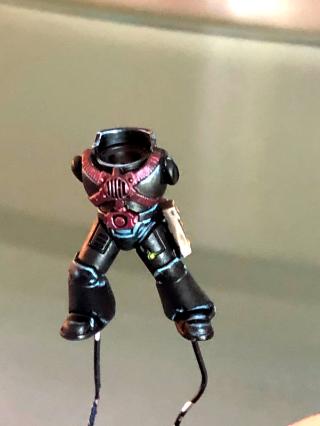
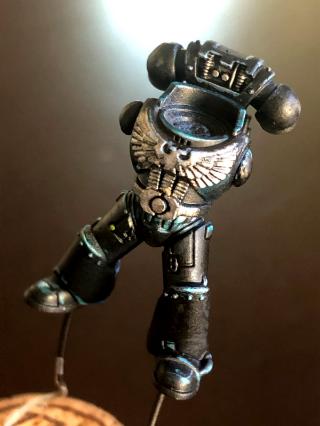
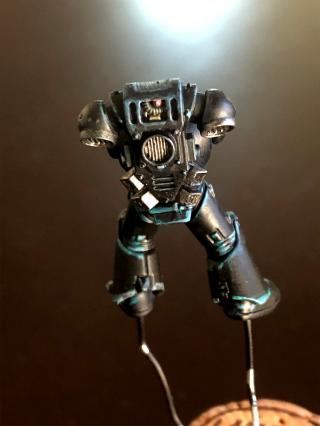
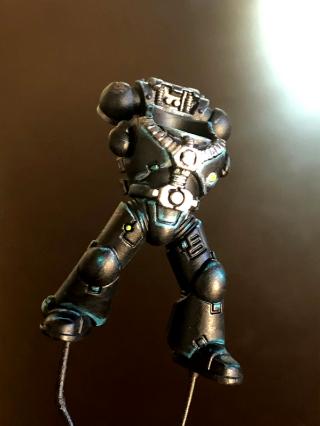
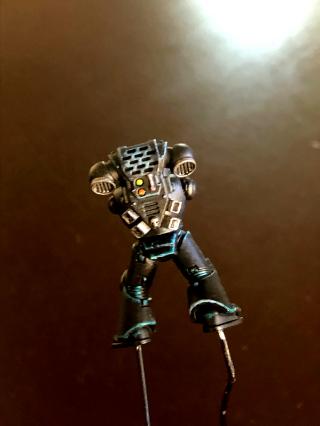
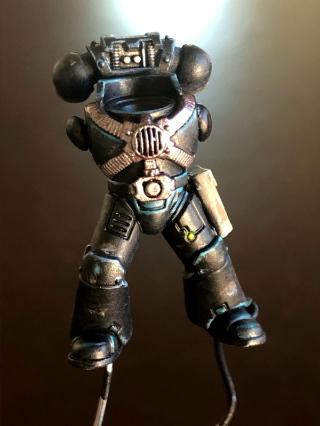
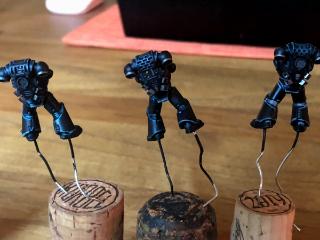
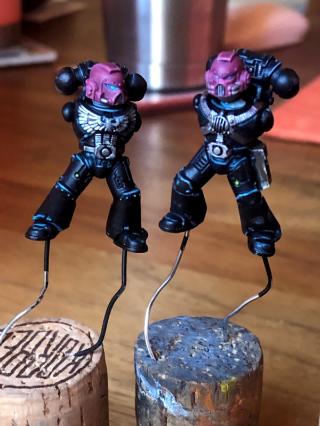
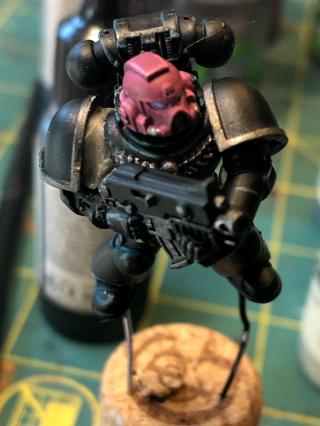
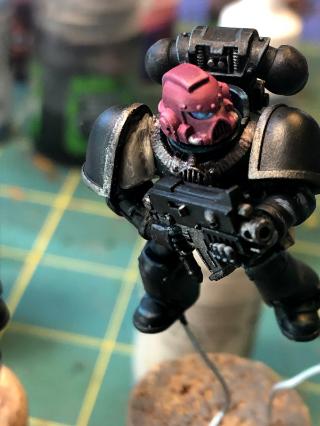
As I have made my way through 4 models, the final look has begun to change. Model 1 is in a state of stain gloss drying. Thought I wanted more Screamer Pink than not with the black. Last night I finished off Model 4's body and did not immediately color the crest. Sort of like it silver. Now, the debate of changing the plan and quickly redoing a few crests. Would also require re-working some helmets and not thrilled about that.
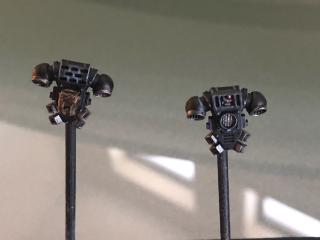
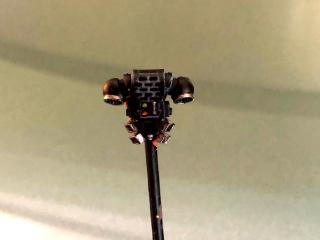
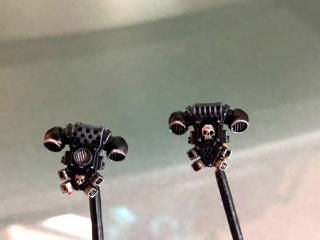
Model 2
Model 3
Model 4
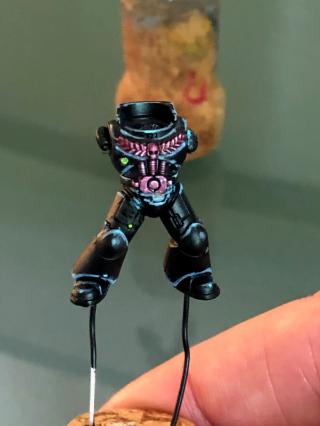
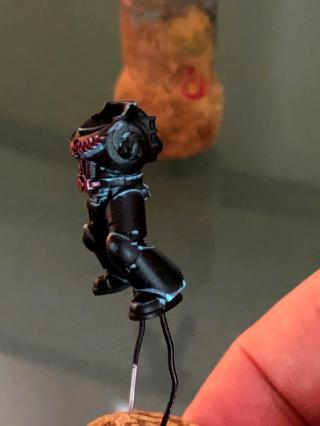
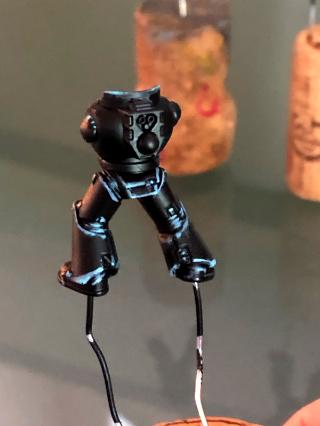
I used D Lantham's Painting Black tutorial. I do not have the skills or brush dexterity to do what he does. I ended up opting for 2 colors of blue. A stronger first highlight and, then, the dot or smaller line.
To anyone else new or debating giving it a go ... try. Also, dismiss box art and all the pro level products with professional pictures/editing. Awesome to look at and admire. Aspire to be that proficient one day. Compare? Fight that urge.
I am highly competitive and slight perfectionist. It has taken 6 weeks and I have found ... that is my best and I am good with it
Biggest thing I have learned so far.
This blog will help keep me accountable to painting a little bit each day and the continuance of learning.
Lastly, ALL feedback welcomed.
This message was edited 17 times. Last update was at 2020/08/02 22:45:50
@youwashock ... Thank you. Trying to find little victories with each subsequent model. By design I picked a model type (lot of flat edges) and color scheme (fewer vs more) that sort of help boost some confidence. Also, why there are no cloaks on any of the models thus far.
Ok ... I missed my morning window for great lighting to take pics. I will try and update again later. Status ...
I have now painted 9 days in a row. Little bit at a time, which is not in my nature. Something not being "done" is not easy to process but painting these models takes time.
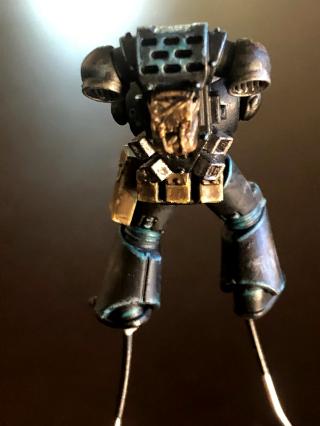
I went heavy with blue highlights. Going to finish the 5 models I have, as is. However, I think a grey with touch of silver would be better for an Iron Hands look. Sleek and clean. The blue look is awesome. Just that blue looking great equally little bit out of my scope and not the ideal Iron Hands feel. My lines are still 50% clean and 50% I have to go back and touch up. Speaking of ...
Diminishing returns. This week I did figure out sort of my zenith of ... best I got ... put it down and walk away. I spent WAY too much time on the initial stages of the first few back packs. Less or just enough time made the last few look better than the first.
I have to be more careful cutting items from sprue and, then, sanding. I have 2 legs and several backpack orbs with some damage. Thus, I am going to take an attempt at battle damage today. Based on research the hairspray method seems so much easier. However, that would require planning in terms of under color and, then, stopping to spray, etc. Missed opportunity and lesson learned.
I bought a few much nicer brushes. HUGE difference.
That bag I added onto the one backpack, which is a cool little item I found in a bits bin, would not take paint. I struggled getting paint to stay on it. Zero clue what it is made of and beyond my painting skill to handle. Did my best to get it to match worn leather.
Going to try decals too. Why not at this point ? I picked up some random, OLD decals out of a random box at a hobby shop. Once I get a satin coat on the crew a few will get decals/transfers.
My next few will definitely have more grey less blue. I am still debating repainting the 5 helmets, which are all pink, back to black. Those were the first items I painted it and it took my a LONG time.
As always, any feedback welcomed. Better pics with some battle damage later today.
Automatically Appended Next Post: New Guy Problems ...
I used poster tac to cover all critical areas to make sure there was plastic on plastic for super glue. Well, except the bulb for the backpacks. A-W-E-S-O-M-E ...
4 were solved by scraping/roughing surface to get back to plastic. The 5th had been shot with satin gloss and that took some scraping; sculpting stuff and just less than awesome. All 5 are drying and waiting for better light for pics.
Help Needed ...
So I am hitting the models with a contrast paint post highlights. This was from the D Lantham video. Most are coming up looking dirty. I am CAREFUL not to disturb the contrast paint once on ... stuff is fussy. I think my thumbs may be hitting my model, as I paint/turn them. Rubbing off base layer and created cracks. The contrast paint finds it and it looks messy.
Any one else had this issue?
Automatically Appended Next Post:
At some point i am going to find a better way to capture images; right time of day and all that stuff
This message was edited 2 times. Last update was at 2020/05/17 21:28:00
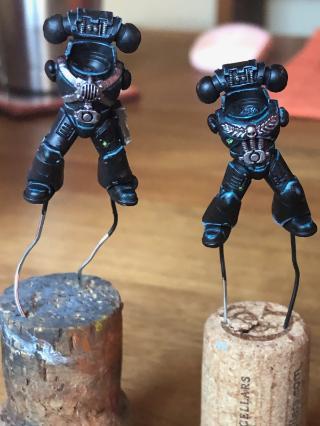
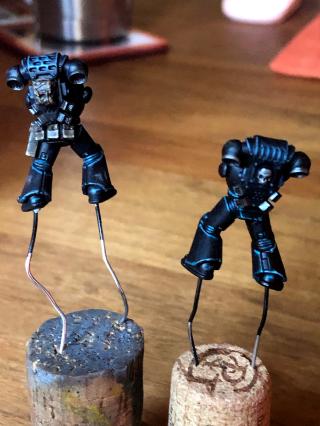
A group shoot courtesy of morning light and my former home office space, which has been taken over by my wife. The goal is to finish these over the next few days. I actually enjoy basing more than the painting. I like the modeling portion of this little more than the painting.
Any feedback welcomed.
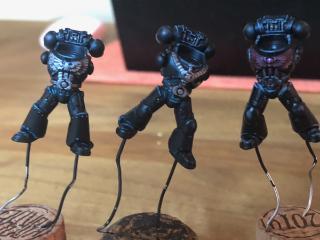
Current stage ...
Pink crest is satin sealed. Will attempt to repaint the pink to silver once matte again.
4 silver crested have not been sealed.
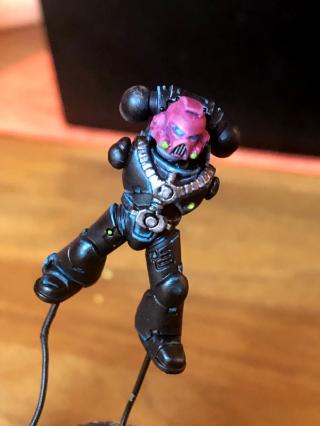
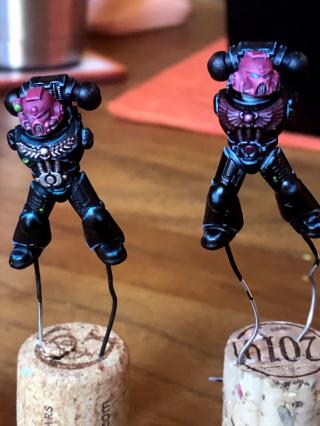
Automatically Appended Next Post:
Forgot I had the completed helmets. Placed them on for a view. Now, sort of like Screamer Pink against the blue highlights/black.
Any feedback or thoughts welcomed
This message was edited 1 time. Last update was at 2020/05/18 14:18:08
2020/05/19 22:25:26
Subject: Re:New Guy Journey - Updated Pics & Progress
Write down your paints and recipe. Today's lesson ...
Center frame is my test base. I was 80% certain of the colors I used and in what ratio and or order. I tried my hand at mixing and maxing vs right out of the pot/dropper. Think I ended up super close or close enough.
Next, the final product has a few tufts that are greenish and blueish in hue. Those make the undertone of blue in the base "pop" .... as I tested that out after I saw the result of the completed bases.
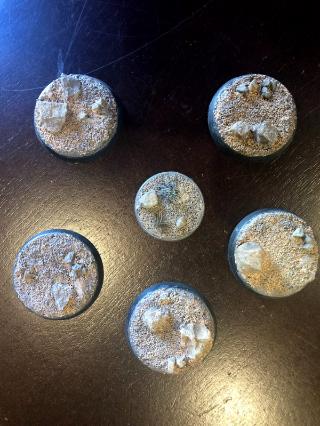
Finally, the bases came out as I had pictured them. I spend a great deal of time outdoors/woods/rocks, etc. Rarely is a rocky area identical in hues. There is a random aspect common to those types of areas. I wanted to capture that look.
The grit and rocks on the bases are all items I collected around my house. Each was already unique and remained so after basing. I did consider leaving everything in a natural state. It, though, did not look natural with a model. Something was a off. Post painting it came out how I wanted ... small victory!
I have my hobby streak alive. Meanwhile, I needed a short break from painting space marines and took a different part of the project on for a few days.
My arms and shoulder pads for the first 5 are primed and awaiting a base coat. I am using a Tamiya spray and waiting for the temp to drop. We are now at the time of year it will be 90 - 100 and whatever and anything spray related became more v less complex. Learned very quickly the high temps make the paint fleck/speck and or super runny. Thankfully, all that was ruined were a few random pieces of plastic.
2020/05/19 22:45:10
Subject: New Guy Journey - Updated Pics & Progress
Welcome to the hobby! Your approach to learning techniques is healthy and admirable. You are learning things (write down your paint recipes) that took me months or years to realize!
Things are looking good so far. Good progress. It's good to know when to break from Power Armor and such - I think that's why most people have more than one army at a time, so they can rotate between them to keep their interest.
My painting log is full of snakes Have any retro, vintage, or out of print models? Show them off here! Games I play: 40k (CSM, Necrons); AoS/Fantasy (Seraphon/Lizardmen); Warcry; Marvel Crisis Protocol; Wargods of Olympus/Aegyptus; Mythos
2020/05/20 13:32:30
Subject: New Guy Journey - Updated Pics & Progress
Don Qui Hotep wrote: Welcome to the hobby! Your approach to learning techniques is healthy and admirable. You are learning things (write down your paint recipes) that took me months or years to realize!
Things are looking good so far. Good progress. It's good to know when to break from Power Armor and such - I think that's why most people have more than one army at a time, so they can rotate between them to keep their interest.
Thank you for the note and positive feedback. While I understand the need to have different items to paint, the thought of actually painting an entire 2nd army .... woof.
I have been relying heavily upon the D Lantham videos were either came down or are coming down in the next few days. I have gone back and written down a few of his recipes/guidelines. How he presents the information resonates with me.
Lastly, just fail fast. Sure, I have models that are dinged due to poorly conducted sprue surgery and or thumb prints that showed up post painting efforts but ... I can sort that out next time.
2020/05/26 22:36:39
Subject: Re:New Guy Journey - Annnddd mistakes were made ...
ALL excited to get my 5 models finished. Then, problems ...
I had done the whole dry fit; poster tac routine before I started anything. Made sure everything lined up. Even numbered each individual model, as not to mix up which part went with which model. SUPER organized. I have everything done in sub-assembly and go to glue them together. And?
I neglected to check the arm poses vs the shooting hand angle and 2 out of 3 models required significant surgery/work. Partially ruined a paint job. Just 101 lessons learned. This was my primary concern and I thought I had done everything to guarantee it did not happen. it did. Concern being the arms would not match at the moment of truth.
This has to be a Top 5 New To This error.
Slight vent.
Once I get things in a better state I plan on posting pics. Now, I have the other half of my original 10 Tac Squad models that I have to go back and double check the shooting hand/arm glue job v a dry fit. At least I caught this before I went any further.
The ONLY silver lining is I got to use sculpting materials again. From what I have learned the product I use (A / B) would be an average tool for this job. I think Green Stuff would work better but used what I had. Hard to tell but I was able to get some angle/surfaces onto the epoxy areas to sort of make them seem normal. Need to primer and paint. Thankfully, I have tiny dropper of black primer for mistakes.
Prior to going full epoxy I did attempt to drill and place some small wire/paper clip. Actually, I did have a 3rd model that had issues. That tiny piece of paperclip worked but the look of the arm pose is a little funky. However, no epoxy was needed.
Effort - problem resolution - patience ... I was proud of myself.
Equally frustrated and I broke my hobby streak, as a result. Took slight break. I did, though, determine where I can pick up valuable time on what not to paint or highlight, as the shoulder pads really do cover a bunch of the model.
From a learning perspective I will finish the Tactical Squad. However, I do want to move onto the Intercessor models. There are a few areas that adding more color would be logical/look instinctive.
I still have things I should do with all 5. At this point I want to get them done and, then, move onto the next 5. Like, put some distance behind this set of models; called them complete and paint another few.
Back at it this week. Finish these 5. Check my next 5 and get going.
2020/05/27 01:32:16
Subject: New Guy Journey - Annnddd Mistakes Were Made
Oof, sorry to hear about the emergency surgery. No worries, I've had so many false starts with cutting and recutting models to get them where I want to be. One thing I learned from Dakka is using sticky tac to help pose my models before gluing them in place. But sounds like you were able to get through it and produce some good-looking marines. Good luck on powering through the tacticals and hopefully building the intercessors will be rewarding!
My painting log is full of snakes Have any retro, vintage, or out of print models? Show them off here! Games I play: 40k (CSM, Necrons); AoS/Fantasy (Seraphon/Lizardmen); Warcry; Marvel Crisis Protocol; Wargods of Olympus/Aegyptus; Mythos
2020/06/08 23:51:55
Subject: Re:New Guy Journey - Annnddd Mistakes Were Made
Overdue update ... or ... work has been busy and here we are ...
As COVID started, I picked painting/hobby up. Local shop owner suggested Space Marines for ease of painting and number of models. Bought my tactical squad. 3 test Intercessors. All my painting gear. Narrowed down a color scheme based on easier v harder and, then, time efficiency, given my work schedule. On the way ...
The Good
I have learned a tremendous amount. So, so, so much. Reps matter and sticking with it over a few months has made a difference.
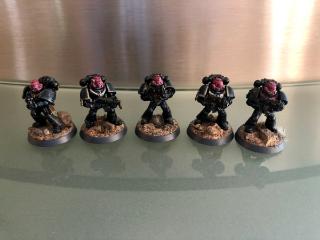
I have finished a 5 man squad. TOOK so long. Work. Life. Starting from Zero. Deliberate with all steps. Yet a small victory
Spoiler:
I love basing. Like, for whatever reason I can replicate anything I want. Been testing, etc. Whereas painting is not natural, the basing is.
Gotten over perfection; why doesn't my best look like box art, etc ... my best effort is my best effort. Took a few weeks
Things will go wrong. They did. Re-prime or sort it out. It is plastic end of day.
Nice creative outlet and healthy, outcome based hobby
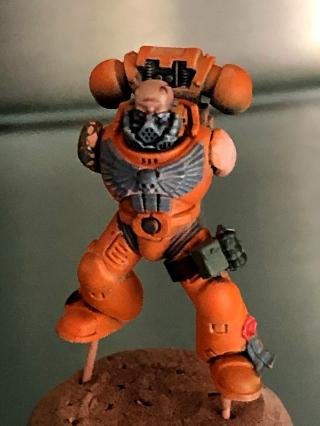
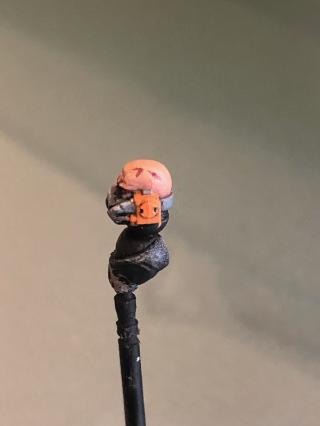
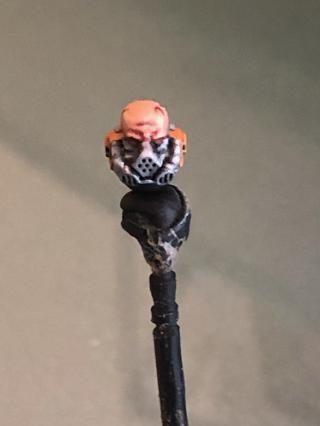
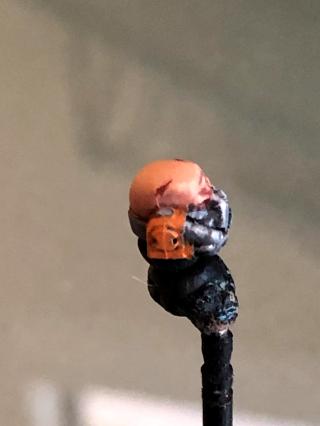
On my second effort I took my face painting from REALLY bad to ... wow, maybe I can do this? Also, the head had dents within the sculpt WAY behind my pay grade to fix and, well, I made scars. RIGHT as I was putting on a last touch I made an error on his brow and the low lights made too dark. I need to try and fix with a glaze. I was pretty proud of this outcome.
But notice how the helmet is orange?
Spoiler:
Spoiler:
Spoiler:
The Bad
In an effort to stretch myself I went with oils/pin wash on my 5 man squad. Things were AWESOME until the shoulder pads. Wrecked them. BAD. BAD. BAD. Waiting for the oils to settle to hit with hair spray and, then, attempt to seal; paint black and try the chipping method . See earlier point around problem solving.
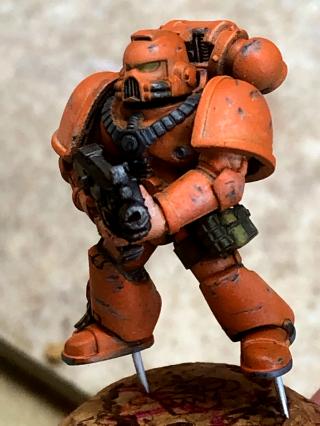
My schedule is changing and I will not fly anytime soon for work. Confirmed. So my original color scheme was orange and picked the pink/blue/black due to time and, perhaps, easier. Now? I have time to paint my army orange. More work. Harder. But time and my primary choice. So time sunk on a small group of models I cannot use.
I love that pink/blue/black paint scheme. I have the colors right. Making that look AWESOME? Outside of my current skill-set and I know it. I have figured out orange is deliberate and takes patience. MANY light coats. Easier, though, to deal with once done than black.
My 5 models are pinned and officially onto those bases. While I would like them back, that is home.
There is an entire new edition coming out. I was able to visit my local shop. Asked some questions. Essentially, consider moving into Intercessors or something beyond the basic tactical marines.
Necrons ... yeah, love those and my choices to play were Marines or Necrons. Now, do I stop and go Necrons; buy the starter kit and attempt that whole Kill Team and full army thing
The Ugly
Current state of 5 sets of shoulder pads. Yep ... not good ... and I think I have a slight chance to make look less than ugly.
This fascination to plan more stuff than you can actually manage. It is so real. Like, I made a promise not to buy any more items until my first box was done and, did that happen? No
Now, I am changing it up and going back to my orange scheme. While time is lost and a few models, my starting point is that much higher. And the change possible due to me being home more than not. Silver lining.
Any feedback on the painting appreciated
2020/06/09 00:36:00
Subject: New Guy Journey - Overdue Update. Paint a Face. Ruin some Shoulder Pads
@youwashock ... Thanks for the note. At some point I will find the optimal time of day and location in my house for better pics. I think mini photography is a hobby within the hobby. Currently, hands full with learning to paint.
2020/06/24 16:21:35
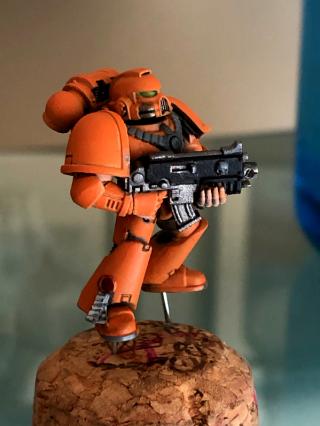
Subject: Re:New Guy Journey - Another Overdue Update - All Things Orange
Again ... it has been a while. As noted, I had originally wanted an orange themed army. Due to lack of time and difficulty of painting, I opted for black. Traded one set of problems for another. Meanwhile, I confirmed I am not traveling anytime soon and time granted back. And ... after painting a face to a decent level for me ... brand new ... my confidence took off. Back to orange.
Love the color. Wanted the hue most common with the Dutch National Soccer/Football team. Love them too. I finally got a formula ... with some spray and mostly hand ... to get there.
Black primer; dark brown spray; barbarian flesh spray and, then, Jokaero layers with Troll Slayer layers. Long-handed? Yes. Teaching me to paint? Yes. Airbrush easier? Yes and I do not own one but under consideration.
I wanted a more sci-fi / sort of retro look too. Thus, orange with certain accent colors. Also, specific lettering. I got some AWESOME decals/transfers from www.bedlamcreations.com The style of lettering matches the look/feel I want.
I like the background of the Iron Hands. Tech, cyborg, sort of off on their own, like machines .... thus, how I arrived here.
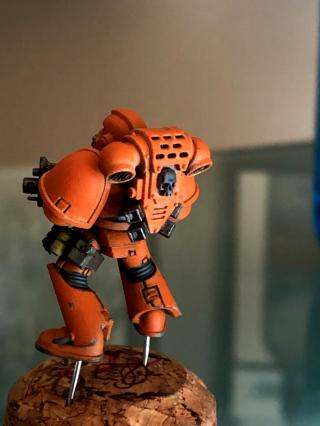
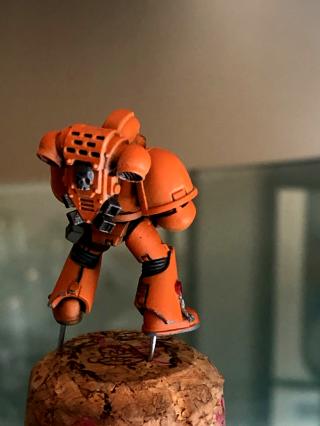
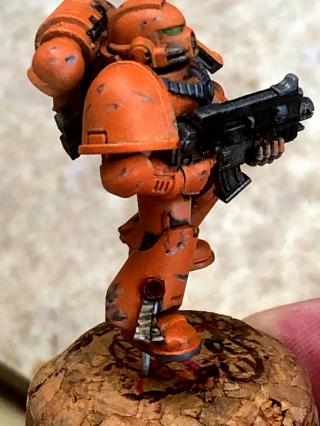
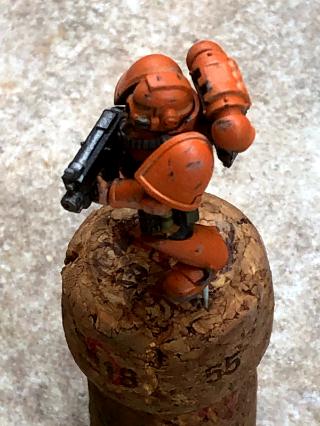
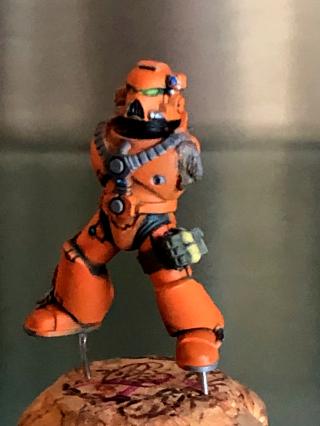
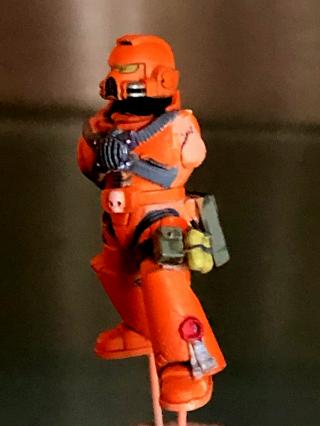
I finally tried to customize a few models. I bought this all-in/grab bag of plastic card. A variety bag of different things. I used diff sized rubber bands to size the strap for the legs. I then made a sample and used it to cut straps for each leg. Then, I cut some pouches and grenades and done. Placement seems more logical on the model. I opted for colors beyond the usually dark brown leather. Wanted more military look and needed some colors to accent and cool orange. The greens, blues, grays and yellow.
Customized a few backpacks. Then, I made a very small scale of what represents a blasting fuse/cord out of fish line and wire. Added a magnet to the Melta Bomb and this becomes an add-on piece to a base of one of the models.
I am a learn by doing and visual learner. What I am finding is that I start with a general idea of color. Then, as I paint, I tinker. I need to see it on the model and, then, keep it or change. Thus, anything you see gray or white means I have not decided what to do and or may leave as is. Mechanicus Gray has a blue tint that looks natural with the model. May leave it. I cannot decide on a crest color. My plan was to use a different color for each different unit type. Undecided.
Tried some free hand. WAY outside my comfort zone. I did some stripes on my rocket launcher. Of course, I did this the hard way by attempting to add the yellow AFTER everything was done. Lesson learned. My one item to correct is the exposed rocket tip. I started with green. Did not like. Went to black. It gets lost in the model. Probably change. I like the look of the rocket launcher figure. Probably too bright or too much variations for others but the color combo nailed what I want. Pumped to try the decals.
Each model is in some state of WIP. Some further along than others.
My second set of 5 models has gone much quicker. Even with me having to paint base layers it is faster. I have gained efficiencies and learned do this first, then, this or that. Lastly, I have enjoyed painting these more than the other 5 black/pink/blue models.
I have zero doubt an airbrush would make this little orange painting so much easier. Then, it is learning how to use one and not sure if I am ready for that.
This layering and building up a color is something I am figuring out. I can get a yellow by a dark brown to light brown to a dark yellow to a bright yellow. Or I can prime my model to help me get to my orange the quickest but go back and paint random items natural gray or a dark gray or light gray and start over. Sure, a lot of rework but I am figuring some things out.
Any feedback appreciated.
2020/06/24 17:49:26
Subject: New Guy Journey - Another Overdue Update - All Things Orange
The skintones look good. Everything else is coming together. The painting on the eyes for all the models is nice and neat. Keep on trucking, find what works for you and what doesn't.
2020/06/24 17:58:08
Subject: New Guy Journey - Another Overdue Update - All Things Orange
You gotta paint a model that is fun to paint - if you want orange, go for orange! Sounds like you've been taking advantage of the opportunities that are available to you for experimenting, which is great.
I happen to really like the grey undercoat left on the aquilla and chest decorations. Maybe a dark wash over them and a quick drybrush of light grey and they'll pop.
Not being a loyalist marine player, one thing that does appeal to me is that different squads and companies within a chapter will use markings to designate their rankings - it's in different places and different color combinations for each chapter, so go wild in designing your own. A different colored stripe on the crest to mark the different squad specialties, with an additional stripe or other decoration to distinguish the sergeant. No wrong answers - they're Your Guys now.
No stress on the freehanding, some things work at scale and some things don't. I only have the one missile launcher in my army, and I just painted the tips of the rockets one color and the body another. Seemed to work out alright. That said, there are some great examples of hazard striping and other freehand industrial stuff throughout the forum - check out MegaDave's Iron Warrior's blog for example.
All in all, happy to see the progress, and happy to see brightly colored marines.
My painting log is full of snakes Have any retro, vintage, or out of print models? Show them off here! Games I play: 40k (CSM, Necrons); AoS/Fantasy (Seraphon/Lizardmen); Warcry; Marvel Crisis Protocol; Wargods of Olympus/Aegyptus; Mythos
2020/06/24 18:11:47
Subject: Re:New Guy Journey - Another Overdue Update - All Things Orange
@youwasshock ... as always, thank you. Much appreciated.
@Don Qui Hotep ... the grey, as is, does look natural. It cools the orange. I also put some Field Blue on the rocket launcher backpack. Hard to tell in pic but it REALLY makes it pop. And I am all about the markings being different and all over. I get how it should be and where it should be, etc. My initial squad was being done in that manner and was not enjoying it. Too much restriction.
I have come up with my own little method. I block out what will not be orange. I get it going and start working it up. Meanwhile, I cover other items in a grey or brown or a light metallic, depending on what the item is. Start to tinker. Get a color I like. Stick with it. Don't ... paint over it or ... not sure ... I leave it for a night. Let it sit. Wake-up and check it out. Does it still look off or do I like it.
That is happening with the rocket launcher. Last night ... I was not sure. Talking the weapon itself. Today, looked at it again and sort of like it. Will keep going on it.
Some of my color choices have made me be slow and deliberate. Easy to screw up orange or get a dark color ending up on orange. I now know how to get an orange i like or go back and fix it. I was most satisfied with the smoothness I got with my orange. All by brush. No streaks.
Always appreciate the vote of confidence
And I forgot ...
I love archery. Big bow and arrow person. Iron Hands are from Medusa. Medusa used a bow. I figured out I am calling my group Medusa's Arrow and am narrowing down a chevron/symbol for the group. Have it down to 3 diff styles. Each is simple yet sleek.
This message was edited 2 times. Last update was at 2020/06/24 18:27:38
2020/06/25 02:14:52
Subject: New Guy Journey - Another Overdue Update - All Things Orange
First off you got great skills. The black and pink head squad still has value. It can be used for trade bait. It could be donated as a prize during a tournament. You could use them for the base of a small deathwatch kill team. Second any new skill you can develop on a model will translate to your next group of models. It definitely show you are willing to step out of the box with some of the technics you are trying. Nothing is a mistake in this hobbie as long as you can learn from it. Good luck in the future.
2020/06/25 15:56:48
Subject: Re:New Guy Journey - Another Overdue Update - All Things Orange
@Pointer5 ... much appreciated. The notes of confidence help. Much appreciated.
So with Kill Team I can have cake and it eat it too. My orange themed army and a squad of my blank/pink/blue guys. Best of both worlds, as I do have concepts for the black/pink/blue style and currently outside my skill level. i plan on making the attempt to fix the shoulder pads on the 5 completed models in time.
Here's where things went wrong. Based painted the models. I was happy. I went to weather and went sideways.
I don't like the overall acrylic wash. Don't like the look or the potential for staining. I do, though, like it in specific places. Like, I will use a green wash on my green items on the orange models. I did get some good results with an oil / pin wash on test models. Where things went horribly wrong was my attempt to dot filter. TOO much paint in the dots on TOO small an area over black, which shows EVERY mistake.
Also, i tried to go beyond my scope and use the D Latham technique of applying a blue contrast hue to black surface. I know I hit the areas multiple times, which you cannot do. Also, contrast paints do not behave like an oil and just naturally follow fold and gravity.
My goal on completing these next 5 is to ....
Use decals. Excited on this
Use a soft oil filter to cool things down
Pin wash
Do some minor weathering/chipping
The order of those events, though, is something people have 101 opinions on and how you should do it
Automatically Appended Next Post:
Spoiler:
Spoiler:
Spoiler:
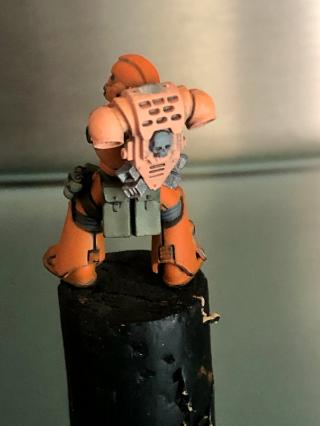
I got curious how a model would looked once put together and closer to finished than not. Thus, stopped everything else; assembled; finished arms; backpack; and put was on the gun; part of backpack and a contrast paint on the gray area of chest and skull.
Then ... I noticed I had some chipped paint around the bottom of legs. I went ahead and did weathering. Only with paints. Put on mid way up leg and, than, another on an arm. SO much easier than attempting that on black first time out.
The eyes are too light. I need to reconsider a touch up or overhaul.
However it happened, the layered up combos of colors produced a lot of built in tone/shadow and edge highlights. I could see this, as I was painting, and made things easier. Again ... my first attempt for all of this was black.
Given how it looks, instead of a bright orange or yellow for the edge I am going to try Clorax White. It sort of works on a small test. Far more natural and helps tone everything done.
Any feedback appreciated especially on a formula for an oil filter.
This message was edited 1 time. Last update was at 2020/06/25 23:24:09
2020/06/30 22:35:44
Subject: Re:New Guy Journey - Second Squad Coming Together
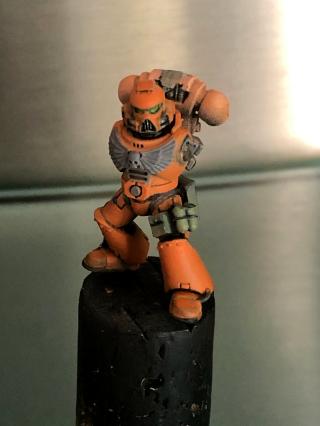
Prior to starting the models I had determined which would serve what role. Thus, this 5 are my leader; special weapon and heavy weapon. Had saved those until I knew a little more. Sarge's arms and hands are both magnetized. I got his backpack started today and, then, called it quits. This head came with dents. I tried to paint scars. Thus, the marks
Special Weapon
Spoiler:
Spoiler:
At some point between priming and today a massive dent was put into his backpack. I had to scrap and, then, attempt to fill. Waiting for that to dry so I can sand it; prime and, then,paint. His arms and weapons also magnetized.
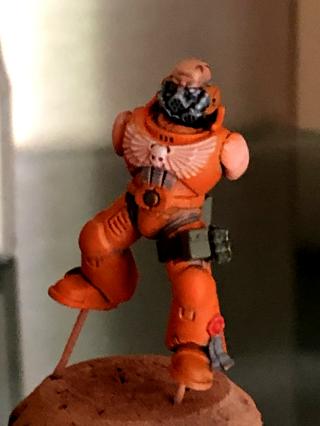
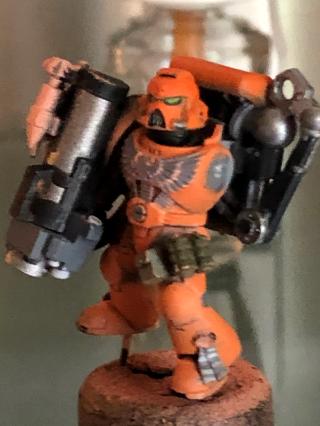
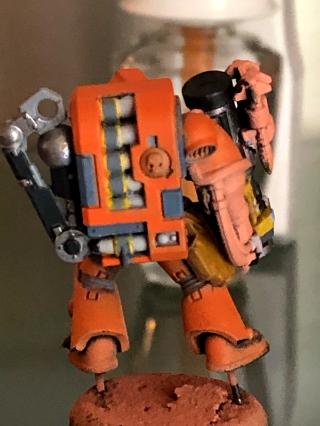
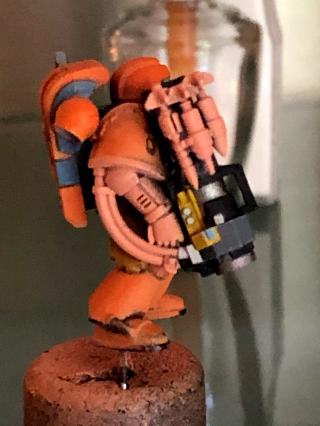
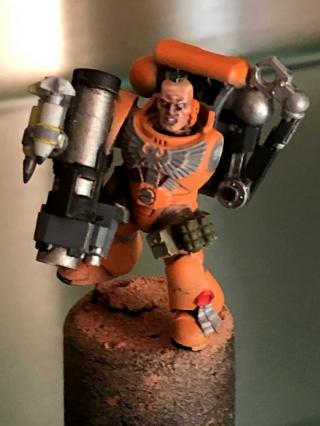
Heavy Weapon
https://images.dakkadakka.com/gallery/2020/6/30/1067494_mb-.jpg" border="0" />
I got into this model and spent WAY too much time on it. Also, I dropped him, which broke one of his arms and dislodged the weapon mount from the launcher. One problem fixed. I stepped on his broken arm and, well, have another arm waiting to dry. It is hard to tell with the pics but I got that whole tube/line color "look" just right with the blue and yellow.
Marine - Some Modeling / Kit Bashing
Spoiler:
[/img]
Spoiler:
In theory this is like an explosives guy. I took a VERY small component ... no clue what it was ... and wrapped wire around it. Then, I found 2 detonator/charge pieces. Put them on upside down for symmetry and to show the cap area. I have the Melta Bomb magnetized to swap on/off the base. Small ring of fishing wire with it to represent a fuse. This is also the figure swapping out ammo.
The Good ...
I am getting the hang of orange and getting blends. None of these have been properly highlighted.
Forced myself to use colors that are a challenge .... orange, red and yellow. Figuring out how they work.
Went back after I did less than I expected on my first 5
I did spend time researching colors and using a color wheel to have some understanding of how to do what especially with orange
I have purposely stayed away from blues and purples (obvious matches). Those colors will be used with Intercessors and or Infiltrators. My basic marines are just a basic orange with yellows/greens and blue-tinted grey.
The Bad ....
While my process of doing things have improved, I am still a very slow painter
There are easy painting days and days like today. A day where I break a model and, then, find I have to rebuild multiple thing
The Ugly ...
Now, with everything assembled I have to address the eyes. Leaving them green and essentially have to start completely over. Not digging the hue
Any and all feedback appreciated
This message was edited 1 time. Last update was at 2020/06/30 22:45:38
2020/07/01 02:21:45
Subject: New Guy Journey - Second Squad Coming Together
youwashock wrote: Progressing well. I appreciate the sense of discovery. The orange guys are looking good.
Thanks for the note.
It is like starting anything new. 80% of it goes like it should and, then, there is 20% somewhere between less than awesome to bad. I am still at a point that 20% shows up at random times and slows everything down a little.
I have 1 of 2 items I can start on next. Thus, I want to get these done. Deal with myself is nothing new can be started until I finish current project. My workaround so far has been to change up pieces of the models I paint or the model itself. Once these 5 are completed I have a box of Intercessors or a 3 man bike squad. I know new bikes are coming out. In the minority but I dig the bikes.
Most likely doing the bikes for a change and, then, the learning experience of doing a vehicle. Starting with the smallest type possible.
2020/07/02 22:25:22
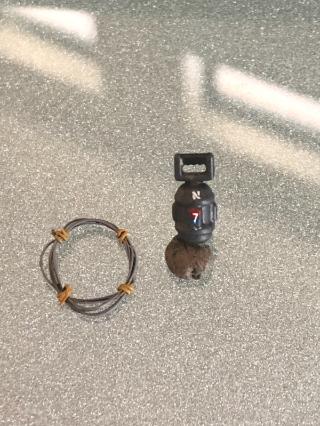
Subject: Re:New Guy Journey - Decals and Small Creation
Ok ... so I try my hand at decals / transfers. The "N" is SMALL and comes via bedlamcreations.com REALLY cool stuff and I mean that "N" is S-M-A-L-L. Meanwhile, the "7" is some random decal. Local hobby (think train/models) just has drawers of old odds and ends. I picked up a few sheets. Zero clue how old this is and my guess is at least 15 years if not more. But ... tried out the Micro Set; Micro Sol ... awesome. However, I accidentally ran my index finger right over a brand new Exacto blade, which was being held in the other hand. I mean barely touched it and, well, I think this has happened to everyone and you know how it ended.
Next to the bomb is a tiny thing I made. It is fishing wire and, then, some low gauge wire. I used a pencil to get the shape and hold it. Wrapped the wire, as best as I could. Cut the wire, as best as I could. Sanded it, as best as possible. This is intended to be a fuse. Something you'd see with explosives. I was pretty proud of how it turned out and my luck with decals. Minus the cut but, like I said in the last post, 80% goes the way it should and I am still running into 20% of new guy stuff. Today, the cut.
I dislike painting weapons. Like, I would outsource it to someone. Do. Not. Like, It. At. All. I magnetized the Sarge and, of course, there is now a weapons cache I have to address.
In my efforts to salvage the arm for the Heavy Weapon model I got it to a certain point and just said ... done. I accidentally discovered glazing and have sorted out the orbs and shoulder pads. I can actually fade a tiny bit. The remodel of his broken arm required a shoulder pad I had screwed up. Cannot get a smooth transition. Let as is. It will bother me but letting it go.
I was able to repair the divot in my Special Weapons back-up. It came out beyond what I had hoped. You cannot tell I did work upon it.
Why no other picks?
Lefty. Slashed my left index finger. My hobby time prematurely ended today.
2020/07/04 18:57:43
Subject: Re:New Guy Journey - Decals and Small Creation
Your squad is looking good! I always wondered why nobody really makes orange space marines. The color actually suits pretty well. Also, I hear you about painting the weapons being a pain. Have you thought about doing an all-gunmetal bolter casing like the old school black templars used to have? At that point all you really need to do is give it an ink wash and its pretty much good to go.
@brushcommando .... thank you. At some point I am going to find an easier way to get the weapons done. For whatever reasons ... of all colors ... I am having a really hard time getting black painted. Thus, I went back to spraying the arm area(s) black and, then, take everything up. Major pain.
Spoiler:
Spoiler:
Spoiler:
Spoiler:
OK ...
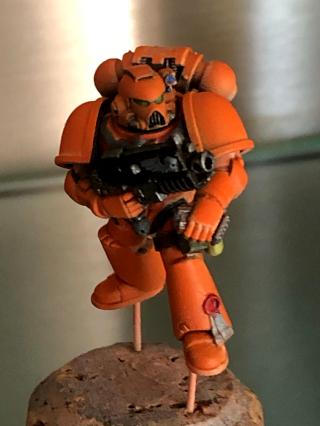
The plan with the limited painting time I had was to finish up the 5. That did not happen. What did happen was an accidental drop of contrast paint on this model's shoulder pad that I did not catch until it had started to try. Given what I learned using those with my black squad, I left it. Once dry ...
Onto chipping.
Now, I STRUGGLED chipping the black models. Just too hard for someone new. This guy ... I did decent job. He looks funny because I have him under a semi-gloss coat. He is drying and getting the decals done. Then, more weathering; sealed; highlighted.
I am going to take another model ... for comparison ... and just seal. Decals, weathering/chipping, sealed and highlighted. I wanted to see the different effect of before/after with chipping.
I found the instructions for an oil filter. How to make. How to apply. I want to try it. Then, I found out how to weather decals via a double sealed coat and some sand paper. Going to try it. Seal it all and, then, highlight at the every end. Seal again.
My chipping method was a little different than majority of tutorials I watched.
I would paint neutral grey. Stipple or via quick scratch with brush.
I would then point in a TINY spec of Vallejo Black Brown.
Next, I would line or stipple Sky Grey
Then, I made a super thin mix of orange/neutral grey or orange/sky grey. I would sort of stipple that around the area to get some discoloration and to help bring the markings into a single hue.
Of all the things I have tried/done the results on this have been my best. My only regret is I had this exactly where I wanted it and decided to add a few more spots. I learned too much chipping is a bad thing and begins took unnatural.
That "pro" painted look with the amazing edge highlighting does not seem to be what is turning out to be "my style" ... I sort of like the more natural, dirty look.
@youwashshock ... Yes. I found a few articles, which are geared more for traditional modeling v mini painting, that connected dots. We all learn/process differently. I figure I might as well try a few things out on these models, as opposed to finally doing 1-2 things on a larger vehicle.
My goal with the filter is to help cool the orange. Now, that I understand the suggested ratio and best practices, I can get something in either a blue or grey. The only problem is there is a varying opinion on leaving oils out for a day or not prior to use and, then, a deeper debate on some topic, which depends on intended use.
Needed to take 5 minutes to myself between what is a never ending series of Teams/Webex meetings.
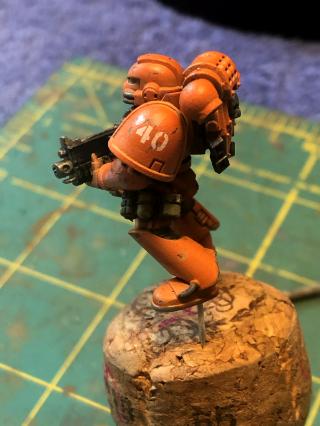
The decals are Stencil Gothic via bedlam creations. Because I have some OCD I knew EXACTLY the "looK" I wanted for the numbers and letters I will use. These came out perfect. Putting those tiny numbers are ... centered ... curved surface ... patience. I was even able to save the "0" after having it curl up into a wad.
I tried the Battle Line decal on the other shoulder. One, wrong font style and did not work. Second, not a general fan. Third, I also have corresponding letters in Stencil Gothic.
Wanted my dudes to have a little diff feel. Thus, I have learned each grouping of marines has 100 soldiers. So ... I am randomly selecting numbers 0-100 for each model. Given I have the letters, I am using a letter naming convention for Battleline, Fire Support, Command, Close Support and Veteran on the other shoulder. For example, he ends up B-40 ... Battleline Marine 40.
In process of having my own little logo created. Figure I can use one of the many areas on the Intercessors or other models just built for a decal.
Well aware this outside the scope of how it "should be done" .... just wanted a diff vibe/feel.
2020/07/10 20:34:50
Subject: New Guy Journey - Test Decals on a Marine
Nice work on the decals! I like the idea of marines being numbered individually with standardized markings. Very Codex Astartes, stamping them with a serial number instead of having to learn a name. Plus I really like how your orange scheme ended panning out.
My painting log is full of snakes Have any retro, vintage, or out of print models? Show them off here! Games I play: 40k (CSM, Necrons); AoS/Fantasy (Seraphon/Lizardmen); Warcry; Marvel Crisis Protocol; Wargods of Olympus/Aegyptus; Mythos
2020/07/11 00:14:11
Subject: Re:New Guy Journey - Test Decals on a Marine


 [spoiler]