| Author |
Message |
 |
|
|
|
|
Advert
|
Forum adverts like this one are shown to any user who is not logged in. Join us by filling out a tiny 3 field form and you will get your own, free, dakka user account which gives a good range of benefits to you:
- No adverts like this in the forums anymore.
- Times and dates in your local timezone.
- Full tracking of what you have read so you can skip to your first unread post, easily see what has changed since you last logged in, and easily see what is new at a glance.
- Email notifications for threads you want to watch closely.
- Being a part of the oldest wargaming community on the net.
If you are already a member then feel free to login now. |
|
 |
2020/10/25 22:52:26
Subject: Custom Gorkanout!
|
|

Regular Dakkanaut
|
  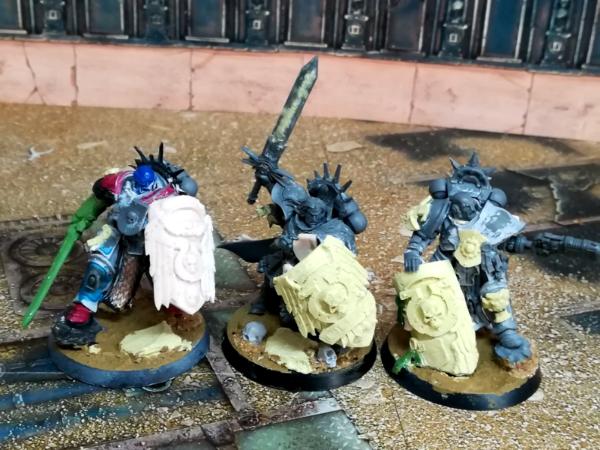
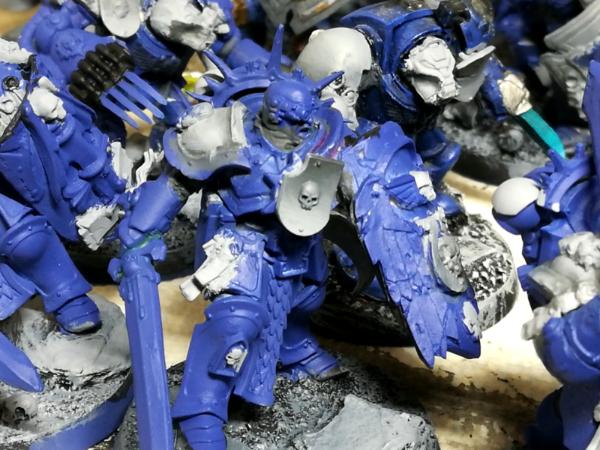
Since I saw the new bladeguard models, although I liked the idea and the mini, I knew I wanted to make a conversion of them. Looking at the stormcast models of age of sigmar they seemed to have the right dynamic poses and size, and I managed get a really cheap group of them in Ebay.
From there I heavily modified most of the mini, removing age of sigmar symbols, changing the neck area to accommodate bigger space marine head and removed the arms completely.
My initial plan was to use gravis helmets, or at least primaris intercessors or supressors, but all of them where way too big for the proportions of the mini. Helmetless primaris heads worked well, and a mixture of hellblaster helmets and other non-helmet heads worked quite well.
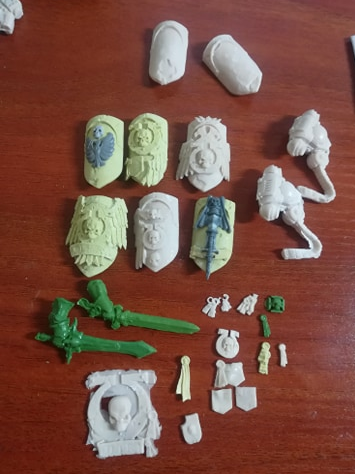
With blues stuff I made molds and I duplicated 2 sword arms (gravis captain and deathguard terminator). Same thing for the shields, which the Ebay bits only had one. Thanks to a forgeworld ultramarine door set I rescued from a second hand rhino, I made many pieces and experimented with different shield designs. Being able to make mods and modify the pieces even when not fully cured really shines here, making things that otherwhise would be almost impossible to do.
I used blue stuff for the molds, and milliput standard for bigger parts and green stuff for thinner bits. Milliput is a bit too brittle, but green stuff is a bit too flexible, but with a metal clip inside the swords it really works well. Is much more expensive than milliput though, so for some details I rather use the cheaper material, and be a bit more carefull when cleaning it and glueing it to the model.
The trickiest part of the build was to get the sword arms and shields in the right poses. I had to cut and ajust for almost an hour each to get them to fit correctly, and I am quite happy with the result. After getting that done, the rest was to apply imperial/ultramarine symbols, and make the minis a bit more techy, otherwise they look a bit like medieval knights. A pistol and granades on the belts worked quite well, for example.
There is a thin balance between too much details and too little for this type of elite unit, and I guess is down to preference.
I would love feedback on those minis to improve for future projects
On the tabletop I might used them as a Judiciar (sword on shoulder and Hourglass on shield guy), lieutenants or captains. Since the model is so converted it can´t be exactly determined as one or the other, so it works to represent both.
I've just started painting today with my terminators, and I hope to finished them before the end of the year (I am a slow painter). Painting might be difficult in some areas like between the shield and the body, which is something I though before building. The placement of the arms was quite complicated and I did not want to risk any gaps or miss-poses, so I will find my way around that issue with a pacient brush, and a "if you cant see it well, the detail does not matter that much" policy. I did manage to get a couple bits to detach correctly, and those are going to be much easier to paint separately (such as the shield of the guy with the plasma gun)
I made some turnaround videos but I do not know how to upload them easely here, specially without annoying external links. Any ideas?
|
|
This message was edited 18 times. Last update was at 2023/11/23 18:02:15
Serve the Emperor today, for tomorrow you may be be dead.
Painting blog:
https://www.dakkadakka.com/dakkaforum/posts/list/793314.page
 |
|
|
 |
|
2020/10/26 00:32:49
Subject: Bladeguard veterans conversion!
|
|
Camouflaged Ariadna Scout
|
 Killatores wrote: Killatores wrote:
With blues stuff I made molds and I duplicated 2 sword arms (gravis captain and deathguard terminator). Same thing for the shields, which the Ebay bits only had one. Thanks to a forgeworld ultramarine door set I rescued from a second hand rhino, I made many pieces and experimented with different shield designs. Being able to make mods and modify the pieces even when not fully cured really shines here, making things that otherwhise would be almost impossible to do.
I used blue stuff for the molds, and milliput standard for bigger parts and green stuff for thinner bits. Milliput is a bit too brittle, but green stuff is a bit too flexible, but with a metal clip inside the swords it really works well. Is much more expensive than milliput though, so for some details I rather use the cheaper material, and be a bit more carefull when cleaning it and glueing it to the model.
The conversions have turned out quite nicely, especially the extra bits you've added. For future reference if you have green stuff and milliput you know they can also be mixed together? Cures hard like milliput but with a bit more flexibility, although it depends on how much of each you use.
|
|
|
|
|
|
2020/10/29 10:58:08
Subject: Re:Bladeguard veterans conversion! - Painting process
|
|
Regular Dakkanaut
|
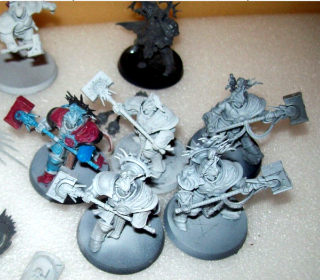
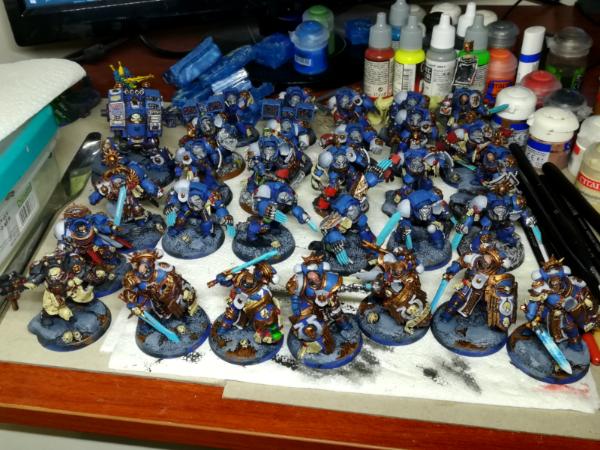
Started painting process a couple days ago, and I wanted to do a dailysh update of the process.
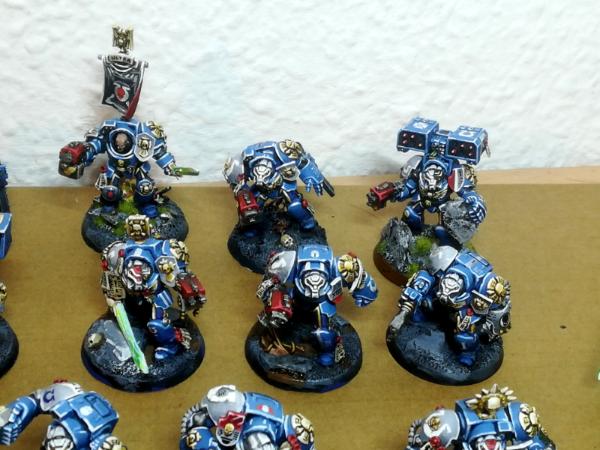
I am also painting 20 terminators (10 normal + 5 TH and 5 LC), 3 terminator characters, and a dreadnough. 30 models in total, which is quite a chunk.
All of them except dreadnought
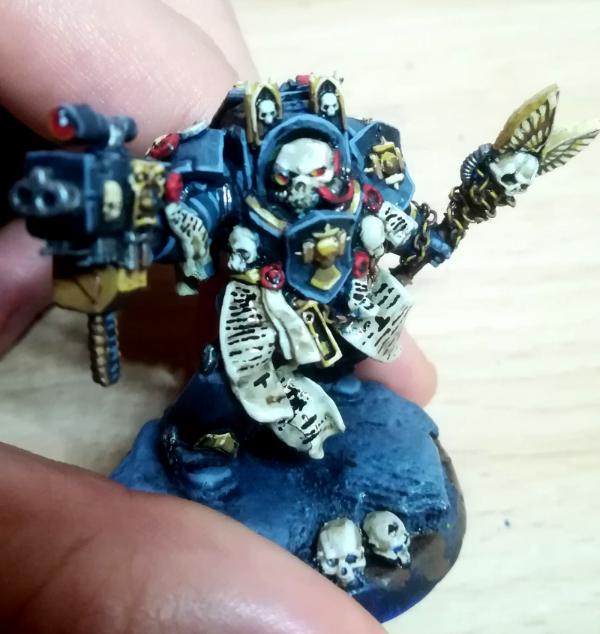
Custom made terminator chaplain. I do like the old and new minis, but they are quite expensive to get. I also wanted to make one of my own, so with using molds I made the necesary bits, and kitbashing a bit I got a nice result.
 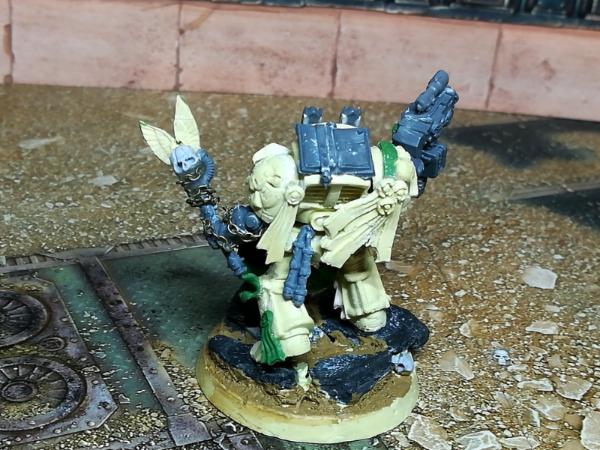
He gets on my terminator character line up, including a terminator librarian which I already painted months ago.
Thanks to my bluestuff cloning I managed to get a rounded number of terminators (I lacked 3 of them), and made a bunch of shoulder shields, shoulder pads, purity seals and other details to decorate the minis.
I never got around to finish this terminators since I had other projects. With the new codex, though, they seem to be a really good option to bring them on the tabletop and purge the enemies of humanity for good.
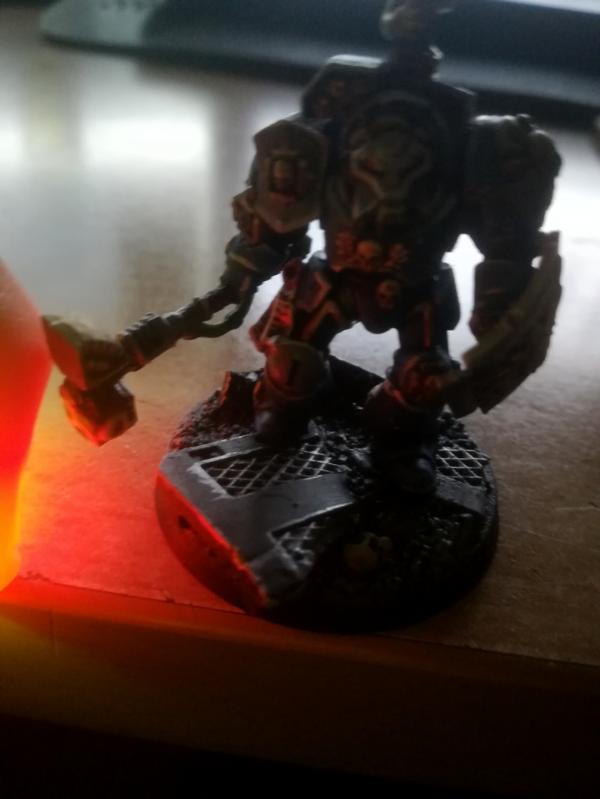
And yes, my thunderhammer are going to have a glowing lava effect on them, because that looks cool.
  Automatically Appended Next Post:
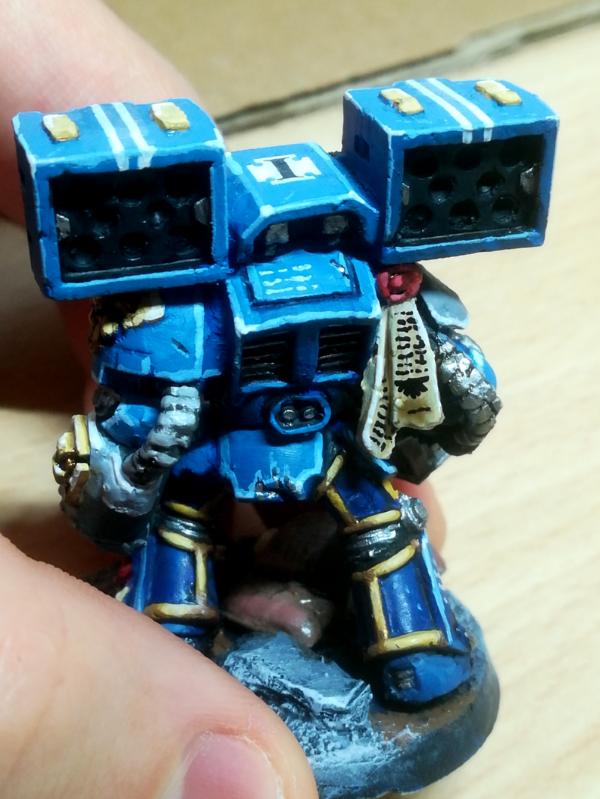
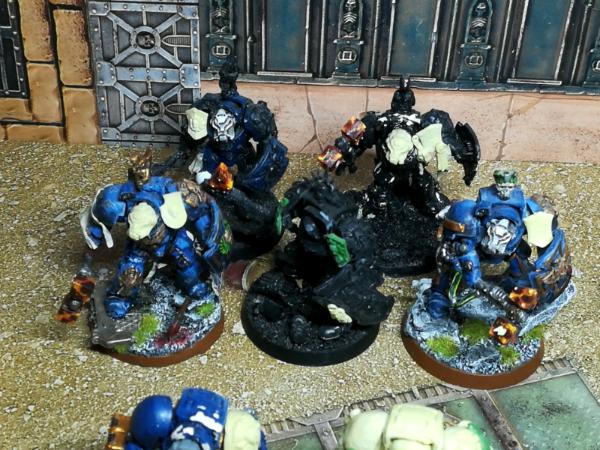
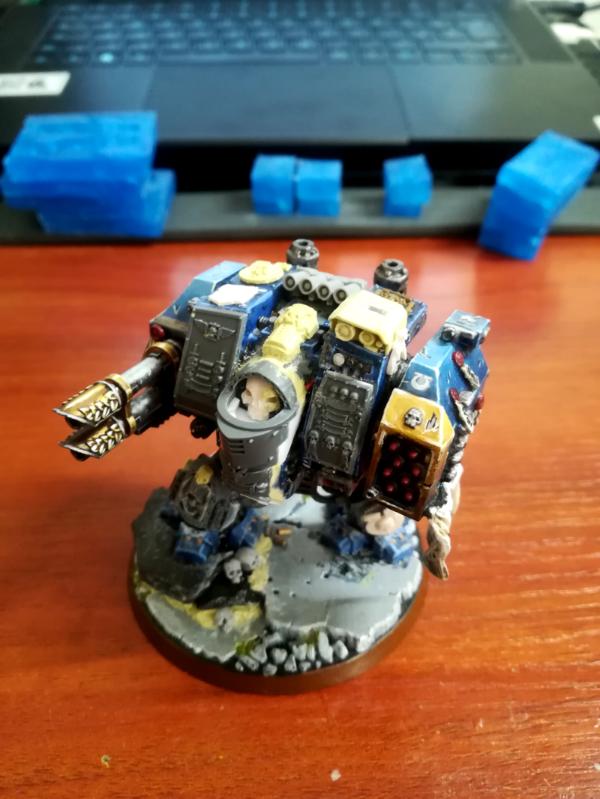
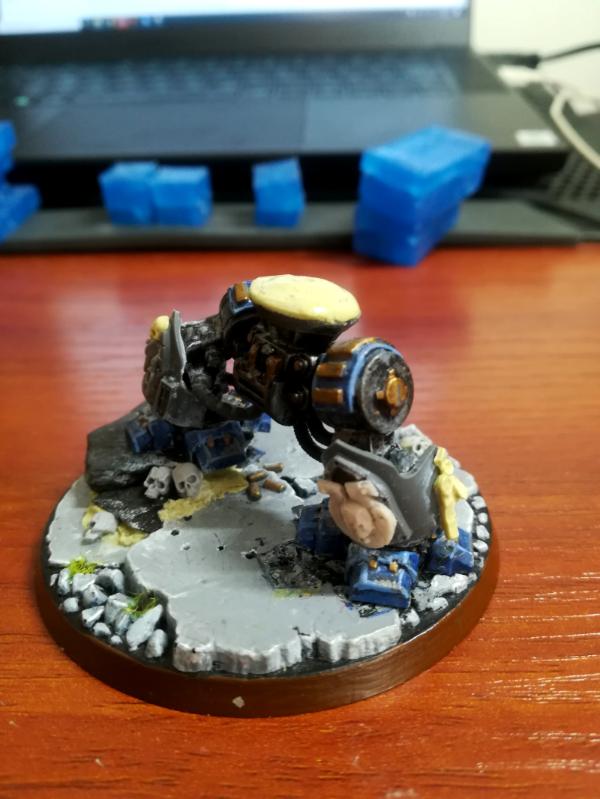
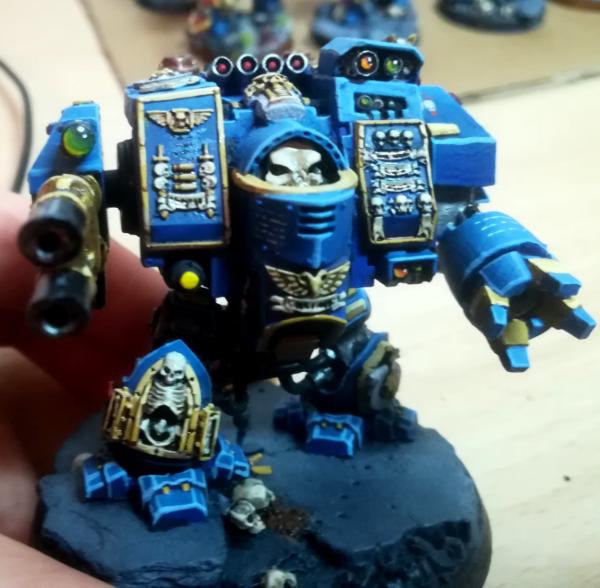
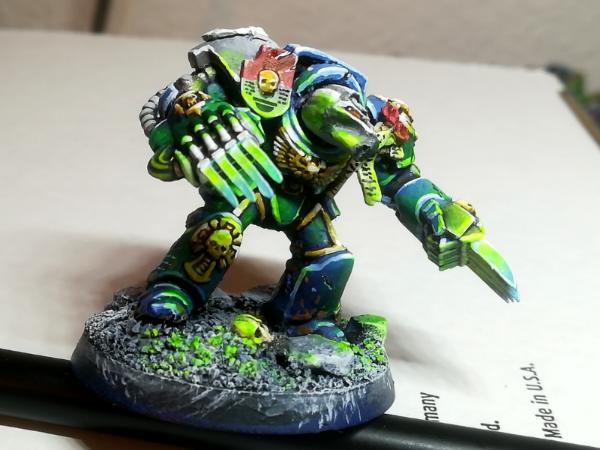
Now for the dreadnought.
I had an old dreadnought painted but I was not happy with it. It looked alright for my 16 year old me, but 10 years later does not hold up that well. Paintjob was messy, the overall shape and pose relally standard, nothing too interesting about it. Thus, I remade it almost from the ground up, and I am pretty happy with it now.
The front of the torso have been completely redesign with a skull as a face, and the armor panels have much more interesing shapes than before.
Standing next to his brother:

I always hated the standard pose of the legs for dreadnoughts. It's a A"" pose which although gives some height to the mini, it makes it look super static. I personally much preffer to do a couple cuts on the knees, and give the legs a bit of a bend. This gives much more weight to this walking tank, and the overall pose is more dinamic than otherwhise. Also, you want to always magnetize the upper body and the arms, obviously.
Now I can swap the parts from one dreadnought to the other if I feel like it 
 Automatically Appended Next Post:
DAY 1:
Automatically Appended Next Post:
DAY 1:
Primed and black coat to the bases. really straight forward. Some old minis had already a decent base coat so I did not touch those that much.
 DAY 2:
Greys. I like to do this first on the bases, so later when I clean up the blues I already have the base painted, which can get messy with the dry brush.
I did some wetblending on all the white areas and pre-coated the purity seals, so later coats of paint with less coverage have an easier time to get the color through. I do not know much of the wet blending will show throught the next step of white, but at least I have a decent base to start from. It is also a good oportunity to practice the technic without warying too much about the end result, and with this I have gotten a bit better at it, getting some creamy blends.
  DAY 3
DAY 3
Golds! A ton of golds here, specially on the bladeguards. First layer was a copper color which has a lot of coverage, and the next one is a semi-dry brush of a brighter gold tone. This step took me a bit longer since although I am messy and going as fast as I can, there are a ton of details and fine lines to at least cover. I will need to have a couple days just for cleaning up the base coat after all the base colors are in, but is worth it!
  DAY 4
DAY 4
Reds, browns and skin. Nothing fancy. Brown for some ammo patches and the faces, skin tone over that brown over the faces. My reds have terrible coverage, so I had to mix them with evil suns to get some color on the mini withough doing 5 layers on them. Thus, the capes look a bit brighter than they should, almost looking already at their maximun brightness, but I will turn down that later.

Since I finished a bit earlier, I did a quick test for the energy swords. Although I think my brush strokes need to be thinner (my white has terrible consistency), I think I got much closer to the result I want than in the past. Before I struggled a lot to differentiate the blue of the sword and the blue of the armor. This one has a much different look, and although it lacks some brightness, I believe I can sell it even more once I do object lighting on the mini and the base.

|
|
This message was edited 3 times. Last update was at 2020/10/29 11:27:11
Serve the Emperor today, for tomorrow you may be be dead.
Painting blog:
https://www.dakkadakka.com/dakkaforum/posts/list/793314.page
|
|
|
|
|
2020/11/03 22:43:06
Subject: Re:Bladeguard veterans conversion,Terminators and dreadnough - Painting process
|
|
Regular Dakkanaut
|
DAY 5
Still basecoat stuff, this time bone colours. I've been working on a couple other projects, so I slowed down a bit my painting progress. I'll get back to it soon, I really want to finish the base coat and give the first washes before the end of the week.

|
Serve the Emperor today, for tomorrow you may be be dead.
Painting blog:
https://www.dakkadakka.com/dakkaforum/posts/list/793314.page
|
|
|
|
|
2020/11/03 23:47:59
Subject: Bladeguard veterans conversion,Terminators and dreadnough - Painting process
|
|
Leader of the Sept
|
Looking good,.and well.done on keeping it all.going!
The self.cast stuff is blending in really well.
|
Please excuse any spelling errors. I use a tablet frequently and software keyboards are a pain!
 Terranwing - w3;d1;l1 Terranwing - w3;d1;l1
 51st Dunedinw2;d0;l0 51st Dunedinw2;d0;l0
 Cadre Coronal Afterglow w1;d0;l0 Cadre Coronal Afterglow w1;d0;l0 |
|
|
|
|
2020/11/04 15:50:36
Subject: Bladeguard veterans conversion,Terminators and dreadnough - Painting process
|
|
Regular Dakkanaut
|
 Flinty wrote: Flinty wrote:Looking good,.and well.done on keeping it all.going!
The self.cast stuff is blending in really well.
Thanks!
Yeah, I am pretty happy with the results I got with my new mold method and materials.
I do have some pieces I made years ago that really don't match the same quality, but with the paintjob I expect it to make up for them.
|
Serve the Emperor today, for tomorrow you may be be dead.
Painting blog:
https://www.dakkadakka.com/dakkaforum/posts/list/793314.page
|
|
|
|
|
2020/11/11 14:06:39
Subject: Re:Bladeguard veterans conversion,Terminators and dreadnough - Painting process
|
|
Regular Dakkanaut
|
Moar updates
Cleaned all the basecoat, did another pass on the greys-whites and bone parts

Good old washes.
Now the fun begins with all the wet blending, details, ilumination effects, highlights and finishing touches. Its going to take a while!
|
Serve the Emperor today, for tomorrow you may be be dead.
Painting blog:
https://www.dakkadakka.com/dakkaforum/posts/list/793314.page
|
|
|
|
|
2020/11/12 08:56:18
Subject: Re:Bladeguard veterans conversion,Terminators and dreadnough - Painting process
|
|
Regular Dakkanaut
|
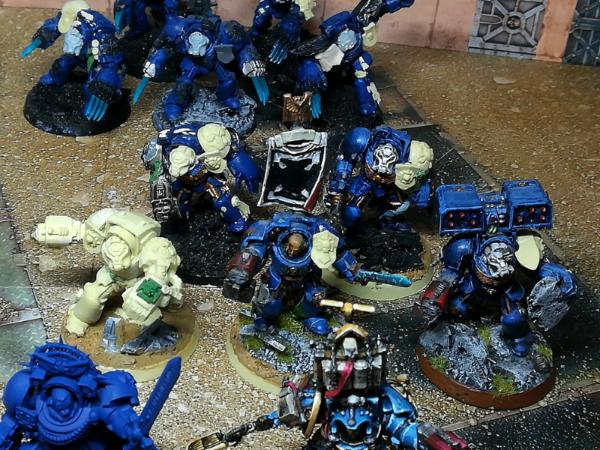
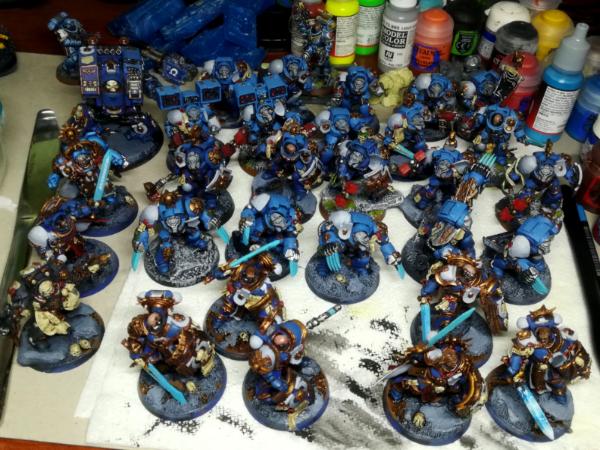
Now the true fun begins! I generally find basecoating a bit tedious other than the choosing of the paint scheme/color design of the model. I see it as if it was a manual priming of the miniature before you start actually paining it.
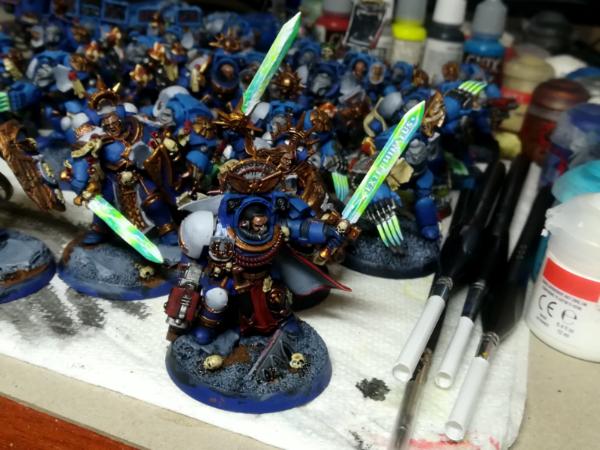
I started with the blues. Only 2 minis of 30, but good progress.
I managed to reduce my blue wet blending to 1 step, instead of 2 that I was doing on the past, which cuts the work by more than half.
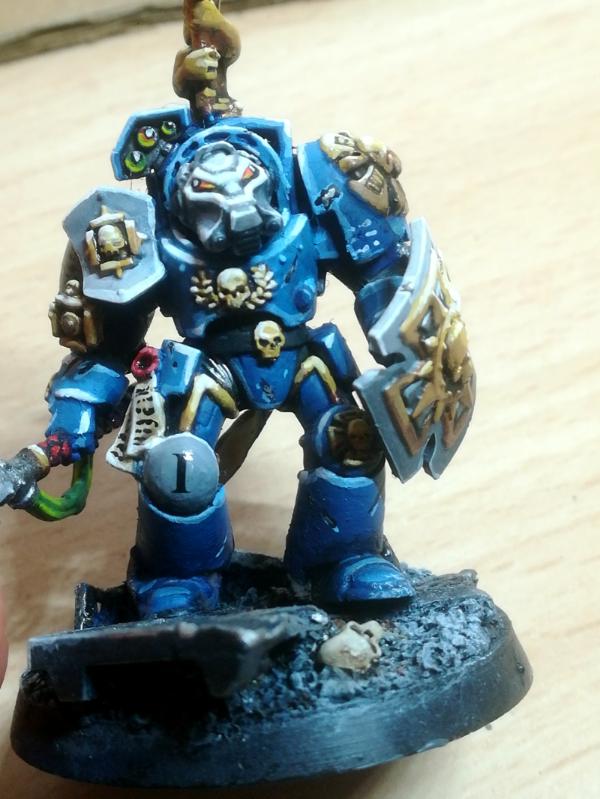
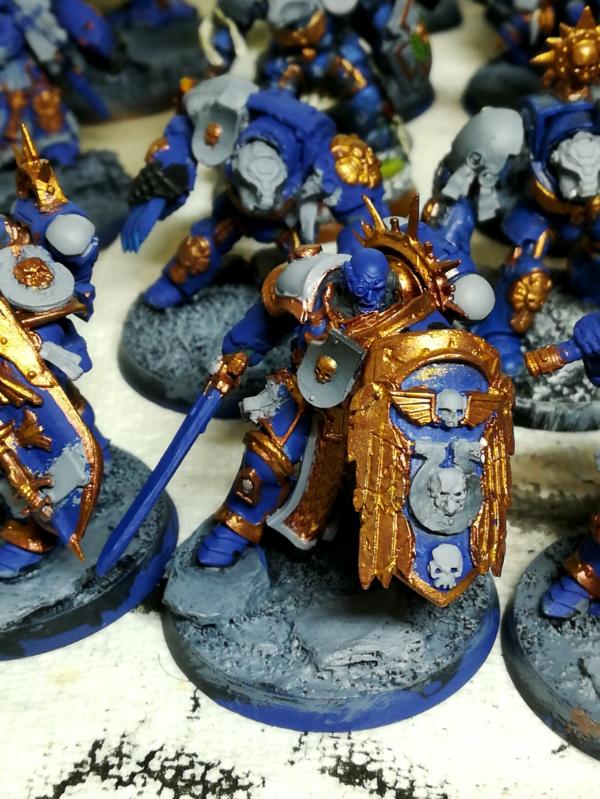
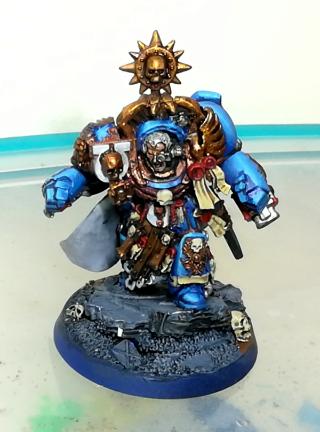
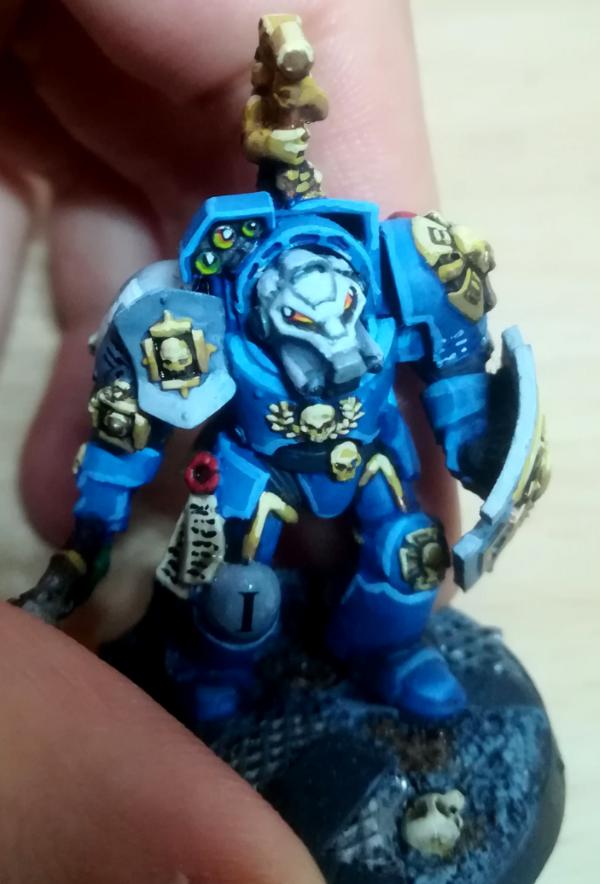
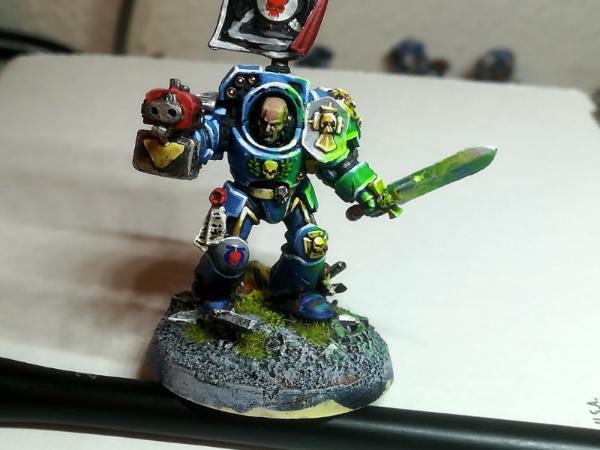
I did the most complicated model right at the start, the terminator Marneus Calgar, which is probably one of my favorite miniatures of the ultramarine range. It would be perfect if it was 20% bigger. I tried to do some non metalic metals on the blues. First attempt at this, not too bad, I'll bring up the contrast after applying decals and the highlightiing will help a lot to make the effect pop a bit more.
28 more models to go!

|
Serve the Emperor today, for tomorrow you may be be dead.
Painting blog:
https://www.dakkadakka.com/dakkaforum/posts/list/793314.page
|
|
|
|
|
2020/11/16 10:44:24
Subject: Re:Bladeguard veterans conversion,Terminators and dreadnough - Painting process
|
|
Regular Dakkanaut
|
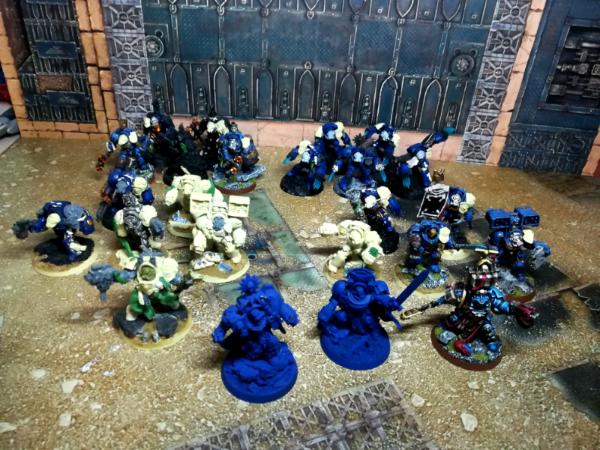
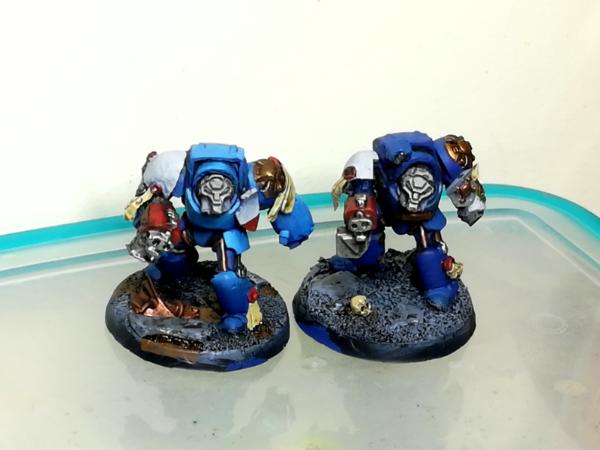
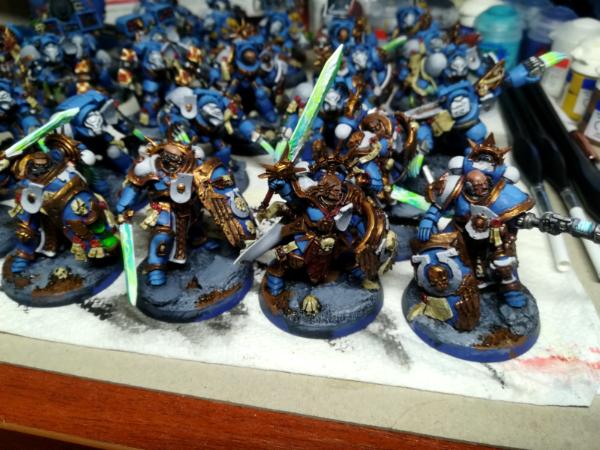
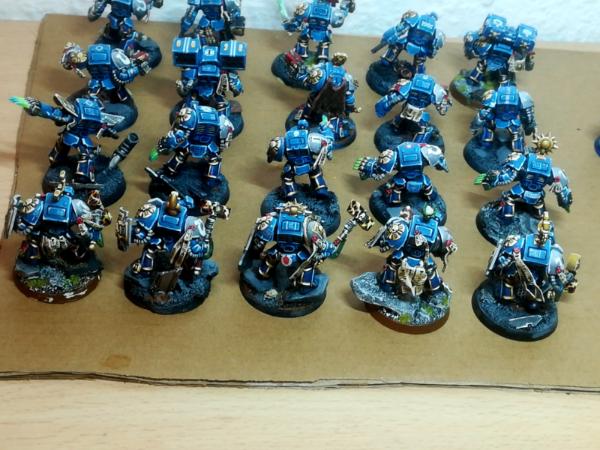
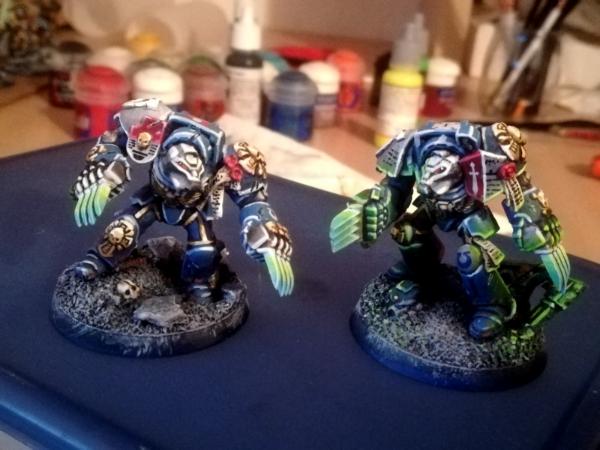
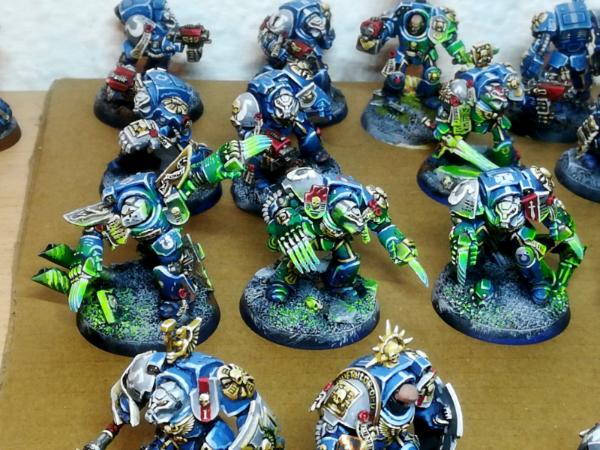
More progress on the blues.
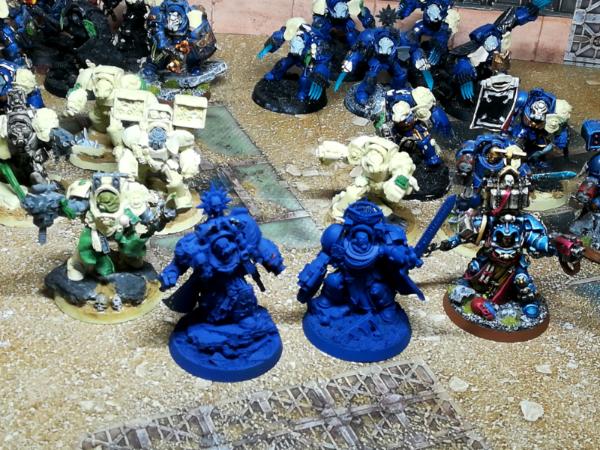
On Saturday I got the 10 standard terminators done, and then I noticed that the blue color I was using on the lighter tones is too vibrant compared to the other minis in my painted army.
Rant about the wrong blue
Here you can see a comparison of the 2 tones. On the left, the more vibrant one, on the right, the one I use on my army. The mini on the middle is painted half in one color, half in the other, so its easier to see the difference. the light on the photo does not help that much to show the difference, but I think its noticeable enough.
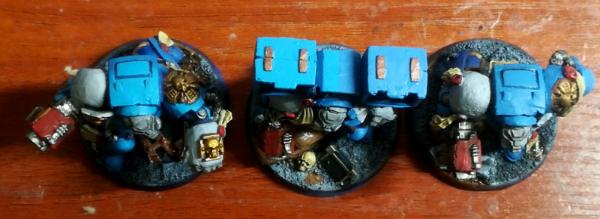
I made a couple comparisons and I decided to re-paint my standard terminators lighter tones with the correct blue, and managed to finish the lighting claws termis as well.
I was hoping to finish the blues this weekend. This mistake cost me a day, but I learned to always double check the colour consistency when changing anything on the formulas.
Thunderhammer terminators started, but I hope to finish the blues of the batch in a couple more days.
|
Serve the Emperor today, for tomorrow you may be be dead.
Painting blog:
https://www.dakkadakka.com/dakkaforum/posts/list/793314.page
|
|
|
|
|
2020/11/19 17:17:23
Subject: Re:Bladeguard veterans conversion,Terminators and dreadnough - Painting process
|
|
Regular Dakkanaut
|
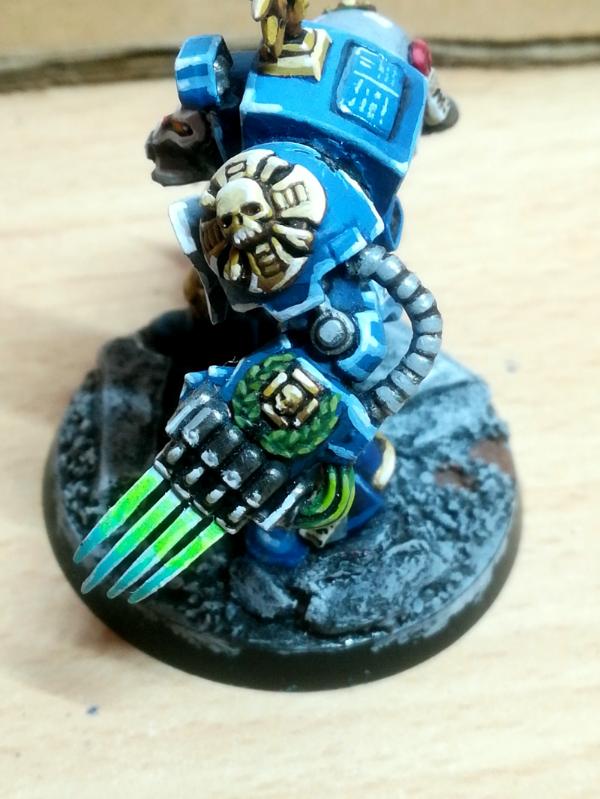
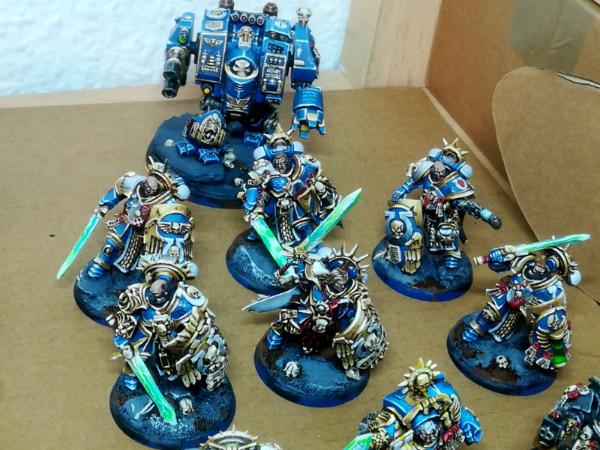
A bit tired of so much blue, I made the energy weapons.
I went through some experimentation, but I didnt get a result I was happy with. This concpt art was part of my inspiration, specially the powerful feel and the brightness of the weapon, iluminatin the armour of the soldier.
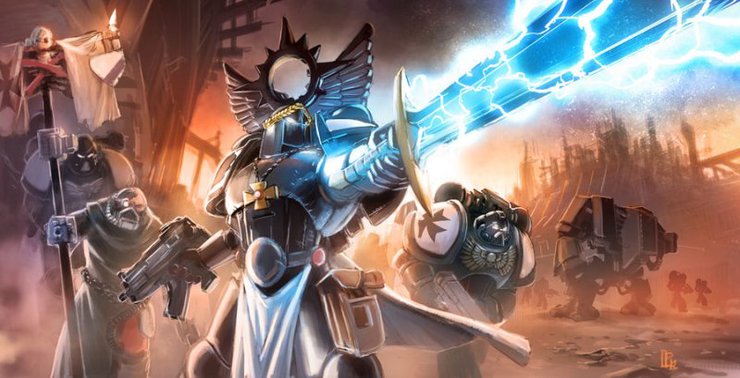
My attempts, though, did not look that bright, and although some of them got that powerful feeling on the lighting effects, they where not quite right.
At the 4th try, thouhg, I got a base that worked much better.
I used the blue I was using as a midtone as the darkest tone, went to pure white for a good portion of the blade, and blend with fluorescent yellow.
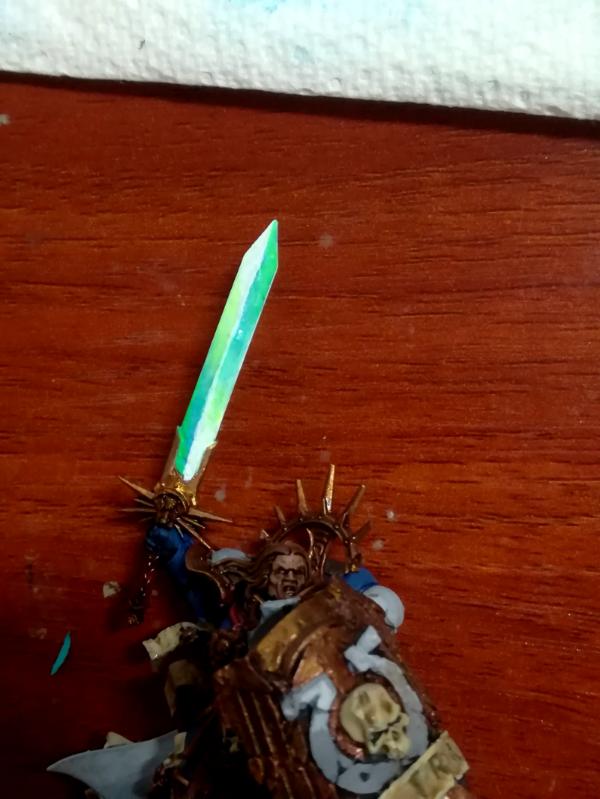 
I am quite happy with how the energy weapons look now. They do have a slight green tone to the blade which I am not completely keen on, but I think it achieves a nice effect. Blue plasma and blue armour does not make for nice contrasts, but this greenish color really stands out on the crowd. It also looks bright and somewhat powerful.
Compared to my first power sword painted, I think its a huge improvement. After finishing this project I will go back to a couple minis in my army that have energy weapons and paint them

|
|
This message was edited 4 times. Last update was at 2020/11/19 21:58:38
Serve the Emperor today, for tomorrow you may be be dead.
Painting blog:
https://www.dakkadakka.com/dakkaforum/posts/list/793314.page
|
|
|
|
|
2020/11/19 17:52:46
Subject: Bladeguard veterans conversion,Terminators and dreadnough - Painting process
|
|

Grisly Ghost Ark Driver
|
Those power weapons really do look fantastic!
|
|
|
|
|
|
2020/11/19 21:59:51
Subject: Bladeguard veterans conversion,Terminators and dreadnough - Painting process
|
|
Regular Dakkanaut
|
Thanks! Most of the credit goes to yellow fluorecent paint from game collor, it makes for some trully cool effects with little efford.
|
Serve the Emperor today, for tomorrow you may be be dead.
Painting blog:
https://www.dakkadakka.com/dakkaforum/posts/list/793314.page
|
|
|
|
|
2020/11/19 23:06:50
Subject: Bladeguard veterans conversion,Terminators and dreadnough - Painting process
|
|
Grisly Ghost Ark Driver
|
If you're feeling up to it a little OSL from the blade would kick those up even a little bit further! They look so bright, my eye is expecting them to be shedding light
|
|
|
|
|
|
2020/11/20 00:46:36
Subject: Bladeguard veterans conversion,Terminators and dreadnough - Painting process
|
|
Regular Dakkanaut
|
 Gwyn chan 'r Gwyll wrote: Gwyn chan 'r Gwyll wrote:If you're feeling up to it a little OSL from the blade would kick those up even a little bit further! They look so bright, my eye is expecting them to be shedding light
Yeah, thats exactly my plan. First I want to finish the whole normal shading of the mini, and then do the OSL on top. I want it to be sublte but strong enough to show the brightness of the weapon.
I did some OST practice with a secret santa we did at work. I need to select the pics I made and made a propper post on miniature showcase.

|
Serve the Emperor today, for tomorrow you may be be dead.
Painting blog:
https://www.dakkadakka.com/dakkaforum/posts/list/793314.page
|
|
|
|
|
2020/11/20 01:01:17
Subject: Bladeguard veterans conversion,Terminators and dreadnough - Painting process
|
|
Walking Dead Wraithlord
|
Killatores wrote: Gwyn chan 'r Gwyll wrote:If you're feeling up to it a little OSL from the blade would kick those up even a little bit further! They look so bright, my eye is expecting them to be shedding light
Yeah, thats exactly my plan. First I want to finish the whole normal shading of the mini, and then do the OSL on top. I want it to be sublte but strong enough to show the brightness of the weapon.
I did some OST practice with a secret santa we did at work. I need to select the pics I made and made a propper post on miniature showcase.
How did you do the green goo base on this?
Looks very vivid and toxic. I dig it. I like to use a lot of toxic themes on my bases so always looking for new knowledge .
|
|
|
|
|
|
2020/11/20 08:51:04
Subject: Bladeguard veterans conversion,Terminators and dreadnough - Painting process
|
|
Regular Dakkanaut
|
How did you do the green goo base on this?
Looks very vivid and toxic. I dig it. I like to use a lot of toxic themes on my bases so always looking for new knowledge .
The base was modeled with milliput, and the painting is many, many layers of Fluorescent green and some fluorescent yellow, both from game color. I'll do a post about this mini project once I have the time to sort out the pics I made before sending it.
|
Serve the Emperor today, for tomorrow you may be be dead.
Painting blog:
https://www.dakkadakka.com/dakkaforum/posts/list/793314.page
|
|
|
|
|
2020/11/20 15:15:25
Subject: Bladeguard veterans conversion,Terminators and dreadnough - Painting process
|
|
Grisly Ghost Ark Driver
|
That's a very cool project, I can't wait to see your posts about it!
|
|
|
|
|
|
2020/11/23 11:11:37
Subject: Re:Bladeguard veterans conversion,Terminators and dreadnough - Painting process
|
|
Regular Dakkanaut
|
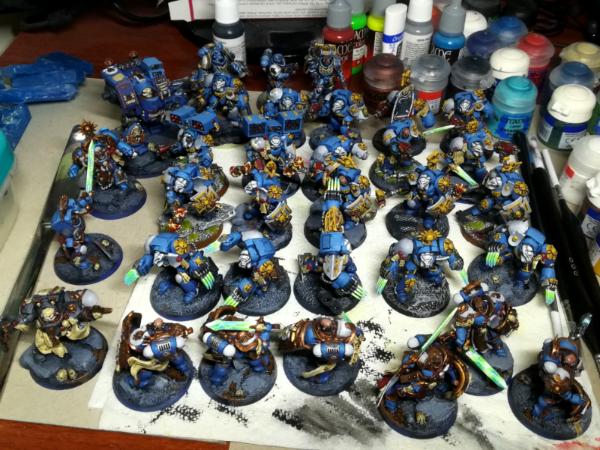
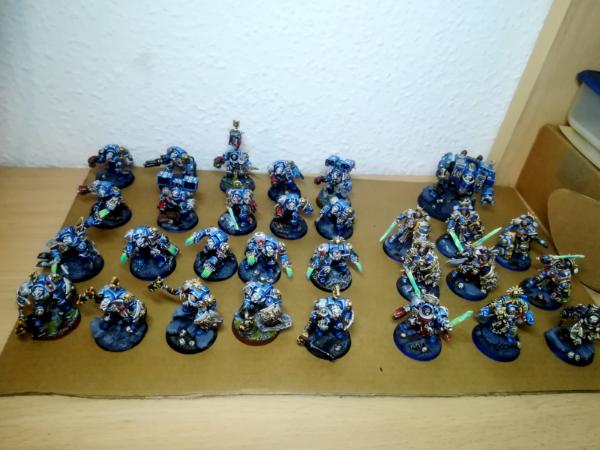
Blues finished!
Whites got another pass. Everythime I look at them I feel like they should be whiter, this is the 3rd time I have done a pass on them. Hope this one is the final one (that is what happends when you change formulas on batches of minis XD)
Started the golds. I'll do first the dark to midtones, and then do another pass of bright tones.
I have plans to add freehand symbols and little paintings, but that's going to get done after all the shading is done (except last black blaze), and before highlights.
In 20 days I am leaving the UK for a couple months for holidays, and I wanted to finish this batch before leaving. I dont think I'll be able to finish it, so I will need to wait to see them all finished.
While away, though, I want to paint at least 10 intercerssors, since my army is lacking a lot of troops after scouts where moved to elites.
|
Serve the Emperor today, for tomorrow you may be be dead.
Painting blog:
https://www.dakkadakka.com/dakkaforum/posts/list/793314.page
|
|
|
|
|
2020/11/23 22:07:42
Subject: Bladeguard veterans conversion,Terminators and dreadnough - Painting process
|
|
Crushing Black Templar Crusader Pilot
|
These guys look awesome with their blades - en masse the effect is most striking
Thanks for sharing!
|
  
Relapse wrote:
Baron, don't forget to talk about the SEALs and Marines you habitually beat up on 2 and 3 at a time, as you PM'd me about.
|
|
|
|
|
2020/11/26 09:09:32
Subject: Re:Bladeguard veterans conversion,Terminators and dreadnough - Painting process
|
|
Regular Dakkanaut
|
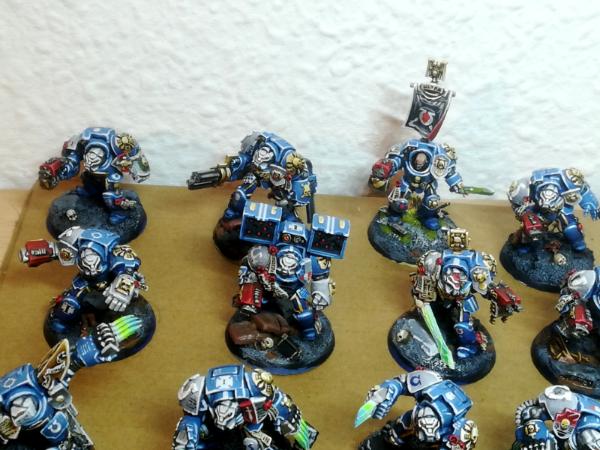
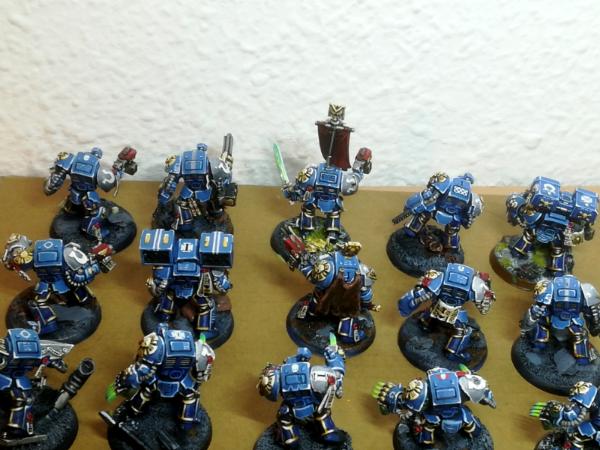
First gold pass on all terminators.
I'll wait for the bladeguard, characters and dread after I finish the second pass to see exactly the end result before applying it to them. I expect it to work well based on my past experience, but after some time without doing it they might end up looking a bit too yellow and I would not like to repaint those bladeguard guys. Once the brighter yellos and whites get in the look changes quite a lot, but I might need to put some brown back in.
Also took a moment to think about the symbols, specifically Ultramarine right shoulder pads. My ultramarines have right white shoulder pads which makes decaling a bit annoying since there are no black squad markings, so I always need to either paint the decals black or hand draw them. Terminators have the Crux Terminatus on the shoulderpad that would normally have the chapter symbol though, so that complicate things a bit.
The ultramarine symbol is a bit extrange to freehand and get a good consistency from mini to mini: I always get the proportions differently. For terminators, though, the elite ancient status of the mini might justify the different shapes, and might give some personality to each guy, adding variation in an othewhise detailess area of the mini (almost all my Termi right shoulderpads have no features.). If there is any big group of minis I would do this to is my terminators, thus it might be my opportunity to learn freehand symbols to improve my painting skills for the rest of the army.
There are some options of non-white ultramarine symbol decals, and even the white ones would work since I did not do my shoulderpads that white this time, for better or worse.
|
|
This message was edited 1 time. Last update was at 2020/11/26 09:10:26
Serve the Emperor today, for tomorrow you may be be dead.
Painting blog:
https://www.dakkadakka.com/dakkaforum/posts/list/793314.page
|
|
|
|
|
2020/12/03 16:00:16
Subject: Re:Bladeguard veterans conversion,Terminators and dreadnough - Painting process
|
|
Regular Dakkanaut
|
Terminator golds done, just in need of white whilights, which would come with the edgehighliing pass over the whole mini. Also did the ultramarine symbols in the shoulder pads, most of them freehanded, some added by casted bits.
This is the difference between the first gold pass and the second. First I go from the base metalic cooper with a black wash to a yellow, and then on the 2nd pass brighten the yellow up to look more like gold.

Now, as a jump to another of my posts.
I tried to stay only painting until finishing this batch of minis, but I just have no self control XD. I enjoyed way to much the building of the converted bladeguard that I had to jump in to do a sternguard/veteran conversion.
If you are interested on cheking it out, please go here:
https://www.dakkadakka.com/dakkaforum/posts/list/0/794405.page#10999491

|
Serve the Emperor today, for tomorrow you may be be dead.
Painting blog:
https://www.dakkadakka.com/dakkaforum/posts/list/793314.page
|
|
|
|
|
2020/12/09 09:28:45
Subject: Re:Bladeguard veterans conversion,Terminators and dreadnough - Painting process
|
|
Regular Dakkanaut
|
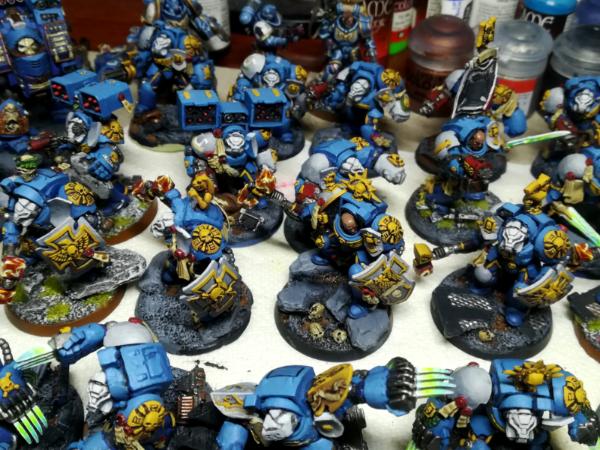
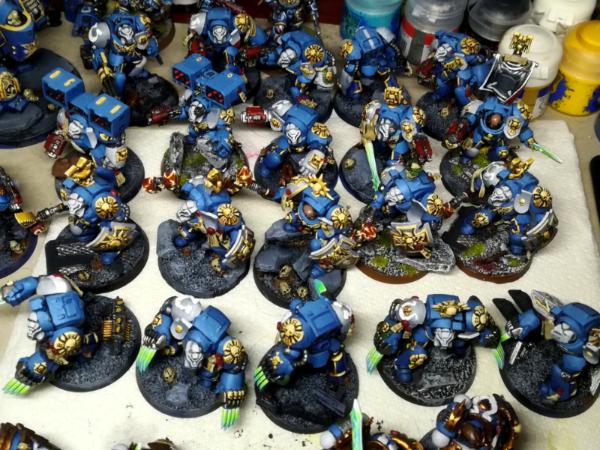
Golds finished, at last.
On the edge highlighting stage they get the last pop in contrast and definition of the shapes, but so far quite happy with how they look.
I will be traveling back to spain at the end of the week and depening on my suitcase space I will be able to transport these minis with me to finish them off during Christmas. Otherwhise I would need to wait until I get back.
|
Serve the Emperor today, for tomorrow you may be be dead.
Painting blog:
https://www.dakkadakka.com/dakkaforum/posts/list/793314.page
|
|
|
|
|
2021/01/24 22:10:45
Subject: Re:Bladeguard veterans conversion,Terminators and dreadnough - Painting process
|
|

Regular Dakkanaut
|
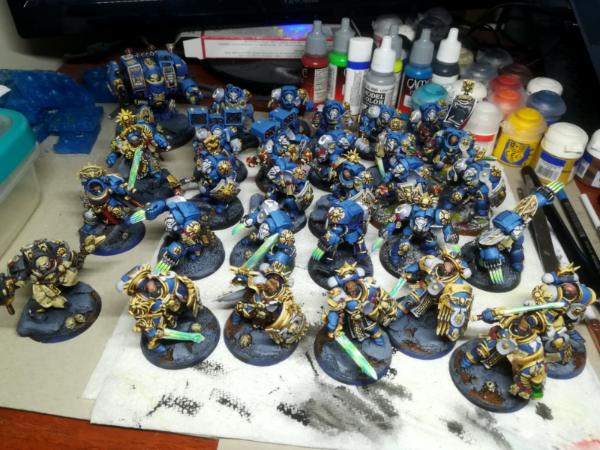
Hi, I have been away from the forum for a while, But since I was able to travel with my minis and paints, I managed to work on them
I took a break on posting since I was working on another project, but I got back to this batch and is getting quite close.
Did quite a lot of tweaks and minor passes, such as on the faces, improved thunderhammer look, general tweaks to shading and other areas before moving foward.
Next went all the decal and text work. Decals where quite interesting to do since I wanted some uniqueness to each mini. For the text I did black text with a permanent pen, and white text with a brush. I believe I could have got a better result on the black text using a brush as well, but the pen is so much faster and easier compared to the quality of the black paint I got. Texts is probably one of my worst skills and still have a ton to learn. I just simply cant get my head to write letters that do not look wonky, curved or badly proportioned, even with pen and paper!
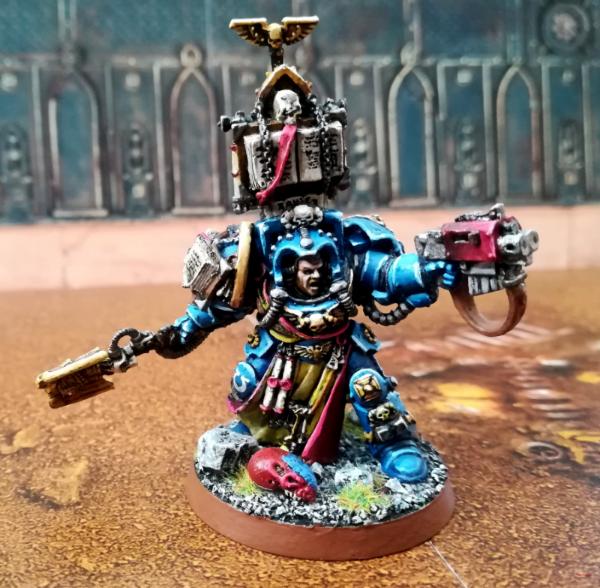
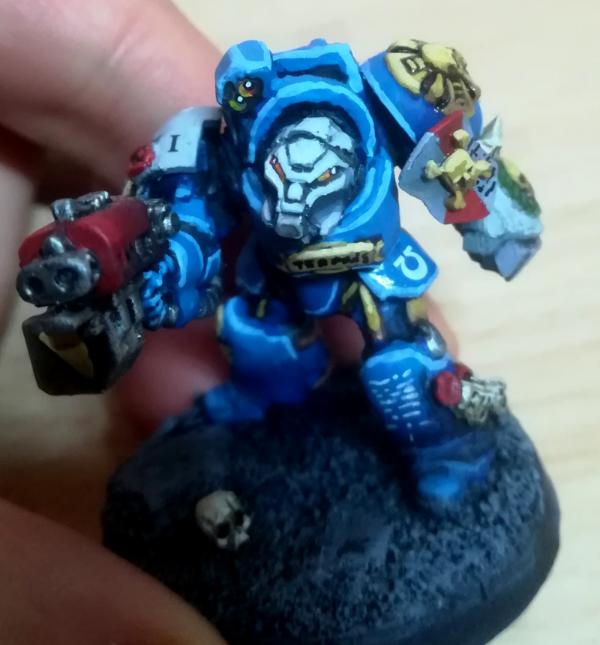
Did a quick edge highlighting pass but I stoped after the first level since I realized that I had to paint the lenses before I did the highlights on the whites, thus, better do the lenses first.
Spent a day doing the lenses and eyes of the minis, quite fun aspect of the painting that brings some detail to the mini. Not the best at it, but I got a simple method that work well for what I need.
Some examples:
  Automatically Appended Next Post:
After lenses I I moved to doing the edge highlighting of most of the mini, finishing with pure white on the corners and upper areas of blues, and specially golds.
the way I do NMN is not too good, but the white highlight at the end makes it look so much different, dont know why exactly. Just a small dot of white makes the whole thing look more gold-ish rather than yellow metal, probably due to the increased overall contrast and making the brown areas more obvious.
This is the stage I am at currently, quite happy with the progress. I would want to pay more atention to edge highlights and texts on the future, since those do not exactly look as I would like. I struggle doing thin controlled lines specially on flat surfaces, and text is just a skill that I do not have XD.
Automatically Appended Next Post:
Things to do next in order:
- Highlights on the greens, including energy cables on thunder hammers.
- Bases
- Battle damage pass - mostly blue armour.
- Mud pass
- Object lighting of energy weapons <--- HUGE!
I believe I know how to do the object lighting thanks to a couple tests I have done. It should be pretty straight forward thanks to the fluorecense-type paints I am going to be using, which behave much more like a thick glaze rather than a paint. I hope this will make those energy weapons particularly impressive to see on the tabletop.
|
|
This message was edited 3 times. Last update was at 2021/01/24 22:38:54
Serve the Emperor today, for tomorrow you may be be dead.
Painting blog:
https://www.dakkadakka.com/dakkaforum/posts/list/793314.page
|
|
|
|
|
2021/01/25 14:22:03
Subject: Bladeguard veterans conversion,Terminators and dreadnough - Painting process
|
|
Grisly Ghost Ark Driver
|
Those are good lenses! This is a lot of models to have on the painting table at once, your pace is fantastic considering that!
|
|
|
|
|
|
2021/01/26 15:24:53
Subject: Re:Bladeguard veterans conversion,Terminators and dreadnough - Painting process
|
|
Regular Dakkanaut
|
|
|
This message was edited 1 time. Last update was at 2021/01/26 15:35:41
Serve the Emperor today, for tomorrow you may be be dead.
Painting blog:
https://www.dakkadakka.com/dakkaforum/posts/list/793314.page
|
|
|
|
|
2021/01/27 13:20:46
Subject: Bladeguard veterans conversion,Terminators and dreadnough - Painting process
|
|
Grisly Ghost Ark Driver
|
Those reference lighting shots are really clever! I wish I had a light I could use to do that, it would be so helpful!
|
|
|
|
|
|
2021/01/27 23:15:45
Subject: Bladeguard veterans conversion,Terminators and dreadnough - Painting process
|
|
Ancient Venerable Dreadnought
|
As Gwyn says, great idea on the reference photos. I’ve very little OSL experience, certainly not on this scale, so can’t offer any advice. So good luck!
|
Goberts Gubbins - P&M Blog, started with Oldhammer, often Blackstone Fortress and Void Panther Marines, with side projects along the way |
|
|
|
|
2021/01/28 15:12:15
Subject: Re:Bladeguard veterans conversion,Terminators and dreadnough - Painting process
|
|
Regular Dakkanaut
|
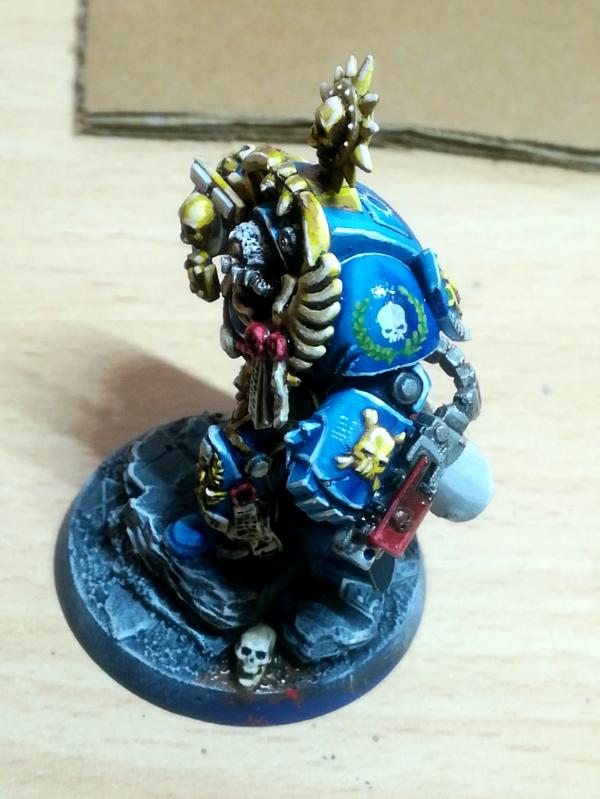
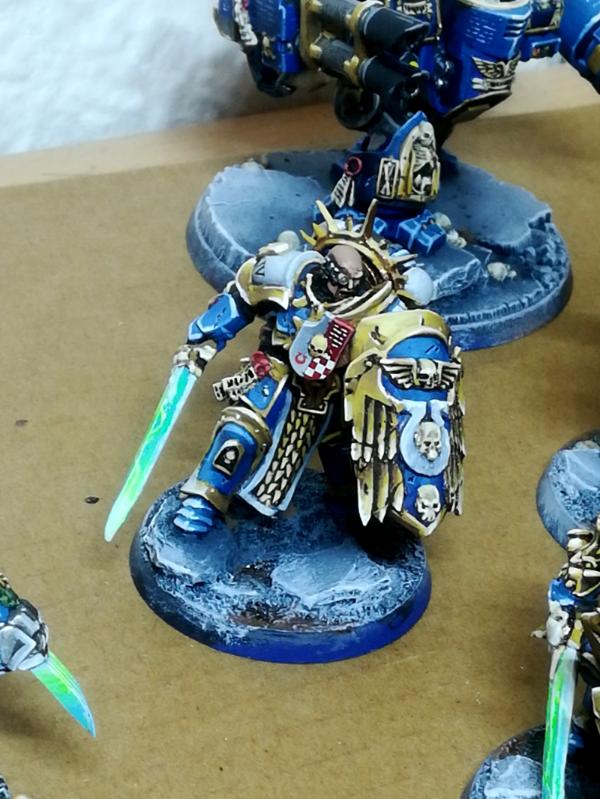
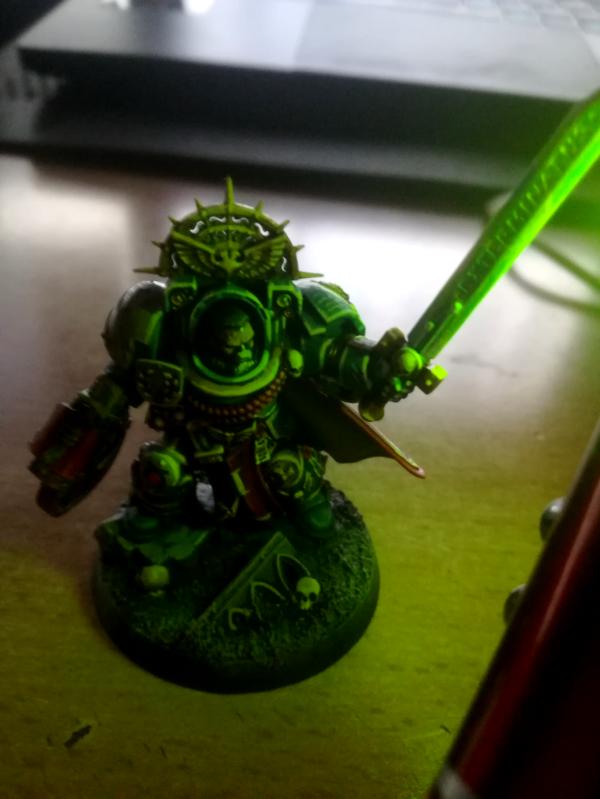
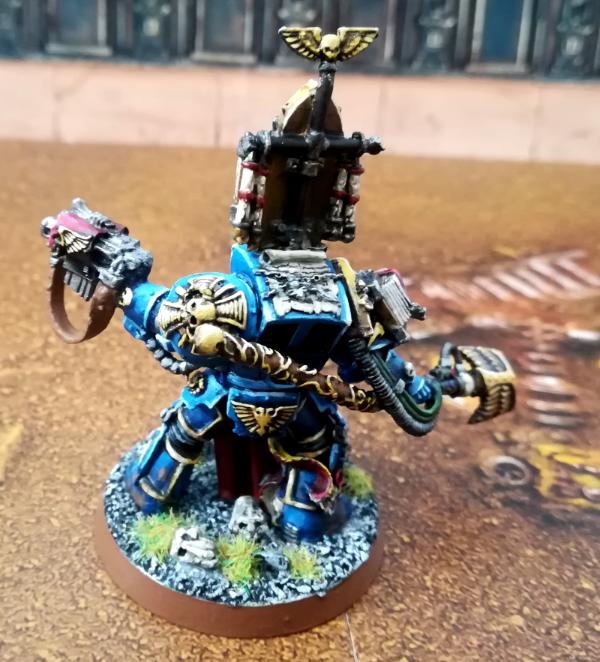
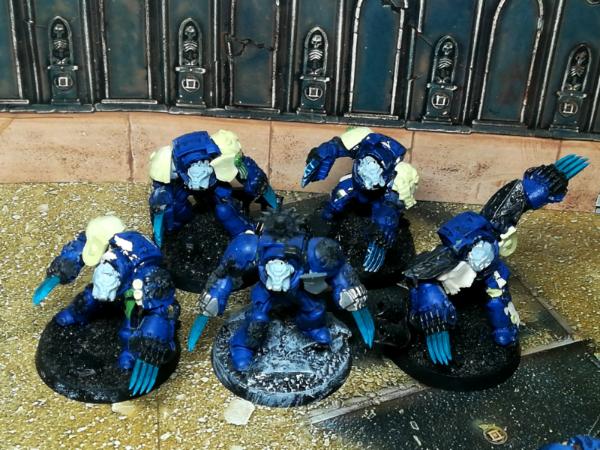
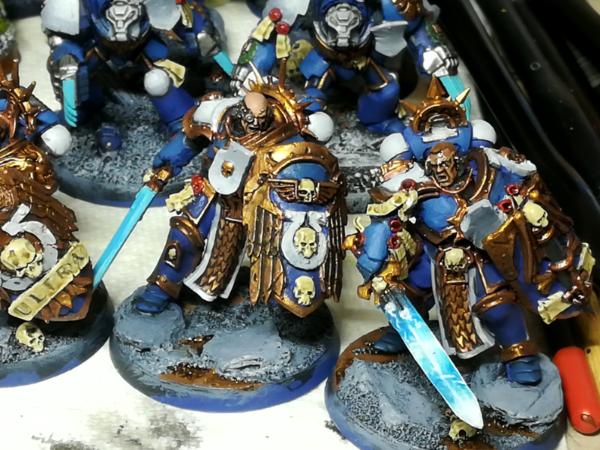
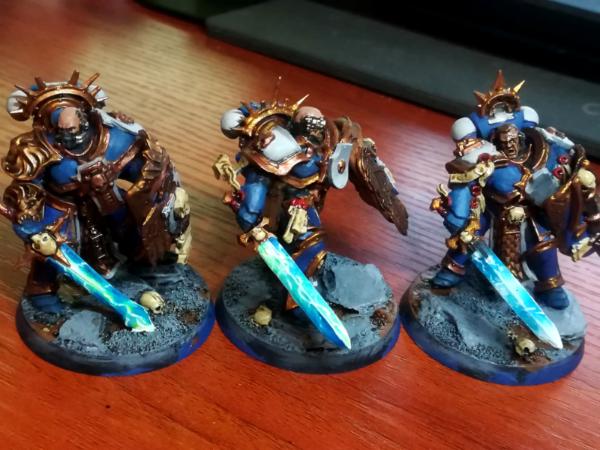
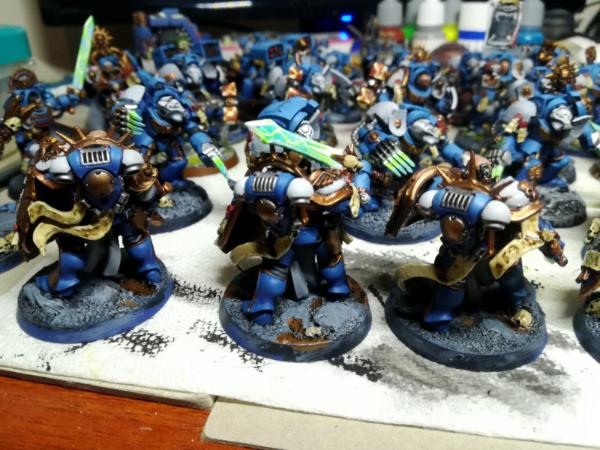
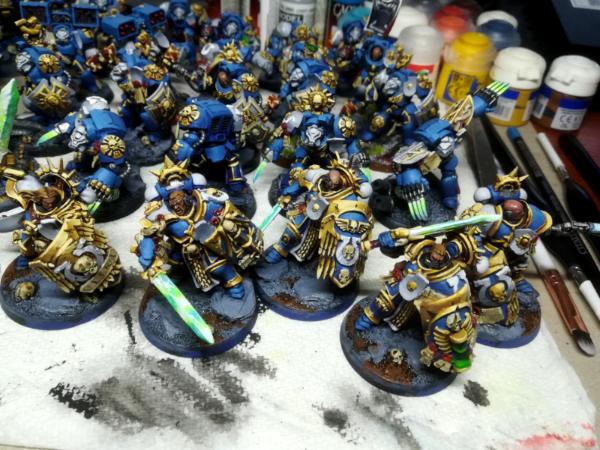
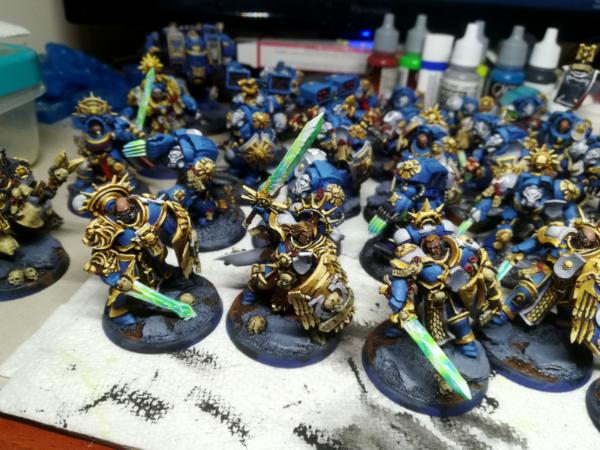
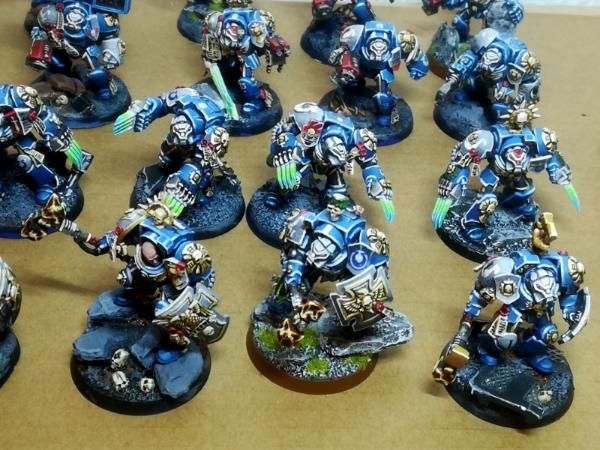
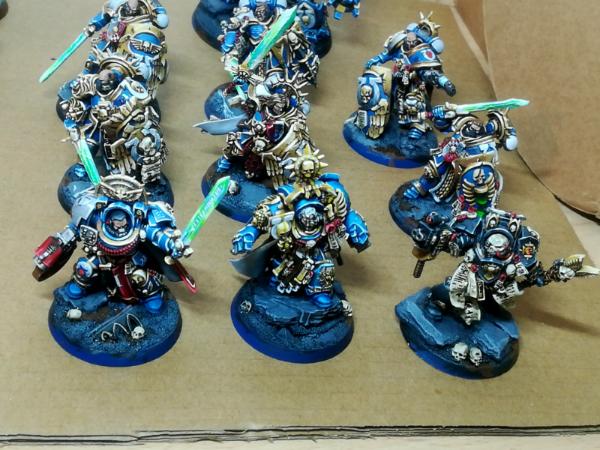
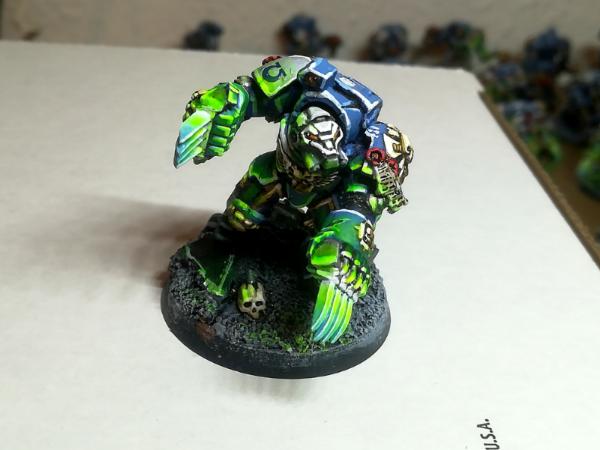
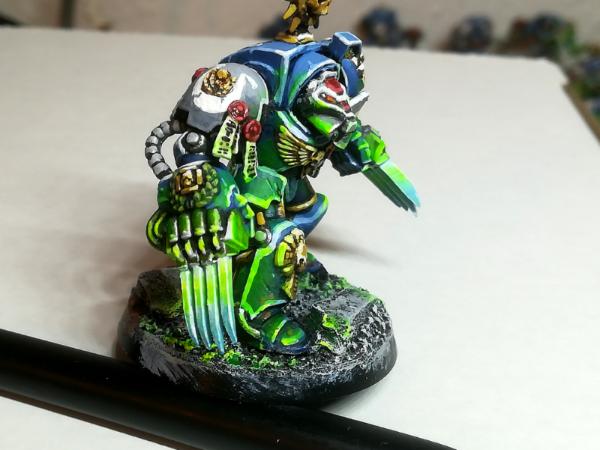
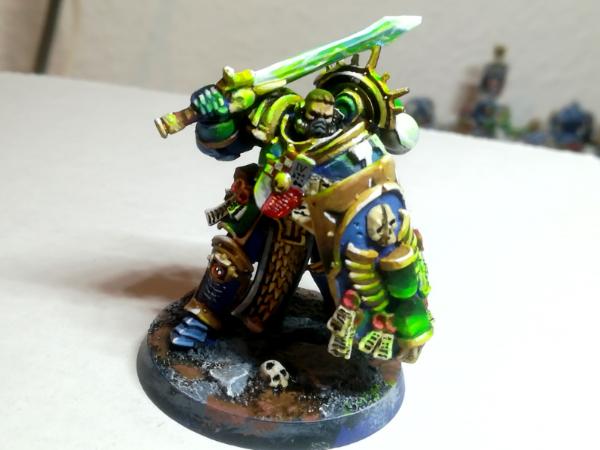
Any finally, the Object source lighting comes and... Im quite happy with the look on this first model
Wanted to get the look right first before doing it on everyone.

Most of the merit goes to the paints, fluorecent green and Yelow from Game Color.
They work more as a thick glaze, making the process white easy. You can paint with a lot of coverage in the areas you want, then with water smooth the edges a bit, and when it dries it turns down a lot allowing some transparency. 1 layer of green 70/30 paint/water, and one layer of yellow did the trick so far, although I might be adding some more yellow in some areas.
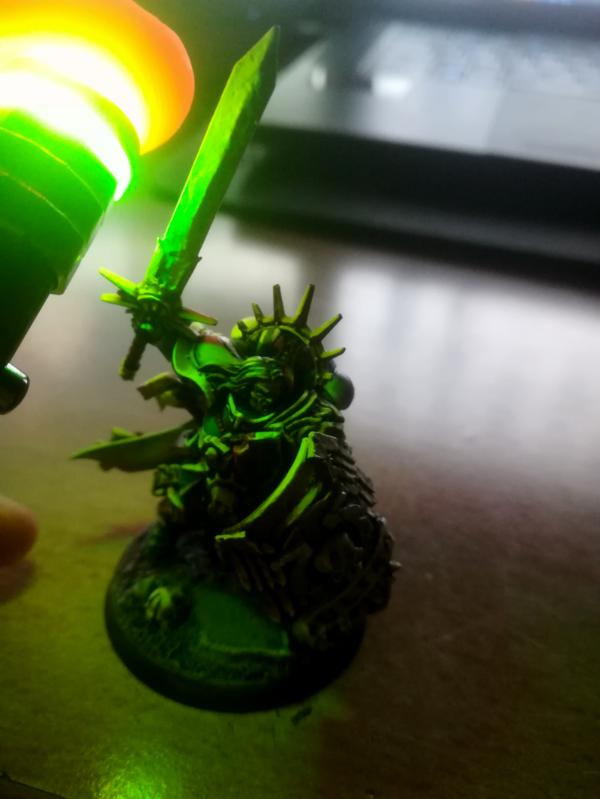
Something to note is that this paint gets more saturated the more light it hits it. With barely any light you barely can tell is there, but if you put a spot light on it it goes overdrive. In normal lighting conditions looks quite good, not as radioactive as with a flashlight on it, but no so turned down that you can barely spot it for a couple metters.
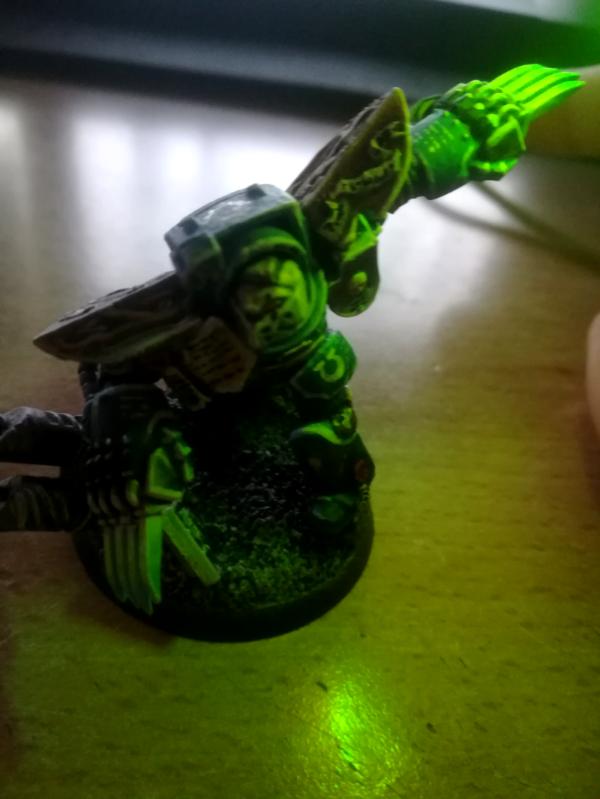
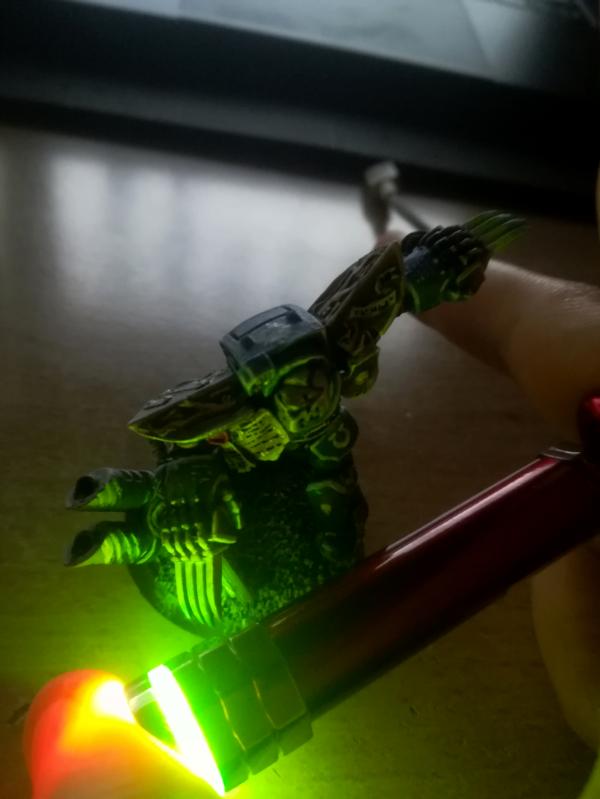
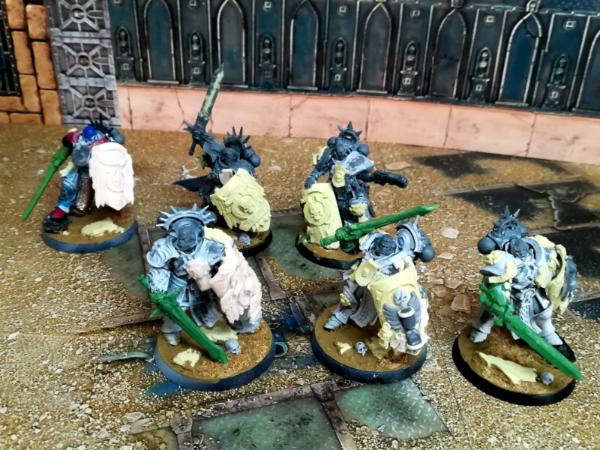
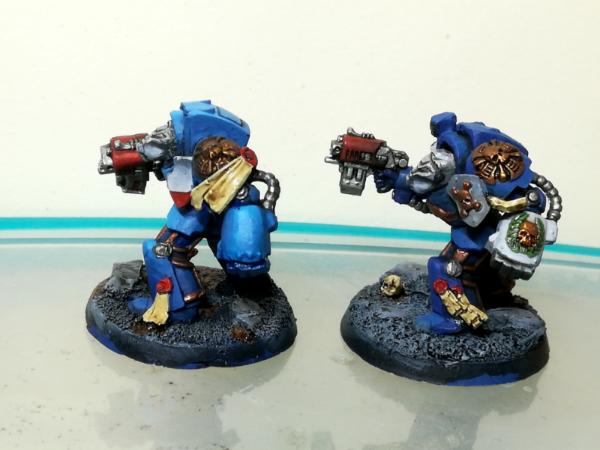
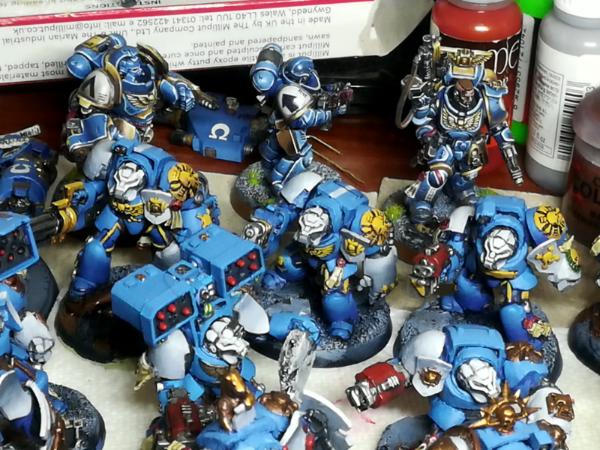
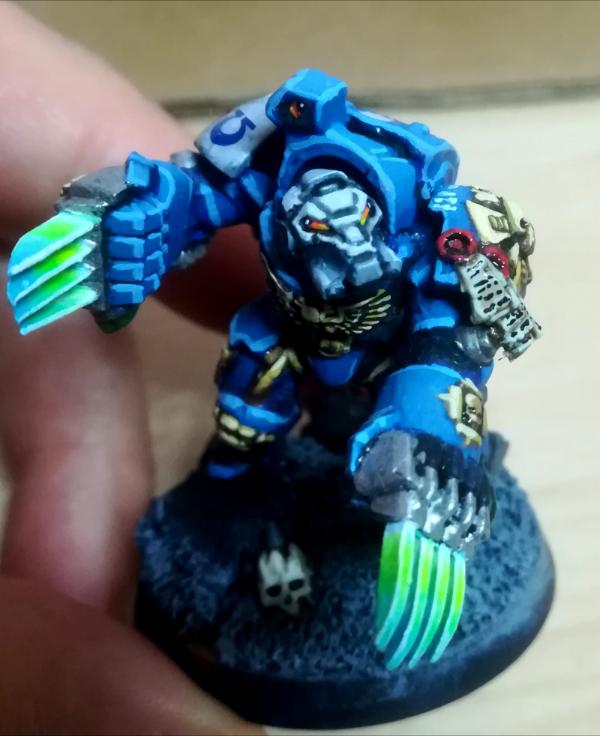
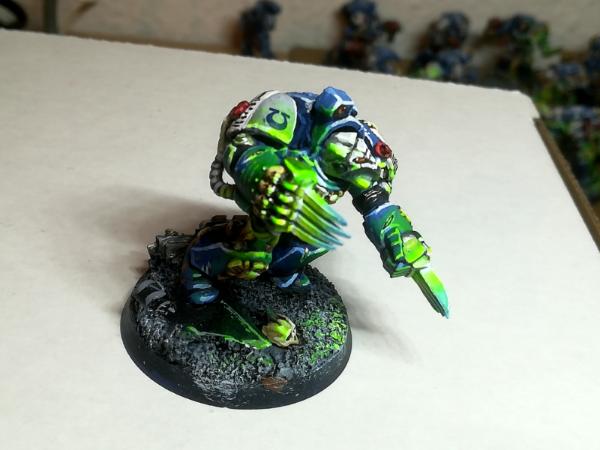
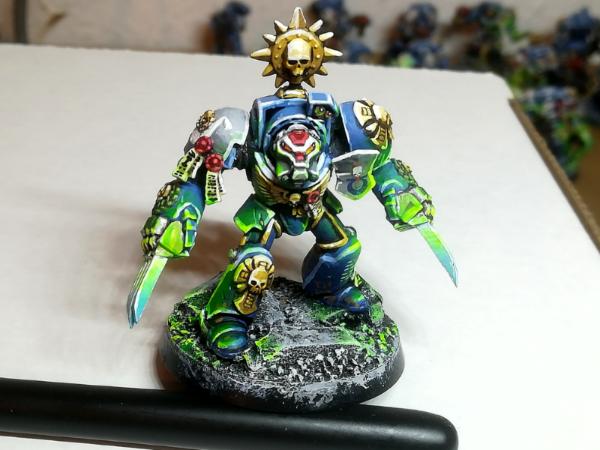
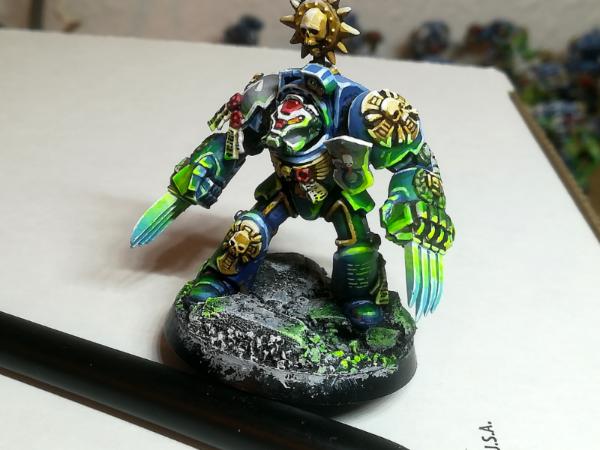
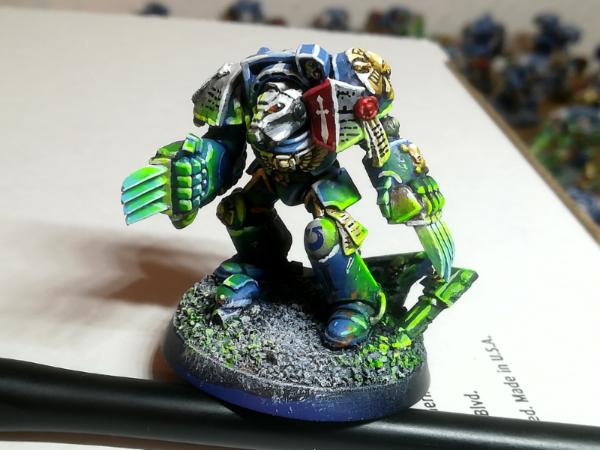
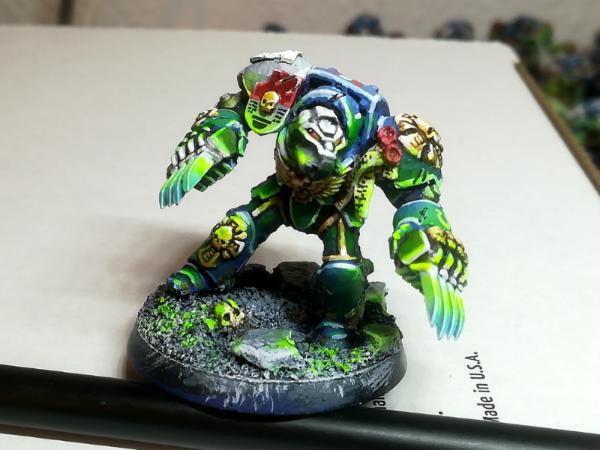
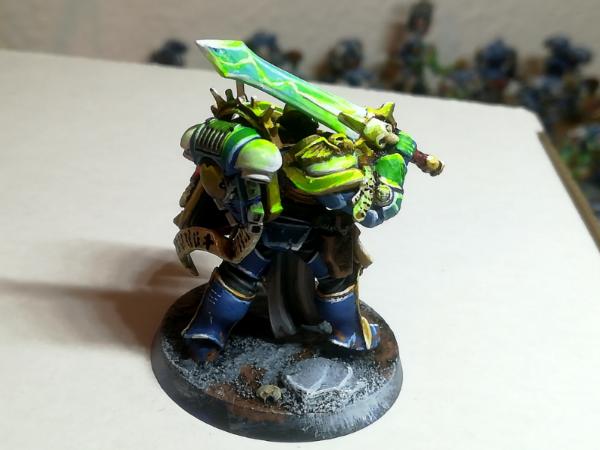
  Automatically Appended Next Post: Automatically Appended Next Post: So, did the rest of the guys.
As said above, process went quite smooth thanks to the paints. Still want to do tweaks to it, but overall quite nice.
I am planning to only use this for energy swords. I could use it for plasma weapons as well, since it solves a lot of the same issues (not having blue glow over blue armour, looking powerfull.. etc), but since combi-weapons are a thing, I really cant put that much glow on the minis that could have that plasma part changed for any other weapon. I could do the glow much smaller for those combi-plasmas, but I would need to experiment a bit with it.
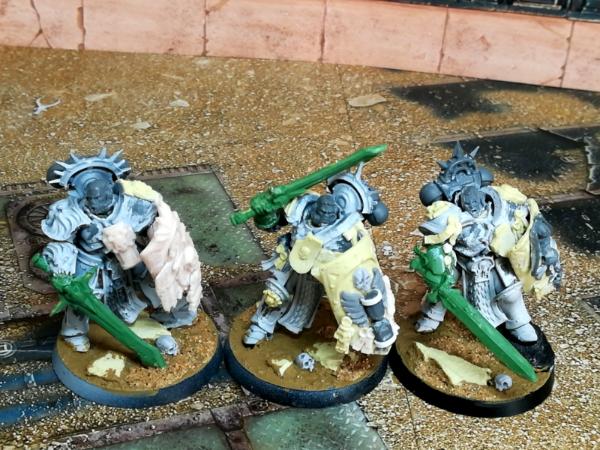
Please give me your thoughts on it so I can improve this for the next miniatures.
  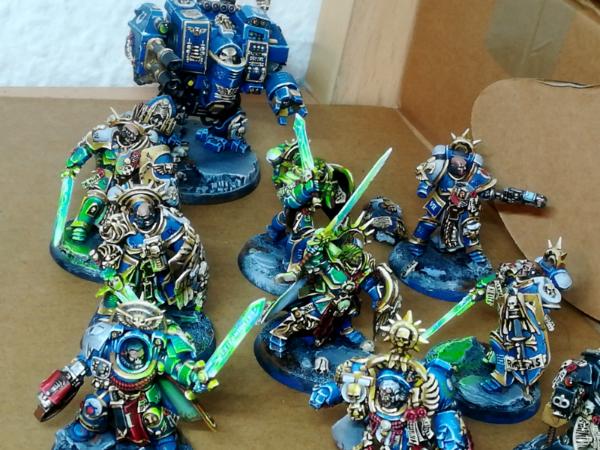
Here some more close up photos of each mini with this effect. This pictures are made with a light quite close to the mini, so it looks really saturated. Normally would be around 25% more subtle:


|
|
This message was edited 1 time. Last update was at 2021/01/28 15:33:25
Serve the Emperor today, for tomorrow you may be be dead.
Painting blog:
https://www.dakkadakka.com/dakkaforum/posts/list/793314.page
|
|
|
|
|
2021/01/28 15:35:09
Subject: Re:Bladeguard veterans conversion,Terminators and dreadnough - Painting process
|
|
Regular Dakkanaut
|
I'll be practicing thunder hammers next. The effect will be much smaller, and the paints I'll be using are quite different
|
|
This message was edited 1 time. Last update was at 2021/01/28 15:36:43
Serve the Emperor today, for tomorrow you may be be dead.
Painting blog:
https://www.dakkadakka.com/dakkaforum/posts/list/793314.page
|
|
|
|
|
2021/01/28 16:10:31
Subject: Bladeguard veterans conversion,Terminators and dreadnough - Painting process - OSL Energy weapons
|
|
Grisly Ghost Ark Driver
|
Those are even better than I was hoping for! That's some fantastic OSL, I absolutely love that 1st Company look!
|
|
|
|
|
|
|
|


 Eldar- 4436 pts