Forum adverts like this one are shown to any user who is not logged in. Join us by filling out a tiny 3 field form and you will get your own, free, dakka user account which gives a good range of benefits to you:
No adverts like this in the forums anymore.
Times and dates in your local timezone.
Full tracking of what you have read so you can skip to your first unread post, easily see what has changed since you last logged in, and easily see what is new at a glance.
Email notifications for threads you want to watch closely.
Being a part of the oldest wargaming community on the net.
If you are already a member then feel free to login now.
Seems to me that the sponsons of the proverbial Leeman Russ cant be attached properly unless one carves away some of the hatch detail where the "cylinder" is (since it is flush with the inner side of the sponson. Not a big deal but then I thought, I've never seen this mentioned anywhere before. Perhaps I'm missing something?!?
I'm a bit confused. All my tanks have sponsons and they went on fine. For magnetization, you can put a good size magnet inside the russ hull before you button it up, and then a sprue glued in the sponson for a magnet mount and they will click on fairly well. I'll see if I can find the tutorial that showed this
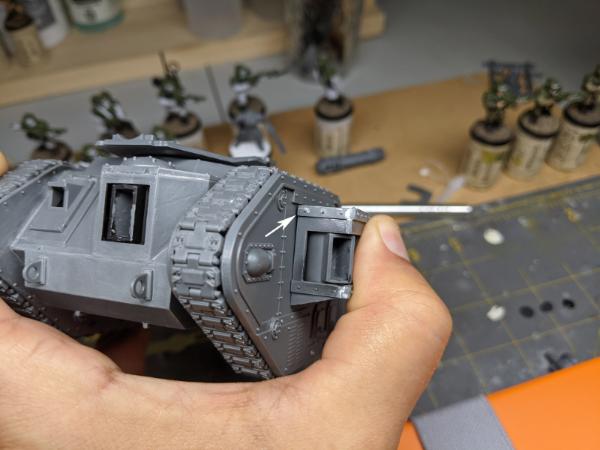
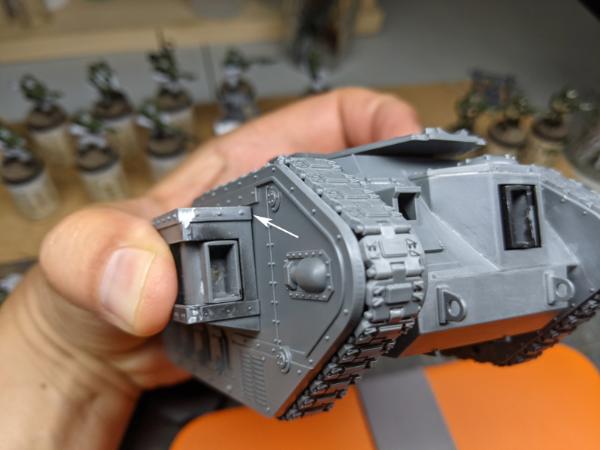
When I dry fit the sponsons to the side, they do NOT sit perfectly flat against the hull: The raised hatch detail on the side of the hull interferes with the sponson cylinder.
I agree with Gert. Double check your assembly vs instructions and any picture / videos you can. There should be a spot over the forward door where it fits
I concur. Though I haven't fully assembled a current LR, just the previous sculpt, I had zero trouble with the previous sculpt one I built and I recall no trouble dry fitting the sponson on the partially built current one I have. I can dig it out and try checking again, but as I recall, the sponson is perfectly shaped the fit around the forward hatch. I think I even put the hatches on before putting the sponson on the older one because I didn't realize they would be covered up.
Sunsanvil wrote: When I dry fit the sponsons to the side, they do NOT sit perfectly flat against the hull: The raised hatch detail on the side of the hull interferes with the sponson cylinder.
This may sound silly, but are you sure you have the left side on the left and the right side on the right? There is a flat and sloped side on them, the flat should be underneath. A little sliding around and it should kind of, slot into place.
Turn them upside down if they don't fit. The nubs on the top and bottom are different sizes. If it's upside down it doesn't nest properly and will stand proud on the top.
I had a similar issue, and it was a simple solution of just turning it over. They look symmetrical but they're not.
Yes I have them on the correct side, in the correct orientation, and position. But for me the cylinder (the part which rotates with the weapon), is recessed on the inner side by barely half a mil, maybe not even. The raised detail on the side wall of the tank is thicker than that.
Here is the dry fitting. You can see it just wont go that last little bit at the top because the cylinder is hard against the raised detail right there.
The only thing I can think is that I may have done too good a job cleaning up the inner-edges of the sponsons, but all I did was sand them a tiny bit.
@SeargentSilver - No magnets, not trying to magnet attach these at all.
@Rybrook - I didnt know there was a hatch to attach. This model is from the Start Collecting box. Did not attach anything to the sides and all parts are accounted for...
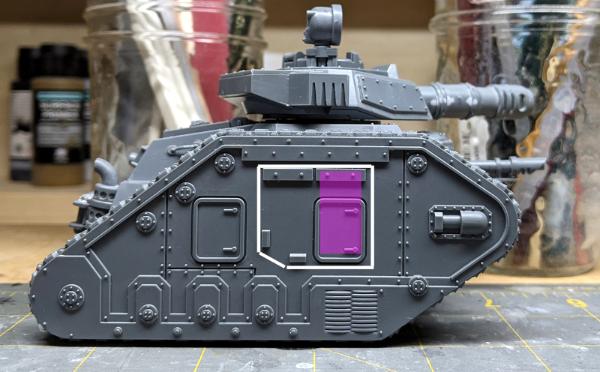
Here is mine. The white line shows where the sponson body goes (fits perfectly), the purple is where the cylinder is (and is contacting the raised detail, especially the chunky bar at the top).
This message was edited 1 time. Last update was at 2021/07/17 12:35:31
Having built too many of both the old and new kits I can say with some certainty that something isn't assembled correctly and my guess is it is how you assembled the sponsons.
It's been a while since I assembled a LR but everything you did looks OK. I wonder if maybe something is off about the kit itself. I do know if you install the unglued cylinder upside down it hits for some reason, I just test fitted it on the newest unbuilt kit I have. However with the parts assembled as you have, which is the correct way, I don't have the same problem. I also had never noticed just how close the cylinder is to the hull. It does basically touch, even on the older kits.
Automatically Appended Next Post: I can't get a good picture of what it looks like with the front plate of the sponson pulled off to show how it lines up.
This message was edited 1 time. Last update was at 2021/07/20 21:44:15