| Author |
Message |
 |
|
|
|
|
Advert
|
Forum adverts like this one are shown to any user who is not logged in. Join us by filling out a tiny 3 field form and you will get your own, free, dakka user account which gives a good range of benefits to you:
- No adverts like this in the forums anymore.
- Times and dates in your local timezone.
- Full tracking of what you have read so you can skip to your first unread post, easily see what has changed since you last logged in, and easily see what is new at a glance.
- Email notifications for threads you want to watch closely.
- Being a part of the oldest wargaming community on the net.
If you are already a member then feel free to login now. |
|
 |
2023/02/13 11:43:33
Subject: Middle Earth - Weathertop & the Shire
|
|

Fresh-Faced New User
|
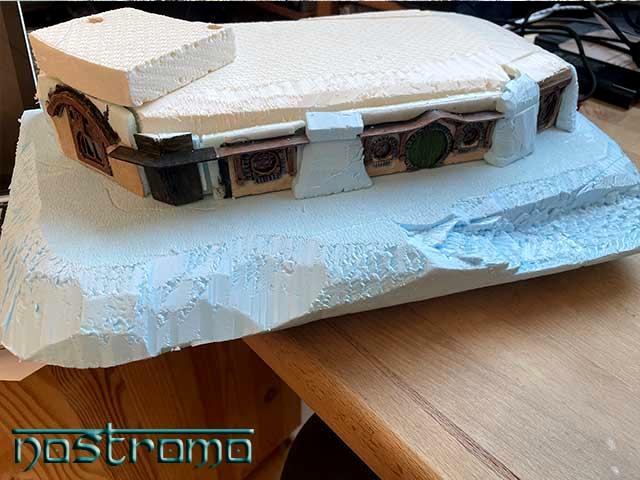
My long term project is close to being finished - i am only struggling with the base plate - i can just as well share it.
I have also started with the first Hobbit hole... and just could not resist to begin with bag end.
|
|
|
 |
|
2023/02/13 11:54:22
Subject: Middle Earth - Weathertop & the Shire
|
|

Longtime Dakkanaut
|
suffice it to say my only comment is as follows
wow
that is seriously nice
|
|
|
|
|
2023/02/13 12:26:16
Subject: Middle Earth - Weathertop & the Shire
|
|

Horrific Hive Tyrant
|
Beautiful work!
|
|
|
|
|
2023/02/13 19:02:52
Subject: Middle Earth - Weathertop & the Shire
|
|

Posts with Authority
|
Ooh, lovely.
Is the ivy part of the mould or added on? It's difficult to tell in some pics.
|
|
|
|
|
|
2023/02/13 20:40:14
Subject: Middle Earth - Weathertop & the Shire
|
|
Fresh-Faced New User
|
@all: thank you!
Mould? What mould? 😄
Perhaps I should also post a few pictures from the building phase… the model consists of about 80% foam, 18% stewalin (for casting the statues and the previously sculpted columns) an some plaster.
So yes… i did use (selfmade) moulds.
But not for the ivy.
The ivy is made of sisal rope and… dried parsley.
Fortunately, I made fotos from making the last batch of ivy, so I could even make a tutorial…
|
|
This message was edited 2 times. Last update was at 2023/02/13 20:43:46
|
|
|
|
|
2023/02/20 18:30:21
Subject: Re:Middle Earth - Weathertop & the Shire
|
|
Fresh-Faced New User
|
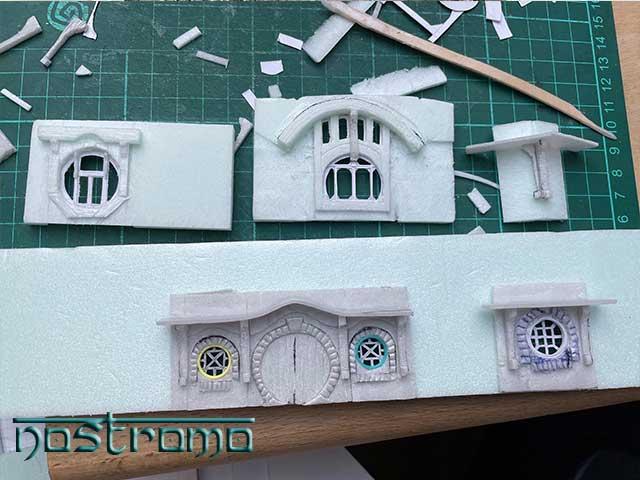
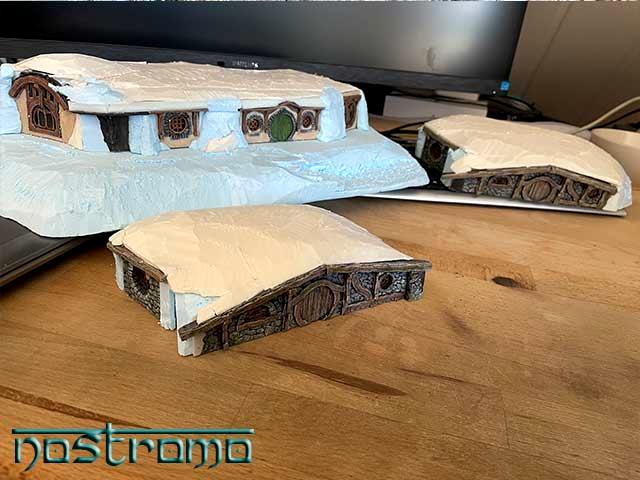
More windows for Smial #1 - i think it is enough. Maybe an cellar entrance...?
But it needs chimneys and of course the iconic tree on top.
On to #2 and #3 - those will be smaller
|
|
|
|
|
2023/02/21 10:48:30
Subject: Middle Earth - Weathertop & the Shire
|
|
Posts with Authority
|
Ravengrove wrote:@all: thank you!
Mould? What mould? 😄
Perhaps I should also post a few pictures from the building phase… the model consists of about 80% foam, 18% stewalin (for casting the statues and the previously sculpted columns) an some plaster.
So yes… i did use (selfmade) moulds.
But not for the ivy.
The ivy is made of sisal rope and… dried parsley.
Fortunately, I made fotos from making the last batch of ivy, so I could even make a tutorial…
Oh. Duh. Sorry. 
Even better, then. The hobbit holes are shaping up to look equally great.
|
|
|
|
|
|
2023/02/22 17:03:45
Subject: Middle Earth - Weathertop & the Shire
|
|

[MOD]
Otiose in a Niche
|
Wow amazing stuff.
I also learned a new word today "Smial" the Hobbit word for Hobbit holes or burrows.
Cool.
|
|
|
|
|
|
2023/03/05 13:24:03
Subject: Re:Middle Earth - Weathertop & the Shire
|
|
Fresh-Faced New User
|
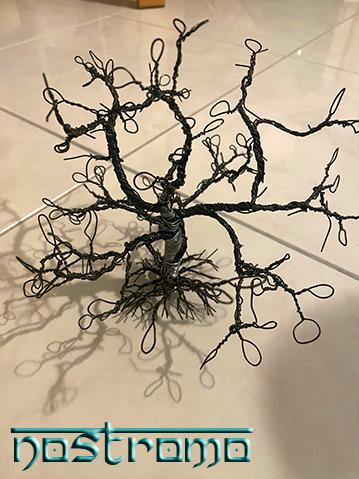
Still Smials - but this time the large oak tree that sits on top of Bag End.
The wire work is about ...40% done.
It already looks like a tree, but i want to add many more, smaller branches with a thinner kind of wire.
The loops will later be cut and turn into split branches.
And i also have an idea how to do the surface structure and the bark.
 Automatically Appended Next Post: Automatically Appended Next Post: and all windows that i made for bag end so far
|
|
This message was edited 1 time. Last update was at 2023/03/05 15:54:36
|
|
|
|
|
2023/03/09 19:20:59
Subject: Re:Middle Earth - Weathertop & the Shire
|
|
Fresh-Faced New User
|
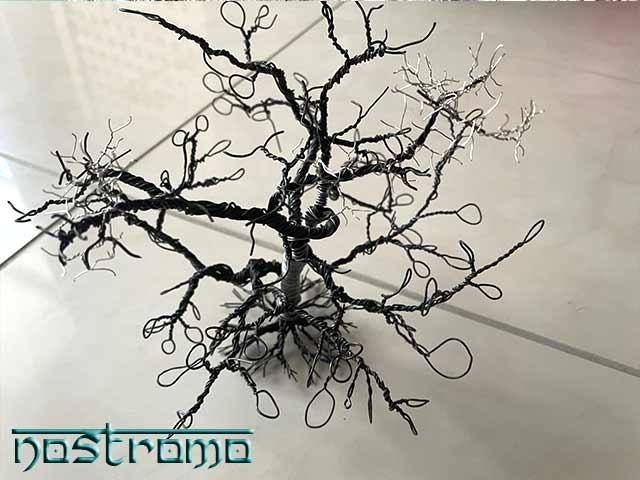
The tree is growing.
But adding the fragile, silver branches takes even more time than i expected. So far, those alone took about 3 hours - if i continue at that pace, this step alone wil take about 15 hours.
But it is really worth it - it even looks by far better in reality than on the photo
|
|
|
|
|
2023/05/06 08:51:58
Subject: Re:Middle Earth - Weathertop & the Shire
|
|
Fresh-Faced New User
|
Weathertop is still on hold.
The smilas, however, make some progress.
By now, i have most of the styrofoam-pats for all three smials finished (two are almost identical, one of them is a gift).
The tree grows more and more branches - that's still going to take a while.
I am also beginning to make sketches for the layout, positioning and the shape. And i realized: epecially bag-end will be much larger than i thought... with the tree, almost as high as weathertop with half its footprint.
|
|
This message was edited 1 time. Last update was at 2023/05/06 08:52:18
|
|
|
|
|
2023/05/24 20:22:03
Subject: Re:Middle Earth - Weathertop & the Shire
|
|
Fresh-Faced New User
|
partial painted prior to assembling.
This is because of the glass in the windows - i prefer to glue them in after painting.
Several chimneys and the tree are still on the workbench.
|
|
|
|
|
2023/06/13 20:24:18
Subject: Re:Middle Earth - Weathertop & the Shire
|
|
Fresh-Faced New User
|
The wire-work-phase of the tree is finished, next step will be obscuring the wire-structure and to get something resembling bark.
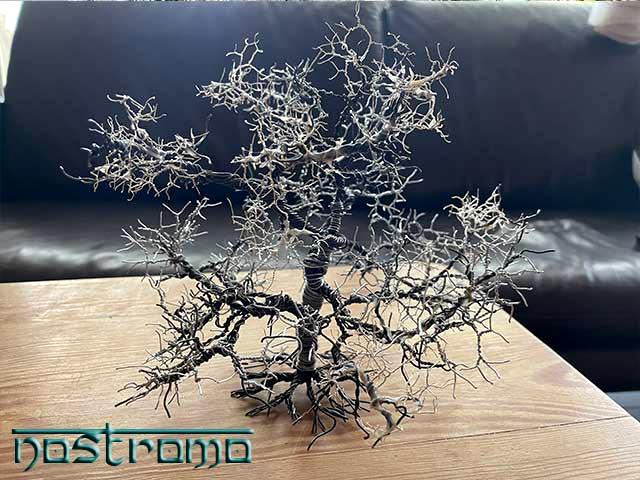
The smials are by now 3-dimensional - still a lt to do, but by now one gets an impression on where the road leads to
The tree will eveantually sit on the large smial. Of course...
|
|
|
|
|
2023/10/16 17:17:10
Subject: Re:Middle Earth - Weathertop & the Shire
|
|
Fresh-Faced New User
|
Still not done, christmas is still the deadline.
Visually, using wall paint for the tree turned out nice enough - but the idea has a downside. The wire underneath is flexible - but the paint is not. I added another layer of PVA-glue and hope this prevents the paint from crumbling.
I am not sure how i am going to do the leafs - but this is still a few steps away.
For the smials, i found something to add color to the plants (blossoms) in the gardens in the last step - something i will also use when i turn to eventually finishing weathertop. No spoilers yet
Time to make fences...[url]
|
|
|
|
|
2023/11/08 09:44:21
Subject: Re:Middle Earth - Weathertop & the Shire
|
|
Fresh-Faced New User
|
The tree is approaching it's final phase - obviously, it lacks green.
All three smials are in a similar stage than Bag End which i took photos of.
All three will get a bench - and let's see how far i get with those fence elements.
|
|
|
|
|
2023/11/10 12:25:52
Subject: Re:Middle Earth - Weathertop & the Shire
|
|
Fresh-Faced New User
|
another photo from an earlier step.
First the tree after coating it in wall-paint and saw dust.
And half-finished materials for further steps.
In the lower half leafs and vines for ivy. In the upper section what is to represent flower blossoms - and in the middle DIY-"flock" for twigs.
|
|
|
|
|
2023/11/15 09:13:04
Subject: Re:Middle Earth - Weathertop & the Shire
|
|
Fresh-Faced New User
|
Getting somewhere.
The small smials are pretty much identical - especially with the protective paper.
The turf is adding up layer by layer - it begins to look like what i want it to. But it is still an early stage of making it green. Gardening? What is the right word for it?
Teasers for the next round:
I also realised that i have not even closely enough fences - it is not even enough for bag end.
The first photo is also a preview of how it will look once the tree is finished.
i am also beginning to prepare the ivy, make bushes with blossoms... the parts start to look like they may turn into a garden.
|
|
|
|
|
2023/11/18 16:01:25
Subject: Re:Middle Earth - Weathertop & the Shire
|
|
Fresh-Faced New User
|
Started to turn the surroundings into a garden - i think i am at about 40% here... likely less.
The yellow, pink and blue foam was way too bright in the first step, so i added some ink. I am not yet happy with the result, but compared with how it looked before, it is already an improvement.
The ivy lost quite a lot of leafs during applying it - but that was to be expected and i make (much) more leafs (for the tree) anyway.
I will add much more plants - and some will need some more treatment with color and maybe turf or something else that looks more like leafs.
I am also going to look how grass fibres will fit in.
And of course i will need to deal with the white plaster stains on the stones. The chimneys need paints, more fences are already on the workbench
|
|
|
|
|
2023/11/25 15:54:02
Subject: Re:Middle Earth - Weathertop & the Shire
|
|
Fresh-Faced New User
|
Still working on the plants - and i think it is still a lot to do. More and different plants.
The bright colors of the blossoms and the trees feel somewhat more like "my little pony" than "Lord of the rings"... perhaps a few drops of wash will help here.
Bag End needs more fences, all need grass.
I still need to clean up plaster residues on stones.
But... the end is in sight.
And then, there is of course still the large oak...
|
|
|
|
|
2023/11/25 18:46:18
Subject: Middle Earth - Weathertop & the Shire
|
|

[MOD]
Making Stuff
|
Looking fantastic!
|
|
|
|
|
|
2023/11/26 03:08:42
Subject: Middle Earth - Weathertop & the Shire
|
|
Guard Heavy Weapon Crewman
|
Looking amazing - Love the work on the tree - That's a lot of effort but the outcome is wonderful.
|
Guard, Templars, Dungeons & Dragons, Terrain & More.
Way too little free time. |
|
|
|
|
2023/11/26 13:31:00
Subject: Middle Earth - Weathertop & the Shire
|
|
Fixture of Dakka
CL VI Store in at the Cyber Center of Excellence
|
really looking good.
|
Every time a terrorist dies a Paratrooper gets his wings. |
|
|
|
|
2023/11/29 06:55:26
Subject: Re:Middle Earth - Weathertop & the Shire
|
|

Death-Dealing Ultramarine Devastator
|
Great stuff, your work inspired me to go out and buy some XPS foam. I have no idea what I'm going to make out of it yet though.
|
|
|
|
|
2023/12/03 12:26:12
Subject: Re:Middle Earth - Weathertop & the Shire
|
|
Fresh-Faced New User
|
in between, while i am still in the middle of gardening...
Grass was NO good idea.
It may have different reasons...
too long fibres (thinking of it, 6mm is definitely too long!), a china-grassmaster that doesn't seem to work, too much grass...
And in addition, it is just a mess.
The (diluted PVA-)glue needs to be sprayed at this point (if i do not want to apply it just to spots) - so the glue gets almost everywhere... and so does the grass. 5 minutes applying, 0.75h cleaning it up again.
But the other plants turn out qite nice so far.
A few stones here and there...
|
|
|
|
|
2023/12/05 17:48:58
Subject: Re:Middle Earth - Weathertop & the Shire
|
|
Fresh-Faced New User
|
Enough plants.
Bag End still needs more fences and leafs on the tree (and something around the roots).
I am really unsure whether i want to risk adding (much less) grass to the other Smials as well.
I would say... last mile. Some of the bushes (the bluish ones, not the ones with blue blossoms) look really crappy - i need to do something about them, but i have a few ideas. Some ink/washes and micro-leafs should do the trick.
... oh, and i need to place some of my real leafs! They add "autumn" instead of "spring" - but they are just so great.
The first photo shows the one without, the second photo the smial with grass.
|
|
|
|
|
2024/02/25 16:03:27
Subject: Re:Middle Earth - Weathertop & the Shire
|
|
Fresh-Faced New User
|
It may well never be finished... but what comes later is quite likely to make little difference on photos any more.
In future months, i will add a few more pigments here and there and more fences.
One of the smials is gone - it was a christmas gift.
Bag End received several additional inches of fence and i toned down some of the plants. It is still quite colorfull - and even more so on the photos. And foremost... the tree is finally done. The leafs just took forever the way i made them... not perfect, but with enough distance, it suffices.
I think i will make a few more shots as soon as i got a better background - and then, when i found and painted the right kind of inhabitants.
Oh, i also made some repairs to weathertop.
Not, it did not get really damaged in the usual sense - but i didn't apply enough color to the ivy. I used dried parsley - and this natural material turns white over time, so i applied more green to it.
The next step here is adding a last layer of green flock... as soon as i get another spray bottle.
And then, also this project will be finally done and just needs inhabitants... and a small camp fire.
![[Thumb - bag-end-10-01.jpg]](/s/i/at/2024/2/25/1ad348a9dcbc6e9eb17fff9c192fd29a_2120.jpg__thumb)
|
![[Thumb - AmonSul-10-01.jpg]](/s/i/at/2024/2/25/91c2bdce9b35fa5eab91ca80b843f11b_2120.jpg__thumb)
|
|
|
This message was edited 1 time. Last update was at 2024/02/25 16:09:16
|
|
|
|
|
2024/03/20 07:56:17
Subject: Re:Middle Earth - Weathertop & the Shire
|
|
Fresh-Faced New User
|
Finally finished.
|
|
|
|
|
|
|

