| Author |
Message |
 |
|
|
|
|
Advert
|
Forum adverts like this one are shown to any user who is not logged in. Join us by filling out a tiny 3 field form and you will get your own, free, dakka user account which gives a good range of benefits to you:
- No adverts like this in the forums anymore.
- Times and dates in your local timezone.
- Full tracking of what you have read so you can skip to your first unread post, easily see what has changed since you last logged in, and easily see what is new at a glance.
- Email notifications for threads you want to watch closely.
- Being a part of the oldest wargaming community on the net.
If you are already a member then feel free to login now. |
|
 |
2018/06/07 19:47:32
Subject: Mac's P&M Shenanigans-- 6/7: Stripping and repainting Realms of Battle boards... 8 of 'em!
|
|

Executing Exarch
|
well I'm sure due dillegence will win the day a little scrub every so often will get it off. its just going to be one of those long war kinda deals considering what you just described. I due look forward to what you come up with though.
In the words of my former squad in regards to the sore shoulder drink water, take some motrin, change your socks and do some pt  lol lol anyrate keep on trucking.
|
|
|
 |
|
2018/06/07 21:08:01
Subject: Re:Mac's P&M Shenanigans-- 6/7: Stripping and repainting Realms of Battle boards... 8 of 'em!
|
|
Preacher of the Emperor
|
Wow, what a day... and I did just spend nearly my whole day on this goofy project. Ambitions are being scaled back by the minute, but hey, dreaming big never hurts. All 8 boards are scrubbed, rinsed, and dried. After a little detail work, they're ready for paint.
I'm excited to start turning this skull pit into a pond. I need to drop just enough rubble in to conceal the skulls, then paint it for illusionary depth and add water effects.
Speaking of water effects, the ice effect in the recess here did not come out, so I'm going to paint right on top of it.

This was the one that required so much extra scrubbing, but it's good enough to move forward. So much paint-soaked flock. I think there's going to be GW static grass in my bathtub until the 41st millennium.
|
|
|
|
|
|
2018/06/07 21:23:56
Subject: Mac's P&M Shenanigans-- 6/7: Stripping and repainting Realms of Battle boards... 8 of 'em!
|
|
Executing Exarch
|
Well that's a great start mac. oh that grass is no joke man lol. again the perseverance of this project will pay off in the long run plus you'll have a snazzy table. eye on the prize.
|
|
|
|
|
2018/06/07 21:34:06
Subject: Mac's P&M Shenanigans-- 6/7: Stripping and repainting Realms of Battle boards... 8 of 'em!
|
|
The Marine Standing Behind Marneus Calgar
|
Oof. Good luck. Have you tried a really long soak?
|
|
|
|
|
|
2018/06/08 21:50:27
Subject: Re:Mac's P&M Shenanigans-- 6/7: Stripping and repainting Realms of Battle boards... 8 of 'em!
|
|
Preacher of the Emperor
|
Thanks, guys. If I had the time, I'd try a longer soak... but I'm a teacher on summer break, and this is my project for the next 8 weeks. I'm only good for about an hour a day after other projects, chores, child care, etc. I'm hoping to get the detailing done next week and prime and paint the week after that. A couple more weeks to do all the inking and drybrushing will leave the last few weeks of summer to bring some terrain pieces I've already done in line with the table. If I can get a game on the new table in by the end of July, I'll have won the race, but that means moving quickly now!
In other news, I decided to Dremel off all the skulls in the pits before I build my pond bottom... maybe try for a photo update this weekend.
|
|
|
|
|
|
2018/06/08 23:24:59
Subject: Mac's P&M Shenanigans-- 6/7: Stripping and repainting Realms of Battle boards... 8 of 'em!
|
|
Executing Exarch
|
Nice, looking forward to seeing your pond build. Well young minds always need molding so yea understandable. Hear's hoping you win your race against the clock. Man you would be surprised on what you can get done in an hour Knightly has a blog and does about an hour a day and he has fantastic work.
|
|
|
|
|
2018/06/10 06:19:01
Subject: Re:Mac's P&M Shenanigans-- 6/7: Stripping and repainting Realms of Battle boards... 8 of 'em!
|
|
Preacher of the Emperor
|
Okay, got a bit further on the pond details... they're basically ready to paint. I still have a lot of detail work to do, and I want to give the ModPodge time to cure a bit before paint, so they're a ways off from being painted for now.
On that note, ModPodge is fantastic stuff, way superior to PVA for terrain building IMO. I did a simple 50/50 mix with water and a few drops of wetting agent, shook some railroad ballast into the deeper recesses, and dripped the thinned ModPodge in with an eyedropper. That stuff is locked down firmly with just one treatment, and I think it's going to wear really well. Super impressed.

|
|
|
|
|
|
2018/06/10 07:10:15
Subject: Mac's P&M Shenanigans-- 6/7: Stripping and repainting Realms of Battle boards... 8 of 'em!
|
|
Executing Exarch
|
very nice stuff never tried modge podge but may check it out in the future
|
|
|
|
|
2018/06/13 15:10:47
Subject: Re:Mac's P&M Shenanigans-- 6/7: Stripping and repainting Realms of Battle boards... 8 of 'em!
|
|
Preacher of the Emperor
|
Some of these boards have been painted and repainted to the point where details are getting muddy. I'm adding railroad ballast along the base of each cliff band so I'll have something to drybrush later.
|
|
This message was edited 1 time. Last update was at 2018/06/13 15:11:11
|
|
|
|
|
2018/06/13 15:22:48
Subject: Mac's P&M Shenanigans-- 6/7: Stripping and repainting Realms of Battle boards... 8 of 'em!
|
|
Executing Exarch
|
oh that sucks. well the basalt should make it look interesting
|
|
|
|
|
2018/06/16 06:50:48
Subject: Re:Mac's P&M Shenanigans-- 6/7: Stripping and repainting Realms of Battle boards... 8 of 'em!
|
|
Preacher of the Emperor
|
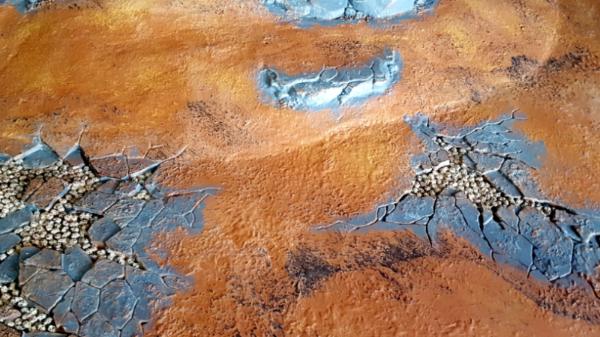
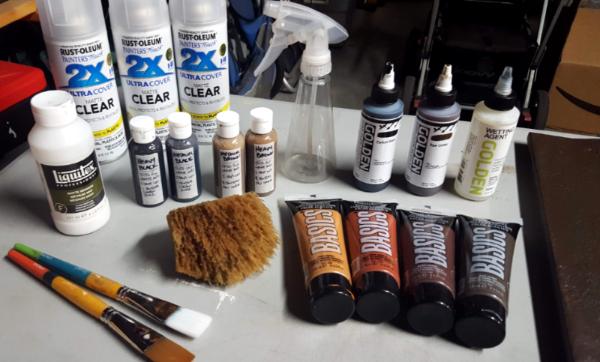
Whew! Ready for paint. It took a few nights, but I added talus to the slope beneath each cliff band. I think the extra detail will help give some depth when I drybrush the whole thing. Super tedious, but it may just come good. It shows up the best on the white one, which was the one most in need of detail after being repainted a few times.

The stuff I used.

|
|
|
|
|
|
2018/06/18 18:00:12
Subject: Re:Mac's P&M Shenanigans-- 6/18: Realms of Battle boards prepped, primed, and painted... progress!
|
|
Preacher of the Emperor
|
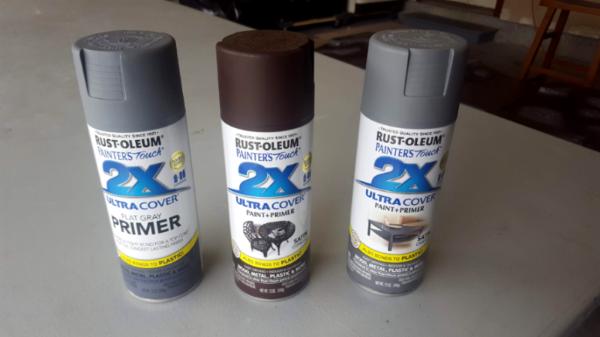
The big painting day... I'm about to have a minor outpatient surgery on my leg, so I was pushing to get these done in case I'm laid up for a while. Six rattle cans and some plastic sheeting, a couple of fans, and we're ready to paint.
I got a flat gray primer, but the colors I wanted (Espresso, Granite) were only in satin. It sucks for the photos, and I hope it doesn't limit my ability to adhere paint from this point on... there's still lots of ink washing and drybrushing to do, plus a matte clear coat at the end, so I'm not too worried about the finished product.
The boards all prepped, cleaned, and detailed with railroad ballast:

Primed gray:

Painted Espresso and Granite:
Next I'll wash the whole thing in a homemade Agrax Earthshade knockoff, give the cliffs a heavy drybrushing in two progressively lighter colors of gray, and then sponge on layers of umber and sienna for the earth. Final details will include a scattering of fallen leaves and the water effects on the two pools.
Big day! I'm pumped to have made it this far with plenty of summer left to finish the job. Also, a very smelly day. Even in an open garage with fans blowing, six rattle cans worth of fumes is a lot. I think I'm going to go lie down and catch up on The Expanse before surgery this afternoon.
|
|
|
|
|
|
2018/06/18 18:55:38
Subject: Mac's P&M Shenanigans-- 6/18: Realms of Battle boards prepped, primed, and painted... progress!
|
|
Executing Exarch
|
looking good my friend
|
|
|
|
|
2018/06/18 19:29:45
Subject: Mac's P&M Shenanigans-- 6/18: Realms of Battle boards prepped, primed, and painted... progress!
|
|

Fixture of Dakka
|
MacPhail,
Great work.
Cheers,
CB
|
|
|
|
|
|
2018/06/21 21:08:32
Subject: Re:Mac's P&M Shenanigans-- 6/18: Realms of Battle boards prepped, primed, and painted... progress!
|
|
Preacher of the Emperor
|
Thanks, everyone for the continued encouragement. I got the first two layers of acrylic paint down on the cliff band on all 8 boards... two night's work. I chose big tubes of art store acrylic paint: Neutral Gray Value 5 and Unbleached Titanium. I laid the gray down thick, let it dry overnight, and drybrushed titanium over it. I also bought a pure white acrylic to do extreme highlights, but I don't know that I'll use it... I can't really spare another 2 hours for this phase of the project. Anyone feel strongly that I should do a white drybrush?
I think I'll move on to the earth, which I'm going to try sponging on for visual texture rather than drybrushing. The previous owner left some thick brushstrokes and glue seams on the surface that I know will pick up the wrong kind of detail. I bought some natural sponges to mess around with making organic shapes in the layers of umber and sienna I'll be using.
The the last big hurdle will be to get the pigment mixed and balanced for a wash that I can spray over the whole thing to unify all the drybrushed layers. This has turned into as big a project as I'd imagined, and maybe bigger, but I think it's going mostly according to plan. Automatically Appended Next Post: I stayed up late to put in another session... got most of the base earth color taken care of. That's Raw Umber, to be followed by Raw Sienna and maybe Burnt Sienna, although that's pretty orange. Still need to mess with technique and see what I can manage. I should say I'm pretty pleased so far.

The MVP of this session was definitely the natural sponge I found at the art store while I was buying paint and bought on a whim. It easily gave me the feathery patter I needed at the margin of earth and stone.

|
|
This message was edited 1 time. Last update was at 2018/06/22 06:55:26
|
|
|
|
|
2018/06/24 05:44:56
Subject: Re:Mac's P&M Shenanigans-- 6/21: Realms of Battle restoration, base colors down, drybrushing underway
|
|
Preacher of the Emperor
|
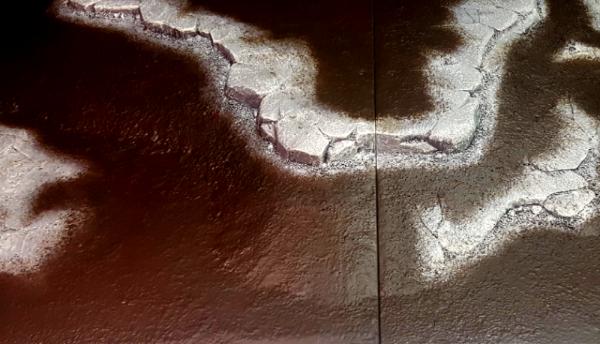
I couldn't resist pushing two of the boards together to see how I'd done on maintaining the width of my painted cliff band across the gap between boards.... not too bad. There's some color variation across the earth tones, but as long as it isn't on a seam I'm not going to sweat it... the detailing and wash will probably even everything out.
|
|
|
|
|
|
2018/06/28 21:44:24
Subject: Re:Mac's P&M Shenanigans-- 6/21: Realms of Battle restoration, base colors down, drybrushing underway
|
|
Preacher of the Emperor
|
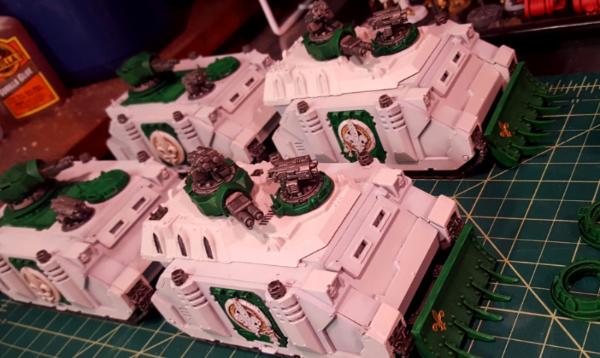
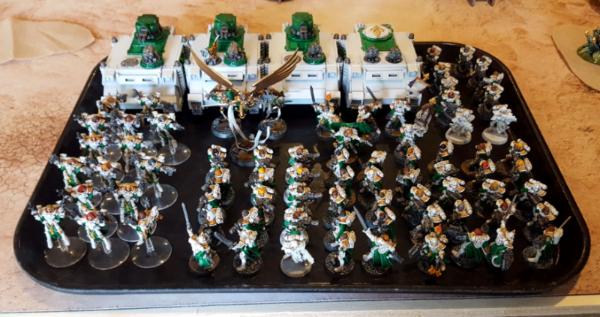
I took a break from working the terrain boards to get some models ready for a game this weekend. I've never run Repressors in a game, and now I've built two of them with some components from Zefig's Shapeways 3D print shop. I upgraded my scratchbuilt Immolator turrets for some nice crisp fabricated ones, added two riser plates for the fire points, scrounged some dozer blades from the bitz box, finally used some etched brass fleur de lis I've had for a while, and did a neat little bit of magnetizing while I was at it. Pretty pleased with both looks and function, but those Rhinos need some more detail.
I'm painting up my last squad of Seraphim too.
|
|
|
|
|
|
2018/06/28 22:13:55
Subject: Mac's P&M Shenanigans-- 6/28: Sororitas Immolators and Repressors with Shapeways 3D printing
|
|
The Marine Standing Behind Marneus Calgar
|
Nice little motor pool there. Good luck in the game.
|
|
|
|
|
|
2018/06/29 15:42:08
Subject: Mac's P&M Shenanigans-- 6/28: Sororitas Immolators and Repressors with Shapeways 3D printing
|
|
Preacher of the Emperor
|
Thanks... I have two more Rhino hulls painted in this scheme, so if the Repressors are everything people say they are, there might be a second round of reboots, plus I have three Razorbacks unbuilt if I wanted to go full mech with this army. So far Seraphim and Retributers bring enough impact for their points that I don't imagine I'll trade them in for more tanks anytime soon.
|
|
|
|
|
|
2018/06/29 17:13:22
Subject: Re:Mac's P&M Shenanigans-- 6/28: Sororitas Immolators and Repressors with Shapeways 3D printing
|
|
Posts with Authority
Boston-area [Watertown] Massachusetts
|
Lovely work!
|
Falling down is the same as being hit by a planet — "I paint to the 20 foot rule, it saves a lot of time." -- Me
ddogwood wrote:People who feel the need to cheat at Warhammer deserve pity, not anger. I mean, how pathetic does your life have to be to make you feel like you need to cheat at your toy army soldiers game?
 |
|
|
|
|
2018/07/10 16:02:32
Subject: Mac's P&M Shenanigans-- 6/28: Sororitas Immolators and Repressors with Shapeways 3D printing
|
|
Executing Exarch
|
good luck with your game, and remember BURN THE HERETIC! lol plus you been slogging on that board for a bit need a break
|
|
|
|
|
2018/07/12 17:08:35
Subject: Re:Mac's P&M Shenanigans-- 6/28: Sororitas Immolators and Repressors with Shapeways 3D printing
|
|
Preacher of the Emperor
|
I've got to get another day in to finish these boards, so rebasing all of my Seraphim onto scenic bases will have to wait until the school year. But the parts have arrived!

|
|
|
|
|
|
2018/07/18 02:10:25
Subject: Mac's P&M Shenanigans-- 6/28: Sororitas Immolators and Repressors with Shapeways 3D printing
|
|
Automated Space Wolves Thrall
|
I must say I’m deeply impressed. You, sir, are an artist!
|
|
|
|
|
2018/07/19 06:24:23
Subject: Re:Mac's P&M Shenanigans-- 6/28: Sororitas Immolators and Repressors with Shapeways 3D printing
|
|
Preacher of the Emperor
|
Thanks for the nods, everyone. Ragnar, you should talk! Your water effects are great and I'll definitely be hitting you up for guidance when I try mine. Your home table is super impressive. Maybe start a P&M thread of your own?
|
|
|
|
|
|
2018/07/25 20:02:29
Subject: Re:Mac's P&M Shenanigans-- 6/28: Sororitas Immolators and Repressors with Shapeways 3D printing
|
|
Preacher of the Emperor
|
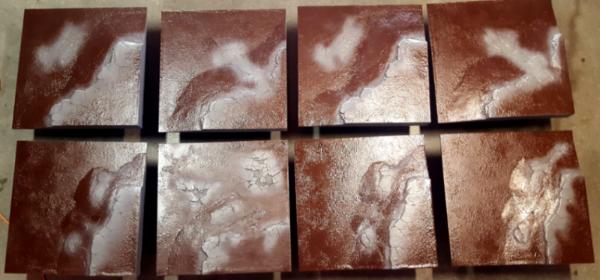
Whew! The last big day on the Realms of Battle restoration project was yesterday... there's a few more touch-ups, some detail work, and the clear coat, but the basic painting is done and they're essentially ready to play on.
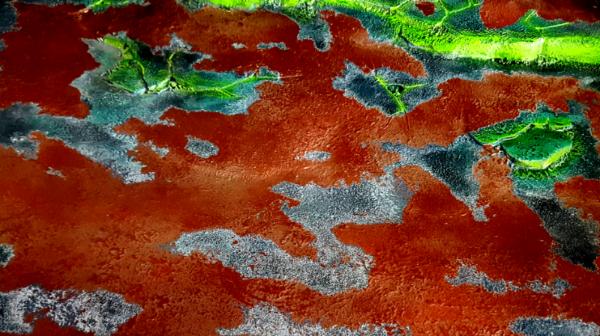
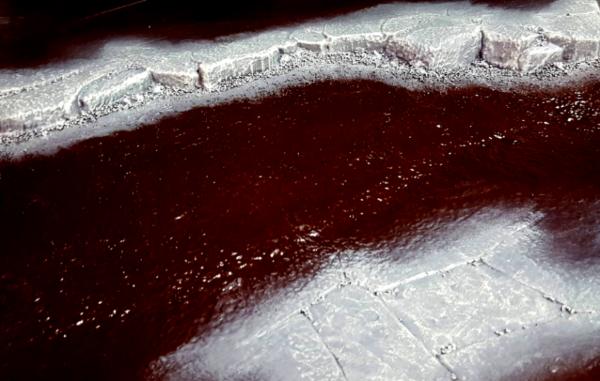
The last major step was to add some visual depth to the mud/earth, so that it wouldn't look so flat compared to the cliff bands. I would normally have drybrushed the texture build into the boards, but the previous owner had brushed on a primer at some point and the boards were covered with obvious brush strokes from a 3-inch wide brush that would have picked up the drybrushing. Instead I went back to the same natural sponge and sponged on random layers of raw sienna and burnt sienna acrylic paint. It was tough keeping my technique consistent across all 8 boards, and I worried that the seams would emphasize the variation in color density, etc. In the end, I maybe worried more than I needed to, and I think I managed a mostly consistent look.
So, tools of the trade:
My first task was a layer of randomly sponged raw sienna, a yellow-orange:

Followed by burnt sienna, an earthy red:

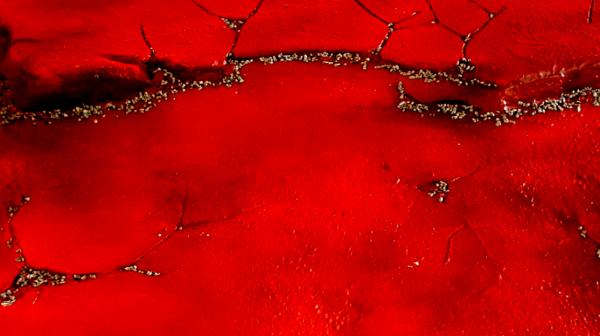
I knew I was going to need to mix my own washes for this project given the scale, and I've been fiddling with it a while. I devised four washes I liked, but I really only using the ones I call Heavy Black and Heavy Brown. These are still not a match for Nuln Oil and Agrax Earthshade, but they're close. I found black to be a much stronger pigment... I doubled the amount of brown to try to match it. The winning recipes for small models-- and I was hoping it would serve for big ones, too-- were these mixed up in 2 oz. bottles:
The exposed rock I did with a single 2 oz. bottle and a brush to guide it... the flow characteristics were pretty good for homemade. The earth took a quadruple batch mixed in the spray bottle. The spray was a mess, but it went where it needed to with the help of a supple brush.

So, the finished table as I hope it appears in-game:

All eight boards finally match!

|
|
|
|
|
|
2018/07/25 20:20:39
Subject: Mac's P&M Shenanigans-- 7/25: Realms of Battle restoration fully painted (hooray!)
|
|
The Marine Standing Behind Marneus Calgar
|
I wouldn’t know this was a rescue project from the results. Nicely done.
Got enough scatter terrain to cover it?
|
|
|
|
|
|
2018/07/26 15:35:34
Subject: Mac's P&M Shenanigans-- 7/25: Realms of Battle restoration fully painted (hooray!)
|
|
Preacher of the Emperor
|
Thanks! I probably don't have enough for 4x8, but I'll mainly play this as 4x6. Now that I have a table to match, I'm going to crank out some new pieces... another structure or two, a few small bases of trees and rocks, maybe a couple more of rusting junk, and the last two MDF+beer can towers from Promethium Forge. That, added to the structure, fuel tanks, and the MDF bridge I've just finished should be enough to cover the whole thing with a mix of cover, LoS blocking, and elevated positions.
|
|
|
|
|
|
2018/07/30 18:04:49
Subject: Re:Mac's P&M Shenanigans-- 7/25: Realms of Battle restoration fully painted (hooray!)
|
|
Preacher of the Emperor
|
I put together a pure Adepta Sororitas list at 2000 points for this month's game and I was aghast to find three models unpainted and another half-dozen unbased. Those targets, plus finishing Celestine and the Geminae, should probably go to the top of the list before I return to terrain.
|
|
|
|
|
|
2018/08/03 03:55:09
Subject: Re:Mac's P&M Shenanigans-- 7/25: Realms of Battle restoration fully painted (hooray!)
|
|
Preacher of the Emperor
|
Aaaaaand, I'm not going to do what I said. I will finish Celestine and crank out a few extra Sisters so I don't have to run unpainted models. But first I can't resist building some supplemental terrain for my newly renovated table.
I'm pretty excited about foamed PVC as a base and building material. 3mm is plenty stiff to build on and with, but not so thick a model can't easily overhang the edge without tumbling over. I've got some ideas to bevel the edges to soften the transition. Unlike insulation foam, it can be spray painted. It also doesn't eat up as much real estate when used for walls; a PVC ruin holds more models than a foam ruin with the same footprint.
I had already bought a chunk of foamed PVC (expanded PVC, Palight, Komatex, Foamex, Celtec) to experiment on. I knocked together some hasty ruins and used them to experiment with color selection, drybrushing and inking technique, and revising my wash recipes as I planned the Realms of Battle resoration. The result is something that I could probably finish up and play on, but I'm excited to make some deliberate terrain pieces with a little more design effort. These will hopefully add some natural texture to my swamp with bushes, rocks, and dead trees, but also tie in with the mud, gravel, and rusted metal of my existing bases.
I bought two 12" x 12" panels of Palight (about $6 each). Last night I laid them out in shapes that I hope will give me room to deploy entire squads in cover. I'll round out the edges into some more organic shapes when I bevel them (hopefully with a Dremel if I can find the right bit), but I didn't want to freehand it and wind up with a useless size or shape. The results, two big, two small:

The other piece I worked into a big wraparound section... I was thinking some heavy industrial junk worked into a barricade overgrown with bushes and grass. The remainder will be my first attempt at a scratchbuilt pool to figure out my water effects for the Realm of Battle board with the pits.

I started messing around with one of the small ones, knocked off some sharp corners, and started using some cork sheets to build up a little rock pile. The guiding principle is definitely gameplay, with easy placement of small-to-medium-sized units, nice flat surfaces, not too much clutter, etc. But I also want it to look good and tie in seamlessly with the boards, so I'm putting in a little extra effort.

|
|
|
|
|
|
2018/08/03 20:34:43
Subject: Mac's P&M Shenanigans-- 7/25: Realms of Battle restoration fully painted (hooray!)
|
|

[MOD]
Making Stuff
|
Looking good so far.
|
|
|
|
|
|
|
|


 Ultramarines, 3rd Co. and friends, 16k+
  4k
4k  2k Points
 Competition Index
 Finished Forge World Elysian Army
  Finished Tau Sept Cadre
  Finished Ork Waaagh |
  Alaitoc Eldar Warhost
  Finished Order of Our Martyred Lady - Sisters of Battle
  Finished Necromundian Imperial Guard Regiment
