| Author |
Message |
 |
|
|
|
|
Advert
|
Forum adverts like this one are shown to any user who is not logged in. Join us by filling out a tiny 3 field form and you will get your own, free, dakka user account which gives a good range of benefits to you:
- No adverts like this in the forums anymore.
- Times and dates in your local timezone.
- Full tracking of what you have read so you can skip to your first unread post, easily see what has changed since you last logged in, and easily see what is new at a glance.
- Email notifications for threads you want to watch closely.
- Being a part of the oldest wargaming community on the net.
If you are already a member then feel free to login now. |
|
 |
2016/06/30 01:35:21
Subject: Re:DakkaDakka Society of Fine Painters
|
|

Fresh-Faced New User
|
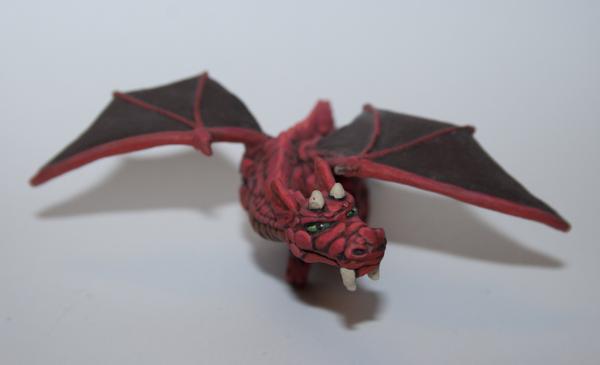
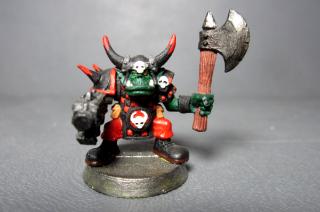
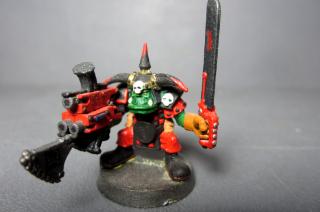
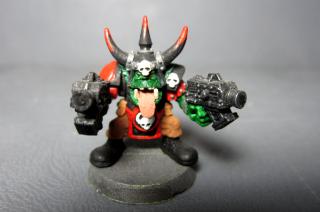
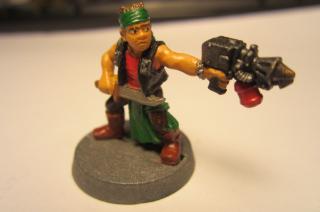
I would love to join DakkaDakka Society of Fine Painters. I have read all your post, and found my self extremely impress with all your work. I feel I could be an asset to your group. I am self taught and been painting mines sins 1984.I am a retired US soldier and try to put some off my experiences out in my mines. I don't have any pics of my old stuff, but here are a fue pics of my more involved peace's. I have tried to go on the blog page but its still under construction. Thanks Tatt .
|
|
This message was edited 1 time. Last update was at 2016/07/13 05:33:52
|
|
|
 |
|
2016/06/30 02:39:08
Subject: DakkaDakka Society of Fine Painters
|
|
Dakka Veteran
|
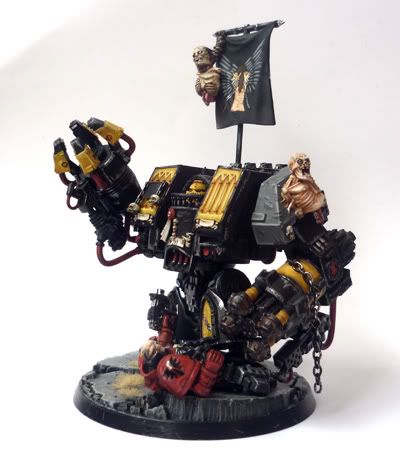
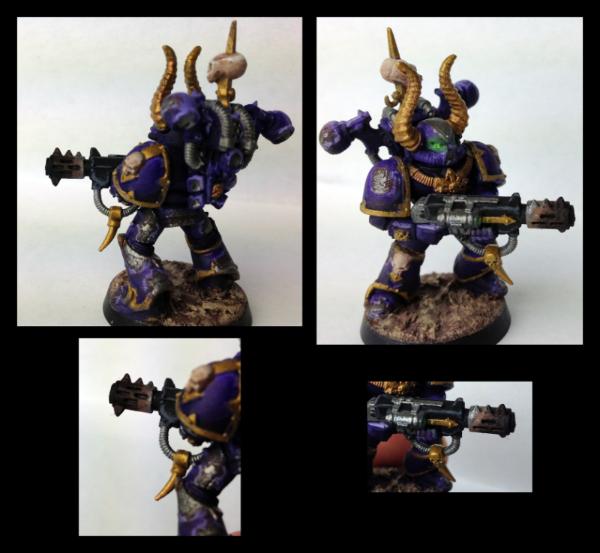
Tatt, I was just admiring that large scale marine recently. Glad to have you among us.
|
|
|
|
|
|
2016/06/30 05:02:22
Subject: DakkaDakka Society of Fine Painters
|
|
Fresh-Faced New User
|
Thanks Heretic Tom, dose this mean I'm in and how do I get the Fine Painters Society bar?
|
|
|
|
|
|
2016/06/30 05:45:13
Subject: DakkaDakka Society of Fine Painters
|
|

Arch Magos w/ 4 Meg of RAM
|
Welcome fella and love that LGS marine conversion
|
|
This message was edited 3 times. Last update was at 2016/06/30 05:47:59
|
|
|
|
|
2016/06/30 08:22:56
Subject: Re:DakkaDakka Society of Fine Painters
|
|

Devastating Dark Reaper
|
Great idea for a forum. I'm currently living in Vietnam so I get very little access to other painters to discuss techniques and gain inspiration/steal their ideas. I have been a painter/modeller since I was 14 with a couple of breaks in between. Living in a hot humid climate, painting can be a real struggle at times. Paint dries out very quickly. The major breakthrough in my painting was when I started to use a wet pallet and focus on thinning my paint. If you don't do it then that is the first place to start for instantly improving your models. Working with the thinned paint does take some practice so start with some rank and file models first.
I do have a bad habit of choosing colours which are hard to work with such as white and yellow. I'd say my other major flaw is rushing models. Usually for the first few models of a project I pour all my focus into them but by the end I am rushing and my standards tend to slip.
I don't have any examples of my early work as I gave it all to my cousin when I left England (arghhhh what and idiot!), I can assure you they were pretty shocking. I remember a particularly horrific example when I tried to paint a space marine army in full army camo. But here is some of my latest work.

One major problem I have is with my brushes. Bent tips and split hairs are the bane of my life. I am heading back to England in two weeks and I have ordered a set of Windsor Series 7 brushes so I am looking forward to seeing what impact they have on my painting. If anyone has any advice on maintaining the condition of bushes (especially in humid climates) it would be much appreciated.
I really want to push my painting to the next level over the next year and hopefully you guys can help me achieve that.
|
|
|
|
|
|
2016/06/30 11:35:29
Subject: Re:DakkaDakka Society of Fine Painters
|
|

Yu Jing Martial Arts Ninja
|
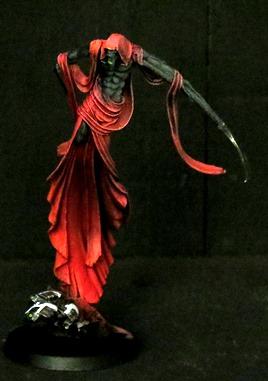
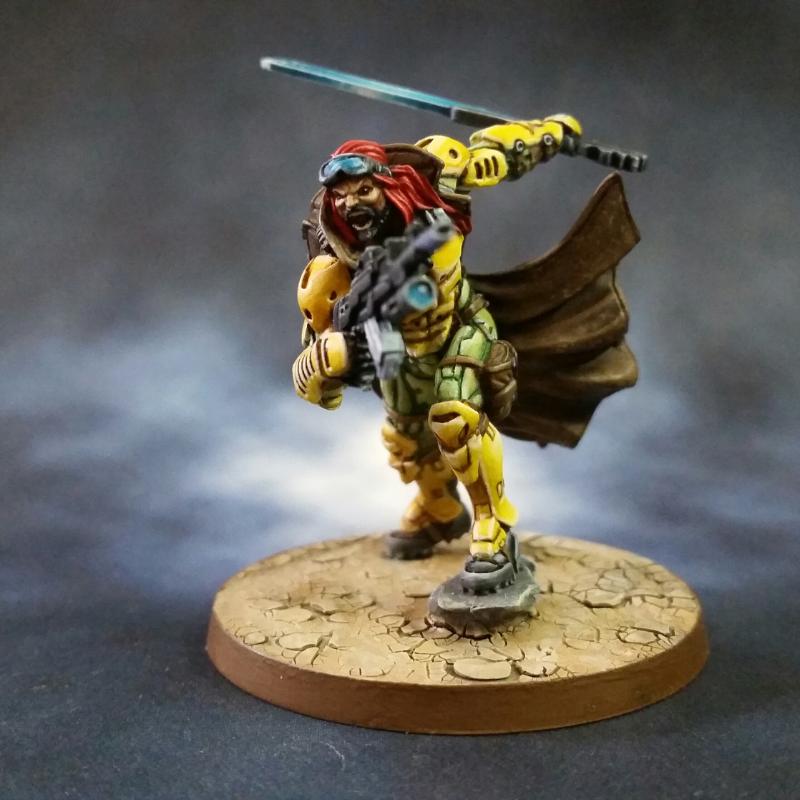
Some Fine Painters in here indeed! Count me in (please  )!
Started painting a couple years ago, and I believe I have improved (or at least would like to think so).
Some of favourite work:
Magneto (which I just posted over on my blog, heh)
Guija.
Tarik (the angry guy in my avatar)
Looking forward to painting with you guys 
|
|
|
|
|
|
2016/06/30 12:02:15
Subject: DakkaDakka Society of Fine Painters
|
|
The Marine Standing Behind Marneus Calgar
|
Lots of nice work here.
<pulls out a notepad and some popcorn>
Don’t mind me, just lurking and stealing ideas.
|
|
|
|
|
|
2016/06/30 20:12:50
Subject: DakkaDakka Society of Fine Painters
|
|
Dakka Veteran
|
 tatt2014 wrote: tatt2014 wrote:Thanks Heretic Tom, dose this mean I'm in and how do I get the Fine Painters Society bar?
I believe bebop posted it on page 1
 Icarium wrote: Icarium wrote:Living in a hot humid climate, painting can be a real struggle at times.
Any tips for those of us who also have to fight high humidity?
Love your marines by the way, i don't remember the last time I had so much fun going through a gallery. What are those figures you have them heroically hacking into chum?
 ckig wrote: ckig wrote:Some Fine Painters in here indeed! Count me in (please )!
Welcome, great looking models!
|
|
This message was edited 3 times. Last update was at 2016/06/30 20:21:15
|
|
|
|
|
2016/07/01 01:08:57
Subject: Re:DakkaDakka Society of Fine Painters
|
|
Decrepit Dakkanaut
|
Well I'm finally off a tiny iphone touchscreen.
I'm Benny, I came into the hobby as a cartoonist and painter, so I found it a bit confusing to paint 3D things with shades and highlights. In my early work you'll probably see that I put them in fairly random places, based on what I was guessing might be right. 
I'm also colourblind, so you'll find a lot of my work is done in shades other people think are heinous.
I started painting about nine years ago, and this was my first figure:

Since then, outside of army painting, which I don't really count... I've probably only completed two dozen figures, if that. I always think "oh this person must paint constantly and we only see their highlights online." well, until the last month, nope. I barely did anything except practise and practise on bitz and the very occasional complete mini.
These guys I did about five years later.
And that was pretty much it for another six years, until I joined Dakka. Partly to talk kitbashing, and partly to spur myself back into painting.
Wherupon I did Judge Minty, and realised I quite like doing faces and still cannot see green.

And then I picked up my airbrush that had previously only seen paper and t-shirts, and did this:

I really like doing faces:

(Belongs to)
Mostly I'm a concept person more than a painter. I like creating ideas, strange builds, and meddling. It means my painting suffers.
Lately I've been doing some more "straight" works to try and improve my focus on the painting, and not the conversion.

|
|
|
|
|
|
2016/07/01 05:02:51
Subject: DakkaDakka Society of Fine Painters
|
|
Utilizing Careful Highlighting
|
 Heretic Tom wrote: Heretic Tom wrote: tatt2014 wrote:Thanks Heretic Tom, dose this mean I'm in and how do I get the Fine Painters Society bar?
I believe bebop posted it on page 1
Icarium wrote:Living in a hot humid climate, painting can be a real struggle at times.
Any tips for those of us who also have to fight high humidity?
Love your marines by the way, i don't remember the last time I had so much fun going through a gallery. What are those figures you have them heroically hacking into chum?
ckig wrote:Some Fine Painters in here indeed! Count me in (please )!
Welcome, great looking models!
re: humidity, AC - seriously. In your paint room if no where else. Maybe a portable dehumidifier? honestly I dunno. it's humid as stuffings here, I don't dare spray paint outside just about year round (rarely get a good day to do it). If not for AC I really don't know how I'd get anything painted =/
Made the mistake of leaving MDF outside in my shed - yeah that didn't work. Not only did it fall apart, being essentially just particle board anyway, but it molded as well. Sigh.
|
|
|
|
|
|
2016/07/01 05:19:00
Subject: Re:DakkaDakka Society of Fine Painters
|
|
Devastating Dark Reaper
|
Love your marines by the way, i don't remember the last time I had so much fun going through a gallery. What are those figures you have them heroically hacking into chum?
Thanks Heretic Tom. Thee civilians are just zombies from the basic vampire counts kits with green stuff clothes added. My entire collectors army is pretty much based on the Space Marine Battle force, the zombie kit and green stuff. I lost half of the models in a box when moving, so that army is on hold as it really destroyed my motivation. I have a half finished Dreadknight conversion which is literally tearing a civilian in half that I can't face finishing.
As for the humidity, Guildenstern is correct. It's all about air con. Without it the paint doesn't even go onto the model correctly. If you accidentally don't close your paints properly they dry out really quickly, especially the white. I just avoid spray painting in the rainy season, for the rest of the year it is fine.
|
|
This message was edited 1 time. Last update was at 2016/07/01 05:19:56
|
|
|
|
|
2016/07/01 05:39:47
Subject: DakkaDakka Society of Fine Painters
|
|
The Hammer of Witches
|
The Collectors are really gore nasty! And great looking.
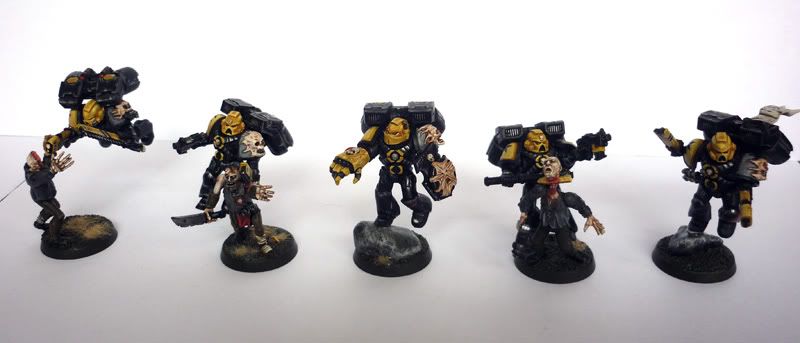
I love your work buttery! That painting commissar is the balls.
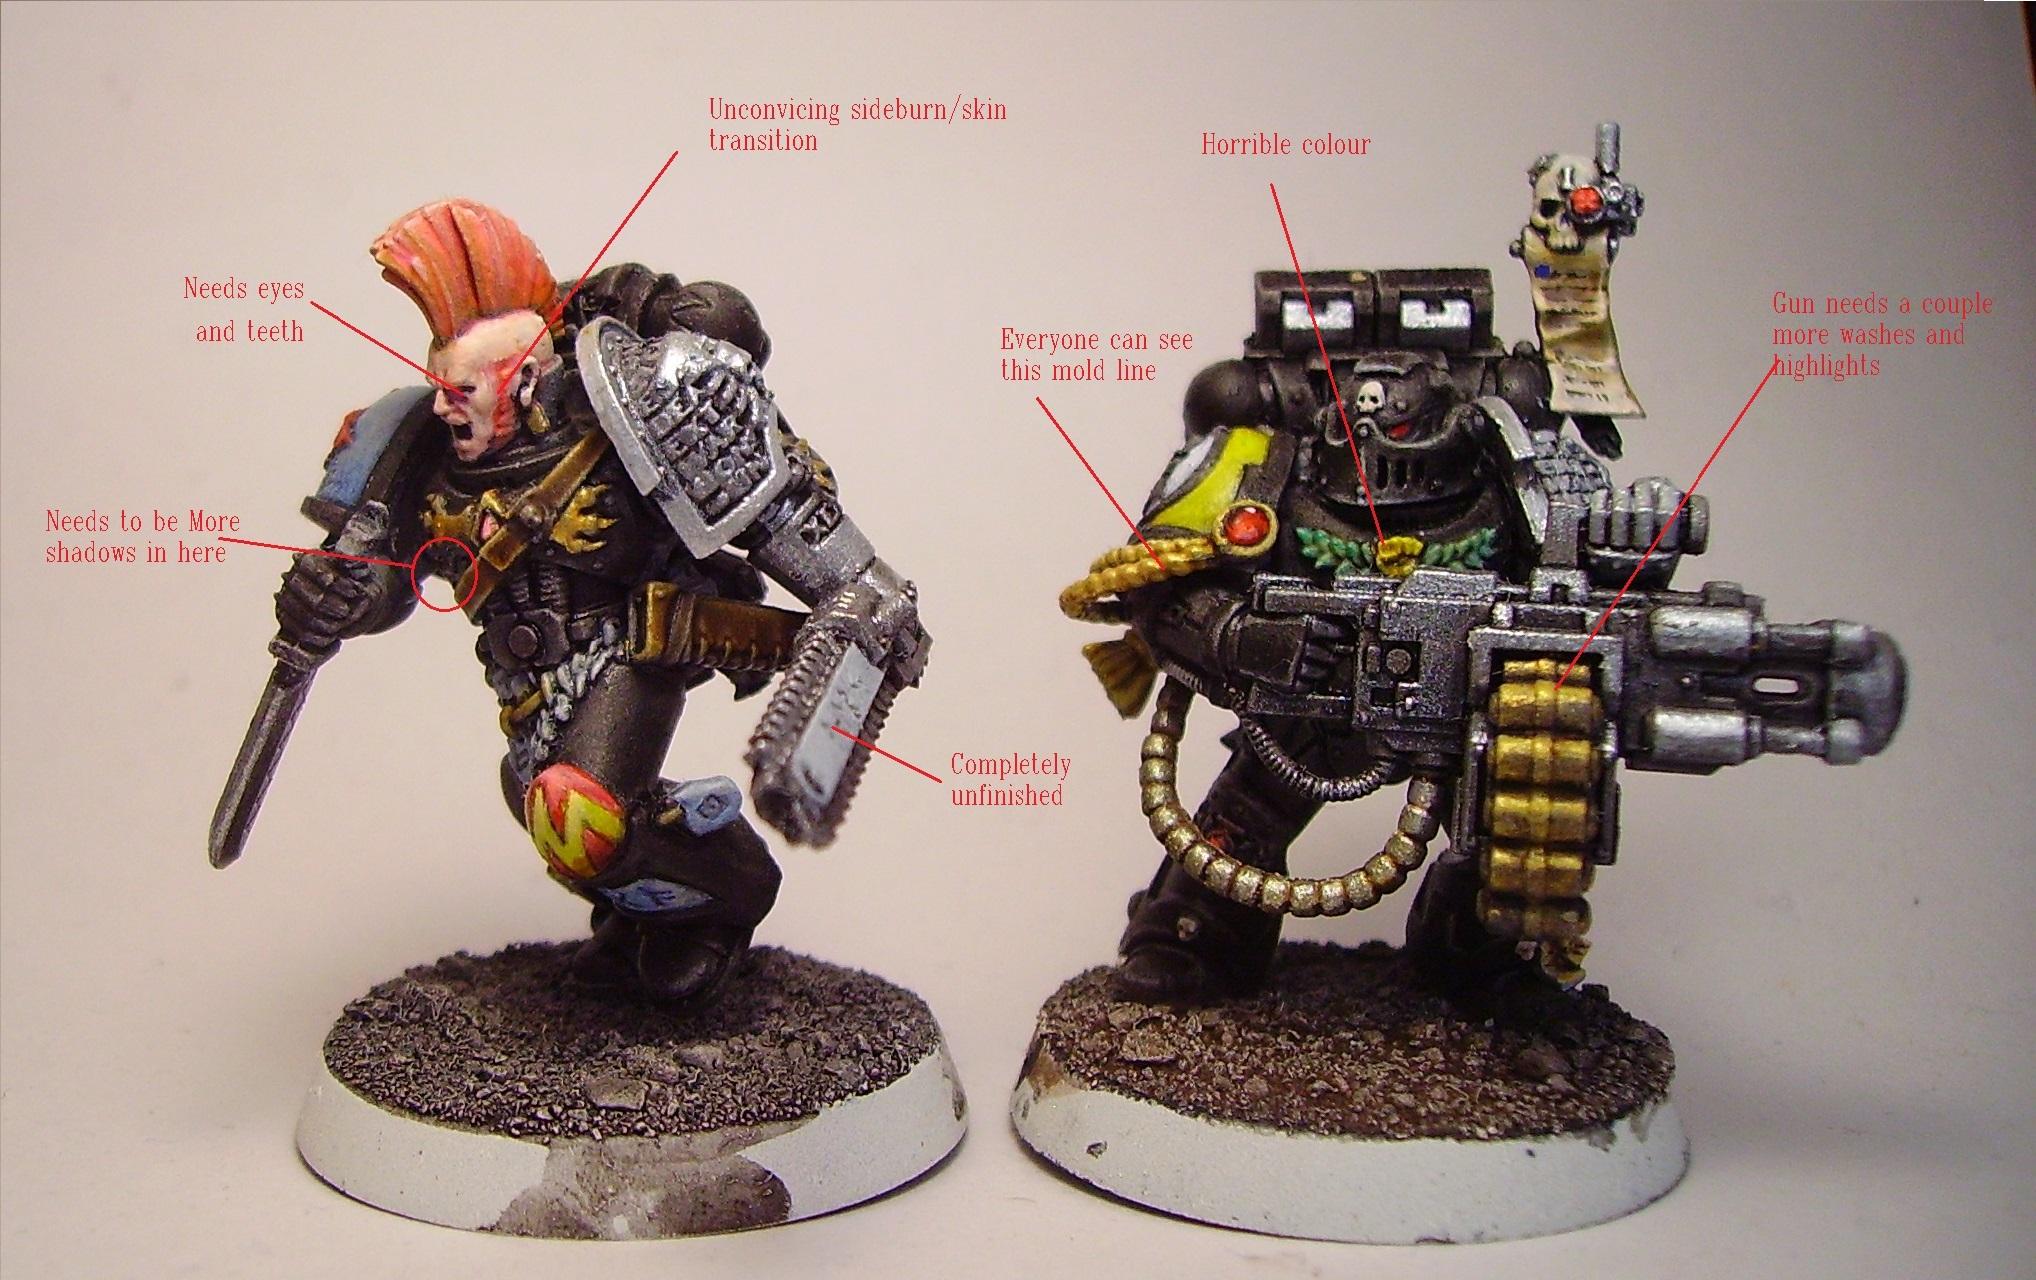
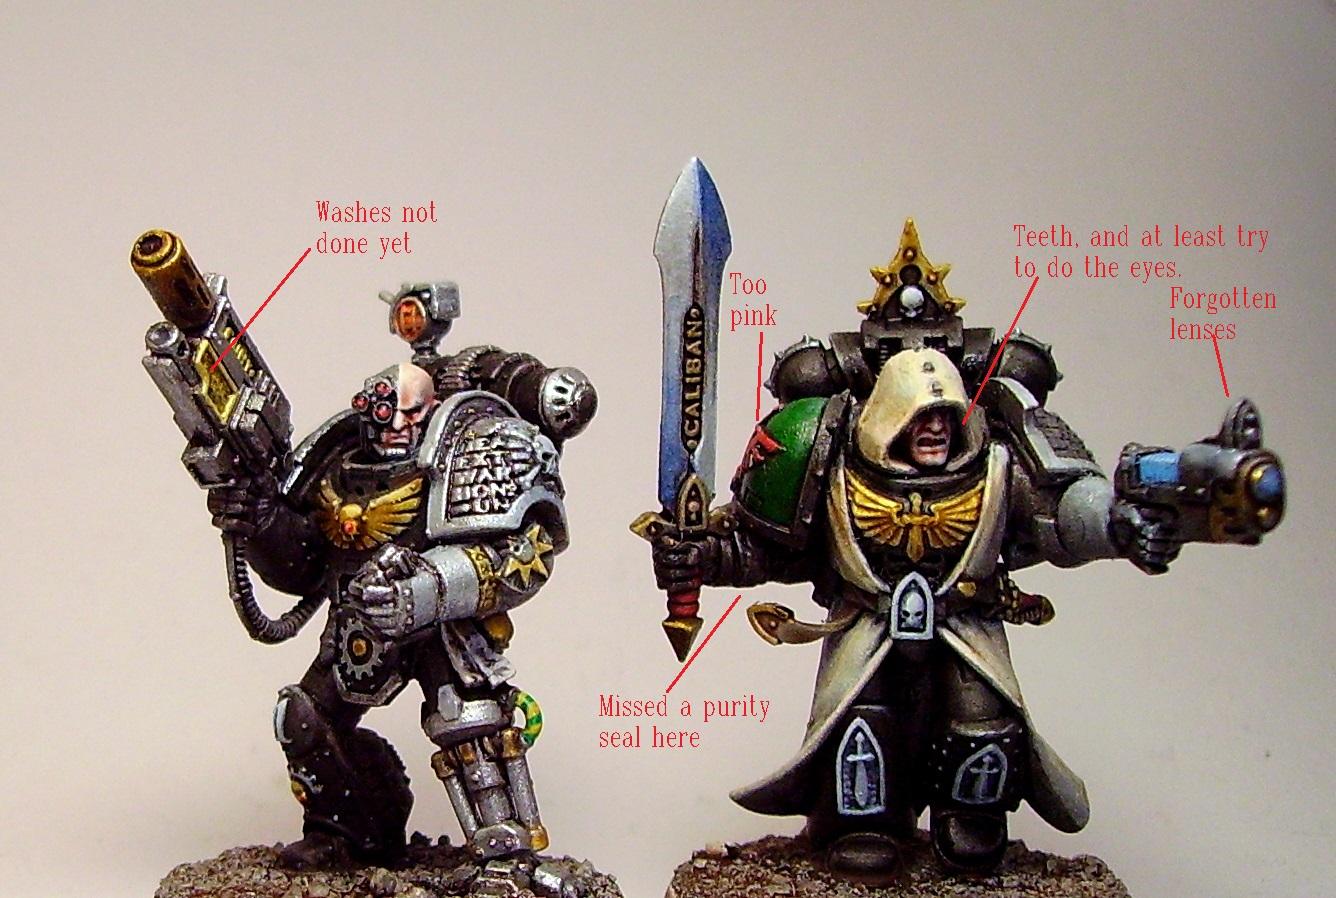
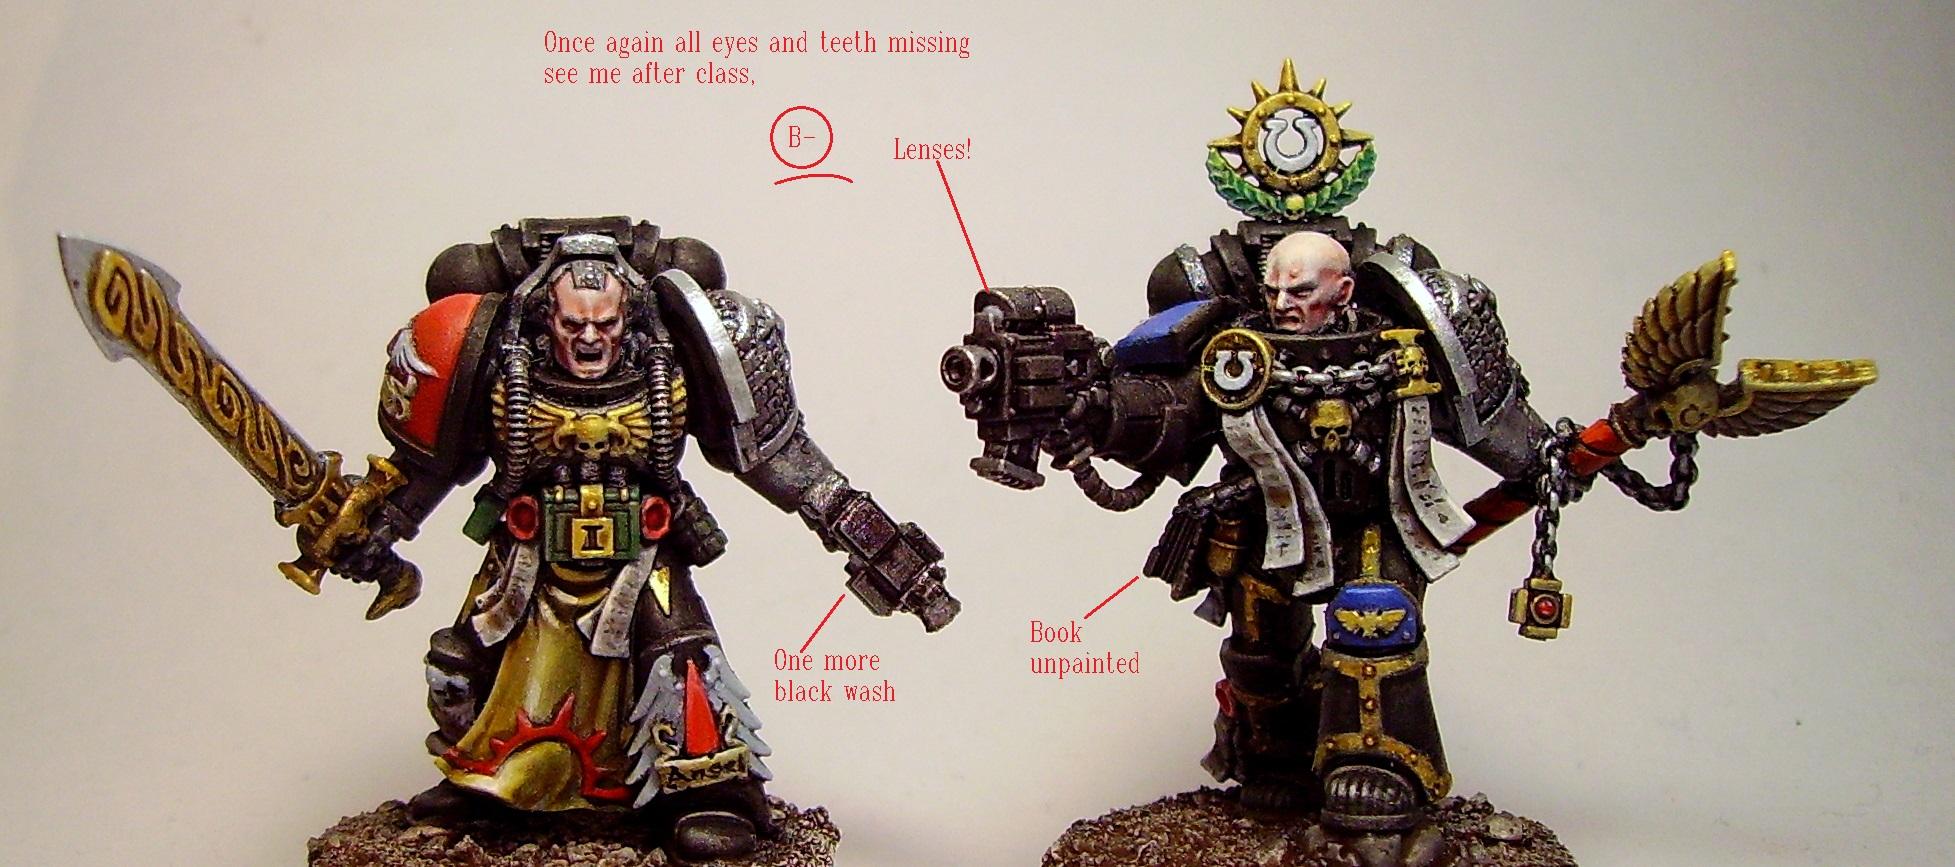
I have been trying to ace the deathwatch overkill marines. I try to improve my painting skills and I find it helps, when you think your done, to take a photo and subject it to your inner critic:
|
|
|
|
|
|
2016/07/01 05:58:42
Subject: DakkaDakka Society of Fine Painters
|
|
Mounted Kroot Tracker
|
Welcome to all the new people!!! Wow!! This group is really taking off!!
@ Icarium: I think I've pintrested some of those marines because I just love the action stances and the modelling gone into them. ALso, yellow and black look great on marines! Welcome man!
@ Tatt: welcome dude. Definitely keep us updated on that giant marine project. And ya the banner is on the front page, but Herectic Tom mentioned to me that he redid the banner?? Tom do you wanna show it off? 
@ckig: Simply gorgeous stuff, you know I love your work. Great colors on that magneto,
@weety: I literally just did this with my current project. In fact I often times think I'm done and in the final pics I notice things I missed and have to go back after I post a final pic, LOL...but it's super helpful to do that I agree. These marines look great, by the way, it's neat to see you paint them, it's some what of a departure from your usual projects right?
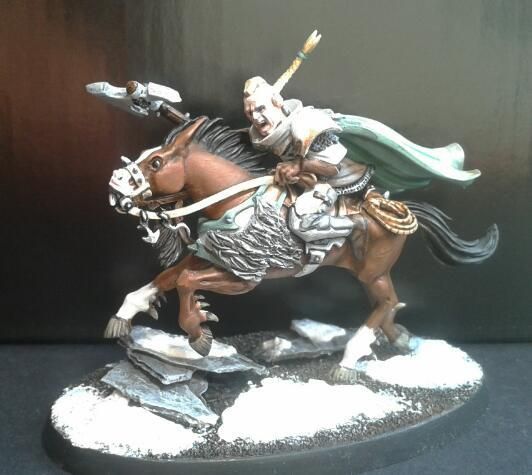
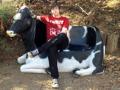
@ Buttery: Awesome update dude and welcom!! I love that blue horse, it's a gorgeous paint job!. Great post!
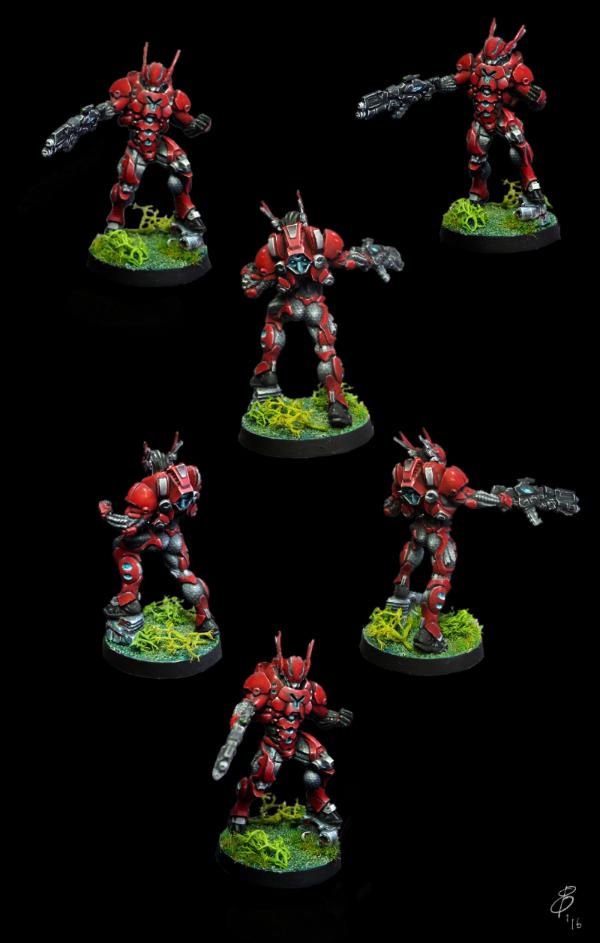
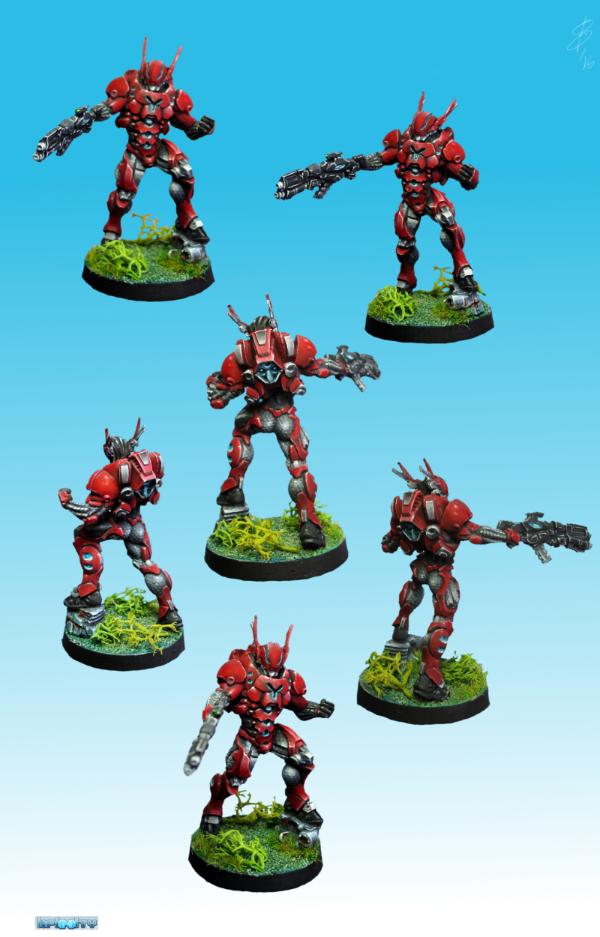
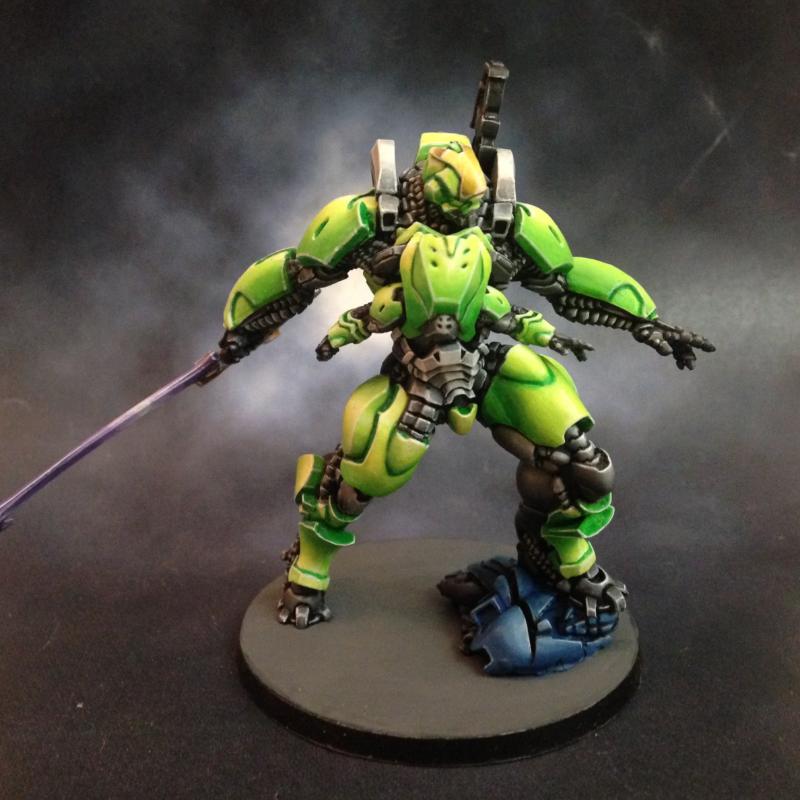
@Keezus: I love that infinity model you painted last month, and in fact I voted for it for the comp. It's a great example of neutral colors with one spot color that really sticks out. Great work and also your current entry in this months is also something I'll be voting for Welcome
Well fellows, I'm going to post my final pics here of my finished project, and because it's late, I'll post a more comprehensive thought about it tomrrow, in the spirit of keeping conversattion going, and this not just becoming a show case plot but something more
I too and having some trouble with hot humid weather but I'm moving back to Cali in a month so I won't be stressing about this for much longer can not wait to get back to Cali. Anywho....here's my latest, and sorry if you saw this in my pm blog, there are wips there and actually a bigger pic that zooms further in and what not...ill post more on this guys process later cheers all:!
heres the full size pic too, i just redited it, can zoom further in
|
|
This message was edited 1 time. Last update was at 2016/07/01 14:18:19
|
|
|
|
|
2016/07/01 06:14:37
Subject: DakkaDakka Society of Fine Painters
|
|
The Hammer of Witches
|
Nice infinity soldier dude! The detail on those things is so tiny. I'm impressed by the tiny hexagons.
I am having a complete departure yes. I used to only paint Rogue trader figures a few years back, and for a year I only did Oldhammer in NMM. A learning experience! Now I will be doing modern boxed sets for a year or two, just because I really like whats come out recently and the quality of the models shows off my painting better. After years of working with lumpy old sculpts its nice to start with a smooth surface!
|
|
This message was edited 1 time. Last update was at 2016/07/01 06:58:43
|
|
|
|
|
2016/07/01 07:43:57
Subject: DakkaDakka Society of Fine Painters
|
|
Dakka Veteran
|
 bebopdrums2424 wrote: bebopdrums2424 wrote: And ya the banner is on the front page, but Herectic Tom mentioned to me that he redid the banner?? Tom do you wanna show it off?
Sure. Also, if you guys want something specific just ask

 weetyskemian44 wrote: weetyskemian44 wrote: I try to improve my painting skills and I find it helps, when you think your done, to take a photo and subject it to your inner critic
This has happened to me, literally, every time I have photographed a mini so far. I always notice something, go back and fix it, and then rephotograph my figure. Invariably, I still miss something and don't notice it until it's uploaded.
|
|
This message was edited 4 times. Last update was at 2016/07/13 13:33:51
|
|
|
|
|
2016/07/01 20:27:50
Subject: Re:DakkaDakka Society of Fine Painters
|
|
Never Forget Isstvan!
|
The two Infantry figures are from my start, though by no means my first painted minis. The Powerfist Marine won me a best painted in the very first tournament I entered. late 90's?? Can''t remember that far back.
I don't paint more than table top.. but this one I'm proud that I took extra time on doing..
My most recent project.. again tabletop.
|
|
This message was edited 2 times. Last update was at 2016/07/01 20:33:27
|
|
|
|
|
2016/07/01 23:31:38
Subject: DakkaDakka Society of Fine Painters
|
|
Utilizing Careful Highlighting
|
weetyskemian44 wrote:I try to improve my painting skills and I find it helps, when you think your done, to take a photo and subject it to your inner critic:
lol'ing so much at your notes, they sound so much like the voice in my head when I look at my stuff... I swear, all I see is all the mistakes I make
|
|
|
|
|
|
2016/07/02 19:18:51
Subject: DakkaDakka Society of Fine Painters
|
|
Mounted Kroot Tracker
|
@ weety: yeah these little dudes are tiny as eff, but really super detailed and I just LOVE the asthetic which I think less people on dakka like. I'd love to see you and Damo paint some these guys because I think you'd both do a stellar job with them.
@ Solar lion: welcome sir! Glad to have you in the group and great looking models man! That red is really vibrant on the necron lord as well as the flyer!! Fantastic!!
@ Guildenstern: me too I'm the same way, extremely critical of my own work, and those little mistakes can sometimes be so frustrating, but in the end I usually let it go because it's easy to get obsessed and that's when the real mistakes start to appear!
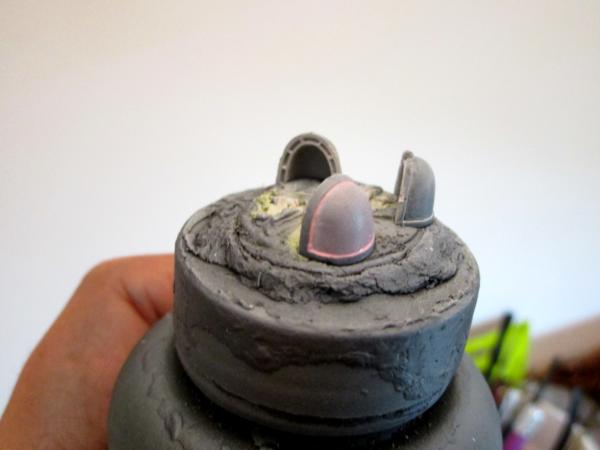
So, guys!, again in the spirit of this thread, and to avoid this degenerating into a showcase thread, I wanted to expose a little bit more of the processes that I've personally been working with, and I made a short and somewhat crude "tut" about painting thin and using washes to build up to colors, and using zenithal to help this. And all you guys are encouraged to post your own processes and the like, the more information and viewpoints compiled here, the better for us all!!
So, basically I'm always spouting off about the thinner the better, so, using a space marine shoulder pad, i decided to do a quick paint up of a pinkish - purple transition kind of slannesh vibe (I did this quick so no judgment ) Before going into it, the concept is basically this: the foundation color is the mid/highlight and then I'm basically shading down from there, while adding further highlights as I go up: On paper it would look like this:
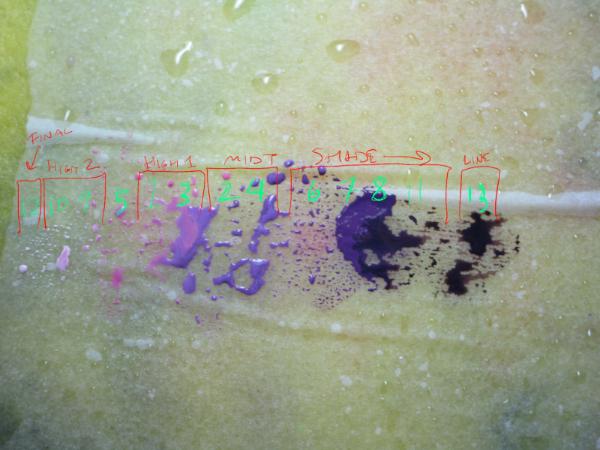 /
The green numbers is the order in which I apply it...notice I don't start with the ACTUAL color I want it ending up to be.
Now, let's see what stage one looks like (this is one "coat" of paint):
Pretty much nothing there...so as we continue I reinforce the highlight tone but I'm also aware of the zenithal so I am careful to not paint the areas I want to be a point highlight.
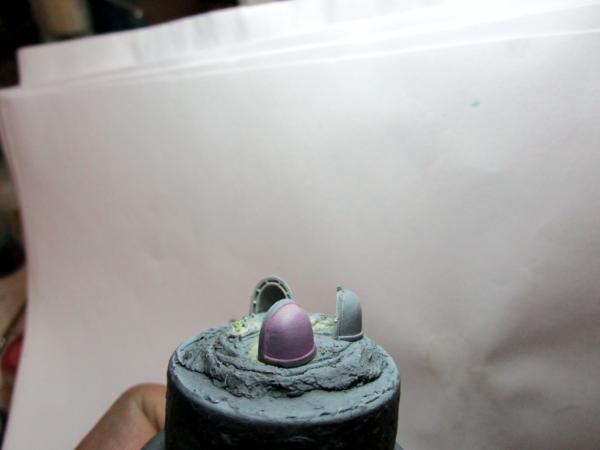
Next I begin to feather down into the mid tones and set my true colors. Same consistency of paint, and focusing away from the highlight:

So as I continue to do this...going deeper into my mid town and shades, which the zenithal has made obvious to me, and smoothing out highlights with, in this case, red glaze...
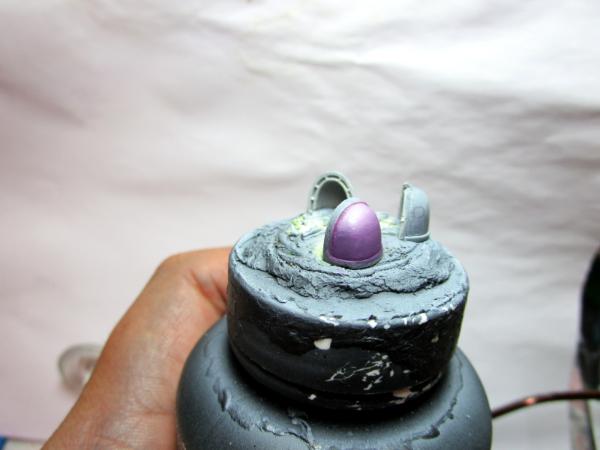
Getting closer to final stages, I solidify my point highlights that at this point are pretty obvious. Though one thing to mention, which has been a personal struggle in the past, is picking a light direction and sticking to it, because the natural urge is to move the model around and paint areas that need it. Be vigilant and stick to one angle. I generally have 4 sides to model and make sure to hold them as I paint in each of the exact same 4 ways.....
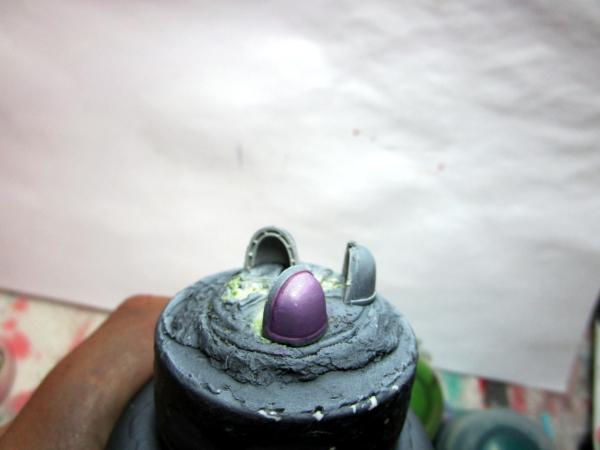
And the final result (somewhat crudely done, sorry but did this quick) is such:
So a couple of notes: If you want your colors stronger, simply use more layers of your colors. The mantis warrior was done this way and so was the red nomads I've done, and they are quite bright in color. However This technique works less successfully if your colors do not have white in it. It tends to look a little washed out. I tried as an experiment this process on skin, and it didn't look right. And I don't always use this order either, it's just that I've found when I'm painted basically NMM colored surfaces, where sometimes the light reflections are more present than the mid tones, it saves me some effort in blending in more highlights later on. A lot of it also comes down to improvising a technique to get the effect that I want, in the moment that it's needed. I'll do another one of these, where I go straight hard midtone and then go down and up, for warmer materials, cloth skin, etc etc, but I've been painting hard armor for the last month basically so this is where my head is at.
Guys I encourage you to post your own techniques if you feel that you think we can get some valuable information from it! Please
Cheers guys happy painting
Bebop...
|
|
This message was edited 2 times. Last update was at 2016/07/02 19:59:35
|
|
|
|
|
2016/07/02 20:27:51
Subject: DakkaDakka Society of Fine Painters
|
|
Mastering Non-Metallic Metal
|
I always blow up photos of my models on my computer (sometimes I even share those photos on DDakka) to look for mistakes. Even if I can't see it in the hand, if I can see it in an enlarged photo, I'll attempt to correct it.
Those of you familiar with my feedback for contests such as the LoER's, know how close I can look over a model and pick out the tiniest of slips etc. You can be sure I am 10 times harsher with my own models.
But there always comes a point where, even though there is something on the model that jumps out at you and stabs you in the eye, you have to put it down and call it done... for now.
I will eventually come back to past models and improve them, when I have time, or fancy a change.
You can't force yourself to perfect every model, every time. You will always make it worse, become frustrated, and not "finish" anything.
It's ok to say "this model is done... and I may come back later and perfect it".
That is, unless you are planning on selling it. Then I always add the final "tidy up" step, where I go in and fix absolutely everything that I can to the best of my abilities.
Most of you won't have to worry about this.
BB: It's interesting to see that technique. I hear people talk about starting with the mid-tone and then shading down and highlighting up, and I just see it as making life difficult for yourself. Not that I'm saying it's the wrong way to do it; everyone has to find their own method and what works for one person may not for someone else.
2 questions:
Do you make your "first" layer solid (that is it covers the grey underneath) before moving on to the next layer?
Obviously most of the area will be covered with subsequent layers where it is shaded or highlighted, but there must be a point between the two where it "should" be the colour that you have started with. Do you ensure that this part has the coverage, or are you relying on the blending of the following layers to produce the coverage?
and
How do you cope with tricky areas, undercuts, and hard to reach parts that get the darkest shades, and not get a dark streak across the middle of your lighter shaded area that you have just painted?
This second point is what drives my method of painting; I start dark, all over, and then highlight all the way up to the brightest shade.
I do tend to paint fully constructed models, as I like to get the build complete before starting painting. As I rarely build a model without modifying it in some way, I can't really leave an arm off (as it may have wires or something else extending from the body) and I want all gaps properly filled (not something to do after painting).
When I come to paint something as a good example, I'll (hopefully) remember to take photos of every stage and post them up, but this is quick run through:
Prime grey,
Check the build for any errors (gaps, rough areas, places where something "more" needs adding),
Paint everything black, ensuring to get into every crack and crevice. From this point on anything hard to reach is left in shadow (hence the above question).
Choose the paint that will eventually be the mid-tone colour, add black, paint it over everything except the deepest darkest crevices.
Then add layer after layer, using more mid-tone and less black, until reaching pure mid-tone, covering less and less area moving away from the shadows. (probably about 5 layers)
Then start adding the highlight colour (not always, but often white) little by little to the mid-tone and continue covering less area to create the highlights. (probably another 4 or 5 layers)
Reserve the pure highlight colour for sharp highlights (edges etc.).
Weathering etc...
|
|
This message was edited 1 time. Last update was at 2016/07/02 20:32:07
     Mastodon: @DrH@warhammer.social Mastodon: @DrH@warhammer.social
The army-                   ~2295 points (built). ~2295 points (built).
 
* -=]_,=-eague Spruemeister General. * A (sprue) Hut tutorial *
Dsteingass - Dr. H..You are a role model for Internet Morality!  // inmygravenimage - Dr H is a model to us all // inmygravenimage - Dr H is a model to us all
Theophony - Sprue for the spruemeister, plastic for his plastic throne! // Shasolenzabi - Toilets, more complex than folks take time to think about! |
|
|
|
|
2016/07/02 20:29:49
Subject: DakkaDakka Society of Fine Painters
|
|
Combat Jumping Ragik
|
Learn to paint with thick paint too. It is a valuable skill as well. A decent painter should be able to do both, paint thin or thick. IMHO.
Brush sizes. I've been experimenting with larger, #3 and #4 rounds and liking them for pretty much everything but really fine detail. What are the preferred brush sizes you guys use? I'll use #0 for pretty much every finer detail, but for crazy small I drop down to a 3/0.
|
|
|
|
|
|
2016/07/02 20:35:46
Subject: DakkaDakka Society of Fine Painters
|
|

Executing Exarch
|
 Red Harvest wrote: Red Harvest wrote:Learn to paint with thick paint too. It is a valuable skill as well. A decent painter should be able to do both, paint thin or thick. IMHO.
Brush sizes. I've been experimenting with larger, #3 and #4 rounds and liking them for pretty much everything but really fine detail. What are the preferred brush sizes you guys use? I'll use #0 for pretty much every finer detail, but for crazy small I drop down to a 3/0.
I use a #2 for almost everything, with a #1 Series 7 for detail work. That's really it. Sometimes I'll use a bigger brush for quickly filling in large areas.
|
|
|
|
|
2016/07/02 20:46:30
Subject: DakkaDakka Society of Fine Painters
|
|
Mounted Kroot Tracker
|
@Dr H: good questions. The initial color put down varies in coverage depending on what it is im painting. It could be very trasparent to very opaque. The mid tone again varies, in the case of the Nomad, the red is very opaque in contrast to the highlights because they are pinkish, so if I don't support the red, the over all effect will be pink armor, not red armor with reflection. AS for tricky bits, I totally hear you. What I do is essentially ignore any detail and paint the piece or quadrant entirely before adding stark highlights and black lines and try not to get caught up with the details but look at the overall light source, where its highlights are, where the Midtone generally should be, and where the shade should be. The last steps Of edge highlights and shade lines tie it all together. This by no means is the fastest way, it's not, it's slow as hell. But I enjoy the process and I feel like it's getting me results I'm happy with and the more I practice it the faster I get and I feel stronger as a painter for it. But yeah, it's not efficient, it's not fast, and not really meant as an army painting strategy. AS far as the streaking, if your paint is super thin, this is a non issue as long as you are careful to feather each stage.
@ Red, could you give some examples where using thick paint is useful in your endeavors? I'd love your input here! The only time I use thick paint, and I use the word thick pretty liberally, is when I need something incredibly small and it has to be stark in contrast and can't run, like perhaps an edge highlight, and even then the danger is that it dries on the brush before you apply it. The other times are of course, drybrushing, or other technical applications.
|
|
|
|
|
|
2016/07/02 21:43:01
Subject: Re:DakkaDakka Society of Fine Painters
|
|
Dakka Veteran
|
Bebop, thanks for posting the quick tutorial, I'm going to give this a try with my next csm.
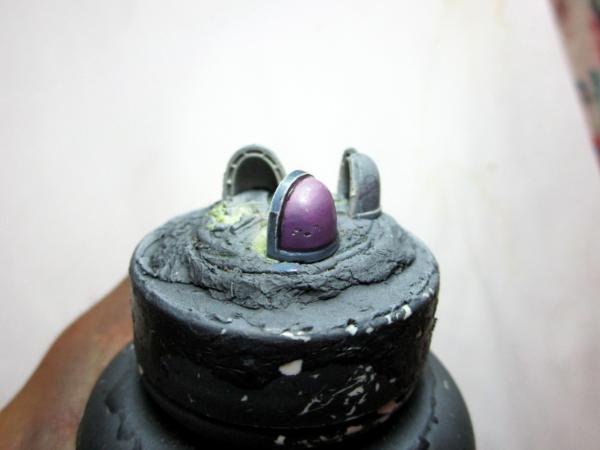
I posted this In my P&M but I thought I'd put it here as well. I tried my hand at a "burnt muzzle" effect on what I thought was a much too pristine looking melta. It didn't come out quite as I'd hoped, but I wouldn't call it terrible either. Thoughts? Suggestions? I think I probably need to throw a sepia toned wash over it.
It was not a very complex/thorough process (which may explain my mixed feelings about the end result) but basically I just took some very thin brownish paint (I tried to go for the color of a roasted marshmallow ) and brought it from the tip of the melta barrel down, leaving a bit of untouched metal near the other end, I then did the same thing a few more times not going quite as far with each subsequent layer in an attempt to feather the color. I then painted the tip of the barrel solid black, bringing it down the barrel just the slightest bit. After this, I then stippled the black further down the barrel with my dry brush, I had considered using sponge for this last step but I feared I may not be able to cover as small of an area with the sponge. And that's it, as I said above, I considered/am still considering putting a light brownish wash over the entire "charred" area.
Heretic Tom 
|
|
This message was edited 3 times. Last update was at 2016/07/03 07:14:26
|
|
|
|
|
2016/07/03 01:15:40
Subject: Re:DakkaDakka Society of Fine Painters
|
|

Ork Boy Hangin' off a Trukk
Moncton, New Brunswick, Canada
|
I just stumbled across this thread and I am definitely subscribing. 
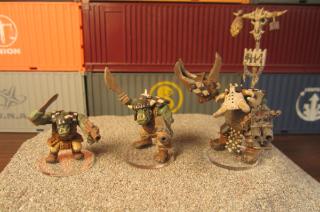
My earliest attempts were on HO scale model railroad people and buildings when I was about ten, and then D&D figures in high school. Those are long gone, but I do have some 2nd edition orks I painted back sometime around university...
And some Necromunda figures from during their heyday...
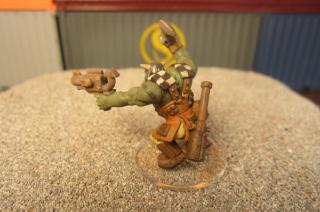
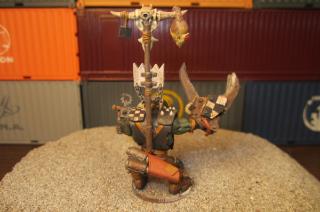
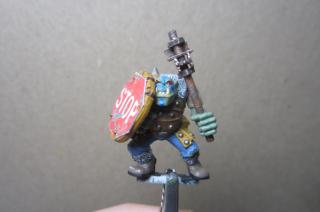
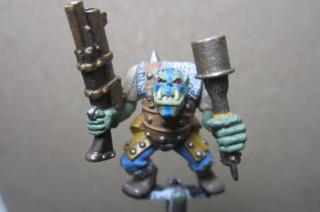
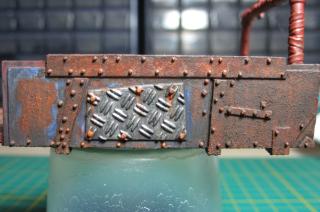
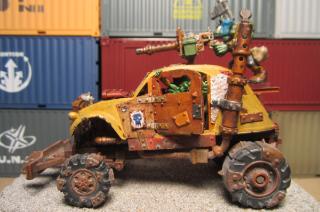
Then there was a long stretch where I didn't do anything hobby related, until a few years ago I picked up an ork trukk and converted it. That was it, I was back in the hobby big time. Here are some shots of some recent work...
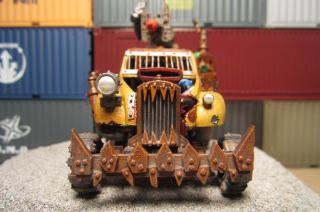
I think I've improved a fair amount, but there are clearly a heckuva lot of things I can learn from this group. Right now I'm focusing mainly on experimenting with rust effects...
Although I am particularly happy with how the large headlight came out on my buggy.
|
|
|
|
|
|
2016/07/03 01:22:13
Subject: Re:DakkaDakka Society of Fine Painters
|
|
Fresh-Faced New User
|
tatt2014 wrote:I would love to join DakkaDakka Society of Fine Painters. I have read all your post, and found my self extremely impress with all your work. I feel I could be an asset to your group. I am self taught and been painting mines sins 1984.I am a retired US soldier and try to put some off my experiences out in my mines. I don't have any pics of my old stuff, but here are a fue pics of mhttp://images.dakkadakka.com/gallery/2016/7/1/809893_sm-banner.jpgy more involved peace's. I have tried to go on the blog page but its still under construction. Thanks Tatt .
|
|
|
|
|
|
2016/07/03 01:47:10
Subject: DakkaDakka Society of Fine Painters
|
|

Longtime Dakkanaut
|
Wow, Bebob, that's some really cool layering/glazing there! I myself never have the patience for that :>
|
|
|
|
|
|
2016/07/03 06:17:46
Subject: DakkaDakka Society of Fine Painters
|
|
Arch Magos w/ 4 Meg of RAM
|
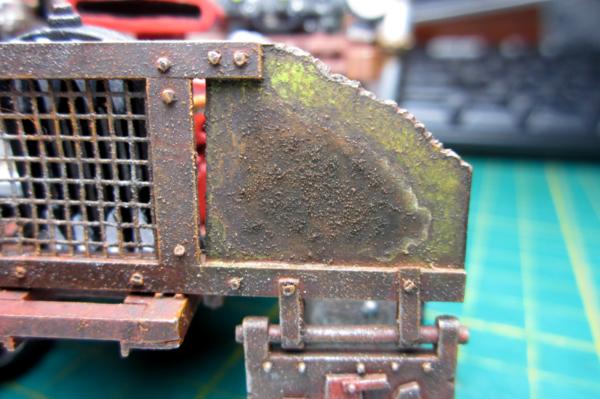
Quick little cheap and nasty technique I'll throw out for folk that might find it useful
I love my metals and metallics - TMMs all the way. Bright, shiny and new metals are nice but I prefer the dirty, stained and old metals for the most parts. This works nicely as an esy way to get a good old and worn metal base to then further work on.
Base whatever it is with a black spray first (I've alwys used GWs Chaos Black spray and always found it to be top notch)
Once dry, get out your drybrushes - its fun messy time.
We're going to put down a succession of three different metallics to give a nice tarnished patina'd effect.
First up - roughly drybrush with warplock bronze - this gives a nice dark depth to the metal finish
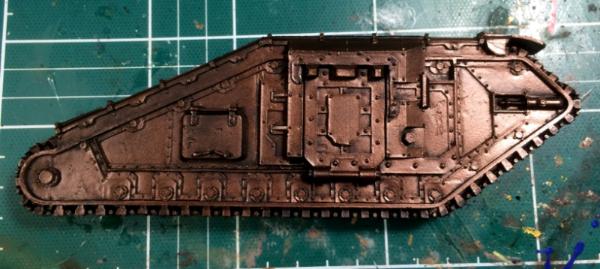
nice and light. get in there! Wash out the drybrush thoroughly and let it dry
Next drybrushing time again, this time with ghenna's gold. This will give patches of stain, tarnish, oxydation etc etc. Dont be as thorough with this layer as before - let some of the bronze show through in places
washy washy, dry dry......drybrush the final layer with runefang steel. This will seem really too bright and shiny but it needs to be as the washes later will bring it right down.
Be quite thorough with this layer but again heavy in some places, lighter in others
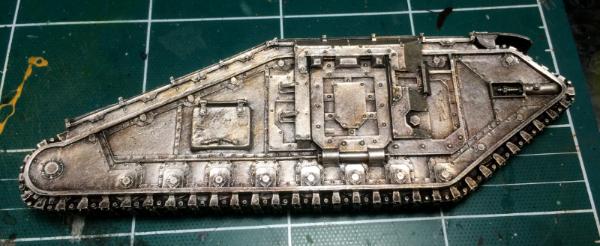
Leave to totally dry and then some. Finally wash the whole thing with ye olde faithful Nuln Oil - don't be scroogey with this wash but try to avoid pooling. Even if you do get a few coffee stains here - it doesnt really matter as it just fits right in with the overall intended effect.
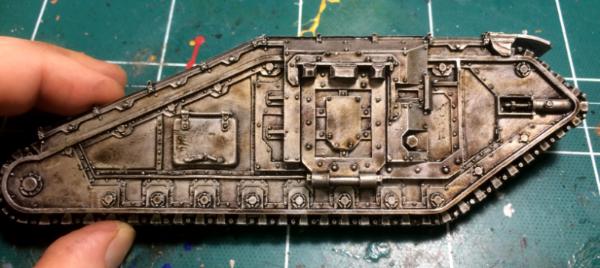
Once this is dry you have your base aged metal done. From here, you can add other targeted shades/washes to add further stains, grime etc - agrax and coelia are great for this.
Later some dabs of typhus corrosion into corners and lower recesses complete the fithly metal effect
Hope all of that makes sense and helps some folk out
Cheers
Jan
|
|
|
|
|
|
2016/07/03 06:44:36
Subject: DakkaDakka Society of Fine Painters
|
|
Mekboy Hammerin' Somethin'
|
nice!
although, I actually kinda like that gold over bronze pic...seems kind of a shame to cover it with the silver
|
   ...it's good to be green! ...it's good to be green! |
|
|
|
|
2016/07/03 06:48:17
Subject: DakkaDakka Society of Fine Painters
|
|
Arch Magos w/ 4 Meg of RAM
|
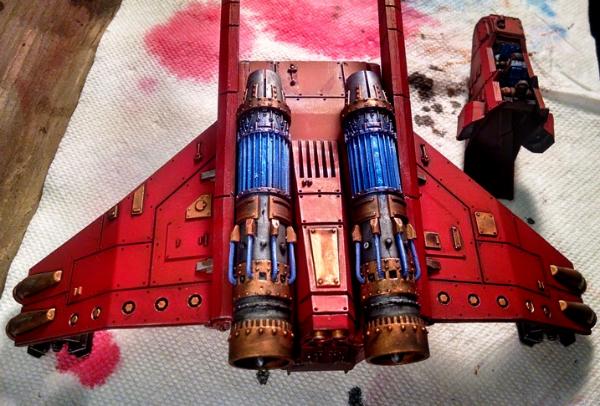
ㅏyou could just wash over the gold with agrax and leave it at that for an old brass look. Add a few days of coelia for the start of patina and verdigris I guess.
I'll add to the above post as I get more work done on the tank. Next up is painting some of the panels in its army livary and then onto chipping, weathering and so on
|
|
|
|
|
|
2016/07/03 07:52:32
Subject: DakkaDakka Society of Fine Painters
|
|
Dakka Veteran
|
Awesome! Jan, as usual, you make it all look so easy
|
|
|
|
|
|
|
|


 CSM-The Collectors
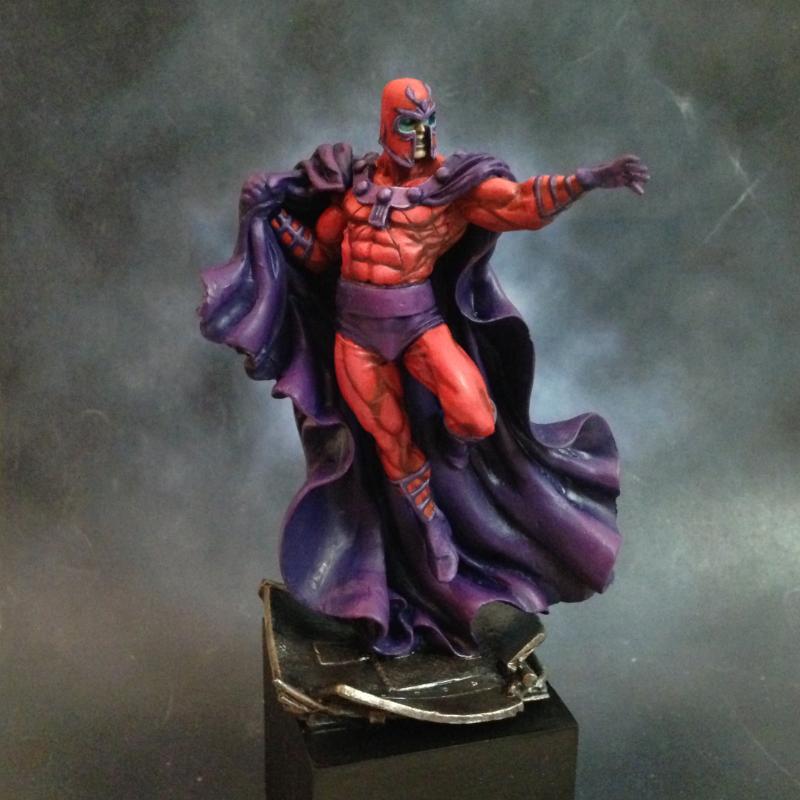


 Ultramarines, 3rd Co. and friends, 16k+
  4k
4k  Competition Index