| Author |
Message |
 |
|
|
|
|
Advert
|
Forum adverts like this one are shown to any user who is not logged in. Join us by filling out a tiny 3 field form and you will get your own, free, dakka user account which gives a good range of benefits to you:
- No adverts like this in the forums anymore.
- Times and dates in your local timezone.
- Full tracking of what you have read so you can skip to your first unread post, easily see what has changed since you last logged in, and easily see what is new at a glance.
- Email notifications for threads you want to watch closely.
- Being a part of the oldest wargaming community on the net.
If you are already a member then feel free to login now. |
|
 |
2017/05/31 17:25:28
Subject: Re:sCratchbuilding and Citbashing by Meer_Cat: Chimera conversion- turret guns built 5/30
|
|

[DCM]
Boom! Leman Russ Commander
|
Hey Yorkright- I went through all your blog pages earlier, and I'll swap some of my meager converting skills for your ability with flesh tones for an even trade! I've never done any really major converting before, but Dakkadakka has got me interested in trying new things. It's amazing how having an avenue to others with similar interests makes it so much more fun to get creative. If we can't share our work, get some constructive feedback and possibly the odd word of praise, the hobby loses something. I was a fiend for painting and army building back in the late 80's, early 90's- when I could take my 'treasures' down to the gaming store for tournament play and show them off. I kept my hand in for the next 20 years, but never really captured those heady early days. Now I've got all of Dakka to interact with, get ideas and feedback from- I'm more productive than ever!
It _does_ help to have a basic army built, and not be in a rush tog et something done so it can immediately go into battle. Makes projects like this Hanomag conversion a lot more fun not to be under a deadline.
In the 'naming of the beast' competition, I'm thinking about calling this command and control carrier the Athena after the Greek goddess of wisdom, strategy and undoubtedly other attributes that I have forgotten from school. The companion troop carrier would then be the Artemis class armored vehicle. The female mythological names in tribute to DreamForge Games' female Panzerjaeger that the transports are being built for.
More follows soonest.
|
"He fears his fate too much, or his desserts are small, who will not put it to a single touch; to win- or lose- it all."
Montrose Toast

|
|
|
 |
|
2017/06/01 06:17:50
Subject: Re:sCratchbuilding and Citbashing by Meer_Cat: Chimera conversion- turret guns built 5/30
|
|

Liberated Grot Land Raida
|
Totally agree, the ability to share stuff on dakka and get friendly and helpful advice is worth a lot to me as well. I've grown lots thanks to all the people commenting in the blogs and showing how they do things. And the beauty of dakka: everybody shares their tricks, and makes tutorials on demand.
|
A Squeaky Waaagh!!
Camkhieri: "And another very cool thing, my phones predictive text actually gave me chicken as an option after typing robot, how cool is that."'
Meercat: "All eyes turned to the horizon and beheld, in lonely and menacing grandeur, the silhouette of a single Grot robot chicken; a portent of evil days to come."
From 'The Plucking of Gindoo Phlem' |
|
|
|
|
2017/06/01 07:04:14
Subject: sCratchbuilding and Citbashing by Meer_Cat: Chimera conversion- turret guns built 5/30
|
|
Ragin' Ork Dreadnought
|
I'm floored by the simplicity of your conversion materials. And yet the end product still looks convincingly complex. Really cool turret design, Meer. I like it a lot.
|
|
|
|
|
|
2017/06/01 10:39:36
Subject: Re:sCratchbuilding and Citbashing by Meer_Cat: Chimera conversion- turret guns built 5/30
|
|
[DCM]
Boom! Leman Russ Commander
|
CommissarKhaine: The tutorials are what I find the most striking. Most of us would love the chance to show off a trick or technique, but to take the time to explain how it is done? Ours is a very generous hobby (or obsession, take your pick).
Warboss: Thank you for the kind words! I have a lot of fun looking at some random article lying about and imagining what it could become. That clasp has been sitting in my parts tray for almost a year- primered white!- waiting for a chance to become a gun turret. On the principle that nothing is done until it's OVERDONE I was looking at it and it seemed kind of spindly. So I worked up some ammo drums and fastened them onto the sides of the receivers and there is much better balance to the piece. Pics are still on the SD card in my camera- I'll get them up shortly.
Since the 'remotely operated gun system' needs a weapons position inside the vehicle (got to get into the habit of calling it the Athena) I tore out the right hand benches, cut down the oversize computer monitor I had made out of a piece of circuit board and installed that. I've trimmed pieces to act as the keyboard and have a seat/stool on hand to install when time permits. Pics follow for that shortly also.
Really, MORE follows shortly! Thank you all for looking in and for all your comments.
|
"He fears his fate too much, or his desserts are small, who will not put it to a single touch; to win- or lose- it all."
Montrose Toast
|
|
|
|
|
2017/06/05 02:08:40
Subject: Re:sCratchbuilding and Citbashing by Meer_Cat: Chimera conversion- turret guns built 5/30
|
|
[DCM]
Boom! Leman Russ Commander
|
I'm headed out tomorrow at o'dark thirty for Seattle and business, so wanted to get a little something to show for the week posted up.
Here's a quick mini-tutorial on doing cheap ammo drums for the gatlings I just completed:
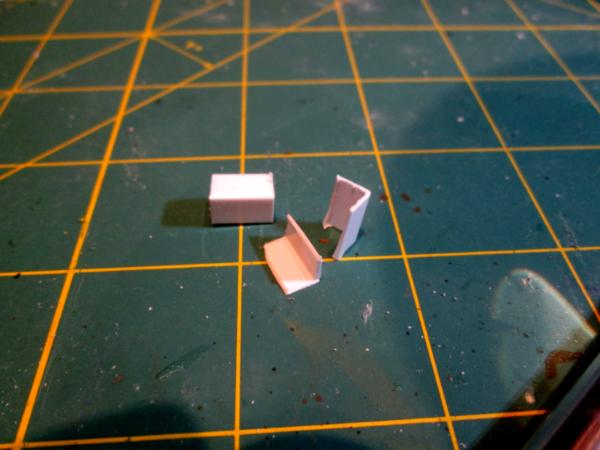
You'll need a couple of nozzles from old superglue/cyano-acrylite tubes (one per drum you want to make); cut the nozzle bit off:

I used a couple pieces of sprue from the Wargames Factory Greatcoat Troopers because the half-round extrusion was exactly the right size to fit into the glue cap; I trimmed the arm fairly short, so that the drum will fit snug up to the gun- conversely, you could cut the arm longer and make a feed-ramp for a belt that would then run into the gun; you'll also need two 3/16" circles cut out of thin plastic card/yard sale sign (I used the largest setting on my leather punch)- these glue over the hole in the front of the glue cap:

I drilled a hole into the side of the Gatling's receiver and viola', cheap ammo drums. I think the addition of the drums gives a better balanced look to the whole system:
Of course, they look better now that they've been base coated WWII US Bomber Green. When I get back, I have the gunner's console to finish (Thanks for the inspiration and the 'how-to' Cam- saw your pictures and the computer screens look great!) and I believe I can actually get started on the top deck armor and adding stowage. Also the TC figure and possibly the flagbearer to finish. Then painting, weathering, highlighting and I'm already itching to get started on the Artemis version for one of the line squads.
More follows soonest.
|
"He fears his fate too much, or his desserts are small, who will not put it to a single touch; to win- or lose- it all."
Montrose Toast
|
|
|
|
|
2017/06/13 02:01:19
Subject: Re:sCratchbuilding and Citbashing by Meer_Cat: Chimera conversion- ammo drums added 6/4
|
|
[DCM]
Boom! Leman Russ Commander
|
Howdy all- safely back from the West Coast and got a few things done tonight. I (perhaps presumptuously) feel that things are finally coming together. You folks will be the judge of that.
First up, put some finishing touches on the ramp, adding no-slip diamond tread to the inner surface and 'zimmereit' to the outer (this is a piece of the kit's original flooring cut to size). Some weathering, and perhaps hazard stripes on the outer skin, and done:


The holes will be covered/filled with fuel cans, packs and other stowage.
Next, I completed the gunner's console in the interior. This necessitated pulling out half of one of the troop benches, but on the plus side, I got to use the big-screen-tv monitor I built earlier. I'm going to buld the TC figure such that she can be sitting nonchalantly in the TC's cupola when the model is displayed closed, and at the gunner's console when the top is off:


Inking, highlighting and the interior is nearly done. I want to add a tripod mounted to the wall for the ring mounted heavy bolter and (ripped of from Camkierhi) I'm putting some speakers in to relay for the radio that will be mounted next to the gunner's console. Also some loose stowage- packs, submachinegun, that sort of thing.
Finally, I took a look at the top deck whilst everything else was drying and figured it looked a little bald. So I added some 'terrain' to the armor to break up the outline. These can be ammo bins, armored hydraulic lines/pumps or unicorn dust stowage- but the outline is broken up pretty well:


Unfortunately, the top plate only goes on one way, and I accidently added all the gubbins to the wrong end- they were supposed to go _behind_ the gatlings. Now the back of the gun system looks bare. To rectify this, I'm going to add a search and acquisition radar to the back (like on a ZSU-23mmx4) to fill that hole in. I've got some tow chain to add and some ammo boxes and such and the top is mostly done (except for the weathering, highlighting, etc).
I put in some developmental work on other pieces of the total model, so should have some more progress to report shortly. In the meantime, thank you for the chance to show off some of my work,and I look forward to your comments, suggestions and constructive criticism.
If it ain't overdone, it ain't done yet. More follows soonest.
|
"He fears his fate too much, or his desserts are small, who will not put it to a single touch; to win- or lose- it all."
Montrose Toast
|
|
|
|
|
2017/06/15 21:57:19
Subject: Re:sCratchbuilding and Citbashing by Meer_Cat: Chimera conversion- lots new 6/12
|
|

Longtime Dakkanaut
|
The difference between a stock Hanomag and what you have created is crazy
well done mate  thats seriously good use of scrap and non hobby "stuff"
|
|
|
|
|
|
2017/06/15 22:47:29
Subject: Re:sCratchbuilding and Citbashing by Meer_Cat: Chimera conversion- lots new 6/12
|
|
[DCM]
Boom! Leman Russ Commander
|
Thanks Big H! I'm having a ball trying new things- techniques I never figured I'd get a chance to try out, including scratchbuilding a lot of sub-systems. I'm even going to try OSL on the headlamps- something I never thought I'd get the hang of. Making use of the odd 'treasures' I've scavenged over the years is great too, and let's me justify stopping my wife from throwing them out every couple of months.
With that in mind, I'm going to post a couple more WIP shots of the side plate bustle racks I built, so as to have someplace for the line doggies to hang their rucksacks (and because those big, long, blank sides were just screaming for 'something' to fill them in- did I mention I keep going over scope/out of scope on this project?).
So, I sawed off a couple of 0.75 inch sections of 'girder' plasticard; I got a huge assortment of shapes and sizes for cheap off eBay and have been having fun trying it out in various applications on this project:

Split those in half to form the corner angles:
Next cut a bunch of slats:

Glued the side slats on:

And the bottom slat:

A little paint, and presto- side storage bustle racks:

(Technically, the bustle rack is on the back of a fighting vehicle turret- so named because it sticks out like the bustle on a 19th century fancy dress. But it seemed the appropriate name.)
I honestly think I'm nearly done with this project- a few more bits to glue on for the vehicle itself, a bunch of stowage to glue on, the TC to finish painting (around 75% now) and then weathering everything (the inside is done). So this is probably the last WIP entry for the Athena Panzerjaeger Transport project. The next entry will be finished photos. And then on to the next! (So many vying for attention....)
And remember: It ain't done until it's OVERDONE!
More follows soonest.
|
"He fears his fate too much, or his desserts are small, who will not put it to a single touch; to win- or lose- it all."
Montrose Toast
|
|
|
|
|
2017/06/15 23:02:50
Subject: sCratchbuilding and Citbashing by Meer_Cat: Chimera conversion- Bustle Racks 6/15
|
|
1st Lieutenant
Because we’re here,lad...
|
Fantastic stuff. I've been really impressed with your ability to take seemingly boring regular items and make them into something quite the opposite. Consider me on board!
|
I love those little moments between the first kiss and the pepper spray... |
|
|
|
|
2017/06/16 00:33:47
Subject: Re:sCratchbuilding and Citbashing by Meer_Cat: Chimera conversion- Bustle Racks 6/15
|
|
[DCM]
Boom! Leman Russ Commander
|
Thanks very much, Bash! I love finding an odd 'gubbin' or bit and imagining what it might be used for- the spring clasp that forms the basis for the twin gatlings I've had for more than a year, with the idea of using it in very much this way always in mind. And I've got a lot of other 'junk' lying around waiting for its moment.
I think I was motivated by reading books like "The Borrowers" and the Miss Bianca mouse stories, in which the characters used real, human-sized items in completely different ways to fit their size.
I'm thinking of trying my hand at resin casting in the near future, so that when I make something that actually works (like the smoke launchers) I can reproduce it accurately and easily to use on multiple models.
More follows soonest!
|
"He fears his fate too much, or his desserts are small, who will not put it to a single touch; to win- or lose- it all."
Montrose Toast
|
|
|
|
|
2017/06/16 09:46:05
Subject: Re:sCratchbuilding and Citbashing by Meer_Cat: Chimera conversion- Bustle Racks 6/15
|
|
Gargantuan Great Squiggoth
|
Excellent work on the stowage, really brings a model to life for me.
Scary how much "junk" I have kicking about waiting for me to get my finger out.
As to casting, before you go diving in ask us about it, several great pieces of advise have come from dakka on the subject, and I do it regularly, not necessarily to a high standard, but works for me.
|
|
|
|
|
|
2017/06/16 12:18:14
Subject: Re:sCratchbuilding and Citbashing by Meer_Cat: Chimera conversion- Bustle Racks 6/15
|
|
[DCM]
Boom! Leman Russ Commander
|
Thanks Cam! I do have to admit that my triumphant 'HA!' when I showed my wife how I used a couple of the bits that have been banging around for awhile was immediately deflated by her penetrating glare at all the other junk piled up on and around my worktable. She's pretty understanding, actually. But she doesn't get that I need to see things to make up something new sometimes, so it needs to be out of boxes and drawers and spread out on the desk (or the floor, the nearby shelves, etc). I do pick up between projects though, and am pretty obsessive/compulsive orderly about everything else (30 years in the armed Forces will do that to you), so it works out.
When I do vehicles, they just aren't 'realistic' to me unless they have people and stowage. Other than tanks under direct fire in a meeting engagement, I never once saw any kind of military vehicle that didn't have the crew hanging out of it as much as possible (unless it was raining) and that wasn't covered with packs, duffles, extra crates, ammo boxes and anything else you can think of. The big brains that design these things make allowance (sometimes) for the fuel and ammunition that the platform requires, but rarely think about the men (or the real ammo requirements- extra is always 'meets the minimum').
I've seen your resin casting work and would very much appreciate any advice for getting started you might have- and that of anyone else who has experimented with casting their own parts. My 'research' up to this point has only been to read al the product descriptions in the Micro Mark catalogue, so I truly know nothing about any of it.
Next project will either be:
a) Converting an Mi-24 into a Valkyrie or
b) Converting a Soviet B4 203mm howitzer into a Basilisk or
c) Converting a British WWI Mark IV 'Mother' tank into a Malcador or
d) Painting up the command squad for Raging Heroes Red Hammers KST troops (to start forming a Company Command Group, the Panzerjaeger form a Platoon Command Group)
And there are others, but these are the most interesting to me at the moment. I'm very blessed to have the resources and the time (for the moment) to have 'first world' problems like which project to do next.
More follows soonest!
|
"He fears his fate too much, or his desserts are small, who will not put it to a single touch; to win- or lose- it all."
Montrose Toast
|
|
|
|
|
2017/06/27 22:09:01
Subject: Re:sCratchbuilding and Citbashing by Meer_Cat: Chimera conversion- Bustle Racks 6/15
|
|
[DCM]
Boom! Leman Russ Commander
|
Welp, this project is finished. I may go back and build an alternate weapon platform that looks more like a multi-laser, but for the moment I'm very pleased with how this has come out. And I think I've met my motto that "It's not done until it's OVERDONE" considering that this project started out to be a closed-hull vehicle and instead has a fully detailed interior.
Some things I got to try that I hadn't before were: using circuit boards as building bits, weathering powders, Camkierhi's magic baking soda plus superglue welding method, employing multiple washes and practice doing a good job (I think, anyway) on faces.
The original goal of the effort was to take this:
And make it look more like this:

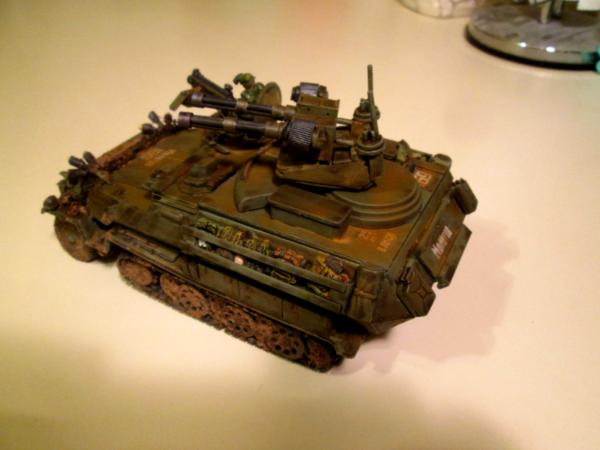
The vehicle is to be the transport for a squad of DreamForge Panzerjeager, which will also be the HQ squad for a Platoon or Company, so this became the Athena Command and Control Vehicle (C2V) and wound up looking like this:
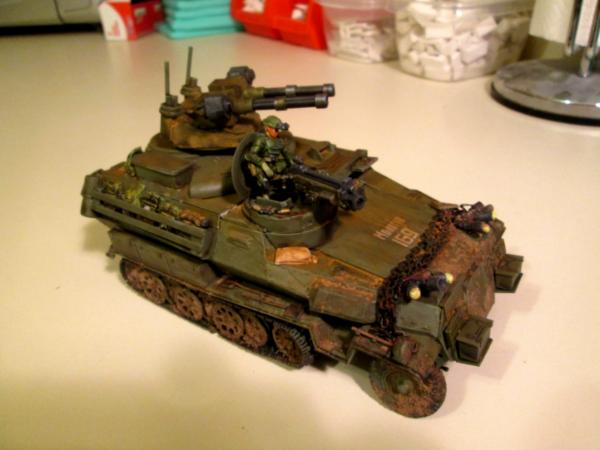
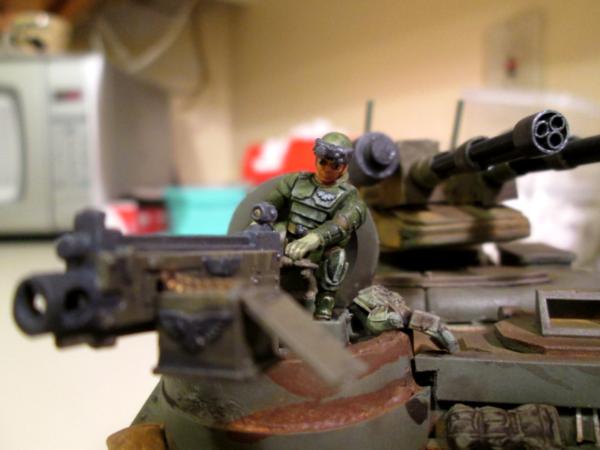
I think of it as a "counts-as" Chimera, and so it has a Heavy Bolter and the twin gatlings you see can (with the acceptance of a generous gaming group) stand-in as the multi-laser. I'm very pleased with the Track Commander ( TC) figure, as the face came out decent, the shading on the armor I think is pretty good and the posing looks like she is using the charging handle on the HB to chamber the first round of the belt. Note the stowage added to her left (your right) and in the pictures that follow- I added a ton of things. My service in the military taught me that the only armored vehicle you see that doesn't have twice the vehicle weight in added bags and boxes and personal effects is the one going into a parade.
Per the example of many of you Dakkanauts, I used Russian WWII decals to give some personality to what otherwise would have been a broad, blank hood. It's been awhile since I've used water-slide transfers, so I'll need some more practice (and some better decal fix to hide the edges). I didn't get to try Object Source Lighting ( OSL) as I tossed on too much grubby, but will do the next vehicle a bit cleaner and will try it then.
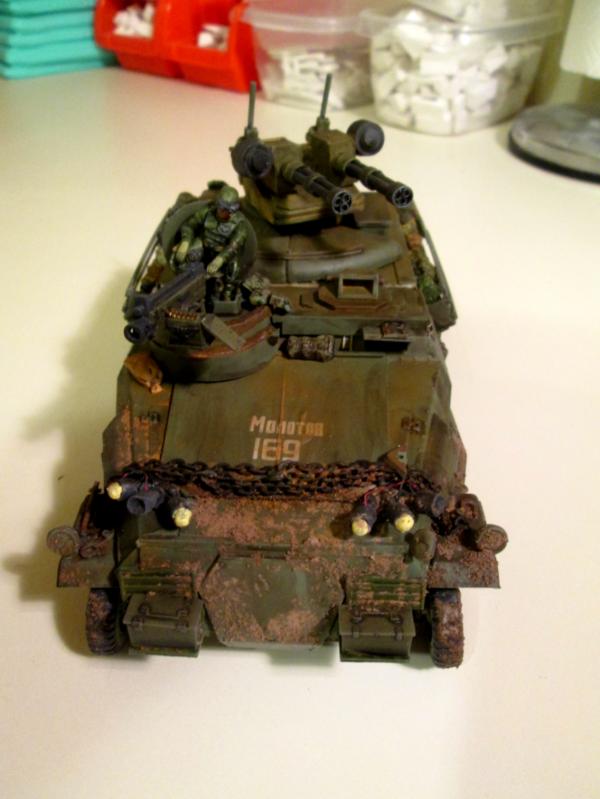
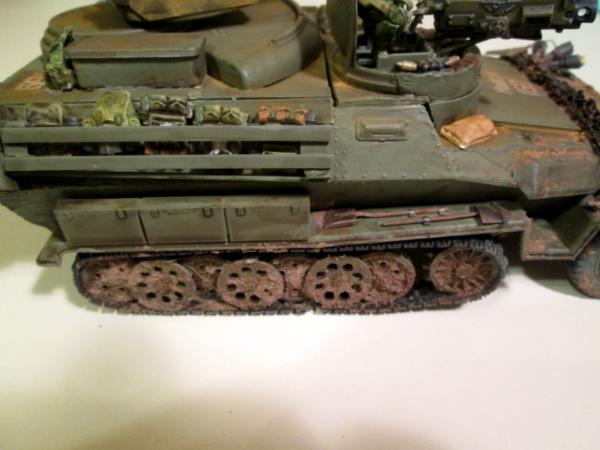
Here's the left side, more stowage, more decals and more mud:
A shot of the top half of the rear ramp and its decal:
And the right side, with its bustle racks for packs, stowage boxes and pioneer tools (the great thing about pictures is they let you see things as they really are- I may go back and add some more grunge to this side).
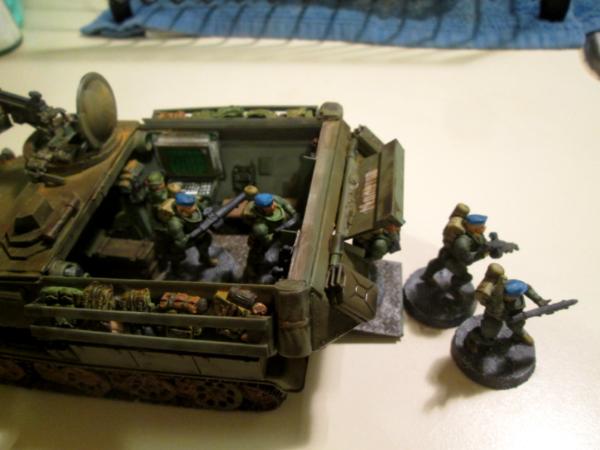
Here's the Athena with the squad deploying and using the vehicle for cover:
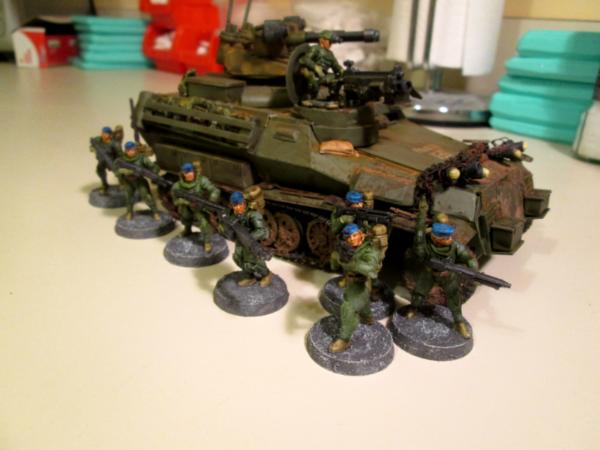
And a close up showing the squad leader:
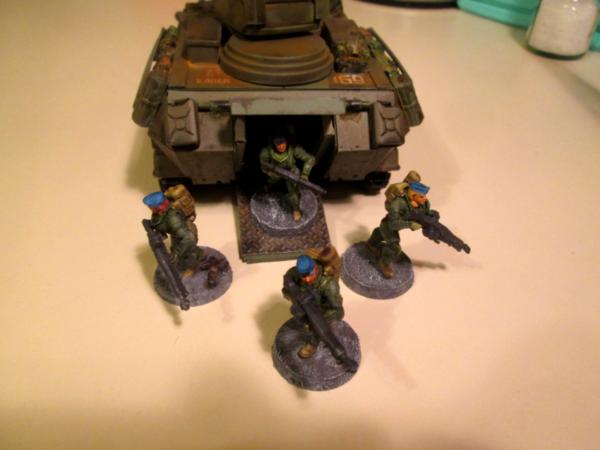
Here's a shot showing the squad deploying via the rear ramp:
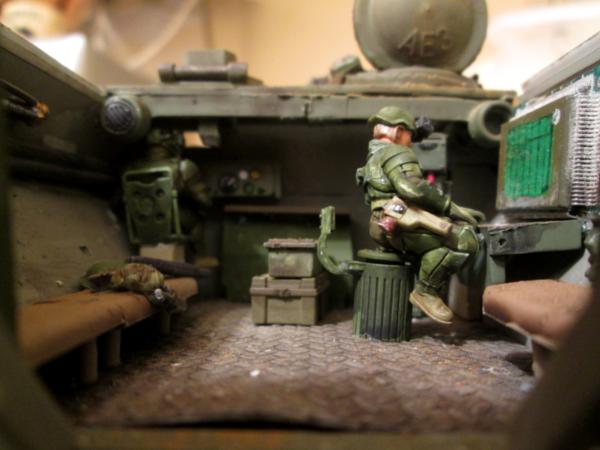
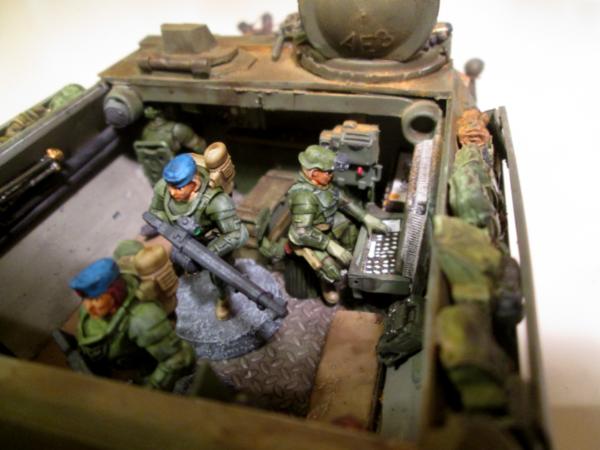
Here's a shot with the top lifted off to reveal the interior. The gunner sits at her console to provide overwatch for the squad using the remotely controlled twin gatlings. There is a standard issue voxcaster mounted to the frame upright beside her, and a manpack radio on the bench to her other side. There is a crew speaker mounted to the left side of the cross member located forward. The driver has carelessly shoved her walkabout kit onto the bench behind her seat- the squad won't be terribly impressed by that when they re-embark:
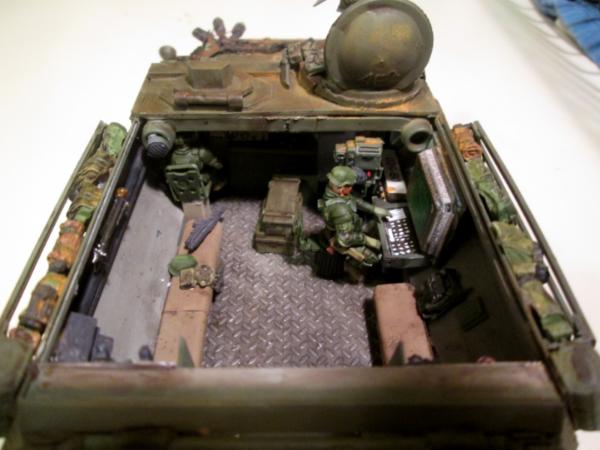
A closer shot of the interior taken through the rear ramp:
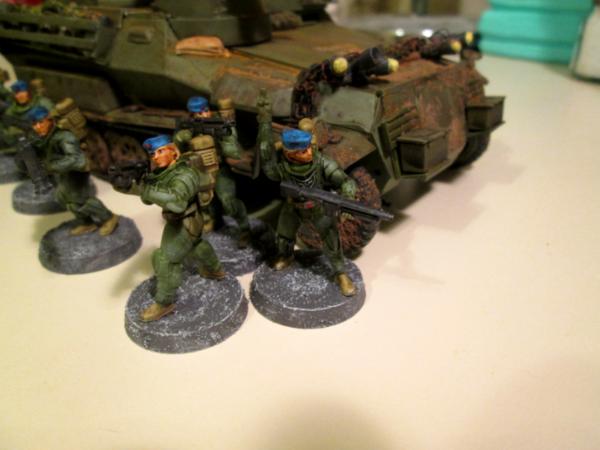
A high-angle view of the squad deploying:
The squad leader signals the Panzerjaegers to close up:
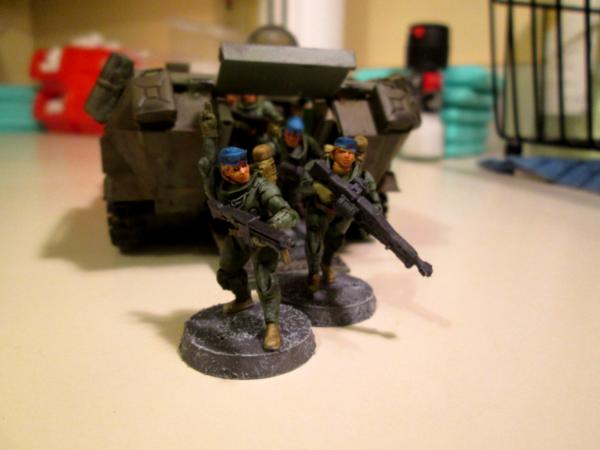
A last view of the squad exiting. You can see the ground mount tripod for the Heavy Bolter affixed to the compartment wall in the background:
So that's it. A long time, a lot of work and a lot of fun. I especially like the opportunity to show off the WIP to you as it has progressed, and very much appreciate the many comments and ton of feedback you've given me- it all helped to result in this finished product.
One last shot of something you almost never see:
 A Clean Workbench Waiting For The Next Project!
More follows soonest.
|
"He fears his fate too much, or his desserts are small, who will not put it to a single touch; to win- or lose- it all."
Montrose Toast
|
|
|
|
|
2017/06/29 03:42:19
Subject: sCratchbuilding and Citbashing by Meer_Cat: 6/27 Chimera conversion finished- many pics!
|
|
Gargantuan Great Squiggoth
|
Fantastic and inspirational stuff, excellent build, love the detailing. Brilliant posing on the figures, love the little things like the kit on the bench, she is sat on a bin, TC preping the HB. All excellent stuff. Did a good job with the weathering.
Looking forward to the next project.
|
|
|
|
|
|
2017/06/29 12:05:52
Subject: Re:sCratchbuilding and Citbashing by Meer_Cat: 6/27 Chimera conversion finished- many pics!
|
|
[DCM]
Boom! Leman Russ Commander
|
Thanks Cam! I need to put up a couple more shots of the interior- there is more detailing that can't be seen in what I've got so far (but this was one of the longest posts I've ever put up, so was running out of steam by the end!).
My track had a seat made out of a trash can with a broken seat back welded on by the engineers during the First Gulf War- it became a legacy item, bequeathed by out-going track commanders to new track commanders. It was very comfortable (compared to sitting on your helmet or the ground) and we fought over who got to use it.
The TC figure I had fun with posing just so she could be shifted between sitting perched up on the cupola and sitting on the trash can at the gunner's console. As with everything, in the end it was 70% plan and prep and 30% luck that it came out the way it did. I like it a lot. This is easily my most elaborate model to date (with 40 years of modeling under my belt) and also easily my favorite to date. It's amazing what lurking on Dakka Dakka for a year, soaking up tips and advice, can do for your modeling game.
I've started a squad of Eisenkern riflemen that will start forming the platoon for which the Panzerjaegers are the HQ for. That's fairly cut and dried techniques that I've used for a long time- although I want to try some new things there as well, not rush to get finished.
But then comes either converting a Soviet WWII B4 203mm howitzer into a Basilisk or a Mi-24 into a Valkyrie. The Emperor needs one!
More follows soonest.
|
"He fears his fate too much, or his desserts are small, who will not put it to a single touch; to win- or lose- it all."
Montrose Toast
|
|
|
|
|
2017/07/01 14:38:27
Subject: Re:sCratchbuilding and Citbashing by Meer_Cat: Hanomag/Chimera conversion finished- many pics!
|
|
[DCM]
Boom! Leman Russ Commander
|
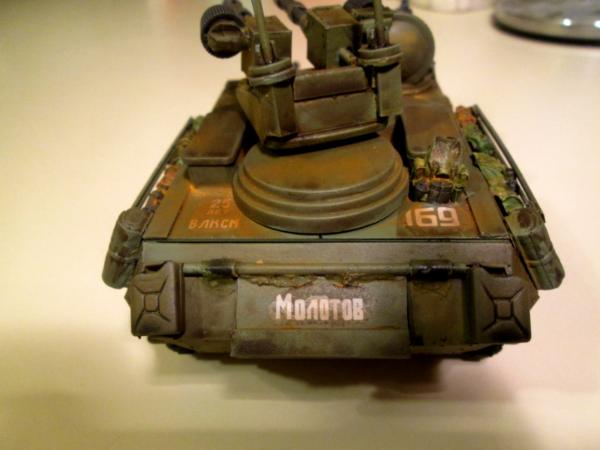
As an addendum, I added the Russian tank decals for aesthetics and to fill in some of that big blank space on the hood- but I don't read Cyrillic (I speak some Russian, but can't read). My wife, however, is a very accomplished Russian linguist;
The decals read "Molotov" after the Soviet Foreign Minister during WWII.
The gas-filled bottles were nicknamed Molotov Cocktails after his exhortations to defend Leningrad, Stalingrad and Moscow using anything at hand against the Nazis.
|
"He fears his fate too much, or his desserts are small, who will not put it to a single touch; to win- or lose- it all."
Montrose Toast
|
|
|
|
|
2017/07/06 00:04:10
Subject: Re:sCratchbuilding and Citbashing by Meer_Cat: Hanomag/Chimera conversion finished- many pics!
|
|
[DCM]
Boom! Leman Russ Commander
|
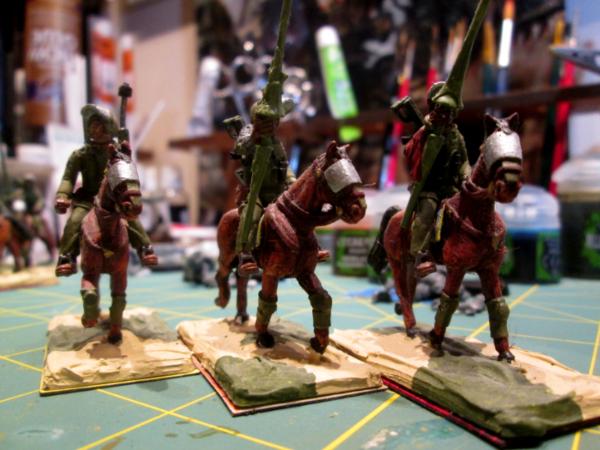
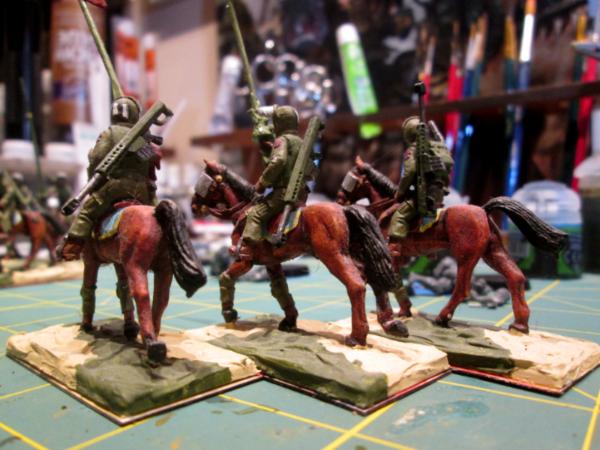
Here's a counts-as Rough Rider squad I did awhile back. These are by Offensive Miniatures and are from their 'Law Enforcement' line. These were originally mounted police with riot batons in hand. I cut the batons away and epoxied the lances (I think they're from the Tomb Kings by GW) in place. The figures are quite nice, but a bit smaller than heroic 28mm- they'd go well with Bolt Action, for instance, but are really more like true scale 28mm or big 25mm. Nonetheless, I like 'em and they're Rough Riders for me. Somewhere I've got a mounted Captain Chenkov Valhallan figure, and that will be the commander for the element.
I added the heavy barrel .50 caliber rifles to back up the hunting lances (one good stick and you're out of ammo!). The squad is composed of a captain, a lieutenant, a radioman and six troopers.
I did the horses with a technique that I learned painting Napoleonic cavalry: a good white base coat, then smear oil based paints (burnt umber, greys or sienna or other browns) and then immediately wipe off the excess. The more you wipe, the more is removed. This creates natural highlights and darker low points and is a quick way to do a lot of horses fast. When completely dry, you then paint the horse furniture.
The bases were created using artist's gel media brushed on and then sculpted to get the look I wanted. When it dried I painted the colors. Attached to the underside is a strip of magnetic paper (like those fridge magnet ads that come stuck onto the new phone books). This is to help keep the figures from sliding around in their transport box, which is an old metal biscuit tin from Yorkshire.
I'm looking forward to touching these up, and to painting some more, given the new techniques and materials I've been learning and using lately.
Thank you for the opportunity to show some more of my work. I look forward to your comments, observations and constructive criticism.


|
"He fears his fate too much, or his desserts are small, who will not put it to a single touch; to win- or lose- it all."
Montrose Toast
|
|
|
|
|
2017/07/11 23:01:50
Subject: Re:sCratchbuilding and Citbashing by Meer_Cat: 5/7 Counts-as Rough Riders
|
|
[DCM]
Boom! Leman Russ Commander
|
Here's another project I finished up a bit ago, so no WIP pictures (although it is really only a minor conversion/kitbash using a couple of GW bits and some furniture fasteners). I wanted (I don't game enough to say I 'needed') a Hellhound, and really, REALLY wanted an excuse to build a Polish 7TP tank kit, so I merged the two.
Here are shots from the right-front oblique and the front, showing the flammpanzer with elements of the 7th Regiment of Infantry (the Lucky 7's) acting as screen:

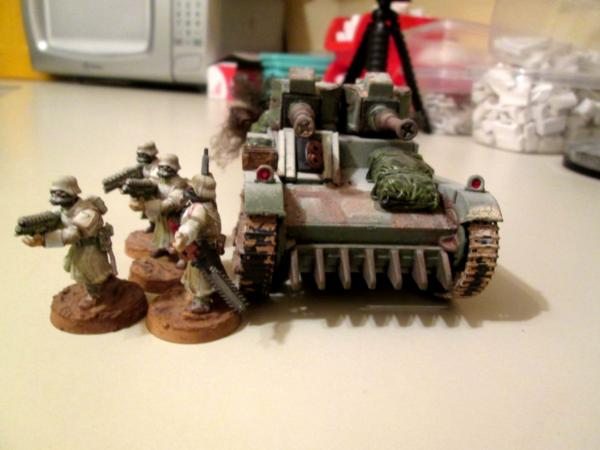
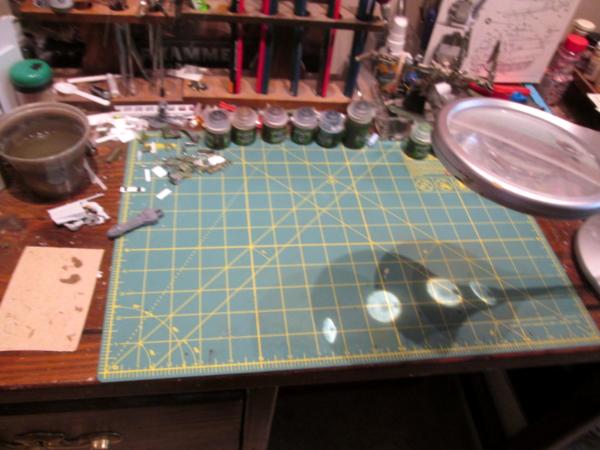
Those pics give a pretty good view of the muzzles of the flame projectors. They're wood fasteners from a pre-cut/drilled Ikea/Saunders type shelving unit, one of the ones visible in the pic of my workspace shown earlier in the blog. I like how the rust came out on them using the 4 step process materials from Micro Mark. You can also see the flamer installed in the bow armor, replacing the heavy bolter that would normally be there. The grunts in Vietnam nicknamed the flame tracks used there Zippos- after the famous lighters. I reckon that's a good name for this vehicle.
Here are some more views of the track:


The fuzzy stuff at the back, stuffed in front of the fuel canisters, is a hair net pretending to be camouflage netting.
The 7TP was a light tank armed with either two machineguns, each in its own turret, or a single 37mm anti-tank gun mounted in one turret. It was the export version of the British Vickers Mark VI. They were too light to take on other armored vehicles and too vulnerable to infantry anti-tank weapons and did not see frontline use after the fall of Poland in 1939. Still, an interesting vehicle and a lot of fun to use as a basis for a conversion. Later, I'll throw up some pics showing size comparisons between the Zippo, the Athena, a Chimera and a Leman Russ MBT.
Thank you for the opportunity to show some more of my work. Your comments, observations and constructive criticism are always most welcome.
More follows soonest.
|
"He fears his fate too much, or his desserts are small, who will not put it to a single touch; to win- or lose- it all."
Montrose Toast
|
|
|
|
|
2017/07/12 02:52:38
Subject: sCratchbuilding and Citbashing by Meer_Cat: 7/11 Hellhound conversion
|
|
Combat Jumping Rasyat
|
Mmm, crazy pyro vehicle, always a good choice. Looks somewhat impractical for real world combat but perfect for 40K. Only thing I'm unsure on is the camouflage netting, looks a little loose.
|
|
|
|
|
2017/07/12 04:33:30
Subject: Re:sCratchbuilding and Citbashing by Meer_Cat: 7/11 Hellhound conversion
|
|
Longtime Dakkanaut
|
Nice work here, Meer_Cat. I especially like your work on the 251. 
|
Proud Purveyor Of The Unconventional In 40k |
|
|
|
|
2017/07/12 05:15:37
Subject: sCratchbuilding and Citbashing by Meer_Cat: 7/11 Hellhound conversion
|
|
1st Lieutenant
Because we’re here,lad...
|
Brilliant stuff as always, and great mini tutorial on the Gatling drums. Consider it borrowed!
|
I love those little moments between the first kiss and the pepper spray... |
|
|
|
|
2017/07/12 05:20:46
Subject: sCratchbuilding and Citbashing by Meer_Cat: 7/11 Hellhound conversion
|
|
Pious Palatine
|
Nice work on the Rough Riders and tank.
Great weathering on the tank.
EDC
|
|
|
|
|
2017/07/12 10:32:53
Subject: sCratchbuilding and Citbashing by Meer_Cat: 7/11 Hellhound conversion
|
|
Gargantuan Great Squiggoth
|
Great work, certainly building a rep for awesome bud.
Rough riders are great, always love the idea of them, nice models.
The little tank is looking awesome, nice work.
|
|
|
|
|
|
2017/07/12 21:54:00
Subject: Re:sCratchbuilding and Citbashing by Meer_Cat: 7/11 Hellhound conversion
|
|
[DCM]
Boom! Leman Russ Commander
|
Thank you all for the encouragement and kind words!
ChaoticMind: Yep, the camo netting on the Zippo looks to fluffy to me, too. I'm just not sure the best way to flatten it down some. I figure I can either: apply light heat and melt it a bit, soak some thinned down white glue and collapse it and then paint it again when it's dry or create some stowage- a baulk of timber, a steel beam, sand/mud runners, or even just boxes and crates and weight the thing down. Thoughts?
Oldravenman3025: The Hanomag is easily the most elaborate kitbash/conversion I've ever attempted, what a lot of fun! When my project scope crept past an enclosed vehicle to include a detailed interior, it helped having had served in armored vehicles before- gave me an idea of what, realistically, should be inside and where it should be.
Bash: I'm glad the tip on the ammo drums might come in useful (I'm still marveling at your use of spent brass to make battle cannon on your recent Sicaran) and am looking for a project to try that trick myself. I painted my drums flat black as a base, then boltgun metal then silver dry brushings, but am not entirely pleased with how they came out. My only real-life referent were the detachable box magazines for the M249 SAWs, and those were basically flat black plastic. I was trying for that look and missed, I fear. May try something different 'next time'.
EDC: I was trying for a winter/cold weather look with the white highlights and lots of rust- something like the Russian equipment must have had during their invasion of Finland prior to WWII. I think I came pretty close to the look I wanted, but it was as much happy accident as design: the matte varnish over-coating I was using at the time had gone bad and spit out the white-tinged stuff- you can even see it on the Lucky 7's that I painted at about the same time. I decided it looked like snow/grunge/wintery crap and kept it!
Cam: The Rough Riders were fun, and I will game them (if I ever get the chance), but they are a bit small. I think they would blend in very well with Bolt Action stuff. Jackie over at Offensive Miniatures is really good people and their figure lines are really well sculpted (IMO).
I am working on some infantry to go with the Panzerjaegers and when finished- another armored vehicle for the Emperor (I should probably look to play Armageddon more!).
Thank you all again, and more follows soonest!
|
"He fears his fate too much, or his desserts are small, who will not put it to a single touch; to win- or lose- it all."
Montrose Toast
|
|
|
|
|
2017/07/17 22:34:50
Subject: Re:sCratchbuilding and Citbashing by Meer_Cat: 7/17 High Elf Seaguard!
|
|
[DCM]
Boom! Leman Russ Commander
|
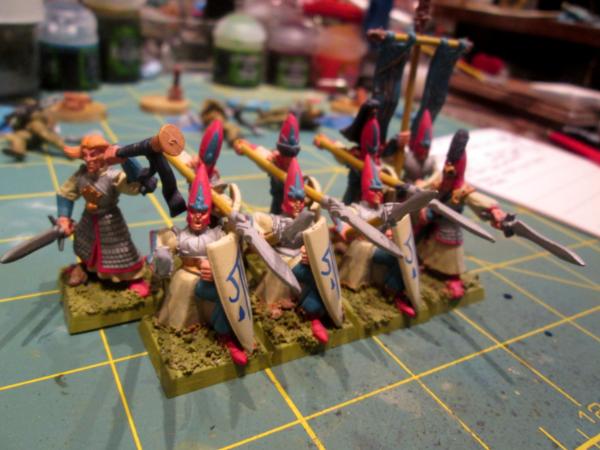
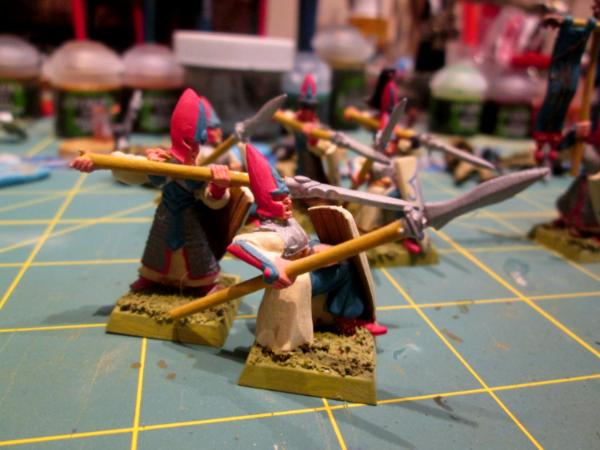
Here's another set of pieces that I painted a _long_ time ago- more than 15 years, in fact. This is a section of High Elf 'Lothern Seaguard' that I did up for my WFB High Elf Army. This would have been around 1999.
I first started playing Warhammer Fantasy Battle (it was just 'Warhammer', back in the day) and Warhammer 40k when my friends and I discovered it in 1989. We literally drew straws to see who would model which armies for both- everything looked fascinating. I got Imperial Guard for WH40K and High Elves.
This detachment I named 'Lothern Harathoi' which- if their Codex is to be believed means 'Youthful (or Boundless) Stormbringers'. The kneeling spearmen are a kitbash of High Elf plastic Spearmen and Archers sets, and the standing second rank are long out of print white metal figures. The command group are plastic from the archers set, although the commander is another white metal oop. . The design on the banners are the Elvish characters for Lothern Harathoi and are painted freehand, as is the character on the shields.
I would have loved to add the arrow quivers to the pieces, to show that Seaguard (at least back in that Codex) could not only fight three ranks deep but could use both bow and spear- but the figures were a bit crowded with just the spears and shields.
I'm not generally good at selecting complementary (and/or complimentary) colors, but am really pleased at how these came together. Now that I have them out, I'm thinking I'll hit them with some washes and highlighting and try to make them even a little bit better.
Somewhere I have the rear (third) rank of bowmen, all with bows pitched up to shoot over the front two ranks- as soon as I can find them (plus some other High Elf units) I'll post pictures.
Your comments, observations and constructive criticism are always welcome.
More follows soonest.


|
"He fears his fate too much, or his desserts are small, who will not put it to a single touch; to win- or lose- it all."
Montrose Toast
|
|
|
|
|
2017/07/18 09:20:02
Subject: sCratchbuilding and Citbashing by Meer_Cat: 7/17 High Elf Seaguard!
|
|
Gargantuan Great Squiggoth
|
So you have always been talented then?
They look great, compared to todays work they look slightly flat, so a wash or too and a highlight should bring them bang up to date. Nice work on the conversions.
|
|
|
|
|
|
2017/07/18 12:18:31
Subject: Re:sCratchbuilding and Citbashing by Meer_Cat: 7/17 High Elf Seaguard!
|
|
[DCM]
Boom! Leman Russ Commander
|
 Got no talent- everything I can do one you Dakkanauts showed me! Genetics did give me a steady hand though- or drilling to apply a 'steady hold' for pistol fire has translated over to being able to control a brush (although really fine details like eyes are still a real challenge for me).  These Seaguard were truly a happy accident in the color and posing coming together. I remember showing them to one of the staff at a Games Workshop back in the day, who said something to the effect "Great job basecoating- now you need to ink, wash and highlight!" I was really deflated, because I'd put all this time into doing even as good a job as it came out, and now this pro was telling me I was really only half done! Now, I'm not so much in a hurry, and I really want to develop some of the skills that the other painters have that I see here on Dakka Dakka.
At risk of ruining work that I did so long ago, I am going to 'upgrade' these with the next step and see if I can't bring some better life into them. I nice thing about photographing your work is you can see the details better that need to be fixed- that musician's horn is really glaring at me to be drilled out.
I really appreciate the forum to show off some of my things and get some feedback- for the most part I don't have the chance to interact with other modelers except through Dakka Dakka- the collegiate environment here, and its very positive atmosphere, is very much like back in the 80's when I first got started!
More follows soonest!
|
"He fears his fate too much, or his desserts are small, who will not put it to a single touch; to win- or lose- it all."
Montrose Toast
|
|
|
|
|
2017/07/18 12:59:38
Subject: sCratchbuilding and Citbashing by Meer_Cat: 7/17 High Elf Seaguard!
|
|
1st Lieutenant
Because we’re here,lad...
|
I've always enjoyed rank and file spear troops, and your High Elves are no exception.
And I totally agree about the feeling of shared interest on dakka. It's what helps build my confidence in trying to push my modelling skills.
Looking forward to seeing your Elves updated.
|
I love those little moments between the first kiss and the pepper spray... |
|
|
|
|
2017/07/18 22:09:48
Subject: Re:sCratchbuilding and Citbashing by Meer_Cat: 7/17 High Elf Seaguard!
|
|
[DCM]
Boom! Leman Russ Commander
|
|
"He fears his fate too much, or his desserts are small, who will not put it to a single touch; to win- or lose- it all."
Montrose Toast
|
|
|
|
|
2017/07/19 23:06:31
Subject: sCratchbuilding and Citbashing by Meer_Cat: 7/18 Now with more archers!
|
|
Longtime Dakkanaut
|
Mate, the problem with figure painting is they never actually get finished, you just keep revising them !!!
|
|
|
|
|
|
|
|