| Author |
Message |
 |
|
|
|
|
Advert
|
Forum adverts like this one are shown to any user who is not logged in. Join us by filling out a tiny 3 field form and you will get your own, free, dakka user account which gives a good range of benefits to you:
- No adverts like this in the forums anymore.
- Times and dates in your local timezone.
- Full tracking of what you have read so you can skip to your first unread post, easily see what has changed since you last logged in, and easily see what is new at a glance.
- Email notifications for threads you want to watch closely.
- Being a part of the oldest wargaming community on the net.
If you are already a member then feel free to login now. |
|
 |
2018/02/12 23:55:28
Subject: Syro's projects: Currently Hero Quest Furniture
|
|

Omnious Orc Shaman
A long time ago in a galaxy far, far, away...
|
Any plans to remake the doors? Could even have them hinged (similar to the old Advanced HQ plastic versions...
|
|
|
|
 |
|
2018/02/13 02:53:33
Subject: Re:Syro's projects: Currently Hero Quest Furniture
|
|

Krazed Killa Kan
|
I've been thinking about remaking the doors too, especially since they look pretty sad next to the new furniture. I didn't know that the old Advanced Hero Quest had hinged plastic doors, thanks for the info and thanks for visiting.
|
|
|
|
|
|
2018/02/15 21:48:07
Subject: Re:Syro's projects: Currently Hero Quest Furniture
|
|
Krazed Killa Kan
|
I've been getting antsy to post this. I may add more to it later). Finally my" "How to scratch build a dreadnought" tutorial
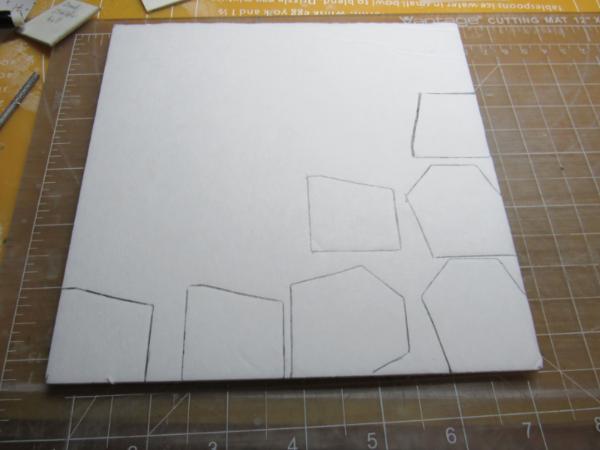
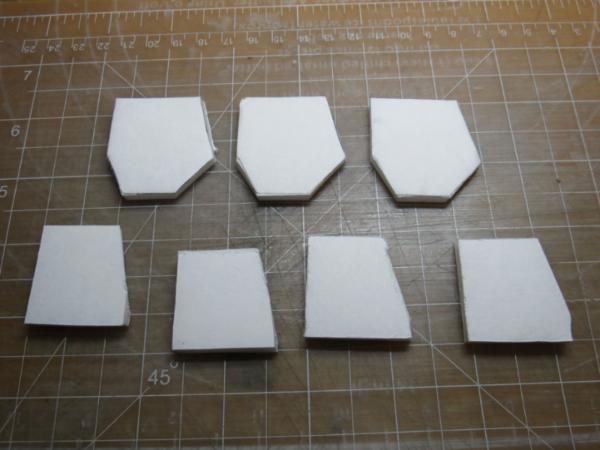
You can either do this directly on foamcore, or make a single template for each of the two repeating sections like I did, and then trace.
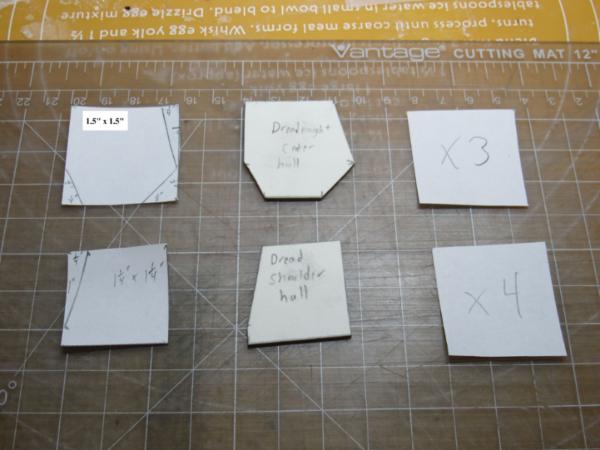 ]
You want to start with three 1.5 inch by 1.5 inch squares for the center hull of the dread (wrote the wrong number when taking pictures, so I edited it). Closest metric looks like 37mm x 37mm. You also need four 1.25 inch by 1.25 inch squares for what I refer to as the shoulder hull sections. That's a 32mm square in metric. The shoulder hull has one simple cut, removing a 1 inch by 1/4 of an inch triangle from the side (see picture) (looks like 25mm by 5mm). The center hull is more complicated, checking the picture will be helpful. First, Starting with your center hull squares/template: you will remove a 1/4 inch wide and 1 inch tall triangular section from the upper right corner, that's 1/6 of the width and 2/3 of the height cut away, that's about 5-6mm by 24-25 mm. Second, you will cut away from the lower right a 1/2 inch by 1/2 inch triangle, this 1/3 of the width and 1/3 of the height of the original square, that's about 7-8mm on each side. Third, the final triangular section is cut from the lower left corner. It is 1/4 of an inch wide (5-6mm) (1/6 of original width) by 1/2 an inch high (11-12mm) (1/3 of original height).
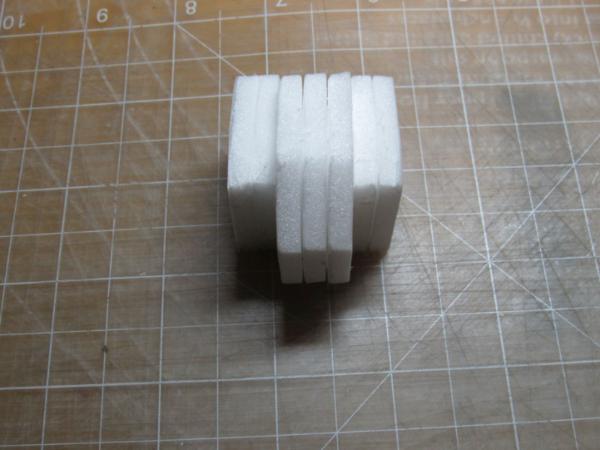
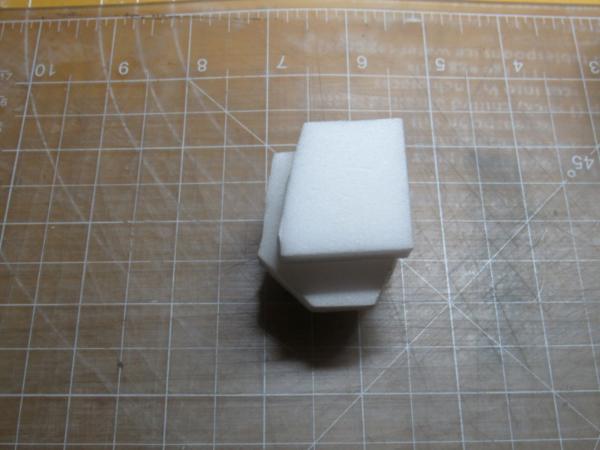
You will then glue together the three center hull sections to get the correct width. Glue two shoulder hull sections together for the right shoulder, and two together for the left shoulder. So center hull is three layers of foamcore thick, and each shoulder hull section is two layers of foamcore thick. The foamcore I'm using is 3/16 of an inch thick. When gluing the shoulder hull sections to the center hull, you want the bottoms of the shoulder hull to line up with where the center hull narrows at the bottom (see photos).
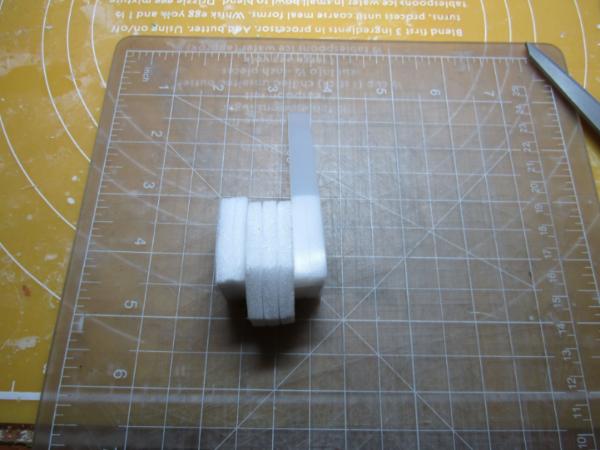
Using strips of thin plastic or card cover up all the edges.
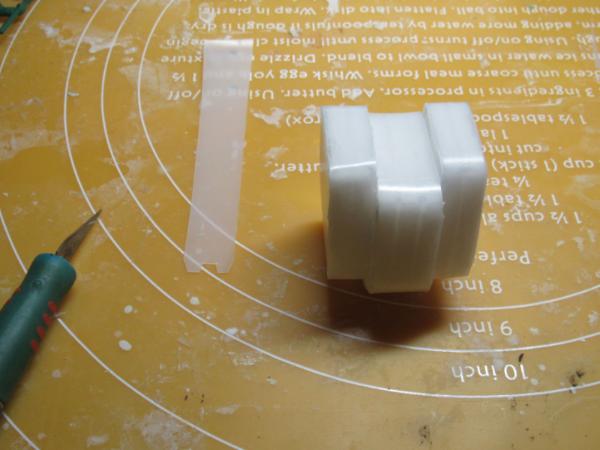
For the top of the center hull, it looks nice to have this little patterned piece.
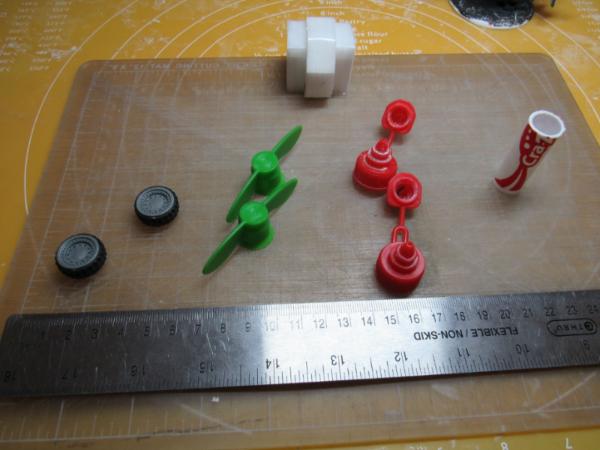
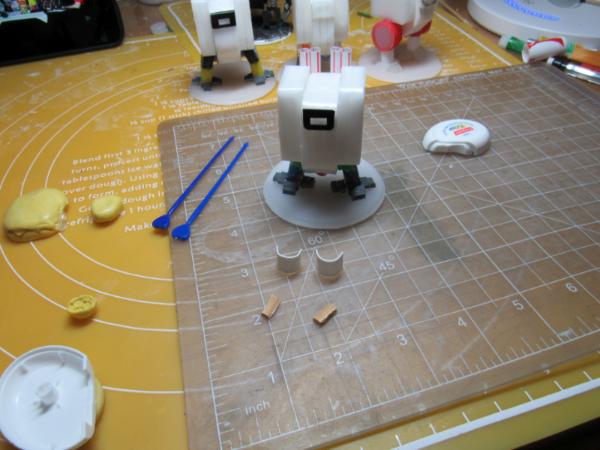
Next you will add the hip joints. I have included several options to show you different things you can try. Starting from the left is wheels from dollar store mini monster trucks. These are my favorite to use, but I'm running out, and they aren't exactly widely available for following this tutorial. The wheels are 3/4 of an inch in diameter (about 20mm). Second is the twist tops from kids' applesauce packets. I use the upper section in this, they are 1/2 of an inch in diameter (12mm). Third is the tops to tiny squeeze bottom contact lens cleaner. They are a little to big, but still work, they are a little over 3/4 of an inch and wider than the wheels. Lastly, you can just cut 1/4 of an inch (6mm) section off an old fat crayola style marker. The marker I used is 5/8 of an inch in diameter (15mm).
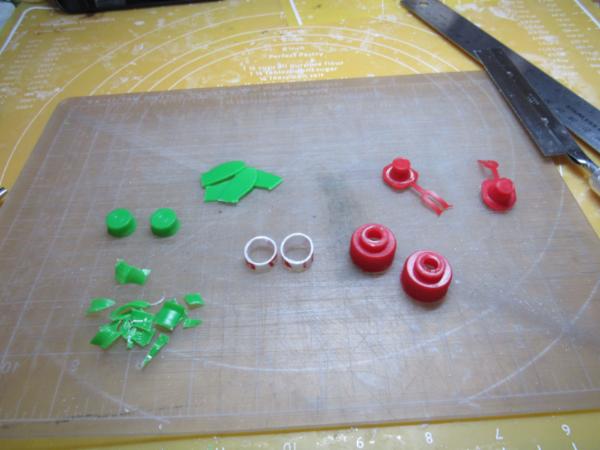
You only need the small upper section of the applesauce twists, I clipped off the "wings", and then trimmed off close to 2/3 of the height of the center section. I also trimmed off the cap section and the dropper tip of the contact lens cleaner tops.
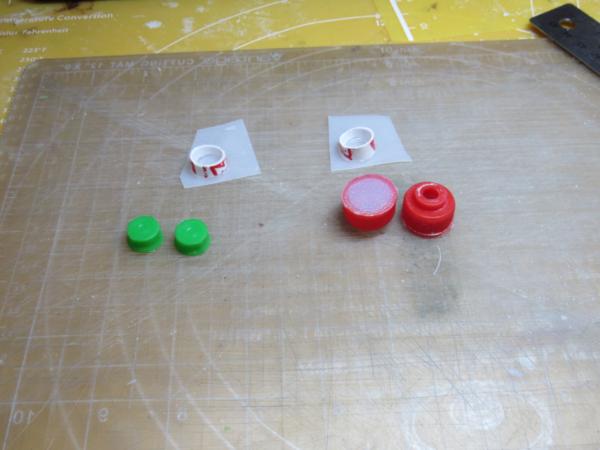
I covered up obvious openings with things plastic sheets (as usual I'm using cut up water jugs).
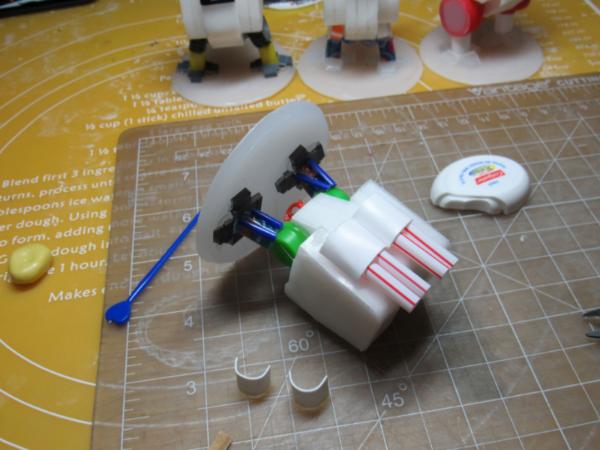
Glue these hip joints in the low part of the center hulls (see photo). It isn't necessary, but I find it looks nice to attach some small bits of wire of plastic thread from the hip joints into the bottom of the center hull.
Next you attach the legs. I used 1/4 of an inch (6mm) sections of thin markers and mechanical pencils, you can of course also use styrene tube. The largest I used was 3/8 of an inch (10mm), slightly bigger than 1/4 of an inch (exact is 5/16 of an inch/ 8mm) works better.
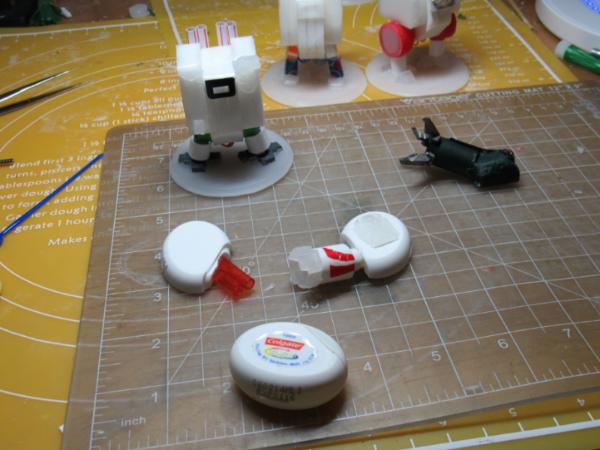
Next (or before the legs if you want) we will attach the visor. I have retaining clips from inside some broken electronics that I love to use for this (black plastic bits), you can also easily cut a rectangle to use from plastic or card. If you want to make your dread unique you can add something else. On the right is a piece from a hydrogen peroxide based contact lens cleaner called "Clear Care", I love the look of these, and use them for chaos dreads.
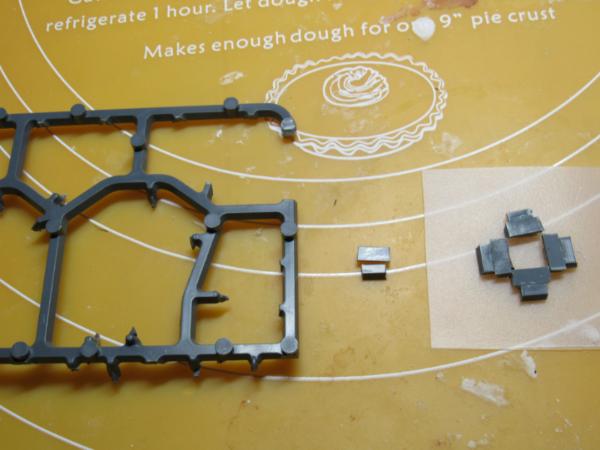
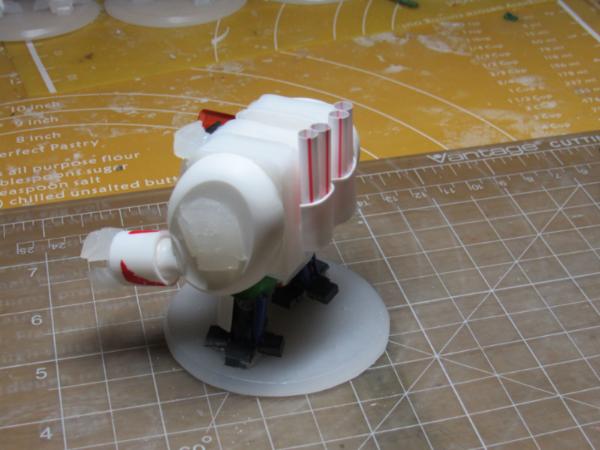
Next we can use our beloved sprue for the feet. Find sections without all the pointy bits sticking off, or clean them up. You will need four pieces for each foot that are 3/8 of an inch and four smaller pieces at 1/4 of an inch. That's a total of 16 pieces, 8 big (3/8") and 8 smaller (1/4"). Metric is 10-11mm for big, and 7mm for small. Feel free to make extras, you'll use 4 more of each size if you make a dreadnought powerfist. Like you can see in the photo, you will flip the larger piece upside down so that their trapezoid shape fits into each other nicely.
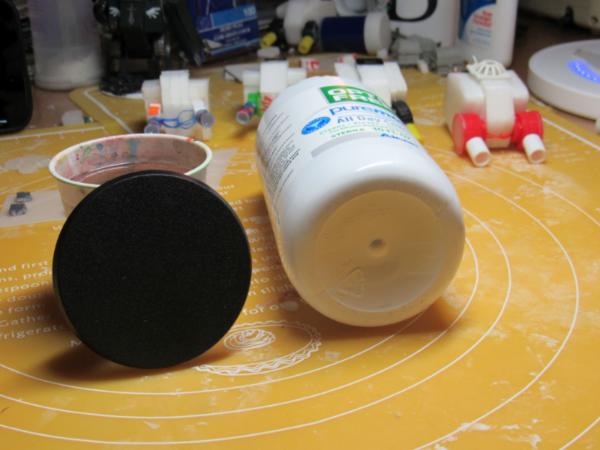
Next we need a base. You can cut out a circle the correct size for a dread base, use a real base, etc. If you want to go super cheap like I used to (and have contact lenses) The bottoms of most contact lens cleaning bottles are extremely similar is size to a dreadnought base. These bases do end up quite a bit taller than official bases.
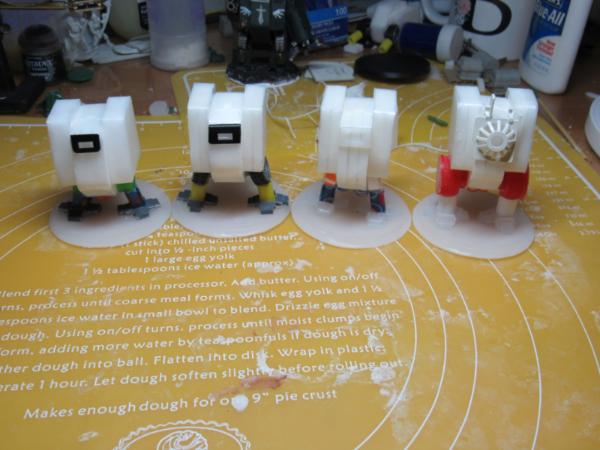
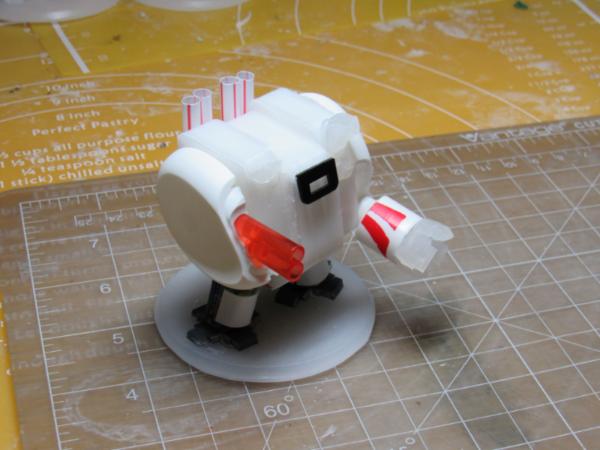
You are now ready to glue your dread's legs to the base and glue the parts of its feet on too. Glue the 4 foot sections equal distance apart around the round leg pointing in the four cardinal directions. The the picture you can also see all the visors on the dread now.
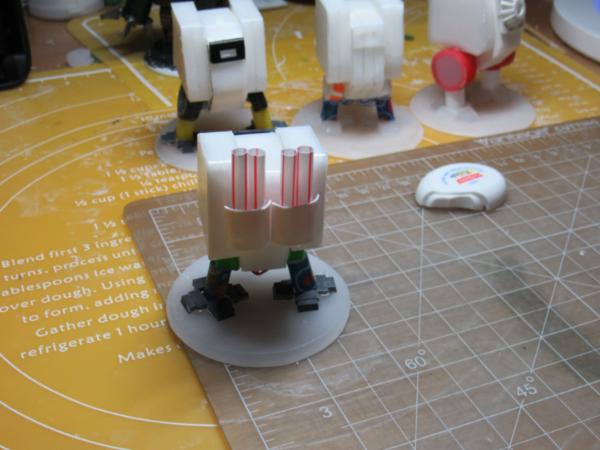
Now is a good time to glue on exhaust pipes. I cut four, 1 inch long (12-23mm) pieces of drinking straw and glued them in two pairs sticking up from the back (see photo). Then cut two pieces of plastic/cardboard sheet 3/4 inch by 1/2 inch (17mm by 12mm). I then bent them into a curved shape. For the plastic, I heated it on the tip of my glue gun, bent them and let them cool. IF YOU DO THIS BE VERY CAREFUL NOT TO BURN YOUSELF
The legs should be made to look better. I cut plastic tooth picks the length of the leg 4 times for the back of the leg to look like pistons. Along with spacer to hold it off the surface of the leg, I repeated the bending trick from the exhaust pipe covers for leg armor. They were about 3/8 inch high by 3/4 inch wide (about 10mm by 19mm).
They aren't necessary, but they add to the look if you have some bits to attach to it, I have molds of some cameras, the crux teminatus, and an imperial eagle, which I made quick hot glue casts to decorate this. You can paint on details that look great also. Finally all that's left to make is the arms, so you can see why I've had these strange oval dental floss containers lurking in my pictures. They are my favorite bits to make dreadnought arms out of. Everyone probably doesn't have access to these, but dread arms are open to a lot of interpretation. I can add more ways to make arms to the tutorial if any of you would like.
The multi-melta is easy, just glue two tubes/straws next to each other coming out of the main part of the arm. I've never bothered drilling out the air holes, but it's up to you. Next is the dreadnought close combat weapon arm. These can be pretty complicated or really simple. My first dread I made the Dark Angles dread has an arm made from a whole marker cap glued onto a piece of styrofoam for the shoulder, and random strip of plastic to break up the shape, and some pieces of sprue that looked like claws. It doesn't look very good, but you can tell what it is. For this one we'll get more complicated. I used the other half of the dental floss container to match the upper arms. I used a cast of the front of a storm shield to look like a huge crus terminatus (terminator symbol) For the powerfist I glued half an inch (12-13mm) of the thicker marker around 3/4 inch (19-20mm) of a thinner marker. Then used the same technique for making the dreadnought's feet to make its "fingers"
Please let me know what you think. If you have any questions, want clarification, have suggestions, etc. Thanks for stopping by, and I'll post more pics of this guy once he's painted (and do a scale shot)
|
|
This message was edited 3 times. Last update was at 2018/02/15 22:40:15
|
|
|
|
|
2018/02/16 01:41:22
Subject: Syro's projects: Currently: Scratch building a dreadnought tutorial
|
|
Gargantuan Great Squiggoth
|
Looking forward to the paint and the scale shot, but looking good so far, very promising, quick by the look of it too.
|
|
|
|
|
|
2018/02/16 13:29:00
Subject: Syro's projects: Currently: Scratch building a dreadnought tutorial
|
|

Sureshot Kroot Hunter
|
Wow, great looking dreads. Definitely some of the best scratch built ones I've seen around
|
|
|
|
|
|
2018/02/16 13:58:29
Subject: Re:Syro's projects: Currently: Scratch building a dreadnought tutorial
|
|
Krazed Killa Kan
|
Thanks Cam, thanks Boundless! Here's a size comparison shot before painting.

|
|
|
|
|
|
2018/02/16 15:21:01
Subject: Re:Syro's projects: Currently: Scratch building a dreadnought tutorial
|
|
Stealthy Grot Snipa
|
Fantastic tutorial, thanks for posting - going to have to try my hand at those dreads 
|
|
|
|
|
|
2018/02/17 00:30:26
Subject: Re:Syro's projects: Currently: Scratch building a dreadnought tutorial
|
|
Krazed Killa Kan
|
Thanks Skinflint Games! It's awesome that you want to try out the tutorial. If you do, please let me know/see
|
|
|
|
|
|
2018/02/17 23:59:25
Subject: Re:Syro's projects: Currently: Scratch building a dreadnought tutorial and mek gun kannons
|
|
Krazed Killa Kan
|
|
|
|
|
|
|
2018/02/18 02:02:29
Subject: Syro's projects: Currently: Scratch building a dreadnought tutorial & ork mek gun kannon
|
|
Gargantuan Great Squiggoth
|
That is looking spotty dog bud, brilliant work.
|
|
|
|
|
|
2018/02/18 05:42:13
Subject: Syro's projects: Currently: Scratch building a dreadnought tutorial & ork mek gun kannon
|
|

Tough Tyrant Guard
|
I love the storage option to protect your hero quest furniture, looks safe and sound to me!
The scratch built tutorial and build on the dreadnoughts is great, they have come out nicely.
|
|
|
|
|
|
2018/02/18 20:09:21
Subject: Syro's projects: Currently: Scratch building a dreadnought tutorial & ork mek gun kannon
|
|
Sureshot Kroot Hunter
|
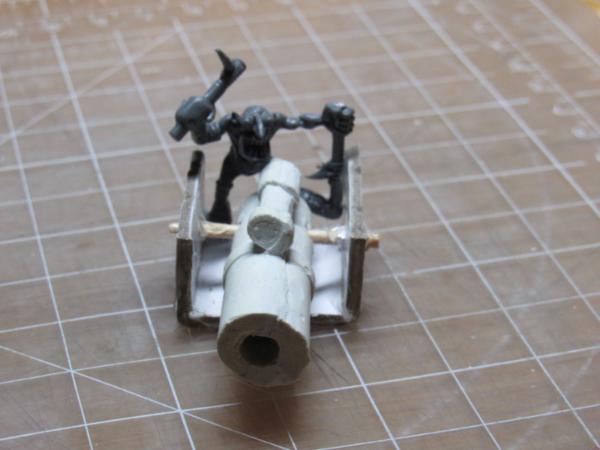
Great cannon Syro! Love the grot though, he is certainly a character! 
|
|
|
|
|
|
2018/02/18 23:11:46
Subject: Re:Syro's projects: Currently: Scratch building a dreadnought tutorial & ork mek gun kannon
|
|
Krazed Killa Kan
|
Thanks Cam, I've never heard that slang before, but I'm glad you like it.
Thanks Mad.. I can breath easier knowing that furniture I worked so hard on is safe 
Thanks boundless, the head cracked me up, I thought it would be fun for a kannon gunner. The head was originally from the Dakka Jet kit I think, and the body was a grot that hangs off the back of an ork warbike.
|
|
|
|
|
|
2018/02/20 03:19:23
Subject: Re:Syro's projects: Currently: Scratch building a dreadnought tutorial & ork mek gun kannon
|
|
Krazed Killa Kan
|
I am very excited to announce that I won the most recent League of Extraordinary Riveters terrain contest with my Hero Quest furniture. That also means I am the judge for the newest LoER contest. I would love to see any viewers of this blog taking part if possible, it really is a fun experience. Plus, I've stopped by the P&M blogs of most people who comment here, and have been impressed.
The newest contest is called: "For the War Effort" Check it out:
https://www.dakkadakka.com/dakkaforum/posts/list/751255.page#9843787
|
|
|
|
|
|
2018/02/20 05:18:12
Subject: Syro's projects: Currently: Scratch building a dreadnought tutorial & ork mek gun kannon
|
|
Tough Tyrant Guard
|
Congratulations on the win!
Good luck with the judging gig, it will be a hard choice to pick a winner I reckon
|
|
|
|
|
|
2018/02/23 23:23:50
Subject: Re:Syro's projects: Currently: Scratch building a dreadnought tutorial & ork mek gun kannon
|
|
Krazed Killa Kan
|
Thanks Mad, I'm still really psyched about the win. And thanks again, I think the judging will be hard too, that what I always hear. At the same time, I also hope it's hard, because that means I have a lot of people creating really great stuff in the contest. Except for the lots of people part, it's already looking that way
|
|
|
|
|
|
2018/02/27 02:36:37
Subject: Re:Syro's projects: Currently: Scratch building a dreadnought tutorial & ork mek gun kannon
|
|
Krazed Killa Kan
|
Sorry for the lack of life on my blog, been very tired and busy as usual, and not really feeling it for crafting.
This isn't quite in line with what this blog is about, but it's still painting models of animals so hopefully it's okay. Plus this at least shows I haven't been completely lazy recently.
Every year my mom takes a several month section of the school year to focus on teaching her students about all different countries around the world, focusing on one continent at a time.
A year or two ago I painted a dollar store giraffe to make it look better as a display for her students (I also painted a lion, but I can't find any pics of it).
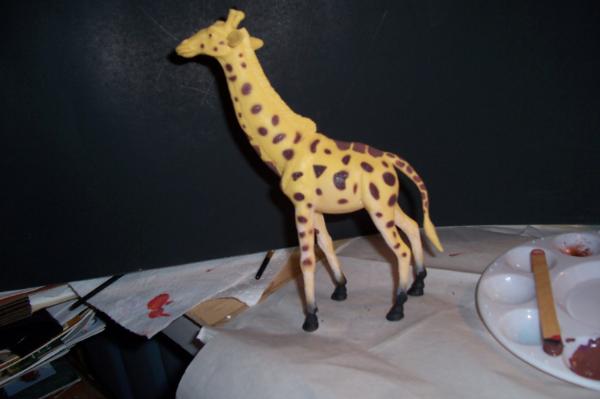
This how it looked when she bought it. (Though actually I had already painted the other side, before realizing I hadn't documented it)

This is its new paint job
This year I decided to paint her a zebra.
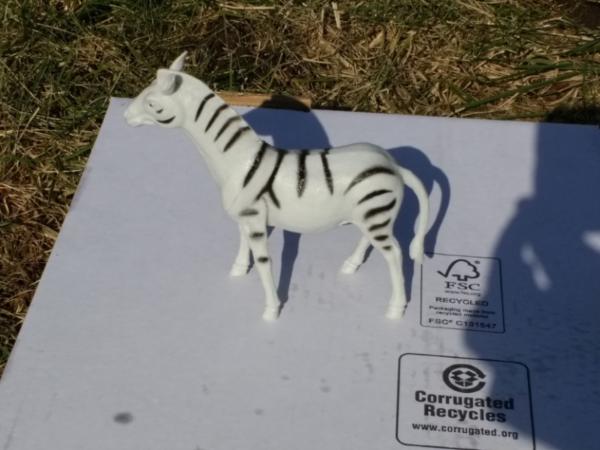
This is its original paint job straight from the store.

Primed and ready
 WIP
WIP
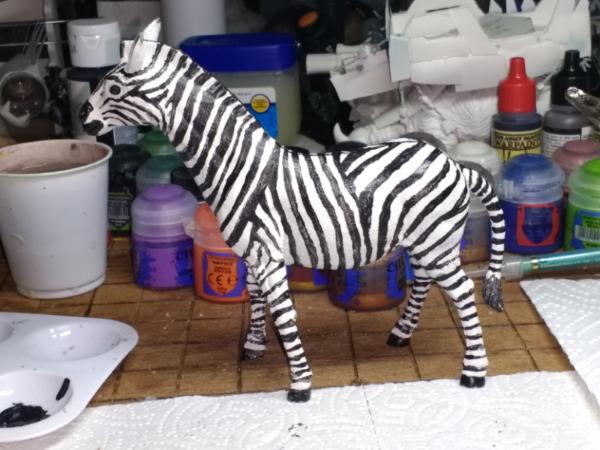
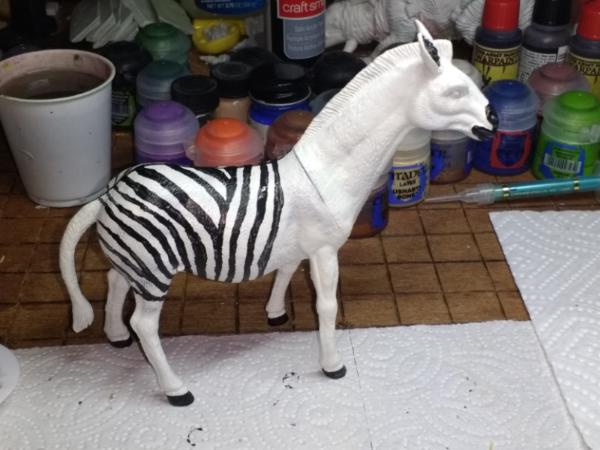
Finished zebra
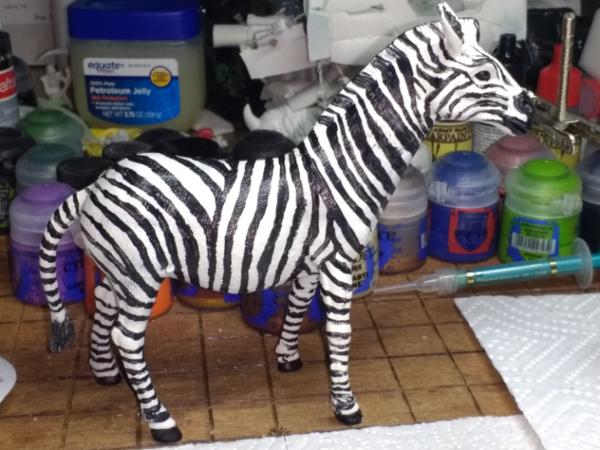
Finished zebra
I finished the whole thing in about 3 hours including pausing to wait for sections to dry so I could handle it.
|
|
This message was edited 1 time. Last update was at 2018/03/03 23:08:57
|
|
|
|
|
2018/02/27 02:53:01
Subject: Syro's projects: Currently: Scratch building a dreadnought tutorial & ork mek gun kannon
|
|
Gargantuan Great Squiggoth
|
That is actually really impressive bud, and the old saying practice makes perfect is true, that is excellent practice for doing camo or any detailed paint work. You certainly did a brilliant job on these.
|
|
|
|
|
|
2018/03/03 23:10:00
Subject: Re:Syro's projects: Currently: Scratch building a dreadnought tutorial & ork mek gun kannon
|
|
Krazed Killa Kan
|
Thanks Cam, also it turns out I actually did take a pic before priming the zebra, so I jsut updated my last post with that pic
|
|
|
|
|
|
2018/03/04 20:00:44
Subject: Syro's projects: Currently: Scratch building a dreadnought tutorial & ork mek gun kannon
|
|

Druid Warder
|
Organizing stuff is right and proper. Saves time on repairs too. Thumbs up!
|
Painting progress tracker:
2017: 50 of 50 planned; 2018: 80 of 60 planned; 2019: 75 of 75 planned
Pledge 2020:
6 to sculpt, 75 to paint (2/57 done) |
|
|
|
|
2018/03/05 00:06:07
Subject: Re:Syro's projects: Currently: Scratch building a dreadnought tutorial & ork mek gun kannon
|
|
Krazed Killa Kan
|
Thanks Wirecat!
I think viewers of my blog know that I have trouble focusing on a single project, and tend to jump around a lot. I will try to get back to the squiggoths soon, and paint that dread and a warbuggie. But I'll do a quick proof of life post of something I just started working on. I bought myself the starter set for Dungeons & Dragons 5th edition for Christmas, with plans to maybe start playing. Some of the boys I play with are really chomping at the bit to both get in some games of 40k and start playing D&D, so I've started collecting and making miniatures for our D&D game now too.
So far, I've been making goblins. I'm using the three that come in the expansion of the Magic the Gathering board game (in red), plus grots from 40k since I like their look for goblins more than other sculpts (plus I already own them ) I've been making and converting them for a fantasy realm.
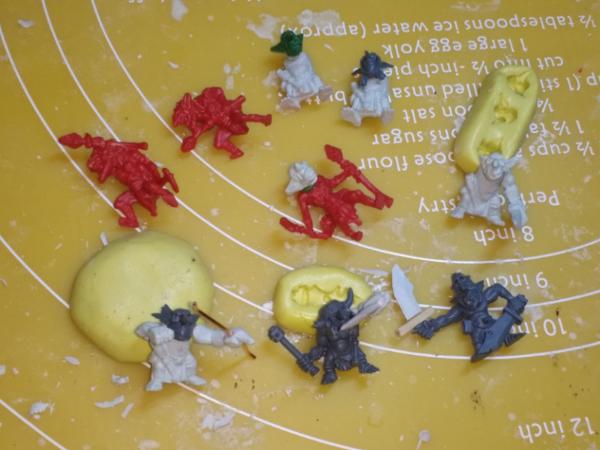
Sorry the photo is so rough, I quickly snapped it with my phone. I really like the guy I made pulling back the bow.
|
|
|
|
|
|
2018/03/05 19:24:15
Subject: Syro's projects: Currently: Scratch building a dreadnought tutorial & ork mek gun kannon
|
|
Gargantuan Great Squiggoth
|
By far the best models available today. Grots rule!
|
|
|
|
|
|
2018/03/09 23:22:23
Subject: Re:Syro's projects: Currently: Scratch building a dreadnought tutorial & ork mek gun kannon
|
|
Krazed Killa Kan
|
I'm glad to hear you like the look of grots too Cam
I've done some more work on homemade/converted D&D miniatures

All 10 of the goblins I was planning to make have more of their body parts and weapons assembled now, and are all glued on bases. Many still need some gab filling, and some need an entire arm sculpted over wire frame.
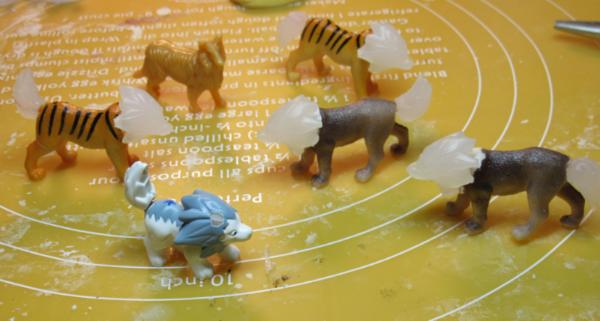
I also made 6 wolves, which is the maximum number that can appear at one time in the D&D 5e starter campaign. I'm not sure if it will look good, but I thought it could be a cool unique look for them to mostly follow the features of the little grey guy in the front. Anyone recognize him by the way? It really take me back. I used lion and tiger bodies from the "Battat terra wild animals tube" that i got off of Amazon with the little grey wolf's head and tail to make most of the wolves. One is just a long haired dog from a cheap dollar store farm animal pouch. I'm planning on making a 1 inch by 2 inch cavalry style base for these wolves since I think traditional cavalry bases are too big, I'll need to check to be sure.
|
|
|
|
|
|
2018/03/10 16:51:56
Subject: Syro's projects: Currently: Making D&D monsters and big squiggoths
|
|
Sureshot Kroot Hunter
|
Gobbos look great Syro. You casting those now?
|
|
|
|
|
|
2018/03/10 18:32:08
Subject: Re:Syro's projects: Currently: Making D&D monsters and big squiggoths
|
|
Krazed Killa Kan
|
Thanks boundless! I do cast some grots occasionally, it all started with not liking have left over pieces in the model, like how they'll give you more heads than bodies, etc. So I made a mold of the body. Then I liked a few of the heads more than others, you know how these things snowball Now if I need a few grots to round out a project I just cast them rather than buy them, since I have enough mold for one unique body, 3 different heads, and two different options of arms on each side.
Progress:

I've finished the gap filling and making sections of arms on the goblins, so I should be able to prime and paint these guys pretty soon. I planned to make the stickbombs look more like clubs and maces, but drilling a hole and adding a piece of wire didn't work so well. I might try to greenstuff on some spikes, but I don't know how well that will work out. I'm open to suggestions.

I want to have an actual model of the oxen drawn supply cart for the first session of D&D "Lost mines of Phandelver", but I don't have any in my collection of animal figurines I've amassed in preparation, and I can't find any sets that look good or don't have terrible models included. So I've decided to Frankenstein up some oxen. On a foam core base, I've glued the lower half of the legs of giraffe that aren't to scale and I'll probably never use. The tails of the tails of the two lions that I chopped the heads and tails off of to make some of the wolves in my last post. I have also started to sculpt the heads.

The oxen's muzzles are the only detail I've sculpted in so far.
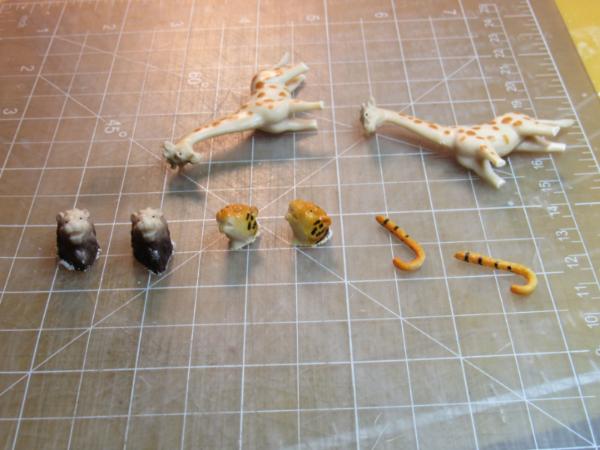
And here's a shot of the dismembered pieces of these models I've leaving in my wake as I craft stuff. Hopefully I'll find a use for all of it eventually. I'm thinking maybe cat people like the Kajeet in Elder Scrolls could be a good use for the cat heads. The giraffe will be harder, maybe I could convert them to passable donkeys?
|
|
|
|
|
|
2018/03/10 19:59:55
Subject: Syro's projects: Currently: Making D&D monsters and big squiggoths
|
|
Sureshot Kroot Hunter
|
I know the feeling! You start off casting a single grot body then by the end of the week you've employed several people to work in your plastic moulding factory you've set up in your shed
As for the spikes, I've had no luck with greenstuff, it's too floppy. Something like milliput might have a better density for that stuff? I've seen some people around here combine milliput and greenstuff but I've no idea about that. Thick plasticard trimmed down, actually even some leftover sprue would work in a pinch as well
|
|
|
|
|
|
2018/03/11 13:07:15
Subject: Syro's projects: Currently: Making D&D monsters and big squiggoths
|
|
Gargantuan Great Squiggoth
|
Just cut the tips off cocktail sticks/toothpicks and superglue them on.
You can combine milliput and greenstuff quite easily, mix the two parts seperately then mix them together. You can also mix in metal epoxy putty, that stuff thats sold as plumbers fix. But that stuff sets very very quick so be warned. The milliput /GS mix is a favourite of mine, gives a very strong ridged and smooth finished product.
I occasionally will cast a part, but try to not cast whole models, too close to the wind for me, would rather sculpt a quick body or something myself. Strange were we draw the lines sometimes.
All looking brilliant bud, keep it up.
|
|
|
|
|
|
2018/03/11 14:56:53
Subject: Syro's projects: Currently: Making D&D monsters and big squiggoths
|
|

Drew_Riggio
|
Catoplebas for the giraffe
|
|
|
|
|
|
2018/03/12 00:33:40
Subject: Re:Syro's projects: Currently: Making D&D monsters and big squiggoths
|
|
Krazed Killa Kan
|
Thanks Cam, and I hope I haven't disappointed you with my fondness for making molds of things. Also thanks, for the tips Cam, I'll have to try some of them out, and see how they work.
@The Brave: I never would have thought of that, but Catoplebas is a really good idea. Looking up art of them, some pics look a great deal like the proportions of a giraffe, though my giraffes are so shrimpy they may need to be juveniles, and I'd make a bigger adult. Thanks
A little progress towards new models:

A monster from the "True Heroes Mythical Warriors Bucket" I bought from Amazon (though it apparently used to come from Toys R Us), had a monster that I thought would work very well as bugbears. I Cut a few weapon hands off other models and swapped them for some variety. I've also continued working on my Oxen. I just need to define the upper legs a bit more and then sculpt the details of the heads and they should be done.
|
|
|
|
|
|
2018/03/13 15:36:52
Subject: Re:Syro's projects: Currently: Making D&D monsters and big squiggoths
|
|
Krazed Killa Kan
|
Using the tips of cocktail sticks worked a lot better than I expected, thanks Cam. I didn't think they would be that different from the similarly sized snips of wire. All my goblins that had stickbombs now have small clubs with a single spike sticking out. (I don't have a pic though).
More D&D mini progress:

A lot of little things going on in this pic. I've sculpted some mildly creepy eyes on the oxen I'm making. Also added some thick triangular fur tufts on two of the wolves following the basic pattern of the molded heads to cover up damage from clipping of the lions' manes. Gave the baby wolf floppy ears to replace the horns I cut off. I made the main body of a wooden barrel I'll be sculpting detail into soon. And what I'm most happy about, is I made five crowbars/pry bars out of thick aluminum florist wire, and began making a wagon wheel.
|
|
|
|
|
|
|
|