Forum adverts like this one are shown to any user who is not logged in. Join us by filling out a tiny 3 field form and you will get your own, free, dakka user account which gives a good range of benefits to you:
No adverts like this in the forums anymore.
Times and dates in your local timezone.
Full tracking of what you have read so you can skip to your first unread post, easily see what has changed since you last logged in, and easily see what is new at a glance.
Email notifications for threads you want to watch closely.
Being a part of the oldest wargaming community on the net.
If you are already a member then feel free to login now.
To be honest CK, I'm not terribly tech savvy myself. I truly wanted a printer that was pretty much 'plug and play' (or 'fire and forget') right out of the box and was willing to pay a bit more for that reliability.
I think I got into the game right was price point and product availability was swinging to make machines that met that expectation the norm- more and more machines are being offered today with filament run-out sensors, overheating sensors, self-leveling capability and more, at the same price or less that I gave for a relatively straightforward 'mechanical' printer just two years ago that needed to be manually calibrated for everything.
Having said that, I can learn, when I have to, and have gotten interested in understanding the mechanics of operation of a printer. My increasing number of machines is partly my quest for the utterly reliable, indestructible and totally eluctible perfect printer- but also a realization that printing one model or piece of a model at a time is very limiting. I've got a very extensive library of .stl (stereo-lithography) files just itching to get made into something. If I can ever get my Ender running, it'll be nice to have three going at once.
What I really want is even one machine that I can start on a job when I get home from work and then forget about- go off and paint other things and only look over that machine when I notice it isn't chugging away and start it on something else.
I also suspect that the 3d printer market is going to continue to changed rapidly: I don't thin the market is any near saturated with suppliers yet and the technology continues to evolve and add refinements at breakneck speed. Taking time to think things over, learn the lingo and talk with your friends should only see more choice at better price added to the selections available.
Of course, do keep the odd Grot curse words handy- no matter how good the tech you're bound to need them one day.
"He fears his fate too much, or his desserts are small, who will not put it to a single touch; to win- or lose- it all."
Interesting point! Interesting to hear how you experienced it. It also convinces me to wait just a wee bit longer, to be honest . My hobby time is limited, and spending half of it trying to get things to work is a recipe for disaster to me.
I'm Ok with the prices they're being sold right now, I just want them to be a bit more user friendly I guess.It's self-protection, really: if I want to relax after a bad/stressing/uninteresting day, the last thing I need is to spend time figuring out why stuff went wrong. I do that for a living, that's bad enough already
Camkhieri: "And another very cool thing, my phones predictive text actually gave me chicken as an option after typing robot, how cool is that."'
Meercat: "All eyes turned to the horizon and beheld, in lonely and menacing grandeur, the silhouette of a single Grot robot chicken; a portent of evil days to come."
From 'The Plucking of Gindoo Phlem'
There's honestly not a lot of tech savvy needed with current FDM printing. Plus there's wonderful people here and on other forums that can help with any issue. I am considering a resin printer now as I want to do armies of small models. The Ender is doing great with larger models, but still the 28mm scale guns are just too fiddly. I think new innovations will just keep making 3d printing better and better for gamers.
LOL, Theo your mind is an amazing place, never change.-camkierhi 9/19/13
I cant believe theo is right.. damn. -comradepanda 9/26/13
None of the strange ideas we had about you involved your sexual orientation..........-Monkeytroll 12/10/13
I'd put you on ignore for that comment, if I could...Alpharius 2/11/14
2021/01/19 23:10:38
Subject: Re:sCratchbuilding Customizing & Citbashing: 19 JAN 21: Progress!
So much to catch up on, it's been a while since last posting and I've been getting things done, just no time to post up. My job deals with both physical and cyber security, so we've been just a titch busy this last little while.
First up, some philosophy:
I fully agree with Theo's observation that there does not have to be a tremendous amount of tech understanding involved in running a 3d printer. I think originally, when one had to assemble the motherboards and invoke the dark spirits of the Resistors and the Capacitors, yes- being an electrical engineer who also helped put men on the moon definitely helped. Nowadays, printers come with some assembly required to make them easier, cheaper and sturdier to ship, not so much because the industry is still in its infancy. And new printers come with more and more bells and whistles as standard (see Kano's Model which states that what was once a 'delighter' when first introduced, rapidly becomes 'standard expectation' as the innovation gets adopted by more and more producers to stay competitive; things like easy to read touch screens and self-leveling.)
I would argue however, that there are so many variables that can affect why a print succeeds or fails that there is an element of the arcane involved. Is the bed level? Is the z offset right? Is the bed too hot, too cool? How about the filament- too cool, too stiff, to much dust? The variables are many but not infinite. In trouble shooting, I feel as much like a necromancer as I do a citizen of the 21st century. I still refer frequently to my two favorite quotes from actual sciency guys to explain my love/hate relationship with technology:
Robert Heinlein: "If you flip the light switch and you know why the light comes on, you're a scientist. If you don't, you're a sorcerer."
Arthur C. Clarke: "Any sufficiently advanced technology is indistinguishable from magic."
Theo is also right on the money when he states that there is a large and eager community of magic-users who are more than happy to share what they know and even more- what didn't work. It's a very good time to be getting into the hobby/industry: device prices are coming down, capabilities are going up, more functions are being automated and there is a growing community of practitioners to consult.
Next up: the Chinese Walled Villa:
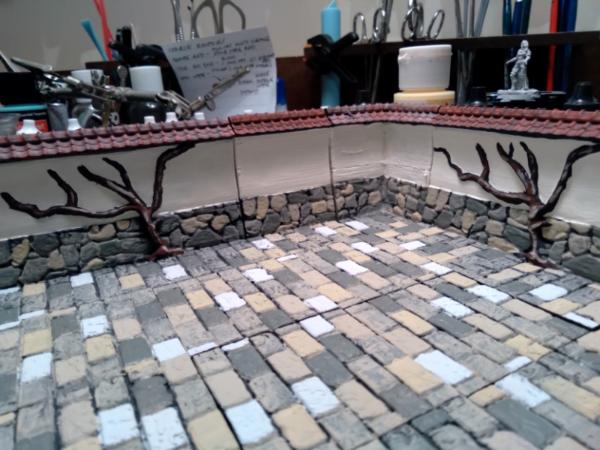
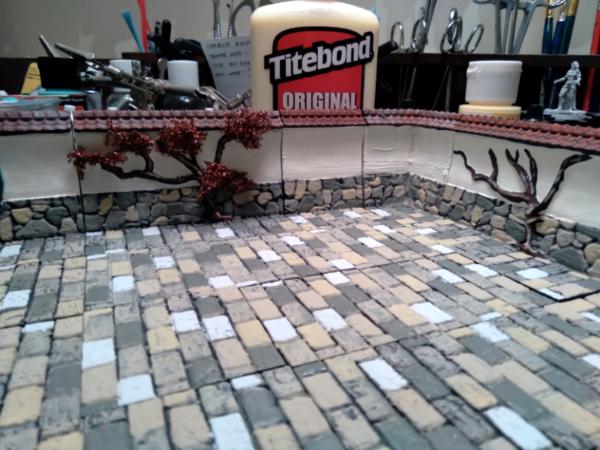
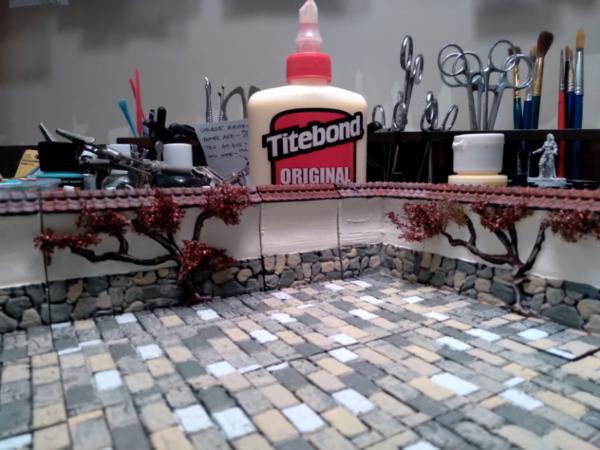
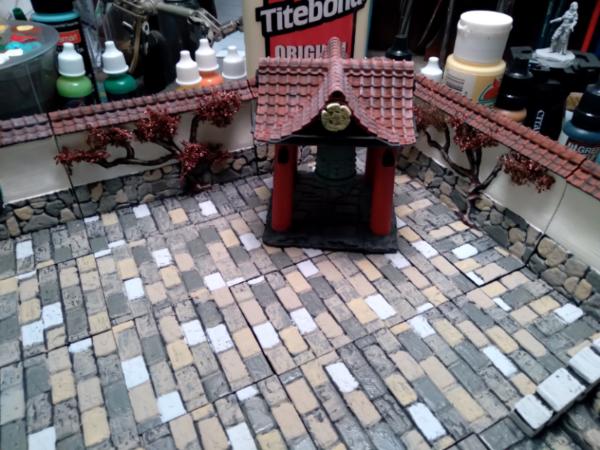
All the wall sections have their base coats of plaster color and stones, and all the tiles are done (except for a few along the front that will be earthen). I'm finishing painting the ones with barred portholes or trees on them tonight and hopefully gluing them down tomorrow. The large rectangular grey areas you see are the foundations for the houses/buildings. Everything else will rest on top of the courtyard tiles so that more variety can be obtained (stone gardens, statuary, temples, shrines, wells, etc) or can be left open for more playing/fighting space. I really like how the courtyard stones are shaping up, and this is without even a base wash to tie them together.
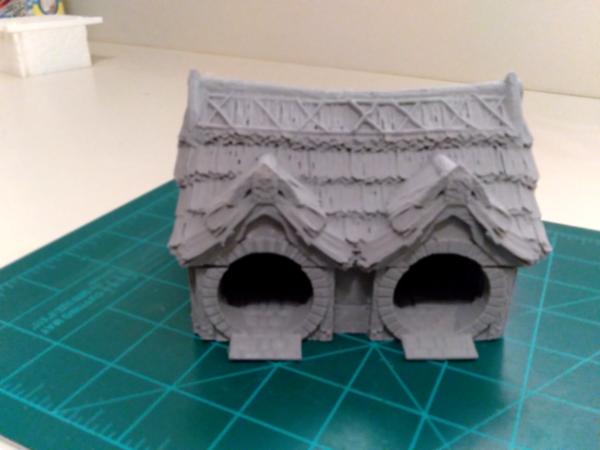
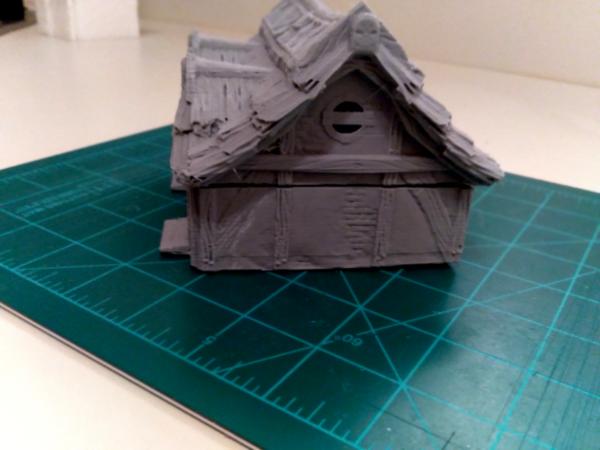
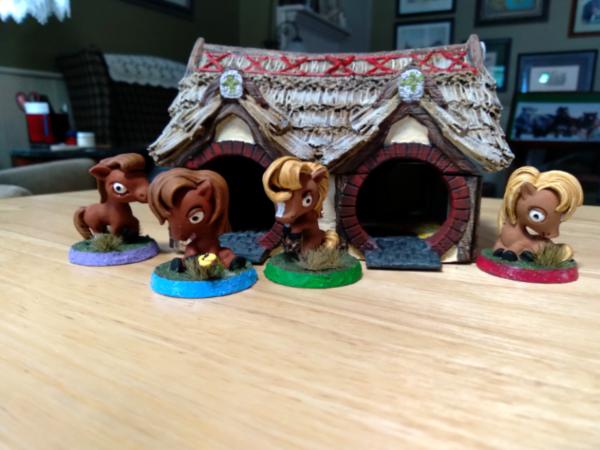
Next: I got tired of printing all this junk for the villa, so printed this Halfling Stable off from the Dark Realms Miniatures 'Shire' Kickstarter. It's actually to go with the chibi Shetland Ponies I painted for the wife some time ago and I'm actually printing off a couple of doo-dads to go with it (a shade tree and some hay bales).
You see it exactly as it came off the Monoprice MP10-Mini printer. I think with a little sanding it will fit very tightly together and look very good. The holes you see in the top front edge are for slipping wires down to act as hinge pins for the doors. I'm looking forward to getting it painted up and out of the way.
Finally: At the moment I have the Monoprice and the Creality CR-6 running fairly reliably and consistently. I lost a couple of weeks on the CR-6 because the main power switch died (me neither- never heard of those going bad) but it was an easy part to order from Amazon and even my Humanities Majoring ass was able to hook it up correctly.
I do still hope to get the Ender-3 Pro back in action, but as Napoleon said to Ney- rushing from Quatra Bras to Waterloo- "ask me for anything except time!" At the same time, Wellington, of course, was saying "Give me Blcuher or give me nightfall." It was 'a near run thing."
More follows soonest, thank you for your kind words of constructive criticism!
"He fears his fate too much, or his desserts are small, who will not put it to a single touch; to win- or lose- it all."
Montrose Toast
2021/01/20 06:54:26
Subject: sCratchbuilding Customizing & Citbashing: 19 JAN 21: Progress!
That courtyard looks magnificent all put together! Good luck on getting the rest of it done.
Hobbit stables are very cool, hope getting the doors on will be easy.
2021/01/21 15:12:53
Subject: Re:sCratchbuilding Customizing & Citbashing: 19 JAN 21: Progress!
It's fun to see that big Chinese walled villa so complete, I'm looking forward to seeing when you add more of the internal buildings. How large is that complex?
Seeing your cute little stables and talking about chibi Shetland ponies reminded me that you were considering converting some of those ponies into a kill team or something. Am I remembering that right?
How are the repairs going on your poor collection?
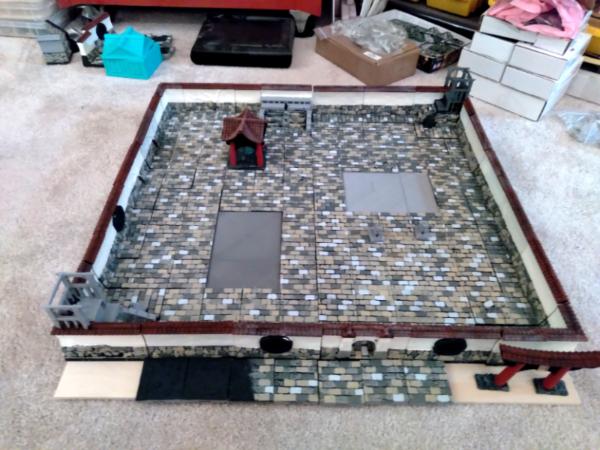
The villa comes along- lots more printing to do but having the courtyard done is a major load off (frankly, it was getting boring painting all those stones and rocks!). I think it is the most ambitious project since the firebase made from a multi-picture frame a few years back. It is mounted on 4 1' square birch panels, so measures 2' x 2' or 4 square feet of playing surface.
I've got three sets of the Shetland ponies done (pictures to follow): the first set of four that have the coloring and markings of our four, another set of four with the same coloring/markings but done up as superheroes (Superman, Spiderman, Wonder Woman and Black Widow) and a last set of eight that are rigged as a kill team. A lot of fun to paint up, but I have to go back and do the eyes over, as I saw how Dr. H did his on the Monoloke (sp?) diorama he built a bit ago. I'll get the stable painted up probably this coming week- I've put together a 'go bag' of painting stuff so that when I'm spending my Blue Team week working from the farm, I have materials to work with. In many ways, it is more liberating than working at my painting desk in the commuter apartment in Virginia- almost too much choice in terms of paints, bits and bobs and new projects. Planning ahead and taking with me the wherewithal to get something done at the farm makes me focus within manageable limits.
The collection of finished work is mostly complete- all the arms glued back on, the buildings repaired (and in some cases modified and improved) the vehicles rebased and terrained. Some things just weren't salvageable, but most everything is back to near normal. Unfortunately, the incident has left me with the idea that I can't have everything out on display down here, so I've been boxing things up and taking them to the farm, where they will languish in darkness until I have some shelves set up to put them out on again. Considering I have still about 40 boxes of boxes that need library shelves to put them on after 14 years since they were packed up three moves ago, it may take a while.
It's like they told us in Airborne School: "If you have a total malfunction with your main canopy, you have the rest of your life to deploy your reserve parachute." I have the rest of my life to get books and models set up on shelves, because I don't reckon to move again. I'm just too old, unless there is a darn good reason!
I'm learning more about the kind of adhesion to slice into the pieces I print, which varies depending on which machine I'm doing the file for. Recently, I was printing medieval roof sections for a village that had a pretty broad footprint, but were tall (steep pitched). For some reason, the corners curled up, even though I had the build plate temperature lower, and the height of the print and the friction of the nozzle extruding the higher layers was enough to knock it off the build plate twice- and my usual problem is chiseling something loose from the build plate. Next week I figure to try reprinting the piece, but using a full raft instead of a skirt- to give it more footprint to stick to the build plate- we'll see if that works on the MP-10 Mini. If not, I'll try the print on the Cr-6- that sucker I have to be really careful, really delicate and really patient to get things off, because I'm literally using a fine masonry chisel to get under the corners and pry things up; it sticks too well!
Thank you again for looking in and asking after- I'm very flattered that folks take the time to look at my work.
More follows soonest!
"He fears his fate too much, or his desserts are small, who will not put it to a single touch; to win- or lose- it all."
Montrose Toast
2021/01/22 10:56:14
Subject: Re:sCratchbuilding Customizing & Citbashing: 19 JAN 21: Progress!
And interesting thoughts on the philosophy of 3d printing. The more I look at the results people get (e.g. your courtyard and the buildings) the more I feel tempted to try the magic. Just don't want to spend more time with computer than I do already.
Good to hear your repairs are mostly done.
Have fun with the ponies!
2021/01/22 11:49:37
Subject: Re:sCratchbuilding Customizing & Citbashing: 19 JAN 21: Progress!
Courtyard really came together nicely. It’s so tempting to try and take that project on because 2’ square is the Bushido board size, but since they just released playmats I think I’ll just use some of those walls and towers for terrain.
The ponies stable looks great, whoever designed it really did a good job if there was no clean up of supports for the parts.
I never saw myself as a wizard, I was always the thug .
LOL, Theo your mind is an amazing place, never change.-camkierhi 9/19/13
I cant believe theo is right.. damn. -comradepanda 9/26/13
None of the strange ideas we had about you involved your sexual orientation..........-Monkeytroll 12/10/13
I'd put you on ignore for that comment, if I could...Alpharius 2/11/14
I have, in fact, been up to something(s). As mentioned earlier, having to anticipate what I'll need when I'm working from the farm helps me focus on individual projects wonderfully. Working from a wooden folding TV tray with only a few colors, a couple of brushes and some bits of cardboard for palettes is, for me, very effective. I can't do everything I'd like and I won't trade my painting desk for anything. But I do enjoy getting a couple of things done here and there.
First up, Theo: I wouldn't have printed and painted all those courtyard tiles if I didn't have to. The walls, towers, gates and everything else are intended to be taken apart when the game is compete (the courtyard too, for that matter). I am trying out an idea to make a big diorama manageable for transport and set-up- sort of like the fortification I did a long time ago, but in pieces. I think a battle mat and the terrain bits you need for line of sight and sheltering, etc, is the way to go.
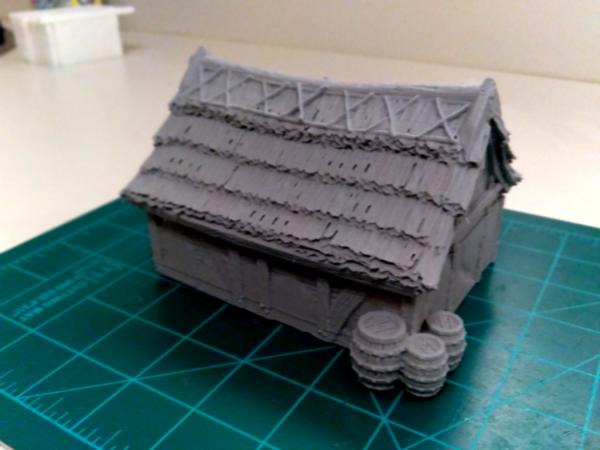
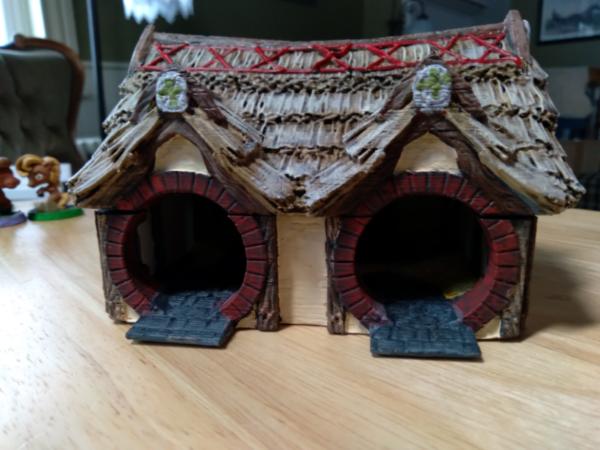
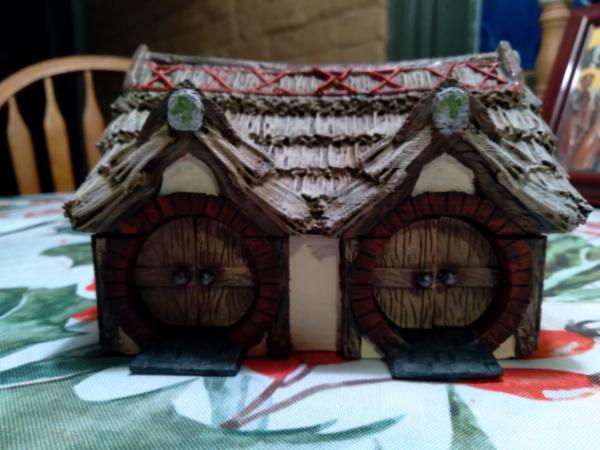
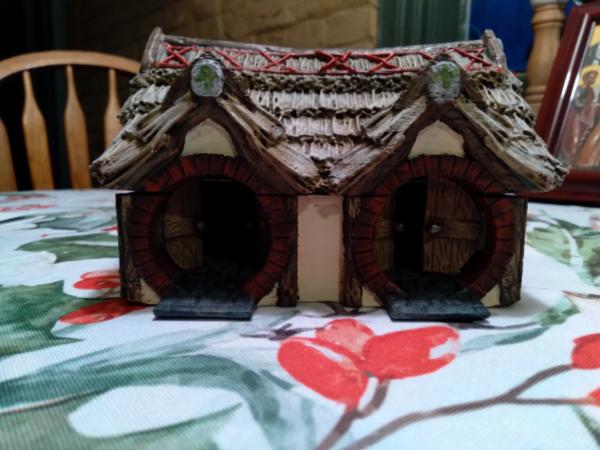
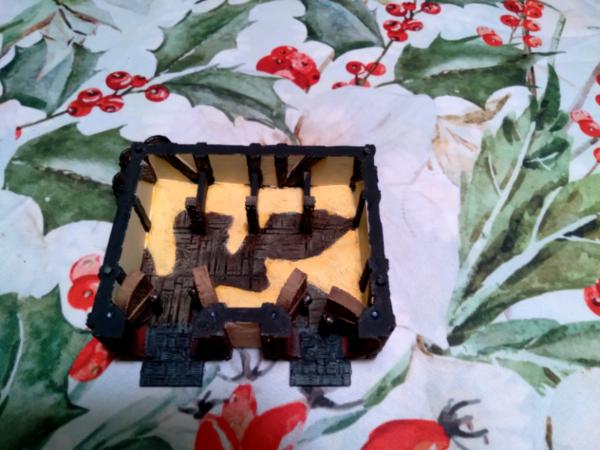
Next up: The Hobbit Stable. Printed extremely well on the Monoprice MP10-Mini with no supports and almost zero stringing or other defects and here's the end result:
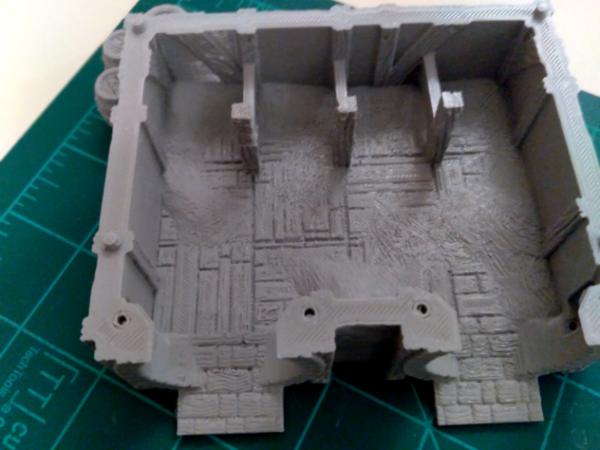
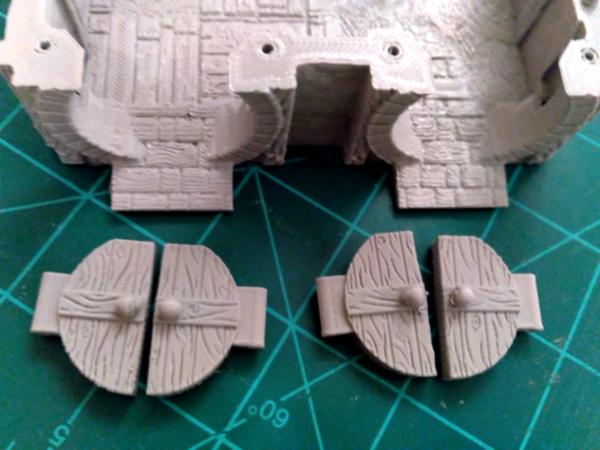
I'm overall pretty pleased with the final product. I tried to sand a little bit to get the seam between the top and bottom pieces to line up better, but sanding and FDM printing aren't always highly compatible (the layers can separate and start 'unraveling' sometimes) but eliminating it entirely was not possible. I don't like how the hay inside came out and will probably redo that tonight when chores are done- but don't let the perfect be the enemy of the good; I wanted to get some pictures up. The doors are done, but I need a bit of wire or filament to hang them and will do that when I can find something to use.
The pony figurines are the next project- having seen how Doctor H painted the eyes on his chibi diorama I want to redo these and then give the whole set over to the spousal unit, who has been clamoring for them for her desk for some time now.
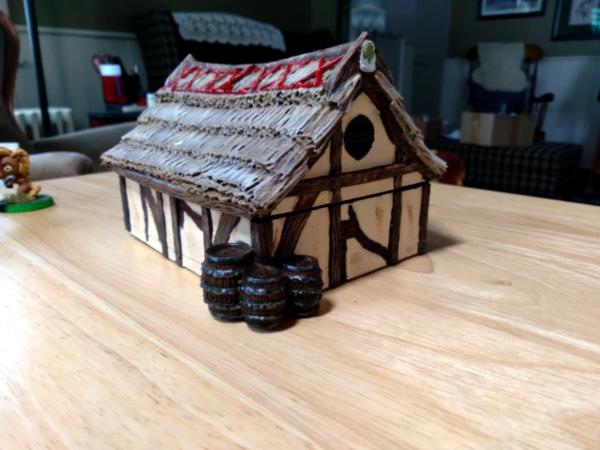
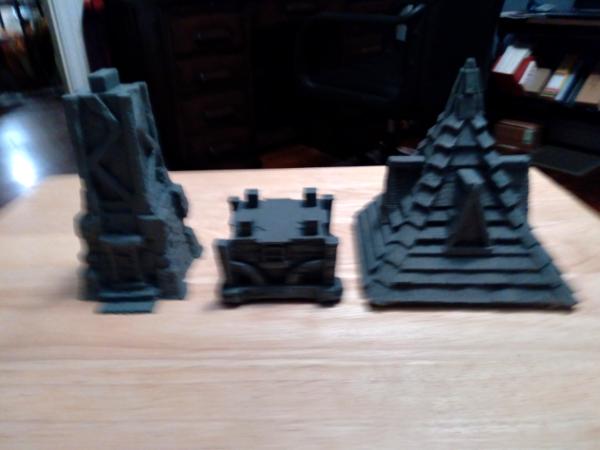
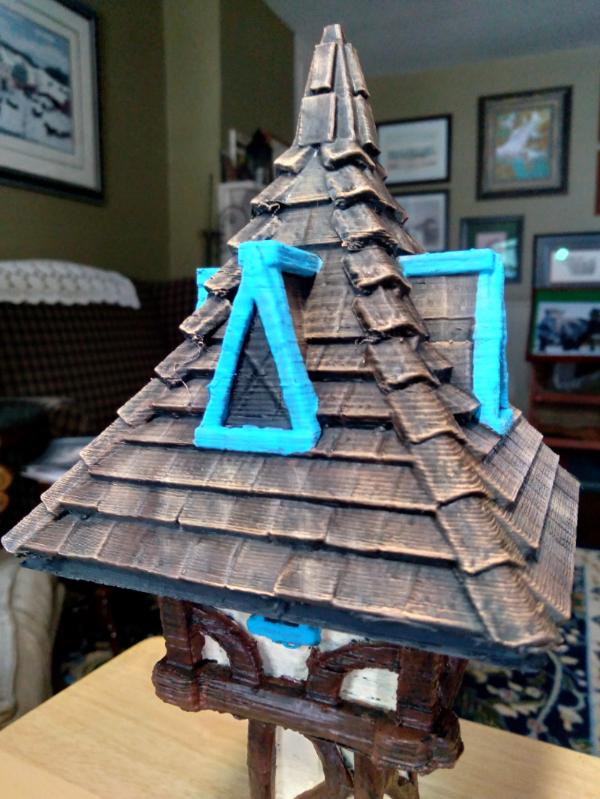
Finally, I'm very proud to have been asked by the creator of one of the Kickstarter campaigns I'm backing to test print one of the buildings. The set is titled 'Medieval Architecture' and is a very nice assemblage of Russian styled houses, walls, bell towers and shops, with a bit of added whimsy that makes them fun to print, paint and play. The are scaled fairly well for 28mm to 32mm figures, but you make the call when you see the pics. I don't want to break any DakkaDakka rules, so won't post a link to the campaign, but you can find it easily enough on the Kickstarter website by searching for the title or you can DM me and can provide it. I have the creator's permission to use these pics here.
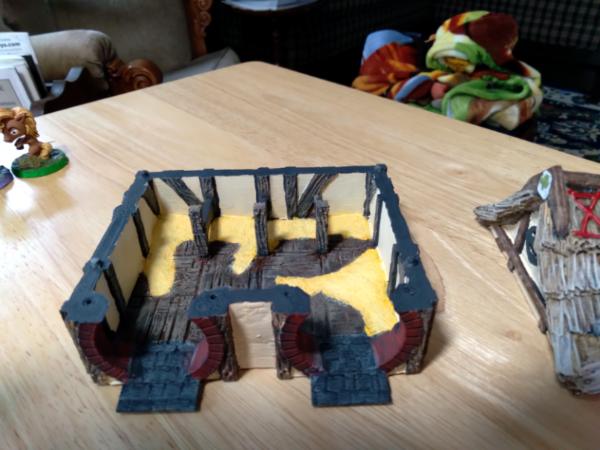
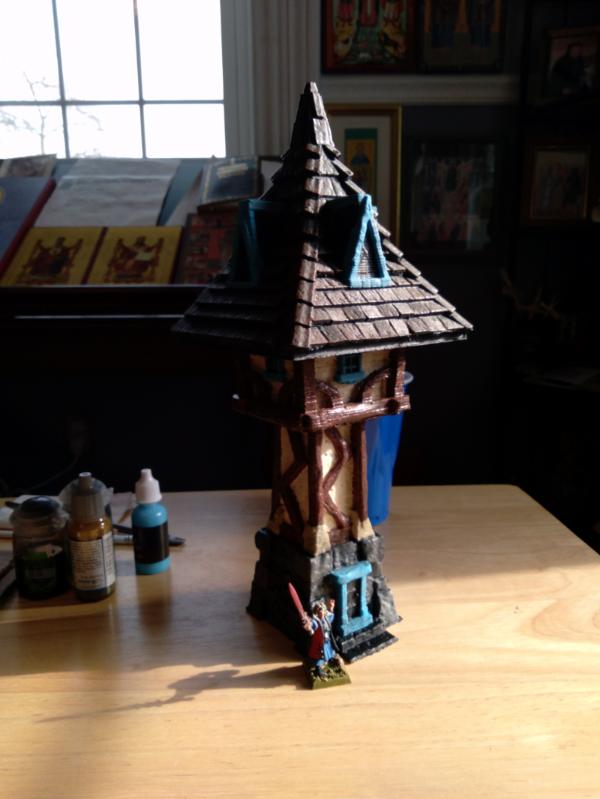
Apologies for this picture, my little camera died and I'm using my phone for now (all the other pics are better). The building I was given to test is the Watch Tower. It prints out in three pieces and they all peg together very nicely. The top/roof was a 20 hour print (at my settings, there are probably better to be more efficient), the middle portion about 8 hours and the bottom was 12.
I primered it grey and undercoated it flat black. Here's with base colors applied:
And after some washing and drybrushing:
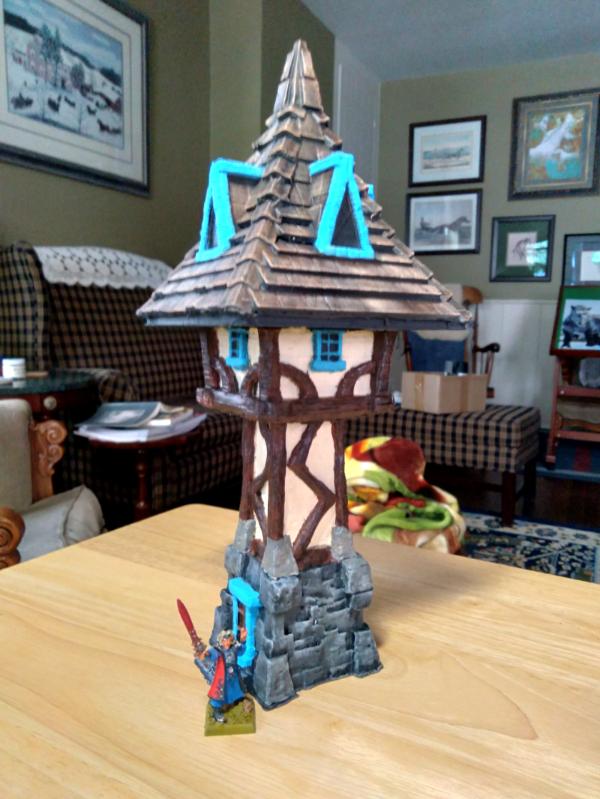
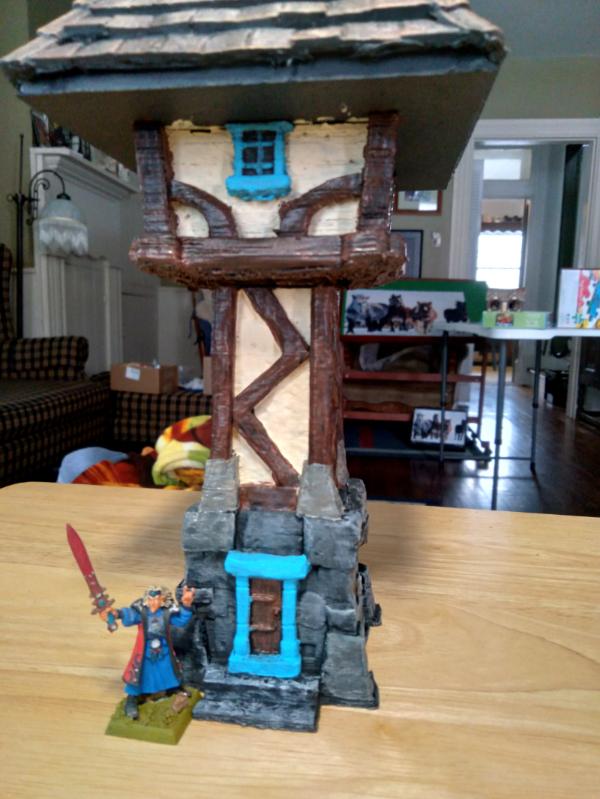
As always, I see things in the photos that are invisible to the naked eye and I'll do a bit of clean up under the eves and such places. The figure is a Games Workshop High Elf Mage at 28mm Heroic scale. And one of these days, I've really got to try to redo the eyes on that sorcerer.
I wanted to take a closer-up of the roof- I'm really chuffed at how the whole thing came out: between the detail in the .stl file and the natural fine lines of the print, it took the undercoat of black, then a heavy drybrush of Maple Syrup Brown (acrylic craft paint) and then a light drybrush of Peach really well, I think, very Russian-wooden-shakes-looking:
So that's it for now. I have started printing an older Evan Carothers file for a planetary defense/anti-ship laser and whilst that is printing I've got some non-OEM Sisters of battle that are cleaned, assembled and primed and have been waiting their turn for paint for awhile, plus there is the latest League of Extraordinary Riveters competition to try to catch up with, plus the older LOER projects I need to finish off and a ton of other things.
I hate having nothing to do!
This message was edited 1 time. Last update was at 2021/02/11 15:46:36
"He fears his fate too much, or his desserts are small, who will not put it to a single touch; to win- or lose- it all."
And here's after watching a couple of YouTube videos on different techniques for painting Chibi Eyes:
I'm quite pleased with this effort, as I'm working from the farm this past week and didn't have my illuminated magnifying lens- which I'm finding I need for more and more things. I may mess with these again, but I may leave well enough alone, and finish off the Chibi Pony Superheroes and let repetition become my Master in improving skill.
More follows soonest.
"He fears his fate too much, or his desserts are small, who will not put it to a single touch; to win- or lose- it all."
Thanks, Syro! I'm working the next set of chibi ponies, amongst everything else and hope to have some more pics up soon. Actually have two (of three) printers running at the moment, so have some new pieces to get primed and basecoated as well. Real ponies, weather and work have been bit of a challenge, leaving not much time for hobbies, but should settle out soon.
More follows soonest.
"He fears his fate too much, or his desserts are small, who will not put it to a single touch; to win- or lose- it all."
All those crazy snow storms must make caring for the real ponies a lot more work. Not to mention that long drive to the apartment for work each week. Hang in there!
Thanks Syro- we're luckier than many folks with the storms, but you know it's rough when your Shetland Pony rescues see you coming with halters in hand for their afternoon exercise and they run and hide from you! They're as tired of slogging through the snow as we are- and their legs are shorter!
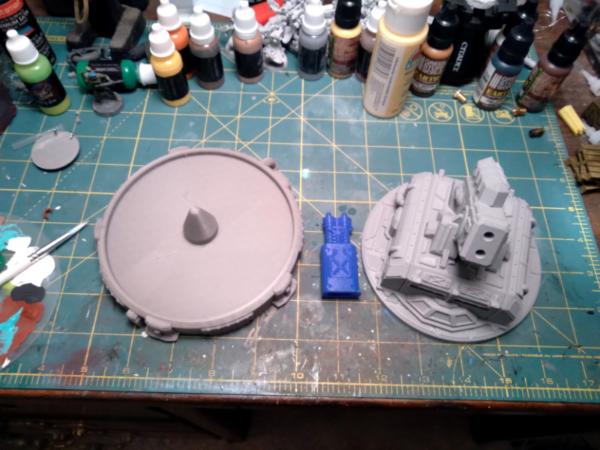
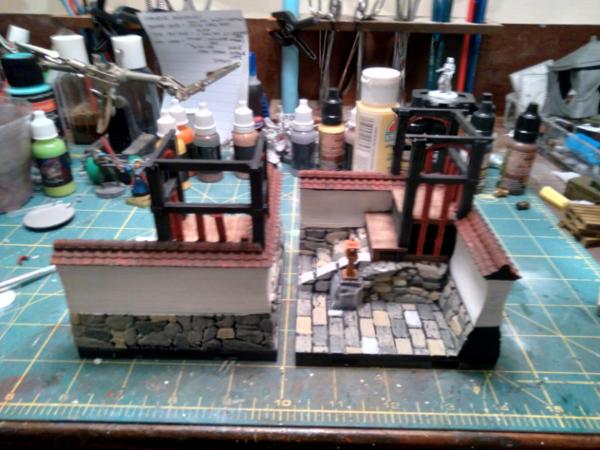
I'm still painting on pieces for the Chinese walled villa- working on the guard towers at the moment and hope to have good results to show soon, but here is a 3d print project I've had screeching in the back ground whilst I paint:
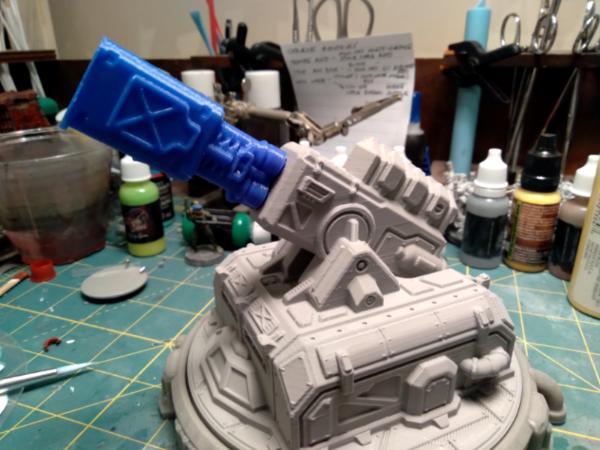
This is the Coil Gun Turret from Evan Carothers' kickstarter The Ignis Quadrant. It printed out in three pieces:
The base and riser in grey came off the MP10-Mini just as you see them- nice and clean, no stringing. The barrel extension is from the CR-6 and came out pretty well also.
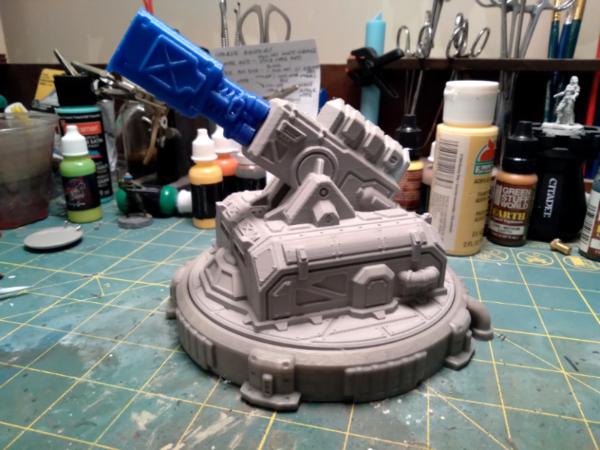
Assembled. The gun spins 360 degrees on its mount, but the barrel elevation is fixed. Seeing as it is a Planetary Defense Ship-killer though, shooting at line of sight to the horizon, maybe it doesn't really need to adjust for elevation (kidding!):
Closer up of the barrel:
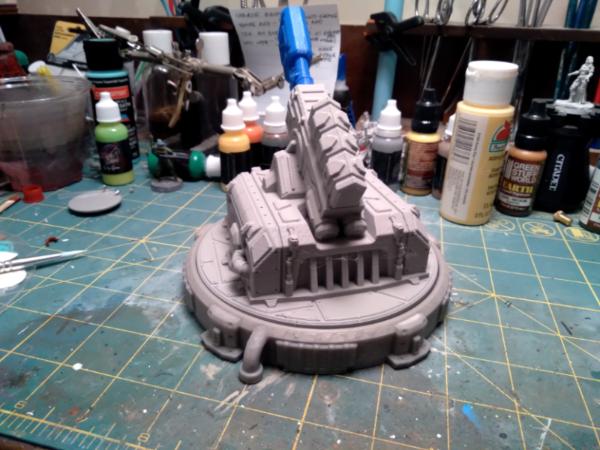
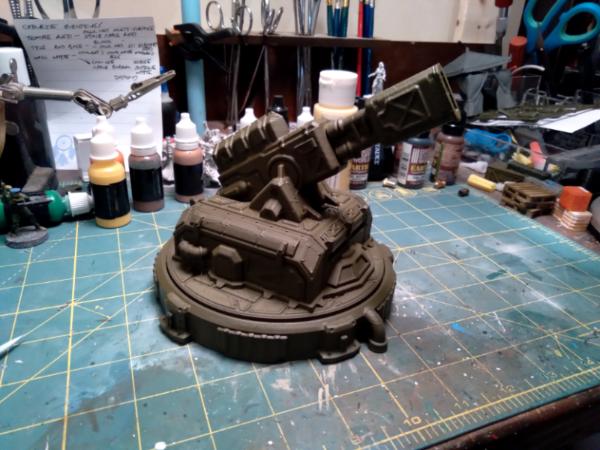
And basecoated:
Today was the Day of Not-quite Right, as- after printing the excellent results you see here, both printers have now decided to be obstinate and not print. I put in about an hour of troubleshooting, but haven't got them to liking me again yet. So, I worked on Chinese Villa parts, but also wanted to airbrush a basecoat onto the Coil Gun. Except the airbrush didn't want to work (air comes out, I disassembled and cleaned it twice, just no paint wants to come out). Fortunately, I had some WWII US Bomber Green in a spray can from an earlier project hanging around and was able to use that.
I'm hoping to get all my machines back in order shortly, as I need the airbrush for weathering and have tons more files to print.
More follows soonest.
"He fears his fate too much, or his desserts are small, who will not put it to a single touch; to win- or lose- it all."
Finished up the Hobbit Stable this afternoon. The hole that was printed into the front walls was exactly the right size to accept 1.75mm filament to serve as the hinge for each door half- hat tip to Theophany, I read on his thread that he had printed something that used filament in a similar way.
An interesting oddity is that the pair of doors on the right can't open fully, as the molded straw/hay on the floor gets in the way. Spousal Unit is very pleased and now wants more 'farm' type prints to go with; fortunately the set from Dark Realms has some more pieces that fill the bill.
More follows soonest.
"He fears his fate too much, or his desserts are small, who will not put it to a single touch; to win- or lose- it all."
I actually bought a book from (of all places) Green Stuff World that had a lot of step by step and tips and an awful lot of advanced material, things I may never get to.
For purposes of these little figures I relied heavily on these two videos:
They both advocate essentially the same theory- but are reversed on which edge of the eye to start on- painting from the top down or the bottom up.
I'm actually looking forward to an opportunity to try painting some more, I must admit I very much liked how this set came out (while acknowledging there are some touch ups I'd like to make- Callsign Household Six has forbidden any messing with them as they are).
More follows soonest!
Automatically Appended Next Post: Oh- something that the videos don't really address but I think is a valid observation on my part: where you place the small white fleck as the last step largely determines how the eye's "line of sight" appears; that is, by placing the white fleck low or high in the eye and even how you angle the little fleck will have a great impact on where the eye appears to be 'looking'.
On these four pieces, I never really did a "paint out, paint over" but I did move the little white fleck a couple of times to get the 'visage' that I wanted.
Hope that made sense!
This message was edited 1 time. Last update was at 2021/02/21 22:21:51
"He fears his fate too much, or his desserts are small, who will not put it to a single touch; to win- or lose- it all."
I actually had to stop and ask myself "at what distance do I intend these to be viewed?" because to paint them nicely for ultra-up-close viewing is beyond my talents- even with magnification. Someone (I forget who, but possibly Theo?) has in their sig file "I paint to the ten foot rule" and I employed something like that here. Not ten feet, but realistically about 1.5 to 2 feet. As I was painting the eyes, the different colors looked like unrelated blotches; when I backed my head off a bit to look again, they looked better. Frankly, I'm quite surprised at how good they look (in my own humble opinion ) in the photo!
I'm pleased at how they came out and want to try again although, as you say, some of the chibi projects freak _me_ out, too.
More follows soonest!
"He fears his fate too much, or his desserts are small, who will not put it to a single touch; to win- or lose- it all."
Thank you for the kind words, Viterbi! The stables particularly weren't just a lot of fun to paint- it was nice to actually finish something from A-Z, from printing to cleaning up to painting to assembling.
Nearly there on the walled villa, I got a fair amount of painting on some of the last pieces this past week and (fingers crossed) will be gluing down and finishing off this coming week.
Still not sure what major item to install in the fourth board- so many fun things to print, so little time!
More follows soonest!
"He fears his fate too much, or his desserts are small, who will not put it to a single touch; to win- or lose- it all."
Couple of fuzzy shots and then I'm going to start gluing things down:
These are the two watch towers and the steps up onto the wall/battlements/walkways for the walled villa. Ideally, I'd have used four towers- one at each corner- but given my very spotty luck getting things to print most of the time I'm happy to have the two.
It really is time to be getting on to some other project, but in addition to printing troubles, the other thing holding me back is the fear that as I apply silicon caulk to the boards and permanently stick things down I'll goof it up and literally months of work will be gone.
But, as the Bard informs us in Hamlet, screw your courage to the sticking place and let's see what happens.
More follows soonest.
"He fears his fate too much, or his desserts are small, who will not put it to a single touch; to win- or lose- it all."
Meer_Cat wrote: Spousal Unit is very pleased and now wants more 'farm' type prints to go with; fortunately the set from Dark Realms has some more pieces that fill the bill.
They look fantastic, Meer_Cat! I'm sure you'll be fine whether you do it perfectly or mess the whole thing up in the first go. Not the end of the world, no worries.
Thank you Captain! I realize I'm very fortunate to have a wife who will tolerate me playing with toys- this is the first time she's really paid attention to what I've been working on. Now, the ponies themselves are painted in the (somewhat cartoonish) colors of the members of our permanent herd and I added their specific markings (socks, blazes, stars and snowballs) so they are pretty accurate chibi representations of our little guys, so she had a hook to hold her interest. [The permanent herd are the ones we've rescued over the years that have such a combination of conditions as to be unlikely for a happy/successful adoption- so we're keeping them safe with us. We all need each other.] My wife is my greatest blessing. As we always toasted at our formal dinings-in: Gentlemen- to the Ladies!
Thank you Warboss! I am, unfortunately, a natural born hoarder. I'll buy a package of something-or-other (scale crates, flock for trees, anything) and then want to hang onto it for just the 'right' project. I'm slowly breaking myself of that habit as I now officially have more work (and components for customizing, kitbashing and scratchbuilding) than I will ever complete before I shuffle off this mortal coil. I'm actually just grabbing what looks good and gluing it onto whatever I'm working on at the moment. All these tiles and structures represent hundreds of hours of printing time- so I'm not loath to make a mistake gluing down, but am reading having to reprint a piece (or God helps us- many pieces!). I never know how finicky the printers are going to be whenever I start a new print- sometimes it's a snap, often it is fiddly and time consuming and I never know for sure how to fix the problem.
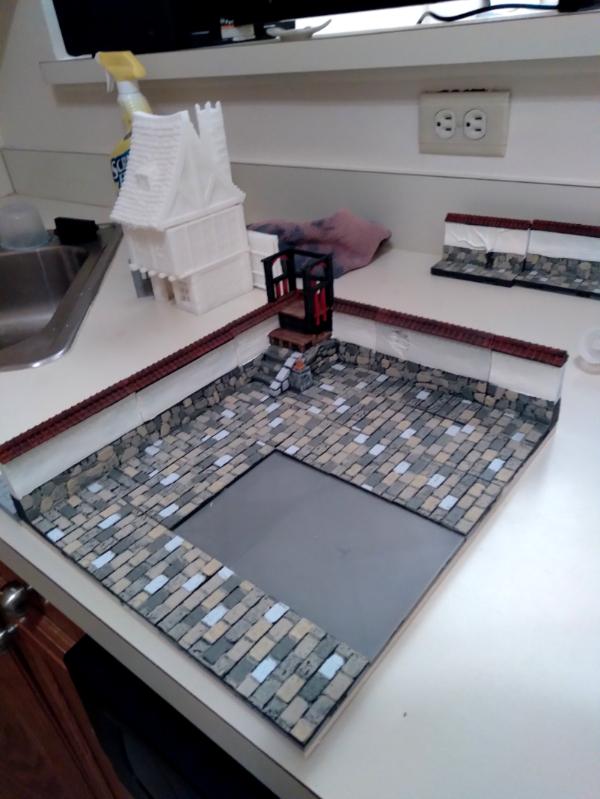
But on that note, everything I've got up to this point is glued down and I'm pretty satisfied with the result.
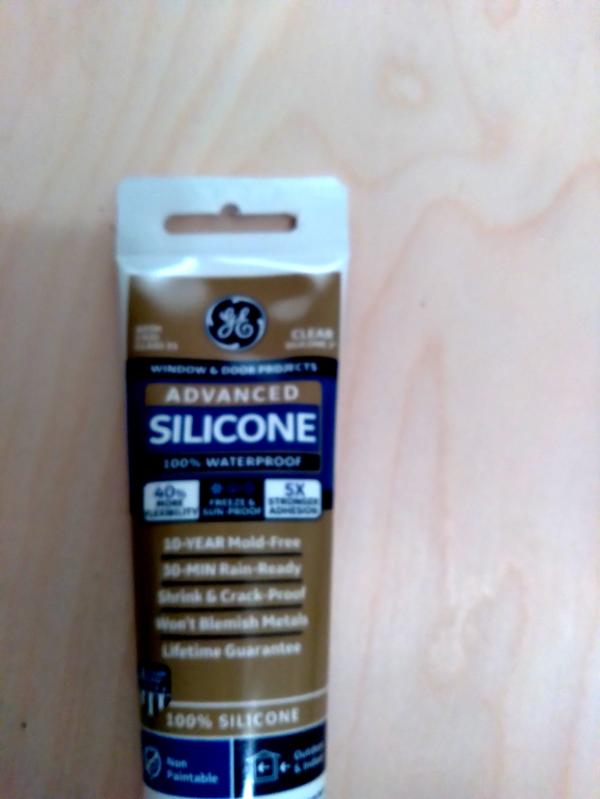
I used GE (I know, lightbulbs, right?) silicon caulk as the bonding agent, because it's strong, flexible and has a longer drying time than 2-part epoxy in which to adjust the pieces:
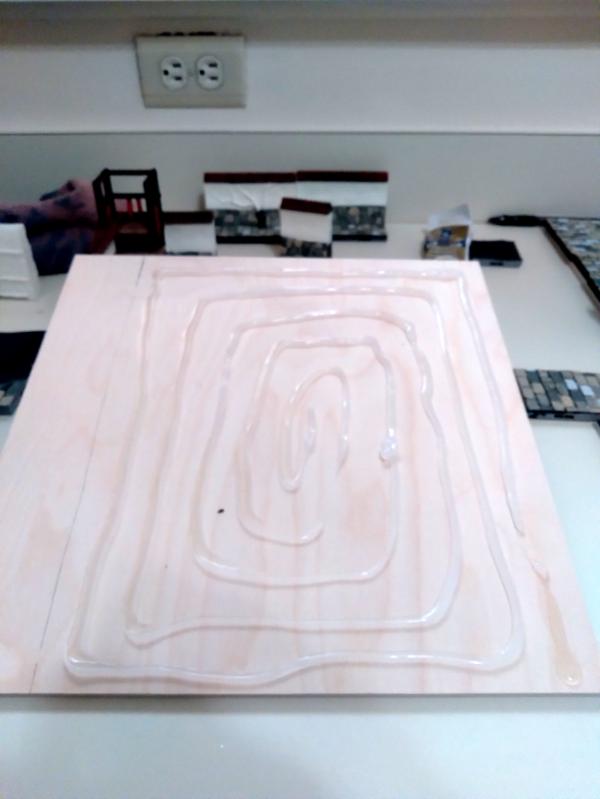
Applied in a spiral pattern:
And Bob's your uncle- just stick the pieces on and you're done. The Open Lock System bases to all the tiles allow for a lot of space for excess silicon to squirt up into- I had no problem with excess material squeezing out from under the tiles:
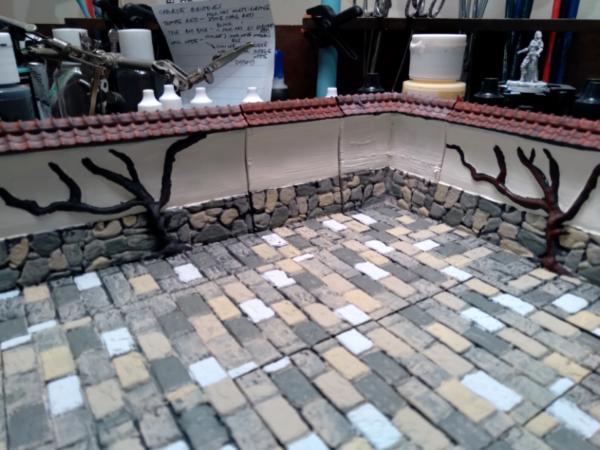
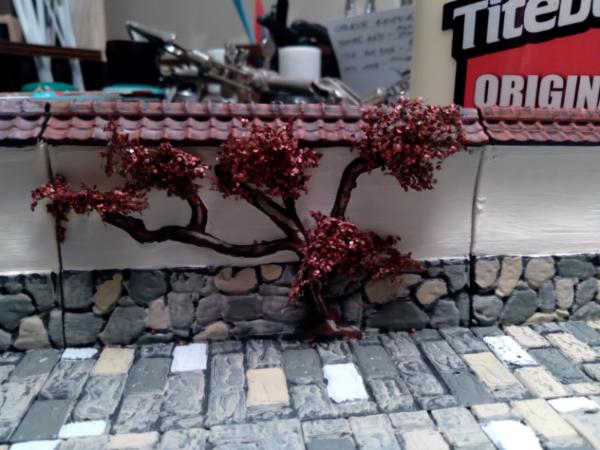
I had done two of the quadrants yesterday and so started the finishing work on one of these, the one with the vines or tress molded onto some of the wall sections. I base coated the tree trunk black and then used a really 'wet' dry brush to apply a dark brown (just black on the left, black and dark brown on the right):
Then a medium-wet drybrush of a sandy brown:
Add some flocking (gotten from Green Stuff World- love those guys):
And done:
That crevice between two tiles you see in this last picture I'm going to partially fill with some grasses. This quad will be for a variety of interchangeable pieces- the bell shrine you see here, the Taicho Drums, a Zen sand garden, other things from Iain Carothers' Hobgoblin City set.
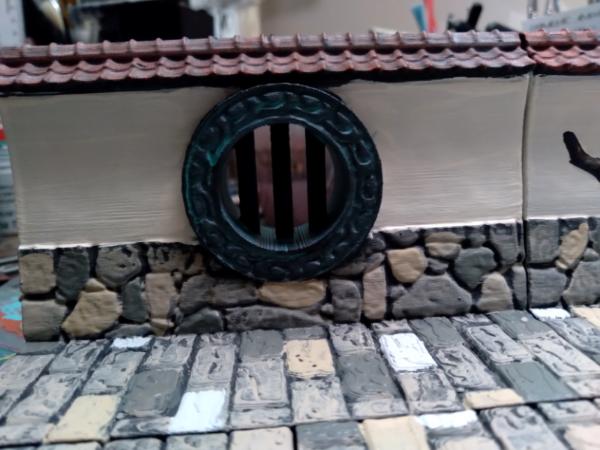
I also got some turquois paint on the wall section with the portholes (for want of a better term):
Basecoat flat black, make a wash of the paint, I may still go back and do a light drybrush of white for highlights. I was going for an aged bronze-like finish on these.
I'm also eyeballing the gaps between the wall sections- I may go and fill those in the buff colored sections and then paint so they blend better. The gaps amongst the stonework aren't so noticeable. And I'm finally ready to mix up some black wash per the YouTube video I saw and slo that around on all the stones.
Actually almost to the point of being able to say it's definitely the end of the beginning, and maybe even the beginning of the end of this project.
More follows soonest.
"He fears his fate too much, or his desserts are small, who will not put it to a single touch; to win- or lose- it all."
I mean, honestly, most of us are natural born hoarders. The hobby attracts our type like fruit flies to apple cider vinegar. The assembly looks fantastic and I love that tree. Looking great.
Our formal dine-in toasts were not that friendly to our better halfs...so they were changed over a decade ago. Which only means that there was an excuse for another toast with the old sayings.
Thanks Warboss! I've met a lot of us in our hobby and the hoarding gene manifests itself frequently, for all that it is (having traced the genome structure using a sub-atomic particle accelerator) a double recessive. We do all seem to have it. I don't mind hoarding so much, as being willing to use pieces from the hoard- the question is always "Do I use this now or for when it will really be useful?". Having so much plastic on hand that someone will be very happy to be gifted everything I didn't get painted in this life is actually somewhat liberating- I'm more apt now to say 'screw it, I'll try using this and if it doesn't work, nothing lost".
Thanks Josh! I hadn't really thought about trees growing up walls as defining age, but it surely does. Something must have been around awhile for a whole tress to mature on it. The red foliage was a happy accident: I had this box of stuff lying around and didn't have any more traditional colors (green) on hand, so used it. I like the look and am happy that others think it works also. Not being well-studied in Asian cultures (some 200-level classes in college) I'm really looking for a generic 'feel' that could be anything- although much of the architectural flourishes in the set are clearly Japanese. I backed the Reaper Bones V Kickstarter, so will have the Oni Add-on coming my way sometime this summer to paint up. I also have a couple of Midlam Miniatures Hobgoblins to use to populate the villa.
Thanks Captain! You make a good point: I did say dinings in, but meant dinings out! For the ins we had some colorful toasts as well (only members of the Mess present). For outs we had to be slightly more civilized. The most fun I ever had was being invited to a Dining In as a Guest of the Mess with the Amalgamated Highland Regiment. I loved the pageantry, ceremonial and traditions of all military customs and courtesies and the Scots had them all in spades. As the last formal Act of the Mess, the President called for the pipes to 'parade the Mess' and they did- by walking across the tops of the tables! Truly magnificent and easy to see how the bagpipes were used to whip up a frenzy in preparation for an assault. Now _there's_ an idea for a miniature diorama- or even a whole Imperial Guard Regiment!
I'm at the Farm this week and getting some painting done in the evenings, so should have some photos to add directly. Thank you all for looking in and for your comments.
More follows soonest.
"He fears his fate too much, or his desserts are small, who will not put it to a single touch; to win- or lose- it all."


 . My hobby time is limited, and spending half of it trying to get things to work is a recipe for disaster to me.


 Finished Forge World Elysian Army
  Finished Tau Sept Cadre
  Alaitoc Eldar Warhost
  Finished Order of Our Martyred Lady - Sisters of Battle
  Finished Necromundian Imperial Guard Regiment