| Author |
Message |
 |
|
|
|
|
Advert
|
Forum adverts like this one are shown to any user who is not logged in. Join us by filling out a tiny 3 field form and you will get your own, free, dakka user account which gives a good range of benefits to you:
- No adverts like this in the forums anymore.
- Times and dates in your local timezone.
- Full tracking of what you have read so you can skip to your first unread post, easily see what has changed since you last logged in, and easily see what is new at a glance.
- Email notifications for threads you want to watch closely.
- Being a part of the oldest wargaming community on the net.
If you are already a member then feel free to login now. |
|
 |
2017/03/31 11:21:51
Subject: ]Preparing the Head for the Interrogator-Chaplain with Jump Pack
|
|

Focused Dark Angels Land Raider Pilot
|
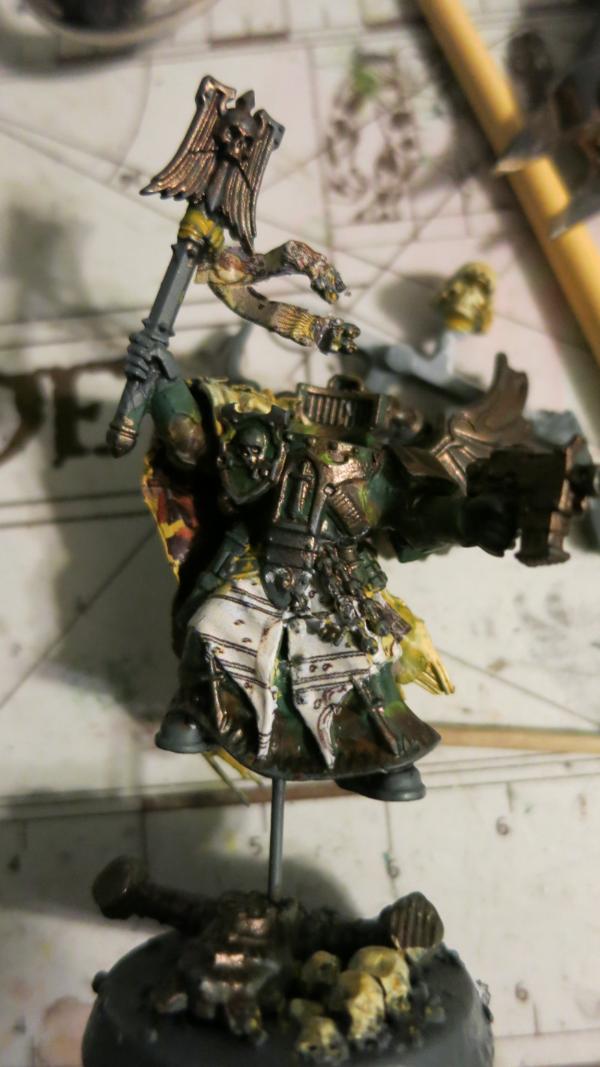
Preparing the Head for the Interrogator-Chaplain with Jump Pack
I have started painting my heads separate from the rest of the model. Often when the head is mounted on the model, it is difficult to paint. It also helps with the detail on the face which can be lost if there are too many layers of paint. For most of my models, I spray a black base coat, and then a grey base coat sprayed from the front and top. I then spray a white base coat on the face, usually just a single quick squirt to brighten up the face. By keeping the head separate, I don’t use the black on the face, only the grey for the back and lower part of the face, and then use the white directly down and towards the face so that the gray provides some shadow and the white the highlights.

Hooded Face for the Interrogator-Chaplain
It was fairly easy to paint the face for this particular model since the face is only a white skull. I painted the face an off white with white highlights.

Hooded Face for the Interrogator-Chaplain – Right Side View
|
|
|
 |
|
2017/04/01 20:57:31
Subject: Decaling the Interrogator-Chaplain with Jump Pack
|
|
Focused Dark Angels Land Raider Pilot
|
Decaling the Interrogator-Chaplain with Jump Pack
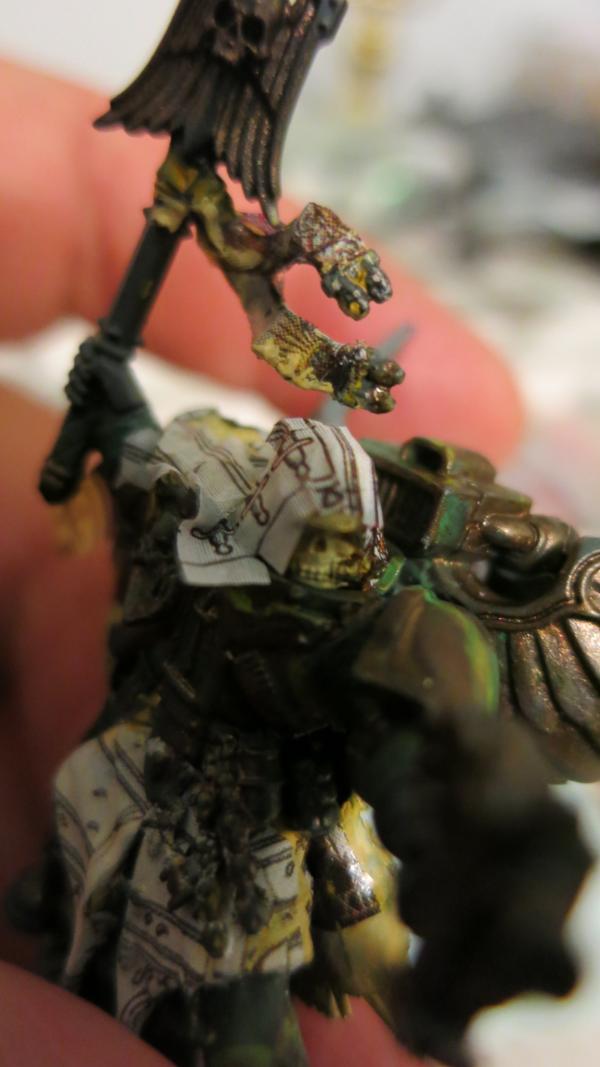
The Decals on the Front of the Interrogator-Chaplain
I applied the front decals with Micro Set® and then Micro Sol® right over the bits such as the key in front. Then I kept reapplying the Micro Sol® and scraping away that part of the decals over the bits until the bits were exposed so that the bits look like they are over the decals on the fabric. This was a long and tedious work. If you look close at the bits, particularly the key at the front, you can see the decals still over the key. I will then repaint over any remains of the decals on the bits. Also, note the head in the background.

The Decals on the Cape of the Interrogator-Chaplain
I used a lot of Micro Sol® over the decal on the cape so that the decal followed the flow of the cape. Again, this took time but not as much time as bits on the front. After I put the cape on the model, I had to blend it into the front of the cape at the front of the model and add decals over this area. I also glued the head to the model.
The next pictures show the steps to get the decals on the top portion of the robe.

Placing the Decal Sheet over the Models Head and Shoulder
I had to use a large sheet over the head and shoulders of the model and then used repeated doses of Micro Sol® to conform the decal to this complicated surface.
Conforming the Decal to the Hood and Top of Cape
This was time consuming and I had to remove some of the decals to fit it. Slowly the model emerged.
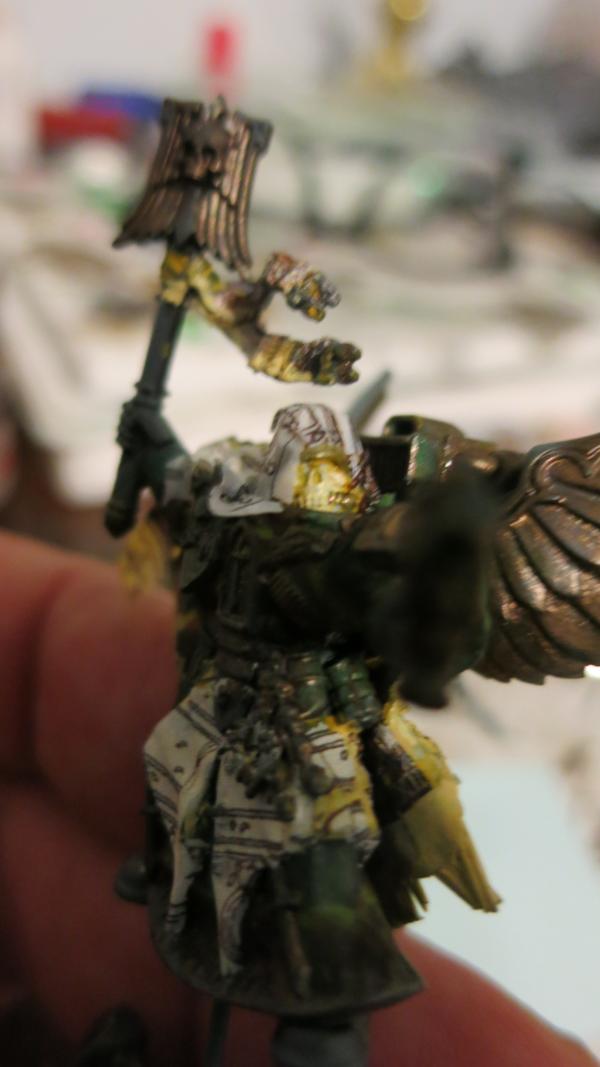
Conforming the Decal to the Hood and Top of Cape
Notice the decals on the banner of the chaplain’s Crozius Arcanum.
After placing all the decals on the top front of the model, I repeated the process for the top rear of the cape.
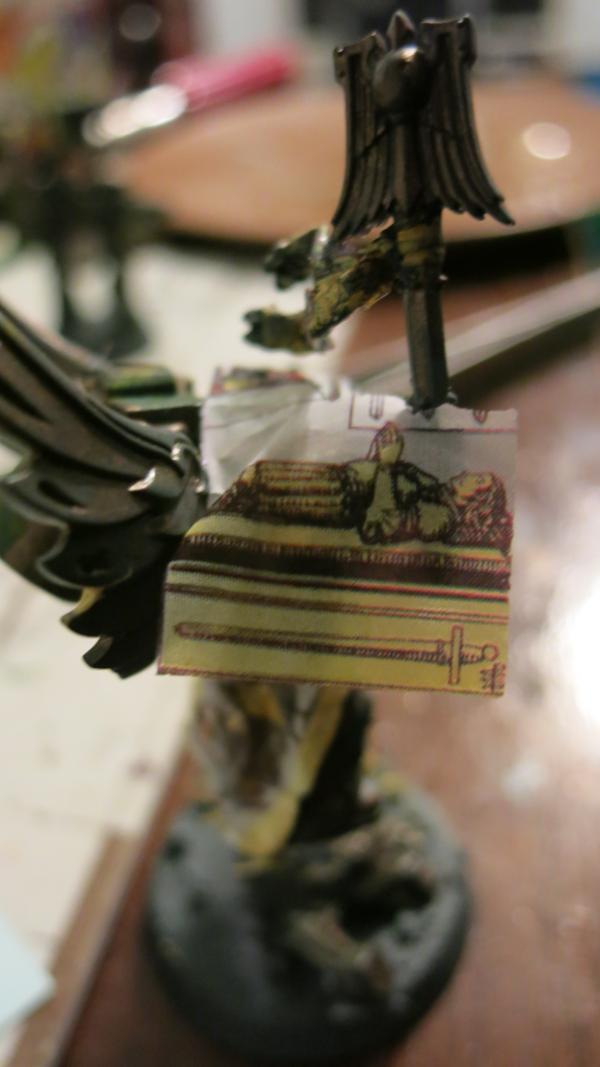
Placing Decal on Top Rear of the Model
|
|
|
|
|
2017/04/02 16:31:14
Subject: The Interrogator-Chaplain with Jump Pack
|
|
Focused Dark Angels Land Raider Pilot
|
The Interrogator-Chaplain with Jump Pack

The Interrogator-Chaplain with Jump Pack and Crozius Arcanum– Front View
I painted metallic gold over the bits and the trim on this hood. Using washes, I also painted portions of the decals.
The Interrogator-Chaplain with Jump Pack and Crozius Arcanum– Right Rear View
The Interrogator-Chaplain with Jump Pack and Crozius Arcanum–Rear View
Note the over painting of washes on the decals on the cape to both darken the folds in the cape and to bring out the blue.
The Interrogator-Chaplain with Jump Pack and Crozius Arcanum–Front Right View

The Interrogator-Chaplain with Jump Pack and Crozius Arcanum–Front Left View
Notice a small bit of decal got on the ridge of the base. These small flaws are only seen in the pictures since the model themselves are fairly small.
All this work for a model that I probably don’t need after the Dark Angels FAQ came out.
|
|
|
|
|
2017/04/03 22:50:32
Subject: Stormhawk Interceptor
|
|
Focused Dark Angels Land Raider Pilot
|
Stormhawk Interceptor
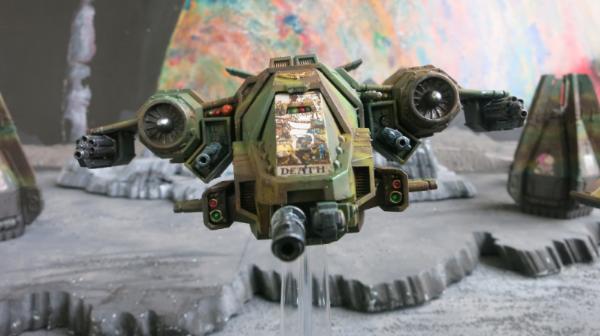
I like having a flyer - mostly to counter any flyers or flying creatures that might threaten my ground troops. For the points, the tough little Stormhawk Interceptor seems a good choice. Games Workshop’s pictures of the Stormhawk Interceptor always have the cockpit cover painted white. This seemed to be a perfect choice for one of my tarot card decals. For this little flyer, the death tarot card seemed a match.
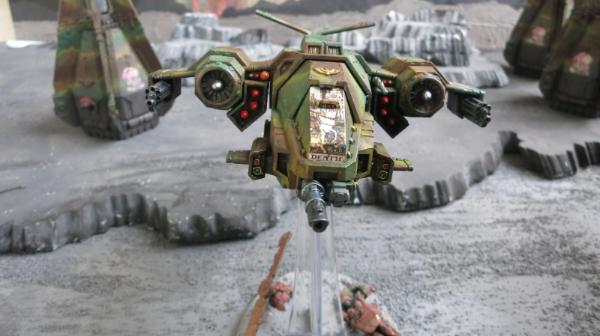
Stormhawk Interceptor with Las-Talon and Death Tarot Card
I used an airbrush to paint the model but brush painted on a white base for the decal.

Stormhawk Interceptor with White Base Coat for Decal

Stormhawk Interceptor with White Base Coat for Decal
I used a base coat with a mixture of white, ochre yellow and metallic gold. It looks terrible until the decal is placed, and then it really lights up the model.
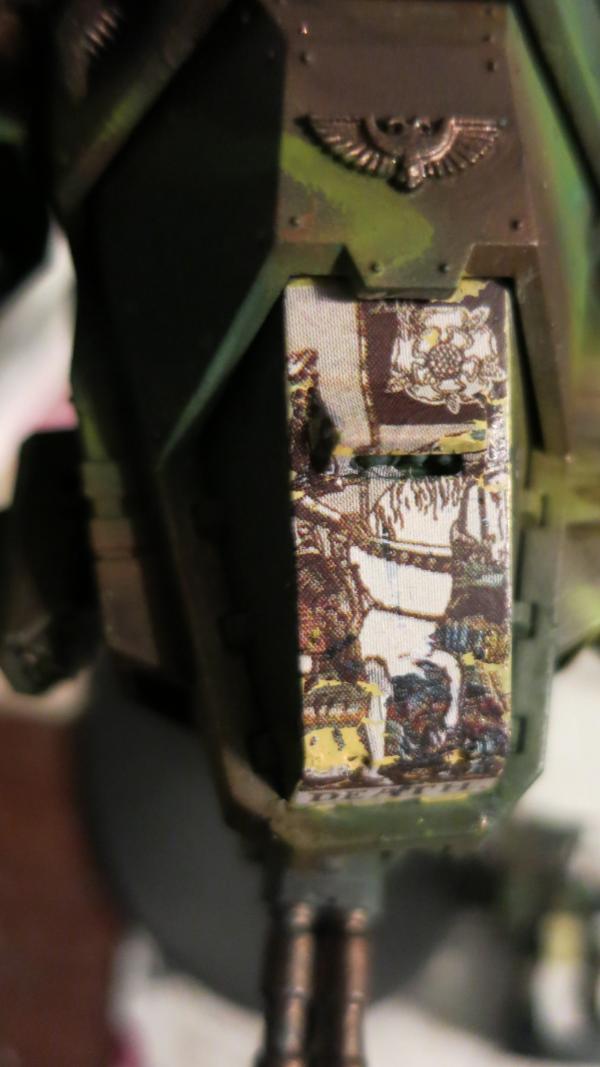
Close-up of Death Tarot Card Decal on Stormhawk Interceptor
To get it right, I had to work it over the periscope opening which took at little work. I also had to deal with the left and right sides of the periscope cover. I think I used some excess decal material to match it.

Stormhawk Interceptor with Las-Talon and Death Tarot Card
|
|
|
|
|
2017/04/04 10:54:19
Subject: Re:6th Biker Troop - “Schrödinger's Apocalyptic Raiders”
|
|

Stealthy Space Wolves Scout
|
Like the camo on the marines; a bit unusual and that's always cool, but I love the transfers you've worked out for the banners and the stormhawk and the the interrogator chaplain especially!
|
|
|
|
|
2017/04/05 02:14:43
Subject: Re:6th Biker Troop - “Schrödinger's Apocalyptic Raiders”
|
|
Focused Dark Angels Land Raider Pilot
|
Kurnost wrote:Like the camo on the marines; a bit unusual and that's always cool, but I love the transfers you've worked out for the banners and the stormhawk and the the interrogator chaplain especially!
Thank you for your comments. The decals are fun and I really sort of stumbled into them. There was a booth at NOVA Open a couple of years ago for Fallout Hobbies who would custom make decals. The first set I ordered was a skull insignia with red flowers which was nice and I really like it. But one day I realized that I would like decals of Medieval manuscripts so I went through the internet and found old Bible manuscripts and ordered a second set of decals. Then I realized that Tarot cards decals would also be cool and ordered them. Still it is only lately that I discovered how neat the manuscripts and tarot cards decals made these models. I especially like the Tarot cards but the other two sets of custom decals work really well with the Tarot cards.
|
|
|
|
|
2017/04/05 21:52:05
Subject: Stormhawk Interceptor – The Magnetized Weapons Systems
|
|
Focused Dark Angels Land Raider Pilot
|
Stormhawk Interceptor – The Magnetized Weapons Systems
If you can’t figure out what you want, use magnets so that you can choose among the weapons systems. I have tried this with some of my infantry and bike models, but I found that it really doesn't work too well. If I am trying to choose between a space marine with a flamer and one with a meltagun, I just make two models rather than try to magnify the guns. It is quicker and the weapons are stable and don’t fall out and get lost. For a bigger model such as this flyer, however, the magnetized weapons are doable.
Stormhawk Interceptor with Las-Talon and Heavy Bolter
Not a bad choice. What else is there?

Stormhawk Interceptor with Icarus Stormcannon and Heavy Bolter
Not bad. What else?
Stormhawk Interceptor with Las-Talon and Skyhammer Missile Launcher
Stormhawk Interceptor with Las-Talon and Typhoon Missile Launcher
I also magnetized the back of the Heavy Bolter/Missile Pod. The back for the two missile launchers is the same but the back for the heavy bolter is different. See if you can tell the difference.

Rear View of Stormhawk Interceptor with Heavy Bolter
Rear View of Stormhawk Interceptor with Missile Launcher
If you can’t, don’t worry about it. I had to blow the picture up to see the difference and I know what I am looking for. Actually, it is difficult to spot the difference even with the live model so I probably will just use the missile launcher back for the pod since it is really difficult to remove and replace it, even with the magnet.
|
|
|
|
|
2017/04/07 00:35:24
Subject: Re:6th Biker Troop - “Schrödinger's Apocalyptic Raiders”
|
|
Focused Dark Angels Land Raider Pilot
|
Stormhawk Interceptor – More Pictures
I took a lot of pictures of the Stormhawk Interceptor. Here are some more.
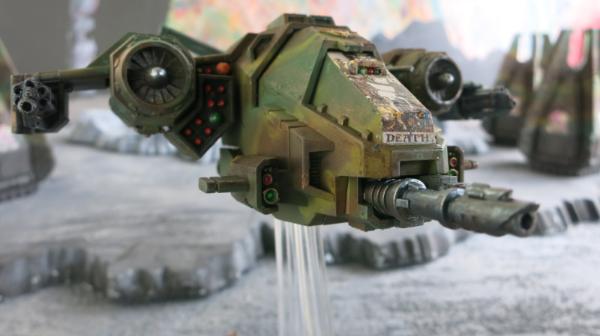
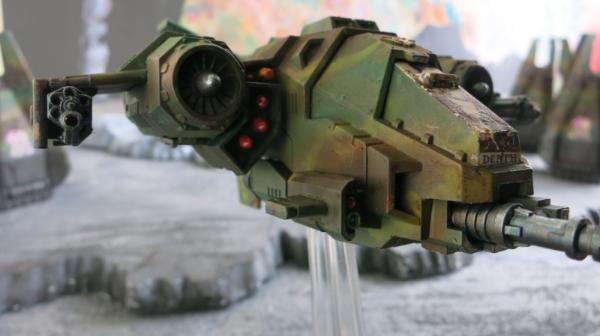
Stormhawk Interceptor with Las-Talon and Heavy Bolter – Left Side

Stormhawk Interceptor with Las-Talon and Heavy Bolter – Right Side
Stormhawk Interceptor with Las-Talon and Heavy Bolter
This picture and the last show the effect of the dark and light paint. I keep the top light and the bottom dark. In normal light, the top looks light and the bottom dark. The light is coming from the right top. The bottom looks naturally dark.

Upside Down Stormhawk Interceptor with Las-Talon and Heavy Bolter
Here the flyer is upside down. Notice that the top of the flyer is about the same darkness as the bottom of the flyer. This is because the light is lighting up the upper area which is painted with a shade. The lower part of the plane which is normally the top is painted brighter than the bottom but because it is now in the shade, it looks the same darkness as the lighted portion above. The overall effect is that the model appears duller than the normal pictures.
Many animals are camouflaged by having their coloring with dark coloring at the top and the light coloring at the bottom. When they are in the wild, they have the same effect as my upside down airplane and the animal is a bland and blends into the landscape. The shape of the animal is hidden.
This is actually a challenge with painting an animal or a military model in a natural setting. For our model, we want the model to pop so it draws the eye. In reality, the animal or soldier wants to remain hidden. Our goal to make our model realistic counters our goal to make our models draw the eye. So I counter my camouflage pattern by darkening my natural shadows and lighting the lighted areas to make the model more noticeable. .
|
|
This message was edited 1 time. Last update was at 2017/04/07 00:37:22
|
|
|
|
|
2017/04/07 14:43:11
Subject: 6th Biker Troop - “Schrödinger's Apocalyptic Raiders”
|
|

Pious Palatine
|
Amazing work with the decals on the Chaplin!
EDC
|
|
|
|
|
2017/04/08 16:17:47
Subject: 6th Biker Troop - “Schrödinger's Apocalyptic Raiders”
|
|
Focused Dark Angels Land Raider Pilot
|
|
|
|
|
|
2017/04/09 12:30:30
Subject: Ravenwing Dark Talon
|
|
Focused Dark Angels Land Raider Pilot
|
Ravenwing Dark Talon
The Ravenwing flyers may be some of the neatest looking flyers in the 40K universe but they are over-costed for competitive play. Of course, I am not that competitive. I played a Nephilim Jetfighter at the NOVA Open 40K Narrative and its performance was underwhelming. Actually, I never encountered another flyer at the Narrative so I used the Nephilim for ground support which it is not really made for. Actually, it is over-costed for its anti-flyer role and I think the Stormhawk Interceptor would do just as good for less points. See prior posts.

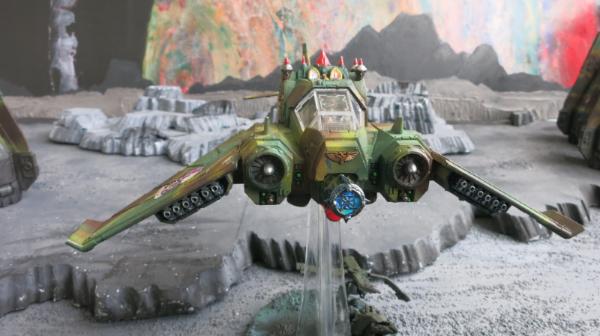
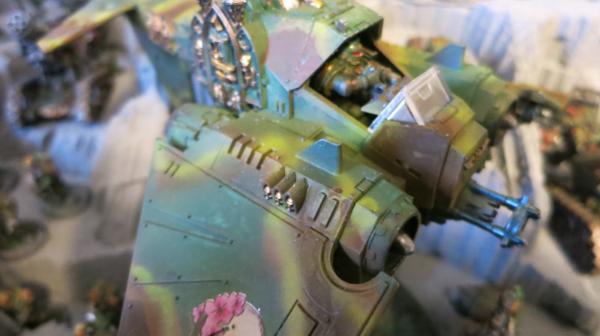
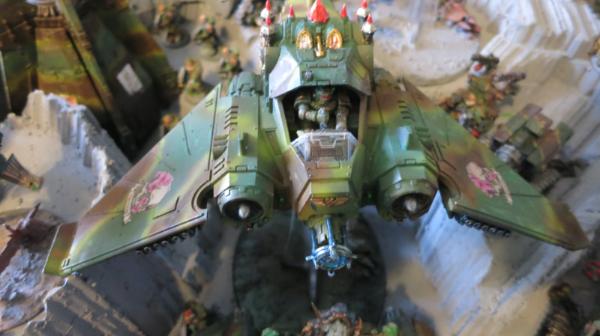
Ravenwing Dark Talon
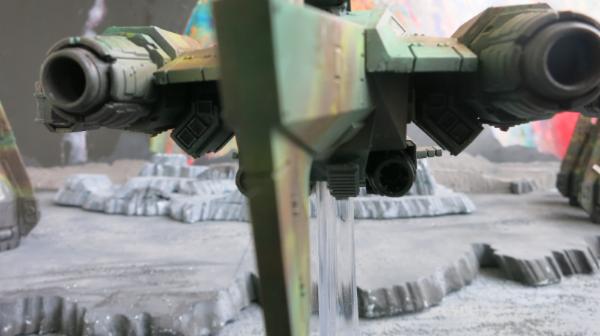
For slightly fewer points, the Ravenwing Dark Talon might be fun for ground support. So I made one. This picture clearly shows the war gear, the two hurricane bolters, the weird looking Rift cannon in the nosecone, and the Stasis bomb underneath. None of these is particularly designed for flyer to flyer combat but they could make enemy ground troops unhappy.

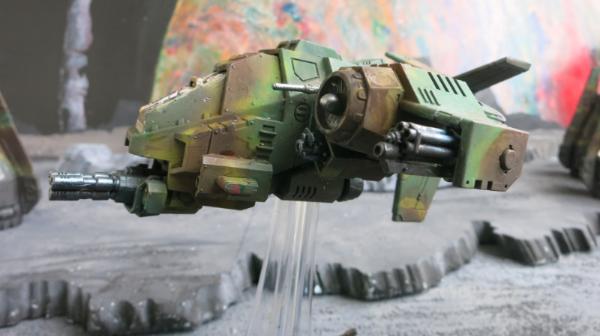
Ravenwing Dark Talon – Right Side View
It is a gaudy model, especially in comparison with the Jetfighter but that part of the Dark Angel’s charm. Actually, like most of the 40K flyers, they look better in the camouflage than in the traditional color scheme.

Ravenwing Dark Talon – Left Side View
|
|
|
|
|
2017/04/11 01:09:26
Subject: Re:6th Biker Troop - “Schrödinger's Apocalyptic Raiders”
|
|
Focused Dark Angels Land Raider Pilot
|
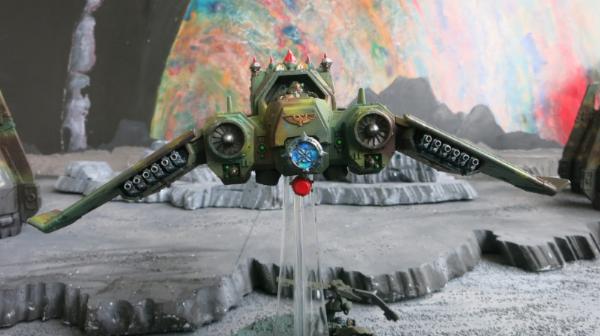
Ravenwing Dark Talon – Canopy or Not?
I like the look of the pilot in the cockpit.
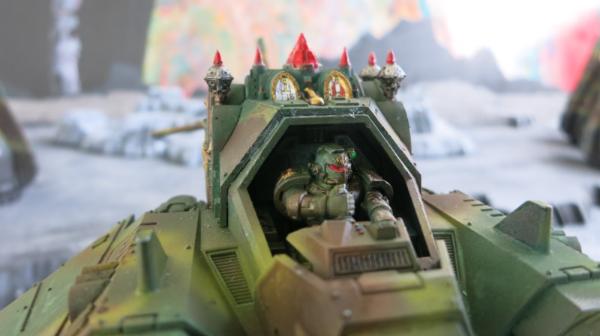
Ravenwing Dark Talon – Pilot
I actually prefer the look of the pilot without the canopy but it does look unfinished. Below are some comparison shots.
Ravenwing Dark Talon – With Canopy

Ravenwing Dark Talon – Without Canopy

Ravenwing Dark Talon – With Canopy

Ravenwing Dark Talon – Without Canopy
What do you think? I am leaning toward cutting up the canopy to make a windshield. I think I have an extra canopy that came with the Stormhawk Interceptor. Perhaps, I will cut that up and see how it looks.
|
|
|
|
|
2017/04/11 08:21:05
Subject: 6th Biker Troop - “Schrödinger's Apocalyptic Raiders”
|
|
Pious Palatine
|
Personally I think it needs something. As you say without it, it does look a bit unfinished.
EDC
|
|
|
|
|
2017/04/12 01:32:27
Subject: 6th Biker Troop - “Schrödinger's Apocalyptic Raiders”
|
|
Focused Dark Angels Land Raider Pilot
|
 evildrcheese wrote: evildrcheese wrote:Personally I think it needs something. As you say without it, it does look a bit unfinished.
EDC
I agree. I experimented with an extra canopy that I cut to make a windshield. I took several quick pictures and they are a little blurry.
 Ravenwing Dark Talon with Windshield
 Ravenwing Dark Talon with Windshield 2
 Ravenwing Dark Talon with Windshield 3
|
|
|
|
|
2017/04/13 00:30:58
Subject: Ravenwing Dark Talon – Magnetized Stasis Bomb
|
|
Focused Dark Angels Land Raider Pilot
|
Ravenwing Dark Talon – Magnetized Stasis Bomb
I magnetized the Statis Bomb since it is a One Use Only Weapon. So here it the Dark Talon on a bombing run.
Ravenwing Dark Talon – Before Dropping off Statis Bomb
Ravenwing Dark Talon – After Dropping off Statis Bomb
Lots of fun.
|
|
|
|
|
2017/04/15 17:30:49
Subject: Ravenwing Dark Talon – Upside Down
|
|
Focused Dark Angels Land Raider Pilot
|
Ravenwing Dark Talon – Upside Down

Ravenwing Dark Talon – Right Side Up
This shows how the brighter top and darker bottom of the model shows the three dimensional shape of the model.

Ravenwing Dark Talon – Up Side Down
Here the colors are more muddled with the top and the bottom the same intensity. I discussed this earlier with the Stormhawk Interceptor.
|
|
|
|
|
2017/04/20 15:01:33
Subject: Re:6th Biker Troop - “Schrödinger's Apocalyptic Raiders”
|
|
Focused Dark Angels Land Raider Pilot
|
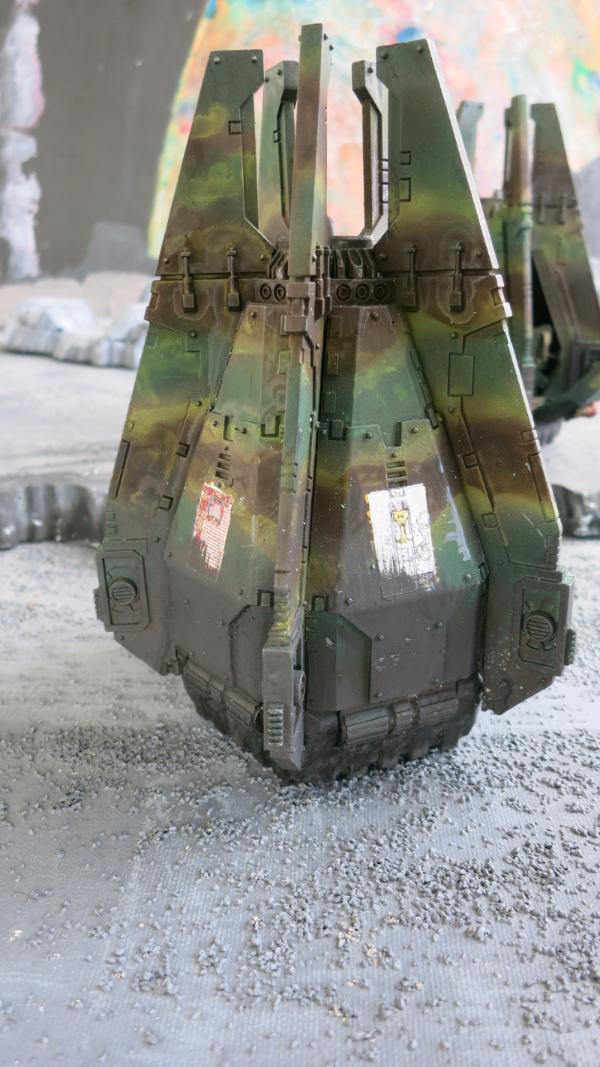
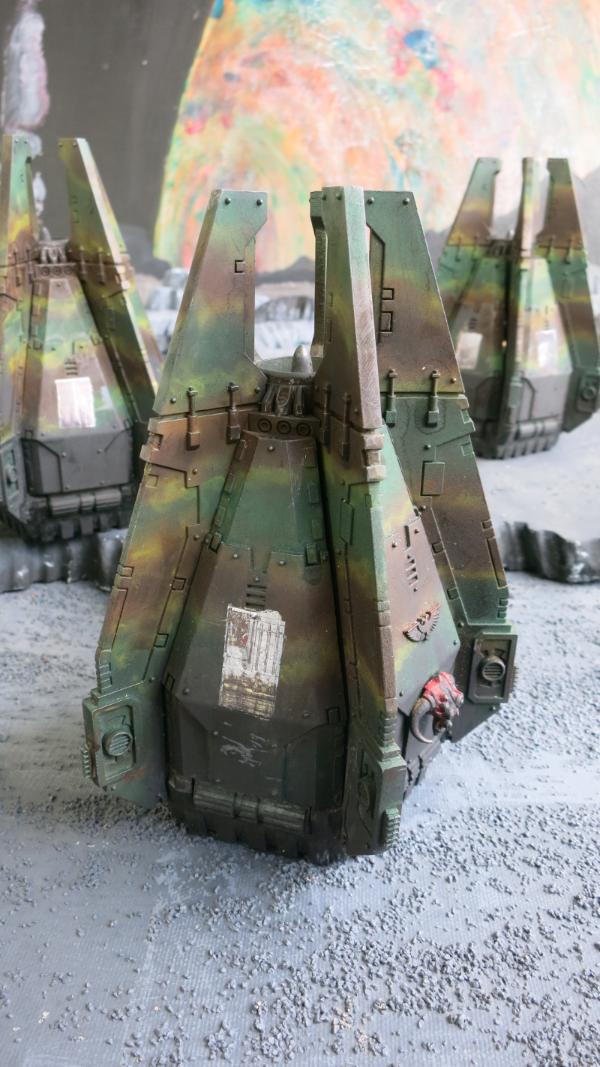
Drop Pods
I put some of my decals of my drop pods so I took to many pictures of them. I also used a lot of pigment so that they looked like they had they had just finished with a fiery landing.
Drop Pod – Ace of Cups Tarot Card

Drop Pod – Ten of Swords Tarot Card

Drop Pod – Ace of Cups Tarot Card
Drop Pod – Manuscript
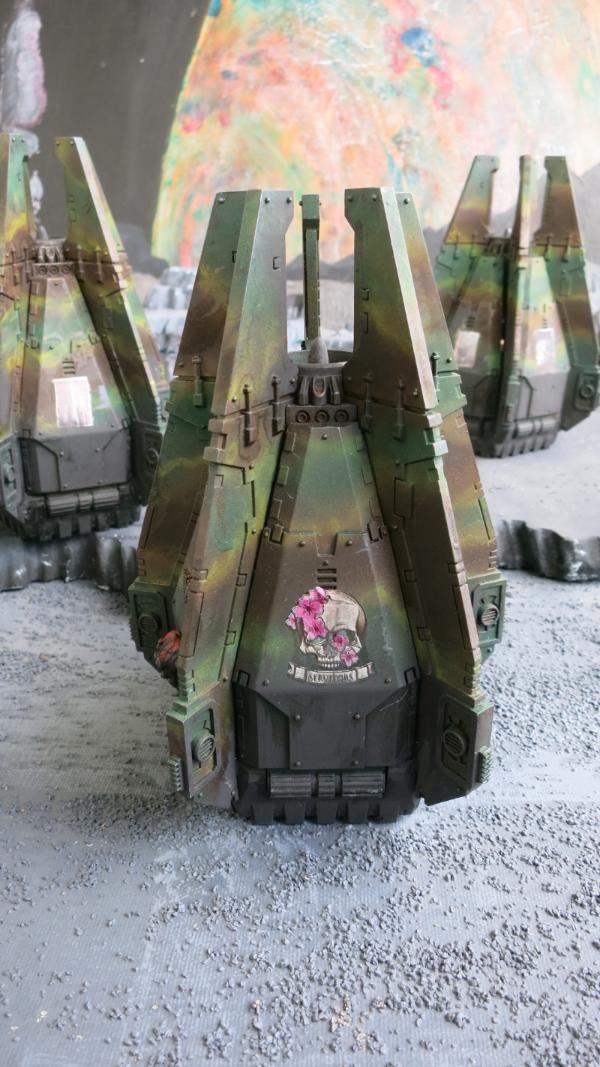
Drop Pod – Skull with Flowers

Drop Pod – Head of Demon Prince
Drop Pod – Four of Swords
|
|
|
|
|
2018/01/01 14:56:31
Subject: Unfinished Ogre Leadbelchers
|
|
Focused Dark Angels Land Raider Pilot
|
Unfinished Ogre Leadbelchers
It has been a while since I posted. My last post was in April 2017. I have not been as involved with the hobby during 2017.
Still, I started working on projects, including these Ogre Leadbelchers. Below are some pictures of the ogres with just a base coat.

Unpainted Ogre Leadbelchers with Heads
The heads are attached with sticky tack, a blue reusable adhesive putty that my wife uses to post temporary pictures. Sticky tack allows me to assemble a model for spray painting the whole model and then pull some parts off for more detailed painting. I have started painting heads separate from the rest of the model.

Unpainted Ogre Leadbelchers – Top View
The fuses are made from twisted floral wire and the flames are pulled green stuff.

Single Unpainted Ogre Leadbelchers
|
|
|
|
|
2018/01/12 21:11:27
Subject: Dark Angel’s Primaris Azrael – The Goa
|
|
Focused Dark Angels Land Raider Pilot
|
Dark Angel’s Primaris Azrael – The Goal
One new model I have been working on is Azrael. I have had a metal Azrael for a number of years that I never painted up. I am not too excited about metal models. The figures tend to be noticeably undersized in comparison to their plastic counter-parts. They tend to be much more crudely made. Finally, they do not last as the paint tends to easily chip off them.

Metal Azrael Side by Side Other Space Marines
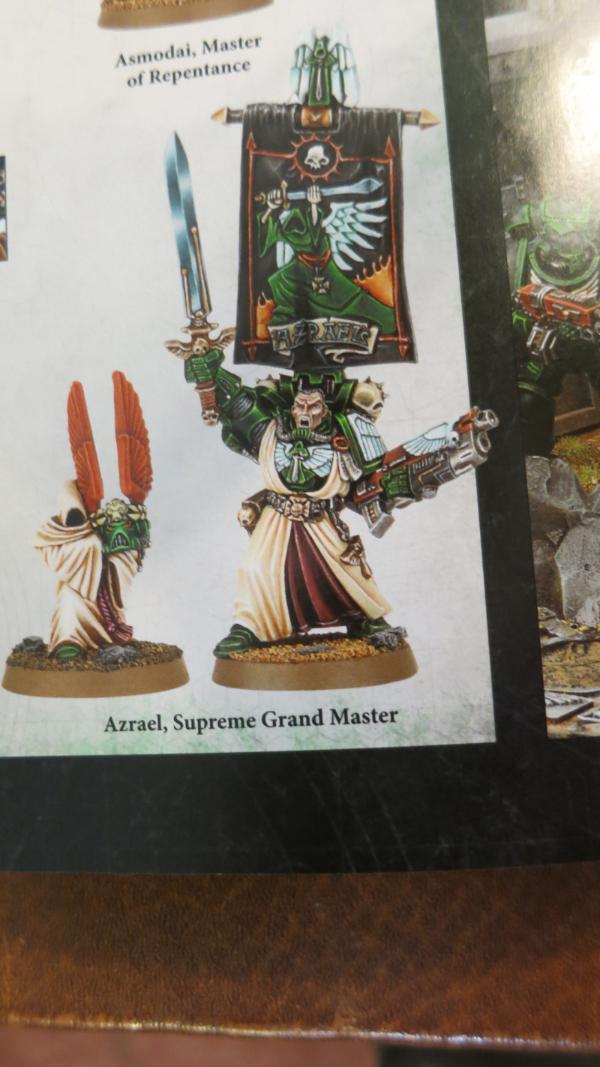
Notice in this picture, Azrael seems slightly undersized in comparison with other marines. This is going to be even more noticeable if I deploy him aside Primaris models such as Hellblasters. Moreover, the metal model does not really look like him. The Codex Dark Angels has a picture of Azrael that I really like.

Picture of Azrael Found in the Dark Angels Codex
Compare this picture to the picture of the painted metal model also found in the Codex.
Picture of Model of Azrael Also Found in Dark Angels Codex
This model, although masterfully painted by one of Games Workshops modelers, does not have the power or authority of the Azrael in the first picture. Of course, few models would but I think the Primaris Captain comes closer.

Unpainted Primaris Captain

Unpainted Primaris Captain
This is the look I would like to have for my Azrael model. This is the goal.
|
|
|
|
|
2018/01/14 19:22:04
Subject: Re:6th Biker Troop - “Schrödinger's Apocalyptic Raiders”
|
|
Focused Dark Angels Land Raider Pilot
|
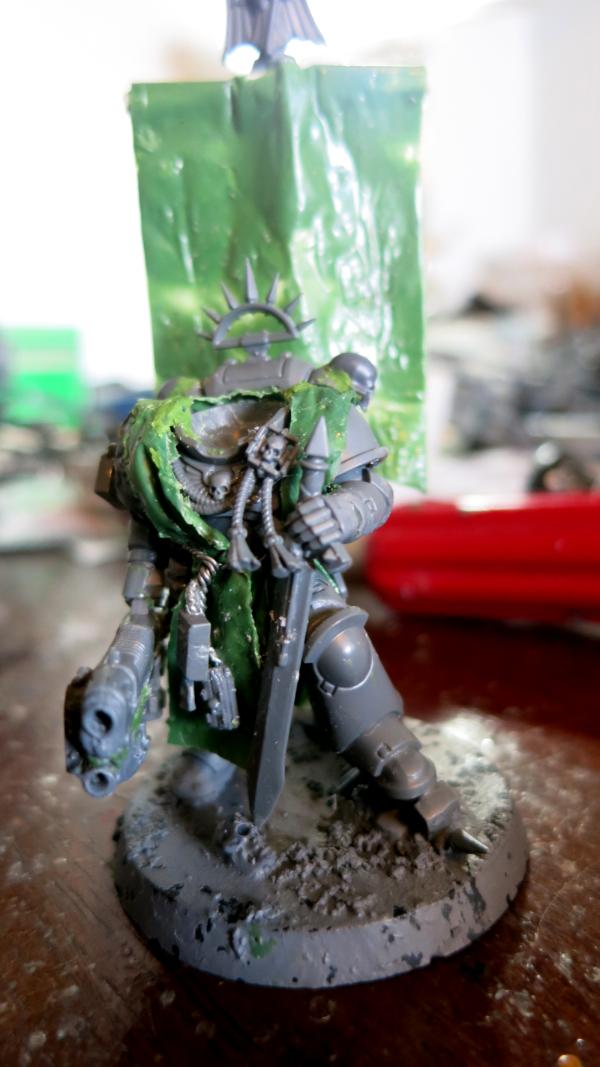
Primaris Azrael – The Execution
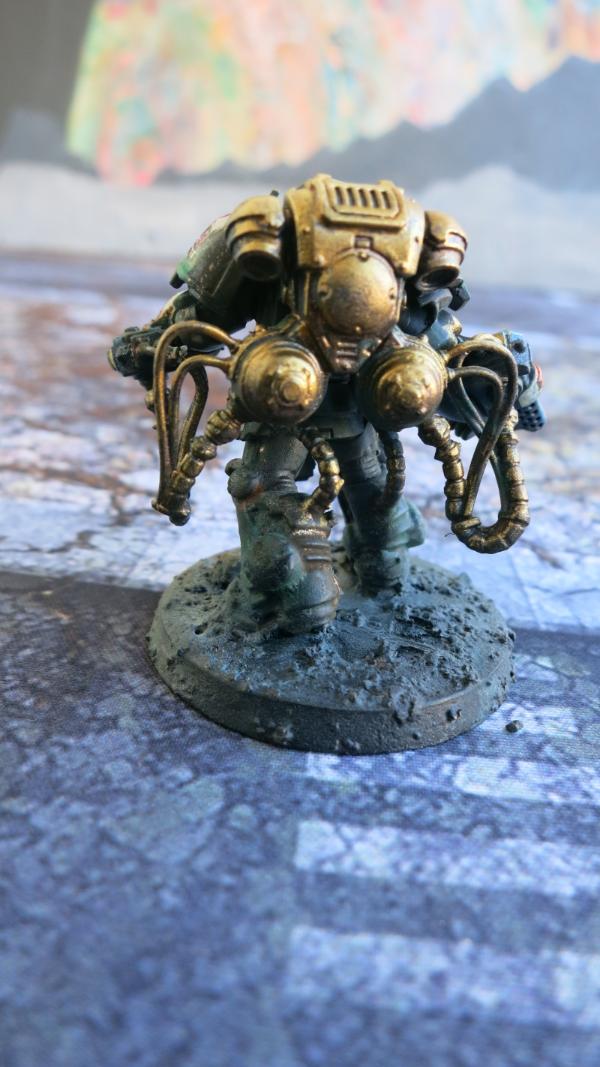
I have decided to build Azrael using the Primaris Captain as the template. This will mean that Azrael with be considerably bigger than the metal model. Below is an unfinished Primaris Captain right next to the metal Azrael. Note the size difference even without the head.

Metal Azrael Next to Unfinished Primaris Captain
This model took a look of customizing with bits from the Primaris Captain and bits from the Dark Angels Hellblaster kit. I also added a little green stuff for the robes and flag as well as a little bit of floral wire robe to hold his robe.

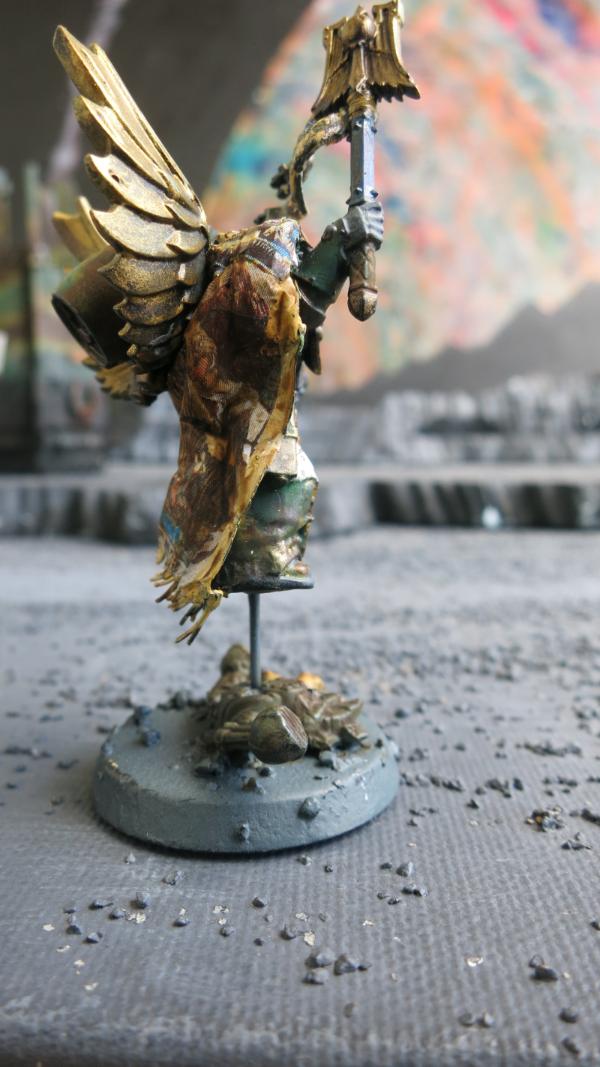
Azrael Right Side Showing the Lion’s Wrath
I cobbled the Lion’s Wrath from several kits including a Plasma Incinerator frame from the Hellblaster’s kit and a bolter with barrel-shaped magazine from another kit.

Azrael Left Side Showing the Banner
I made banner using a technique that I have discussed in a tutorial on how to make banners and capes. They are actually fairly easy to make once you know the technique.
I am pleased with the model but I did notice in comparing it to the pictures’ above, that Azreal’s backpack has twin skulls on the sides. I’ll have to see if I can add this.
|
|
|
|
|
2018/01/15 20:30:42
Subject: Primaris Azrael –Twin Skulls
|
|
Focused Dark Angels Land Raider Pilot
|
Primaris Azrael –Twin Skulls
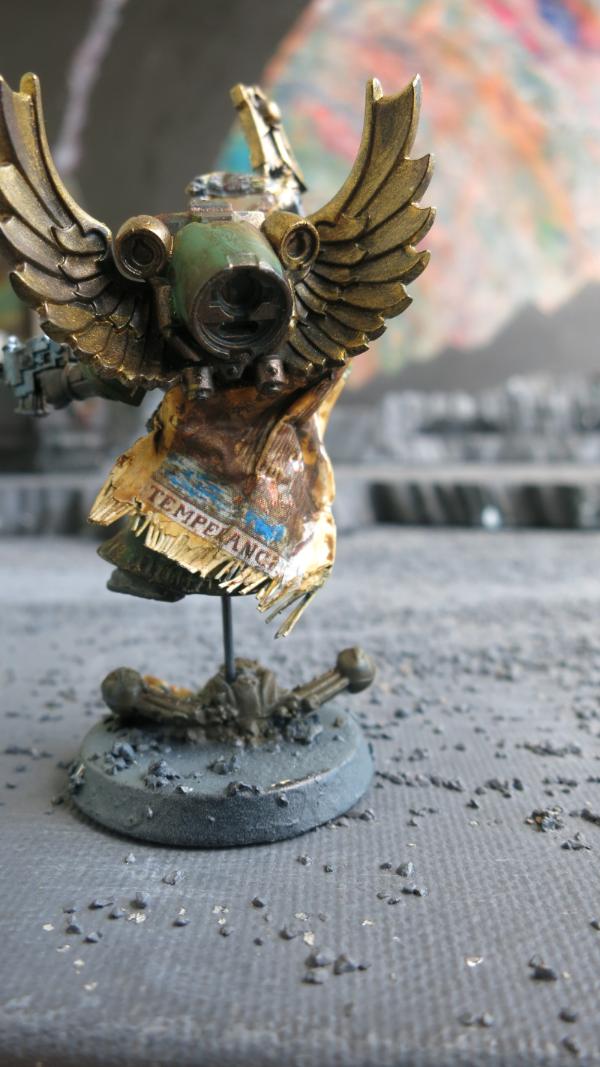
After viewing the pictures of Azrael, I decided to add the twin skulls on his backpack. I have plenty of skulls since I bought the Citadel Skull kit since one cannot have too many skulls for the Grim Dark. I tried to carve the skull bases to fit the backpack but that was too hard so I found that it was easier to carve out a hole on the backpack and fit a skull to it. Below are the results.
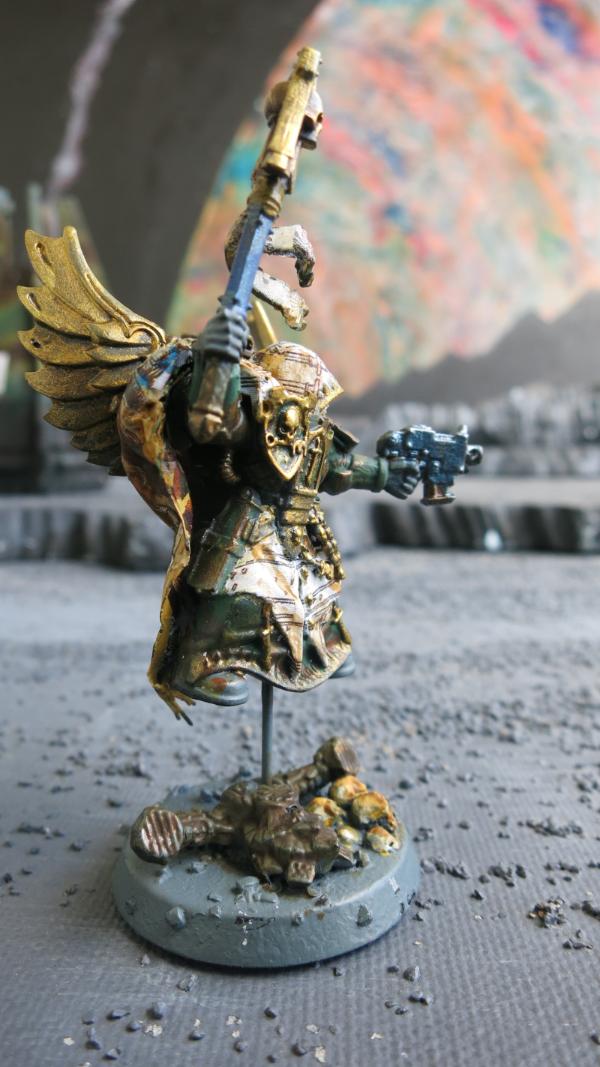
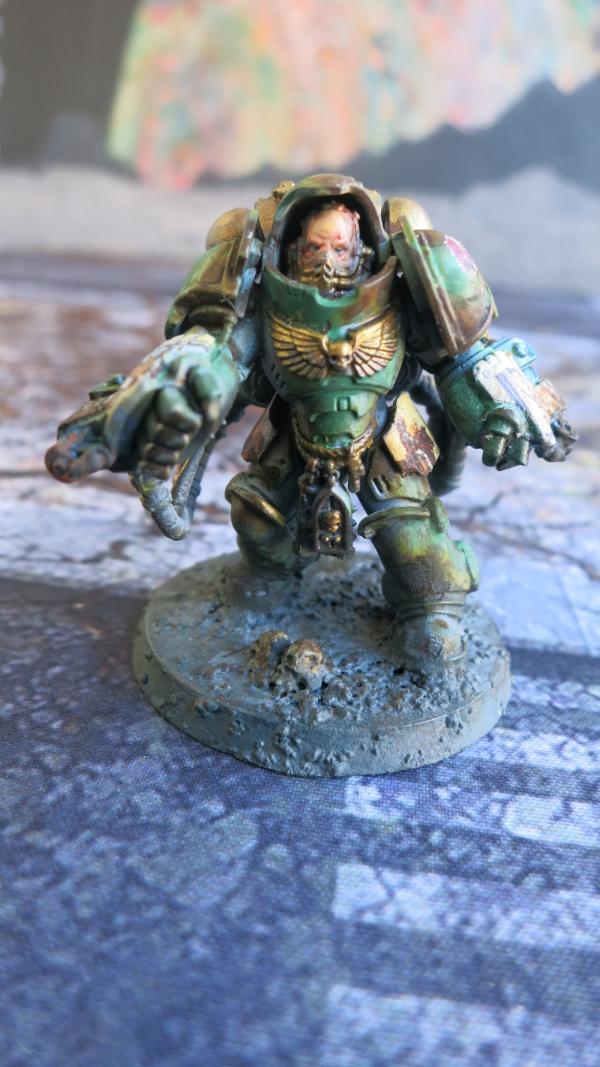
Azrael with Twin Skulls Backpack – Front View
I also added some Dark Angel bits to the ends of the rope around his robe.

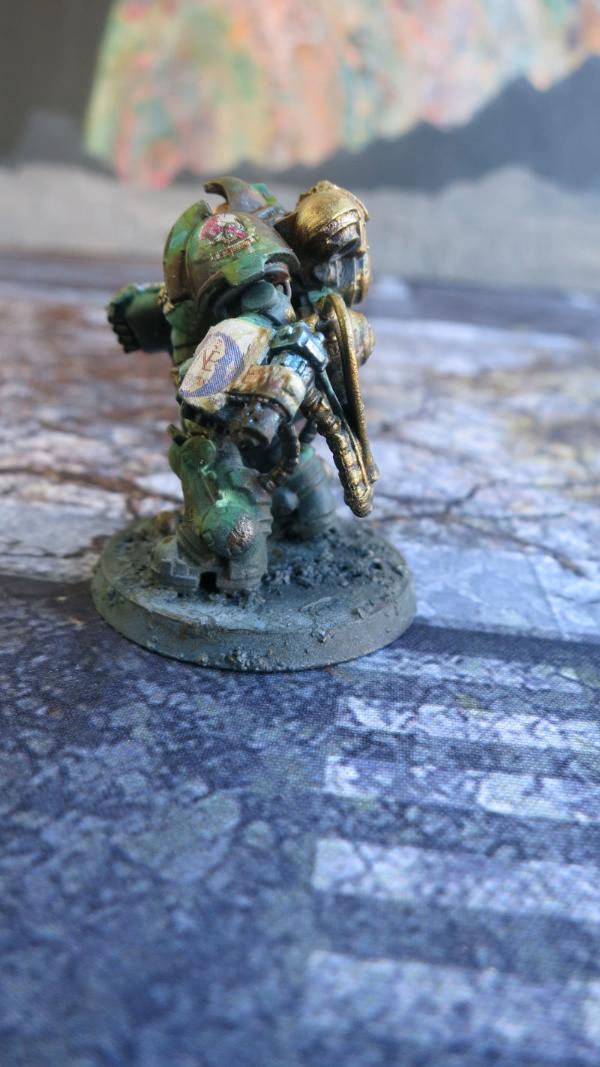
Azrael with Twin Skulls Backpack – Left Side View

Azrael with Twin Skulls Backpack – Right Side View
|
|
|
|
|
2018/01/16 16:00:48
Subject: New Primaris Models
|
|
Focused Dark Angels Land Raider Pilot
|
New Primaris Models
I really like the new Primaris models and just finished an Intercessor Squad, a Primaris Master (or Captain) and, and Aggressor Squad. The problem is that the Primaris marines make regular marines look squatty. Below is a Primaris intercessor model next to a normal sized space marine that I built as a standard marine lieutenant. I like both but the lieutenant looks like a hobbit aside a Primaris model rather than one of the most feared warriors in the Grim Dark Universe.
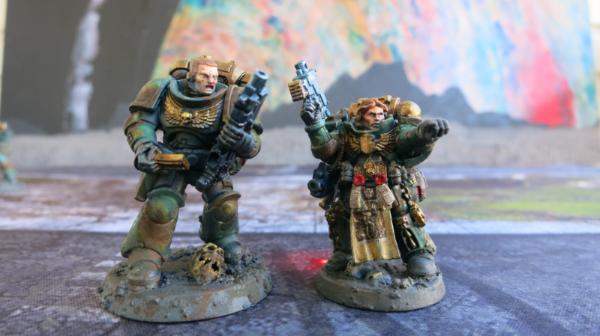
Primaris Intercessor and Regular Space Marine Lieutenant Side by Side
Below is a picture of a regular sized Apothecary and the Lieutenant alongside a Primaris Captain. It looks like Gandalf with Frodo and Sam, two hobbits. Of course, part of the reason is that I used some old Bretonnia heads for the Apothecary and the Lieutenant. It also doesn’t help that the space marines have this little squatty stance that makes them look like dwarfs.
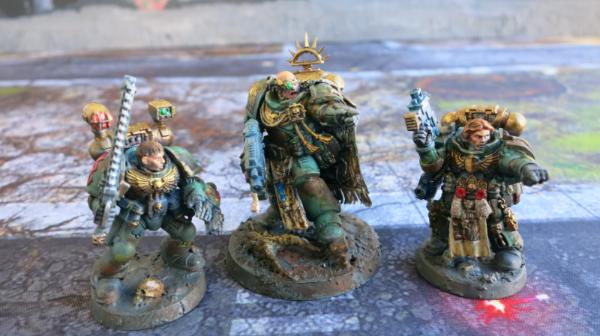
Primaris Captain with Regular Space Marine Apothecary and Lieutenant - 1

Primaris Captain with Regular Space Marine Apothecary and Lieutenant - 2
|
|
|
|
|
2018/01/17 15:12:56
Subject: The Aggressor Squad
|
|
Focused Dark Angels Land Raider Pilot
|
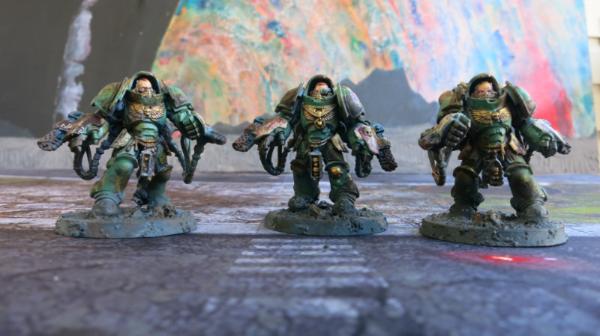
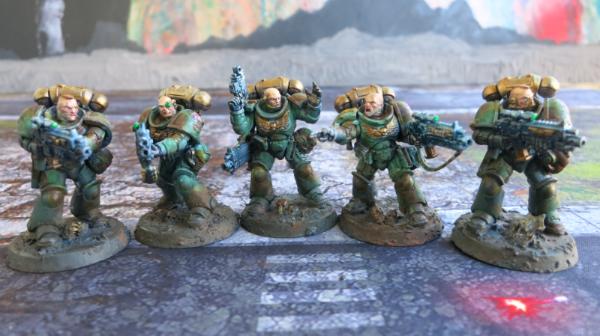
The Aggressor Squad
With each model having Flamestorm Gauntlets with 2D6 shots that automatically hit their targets, these three models can put out 6 to 36 wounds during the shooting phrases, with the average being about twenty-one wounds. This aggressor squad may be a good tool to remove hordes of light infantry. At least it was fun to build.

Aggressor Squad Ready to Flame 1
When I was at the Basic Infantry Officer’s training, one of the instructors told us to pick our most sadistic and most expendable soldier to operate the flame-thrower. The soldier should be sadistic since he needs to enjoy watching other people burn. He needs to be expendable since once the flames start, everyone on the battlefield knows exactly where the flamethrower is. I always try to make my flamer models a little more flamboyant than the other models because they are flamers.
Aggressor Squad Ready to Flame 1
|
|
|
|
|
2018/01/18 18:25:35
Subject: The First Aggressor
|
|
Focused Dark Angels Land Raider Pilot
|
The First Aggressor

First Aggressor – Front View
I used pigment on the flamers and on the base. The pigment on the flamers gives it a rusty burned look. The pigment on the base and on the feet of the model gives the base a more natural look. The skulls on the base are from the Citadel Skull kit. The skulls are dry brushed with flake white and then covered with a mixture of browns and grey pigments.
First Aggressor – Right Side View
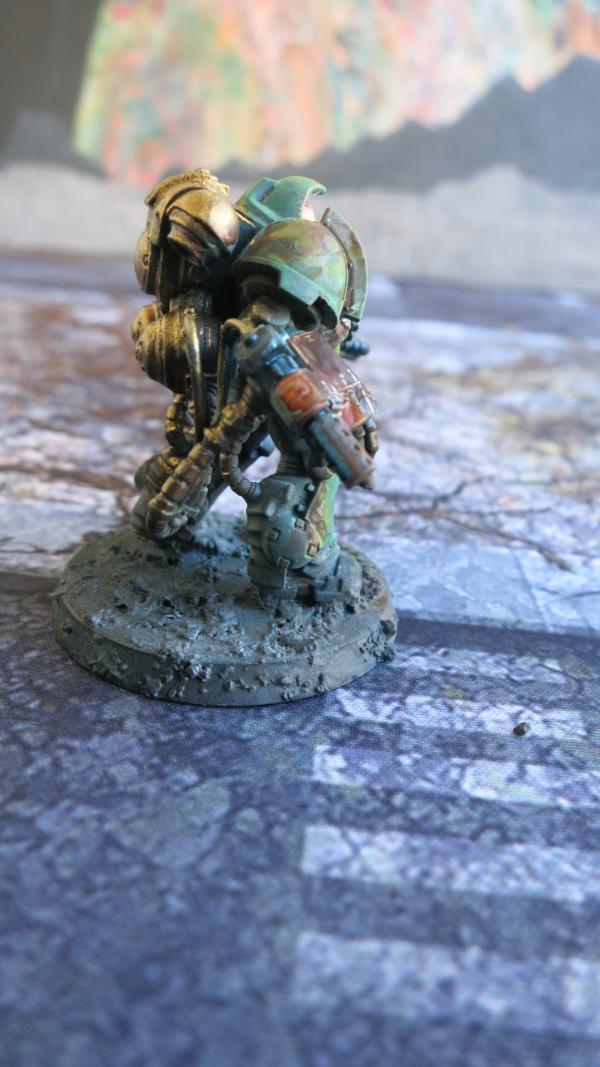
First Aggressor – Back View
This view shows hints of the footprints in the base. These are primaris marines and are heavy enough to make footprints wherever they go.

First Aggressor – Left View
This view shows the details of the flamer. I put a decal on the handguard but used pigment and a sepia wash to give it depth and the rusted worn look. The flamer itself is painted with a gunmetal blue metallic paint and then covered with pigment.
|
|
|
|
|
2018/01/19 16:27:06
Subject: The Aggressor Sergeant
|
|
Focused Dark Angels Land Raider Pilot
|
The Aggressor Sergeant

The Aggressor Sergeant – Front View
He must be the Sergeant. He has an icon on his chest.

The Aggressor Sergeant – Left View
The problem with close-ups is that the picture shows the flaws, is hard to focus, and distorts the image. Still, I do it to show the detail.

The Aggressor Sergeant – Rear View
This view shows the footprints. The backpack and the hoses are painted with tin bits (a dark brown metallic), bronze, with gold highlights. This gives depth.

The Aggressor Sergeant – Right View
This model is somewhat out of focus.
|
|
|
|
|
2018/01/21 02:15:05
Subject: Tableware™ Urban Combat Gaming Mat
|
|
Focused Dark Angels Land Raider Pilot
|
Tableware™ Urban Combat Gaming Mat
Several years ago at NOVA Open; Frontline Gaming & Tableware™ were selling Gaming Mats that could be preordered before the convention. I preordered a 6’x4’ Urban Combat gaming mat which I picked up at the convention, took it home, and put in my closet without even opening the box. Life got busy and I forgot about it. A few days ago, when I was photographing my models, I set up my background. Looking at my old homemade battleground, I noticed that is was pretty beat up and had warped. So I finally pulled out the gaming mat out of the box and used it. I was really pleased. It was heavy and flexible enough to lie down really flat and the color was just perfect. My models look pretty good on this mat. I am pleased and will use this mat in both my photographs and for my gaming.

Primaris Intercessor on Tableware™ Urban Combat Gaming Mat
I used a painting of a gas giant that I painted a few years ago for the background. The gaming mat is laid over a card table. As you can see if you look carefully at the next picture,the picture of the gas giant just leans against a wall just outside my porch. I really like the red spot right near the base of the mat.

Primaris Intercessor on Tableware™ Urban Combat Gaming Mat and Painting of Gas Giant
|
|
This message was edited 2 times. Last update was at 2018/01/21 19:08:00
|
|
|
|
|
2018/01/22 14:26:08
Subject: The Second Aggressor
|
|
Focused Dark Angels Land Raider Pilot
|
The Second Aggressor
The Second Aggressor – Front View
For some reason, this aggressor has smaller flamers than the other two.
The Second Aggressor – Left Side View

The Second Aggressor – Rear View
This view also shows the footprints. The paint look mottled in this picture but that is a problem with the close-up. The actual model has no noticeable mottling.

The Second Aggressor – Right Side View

The Second Aggressor
|
|
|
|
|
2018/01/23 13:51:20
Subject: The Intercessor Squads
|
|
Focused Dark Angels Land Raider Pilot
|
The Intercessor Squads
I built two intercessor squads, each of five men. These are troops and troops create battalion and brigade detachments which in turn create command points. Although these are expensive troops, they seem to be more durable than scouts and tactical squads. Unfortunately, I placed both sergeants, the ones with the keys on their belts, in the same squad in the picture of the first intercessor squad and none in the picture of the second squad. Of course, this is no big deal except for these pictures.
The First Intercessor Squad
Both squads have an auxiliary grenade launcher which may be fun.

The Second Intercessor Squad
|
|
|
|
|
2018/01/24 15:04:00
Subject: The First Intercessor Sergeant
|
|
Focused Dark Angels Land Raider Pilot
|
The First Intercessor Sergeant
This is one of my favorite models. He is everything an Intercessor Sergeant should be: opinionated, loud, and in charge.

The First Intercessor Sergeant – Front View

The First Intercessor Sergeant EAT DEATH
If you want to know what the writing on his bolt rifle reads, it reads DEATH. Unfortunately the scrolling hides the D and the H so that the word appears as EAT. Both work.
The First Intercessor Sergeant – Right Side View

The First Intercessor Sergeant – Left Rear View
Although I am now painting almost all of my human models with bare head because I like painting bare heads, I have each model's helmet readily accessible. Also note the footprints on the base.
|
|
|
|
|
2018/01/25 18:51:42
Subject: Intercessor with Mohawk
|
|
Focused Dark Angels Land Raider Pilot
|
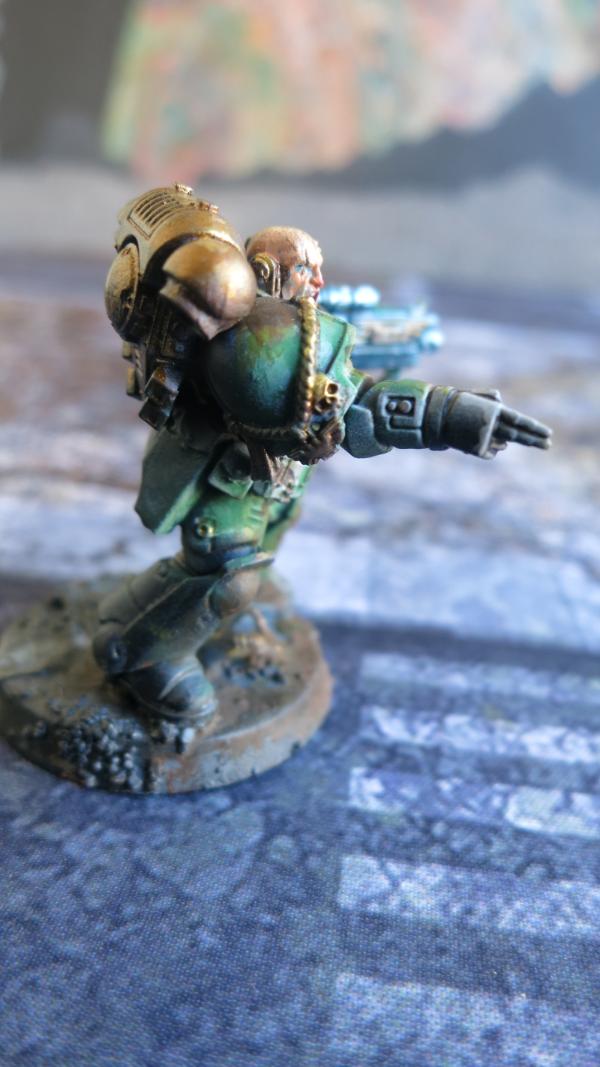
Intercessor with Mohawk
Sometimes, I take my picture too close to the model. It shows details but a lot of the model is out of focus and the image is distorted.
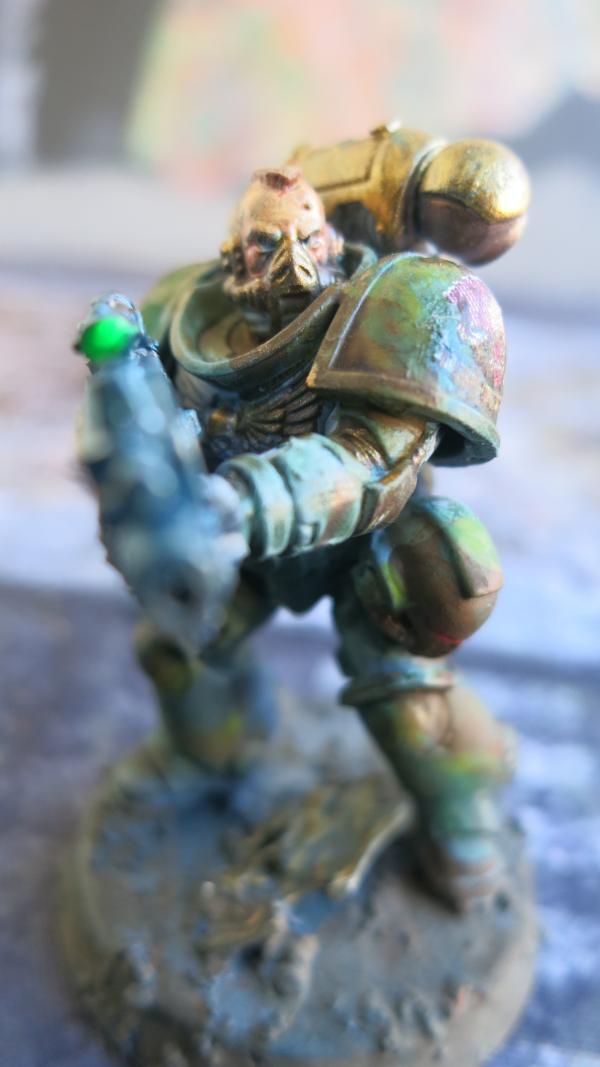
Intercessor with Mohawk – Close Up
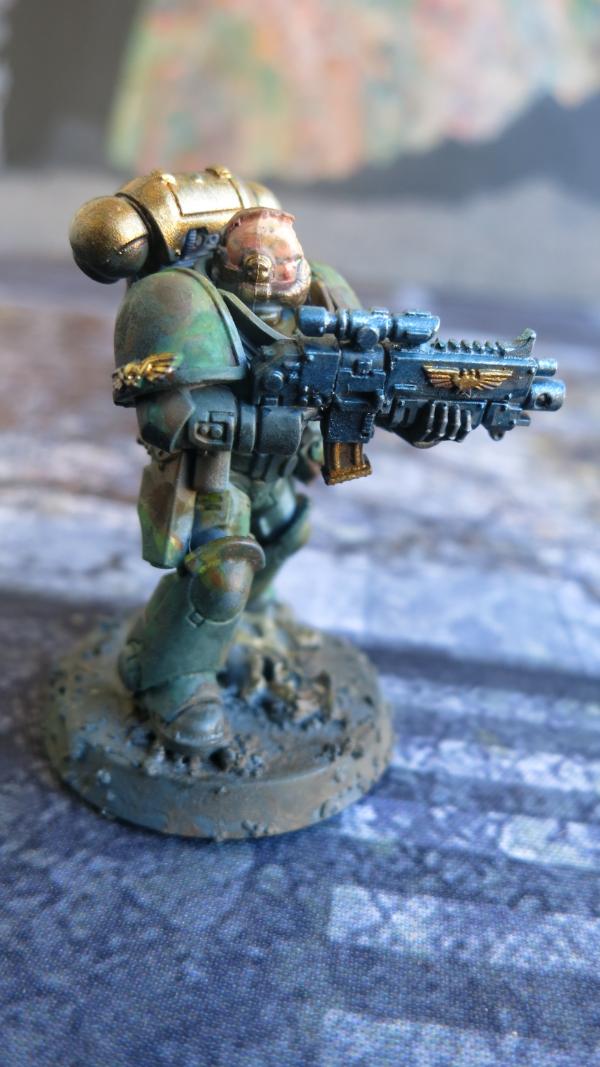
Intercessor with Mohawk – Right Side View
I missed a seam line in the head. One advantage of these close ups is that I can see details that I may miss just looking at the model. I like the bluing with the bronze details on the bolt rifle.

Intercessor with Mohawk – Right Rear View
Again, these close ups show details that I missed when I examined the model. Note the gold on his winged skull that has smeared to the shoulder pad.
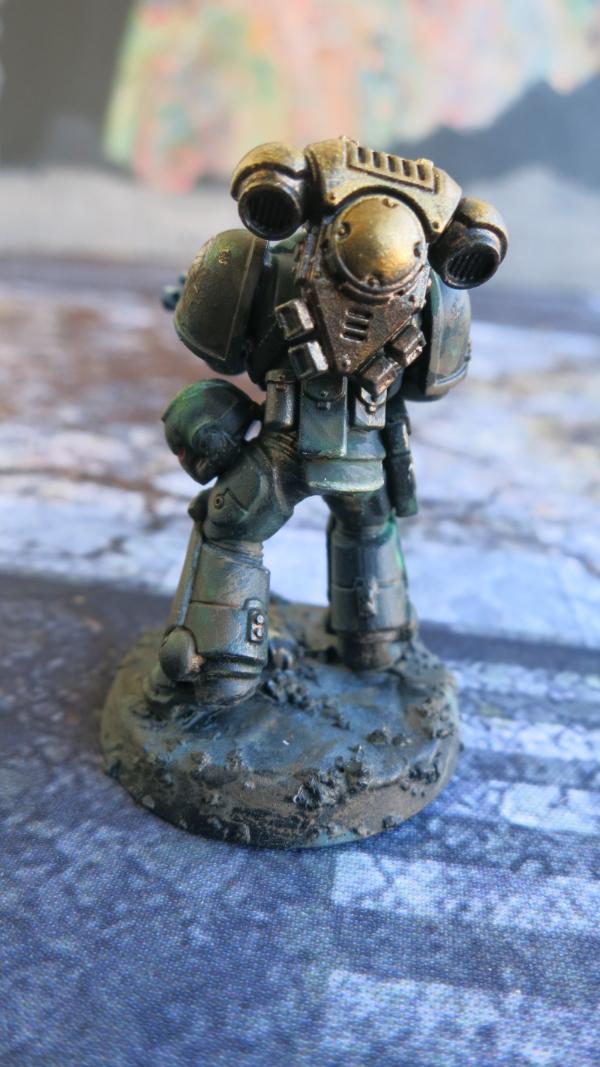
Intercessor with Mohawk –Rear View
|
|
|
|
|
|
|