| Author |
Message |
 |
|
|
|
|
Advert
|
Forum adverts like this one are shown to any user who is not logged in. Join us by filling out a tiny 3 field form and you will get your own, free, dakka user account which gives a good range of benefits to you:
- No adverts like this in the forums anymore.
- Times and dates in your local timezone.
- Full tracking of what you have read so you can skip to your first unread post, easily see what has changed since you last logged in, and easily see what is new at a glance.
- Email notifications for threads you want to watch closely.
- Being a part of the oldest wargaming community on the net.
If you are already a member then feel free to login now. |
|
 |
2014/07/04 22:28:33
Subject: Orkishness - the thunderfarter years. it's just Dredd full!!
|
|

Near Golden Daemon Caliber
|
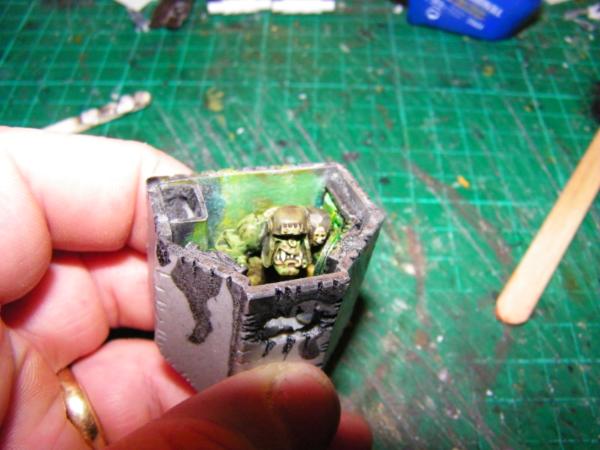
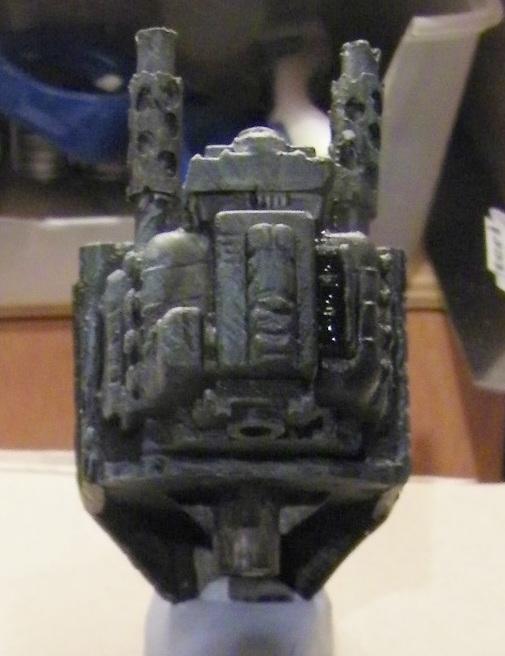
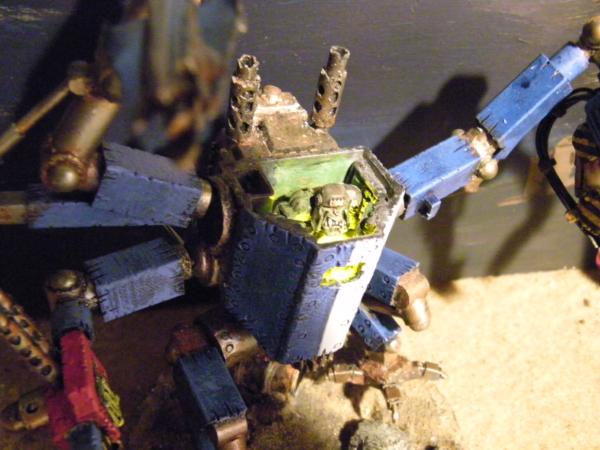
I never imagined a dred with lit panels and screens in it.... that's awesome!
|
|
|
|
 |
|
2014/07/04 23:15:24
Subject: Re:Orkishness - the thunderfarter years. it's just Dredd full!!
|
|

Gargantuan Great Squiggoth
|
Thanks Grim, Probably just me. This guy might be afraid of the dark, pretty cramped in there..........
Cheers
|
|
|
|
|
|
2014/07/04 23:20:21
Subject: Orkishness - the thunderfarter years. it's just Dredd full!!
|
|
Near Golden Daemon Caliber
|
That's awesome. Too cool.
|
|
|
|
|
|
2014/07/05 01:31:27
Subject: Re:Orkishness - the thunderfarter years. it's just Dredd full!!
|
|
Gargantuan Great Squiggoth
|
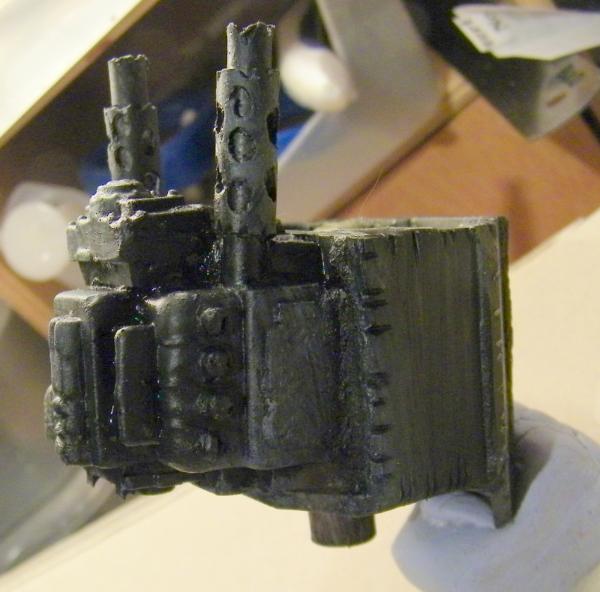
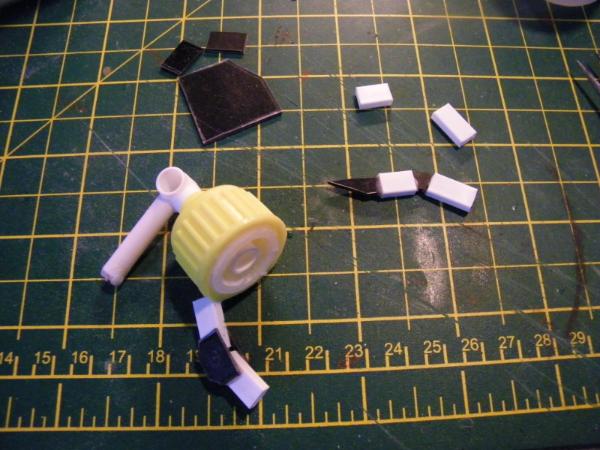
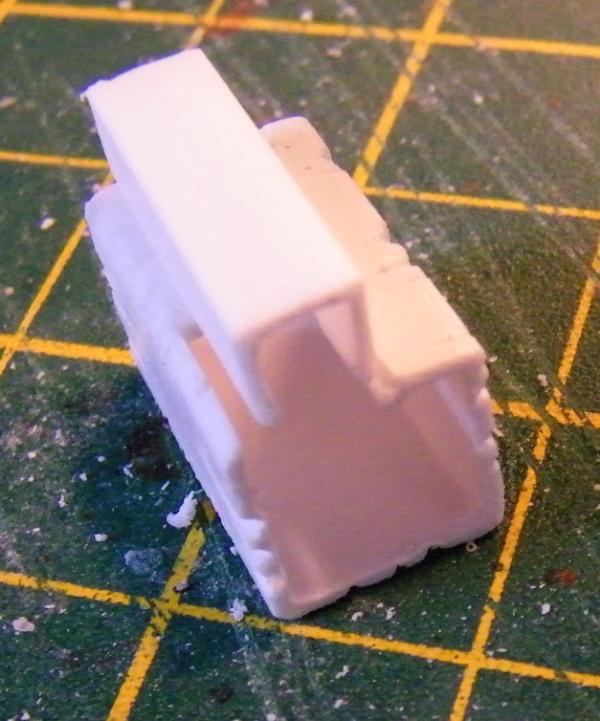
Last bit for tonight,
Here is what I cast ......
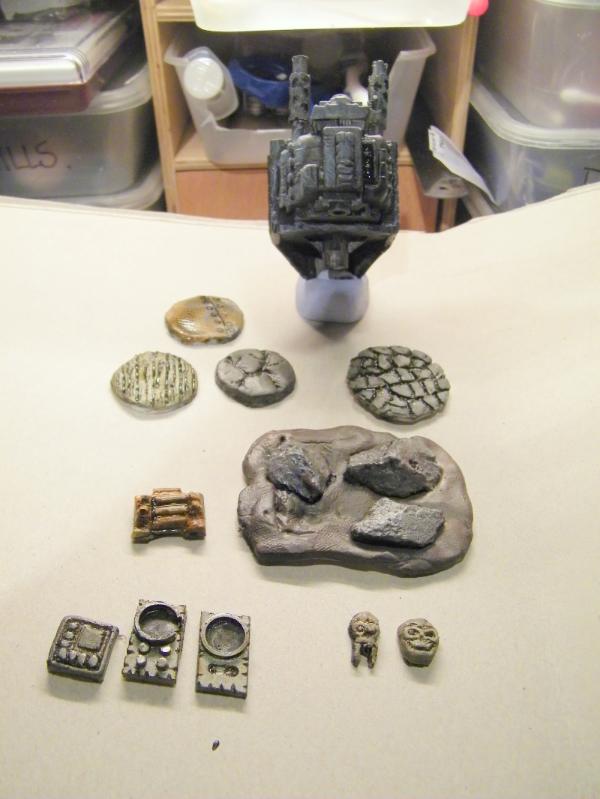
Yup made an engine block type thingy, and cast it up....
Primed up so easier to see.
Thanks to all, hope you have a great 4th July celebration to all the Yanks out there.
Cheers
|
|
|
|
|
|
2014/07/05 02:25:32
Subject: Re:Orkishness - the thunderfarter years. it's just Dredd full!!
|
|
Nasty Nob
|
 Camkierhi wrote: Camkierhi wrote:Thank you all,
@ Vik. Resin is white, those bits are made with that metal putty I keep on about, sets in about 1 minute. Demoulds no worries. perfect for these bits.
The other bits I will sort later for your amusement.
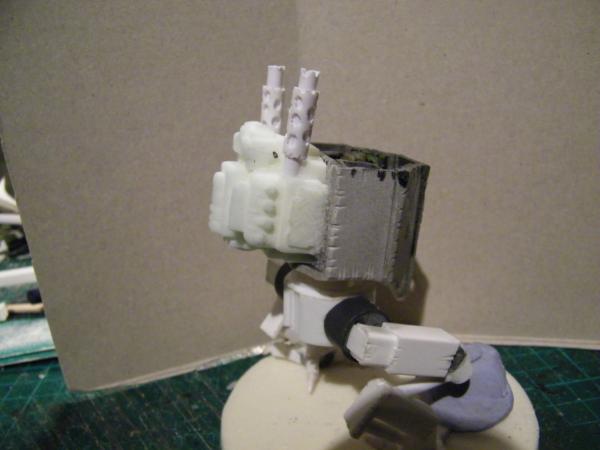
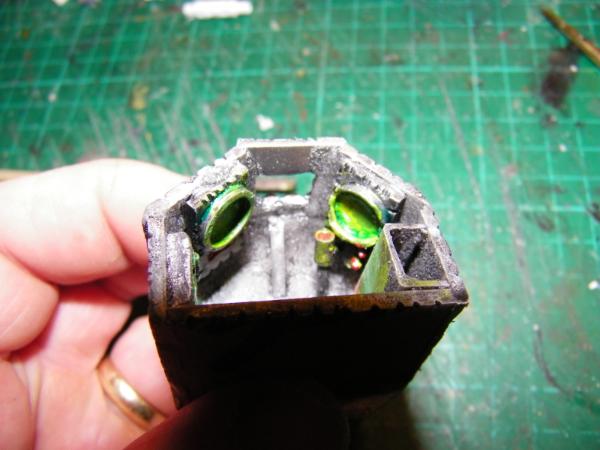
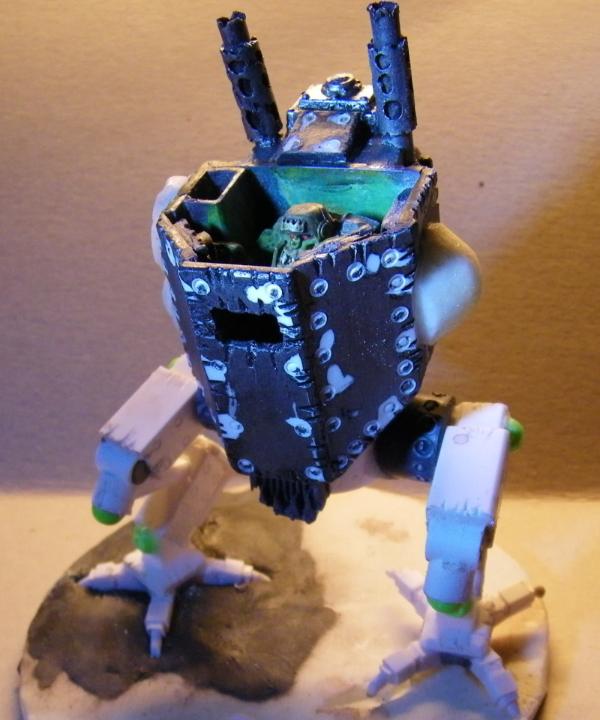
So did a bit more, here you can see why I needed those control panels...
Thanks for all your support.
Ooooh! A push-button dread! One o' them new-fangled kind wot you can get back out of without a crowbar! Nice!
Always subscribed to the 'nail 'em in there' school of dreads myself, but it's probably nice to get out, stretch your legs, and eat solid food. 
|
|
|
|
|
|
2014/07/05 02:28:14
Subject: Orkishness - the thunderfarter years. it's just Dredd full!!
|
|
Combat Jumping Ragik
|
You Scots may be getting your own Independence Day soon enough. The referendum is coming soon isn't it.
The legs and feet on that are great. I gather the resin doesn't hold sharp corners so well? I bet it will paint up nicely though. Lots of good detail to it.
Camkierhi wrote:Thanks Grim, Probably just me. This guy might be afraid of the dark, pretty cramped in there..........
Cheers
Orcs are never afraid of mere darkness,, no matter how grim it may be.
|
|
|
|
|
|
2014/07/05 02:53:56
Subject: Orkishness - the thunderfarter years. it's just Dredd full!!
|
|
Rogue Inquisitor with Xenos Bodyguards
|
This will be an awesome dred cam!
|
"Your mumblings are awakening the sleeping Dragon, be wary when meddling the affairs of Dragons, for thou art tasty and go good with either ketchup or chocolate. "
Dragons fear nothing, if it acts up, we breath magic fire that turns them into marshmallow peeps. We leaguers only cry rivets!


|
|
|
|
|
2014/07/05 13:13:09
Subject: Orkishness - the thunderfarter years. it's just Dredd full!!
|
|
Decrepit Dakkanaut
|
Excellent detailing my friend!
|
|
|
|
|
|
2014/07/05 18:04:51
Subject: Re:Orkishness - the thunderfarter years. it's just Dredd full!!
|
|
Gargantuan Great Squiggoth
|
SO thought I would do a little write up on my experiences with the moulding mallarky....
@ Da Butcha. I know what you mean, just thought I would be different, maybe next one will be more "wired in".
@ Gits & Shas. Thank you guys.
@ Red. Thanks. Not even going there on the Independants rubbish.
On the moulding/casting....
Actually the resin holds very well to the detailing, and nice crisp edges where they are. However my mould making skills maybe at fault here. Also I made the originals for some of this a bit too smooth in places, was worried about the silicon letting go of the resin. As it turns out I need not have bothered.
So my experiences, and pitiful advice I can pass on. I may miss bits and please feel free to correct anything I mess up, this is meant to be helpful.
1) Preparation. Preparation, preperation.
Get your self a clear area to work. Make sure you have all the kit you will possibly need. And think your way through everything TWICE.
2) Kit.
Work in a tray, you will spill stuff, nasty stuff you really do not want to explain to the other half stuck in the carpet.
Measuring kit. I have now purchased a set of jewelers scales, they go up to 300g in 0.00g, so NOW I can accurately measure the ratio of silicon mixture. I have wasted a lot of the silicon, because I was working in 25:1g mixture. You end up making mould you don't really need and often are way too thick. I also got some disposable cups, some "normal" ones and some "Shot glasses". As it happens the shot glasses measure out a pretty good batch of resin. Strangly in fact, a shot of each component mixed makes the track unit, exactly!! Also something stiff to stir with. I have been using lollipop stick as "stirers" where too flimsey, and I have millions. Plastacine (modelling clay) this stuff has been great, need a quick mould to use up a bit of resin, plastacine, the cobbles and bases I have made here are from plastacine. I will try others, but I have used olive oil as a release agent. I learnt the hard way, you only need a very thin smearing. And in fact totally forgot on one batch and had no real problems. And finally Lego. There are lots of tutorials and I would not presume to even attempt to add to them, but one of the best bits I picked up was use Lego to make your mould "casings". It comes apart easy after you see. I made mouild in all sorts of things, But half the time they are a bugger to get things out of after. Lego for the win here.
3)The Silicon.
Bought mine off ebay, a company called DWR plastics. I bought this.
http://www.ebay.co.uk/itm/RTV-Silicone-Moulding-Rubber-520g-kit-Shore-A28-Fast-Curing-/281354760176?pt=UK_Crafts_Other_Crafts_EH&hash=item41820ceff0#ht_2052wt_986
I can honestly say brilliant. Easy to use, fast (cured in a couple hours most of the time.) excellent detail pick up.
I made mistakes, like too much olive oil. Making my originals too smooth. I was worried about tearing the mould getting the resin out. I need not have worried, it is amazingly resilient.
4) Resin.
Again bought from the same source.
http://www.ebay.co.uk/itm/281358103837?var=580390117003&ssPageName=STRK:MEWNX:IT&_trksid=p3984.m1497.l2649#ht_3029wt_1275
And again very happy. Easy as heck to use, plenty of time to do what you need (if you are prepared) and cures in 20 minutes.
I have had minimal problems with bubbles, the casts hold edges and detail well. The end product is strong, and not brittle.
5) Alternatives.
To make moulds, I have tried all sorts, blutak (Dont!), but others like plastacine, melty putty stuff(cant remember the name) have worked a treat. One surprise was you can use foam board. It only works once, as you have to destroy the foamboard to get your resin out. But I got a brilliant window frame out of a piece of foam board just a few minutes ago. (pics to follow)
Once you have your lovely moulds, you do not have to stick to resin. GS or milliput, or as I have used Quiksteel putty pressed in work brilliantly. The last one sets in about 2-3 minutes, so for quick bits!! you could also use plaster, I will be trying dental plaster later.
Right now I have used all the silicon, but got plenty of resin. Well worth every penny, and really feel daft because I was so nervous about this lot and I really should not have been.
I hope this info helps you, any questions ask away. And please feel free to correct me on any points. People have already mentioned you can use different release agents, talc etc. All very good stuff.
Thanks for looking in. Cheers.
|
|
|
|
|
|
2014/07/05 18:50:13
Subject: Orkishness - the thunderfarter years. it's just Dredd full!!
|
|
Near Golden Daemon Caliber
|
Thanks for the write up, i kind of plan to try this part of the hobby out at some point, so i appreciate the fruits of your experience in this matter. I may do it by baby steps and get the casting kit from hobby lobby to start though.
|
|
|
|
|
|
2014/07/05 21:06:46
Subject: Orkishness - the thunderfarter years. it's just Dredd full!!
|
|

Shroomin Brain Boy
|
I think that is a very emotional and trustworthy description... detailed and also shows what my own troubles with starting in casting stuff hampers me...
what I am very eager now to see is that mentioned window frame... done with foamcore as a mold... THAT is probably what would be a way to get me into the whole thing...also... if you look at ebay and so on... there is a market for this ...doors and widows... that doesn´t cost you an arm or a firstborn...  ....just a hint
|
|
|
|
|
|
2014/07/05 21:32:27
Subject: Orkishness - the thunderfarter years. it's just Dredd full!!
|
|
Combat Jumping Ragik
|
I figure it is for Scots to decide, so no opinion either way from me. But do vote.
Small Dixie cups or Solo cups work very well for me. I use then for mixing the epoxy for water effects. The clear ones are best, since you can pre-measure with water, and mark the line with a sharpie on the outside and label them. Dry them out thoroughly though, before using.
Good write-up. Have you encountered stuff cast from the dental plaster? (Around here people like something called 'Merlin's Magic' and another called 'Hydrostone' and they use it for Hirst Art molds.) It holds detail very well, but it is surprisingly heavy. It will be good for terrain. And wood glue or tacky glue works well with it.
|
|
|
|
|
|
2014/07/05 22:01:15
Subject: Re:Orkishness - the thunderfarter years. it's just Dredd full!!
|
|
Gargantuan Great Squiggoth
|
Ok first up....
@ Red I researched a bit about making floor panels etc. and many people say the dental plaster is much harder and stronger than standard stuff. I will let you know how I get on.
Window frame:
OK so I used a bit of 5mm foam board I had spare. This is the type with the foam as apposed to the polystyrene core. I peeled of one side of the card covering, then cut a rough shape of a window through being careful not to cut the card on the other side. Lifted out the foam I did not want, cleaned it up a bit and poured in some resin.
When it had set, I had to cut it out of the foamboard. It had bonded slightly with the foam. So this is a once only mould. Please bear in mind I am experimenting so not my best effort.
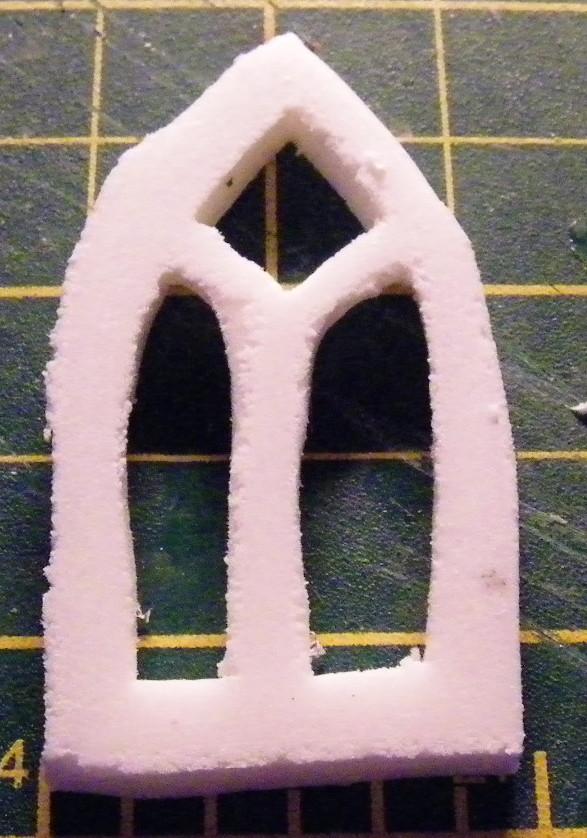
After a bit of a clean up with me scalpel.....
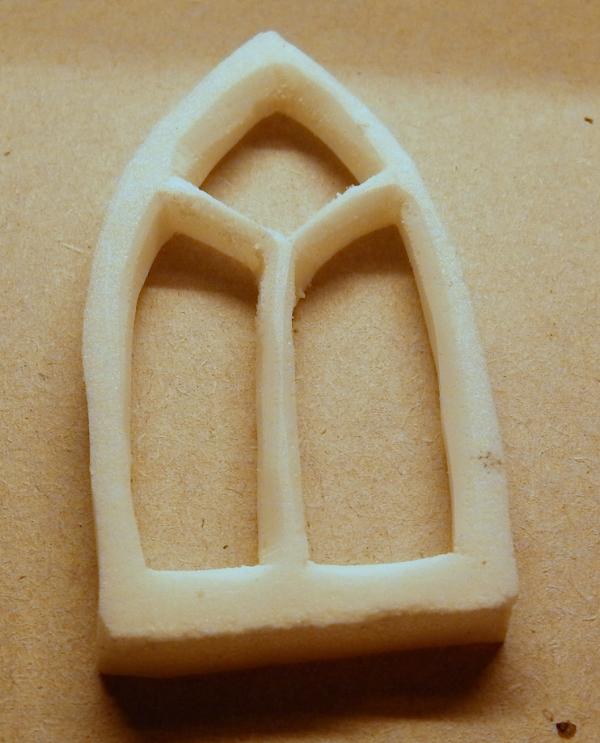
So now I have an exactly 5mm thick window frame. If I took me time and especially if did a less complicated shape I would get good results I am sure.
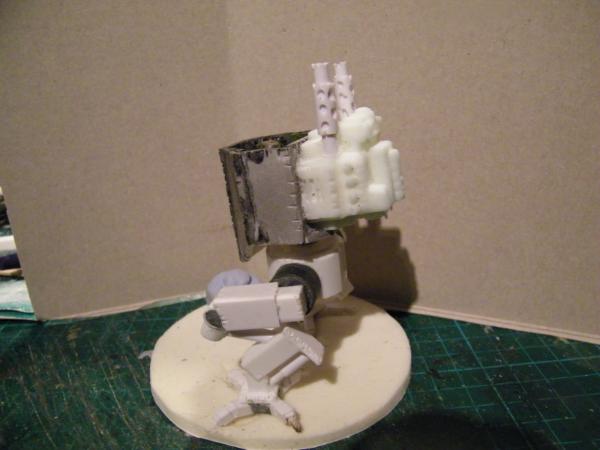
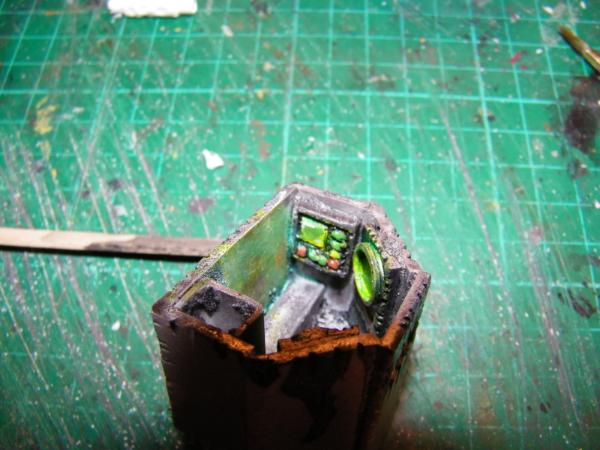
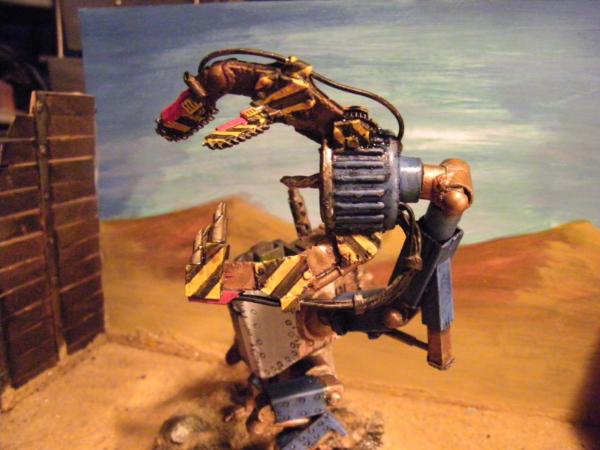
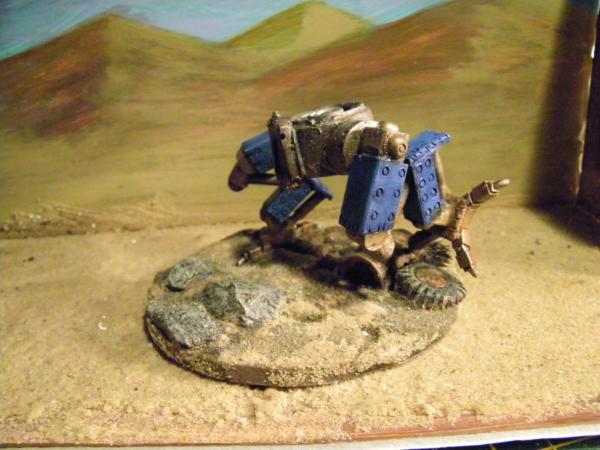
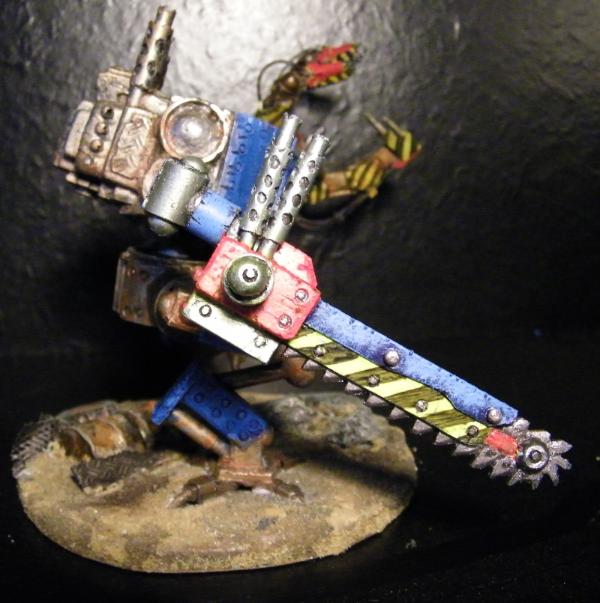
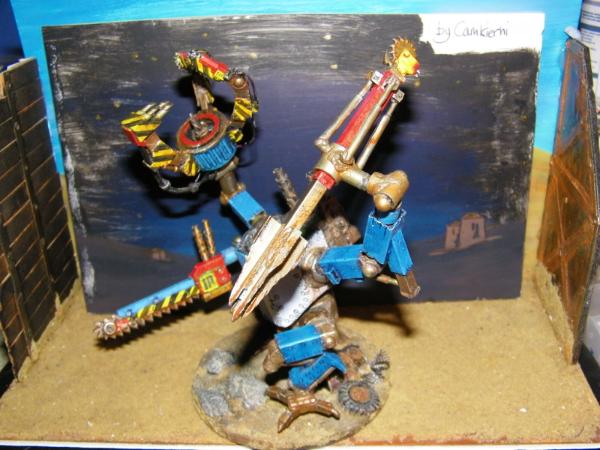
Also done a bit more on the dredd.....
Thanks guys and thanks for stopping in.
|
|
|
|
|
|
2014/07/05 22:10:47
Subject: Orkishness - the thunderfarter years. it's just Dredd full!!
|
|
Shroomin Brain Boy
|
hmmmm.... I think we can call that a success.... my instant idea was ladders... I bet you could to lots of useful flat details that way... maybe even drainpipes?...
I think the foamcore method is a very good way to get flat prototypes for later multiple castings... very inventive!!!
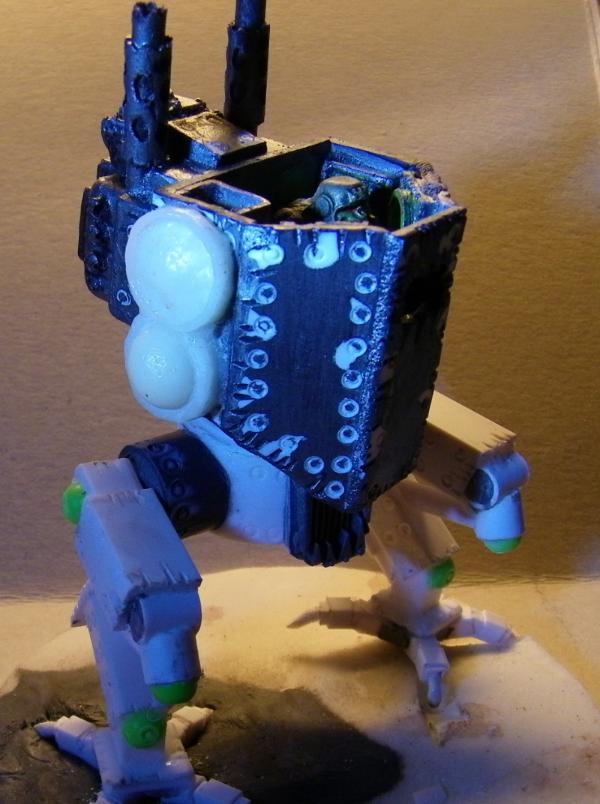
and I see your dredd got the hot riveting treatment ^^ 
|
|
|
|
|
|
2014/07/05 22:50:23
Subject: Orkishness - the thunderfarter years. it's just Dredd full!!
|
|
Combat Jumping Ragik
|
Slow down! I can't keep up. 
I've used pieces made from Merlins Magic, but never cast it myself. It is indeed very hard -- more concrete than plaster. However, it is pricey, and casting enough pieces takes a very long time unless you have many molds.
I did mention the Hirst Art molds, which are meant for the stuff. Here http://www.hirstarts.com/ Have a look around. Some interesting ideas.
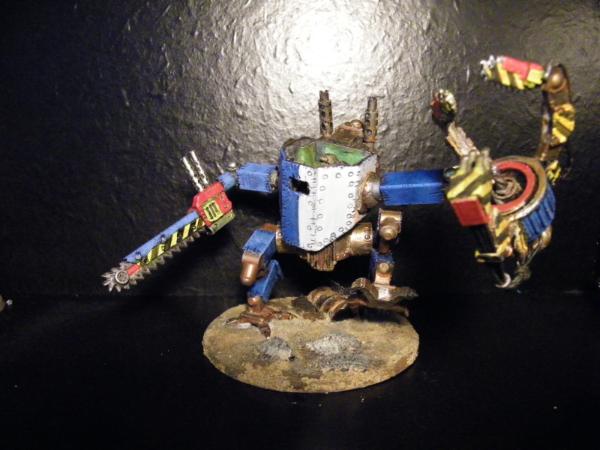
Blue is a nice change of pace from the regular colors one sees on orcy stuff. Good call.
|
|
|
|
|
|
2014/07/06 01:32:37
Subject: Orkishness - the thunderfarter years. it's just Dredd full!!
|
|
Battleship Captain
|
Nice work cam. Very impressed.
|
|
|
|
|
2014/07/06 02:20:18
Subject: Orkishness - the thunderfarter years. it's just Dredd full!!
|
|
Rogue Inquisitor with Xenos Bodyguards
|
Oh man, my Big Mek is gettin' Jealous
|
"Your mumblings are awakening the sleeping Dragon, be wary when meddling the affairs of Dragons, for thou art tasty and go good with either ketchup or chocolate. "
Dragons fear nothing, if it acts up, we breath magic fire that turns them into marshmallow peeps. We leaguers only cry rivets!
|
|
|
|
|
2014/07/06 03:33:11
Subject: Re:Orkishness - the thunderfarter years. it's just Dredd full!!
|
|
Flashy Flashgitz
|
That Dredd is dead stompy. Wonderful work.
Thanks for the casting info. I have always wanted to try, but I've not done much with it.
|
|
|
|
|
|
2014/07/06 20:09:56
Subject: Re:Orkishness - the thunderfarter years. it's just Dredd full!!
|
|
Gargantuan Great Squiggoth
|
Thanks guys,
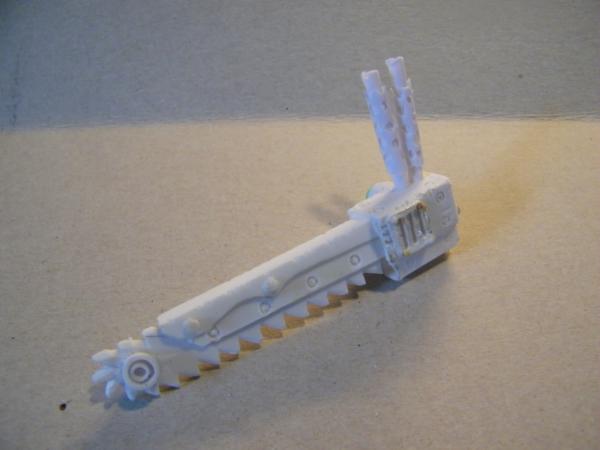
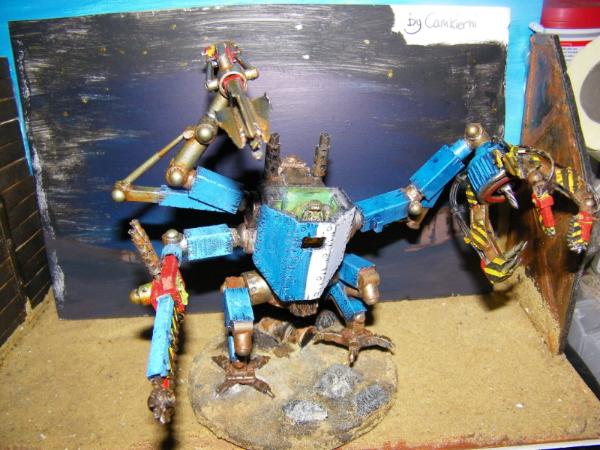
So started in on the arms.....
Well if your going to do a big claw, might as well do it BIG!......
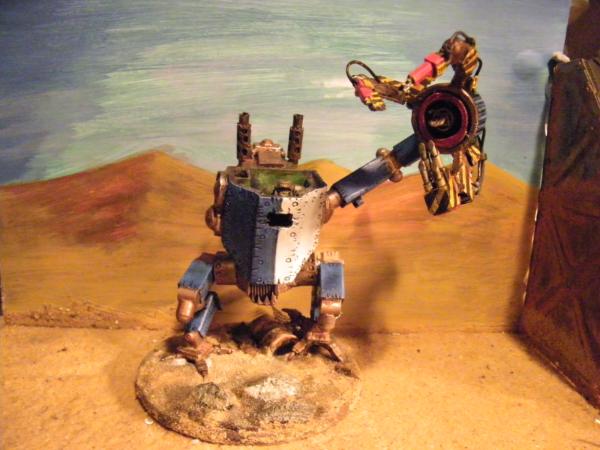
This is articulated and magnetised. It is a bit delicate as the wait is a bit much for the shoulder magnet.
Oh and did some work on the legs and base. Magnetised the one leg.
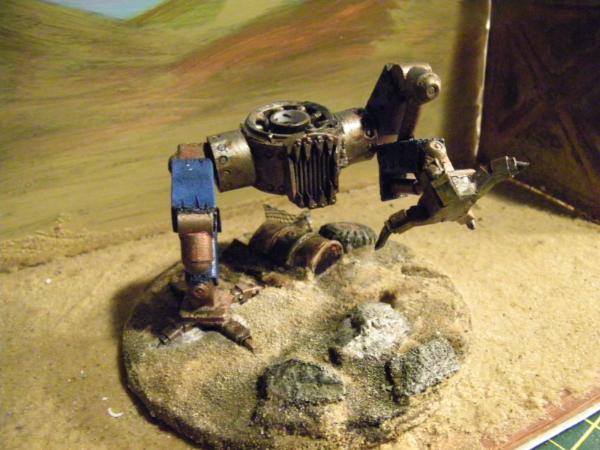
Well obviously still WIP, off to work on other arms....
Thanks for looking in.
|
|
|
|
|
|
2014/07/06 20:29:27
Subject: Re:Orkishness - the thunderfarter years. it's just Dredd full!!
|
|
Mastering Non-Metallic Metal
|
Well, Cam, you have been a busy boy, haven't you... Let's see here... Camkierhi wrote:So my experiences, and pitiful advice I can pass on. I may miss bits and please feel free to correct anything I mess up, this is meant to be helpful. 1) Preparation. Preparation, preperation. Get your self a clear area to work. Make sure you have all the kit you will possibly need. And think your way through everything TWICE.
Very much worth emphasising this point.  2) Kit...
Casting is indeed a messy endeavour. Some moulding and casting materials work on a volume basis, rather than weight. This has it's advantages and disadvantages. And lego is definitely useful for mould boxes. Clean, easy, adaptable... perfect. 3)The Silicon.
As a chemist, I feel I should point out that silicon is entirely different from silicone. and really feel daft because I was so nervous about this lot and I really should not have been..
Yeah, I get nervous/paranoid each time I pick up moulding/casting supplies. Spend ages just staring at it before cracking open the bottles. And, good work on the kan/dread/stompy, spiky, killy thing.
|
|
This message was edited 1 time. Last update was at 2014/07/06 20:30:28
     Mastodon: @DrH@warhammer.social Mastodon: @DrH@warhammer.social
The army-                   ~2295 points (built). ~2295 points (built).
 
* -=]_,=-eague Spruemeister General. * A (sprue) Hut tutorial *
Dsteingass - Dr. H..You are a role model for Internet Morality! // inmygravenimage - Dr H is a model to us all
Theophony - Sprue for the spruemeister, plastic for his plastic throne! // Shasolenzabi - Toilets, more complex than folks take time to think about! |
|
|
|
|
2014/07/06 20:52:25
Subject: Orkishness - the thunderfarter years. it's just Dredd full!!
|
|
Shroomin Brain Boy
|
that claw (way too short a ward for such a big tool of destruction...)...wow!!!! that thing is fit to rip open any tank....a true marine killer!!! (already I would consider that a friendly gesture thus )
and with all those magnetizing going on you really show me that I should get me some more magnets... would solve some issues I have with certain more challenging ideas!...
|
|
|
|
|
|
2014/07/07 01:07:51
Subject: Re:Orkishness - the thunderfarter years. it's just Dredd full!!
|
|
Flashy Flashgitz
|
Wow, looking brutal.
I just remembered, have you ever tried InstantMold from Cool minni or not?
It works pretty well for small things. I've only ever done shoulder pads and small bits.
Basically, you boil it, then as it is cooling press whatever into it and make the mold, then fill with green stuff or what-have you.
I'd much like to try the bigger resin cast molds for some things, but it worked pretty good. I am no sculptor so I'll use what I can get that's easy.
|
|
|
|
|
|
2014/07/07 16:18:35
Subject: Re:Orkishness - the thunderfarter years. it's just Dredd full!!
|
|
Gargantuan Great Squiggoth
|
Thank you,
@ Dr H. Thanks bud all good.
@ Vik. Magnets are great......sometimes. And thank you again sir.
@ Gorgrimm, Thank you. Yup got that insta mould stuff, heat it up in water etc. does work very well., not doing great with two part moulds at the moment for me.
@ Red Sorry still not tried the plaster yet, hopefully later tonight.
So next up, well got a klaw, guess it needs a sawy thing.
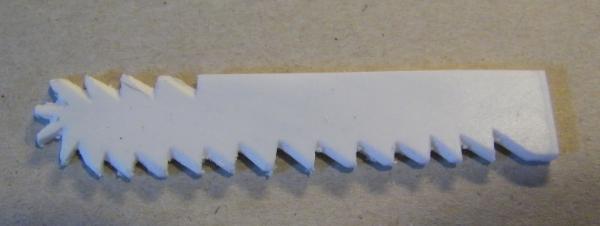
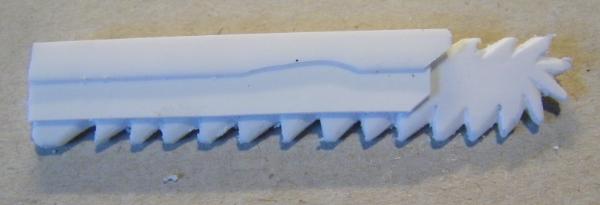
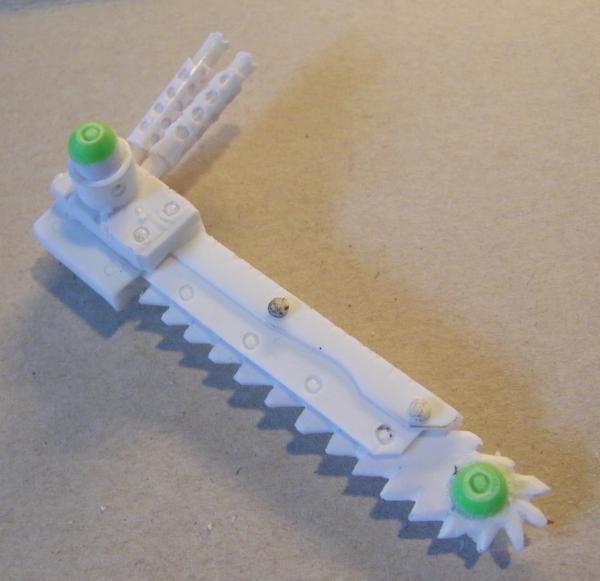
Last combat arm to go then shooty bit.
Thanks for looking in, comments welcome.
|
|
|
|
|
|
2014/07/07 16:41:14
Subject: Orkishness - the thunderfarter years. it's just Dredd full!!
|
|
Mastering Non-Metallic Metal
|
Making 2-part moulds with instant mold / Oyumaru (love this stuff) is tricky. But you can try and try again.
Using resin with it though is not great for mass production, as the resin gets hot when it cures and can lead to loss of detail in the mould. Though you can re-make the mould, it just adds time to the endeavour.
Good saw-arm, Cam.
Your posts like this amuse me. My thought process goes; "good start, shows potential"
to "Ah, more details, yes that works"
to "Could maybe use...Oh, it's painted. Good work"
|
Mastodon: @DrH@warhammer.social
The army- ~2295 points (built).
* -=]_,=-eague Spruemeister General. * A (sprue) Hut tutorial *
Dsteingass - Dr. H..You are a role model for Internet Morality! // inmygravenimage - Dr H is a model to us all
Theophony - Sprue for the spruemeister, plastic for his plastic throne! // Shasolenzabi - Toilets, more complex than folks take time to think about! |
|
|
|
|
2014/07/07 17:53:49
Subject: Orkishness - the thunderfarter years. it's just Dredd full!!
|
|
Ragin' Ork Dreadnought
|
Wow. This Kan looks great. My only critique is that the "gun" arm looks a little too big. But that's just my opinion. Aside from that it's just stunning. I wonder if you could put a little LED light on the floor of the pilot's compartment facing up to shine on the great interior detail and under light the pilot's face through the viewport?
|
|
|
|
|
|
2014/07/07 19:02:48
Subject: Orkishness - the thunderfarter years. it's just Dredd full!!
|
|
Rogue Inquisitor with Xenos Bodyguards
|
Okay major close assault Dreddy, looking good!
|
"Your mumblings are awakening the sleeping Dragon, be wary when meddling the affairs of Dragons, for thou art tasty and go good with either ketchup or chocolate. "
Dragons fear nothing, if it acts up, we breath magic fire that turns them into marshmallow peeps. We leaguers only cry rivets!
|
|
|
|
|
2014/07/07 23:43:06
Subject: Re:Orkishness - the thunderfarter years. it's just Dredd full!!
|
|
Gargantuan Great Squiggoth
|
Thanks as always guy's.
@ Waaazag. I hear you on the size. Might look at it again later. See what you think of arm swaps below.
@ Shas Thank you.
@ Dr H. Thank you and sorry, about the way I post things sometimes, just like for people to see the process some times. 
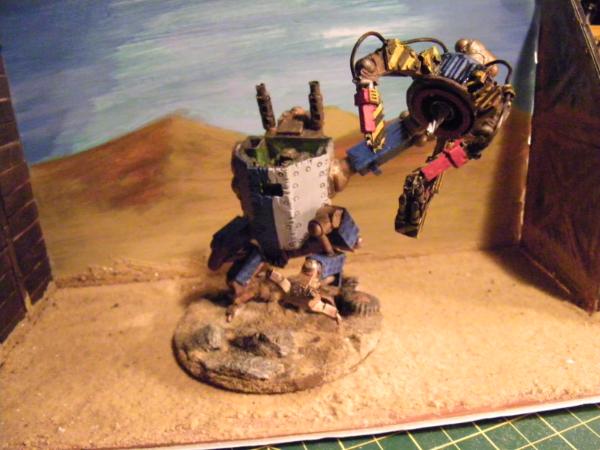
First is a shot of a LED mounted in the bottom of the cab.....(blooming impoossible to get a decent shot of.....
Then there is the last combat arm.....
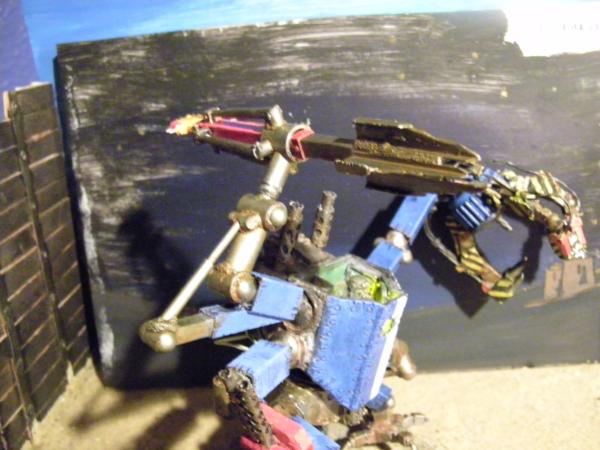
And some of it is interchangable.....
The new arm is a hydrolic spikey thing. I think of the dredd grabbing with the claw then spearing it and the hydrolics tearing the spike into it's victims.
Thoughts?
Also Got the shooty bit to decide on, what do people think I should go with. Originally thought Rokkit rack on roof when I make it. But now I am not sure, maybe a skorcher between its legs!! Or just mounted low on his left. Your thoughts would be helpful here.
As to over all size, he currently stands 8cm ( 3" ) Tall to the top of the body. Exhausts and arms extend everything everywhere.
Thanks for looking in and c&C very much appreciated.
|
|
|
|
|
|
2014/07/08 00:39:29
Subject: Re:Orkishness - the thunderfarter years. it's just Dredd full!!
|
|
Mastering Non-Metallic Metal
|
Camkierhi wrote:@ Dr H. Thank you and sorry, about the way I post things sometimes, just like for people to see the process some times. .
It's not a problem. Always good to see the process.
It's just the way I go through people's posts and make a mental list of things to say and then cross them off as you answer them later in the post.
It's not like my posts, where each one of my updates is just a tiny tweak to the fraction of a model that I'm currently working on.
Good job on the spiky thing.
Can't really help with the weapon choice as my method is usually rummage in my box and see what I find that looks nice.
Although, I wouldn't put it between it's legs. Leave that sort of thing to NF or Theo...
|
Mastodon: @DrH@warhammer.social
The army- ~2295 points (built).
* -=]_,=-eague Spruemeister General. * A (sprue) Hut tutorial *
Dsteingass - Dr. H..You are a role model for Internet Morality! // inmygravenimage - Dr H is a model to us all
Theophony - Sprue for the spruemeister, plastic for his plastic throne! // Shasolenzabi - Toilets, more complex than folks take time to think about! |
|
|
|
|
2014/07/08 01:14:36
Subject: Re:Orkishness - the thunderfarter years. it's just Dredd full!!
|
|
Flashy Flashgitz
|
Haha, man I love the spikey bitz. I can picture that drilling some poor opponent into the ground. Wham! Wham! Wham!
I think that it should be a skorcha on the lower left side. The between the legs thing might be a little...hmmm. Well, I don't know.
|
|
|
|
|
|
2014/07/08 01:58:29
Subject: Re:Orkishness - the thunderfarter years. it's just Dredd full!!
|
|
Is 'Eavy Metal Calling?
|
I don think a flame weapon would be appropriate, I just don't see enough space for fuel cells. Can they have plasma weapons? Otherwise a big shooty gun.
|
LOL, Theo your mind is an amazing place, never change.-camkierhi 9/19/13
I cant believe theo is right.. damn. -comradepanda 9/26/13
None of the strange ideas we had about you involved your sexual orientation..........-Monkeytroll 12/10/13
I'd put you on ignore for that comment, if I could...Alpharius 2/11/14 |
|
|
|
|
|
|


